background image

Controlling the Sound of a Performance

EN-33

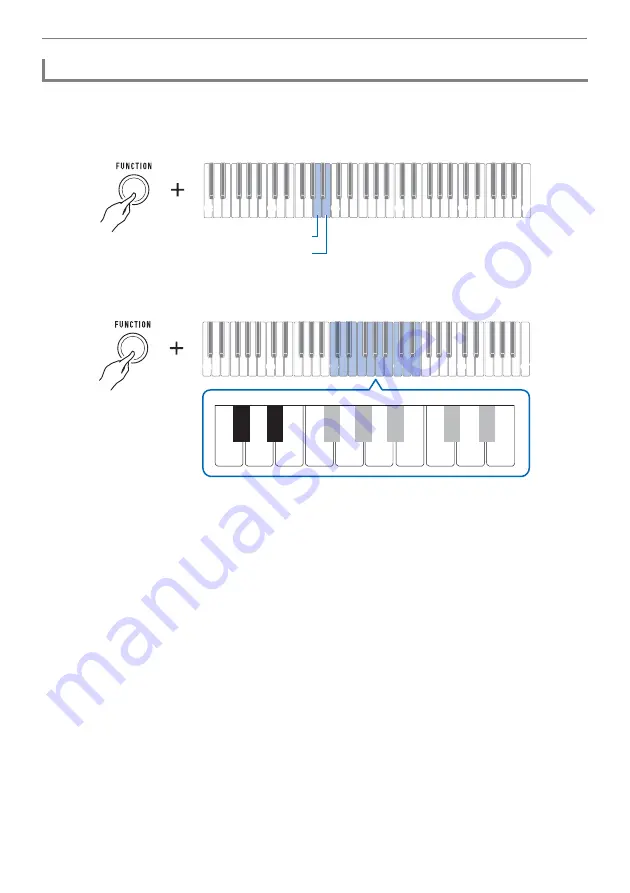
You can use the procedure below to adjust the volume level of the main tone and layer tone.

1.

While holding down 

FUNCTION

, press the A3 or B3 keyboard key.

Do not release 

FUNCTION

 until step 2, below.

2.

Use keyboard keys C4 through E5 to set the volume level.

You can specify a volume value from 0 to 127.

Each press of the + or – keyboard key changes the volume value by 1. Long-pressing either of 
these keyboard keys scrolls the setting value.

You can use keyboard keys 0 to 9 to enter a specific volume value.
Examples:

To set a volume of 20, press 2, then 0. The volume setting will not change until you release 

FUNCTION

 in step 3, below.

To set a volume of 120, press 1, then 2, then 0. In this case, the volume value will change 
as soon as you input the third digit.

To return the setting to its initial default, press the – and + keyboard keys at the same time.

3.

Release 

FUNCTION

.

Adjusting the Volume Level of Each Part

C2

C3

C4

C5

C6

C7

A3 (Main part)

B3 (Layer part)

C2

C3

C4

C5

C6

C7

C4

C

C4

C4

C5

C5

C

C5

0

1

2

3

4

5

6

7

8

9

D4

C

{

4

C4

E4

F4

G4

A4

B4

C5

D5

E5

E

}

4

Содержание Casiotone CT-S1

Страница 1: ...On or Off Connecting Headphones Option Selecting a Musical Instrument Tone Changing the Pitch in Semitone Units Transpose Fine Tuning Tuning Sustaining Notes After Keyboard Keys Are Released Saving an...

Страница 2: ...ibited Except for your own personal use any other use of the contents of this manual without the consent of CASIO is prohibited under copyright laws IN NO EVENT SHALL CASIO BE LIABLE FOR ANY DAMAGES W...

Страница 3: ...sponse EN 25 Using a Pedal EN 27 Sustaining Notes After Keyboard Keys Are Released EN 28 Playing with Reverb EN 30 Playing with a Multi dimensional Expanded Sound Surround EN 31 Layering Two Tones EN...

Страница 4: ...an Audio Device EN 64 Sounding a Bluetooth Audio Capable Device Bluetooth Audio Pairing EN 66 Deleting Bluetooth Audio Capable Device Pairing Registration EN 68 Connecting with a Bluetooth MIDI Capabl...

Страница 5: ...ge numbers General Guide P Power button page EN 13 VOLUME knob page EN 15 Main tone buttons page EN 21 METRONOME button page EN 15 REC a button page EN 42 SURROUND button page EN 31 FUNCTION button pa...

Страница 6: ...follow the international standard Middle C is C4 the lowest C is C2 and the highest C is C7 The illustration below shows keyboard key note names from C4 through C5 USB TO HOST port page EN 60 AUDIO I...

Страница 7: ...Digital Keyboard power before connecting or disconnecting the AC adaptor The AC adaptor becomes warm to the touch after very long use This is normal and does not indicate malfunction To prevent break...

Страница 8: ...nformation about using eneloop batteries or their specified charger be sure to read the user documentation and precautions that come with each item and use them only as directed Be sure to replace bat...

Страница 9: ...One tone Alkaline batteries Two tones Rechargeable nickel metal hydride batteries 3 Release FUNCTION to complete the setting operation Low Battery Indication The TONE VARIATION LEDs will flash to ind...

Страница 10: ...LEDs flash Low battery power may cause notes to become distorted or other problems You can conserve battery power by using headphones and by reducing the volume level Continued use with low batteries...

Страница 11: ...ed while you are listening over headphones Do not listen to output over headphones at very high volume levels for long periods Doing so creates the risk of hearing damage The headphones you use must h...

Страница 12: ...rn off this Digital Keyboard before connecting the Wireless MIDI audio adaptor The Wireless MIDI audio adaptor does not come with this Digital Keyboard When connecting with a Bluetooth capable externa...

Страница 13: ...Digital Keyboard Do not pick up the Digital Keyboard by the strap alone Doing so creates the risk of the Digital Keyboard detaching from the strap and falling The recessed area on the bottom of the Di...

Страница 14: ...ETUP power on recall Auto Power Off Battery type Pressing the P Power to turn off power actually puts the Digital Keyboard into a standby state Minute amounts of current continue to flow within the Di...

Страница 15: ...t play anything on the keyboard Disabling Auto Power Off You can disable Auto Power Off to ensure that power does not turn off automatically during a concert etc 1 While holding down FUNCTION press th...

Страница 16: ...ronome lets you play and practice along with a steady beat to help keep you on tempo You can also set a tempo that is suitable for your practice 1 Press METRONOME This starts the metronome 2 Press MET...

Страница 17: ...ecomes off 0 1 Start the metronome 2 While holding down METRONOME use the C 5 and E 5 keyboard keys to change the number of beats setting Selecting Off 0 disables the chime Use this setting when you w...

Страница 18: ...You can also use the tempo value input keys 0 to 9 to enter a specific tempo value Examples To set a tempo of 80 press 8 then 0 The tempo setting will not change until you release METRONOME in step 3...

Страница 19: ...ard keys to change the metronome sound volume level You can specify a volume value from 0 to 10 To return the setting to its initial default press the and keyboard keys at the same time 3 Release METR...

Страница 20: ...sh and starts tone demo song play Some tone demo songs use the surround effect The SURROUND button will light while the surround effect is in use Tone demo songs play in sequence one after another 2 T...

Страница 21: ...ss PIANO again to return to the tone demo songs 5 To stop playback press REC a You can also stop playback by pressing METRONOME Keyboard Note Name Song Name C2 Turkish March W A Mozart C 2 Moments Mus...

Страница 22: ...ou press lights and the keyboard changes to the button s tone 2 To change to a variation of a tone press TONE VARIATION Each press cycles to the next tone variation A TONE VARIATION LED lights to indi...

Страница 23: ...s a tone assigned to it For tone information see the Tone List page EN 76 2 Release TONE VARIATION to complete the setting operation Advanced Tones The ADVANCED TONE VARIATION LED lights when an advan...

Страница 24: ...is will sound a notification tone and cause the TONE MEMORY TONE VARIATION LED to flash momentarily and register your tone settings The TONE MEMORY TONE VARIATION LED and the main tone button where th...

Страница 25: ...e that the TONE MEMORY TONE VARIATION LED is lit If it isn t press TONE VARIATION as many times as necessary until the TONE MEMORY TONE VARIATION LED is lit 2 Press the main tone button where the tone...

Страница 26: ...a tone that lets you know what setting was selected 2 Release FUNCTION to complete the setting operation Playing with Touch Response Changing Touch Response Sensitivity Notification tone Setting type...

Страница 27: ...either of these keyboard keys scrolls the setting value You can use keyboard keys 0 to 9 to enter a specific volume value Examples To set a volume of 20 press 2 then 0 The volume setting will not chan...

Страница 28: ...lected 2 Release FUNCTION to complete the setting operation Using a Pedal Changing Pedal Functions Notification Tone Setting Type Description One tone Pedal sustain Playing notes while the pedal is de...

Страница 29: ...lied to parts that are turned on and not applied to parts that are turned off 2 Release FUNCTION to complete the setting operation For details about parts see Layering Two Tones page EN 32 While susta...

Страница 30: ...e You can set a sustain time within the range of 0 to 9 Each press of the or keyboard key raises or lowers the sustain time setting by 1 Long pressing either of these keyboard keys changes the setting...

Страница 31: ...tion mode 2 Use keyboard keys C2 through C4 to select a reverb type This sounds a notification tone and sets the selected reverb type 3 Release FUNCTION to complete the setting operation Playing with...

Страница 32: ...und causes sound to expand multi dimensionally front back left and right 1 Press SURROUND This enables surround The SURROUND button will be lit while the surround effect is enabled 2 To disable surrou...

Страница 33: ...what setting was selected High tone On Low tone Off 2 To select the layer part hold down FUNCTION as you press the E3 keyboard key Do not release FUNCTION until step 3 below 3 Press a keyboard key wi...

Страница 34: ...oard keys scrolls the setting value You can use keyboard keys 0 to 9 to enter a specific volume value Examples To set a volume of 20 press 2 then 0 The volume setting will not change until you release...

Страница 35: ...in the range of 3 to 3 octaves A reference tone sounds whenever the setting values becomes 0 To return the setting to its initial default press the and keyboard keys at the same time 2 Release FUNCTIO...

Страница 36: ...the setting values becomes 0 To return the setting to its initial default press the and keyboard keys at the same time If you changed a part tone the part octave shift value is the recommended value...

Страница 37: ...instrument 1 While holding down FUNCTION press the F 3 or A 3 keyboard key The setting range is one octave up 12 semitones and down 12 semitones A reference tone sounds whenever the setting values bec...

Страница 38: ...ote in 0 1 Hz steps Long pressing either of these keyboard keys scrolls the setting value A reference tone sounds whenever the setting values becomes an integer whole number such as 440 441 etc You ca...

Страница 39: ...ds a notification tone and enters the scale tuning selection mode 2 Use keyboard keys C2 through E3 to select a scale tuning This sounds a notification tone and sets the selected scale tuning 3 Releas...

Страница 40: ...tification tone will sound to indicate the scale tuning base note selection mode 2 Use keyboard keys C2 through B2 to select a scale tuning base note Sounds a notification tone and sets the scale tuni...

Страница 41: ...no tuning sharpens high notes and flattens low notes 1 While holding down FUNCTION press the A2 keyboard key This disables stretch tuning Each press of the keyboard key sounds a tone that lets you kno...

Страница 42: ...unds a notification tone and sets the equalizer type 3 Release FUNCTION to complete the setting operation Using the Equalizer Keyboard Note Name Setting Type Description C2 Standard Standard setting C...

Страница 43: ...single song When the number of remaining recordable notes is 100 or fewer the REC a button light will flash When the number of remaining recordable notes reaches zero the REC a button light will go ou...

Страница 44: ...deleted A new recording replaces deletes previously recorded contents Depending on the tone you are using and the reverb setting the sound produced during playback may be different from the sound tha...

Страница 45: ...key changes the volume value by 1 Long pressing either of these keyboard keys scrolls the setting value You can use keyboard keys 0 to 9 to enter a specific volume value To return the setting to its...

Страница 46: ...Recording Your Keyboard Play MIDI Recorder EN 45 1 Long press REC a This will sound a notification tone and delete the performance you recorded To delete a recorded performance...

Страница 47: ...gs listed below can be saved with MY SETUP Tones main layer Sustain Sustain times main part layer part Layer Touch Response Touch off velocity Octave shift Part octave shift main layer Transpose Pedal...

Страница 48: ...omplete the setting operation Use the procedure below to enable MY SETUP power on recall which causes the MY SETUP settings to be applied whenever power is turned on 1 While holding down FUNCTION pres...

Страница 49: ...le To enable or disable the notification tone press the B 6 keyboard key See el Notification tone on page EN 58 3 Release FUNCTION to complete the setting operation After performing steps 1 and 2 abov...

Страница 50: ...ge EN 41 Initial Default Standard Adjusts frequency components of audio 4 Scale tuning type Scale Tuning Setting Value List page EN 38 Initial Default Equal temperament Sets the keyboard scale tuning...

Страница 51: ...lower pitch in octave units 8 Transpose 12 to 0 to 12 Initial Default 0 Raises or lowers the overall pitch in semitone steps 9 Tuning 415 5 Hz to 440 0 Hz to 465 9 Hz Initial Default 440 0 Fine tunes...

Страница 52: ...o change the layer tone See page EN 32 bn Part octave shift main 3 to 0 to 3 Initial Default Depends on the tone Raises or lowers the pitch of the main part tone in octave units bo Part octave shift l...

Страница 53: ...52 Item Setting Options Description Remarks br Keyboard keys 0 through 9 Used to input values bs and keyboard keys Used to input values C2 C3 C4 C5 C6 C7 0 1 2 3 4 5 6 7 8 9 bs and keyboard keys br Ke...

Страница 54: ...lt 100 Adjusts volume when Touch Response is disabled cl Sustain Off On Initial Default Off When enabled sustains notes to produce rich resonance Each press of the keyboard key sounds a tone that lets...

Страница 55: ...g was selected High tone On Low tone Off cq Pedal effect part layer Off On Initial Default On Changes the pedal function effect for layer part Each press of the keyboard key sounds a tone that lets yo...

Страница 56: ...yboard to the Digital Keyboard s internal sound source Each press of the keyboard key sounds a tone that lets you know what setting was selected High tone On Low tone Off dm MIDI OUT Channel main part...

Страница 57: ...Configuring Settings EN 56 do Program Change Send 0 to 127 Sends a program change message to the channel specified by MIDI OUT Channel main part Item Setting Options Description Remarks...

Страница 58: ...etooth audio capable devices See page EN 68 Long press Delete ds Recorded song volume 0 to 10 Initial Default 10 Adjusts the recorded song volume level dt AUDIO IN center cancel Off On Initial Default...

Страница 59: ...nd prepares for initialization While continuing to hold down FUNCTION release the F 6 keyboard key 2 With FUNCTION still held down press the F 6 keyboard key again This sounds a notification tone and...

Страница 60: ...yboard Use the Digital Keyboard sound source to sound music data played using an app on the smart device Configure the settings of your smart device Airplane Mode etc to enable data communication Down...

Страница 61: ...app on the smart device 2 Use a commercially available USB cable to connect the smart device port to the USB TO HOST port After connecting the smart device to the Digital Keyboard use the smart device...

Страница 62: ...documentation of the app Do not perform any Digital Keyboard operation while it is in the process of connecting with the smart device app With a Bluetooth connection your communication environment or...

Страница 63: ...install the driver Supported Operating Systems Windows 8 1 1 Windows 10 2 macOS OS X Mac OS X 10 7 10 8 10 9 10 10 10 11 10 12 10 13 10 14 10 15 11 0 1 Windows 8 1 32 bit versions 64 bit versions 2 W...

Страница 64: ...ur computer 5 Use the settings of your computer s commercially available music software to select CASIO USB MIDI as the MIDI device For information about how to select the MIDI device refer to the use...

Страница 65: ...rd and a plug that matches the configuration of the input jack of external device on the other end Turn off the external device and the Digital Keyboard before connecting them Before turning power on...

Страница 66: ...l of the notes you are playing on the keyboard adjust the volume level of each Digital Keyboard part to balance them See Adjusting the Volume Level of Each Part on page EN 33 Setting the volume level...

Страница 67: ...igital Keyboard power to turn off in order to protect it against damage If this happens lower the volume level of the external device Due to Bluetooth characteristics you may notice some lag in notes...

Страница 68: ...tooth audio capable device For information about how to change this Digital Keyboard s Bluetooth settings see Turning Off Bluetooth page EN 70 Information about the last Bluetooth audio capable device...

Страница 69: ...pable device For information about how to do this refer to the user documentation of each Bluetooth audio device 1 Long press the P Power button to turn off the Digital Keyboard 2 Plug the Wireless MI...

Страница 70: ...of app you installed on your Bluetooth capable MIDI device to select WU BT10 MIDI and connect with the Digital Keyboard Do not perform any Digital Keyboard operation while it is in the process of con...

Страница 71: ...y A tone will sound and Bluetooth will turn off Long pressing the F 5 keyboard key again will turn Bluetooth back on Each long press of the keyboard key sounds a tone that lets you know what setting w...

Страница 72: ...Check and adjust the metronome volume level page EN 15 Try turning this Digital Keyboard off and then back on again page EN 13 to initialize settings Notes keep sounding without stopping Try turning t...

Страница 73: ...and adjust the reverb setting page EN 30 Try turning this Digital Keyboard off and then back on again page EN 13 to initialize settings Connecting to a computer I can t send or receive MIDI data Chec...

Страница 74: ...Cancels the vocal center part in audio input using the AUDIO IN terminal or Bluetooth audio Metronome Beat Beat chime off 1 to 16 beats Tempo 20 to 255 MIDI Recorder Real time recording playback Numb...

Страница 75: ...ments 2 Way Power Batteries 6 AA size alkaline batteries or AA size rechargeable nickel metal hydride batteries Continuous Operation Approximately 3 hours alkaline batteries approximately 3 hours rech...

Страница 76: ...1 Do not allow the electrical load output to exceed the label rating 12 Make sure the surrounding area is dry before plugging into a power source 13 Make sure the product is oriented correctly 14 Unpl...

Страница 77: ...NTAGE 13 2 0 64 0 E PIANO 2 15 D3 DIGITAL E PIANO STANDARD 14 2 0 64 0 16 E 3 AMP 60 s E PIANO ADVANCED 15 2 0 64 0 17 E3 GALAXIA E PIANO MODERN 16 2 0 64 0 18 F3 TREMOLO 60 s E PIANO VINTAGE 17 2 0 6...

Страница 78: ...VINTAGE 39 2 0 64 0 41 E5 VOCODER ADVANCED 40 2 0 64 0 42 F5 SYNTH CHOIR MODERN 41 2 0 64 0 OTHERS 43 F 5 STRINGS STANDARD 42 2 0 64 0 44 G5 GUITAR PAD ADVANCED 43 2 0 64 0 45 A 5 VIBRAPHONE MODERN 4...

Страница 79: ...rough E 3 and violin tones to keys E3 through G9 as shown above Keyboard Key Note Name Sound C1 B1 C2 Rhythm March C 2 Waltz D2 4 Beat E 2 Swing E2 Rock 1 F2 Rock 2 F 2 Bossanova Part A G2 Bossanova P...

Страница 80: ...ayer Octave shift Main tone Octave shift Layer tone Part octave shift main Transpose Part octave shift layer Transpose Part volume main Tuning Part volume layer Keyboard key 0 and keyboard keys Keyboa...

Страница 81: ...X X Clock Commands 0 1 5 6 38 7 10 11 64 65 66 67 71 72 73 74 84 91 100 101 Bank select Modulation Portamento Time Data entry LSB MSB Volume Pan Expression Hold 1 Portamento Switch Sostenuto Soft ped...

Страница 82: ...MA2103 A...

Отзывы: