Casablanca M8511-01W Скачать руководство пользователя страница 12

www.CasablancaFanCo.com

1.888.227.2178

12

M8511-01 • 10/30/14 • © Casablanca Fan Company
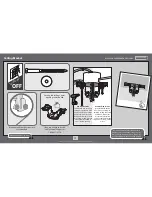
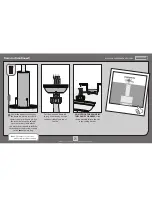
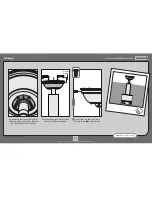
Canopy

 Note: Fan style may vary.

Lift the canopy into place so that 

the screw holes are aligned. 

Position the canopy so that, when 

lifted into place, the canopy fits into 

the hanging bracket as shown.
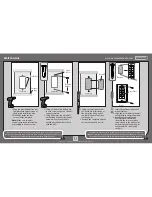
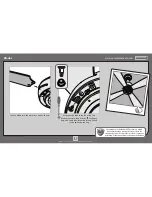
Screw 

Holes

Insert the two canopy screws 

found in the        hardware bag.

Содержание M8511-01W

Страница 1: ...ations on purchasing your new Casablanca ceiling fan It will provide comfort and performance in your home or office for many years This installation and operation manual contains complete instructions...

Страница 2: ...ls w 4 To reduce the risk of personal injury do not bend the blade brackets when installing the blade brackets balancing the blades or cleaning the fan Do not insert foreign objects in between rotatin...

Страница 3: ...1 888 227 2178 3 M8511 01 10 30 14 Casablanca Fan Company Tools Needed Ladder Screwdrivers Pliers Wire Strippers Power Drill optional 9 64 Drill Bit optional If mounting to a support structure you wil...

Страница 4: ...mmon If you have a flat ceiling Hang your fan by a standard downrod included Mounting Options Support Structure Ceiling Outlet Box required Angled Mounting Style Standard Mounting Style Support Struct...

Страница 5: ...to do this call Technical Support at 1 888 227 2178 Make sure all four bumpers are still attached Use wood screws included when securing to support structure with approved electrical outlet box Drill...

Страница 6: ...gs 10 or higher Shorter Downrod for fans installed close to ceiling Standard Downrod for ceilings 8 10 high Option 1 Option 2 Option 3 skip to next page If you need a different downrod length follow t...

Страница 7: ...e inserted Hand tighten the downrod at least 4 5 full turns until it stops The wires can be cut but leave at least 8 extending from the top of the downrod Downrod continued 8 3 8 Tighten the setscrew...

Страница 8: ...anopy Let the canopy sit loosely on top of the fan DO NOT PICK THE FAN UP BY THE CANOPY OR WIRES Place the downrod ball into the slot in the ceiling bracket Lower the adapter cover over the downrod un...

Страница 9: ...x Refer to CAUTION c 1 on pg 2 Place the receiver on top of the downrod assembly as shown Receiver FROM CEILING F R O M CEILING BRAC K E T green yellow stripe grounding green yellow stripe green yello...

Страница 10: ...r will not be used it has a pre installed wire terminator FROM FAN FROM RECEIVER Using an orange wire connector from the hardware bag Connect the black wire ungrounded from the ceiling to the black wi...

Страница 11: ...ardware bag through the wall control and into the drywall anchors Wall Control This device complies with Part 15 of the FCC Rules Operation is subject to the following conditions 1 this device may not...

Страница 12: ...an Company Canopy Note Fan style may vary Lift the canopy into place so that the screw holes are aligned Position the canopy so that when lifted into place the canopy fits into the hanging bracket as...

Страница 13: ...is a nanotechnology coating that repels dust For cleaning the fan use soft brushes or cloths to prevent scratching Cleaning agents may damage the finishes Attach each blade to the fan using two blade...

Страница 14: ...mbly to the light kit fitter using the three light kit assembly screws found in the hardware bag Light Kit Make sure the light kit fitter and light kit assembly are securely attached Failure to proper...

Страница 15: ...s To install the halogen bulb angle one end of the bulb into the socket as shown then push the other socket inward and lift the bulb up until it fits into place Clip Align the the notches in the globe...

Страница 16: ...y holder and reinsert the battery door into the wall control Battery Battery Holder Battery Door ON Turn Power The remote transmitter should already be paired to the receiver and ready to use Note If...

Страница 17: ...pattern In cold weather use b upward air flow pattern a b Reverse Button Press the fan power button off for at least three seconds to initiate the Safe Exit Mode The lights will flash for visual conf...

Страница 18: ...fan before performing any maintenance or relamping OFF Turn Power Changing the bulb carefully rotate the globe assembly clockwise and lower it from the light kit Remove the bulb shield Press in on th...

Страница 19: ...the wall control Make sure the blades spin freely Turn off power from the circuit breaker then loosen the canopy and check all the connections according to the wiring diagram on pages 9 10 Check the w...

Отзывы: