


5
I
sotope
®
MOUNTING RECOMMENDATIONS
Before mounting your Casablanca fan, read the following helpful recommendations. The location of the fan, air
circulation, and fan size are all important factors to consider before installation.
Location
Ceiling fans have practical uses in almost every room in your home. We suggest
you follow these mounting recommendations as you decide where to install
your Casablanca fan.
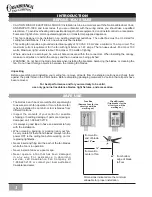
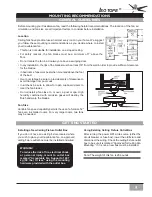
• This fan is not suitable for installation on a sloped ceiling.
• For safety reasons, the fan blades must be a minimum of 7' above the
floor.
• Do not locate the fan in a doorway or above a swinging door.
• In any installation, the tips of the blades must be at least 18" from the wall in order to provide sufficient clearance
for the blades.
• In bedrooms, fans work best when mounted above the foot
of the bed.
• Over pool tables, be sure to provide plenty of clearance to
avoid damage from pool cues.
• In kitchens be sure to allow for open cupboard doors to
clear the fan blades.
• Do not install a fan close to, or over, a pool or spa. High
humidity combined with corrosive gases will destroy the
finish and warp the blades.
Fan Size
Variable fan speed capability permits the use of a full-size 52"
fan even in smaller rooms. For very large rooms, two fans
may be needed.
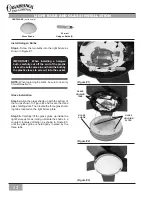
GENERAl GUIDElINES
GETTING STARTED
note: The weight of this fan is 28 pounds.
WaRninG!
To reduce the risk of fire, electrical shock,
or personal injury, mount to outlet box
marked “acceptable Fan Support of 22.7
kg (50 lbs.) or less” using the mounting
hardware provided with the outlet box.
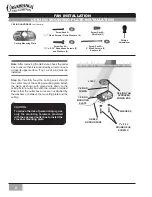
using existing Ceiling Fixture outlet Box
after turning the power OFF at its source (either the
circuit breaker or fuse box), lower the old fixture and
disconnect the wiring. Check the ceiling fixture outlet
box to be sure it is marked “approved for Ceiling Fan
Mounting.” if it is not, a new box must be installed.
installing a new Ceiling Fixture outlet Box
If you do not have an existing fixture located where
you wish to place your Casablanca fan, an approved
ceiling fixture outlet box must be installed and wired.