


Operation of the Monitor
Operation of the Monitor
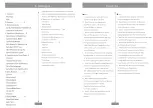
Specification of the Monitor
Brightness
Degree
ViewAn gle
Color Pixel
Dot
Valid Area
Full Transsmion
Type
Inch
Size
Item
Contrast
Dot Distance
Pixel
Unit
Display Mode of
Support
Resolution
Seq
Renovate Rate
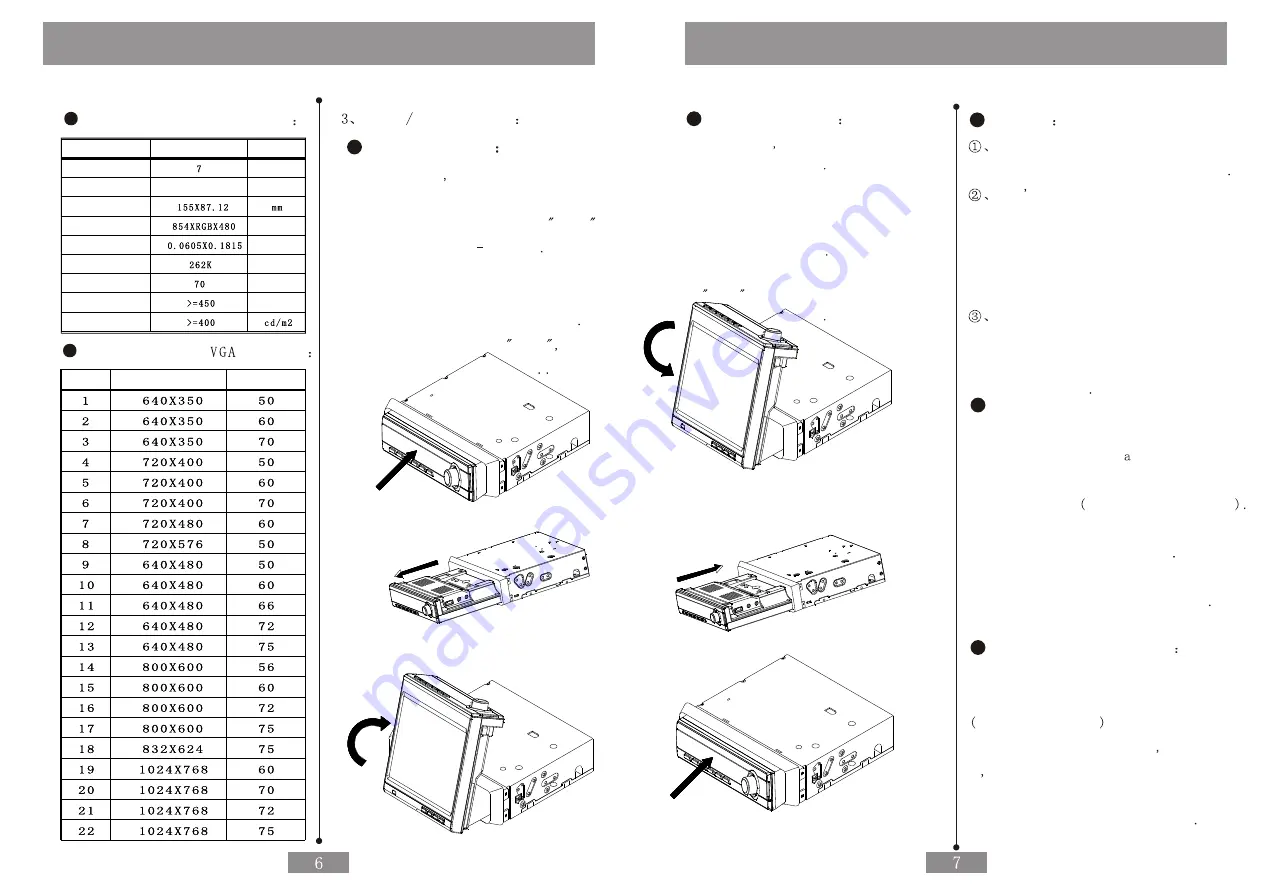
Open Close Screen
Open the Screen
As Follows Push the Front of the Monitor
Emphatically by Finger or Palm then Loosen
the Finger after the Sound of
KaKa then
the monitor will Pop up Slice
Pull the front of the Monitor Emphatically
to the end of Level by Hand then Turn over
the Monitor to the Vertical Position
If there is the Sound of
kaKa
the Monitor
will be Locked Automatically
Close the Monitor
As Follows Monitor can be
Switched right and left
Turn over the Monitor to Vertical
Place then Tip it to Horizontal
Place then Push the Monitor Emphatically
by Hand into the Case
Loosen the Finger after the Sound
of
KaKa then the Monitor will be
Locked Auotomatically
Cautions
Pay attention to operate the monitor
Mildly to Avoid Perpetual Damage
Don t Touch the Panel by Hand
when Open or Close the Monitor
to Avoid the Disabled Touch panel
for the Partial conglutination
of the Touch Kit and ITO Film
The Monitor should be Pull Flatly
when Close the Monitor to Avoid
Scrape of the Crust or to Enter
into the Case
Auto Display when Backing a Car
Monitor will has Rearview Function
if Connect the Camer
with Reverse
Control Cable Correctly according to
the requirement attached Connection
Monitor will be on auto and switch the
Display Image to be Camera
Monitor will come back to the Primary
State after Completing the reverse
Auto Switch for Being on
As long as Connect the Control
Cable and Audio Input Port Correctly
Attached Drawing
on the Condition
of Being ON of the Monitor If any Call
in Audio will Auto Switch into the
Audio Input Port of Telephone to be
Convenient to Answer the Phone
Содержание CID700M
Страница 1: ...Catalogus Cautions...
Страница 18: ......


