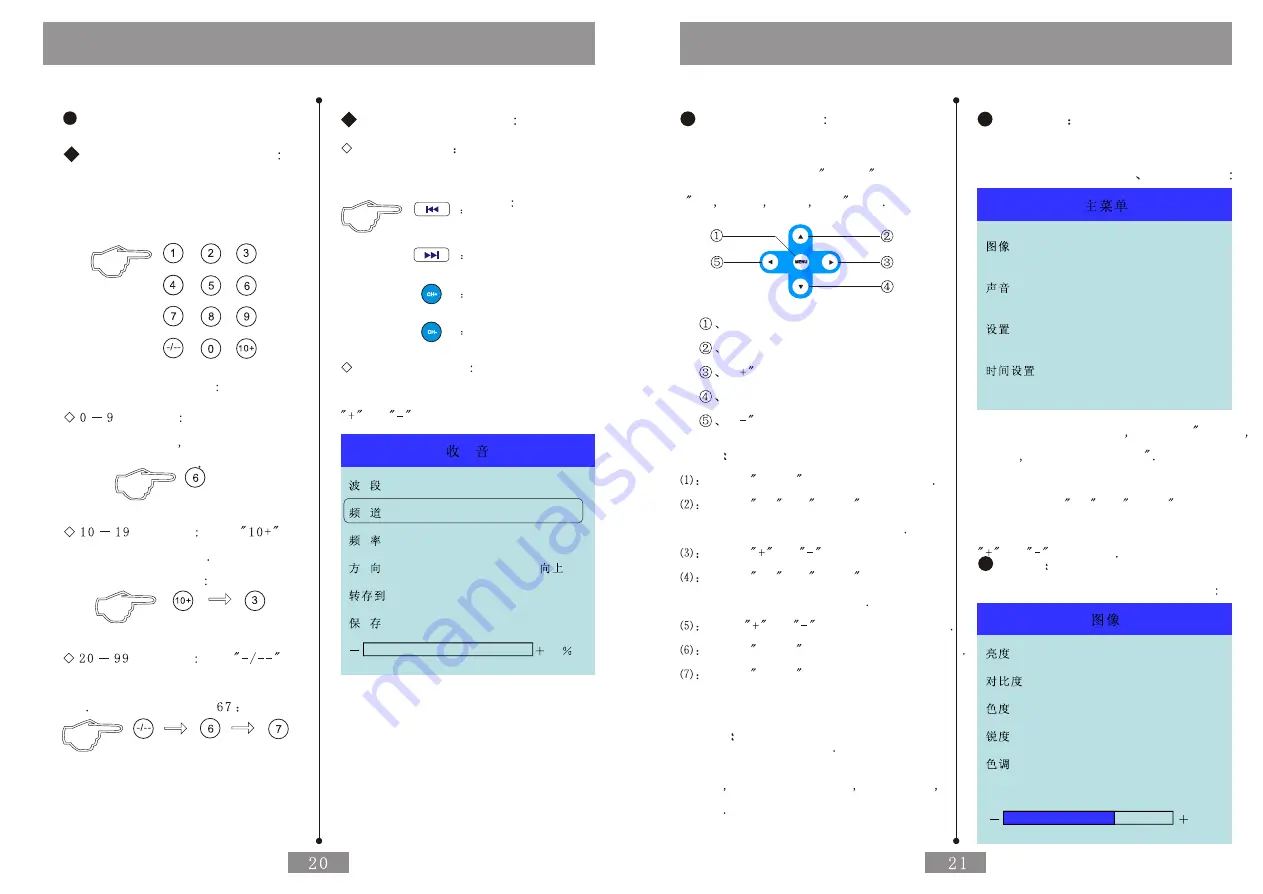
Cartft CID700M Скачать руководство пользователя страница 10

Radio Tuner

Display Set Memory in Advance

Display Shortcut Digit Key

Skip to the Broadcast Appointed Set

Memory in Advance by Pressing the

Digit Key of the Remote Control

Operation is Following

Channel  Press Respond

Digit Key Directly

Such as Channel 6

Channel Press

then Press Single Key

Such as Channel 13

Channel Press

Key

then Tens Digit then Single Digit

Key Such as Channel

Skip of the Channel

Shortcut Key

Skip the Channel by

Pressing the Skip Key of the Front Panel

or the Remote Control

Down Channel

Up Channel

Down Channel

Up Channel

Menu Operation

kip the Channel by Pressing the

or

of the Menu at the Entry

of

Channel

of the Menu

FM

13

99.8MHZ

25

NO

0

Menu Operation

AV Mode

Main Menu will be on Screen by Pressing

Menu Key in the AV1 AV2 Mode

There are Four Entries Such as

Image

Sound Set and Time Set

Select the Entry Needed to Adjust by

Pressing the

Up

or

Down

then Enter

into the Respond Submenu by Pressing

or

to Adjust

Image

Submenu of Image is Following

50

60

60

50

0

60

Operation

Flow

The Menu Operation is Mainly

Operated by the MENU and

Up Down Right Left Key

Menu Key

Up Key

Key

Down Key

Key

Step

Press

MENU  Key to Enter Menu

Press

Up

or

Down

to Select

Submenu Needed to Adjust

Press

or

to Enter Submenu

Press

Up

or

Down

to Select

Entry Needed to Adjust

Press

or

to Adjust the Spec

Press

Menu

to Back to Main Menu

Press

Menu

to Exit OSD after

Adjusting the Spec or the System

Will Exit Automatically Within

Five or Six Second

Menu

OSD Menu will be different in Different

Mode Such as AV Mode VGA Mode Radio

Mode

Содержание CID700M

Страница 1: ...Catalogus Cautions...

Страница 2: ...Light hours Range of working Temperature to Touch Panel Simulate resistance touch panel with high resolution Long Life times Touch Hight Euphotic Rate High Sensitive Ratio High SNR pcs Broadcast Depo...

Страница 3: ...Operation of the Buttons and Remote Operation of the Button and Remote Features of the Remote and Buttons Features of the Front Buttons Remote Window Power Reset Mode Switch Audio Select...

Страница 4: ...Next Step Select to Next Step Select to Next Step Press or Tolerant Route to Intall then Press to Next Step Operation of the Touch Panel Select to Next Step There will be following Image Select CONTI...

Страница 5: ...the Case Loosen the Finger after the Sound of KaKa then the Monitor will be Locked Auotomatically Cautions Pay attention to operate the monitor Mildly to Avoid Perpetual Damage Don t Touch the Panel...

Страница 6: ...e Drive Start the to following Image Press 4 Dot Cal to Enter the Image Pressthe Flickering Dot by Touch Pen Until Flicker Stopped Operation of the Touch Panel Press Sure to Complete the 4 pts Cal Pre...

Страница 7: ...rting Pls Choose Cancel Put the Attached CD Drive into the DVD ROM of the PC If DVD ROM Set the Function of Auto Fun it is as Follows Cautions If DVD ROM Has no Auto Fun Function Double Clink the RUN...

Страница 8: ...ss the Down Menu to Select the Relevant Language then the Windows will be the Selected Language Automatically Set of the Touch Panel Users Select Set Entry to Set the Touch Panel for special function...

Страница 9: ...according the section of the operation in the Menu Mode Select Users can Select the Mode by Pressing the SEL of the Front Panel or the Remote in the VGA Mode Circle Switch by Band Select Ther are two...

Страница 10: ...nu Operation AV Mode Main Menu will be on Screen by Press Menu Key in the AV1 AV2 Mode There are Four Entries Such as Image Sound Set and Time Set Select the Entry Needed to Adjust by Pressing the Up...

Страница 11: ...e by Serial Number Display the Broadcast from the Channel Set in Advance by Pressing Digit Key There are 100 piece Channel Set in Advance From 0 99 for AM and FM Manual Set Memory in Advance ShortCut...

Страница 12: ...near the Heat Area Such as Caliduct for Let r Heat will Cause the Melt of the Insulative able or Damage to Cause the Shortc rcuit of the Car Don t put the Yellow Power Cable Cross the Save Hole into...

Страница 13: ...Press ok at the entry of save after adjusting then all adjusted specification can be saved Press Menu to exit then the entry Operation of the Menu There are two Entries brightness contras Brightness A...

Страница 14: ...t Amplifier 15A Red Video 2 Video 1 Audio4 Left Yellow Yellow White Audio4 Right Yellow Black Power Filter USB VGA MIC OUT Red Whitel Red White Red White Audio3 Left Audio3 Right Audio2 Left Audio2 Ri...

Страница 15: ...nd Card Audio Left Output Sound Card Audio Right Output Car Monitor Connect of the Device External Port There are three Port External Device Such as Disk Mouse Mobile Hard D Caution The Max Current is...

Страница 16: ...ttenuation Distortion Output Power Currency Plus Unit Spec Item Seq Test Condition Kinds Color Dot Distance Dot Viewing Dot Viewing Area Brightness Contrast Deg Down 70 Deg Up 7 Deg Right Deg Left Vie...

Страница 17: ...nel can fix the installing Bolt Choose the Following Installation Dismantle the Installing Tank Bucket from the Machine then Install into Relevant Rotate of the car and fix Screw the M5 Bolt into scre...

Страница 18: ......

Отзывы: