23
4.2.2 - Refrigerant blow down
During cooling operation a small quantity of absorbent can
mix with the refrigerant. This amount can increase over time
and result in a reduced cooling capacity. Therefore refrigerant
blow-down must be performed once during the cooling season.
By doing this the dirty refrigerant is transferred to the absorber
side and new, clean refrigerant is regenerated.
•
Make sure the refrigerant pump is rotating and that the
solution level is visible through the evaporator sight glass.
•
Open the transfer valve completely.
•
When the solution level is no longer visible, close the
transfer valve tightly.
The above blow-down procedure should be repeated a few
times, as necessary. We recommend that you arrange a
maintenance contract with your Carrier service agent which
will include refrigerant blow-down.
V1
V3
V2
SV2
SV1
4.2 - Periodic maintenance
To optimize performance, the chiller requires purging,
refrigerant blow down, absorbent control, and management of
combustion equipment, etc. We recommend that you arrange a
maintenance contract with your Carrier service agent.
4.2.1 - Purging (Fig. 23)
Non-condensable gas inside the machine not only decreases
cooling capacity, but also potentially shortens the life of the
machine. Therefore purging must be done periodically. This
should be done by the Carrier service personnel under the
maintenance contract. If customers carry out the purging
themselves, they should take instruction from our service
personnel.
Purge procedure
When the purge indication light on the control panel comes on,
start purging, following the instructions below.
1. Turn on the purge pump on/off switch on the control panel
and operate the purge pump for 10 minutes.
2. Open V1 and V2.
3. Press the key on the control board once to show data
code 17 "Purge tank pressure" (refer to chapter 3.5.3) and
check if the indicated value drops. If it does not drop,
follow the procedure described in steps 6, 7 and 8 below,
and contact your Carrier service agent.
4. Purge for 10 minutes. Even if the purge indication light
goes off before 10 minutes have elapsed, continue purging
for the full 10 minutes. If the light does not go off,
continue purging until it does.
5. Close V1 and V2.
6. Turn off the purge pump on/off switch.
7. Check whether the valves are open/closed.
V1
Closed
V2
Closed
V3
Closed
B-valve Open
Maintenance pressure
gauge
Liquid trap
Purge pump
Purge tank
B-valve
Purge indication
light (green)
Purge pump
on/off switch
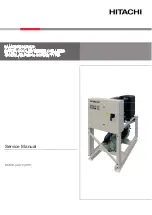
Fig. 24
Fig. 24
Refrigerant
transfer valve