2
INSTALLATION
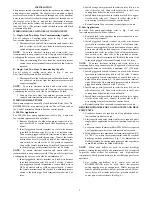
The pressure switch is mounted inside the outdoor unit cabinet by
using adapter tube supplied. The adapter tee is mounted to liquid
service valve and tube is either routed through one of the knockout
holes in unit cabinet (vertical discharge product) or through one of
the service valve holes in unit cabinet (horizontal discharge
product). From inside cabinet, the flare nut is attached to extender
tube. (See Fig. 1.) The pressure switch is wired in series with black
or common fan lead.
WIRING FOR ALL VOLTAGES OF COOLING UNITS
A. Single
−
And Two
−
Stage Non
−
Communicating Capable
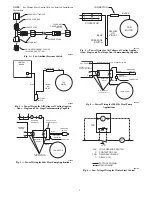
For all voltages of cooling units, refer to Fig. 2 and wire
low
−
ambient pressure switch as follows:
1. Disconnect black fan lead from contactor and connect this
lead to yellow or violet wire from low
−
ambient pressure
switch using connector supplied.
NOTE
: To ensure electrical isolation and strain relief, it is
recommended to wrap connector with UL approved electrical tape
overlapping the wires on each side by a minimum of 1 inch.
2. Connect remaining blue wire from low
−
ambient pressure
switch to contactor terminal from which black fan lead was
removed.
B. Single
−
And Two
−
Stage Communicating Capable
For all stages of cooling units, refer to Fig. 3 and use
Low
−
Ambient Pressure Switch as follows:
1. Disconnect black fan lead from control board and connect it
it to yellow or violet wire from low ambient pressure switch
connector supplied.
NOTE
: To ensure electrical isolation and strain relief, it is
recommended to wrap connector with UL approved electrical tape
overlapping the wires on each side by a minimum of 1 inch.
2. Connect blue wire from low
−
ambient pressure switch to
control board terminal from black fan lead was removed.
WIRING FOR HEAT PUMPS
Heat pumps require a normally closed Isolation Relay (Part No.
KHAIR0201AAA or equivalent) with the 24v coil connected to
the C and O terminals of defrost board or control board.
A 208/230v Applications
For 208/230v heat pump applications, refer to Fig. 4 and wire
low
−
ambient pressure switch as follows:
1. Remove black lead of outdoor fan motor connected to de-
frost board OF2 or control board ODF depending on type
of unit.
2. Install piggyback female terminal on violet wire harness
(provided in isolation relay kit) to tab 1 of isolation relay.
Connect non
−
piggyback female termination of same violet
wire to one side of provided connector. Connect the female
termination of violet (or yellow) lead of low ambient pres-
sure switch to the other side of the provided connector.
Connect the female termination of the black fan motor lead
to the male piggy back terminal located at tab 1 of relay.
NOTE
: To ensure electrical isolation and strain relief it is
recommended to wrap connector with UL approved electrical tape
overlapping the wires on each side by a minimum of 1”.
3. Install piggyback female terminal on black wire harness
(provided in isolation relay kit) to tab 2 of relay. Connect
non
−
piggyback female termination of same black wire to
OF2 on defrost board or ODF on control board. Connect
the female termination of blue lead of low ambient pressure
switch to the male piggy back terminal located at tab 2 of
relay.
4. Install orange wire (provided in isolation relay kit) to one
side of the relay coil. Connect the other side to the O wire
coming from defrost board or control board.
5. Install black wire (provided in isolation relay kit) to oppos-
ite side of the relay coil. Connect the other side to the C
wire coming from defrost board or control board.
6. Reinstall control box cover and reconnect power to unit.
B. 460v Applications
For 460v heat pump applications, refer to Fig. 5 and wire
low
−
ambient pressure switch as follows:
1. Remove black lead of outdoor fan motor connected to out-
door fan relay terminal 3.
2. Install piggyback female terminal on violet wire harness
(provided in isolation relay kit) to tab 1 of isolation relay.
Connect non
−
piggyback female termination of same violet
wire to one side of provided connector. Connect the female
termination of violet (or yellow) lead of low ambient pres-
sure switch to the other side of the provided connector.
Connect the female termination of the black fan motor lead
to the male piggy back terminal located at tab 1 of relay.
NOTE
: To ensure electrical isolation and strain relief it is
recommended to wrap connector with UL approved electrical tape
overlapping the wires on each side by a minimum of 1” (25.4 mm).
3. Install piggyback female terminal on black wire harness
(provided in isolation relay kit) to tab 2 of relay. Connect
non
−
piggyback female termination of same black wire to
outdoor fan relay terminal 3. Connect the female termina-
tion of blue lead of low ambient pressure switch to the male
piggy back terminal located at tab 2 of relay.
4. Install orange wire (provided in isolation relay kit) to one
side of the relay coil. Connect the other side to the O wire
coming from defrost board or control board.
5. Install black wire (provided in isolation relay kit) to oppos-
ite side of the relay coil. Connect the other side to the C
wire coming from defrost board or control board.
6. Reinstall control box cover and reconnect power to unit.
REQUIRED CHANGES FOR COOLING UNITS AND HEAT
PUMP UNITS
1. Crankcase heaters are required on all applications where
low
−
ambient controls are used.
2. Start capacitor and relay (hard start) kits are required on all
single
−
phase applications where low
−
ambient controls are
used.
3. Evaporator freeze thermostat KAAFT0101AAA is required
on all applications where low
−
ambient controls are used.
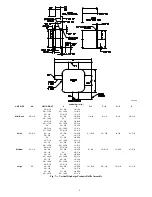
4. Wind baffles are recommended for temperatures below 0
_
F
(
−
17.80
_
C) or where there is substantial wind. For vertical
discharge outdoor products see Fig. 7 for dimensions of
Baffle Assembly. For horizontal discharge outdoor products
consult Product Data for Wind Baffle Kits.
NOTE
: When wind baffles are used on vertical discharge
products, raising the unit off of pad a minimum of 4 in. is required
to provide better airflow for moderate
−
and high
−
ambient
temperatures. Check presale literature for available support feet or
unit risers.
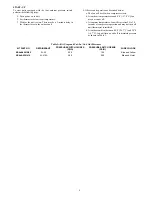
5. For cooling applications only, winter start control
KAAWS0101AAA must be used where low
−
pressure
switch tripping may be encountered. Winter start control
must be wired in parallel with low
−
pressure switch. This al-
lows a delay of 3 minutes before low
−
pressure switch be-


