5
|
CarnivalKingSupplies.com
Frozen Beverage Dispenser
User Manual
Operation
Preparing The Product
Frozen Beverages
Cold Drinks
Concentrate
In order to obtain a homogeneous mix, the product will need
to be premixed before being added to the machine. Follow the
manufacturer’s recommendations for mixing.
Ready-to-Use & Premixed Concentrates
1.
Turn the machine OFF and unplug from power supply.
2.
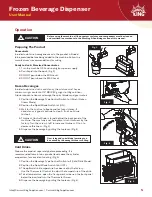
Pour liquid into the bowl. (Fig. 2)
3.
DO NOT pour below the MIN Level.
4.
DO NOT pour above the MAX Level.
1.
Position the Beverage Type Control Switch to I (Slush/Frozen
Cream Mode).
2.
Position the Spiral Blade Switch to I (ON).
3.
Wait for the mixture to freeze and test consistency. If
consistency is good, continue to step 5. If not, continue
to step 4.
4.
Thickness Control Knob is found behind the back panel of the
machine. The machine is set for optimal slush thickness by the
factory. Turn the screw L to R to increase thickness, R to L to
decrease thickness. (Fig. 3)
5.
Dispense the beverage by pulling the tap lever. (Fig. 4)
1.
Position the Beverage Type Control Switch to II (Cold Drink Mode).
2.
Position the Spiral Blade Switch to 0 (OFF).
3.
The optimal drink temperature has been set by the factory.
Use the Thermostat Control to adjust the temperature of the drink.
4.
To set temperature, open the transparent screen on the front panel
below the bowl and turn the Thermostat Screw.
5.
Dispense the beverage by pulling the tap lever. (Fig. 4)
In order to obtain a slush consistency, the mixture must have a
minimum sugar content of 13° BRIX (13g sugar to 100g solution).
A lower concentration may damage the spiral blades and gear motors.
Prepare the product separately before proceeding. It is
recommended to maintain a product level above the cylinder
evaporators for consistent cooling. (Fig. 5)
Over-icing and spiral blade jamming can
be caused by the wrong thickness setting.
CAUTION
Before using the machine, all food contact surfaces and components must be cleaned
and sanitized in accordance to the Washing & Sanitizing section of this manual.
CAUTION
Fig. 2
Fig. 3
Fig. 5
Fig. 4


