


PlantVisor Embedded
cod. +050000620 - rel. 1.1 08/06/06
12
2.
Installation
The system is supplied with a black and white cable that must be connected to position (8). This cable should then be
connected to a mouse and a keyboard, the mouse to the black end and the keyboard to the white end. Once the mouse and
the keyboard have been connected, plug the monitor into connector (7). Then plug the power cable into connector (1) and
the 220 Vac power supply. Finally, connect the CAREL 485 network. The connector used depends on the type of converter
selected. The system is supplied together with the CAREL PC-GATE converter. To use this converter, connect the serial cable
to the COM2 port, that is, connector (2). To use the 485 USB converter (CVSTDUMOR0), any of the USB ports can be used,
connector (5). Optional: if the PlantVisor embedded needs to be connected to an Ethernet network, plug the network cable
into connector (6). Connector (3) can be used to interface to a parallel printer.
2.1
Configuration
Once the cables have been connected (see the previous paragraph), switch the system on using button (1). At the end of
start-up phase, the PlantVisor main page is displayed. This indicates that the system is fully operating. The only difference
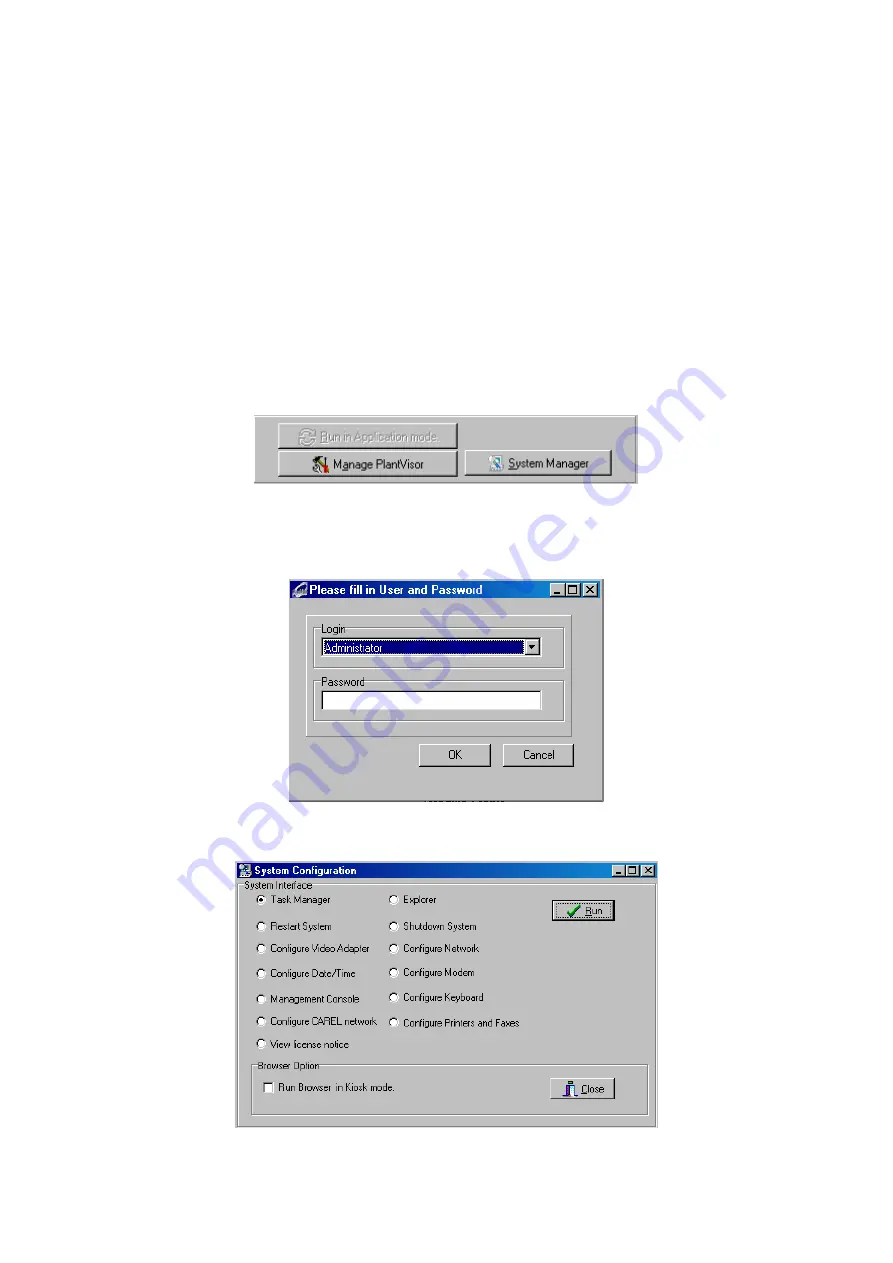
between this version of PlantVisor and the standard version is the presence a system management button.
Fig. 2.1
This button is used to access the operating system. Access to these functions is password protected. Only the user with the
administrator rights can access these functions.
Fig. 2.2
Once the password has been entered, the following window will be displayed.
Fig. 2.3
To access the desired function, simply select it and click Run. To exit, simply click Close.
Содержание PlantVisor Embedded
Страница 1: ...PlantVisor Embedded Foglio istruzioni Technical leaflet ...
Страница 2: ......
Страница 3: ...Foglio istruzioni ...
Страница 6: ......
Страница 11: ...Technical leaflet ...
Страница 13: ...CONTENTS 1 Introduction 11 2 Installation 12 3 Technical specifications 14 4 Dimensions 14 5 Accessories 14 ...
Страница 14: ......
Страница 19: ......


