background image

4

DO NOT install or use this equipment without first reading and understanding this instruc-

tion manual. If you are unable to understand the Warnings, Cautions or Instructions, contact a 

healthcare professional, dealer or technical personnel before attempting to install this equip-

ment - otherwise, injury or damage may occur.

Each individual should always consult with their physician or therapist to determine proper

adjustment and usage.

Rollators are NOT intended to be self-propelled while seated.

A physical/occupational therapist should assist in the height adjustment of the rollator for

maximum support and correct brake activation, the fixture of the screws, the position of the

quick release/assembly kits.

Always ensure brake cables are flush along leg extensions. Brake cables should always be

secured with the supplied tie wrap to the side braces. After any height adjustment, reposition

brake cables so that any excess cable loops out the front of the rollator. Always ensure screws

are fastened to the connector, so that the connector can’t move when forced.

Ensure all snap buttons fully protrude through adjustment holes. Failure to follow these

warnings can result in personal injury.

Care should be taken to ensure that ALL hand and height adjustments are secure, and that

casters and moving parts are in good working order before using this or any mobility aid.

All wheels MUST be in contact with the floor at ALL TIMES during use. This will ensure the

rollator is properly balanced. The brakes MUST be in the locked position BEFORE using the

seat.

When using the rollator in a stationary position, the hand brakes MUST be locked.

Warning for stability

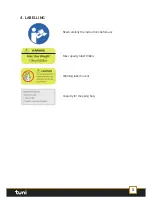
The maximum loading is 136KG (300lbs) including the

weight in the accessory.

The capacity for the shopping bag is 6kg (11lbs)

Warning for folding / assembly

When the rollator is opened or set up, make sure the seat tubing is tight using with the

levers at both sides of the seat, and make sure the bolts are tightly locked with no movement 

between the joints. Do not hang additional weight on either side of the rollator as this may 

cause injury to the user.

Safety warning

When assembling, treat the handle tubing with care, as violently shaking may cause the brake 

cable malfunction inside the tubing. Always make sure the handle height on both sides is the 

same and the knob there is tightened.

Always check the product joints to make sure it is safe for use. And make sure it is locked the 

right position before use it every time.

5. GENERAL WARNINGS

Содержание SAMBA DUO

Страница 1: ...User Manual CareCo Hubert Road Brentwood Essex CM14 4JE Product Code WA01068 lightweight rollator ...

Страница 2: ...his product is intended for use by people who need assistance with mobility with outdoor activities and also can be used as a transport chair for a caregiver to use for people who need transportation from one place to the other in short term The handle height of this product is adjustable from 84 5 to 94 5cm 33 to 37 and should be used in an ambient temperature range of 20 C to 50 C ...

Страница 3: ...o the end of rear wheel tubing in order for help with moving over blocks or steps The brake system consists of both an upward running brake and a downward parking brake The product can be used as a rollator also it can be used as a transport chair with the footrest 3 Parts List 1 3 6 8 11 10 12 2 14 15 13 5 7 9 16 17 4 1 Bell 2 Brake 3 Handgrip 4 Reversible Backrest 5 Handle 6 Seat Tubing 7 Seat 8...

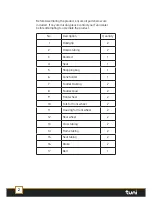
Страница 4: ... Footrest pad 2 9 Front wheel 2 10 Fork for front wheel 2 11 Housing for front wheel 2 12 Rear wheel 2 13 Cross tubing 2 14 Frame tubing 2 15 Seat tubing 2 16 Brake 2 17 Bell 1 Before Assembling the product ensure all parts below are included If any are missing please contact your Tuni dealer before attempting to assemble the product ...

Страница 5: ...3 4 LABELLING Read carefully the instructions before use Max capacity label 136KG Warning label for seat Capacity for shopping bag ...

Страница 6: ...ese warnings can result in personal injury Care should be taken to ensure that ALL hand and height adjustments are secure and that casters and moving parts are in good working order before using this or any mobility aid All wheels MUST be in contact with the floor at ALL TIMES during use This will ensure the rollator is properly balanced The brakes MUST be in the locked position BEFORE using the s...

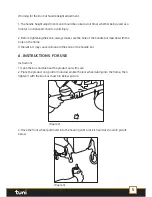
Страница 7: ...e housing until a click is heard as shown in picture below Warning for the knob at handle height adjustment 1 The handle height adjustment knob should be locked at all times whether being used as a rollator or a transport chair to avoid injury 2 Before tightening the knob always make sure the hole of the handle bar matches with the hole on the frame Otherwise it may cause damage to the knob or the...

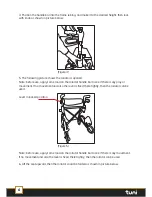
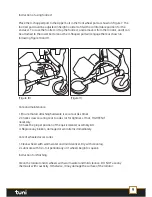
Страница 8: ...le bar to see if there is any play or movement If no movement and also the lever is fixed there tightly then the rollator can be used Note before use apply some load on the rollator handle bar to see if there is any movement If no movement and also the lever is fixed there tightly then the rollator can be used 6 Lift the seat upward then the rollator could be folded as shown in picture below Figur...

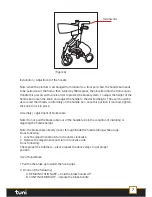
Страница 9: ...this position is reached tighten the knob to lock in place Assembly adjustment of brake cable Note Do not pull the brake cable out of the handle tube in the condition of installing or adjusting the handle height Note the brake cable already moves through inside the handle tubing while usage Do as following 1 Lock the adjustment knob turn it counter clockwise 2 Release the adjustment knob turn it c...

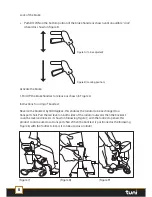
Страница 10: ...ctions for using of backrest Reverse the backrest by 180 degrees this enables the rollator to be exchanged to a transport chair Pull the red lever on both sides of the rollator outward then the backrest could be reversed now As it shown in following Figure 7 with the footrest opened this product could be used as a transport chair When the backrest is positioned as the following Figure 8 with the f...

Страница 11: ...gure 11 Care and maintenance 1 Ensure that all attaching hardware is secure at ALL times 2 Check screw securing seat to side slot for tightness If not TIGHTEN if necessary 3 Check the proper position of the quick release assembly kits 4 Replace any broken damaged or worn items immediately Care of wheeled accessories 1 Clean wheels with warm water and mild cleanser Dry with clean rag 2 Lubricate wi...

Страница 12: ...ontrollers One and a half year limited warranty Electronic Components and Charger One year limited warranty Warranty Exclusion The following items are not covered by warranty Motor Brushes Wheel Tyres Arm Pads Seat Cushion Fuses and Bulbs Tiller Cover Rear Shroud Front Shroud Batteries and Consumable Parts Any damage or defect of any nature occurring from the misuse abuse of the product improper o...

Страница 13: ...11 ...

Страница 14: ...12 ...

Отзывы: