background image

9

7

8

9

7

18

9

7 6

13

3.2

 Assembly instructions

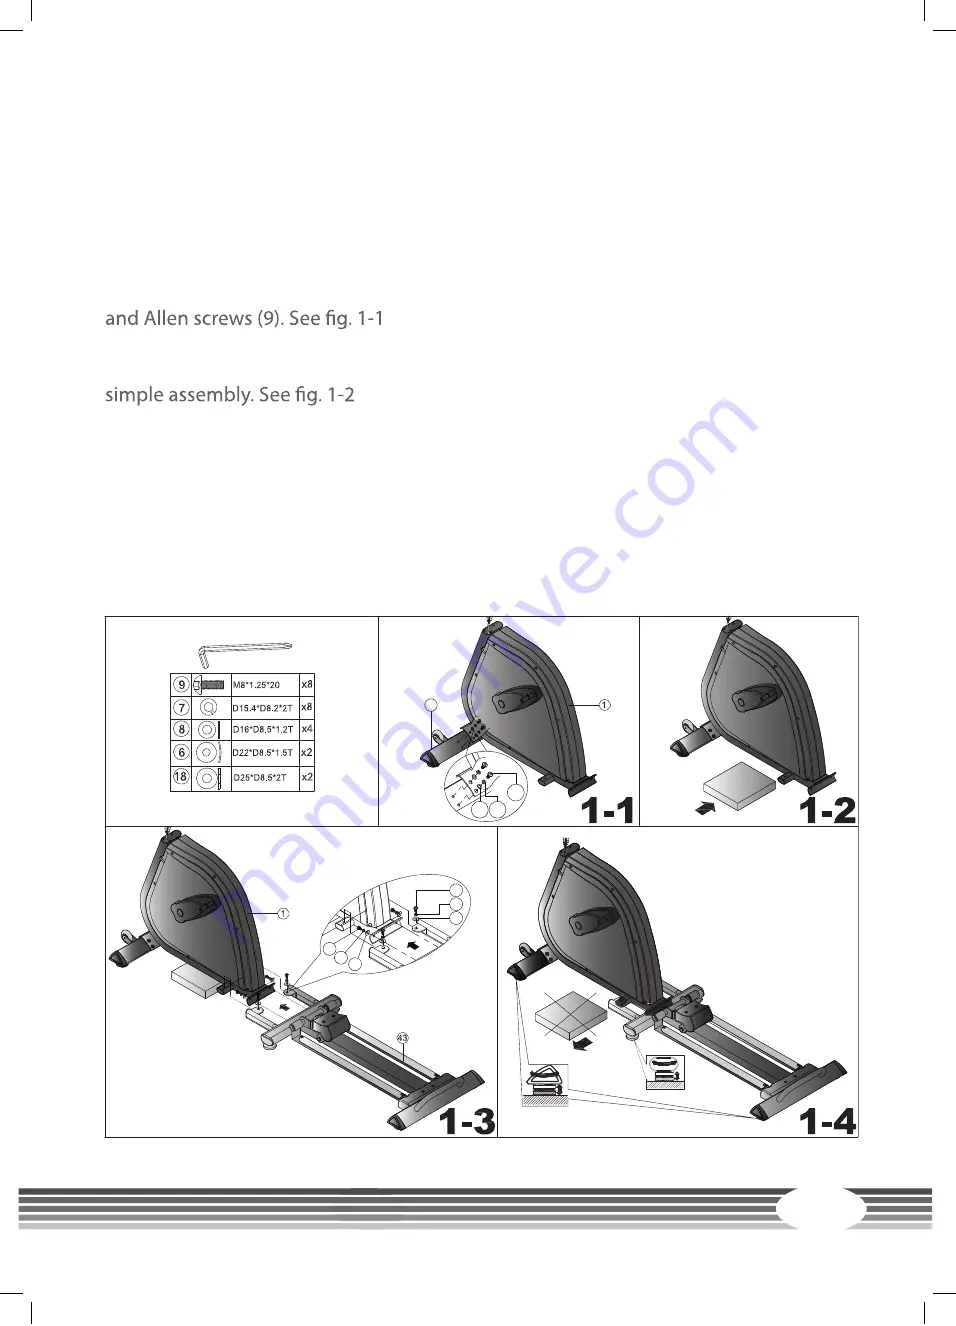
Before the assembly, look carefully at the single illustrated assembly steps and do the 

assembly according to the given order.

Step 1 

1)

 Mount the front base (2) to the main frame (1) with washer (8), spring washers (7), 

2)

 Remove the polystyrene from the packaging and place it under the frame for a 

3)

 Mount the rear foot assembly on the main frame (1) with wave washers (6), spring 

washers (7), Allen screws (9), and washers (18).

4)

 Remove the polystyrene and dispose it of.

2

Содержание FX70

Страница 1: ...Assembly and operating instructions Elliptical cross trainer FX70 Art No CST FX70 CSTFX70 01 01 ...

Страница 2: ...2 FX70 ...

Страница 3: ...t has been manufactured according to the latest safety knowledge As faraspossible potentialsafetyhazardswhichcouldcauseinjuryhavebeeneliminated Make sure to follow the instructions carefully and that all parts are securely in place If required read through the instructions again to correct any mistakes Please pay close attention to the safety and maintenance instructions given here The contract pa...

Страница 4: ...nstructions 13 4 OPERATING INSTRUCTIONS 20 4 1 Console display 20 4 2 Button functions 22 4 3 Turning on and setting the equipment 23 4 4 Programmes 24 4 4 1 Manual programmes 24 4 4 2 Pre set programmes 26 4 4 3 H R C Heart rate controlled programme 26 4 4 4 Watt programme 28 28 4 4 6 RECOVERY Fitness test 29 4 4 7 Body analysis 29 5 WORKOUT INSTRUCTIONS 31 5 1 Heart rate measuring 31 34 5 3 Desi...

Страница 5: ...5 7 DISPOSAL 42 8 ORDERING ACCESSORIES 43 9 ORDERING SPARE PARTS 44 9 1 Service hotline 44 9 2 Serial number and model name 44 9 3 Parts list 45 9 4 Exploded drawing 50 ...

Страница 6: ...sistance level 16 Watt 60 280 Watt User memory 4 Training programmes in all 19 Manual programmes 1 Pre set programmes 12 Watt controlled programmes 1 Heart rate controlled programmes 4 1 Flywheel 9 kg Transmission ratio 1 10 Weight and dimensions Product weight gross incl packaging 97 kg Product weight net without packaging 84 kg Packaging dimensions L x W x H approx 1250 mm x 480 mm x 720 mm Set ...

Страница 7: ... unsupervised access to the equipment Before starting your training make yourself familiar with all of the equipment s functions and setting options Have an expert explain the correct usage of the product to you Make sure that nobodyis in the range of motion of the equipment while exercising Keep your hands feet and other body parts hair clothing jewelry and other objects well clear of moving part...

Страница 8: ...rneath the equipment or under a carpet or rug and do not place any objects on top of it If the power cable or the plug are damaged or defective contact your authorized contract partner Do not use the equipment in the meantime Do not keep electrical devices e g mobile phones in close proximity to the console or the control electronics otherwise display values e g pulse measuring could be inaccurate...

Страница 9: ...t during assembly because small parts are included in the delivery and may be swallowed Make sure that you have enough space at least 1 50 m in every direction during assembly Do not leave any tools and packaging materials like plastic sheeting laying around Assemble the equipment on an underlay mat or on the cardboard packaging in each other Read the assembly instructions carefully and assemble t...

Страница 10: ...functions on the equipment may occur Individual parts are often the to see the six most common errors and how to repair them If the equipment still does not work properly please contact your contract partner Problem Cause Solution Drive discs wobble or make noises Drive pulley is loose Tighten nuts Display does not work No plug connection power supply not plugged in Check all plug connections and ...

Страница 11: ...n including a power cable with mains plug If one of the illustrated parts is missing please contact your contract partner Problem Cause Solution No pulse reading Sources of interference in the room Using a chest strap Unsuitable chest strap Chest strap is incorrectly positioned Batteries are discharged Eliminate sources of interference e g mobile phone loudspeaker etc Use a suitable chest strap se...

Страница 12: ...S D16 D8 5 1 2T 4pcs M5 0 8 12L 2PCS Step 5 Step 6 MM M8 1 25 20L 4PCS D30 D8 5 2T 2PCS 119 D22 D8 5 1 5T 4PCS D26 D19 5 0 3T 2PCS D24 D10 0 4T 2PCS Step 3 Step 2 Step 1 KH 742F2 D15 4 D8 2 2T 4PCS M8 1 25 20L 2PCS D21 16 2 0 3T 2PCS D25 D8 5 2T 2PCS M8 1 25 20L 2PCS 74 18 9 ST4 15L 8PCS 117 Step 4 D15 4 D8 2 2T 4PCS D16 D8 5 1 2T 4pcs D27 D8 2 2 5T 2PCS 9 6 91 64 9 7 6 18 8 18 20 104 31 118 19 9 ...

Страница 13: ...rding to the given order Step 1 1 Mount the front base 2 to the main frame 1 with washer 8 spring washers 7 2 Remove the polystyrene from the packaging and place it under the frame for a 3 Mount the rear foot assembly on the main frame 1 with wave washers 6 spring washers 7 Allen screws 9 and washers 18 4 Remove the polystyrene and dispose it of 2 ...

Страница 14: ...buffer 65 and protective cover 31 2 Mount the pedals 21L 21R to the respective pedal support tube 17L 17R with washers 22 and locking screws 23 3 Put the roller cover 93L 93R on the support tube 11L 11R with the bolt 104 65 D25 D8 5 2T M8 1 25 20 D27 D8 2 2 5T M5 0 8 12L D64 20 18 65 104 31 x2 x2 x2 x4 x2 ...

Страница 15: ...1 Accomplish this assembly step with two persons preferably 2 3 Insert the handlebar 10 in the main frame and mount it with spring washers 7 4 Put down the cover of the handlebar 48 and mount it to the main frame ...

Страница 16: ...FX70 16 Step 4 1 2 Mount the computer to the panel with screws 113 and connect the impulse cable 3 4 29 100 4 1 ...

Страница 17: ... and right pivoted handlebar 30L 30R to the support tube 10 with Allen screws 9 washers 18 and waved washers 74 Then you mount the 5 5 5 10 116 147 116 M5 15 x2 Fix bottle holder 147 onto the handlebar post 10 by using screw 116 ...

Страница 18: ...al stick 17L 6 3 2 Connect the left and right pivoted handlebar 30L 30R with the pivoted support tube 12L 12R with wave washers 6 spring washers 7 and Allen screws 9 see 3 Connect the adaptor 105 to the adapter input on the front of the elliptical cross trainer 24 24 6 1 6 4 6 3 6 2 ...

Страница 19: ...7 Adjusting incline A Hold the pivoted tube and bring it upwards to the appropriate horizontal position B Hold the pivoted tube pull out the orange coloured handlebar and adjust the position to the lower level ...

Страница 20: ...20 4 OPERATING INSTRUCTIONS 4 1 Console display FX70 ...

Страница 21: ...ising the pulse beats per minute is displayed Pulse alarm when the pre set target pulse value is exceeded Watts WATT constant training mode Programmes 12 programmes for selecting User Watt 0 350 Watt Recovery R stands for RECOVERY for receiving the heart rates throughout the recovery state of the user H R C Heart rate Target pulse training mode Body Fat F stands for BODY FAT for measuring the body...

Страница 22: ...gs Control knob down Reduction of degree of resistance Selection of settings Mode Reset Hold the button for two seconds and the computer will be started again from the user settings Back to the main menu while pre setting the training values or the stop mode Start Stop Starts and ends the training ...

Страница 23: ...own on the Then the pre set speed is displayed in the window SPEED and E or A are displaced the MODE button After four minutes when the pedal is not used or the input impulse is missing the console turns in to the energy save mode Press any button on the console to wake it up Figure 1 Figure 3 Figure 2 Figure 4 ...

Страница 24: ...e by pressing START in the main menu 1 Press UP or DOWN on the control knob to choose the training programme Select Figure 7 Figure 9 Figure 8 Figure 10 4 4 Programmes In the main menu press UP or DOWN on the control knob to choose the programme MODE button Figure 5 Figure 6 FX70 ...

Страница 25: ...nsity level by pressing the control knob The intensity level is displayed in the windowWATT If it is not set within three seconds the display is shifted to the window 5 Press START STOP to stop the training Press RESET to get to the main menu Figure 11 Figure 13 Figure 15 Figure 12 Figure 14 Figure 16 ...

Страница 26: ...an set the intensity level by pressing the control knob 5 Press START STOP to stop the training Press RESET to get to the main menu Figure 17 Figure 18 4 4 3 H R C Heart rate controlled programmes 1 Press UP or DOWN on the control knob to choose the training programme Select 2 selected press the set value 30 230 on the control knob use UP and DOWN 3 4 Press START STOP to start or stop the training...

Страница 27: ...27 Figure 19 Figure 21 Figure 23 Figure 20 Figure 22 ...

Страница 28: ...on the control knob to set the WATT level 5 Press START STOP to stop the training Press RESET to get to the main menu 4 4 5 1 Press UP or DOWN on the control knob to choose the training programme Select U 2 are eight columns the user can set the intensity level for each column The user can 3 4 Press START STOP to start the training While exercising the user can set the intensity level by pressing ...

Страница 29: ...n from 00 60 to 00 00 fig 28 The screen displays your pulse beat and your fitness level is evaluated after 60 seconds fig 29 F1 is the best F6 is the worst Due to a regular training the mark can be quickly improved Press the RECOVERY button again to get to the main menu 4 4 7 Body analysis 1 In the STOP mode you press RESET to get to the main menu Then choose F to start the body fat measuring 2 3 ...

Страница 30: ...ns that the hands are not correctly placed on the handlebars E 1 There is no pulse beat signal input E 4 happens when the FAT and BMI results are below 5 or above 50 Figure 30 Figure 32 Figure 34 Figure 36 Figure 31 Figure 33 Figure 35 FX70 ...

Страница 31: ...n a single case the equipment is not defective In this case we recommend using a chest strap to achieve a permanently correct heart rate display serves as a training aid Telemetric heart rate measuring This elliptical cross trainer is already equipped with a heart rate receiver as standard Using a chest strap makes it possible for you to have a wireless heart rate measuring This optimal and ECG pr...

Страница 32: ...deposits of fat In order to achieve this training goal a low training intensity approximately 55 of the maximum heart rate and a longer training period are required Cardiovascular training cardio training The primary goal is to increase stamina system In order to achieve this training goal medium intensity approximately 75 of the maximum heart rate with a medium training period is required Anaerob...

Страница 33: ...ly 157 beats min 220 age x 0 9 20 80 100 120 140 160 180 200 220 65 70 5 3 0 4 5 4 0 5 5 5 0 6 25 30 200 195 190 185 180 175 170 180 150 110 146 107 175 171 166 162 157 153 148 143 139 135 131 128 124 105 102 99 96 94 91 88 85 83 113 116 120 144 139 136 150 155 160 165 Heart rate diagram for training intensity Maximum pulse 220 age 90 of maximum pulse anaerobic maximum intensity training 75 of max...

Страница 34: ...ng appropriate resistance level Do not overexert yourself physically and mentally by starting with resistance levels that are too high Start slowly and increase the resistance steadily Aim for regular and calm breathing 5 Keep yourself properly hydrated Drink drink drink Have a drinking bottle close by during your workout Allow your body and your muscles enough time to recover after your workout O...

Страница 35: ...s speeded up WEEK 1 2 Beginner Advanced Days Duration Intensity Duration Intensity Mon 20 min Slow speed no resistance 30 min Moderate speed keep resistance low Wed 20 min Slow speed no resistance 30 min Moderate speed keep resistance low Fri 20 min Slow speed no resistance 30 min Moderate speed keep resistance low between for two minutes Maintain heart rate In the second week increase the speed f...

Страница 36: ...ow 40 min Vary speed keep resistance low slightly at moderate speed In the sixth week alternate between forwards and backwards movements WEEK 7 8 Beginner Advanced Days Duration Intensity Duration Intensity Mon 35 min Vary speed keep resistance low 45 min Vary speed increase resistance Wed 35 min Vary speed keep resistance low 45 min Vary speed increase resistance Fri 35 min Vary speed keep resist...

Страница 37: ...s buttocks knee points downwards no abduction Straight upper body avoid tilting the pelvic forward hollow back by tensing the abdominal muscles Change legs 2 Exercise Stretching the back thigh leg curl hamstring Pull thigh towards upper body with both hands Stretch through increased stretching in the knee joint The lower leg maintains contact with the Change legs ...

Страница 38: ...arm at 90 to the wall with the elbow just above shoulder height Turn your head and upper body gradually to the opposite sides until you feel a stretch in the front chest of the shoulder being leaned on Pay attention to tension in your abdominal and gluteal muscles Your weight is on your front leg Change legs All recommendations of these instructions apply solely to healthy persons and are not suit...

Страница 39: ...39 5 5 Workout journal Date Training weight Time min Calories burnt Body weight Distance Ø Pulse Resistance level I feel Copy template ...

Страница 40: ...following provisions Warrantee purchased product as a gift from the original buyer Warranty periods Model Use Full warranty FX70 Home use 24 months Repair costs According to our choice there will either be a repair a replacement of individual damaged parts or a complete replacement Spare parts that have to be mounted while assembling the equipment have to be replaced by the warrantee personally an...

Страница 41: ...r bears costs After expiry of the warranty the buyer bears the costs of transport and insurance If the fault is covered by our warranty you will receive a new or repaired equipment in return Warranty claims are invalid in case of damage resulting from misuse or improper handling failure to follow the current safety measures for the equipment failure to follow the operating instructions use of forc...

Страница 42: ... we also want to resolve your queries quickly and in a straightforward manner Thus please always keep your customer number and the serial number of the faulty equipment handy 7 DISPOSAL At the end of its operational life this equipment cannot be disposed of in normal household waste Instead it must be disposed of via an electricals recycling centre Further information can be obtained from your loc...

Страница 43: ...8 ORDERING ACCESSORIES Art no ST FM XL Sport Tiedje chest strap Art No ST1030 Sport Tiedje silicone spray Art No ST 1003 Chest strap contact gel 250ml Art no BK 250 Fitness equipment care kit Art no HF 500 ...

Страница 44: ...list ready SERVICE HOTLINE 9 2 Serial number and model name it in the appropriate space Serial number Brand category Model name cardiostrong elliptical cross trainer FX70 31 172 619961 Mon Thu 9 am 5 pm Fri 9 am 9 pm Sat 10 am 5 pm NL 44 141 876 3972 Mon Fri 9 am 5 pm UK 49 4621 4210 0 49 4621 4210 699 service sport tiedje de Mon Fri 8 00 am 6 00 pm Sat 9 00 am 6 00 pm DE FX70 ...

Страница 45: ...e 1 11L Supporting Tube For Left Pedal 1 11R Supporting Tube For Right Pedal 1 12L Supporting Tube For Left Movable Handlebar 1 12R Supporting Tube For Right Movable Handlebar 1 13 xx x 14 Cover For Rear Stabilizer 316 80 1 47 5 1 15 Mushroom Cap D1 1 4 29L 2 16 Bearing 99502 6 17L Left Pedal Welding Set 1 17R Right Pedal Welding Set 1 18 Flat Washer D25 D8 5 2T 13 19 Bolt M8 1 25 50L 4 20 Bolt M8...

Страница 46: ...ding Set 2 36 Axle Cover D60 13 5L 4 37 Side Cap D29 1 13L 4 38 Flywheel Set 1 39 Roller Wheel D87 2 55L 2 40 Crank Axle Welding Set 1 41 Belt Wheel D305x19 5 1 42 Belt 460 PJ6 1 43 Rear Stabilizer Welding Set 1 44 Slide Beam Welding Set 2 45 Adjustable Pole Welding Set 1 46 Circumgyrate Axle Welding Set 1 47L Left Chain Cover 698 8 597 71 9 1 47R Right Chain Cover 698 8 597 67 5 1 48 Upper Cover ...

Страница 47: ...ble Round Wheel 6 85 Nut M10x1 5x8T 6 86 Cap 40x80x33 2 87 Hdr Foam D30x3Tx530L 2 88 Hdr Foam D30x3Tx680L 2 54 Anti Loose Nut M6x1 0x6T 5 56 Side Cap D36x14 2 57 Anti Slip Nut M10 1 25 7T 2 62 C Ring S 16 1T 3 63 Bolt M8x1 25x30L 1 61 Chainring Protective Cover 125 4x128 5x90 1 1 64 65 Flat Washer F D10xD24x0 4T 2 66 Nut M8x1 25x6T 2 67 Anti Loose Nut M8x1 25x8T 2 68 Spring D3xD19x67L 1 69 Nut D15...

Страница 48: ...15 2 97 Cap 25 50 14 6 98 Round Cap D60 14 2 99 Short Axle D17 48L 2 100 Upper Computer Cable 1050L 1 101 Lower Computer Cable 400L 1 102 Sensor Cable 150L 1 103 Round Magnet M02 1 104 Bolt M5 0 8 12L 7 105 Adaptor 9V 500MA 1 106 Motor 1 107 Handle Pulse PE18 2 108 Screw ST4x25L 2 109 Handle Pulse Cable 700L 2 110 Screw ST4 2 1 4 15L 4 111 Power Cable 550L 1 113 Bolt M5 0 8 10L 4 114 Screw ST4 1 4...

Страница 49: ...1 128 Spring D1 D10 5 20 5L 2 129 Hand Grip D8 95L 1 130 Lock Plate 112 22 4T 1 131 Screw M4x0 7x12L 2 132 C Ring D21 5xD17 5x1 2T 4 133 Flat Washer D28xD6 5x2 0T 2 134 Tension Cable D1 5 130L 1 137 Magnet Fixing Bracket Set 1 138 Spring D1 2 55L 1 139 Flat Washer D14 D6 5 0 8T 1 140 Bolt M6 65L 1 141 Nylon Washer D6 D19 1 5T 1 142 Nut M6 1 6T 1 143 Nylon Nut M6 1 6T 1 144 Bolt M8 52L 1 145 Cone S...

Страница 50: ...98 99 100 101 102 104 105 106 107 108 109 110 111 113 20 114 115 118 119 90 121 120 123 124 125 126 127 128 129 130 131 132 133 123 116 9 9 7 8 8 7 18 9 9 7 6 33 114 115 31 18 18 44 18 9 64 24 114 104 67 104 18 14 90 90 90 120 49 95 121 132 16 34 38 63 64 66 66 67 69 68 70 64 71 74 84 85 134 18 62 73 81 62 82R 82L 82R117 117 137 138 139 140 141 142 143 144 121 18 103 25 95 21R 26 122 43 22 23 21L ...

Страница 51: ... Tiedje GmbH All rights reserved Any use of this trademark without theexplicit written permission of Sport Tiedje is prohibited Product and manual are subject to change Technical data can be changed without advance notice Hotline for Technical Information DE 49 4621 4210 0 49 4621 4210 699 service sport tiedje de NL 31 172 619961 UK 44 141 876 3986 www sport tiedje com www cardiostrong de speciali...

Страница 52: ...Elliptical cross trainer FX70 ...

Отзывы: