CardAccess ZGB20 Скачать руководство пользователя страница 3


_________________________________________________________________________________________________________________________ 
Card Access Security Sensor Bridge V2 


      Page 3 of 12 

Quick Start & Installation Guide 


Card Access, Inc.


Drill with bits 


Mounting screws and anchors (included)  


Mounting 

The bridge can be mounted on any interior wall 
(protected from the elements) by following these steps:  

1. 

Remove the cover by pressing in the button on 
the bottom of the enclosure and rocking the 
cover outward. 

2. 

Hold the bridge base against the mounting 
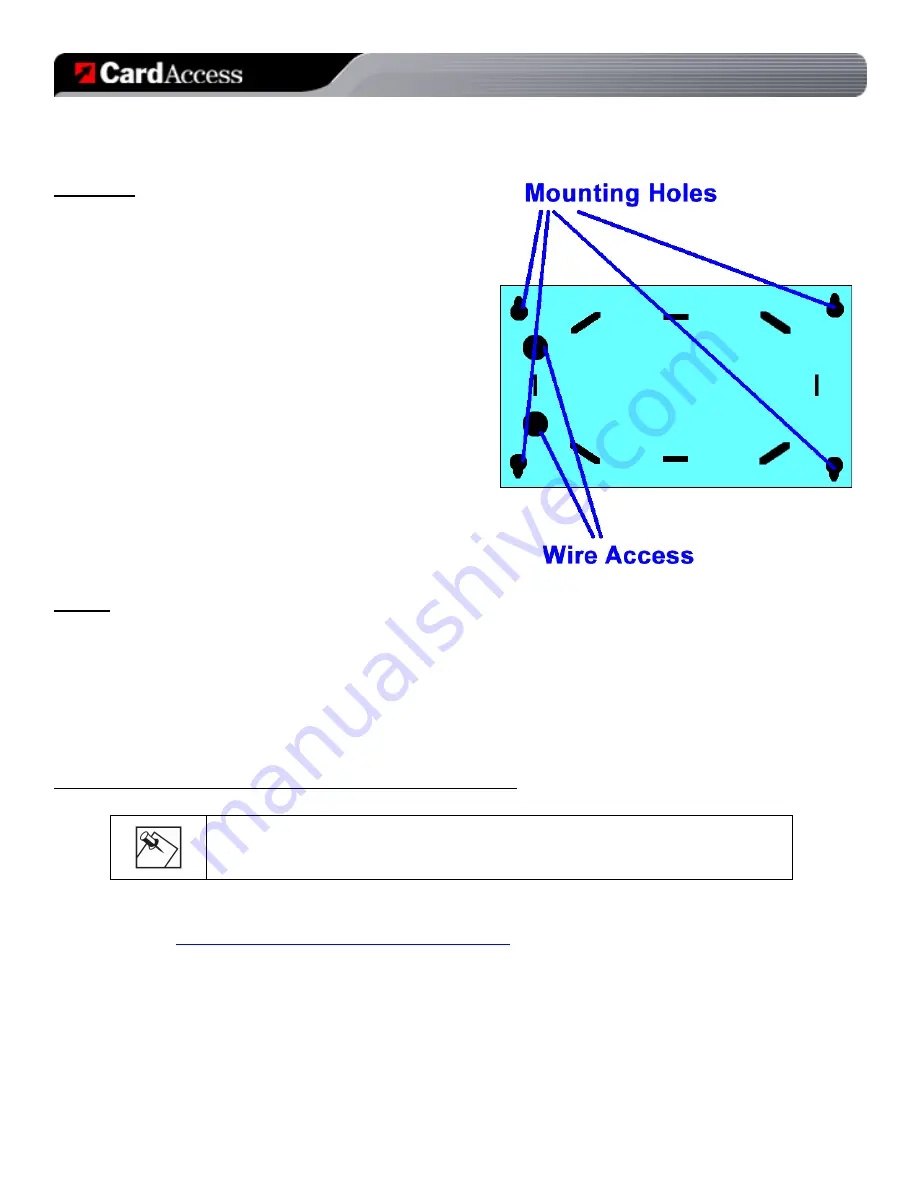
surface and mark the four (4) mounting holes 
and two (2) wire access holes as shown in 
Figure 2. Remember to leave at least 10 in. (25 
cm) above the bridge for the antennas. 

 
NOTE: The circuit board may be hinged out of the bridge base 
plastics to gain better access to the mounting holes by pulling 
outward on the retaining latch with a finger. 


3. 

Drill holes and insert the appropriate anchors. 

4. 

Use the wire access holes to route the wires 
from the DC power supply (included) into the 
bridge base.  

5. 

Secure the bridge base to the wall with the pan 
head screws provided. 

Figure 2 – Bridge Base Plastics 

Wiring 

To wire the DC power supply to the bridge, do the following: 

1.  Remove AC power (if applied) to the included DC power supply. 
2.  Wire leads of DC power supply into terminal block on the lower right side of the board. Polarity of the 

wires does not matter. 

3.  Install metal antennas into outer slots of terminal blocks at top of board. 
4.  Replace cover. 


Control4 Software Installation / Operation Instructions


NOTE

:

  The Card Access Security Sensor Bridge and GE Sensors use Control4 

DriverWorks™ drivers, which are not included with Composer software. They must be 
downloaded from the Card Access website and manually installed.  


Download and Install Drivers: 

1.  Go to 

http://www.cardaccess-inc.com/automation/drivers


2.   Download the drivers you will need to use in your project. 

3.  Copy them to the appropriate folder on the computer you will be using to configure the project, typically “My 

Documents\control4\Drivers\” 

Содержание ZGB20

Страница 1: ...Security Sensor Bridge V2 Page 1 of 12 Quick Start Installation Guide Card Access Inc Security Sensor Bridge V2 Model Number ZGB20 Quick Start and Installation Guide Card Access Security Sensor Bridg...

Страница 2: ...o utilize the wide range of GE sensors available as accessories to the Control4 system The device consists of a self contained wall mountable bridge in a plastic enclosure It is powered by a 12V DC ad...

Страница 3: ...anchors 4 Use the wire access holes to route the wires from the DC power supply included into the bridge base 5 Secure the bridge base to the wall with the pan head screws provided Figure 2 Bridge Bas...

Страница 4: ...to your Composer project 1 When using two or more Security Sensor Bridges in the project you must first add one ZGB20 driver for the first Security Sensor Bridge Then you will add one instance of the...

Страница 5: ...l state During normal operation these LEDs will help to determine if the bridge is functioning properly The tables below provide a brief summary of these LEDs BUS LED top GREEN solid Bridge is connect...

Страница 6: ...ne o Last Check In Shows the last check in date and time of the Security Sensor Bridge o Last Event Shows the date and time of the last sensor event along with the TxID or name of the sensor and the s...

Страница 7: ...dentify Sensor Click this button to allow the driver to automatically learn the TxID of the sensor After clicking the button activate the Tamper switch on the sensor as follows o Micro Door Window Sen...

Страница 8: ...ition on the sensor by pressing and holding the panic button When the sensor has been successfully identified the TxID will appear in the Sensor TxID field of the Driver Properties page Cancel Identif...

Страница 9: ...y process Note that clicking this button is not necessary if you have successfully identified a sensor Carbon Monoxide Detector Driver Details Supported Devices o GE Wireless Carbon Monoxide Detector...

Страница 10: ...e interference by one or more of the following measures Reorient or relocate the receiving antenna Increase the separation between the equipment and receiver Connect the equipment into an outlet on a...

Страница 11: ...01 748 4900 extension 15 to obtain a Return Materials Authorization RMA number and instructions for returning your defective product to Card Access IMPLIED WARRANTIES INCLUDING THOSE OF MERCHANTABILIT...

Страница 12: ...or Bridge V2 Page 12 of 12 Quick Start Installation Guide Card Access Inc Card Access and The Wire Stops Here are trademarks of Card Access Inc Control4 is a registered trademark and 4Sight is a trade...

Отзывы: