background image

NOTICE

The following section was designed to give
instructions on the basic operations of this table saw.
However, it is in no way comprehensive of every table
saw application. It is strongly recommended that you
read books, trade magazines, or get formal training to
maximize the potential of your table saw and to
minimize the risks.

Mitre Gauge Operation

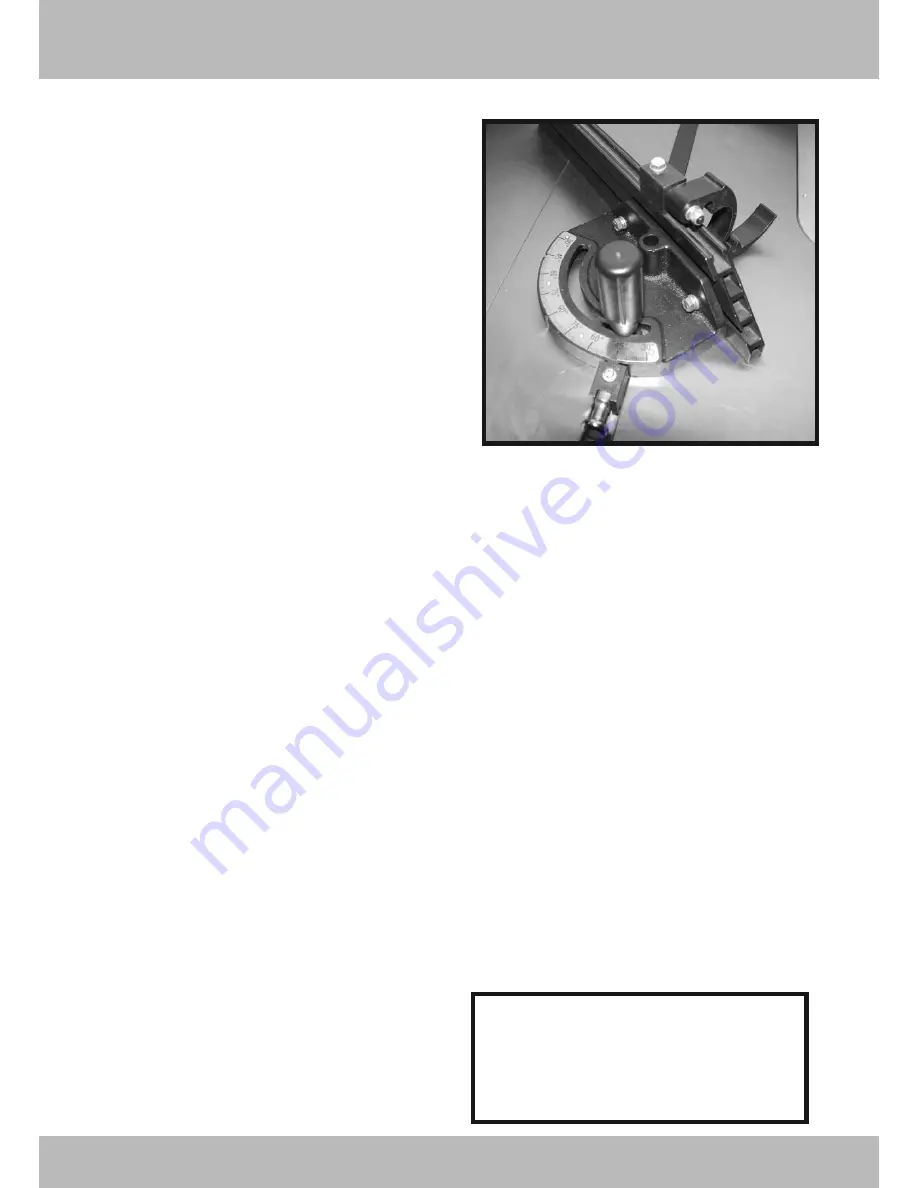
1. Operate Mitre gauge by loosening lock knob(A),
pull out spring loaded plunger (B) and rotate mitre
gauge body (C) to desired angle. See example at
right.
2. Release plunger and tighten lock knob.

Note: Always make test cuts. Do not rely solely on
mitre gauge indictor marks.

Blade Raising and Tilting 
Mechanism

To raise or lower the saw blade, loosen the lock knob
or lever (mounted in the middle or behind the blade
height adjusting handwheel) and turn the handwheel
on the saw front until desired height is reached.
Tighten lock knob/lever.

To tilt the saw blade, loosen the lock knob or lever
(mounted in the middle or behind the blade angle
adjusting handwheel) and turn the handwheel on the
saw front until desired angle is reached. Tighten lock
knob/lever.

Rip Fence Operation

Release the clamping pressure of the fence by raising
the fence lock lever.  Move fence to desired position by
sliding the fence assembly.  Lock the fence into
position by pushing down on the fence locking lever,
until the clamping press is sufficiant to prevent the
fence assembly from moving.  Adjustments can be
made to both the alignment and clamping pressure on
the fence assembly, please refer to the assembly
section.

ON/OFF Switch

On and off switches are normally thermally protected.

If the saw motor is overloaded, or a momentary inter-
ruption of electrical current is sensed, the saw will shut
off. Allow a few minutes for the saw to cool down and
reset by pushing the off button.

Using extension cords can cause a loss in power to
your machine. It is best if the saw is plugged directly
into an outlet on a dedicated circuit. 

www.carbatec.com.au

Operations

WARNING

Always wear a Australian Standards

approved dust mask to prevent inhaling

dangerous dust or airborne particles.

18

A

B

C

Содержание CTH-110L 1PH

Страница 1: ...Owner s Manual CTH 110L 1PH 10 3HP Left Tilting Table Saw C C A A R R B B A A T T E E C C T T O O O O L L S S F F O O R R W W O O O O D D www carbatec com au Ver 2008 001...

Страница 2: ...dth of Dado 20 mm Maximum Diameter of Dado 8 Dust Port Diameter 4 Table Height 876 mm Table Size incl extn width x depth 1 365mm x 685mm Motor Type Induction Motor Power 2200 Watt 3HP Amps 15 Amp requ...

Страница 3: ...a cross cut fence or mitre guage is used to cut across the shortest side of the workpiece Dado Blade A special blade or set of stacked blades that are used to cut wide grooves and rabbets rebates Dado...

Страница 4: ...ring to contain long hair and wear non slip footwear 15 MAINTAIN MACHINERY WITH CARE Keep blades sharp and clean for best and safest per formance Follow instructions for lubricating and changing acces...

Страница 5: ...subject to copyright You may download display print and reproduce this ma terial only in it original and un altered form retaining this notice for your personal non com mercial use ONLY COPYRIGHT 21 S...

Страница 6: ...rt of your body directly in line with the cutting path of the saw blade Avoid operations and hand positions where a slip could cause your hand to move into the blade 18 CHECK FOR DAMAGED PARTS BEFORE...

Страница 7: ...als and coatings from all of the parts and the table saw The protective coatings can be removed by spraying WD 40 degreaser or similar product on them and wiping it off with a soft cloth This may need...

Страница 8: ...W GRUB SCREW COUNTERSINK SCREW FLANGE SCREW FLAT WASHER PANEL WASHER LOCK WASHER LOCK WASHER EYE BOLT WAFER HEAD MACHINE SCREW HEX NUT LOCKING NUT FLANGE NUT WING NUT 3 8 3 8 12mm 10mm 8mm 6mm 5mm 90m...

Страница 9: ...lat washers Do not fully tighten them at this stage See Fig 3 2 Slide the beveled end of the extension wing towards the front edge of the saw table until the beveled edges are flush 3 Using a quality...

Страница 10: ...e arbor flange See Fig 7 8 4 Once the bracket is aligned it is also necessary to make sure it is square with the table Check the squareness of the bracket as shown in Fig 9 5 If an re adjustment is ne...

Страница 11: ...if fitted and the arbor nut and flange 3 Place the blade on the arbor shaft making sure the teeth point down towards the front of the saw see diagram below 4 Replace the flange A and the arbor nut B E...

Страница 12: ...the machine screw provided B See Fig 15 Blade Alignment See Fig 16 17 Blade alignment with the table is adjusted at the factory After a period of use or after moving the saw to another location the b...

Страница 13: ...nt 1 Adjustments in the zero reading can be made by re calibrating the position of the pointer Simply loosen the phillips head screw adjust the pointer and tighten the screw See Fig 18 2 Adjust fit of...

Страница 14: ...oosen lock nut A and turn adjusting stop screw B on the front trunnion in or out The adjusting stop screw should stop against the front trunnion bracket when the blade is 90 to the table See Fig 20 5...

Страница 15: ...attach to the main saw unit LH and RH extension wing with the supplied nuts on the inside See Fig 24 3 Attach the main front fence rail to the front fence support rail using the 3 cap screws and washe...

Страница 16: ...e Do not push the fence so hard as to deflect the blade but so it just rest against the teeth The blade should still be able to turn slightly just skimming the fence face Once you are happy that this...

Страница 17: ...the work area and the saw table top saw blade and entire work area are free from any loose items offcuts or obstructions Test Run 1 Face the table saw and stand to the left of the blade path 2 With on...

Страница 18: ...iddle or behind the blade angle adjusting handwheel and turn the handwheel on the saw front until desired angle is reached Tighten lock knob lever Rip Fence Operation Release the clamping pressure of...

Страница 19: ...10 combination blade will typically have between 40 80 teeth 4 Thin kerf Most types of saw blades are available in a thin kerf style Designed primarily to minimize stock waste thin kerf blades can be...

Страница 20: ...the face of the mitre gauge This may allow wider crosscutting depending on design of your particular table saw Use push blocks where possible to help control our work piece and increase safety To make...

Страница 21: ...aw blade with one or two hands Using push blocks will help control your workpiece and increase safety Thinner workpieces may require working close to the saw blade Use a thin push stick to feed the wo...

Страница 22: ...hich require the blade guard and splifter to be removed from the saw ALWAYS replace the blade guard after dadoing is complete Proper dado set up and operation will differ depending on the blade system...

Страница 23: ...table top as this will help prevent rust from occurring If rust has already accumulated on the table use WD 40 and a fine steel wool to get rid of the rust Using a quality paste wax on the tabletop a...

Страница 24: ...p fence 2 Select another piece of wood Material binds on splitter 1 Splitter not aligned correctly with blade kerf 1 Check and align splitter with blade kerf Saw makes unsatisfactory cuts 1 Dull blade...

Страница 25: ...T 1 124 DUST HOOD 1 125 PAN HEAD SCREW 4 126 TABLE 1 127 EXTENSION WING 2 128 CAP SCREW 6 129 ELASTIC WASHER 6 130 FLAT WASHER 6 131 STD TABLE INSERT 1 132 SET SCREW 8 133 PAN HEAD SCREW 2 136 DADO TA...

Страница 26: ...www carbatec com au 26 PD F cr eat ed wi t h pdf Fact or y Pr o t r i al ver si on www pdffactory com Spare Parts...

Страница 27: ...7 SPLITTER TIGHTEN CLIP 1 2008 ELASTIC WASHER 1 2009 HEX HEAD BOLT 1 2010 ORIENTATION BAR 1 2011 ELASTIC PIN 2 2012 FLAT WASHER 2 2013 ELASTIC WASHER 2 2014 CAP SCREW 2 2015 GEAR 1 2016 GEAR SHAFT 1 2...

Страница 28: ...STIC WASHER 1 417 PAN HEAD SCREW 1 418 KNOB MITRE 1 419 BIG WASHER 1 420 MITRE GAUGE FENCE 1 421 SQUARE NUT 2 422 FLAT WASHER 4 423 ELASTIC WASHER 3 424 HEX HEAD BOLT 2 425 TIGHTEN SUPPORT 1 426 HEX H...

Страница 29: ...326 TOP GUARD 1 327 PAN HEAD SCREW 2 328 FRONT GUARD 1 329 ELASTIC PIN 1 330 SPACER 2 331 SIDE GUARD 2 332 GUARD SUPPORT 4 333 FLAT HEAD SCREW 4 334 FLAT WASHER 8 335 LOCK NUT 8 336 FLAT HEAD SCREW 4...

Страница 30: ...IC WASHER 13 707 FLAT WASHER 13 708 HEX HEAD BOLT 2 709 ELASTIC WASHER 22 710 FLAT WASHER 34 611 REAR RAIL 1 712 HEX HEAD BOLT 6 713 NUT 18 614 TABLE BOARD 1 715 BRACKET 1 716 BRACKET SUPPORT 1 717 HE...

Страница 31: ...Notes www carbatec com au 31...

Страница 32: ...ngvle Vic 3171 Tel 03 8549 9999 Fax 03 8549 9998 melbourne carbatec com au LAUNCESTON CARBA TEC Tas Pty Ltd ABN 122 150 029 242 Hobart Road Kings Meadows Tas 7249 Tel 03 6344 9899 Fax 03 6343 1845 lau...

Отзывы: