background image

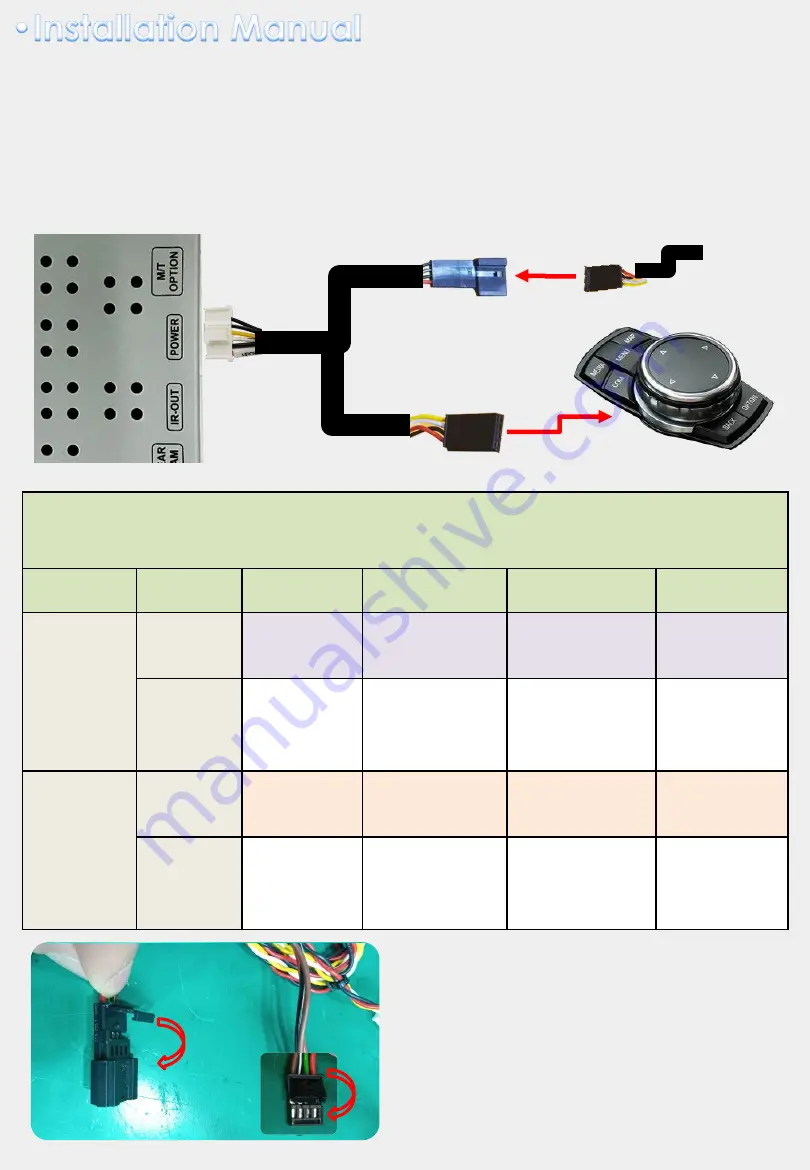
I-Drive 

OEM cable 

Supplied 

Power cable 

* Two ways to connect POWER/CAN cable: 

1.

Connect 

I-Drive jack by jack cable 

under I-Drive, in this case only supports CAN 

data bypass mode. 

(TV free is not supported) 

 * I-Drive Jack by Jack: 

Detach OEM cable from I-Drive and connect with supplied power cable. 


10 

* Please note that 

ID7 7 series

 car have different I-Drive power/CAN pin map with 

other ID7 cars, make sure to check the pin map before installation under I-Drive. 

Car Model 

Cable Type 

#1 

#2 

#3 

#4 

ID7 7 Series 

I-Drive 

Power/CAN 

Pin Map 

OEM 

Cable 

ACC 

(Red/White) 

Ground 

(Grey) 

CAN-High 

(Orange/Green) 

CAN-Low 

(Green) 

QDIS 

supplied 

cable 

12V 

(Red) 

Ground 

(Grey) 

CAN-High 

(Green) 

CAN-Low 

(Black/White) 

ID7 

common 

I-Drive 

Power/CAN 

Pin Map 

OEM 

Cable 

ACC 

(Red/White) 

CAN-High 

(Orange/Green) 

CAN-Low 

(Green) 

Ground 

(Grey) 

QDIS 

supplied 

cable 

12V 

(Red) 

CAN-High 

(Green) 

CAN-Low 

(Black/White) 

Ground 

(Grey) 

* Please find locker on male and female 
connector of supplied I-Drive power 
cable, once open the locker you could 
easily change the pin arrangement and 
lock it. 

[email protected]

car-solutions.com

car-solutions.com

Содержание BM16-ID7

Страница 1: ...Installation Manual Multimedia Interface for BMW MINI ID7 support car solutions com car solutions com c a r s o l u t i o n s c o m ...

Страница 2: ...t To LCD 1 AUDIO OUT 1 Power Spec Input Power 8VDC 18VDC Consumption 5WATT Switch input mode 1 External video sources skip function Able to control input videos on and off via Dip switches 2 Able to switch videos via the remote and button switch 3 Able to detect the rear view camera by CAN or rear lamp cable 2 support car solutions com car solutions com c a r s o l u t i o n s c o m ...

Страница 3: ... MAIN BOARD AV CABLE BUTTON CABLE LCD CABLE POWER CABLE REMOTE CONTROL IR CABLE UART Touch Cable OPTION Power Cable UNDER IDRIVE support car solutions com car solutions com c a r s o l u t i o n s c o m ...

Страница 4: ...ode Skip DIP3 OFF AV2 Mode ON AV2 Mode Skip DIP4 OFF Ext Front Camera Mode ON OEM Front Camera Mode 10POL DIP SWITCH SETTING DIP S W STATUS DESCRIPTION DIP1 OFF No Use ON DIP2 OFF No Use ON DIP3 OFF No Use ON DIP4 OFF No Use ON DIP5 OFF No Use ON DIP6 OFF No Use ON DIP7 OFF OEM Rear Camera Mode ON Ext Rear Camera Mode DIP8 OFF CAN Data In Out Mode ON CAN Data Bypass Mode DIP9 OFF No Use ON DIP10 O...

Страница 5: ... Moving upward Moving downward Moving leftward If you press this button 2 seconds long you can access the factory mode Moving rightward If you press this button 2 seconds long you can reset all the data about user environment support car solutions com car solutions com c a r s o l u t i o n s c o m ...

Страница 6: ...er must connect Rear C cable of the power cable to the rear lamp of the car SAFE ENABLE If enable HDMI RGB and A V mode doesn t show up while driving Default OFF RADAR ENABLE Setting up parking distance alarm sensor ON OFF IMAGE H POSITION V POSITION Setting LVDS MODEL Android Car play Navigation Model Setting IMAGE PARK UTIL1 UTIL2 INFO H POSITION V POSITION LVDS MODEL Menu of FACTORY MENU to Ret...

Страница 7: ... CONTROL Able to control UI remote by touch OFF ON VOICE MEMORY KEY ON OFF CAR MODEL BMW ID7 INFO System version information IMAGE PARK UTIL1 UTIL2 INFO AVOUT SELECT FCAM TIME IR MEMORY CALIBRATE FACTORY RESET Menu of FACTORY MENU to Return SEL to Select Save IMAGE PARK UTIL1 UTIL2 INFO IDRV REMOTE IDRV CONTROL VOICE KEY MEMORY KEY CAR MODEL Menu of FACTORY MENU to Return SEL to Select Save IMAGE ...

Страница 8: ...ri SAFE ON OFF IDRV BACK long press 7sec in ext Open Factory OSD MENU short press Return OSD MENU IDRV WHEEL UP short press DTV CH DVD NEXT OSD MENU UP IDRV WHEEL DOWN short press DTV CH DVD PREV OSD MENU DOWN IDRV WHEEL PUSH short press OSD MENU DOWN IDRV MEDIA short press Return to orignal IDRV RADIO IDRV OPTION IDRV UP short press DTV CH DVD NEXT IDRV DOWN long press 3sec PIP Mode function shor...

Страница 9: ... OEM Monitor OEM Head Unit Resistive touch A V input 2 Rear camera input 1 Front camera input 1 AUX output 1 Capacitive touch Power CAN IR receiver HDMI 2 Optional UART Touch Cable Pin assignment RX TX GND 9 CARPLAY NAVIGATION BOX support car solutions com car solutions com c a r s o l u t i o n s c o m ...

Страница 10: ...der I Drive Car Model Cable Type 1 2 3 4 ID7 7 Series I Drive Power CAN Pin Map OEM Cable ACC Red White Ground Grey CAN High Orange Green CAN Low Green QDIS supplied cable 12V Red Ground Grey CAN High Green CAN Low Black White ID7 common I Drive Power CAN Pin Map OEM Cable ACC Red White CAN High Orange Green CAN Low Green Ground Grey QDIS supplied cable 12V Red CAN High Green CAN Low Black White G...

Страница 11: ...ant to use TV free please set Dip switch 8 to CAN data in out mode 1 Pull out OEM cable from the backside of head unit as above 2 Plug in male connector of supplied power cable to the back side of head unit instead 3 Connect OEM cable to the female connector of supplied power cable Head unit Jack by Jack 11 support car solutions com car solutions com c a r s o l u t i o n s c o m ...

Страница 12: ...face with TOUCH RX of UART TOUCH from QROI2 MULTI CABLE for QROI2 OEM TOUCH CONTROL QDIS CAP TS OUT UART touch cable pin assignment RX TX GND Some QDIS RGB cable Pin 7 is for NAVI IR or UART TX Touch Out support car solutions com car solutions com c a r s o l u t i o n s c o m ...

Страница 13: ...I cannot watch the rear camera on the screen A Set the DIP switch 7 as state ON Q Set mode not appear A Check DIP Switch Q OEM image is not displayed A Check interface s LCD In Out cable connection If the status keeps on inform to manufacturer Q Screen only displays white color A Check LCD out cable is connected well if this status keeps inform to manufacturer Q If no image is shown on screen afte...

Отзывы: