background image

Please keep this instruction manual for future reference


Instruction manual VAP2/3IN1, VAPQ2/3IN1, JOY3IN1

17

6.   Attach the Boiler inlet flexi tail onto the valve on the side of the boiler, and finally, using the 

remainder of the blue tube, connect this to the filter head outlet and then to the end of the 
Boiler inlet flexi tail using the push fit to threaded adaptor. 


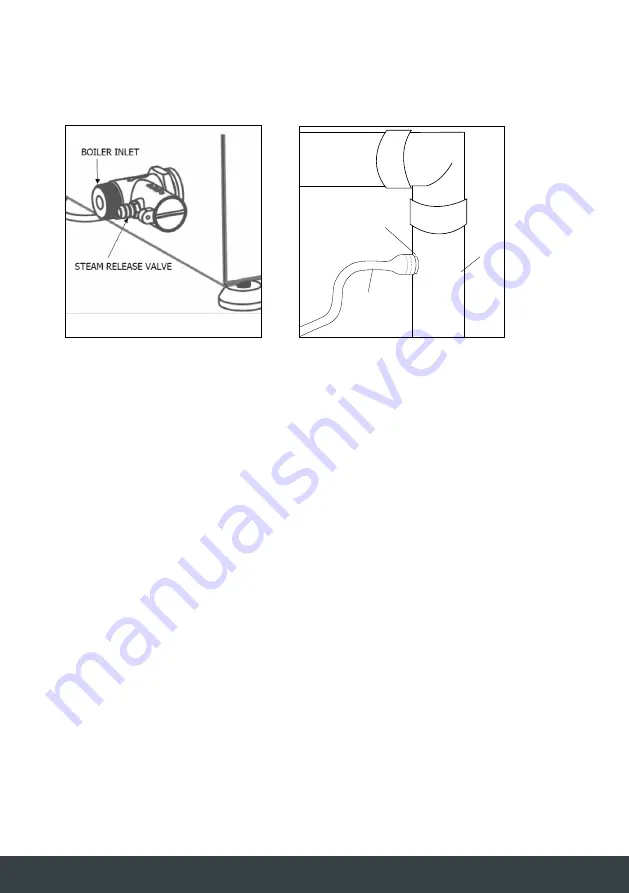
7.    The clear silicone hose connects to the steam release valve on the side of the boiler, and can 

then be attached to the existing plumbing using the threaded metal connector.

8.   Once all of the connections have been made, turn on the standard cold/hot water supply to 

test the cold water (blue colour indicator) and hot water (red colour indicator). Switch it off 
after the flow becomes normal.

9.   Turn on the Boiling water supply (with child safety lock, push the button inand backwards), 

until the water completely fills the boiler tank and begins to flow from the tap continuously. 
Let the water flow for at least 5 minutes in order to flush the tubes, boiler and filter. 

Plumbing

Threaded Metal Connector

Clear Tube

Содержание JOY3IN1/CO

Страница 1: ... Caple on 0117 938 7420 for spare parts or www caple co uk Steaming Water Tap Instruction Manual VAP2 3IN1 BS VAP2 3IN1 SS VAP2 3IN1 GM VAP2 3IN1 GD VAP2 3IN1 CO VAPQ2 3IN1 SS JOY3IN1 SS JOY3IN1 GD JOY3IN1 CO ...

Страница 2: ...O NTE NT S Safety Instructions 3 Environmental Protection 7 Accessories Supplied 8 Installing the Vapos 3IN1 9 Vapos 3in1 Installation 10 Installing the Joya 3IN1 14 Joya 3in1 Installation 15 Operation 19 Tap Dimensions 21 Boiler Dimensions 23 Care and Maintenance 24 Troubleshooting 26 Caple Contact Details 28 ...

Страница 3: ...t be made by children without supervision This is a household appliance only It is not intended to be used in Staff kitchen areas in shops offices and other working environments Bed and breakfast type environments By clients in hotels motels and other residential type environments To avoid all risk if the plug or power cable is damaged it must only be replaced by a Caple appointed engineer Do not ...

Страница 4: ...upervision or instruction concerning use of the appliance in a safe way and understand the hazards involved Children must not play with this appliance When not in use and before cleaning always unplug the appliance I M P O R TA N T Read the instruction manual carefully before using the appliance for the first time This appliance is designed solely to dispense hot and cold water also to dispense ne...

Страница 5: ...r cable as you could damage it If the appliance is faulty do not attempt to repair it Unplug from the mains electric socket and contact Caple Service either by phone 0117 938 7420 or email service caple co uk Keep all packaging including plastic bags polystyrene foam etc out of the reach and away from children This appliance produces very hot near boiling water and steam may form while it is in op...

Страница 6: ... the right to invalidate the guarantee supplied with this product following incorrect installation or misuse of the appliance The guarantee may become void in the event of the water filter not being replaced at the required six month intervals or it not being set to the correct setting as outlined in the filter installation instructions Under no circumstances should any external covers be removed ...

Страница 7: ... symbol on the product indicates that this product may not be treated as household waste Instead it shall be handed over to the applicable collection point for the recycling of electrical and electronic equipment Disposal must be carried out in accordance with local environmental regulations for waste disposal For more detailed information about treatment recovery and recycling of this product ple...

Страница 8: ...exi tails for hot cold and boiling water connections Boiler 1 x Boiler 1 x Steam release valve 1 x Flexi tail for boiler inlet 1 x Clear silicone steam release tube with threaded metal connector for plumbing 1 x Instruction book 1x Hanging Plate Included in the PURITI7 filter box 1 x T piece connector for main cold water to supply 1 x Push fit to thread adaptor 1 x Claris Ultra filter with install...

Страница 9: ...ical wires plugs or the dispenser in a wet or damp location 2 If any cables or sockets have signs of damage do not connect the appliance to the power supply These should be replaced by a Caple Service agent 3 When installing the dispenser you should allow 10 to 15cm of space around it for ventilation 4 You must never use a spare part which is not recommended by Caple 5 The temperature adjustment c...

Страница 10: ...for the boiler which is also correctly earthed The tap can be installed into the sink or the worktop using a 35mm hole Install the water boiler vertically it must not be placed on its side It can be stood on the base of the cabinet but it is recommended to fix the boiler in position using the brackets provided INSTALLATION STEPS 1 Install the tap onto the sink or the worktop as shown below and tig...

Страница 11: ...ct this to the T piece connecter via the push fit connection The opposite end can then be attached to the inlet on the filter head 4 Follow the instructions supplied with the filter and filter head to ensure it is installed correctly and set to the correct setting for the water hardness in your area Failure to do this will invalidate your guarantee 5 The hot cold tap tails can be connected directl...

Страница 12: ...ter blue colour indicator and hot water red colour indicator Switch it off after the flow becomes normal 9 Turn on the left lever of the tap with child safety lock push the lever down and backwards until the water completely fills the boiler tank and begins to flow from the tap continuously Let the water flow for at least 5 minutes in order to flush the tubes boiler and filter Plumbing Threaded Me...

Страница 13: ...may take a few seconds for the water to begin to flow as it makes the way up the tube the time will vary depending on the length of the tube Always allow the water to run for a few seconds before using the steaming water to make a drink This will ensure any water which may have cooled in the tube has been expelled first allowing for a steaming hot beverage to be made To fix the boiler to the cabin...

Страница 14: ... dispenser in a wet or damp location 2 If any cables or sockets have signs of damage do not connect the appliance to the power supply These should be replaced by a Caple Service agent 3 When installing the dispenser you should allow 10 to 15cm of space around it for ventilation 4 You must never use a spare part which is not recommended by Caple 5 The temperature adjustment controls the water tempe...

Страница 15: ...ler which is also correctly earthed The tap and handles can be installed into the sink or the worktop using 35mm cutout holes Install the water boiler vertically it must not be placed on its side It can be stood on the base of the cabinet but it is recommended to fix the boiler in position using the brackets provided INSTALLATION STEPS 1 Install the tap onto the sink or the worktop as shown below ...

Страница 16: ... Cold mains water supply to allow a seperate flow to go direct to the water filter Using the Blue tube supplied with the filter cut it to the appropriate length and connect this to the T piece connecter via the push fit connection The opposite end can then be attached to the inlet on the filter head 4 Follow the instructions supplied with the filter and filter head to ensure it is installed correc...

Страница 17: ... side of the boiler and can then be attached to the existing plumbing using the threaded metal connector 8 Once all of the connections have been made turn on the standard cold hot water supply to test the cold water blue colour indicator and hot water red colour indicator Switch it off after the flow becomes normal 9 Turn on the Boiling water supply with child safety lock push the button inand bac...

Страница 18: ... depending on the length of the tube Always allow the water to run for a few seconds before using the steaming water to make a drink This will ensure any water which may have cooled in the tube has been expelled first allowing for a steaming hot beverage to be made 10 Check all connections to ensure that no tubes are stretched or twisted and there are no leakages then fix the boiler in the final l...

Страница 19: ...te to show the boiler is now ready to use To begin using the boiling water Vapos Press the lever downwards to release the safety lock and then push the lever backwards There is a safety spring mechanism which will switch off the water supply if you let go of the lever Please hold the lever back for the full time you need to draw boiling water from the tank Then release it to switch it off Joya Pus...

Страница 20: ...nk completely before connecting the boiler to the power supply and setting the temperature control to the desired temperature setting Failure to fill the tank prior to switching on may cause damage and invalidate the guarantee It is important that the water filter is replaced at least every 6 months and installed according to the instructions supplied with the filter Failure to correctly set the f...

Страница 21: ...nstruction manual for future reference Instruction manual VAP2 3IN1 VAPQ2 3IN1 JOY3IN1 21 195mm Ø50mm Ø45 mm 405mm 256mm 70mm Ø25mm 220mm Ø50mm 328mm Ø45 mm 230mm 70mm Ø25mm TAP D I M ENS IONS VAP2 3IN1 SS VAPQ2 3IN1 SS ...

Страница 22: ...this instruction manual for future reference Instruction manual VAP2 3IN1 VAPQ2 3IN1 JOY3IN1 22 JOYA 3IN1 SS D I M E N S I O N S Worktop cut outs 35mm required 203mm 205mm 340mm Ø49 5mm 110mm 110mm Ø44 5mm Ø44 5mm ...

Страница 23: ...Please keep this instruction manual for future reference Instruction manual VAP2 3IN1 VAPQ2 3IN1 JOY3IN1 23 232mm 15mm 22mm 347mm 248mm B OIL ER D IM ENS IONS BOILER2 ...

Страница 24: ...f and Cillit Bang these cleaning fluids can also damage the surface and remove the markings on the tank and tap surface REPLACING THE FILTER Replacing a filter cartridge 1 Slowly unscrew the used cartridge by turning counter clockwise This will unlock it from the filter head and enable it to be removed During this process incoming tap water supply and outgoing filtered water valves in the filter h...

Страница 25: ...his should face forwards once in the end position so that all of the necessary information is visible For further information please refer to the manual supplied with your filter 3 Remove the new filter cartridge from its packaging and check for any damage 4 Insert the filter cartridge into the filter head and turn the cartridge clockwise until it stops and end position is reached The flow in the ...

Страница 26: ...to close system on the boiling water handle has malfunctioned and the lever has not sprung back to the off position The valve is leaking Replace the spring for auto close handle system Replace the valve THE WATER IS NOT HOT There is no power supply to the boiler The boiler is turned off The temperature has been set too low Check the power supply Check the boiler is turned on Turn the temperature s...

Страница 27: ...Please keep this instruction manual for future reference Instruction manual VAP2 3IN1 VAPQ2 3IN1 JOY3IN1 27 NOTES ...

Страница 28: ...Caple Service Fourth Way Avonmouth Bristol BS11 8DW T 0117 938 1900 E service caple co uk www caple co uk ...

Отзывы: