Caple CR9209 Скачать руководство пользователя страница 5

Instruction manual CR9209

5

Please keep this instruction manual for future reference

CE DECLARATIONS OF CONFORMITY

This appliance has been designed, constructed and marketed in compliance with safety 
requirements in force.

This appliance has been manufactured to the strictest standards and complies with all 
applicable legislation, including 

-  73/23/EEC regarding “low Voltage”.
-  89/336/EEC regarding ” Electromagnetic Disturbances”.
-  90/396/EEC regarding “Gas appliances”.
-  89/109/EEC regarding “Materials in contact with food”
Moreover the above mentioned Directives comply with Directive 93/68/EEC.
-  This household appliance has been designed for cooking and it must therefore be used 

for this purpose only

ENVIRONMENTAL PROTECTION

Waste electrical products should not be disposed of with household waste. Please recycle 
where facilities exist. Check with your Local Authority or retailer for recycling advice. 

This appliance is marked according to the European directive 2002/96/EC on Waste 
Electrical and Electronic Equipment (WEEE). By ensuring this product is disposed of 
correctly, you will help prevent potential negative consequences for the environment 
and human health, which could otherwise be caused by inappropriate waste handling of 
this product. The symbol on the product indicates that this product may not be treated 
as household waste. Instead it shall be handed over to the applicable collection point 
for the recycling of electrical and electronic equipment. Disposal must be carried out in 
accordance with local environmental regulations for waste disposal.

For more detailed information about treatment, recovery and recycling of this product, 
please contact your local council, your household waste disposal service or the retailer 
where you purchased the product.

CR9209 - Instruction Manual.indd   5

27/04/2017   10:38

Содержание CR9209

Страница 1: ...Contact Caple on 0117 938 7420 or for spare parts www caple co uk Range cooker instruction manual CR9209 ...

Страница 2: ...vironmental protection 5 Warranty 6 For your safety 7 Instructions for installation 8 Electrical connection 9 Room ventilation 10 Gas installation 10 Instructions for use 15 Instructions for cooking 18 Maintenance and Cleaning 20 How to remove the oven door 21 Replacing the oven lamp 21 Caple Service contact details 24 ...

Страница 3: ...ater This product is not designed for commercial use it is a household appliance only It is not intended to be used in Staff kitchen areas in shops offices and other working environments Bed and breakfast type environments By clients in hotels motels and other residential type environments To avoid all risk if the power cable is damaged it must only be replaced by a Caple appointed engineer Applia...

Страница 4: ...uid Never touch the appliance with wet or damp hands Never pull the power cable as you could damage it If the appliance is faulty do not attempt to repair it Isolate it from the mains electric supply and contact Caple Service either by phone 0117 938 7420 or email service caple co uk Keep all packaging including plastic bags polystyrene foam etc out of the reach and away from children Do not rest ...

Страница 5: ...ehold waste Please recycle where facilities exist Check with your Local Authority or retailer for recycling advice This appliance is marked according to the European directive 2002 96 EC on Waste Electrical and Electronic Equipment WEEE By ensuring this product is disposed of correctly you will help prevent potential negative consequences for the environment and human health which could otherwise ...

Страница 6: ...ay need to show it to Caple Technical Service together with proof of purchase If you fail to show your warranty card you will incur all repair charges Spare parts are only available from Caple Technical Service and Spare Parts Authorised Centres ATTENTION Before use remove all plastic films protecting some parts of the appliance fascia panel parts in stainless steel etc Do not use the appliance to...

Страница 7: ...u wear appropriate clothing Avoid loose clothing especially on the arms and flammable materials in the event of a fire such clothing may be a hazard resulting in serious injuries WARNING Parts of the oven become hot when on please keep children away from appliance to avoid any injuries Never cook food directly onto the base of the oven Take care when opening and closing the oven door to avoid trap...

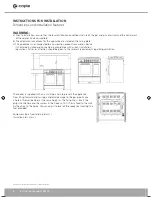
Страница 8: ...vacuation device It should be installed and connected in accordance with current installation regulations Particular attention should be given to the relevant requirements regarding ventilation The cooker is supplied with an anti tilting chain to prevent the appliance from tilting forward and causing accidental damage to the gas pipe Make a hole in the wall behind at the same height as the fixing ...

Страница 9: ...plate of the product If you are directly connecting the cable to the mains without a plug it is necessary to insert a suitable omni polar switch to the appliance with minimum opening between contacts of 3mm the earth wire should not be interrupted by the switch Before connecting to the mains make sure that The electrical counter the safety valve the feeding line and the socket are adequate to with...

Страница 10: ... is supplied for use on NATURAL GAS or LPG check the gas label attached on the appliance Appliances supplied for use on NATURAL GAS they are adjusted for this gas only and cannot be used on any other gas LPG without modification The appliances are manufactured for conversion to LPG Installation and Service Regulations United Kingdom It is a legal requirement that all gas appliances are Installed a...

Страница 11: ...lified and registered installer also with technical knowledge of electricity should install the appliance They should observe the Regulations and Codes of Practice governing such installation of gas appliances Note It is recommended that the gas connection to the appliance is installed with a flexible connecting tube made to BS5386 conforming to all required British Standards Flexible hoses can be...

Страница 12: ...e screwdriver to turn the by pass screw located in the brass shaft as shown right turn screw fully clockwise then turn it anti clockwise a 1 4 turn for the triple burner and 1 8 turn for all other burners The result should be a small stable flame which is uniform around the entire burner ring If not turn the by pass screw anti clockwise until satisfied with the flame Place the knob back on securel...

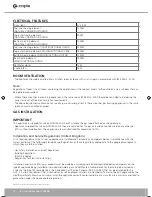
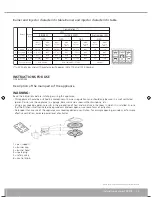
Страница 13: ...alled Ensure that the kitchen is well ventilated keep windows or doors open or use some form of extraction Prolonged intensive use of the appliance may require additional ventilation for example opening a window or for more effective ventilation increase power level of extractor 1 pan support 2 burner cap 3 burner head 4 spark plug 5 safety valve 6 control knob Burner By pass mm Consumption LPG I3...

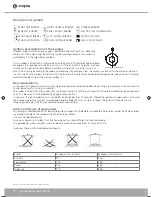
Страница 14: ...hould the burner accidentally turn off immediately close the knob that was in use and repeat the ignition after one minute Once reignited adjust the flame according to your requirements Advice on the use of gas burners For lower gas consumption and a better yield use saucepans with diameter suitable for the burners avoid the flame coming up around the side of the saucepan see the Container Table U...

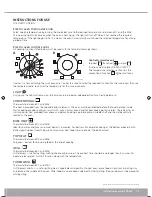
Страница 15: ...sults complete cooking at the bottom especially with dishes requiring heat from the base For maximum heat food is best placed at the bottom level TOP HEAT Thermostat between 60 C and MAX Top oven perfect for browning food at the end of cooking GRILL Thermostat between 60 C and MAX Grill element use for toasting melting cheese or browning The pre heat time should be no longer than 5 minutes To oper...

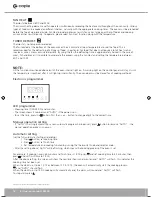
Страница 16: ... it will light up intermittently The oven door must be closed for all cooking methods Electronic programmer LED programmer Showing time 0 00 24 00 and minutes The screen shows 3 numbers and AUTO if the power is on To set the time press the button first then or button to change digits to the correct time Manual operation setting If AUTO is flashing automatic or a semi automatic program has been set...

Страница 17: ...be ready for manual operation Timer 23 hours 59 minutes can be set as maximum When setting cooking time press the button and then or button until the required cooking time shows on the screen Once cooking time has been set the display will return to the time hour minute press the button to display remainder of cooking time Whenever the button is pressed the remaining time will be shown When the se...

Страница 18: ...s for cooking bread and sponge cakes It is advisable to place the food into the oven when it has reached the selected cooking temperature when the thermostat light goes out GRILL COOKING Pre heat the oven for about 5 minutes During grill operation the heat comes from above it is based on the infrared radiation and is good for thinner cuts of meat and toasting For best results oil meat and fish and...

Страница 19: ...70 75 70 80 15 20 30 35 Top heat Perfect for browning food 3 4 220 15 Grilling Sole and cuttlefish Squid and prawns Kebabs Cod fillet Grilled vegetables Veal steak Cutlets Hamburgers Mackerel Toasted sandwiches Chicken Lamb 1 1 1 1 1 1 1 1 1 5 1 4 4 4 3 4 4 4 4 4 4 5 5 5 5 5 5 5 5 5 5 5 Max Max Max Max Max Max Max Max Max Max Max 8 10 6 8 10 10 15 15 20 15 20 7 10 15 20 2 3 70 80 70 80 Turbo grill...

Страница 20: ...f water if too much water is used it could penetrate the internal parts and damage electrical components The pan supports of the hob can be washed in the dishwasher dry immediately once dishwasher cycle has ended For persistent stains use normal non abrasive detergents or a little hot vinegar Clean the glass parts with hot water avoiding the use of rough cloths Do not use stainless steel pads or a...

Страница 21: ...rners again All pan supports have rubber pads on and they are positioned correctly to increase stability and avoid scratches INCORRECT CORRECT How to remove the oven door For a more thorough clean you can remove the oven door According to different structure of oven door purchased proceed as follows Oven door remove and assemble procedure Open the door fully Lift up and turn the small levers situa...

Страница 22: ...Instruction manual CR9209 22 Please keep this instruction manual for future reference ...

Страница 23: ...Instruction manual CR9209 23 Please keep this instruction manual for future reference ...

Страница 24: ...Instruction manual CR9209 24 Please keep this instruction manual for future reference Caple Service Fourth Way Avonmouth Bristol BS11 8DW t 0117 938 7420 e service caple co uk www caple co uk ...

Отзывы: