background image

31

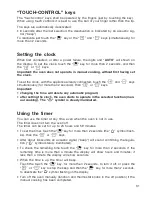
“TOUCH-CONTROL”  keys

The  “touch-control”  keys  shall  be  operated  by  the  fingers  (just  by  touching  the  key).
When  using  touch  controls  it  is  best  to  use  the  ball  of  your  finger  rather  than  the  tip.

The  keys  are  automatically  deactivated:

• 8  seconds  after  the  last  selection;  the  deactivation  is  indicated  by  an  acoustic  sig-

nal  (“beep”).

To reactivate just touch the “

” key or the 

and 

keys (simultaneously) for

more  than  2  seconds.

Setting  the  clock

When  first  connected,  or  after  a  power  failure,  the  digits  and  “AUTO”  will  shown  on
the  display.  To  set  the  clock,  touch  the  “

”  key,  for  more  than  2  seconds,  and  then

the 

or 

keys.

Important: the oven does not operate, in manual cooking, without first having set
the  clock.

To set the clock, with the appliance already connected, touch the 

and 

keys

simultaneously (for more than 2 seconds), then 

or 

keys.

Important:
• changing  the  time  will  delete  any  automatic  program;
• after setting the clock, the oven starts to operate in the selected function (man-

ual  cooking).  The  “

”  symbol  is  steady  illuminated.

Using  the  timer

You  can  use  the  timer  at  any  time,  even  when  the  oven  is  not  in  use.
The  timer  does  not  turn  the  oven  off.
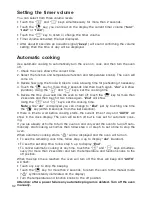
The  timer  can  be  set  for  up  to  23  hours  and  59  minutes.

• To set the timer, touch the “

” key for more than 2 seconds (the “

” symbol flash-

es),  than  the 

or 

keys.

• After  about  8  seconds  an  acoustic  signal  (“beep”)  will  sound  confirming  the  regula-

tion  (“

”  symbol  steady  illuminated).

• To  check  the  remaining  time  touch  the  “

”  key  for  more  than  2  seconds.  If  the

remaining  time  is  more  than  a  minute  the  display  will  show  hours  and  minutes;  if
less  than  a  minute  the  display  will  show  seconds.

• When  the  time  is  up,  the  timer  will  beep. 

Touch  the  touch  the  “

”  key,  for  more  then  2  seconds,  to  turn  it  off;  or  press  the

or 

key  to  stop  the  beep  and  than  the  “

”  key,  for  more  than  2  seconds,

to deactivate the “

” symbol flashing on the display.

• Turn  off  the  oven  manually  (function  and  thermostat  knobs  in  the  off  position)  if  the

manual  cooking  has  been  completed.

Содержание cr9204

Страница 1: ......

Страница 2: ...this instruction manual thoroughly before use This manual contains installation advice cleaning tips and a cooking guide as well as other important facts about your CAPLE cooker If treated with care your CAPLE appliance should give you years of trouble free cooking For Product Service or Spare Parts please check contact details at www caple co uk ...

Страница 3: ... within a non domes tic environment i e a semi commercial commercial or communal environment Important information for correct disposal of the product in accor dance with EC directive 2002 96 EC At the end of its working life the product must not be disposed of as urban waste It must be taken to a special local authority differ entiated waste collection centre or to a dealer providing this service...

Страница 4: ...vironmental protection regulations ensur ing in particular that all potentially hazardous parts be made harmless especially in rela tion to children who could play with unused appliances After use ensure that the knobs are in off position Household appliances are not intended to be played with by children Keep children away from the appliance during use The appliance is not intended for use by you...

Страница 5: ... to be scrapped remove the power cord Always use oven gloves when removing the shelves and food trays from the oven whilst hot Do not hang towels dishcloths or other items on the appliance or its handle s as this could be a fire hazard Clean the oven regularly and do not allow fat or oils to build up in the oven base or tray Remove spillages as soon as they occur Do not stand on the cooker or on t...

Страница 6: ...ion of the electrical plant can bear the load which is also indicated on the plate The cooker must be connected directly to the mains placing an omnipolar switch with minimum opening between the contacts of 3 mm between the appliance and the mains The power supply cable must not touch the hot parts and must be positioned so that it does not exceed 75 C at any point Once the cooker has been install...

Страница 7: ...llation Wall box connection FEEDER CABLE SECTION type H05RR F 230 V 3 x 2 5 mm2 Connection with wall box connection PE Earth N Neutral L Live This appliance must be connected to a double pole isolating switch fig 1 1 and to the terminal block in the cooker figs 1 2 1 3 using the following guide FUSE DOUBLE POLE SWITCHED FUSED SPUR OUTLET USE A 20 AMP FUSE ON 1 The wire which is coloured brown must...

Страница 8: ...o heat The veneered synthetic material and the glue used must be resis tant to a temperature of 90 C in order to avoid ungluing or defor mations Curtains must not be fitted immediatly behind appliance or within 500 mm of the sides It is essential that the cooker is positioned as stated in Figs 2 1a 2 1b This cooker has class 2 1 overheating protection so that it can be installed next to a cabinet ...

Страница 9: ...ckag ing exposing the base for the fit ting of the feet Fit the 4 legs by screwing them tight into the support base as shown in picture 2 3 Levelling the cooker The cooker may be levelled by screwing the lower ends of the feet IN or OUT fig 2 4 Fig 2 2 Fig 2 3 Fig 2 4 Fitting the adjustable feet and levelling the cooker Model CR 9204 ...

Страница 10: ...m 35 mm Fig 2 6a Fig 2 6b The cooker is already fitted with four levelling feet Level the cooker by screwing or unscrewing the feet Fig 2 5 Make sure you follow the instructions in Figs 2 6a and 2 6b Note bolts are supplied with the cooker in a separate kit ...

Страница 11: ...e carefull do not lift the cooker by the door handle when raising to the upright position fig 2 8a 2 8b Moving the cooker Warning When raising cooker to upright position always ensure two people carry out this manoeuvre to prevent damage to the adjustable feet fig 2 7a 2 7b Fig 2 7a Fig 2 8a Fig 2 9a Fig 2 7b Fig 2 8b Fig 2 9b ...

Страница 12: ...ed from most plumbers merchants and do it yourself D I Y shops Wall fixing Floor fixing Bracket Existing slot in rear of cooker Dotted line showing the position of cooker when fixed Dimension is in millimetres 3 Outline of cooker backplate at the engagement slot Fig 2 10 Stability bracket Model CR 9204 ...

Страница 13: ...ed from most plumbers merchants and do it yourself D I Y shops Wall fixing Floor fixing Bracket Existing slot in rear of cooker Dotted line showing the position of cooker when fixed Dimension is in millimetres 3 Outline of cooker backplate at the engagement slot Fig 2 11 Stability bracket Model CR 1204 ...

Страница 14: ...tside air in which case no permanent ventilation is required For rooms with a volume greater than 10 m3 no permanent ventilation is required NB Regardless of room size all rooms containing the appliance must have direct access to the outside air via an openable window or equivalent Where there are other fuel burning appliances in the same room BS 5440 2 2000 should be consulted to determine the co...

Страница 15: ...ces are Installed Serviced by a competent person in accordance with the current editions of the following Standards Regulations or those regulations appropriate to the geographical region in which they are to be installed Gas Safety Installation Use Regulations Building Regulations British Standards Regulations for Electrical Installation Installation and service of any gas product must be made by...

Страница 16: ...of electricity should install the appliance He should observe the Regulations and Codes of Practice governing such installation of gas appliances Note It is recommended that the gas connection to the appliance is installed with a flexible connecting tube made to BS5386 Notes Flexible hoses can be used where the sited ambient temperature of the hose does not exceed 70 C These hoses must be manufact...

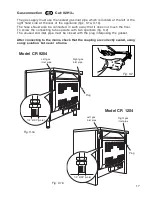
Страница 17: ...uch the floor To screw the connecting tube operate with two spanners fig 3 2 The unused end inlet pipe must be closed with the plug interposing the gasket After connecting to the mains check that the coupling are correctly sealed using soapy solution but never a flame GB Fig 3 1a Fig 3 1b Fig 3 2 Left gas inlet pipe Right gas inlet pipe 1 2 BSP male 1 2 BSP male Left gas inlet pipe Right gas inlet...

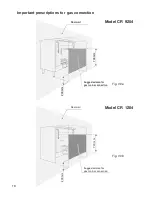
Страница 18: ...tion 700 mm 700 mm Rear wall Rear wall Suggested area for gas mains connection Suggested area for gas mains connection 200 mm 200 mm Fig 3 3a 700 mm Rear wall Suggested area for gas mains connection 200 mm Fig 3 3b Model CR 9204 Model CR 1204 ...

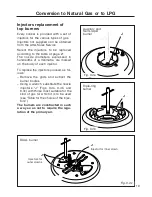
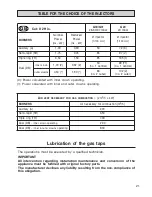
Страница 19: ...rked on the body of each injector To replace the injectors proceed as fol lows Remove the grids and extract the burner bodies Using a wrench substitute the nozzle injectors J Figs 3 4a 3 4b and 3 4c with those most suitable for the kind of gas for which it is to be used see Table for the choice of the injec tors The burners are constructed in such a way so as not to require the regu lation of the ...

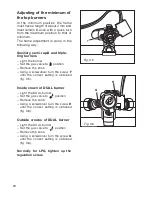
Страница 20: ...osition Remove the knob Using a screwdriver turn the screw F until the correct setting is obtained fig 3 5 Inside crown of DuAL burner Light the DUAL burner Set the gas valve to position Remove the knob Using a screwdriver turn the screw H until the correct setting is obtained fig 3 6 Outside crowns of DuAL burner Light the DUAL burner Set the gas valve to position Remove the knob Using a screwdri...

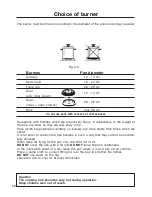
Страница 21: ... Nominal Power Hs kW Reduced Power Hs kW Ø injector 1 100 mm Ø injector 1 100 mm Auxiliary A 1 00 0 30 50 72 X Semi rapid SR 1 75 0 45 65 97 Z Triple ring TR 3 50 1 50 95 135 T Dual DB inner crown 1 00 0 32 50 no 1 central 69 F1 no 1 central outer crowns 4 50 1 90 66 no 2 outer 102 Z no 2 outer Power calculated with inner crown operating Power calculated with inner and outer crowns operating AIR v...

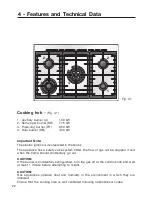
Страница 22: ... has a safety valve system fitted the flow of gas will be stopped if and when the flame should accidentally go out CAuTION If the burner is accidentally extinguished turn the gas off at the control knob and wait at least 1 minute before attempting to relight CAuTION Gas appliances produce heat and humidity in the environment in which they are installed Ensure that the cooking area is well ventilat...

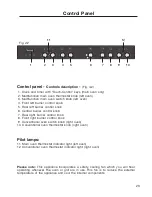
Страница 23: ...Clock and timer with Touch Control keys main oven only 2 Multifunction main oven thermostat knob left oven 3 Multifunction main oven switch knob left oven 4 Front left burner control knob 5 Rear left burner control knob 6 Central burner control knob 7 Rear right burner control knob 8 Front right burner control knob 9 Conventional oven switch knob right oven 10 Conventional oven thermostat knob rig...

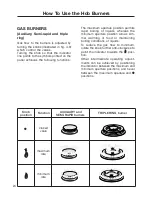
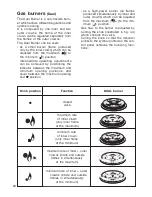
Страница 24: ...ling of liquids whereas the minimum aperture position allows sim mer warming of food or maintaining boiling conditions of liquids To reduce the gas flow to minimum rotate the knob further anti clockwise to point the indicator towards the posi tion Other intermediate operating adjust ments can be achieved by positioning the indicator between the maximum and minimum aperture positions and never betw...

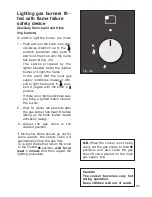
Страница 25: ... in position If there is no mains electrical sup ply bring a lighted match close to the burner 2 Wait for about ten seconds after the gas burner has been lit before letting go the knob safety device activation delay 3 Adjust the gas valve to the desired position If the burner flame should go out for some reason the safety valve will automatically stop the gas flow To re light the burner return the...

Страница 26: ...regulated separately from the flames of the outer crowns The Dual Burner can be used as a small burner flame produced only by the inner crown which can be adjusted from the maximum to the minimum position Intermediate operating adjustments can be achieved by positioning the indicator between the maximum and minimum opening positions and never between the maximum opening and position as a high powe...

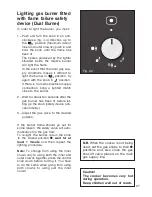
Страница 27: ...fter the gas burner has been lit before let ting go the knob safety device acti vation delay 3 Adjust the gas valve to the desired position If the burner flame should go out for some reason the safety valve will auto matically stop the gas flow To re light the burner return the knob to the closed position wait for at least 1 minute and then repeat the lighting procedure Note To change from using t...

Страница 28: ...t frying fill the pan only one third full of oil DO NOT cover the pan with a lid and DO NOT leave the pan unattended In the infortunate event of a fire leave the pan where it is and turn off all controls Place a damp cloth or correct fitting lid over the pan to smother the flames DO NOT use water on the fire Leave the pan to cool for at least 30 minutes Caution The cooking hob becomes very hot dur...

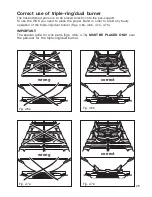
Страница 29: ...WOK you need to place the proper stand in order to avoid any faulty operation of the triple ring dual burner Figs 4 6a 4 6b 4 7a 4 7b IMPORTANT The special grille for wok pans figs 4 6b 4 7b MuST BE PLACED ONLy over the pan rest for the triple ring dual burner Fig 4 6b Fig 4 6a wrong correct Fig 4 7b Fig 4 7a wrong correct ...

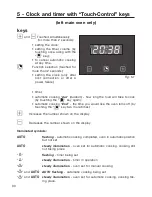
Страница 30: ...position but not set AUTO steady illumination oven set for automatic cooking cooking still not taking place flashing timer being set steady illumination timer in operation steady illumination oven set for manual cooking and AUTO AUTO flashing automatic cooking being set and AUTO steady illumination oven set for automatic cooking cooking tak ing place timer automatic cooking dur duration how long t...

Страница 31: ...tic program after setting the clock the oven starts to operate in the selected function man ual cooking The symbol is steady illuminated Using the timer You can use the timer at any time even when the oven is not in use The timer does not turn the oven off The timer can be set for up to 23 hours and 59 minutes To set the timer touch the key for more than 2 seconds the symbol flash es than the or k...

Страница 32: ...king time Note while dur is displayed you can change to End just by touching one time the key within 8 seconds from the last selection If there is time to wait before cooking starts the current time of day and AUTO will show in the clock display The oven will switch off but is now set for automatic cook ing If you are already at home to turn the oven on and only want the oven to turn off auto mati...

Страница 33: ... MULTI FUNCTION oven are obtained in the fol lowing ways a by normal convection The heat is produced by the upper and lower heating elements b by forced convection A fan sucks in the air contained in the oven muffle which sends it through the circular heating element and then sends it back through the muffle Before the hot air is sucked back again by the fan to repeat the described cycle it envelo...

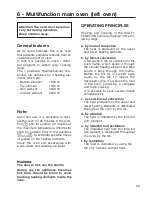
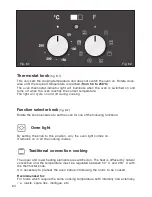
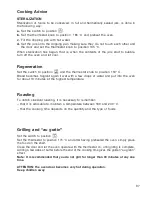
Страница 34: ...kwise to set the oven for one of the following functions F Fig 6 1 Fig 6 2 Oven light By setting the knob to this position only the oven light comes on It remains on in all the cooking modes Traditional convection cooking The upper and lower heating elements are switched on The heat is diffused by natural convection and the temperature must be regulated between 50 C and 250 C with the thermostat k...

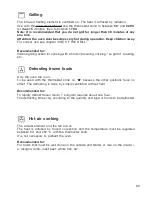
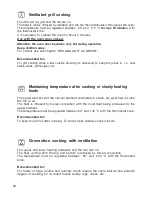
Страница 35: ...g etc Defrosting frozen foods Only the oven fan is on To be used with the thermostat knob on because the other positions have no effect The defrosting is done by simple ventilation without heat Recommended for To rapidly defrost frozen foods 1 kilogram requires about one hour The defrosting times vary according to the quantity and type of foods to be defrosted Hot air cooking The circular element ...

Страница 36: ...ing temperature after cooking or slowly heating foods The upper element and the circular element connected in series are switched on also the fan is on The heat is diffused by forced convection with the most heat being produced by the upper element The temperature must be regulated between 50 and 140 C with the thermostat knob Recommended for To keep foods hot after cooking To slowly heat already ...

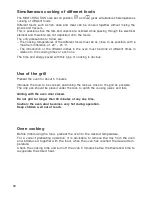
Страница 37: ...nt again if wet with a few drops of water and put into the oven for about 10 minutes at the highest temperature Roasting To obtain classical roasting it is necessary to remember that it is advisable to maintain a temperature between 180 and 200 C that the cooking time depends on the quantity and the type of foods Grilling and au gratin Set the switch to position Set the thermostat to position 175 ...

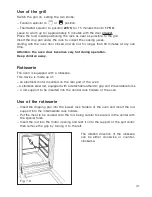
Страница 38: ...king times of each one The time and energy saved with this type of cooking is obvious Use of the grill Preheat the oven for about 5 minutes Introduce the food to be cooked positioning the rack as close to the grill as possible The drip pan should be placed under the rack to catch the cooking juices and fats Grilling with the oven door closed Do not grill for longer than 30 minutes at any one time ...

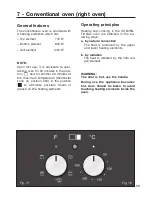
Страница 39: ...m temperature thermostat knob on position 250 in the position to eliminate possible traces of grease on the heating elements Operating principles Heating and cooking in the CONVEN TIONAL oven are obtained in the fol lowing ways a by natural convection The heat is produced by the upper and lower heating elements b by radiation The heat is radiated by the infra red grill element WARNING The door is ...

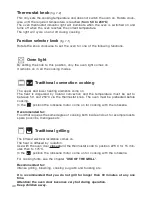
Страница 40: ...ection and the temperature must be set to between 50 and 250 C via the thermostat knob The oven must be preheated before cooking In the position the rotisserie motor come on for cooking with the rotisserie Recommended for Food that requires the same degree of cooking both inside and out for example roasts spare pork ribs meringues etc Traditional grilling The infrared electrical resistance comes o...

Страница 41: ...5 C Leave to warm up for approximately 5 minutes with the door closed Place the food inside positioning the rack as near as possible to the grill Insert the drip pan under the rack to collect the cooking juices Grilling with the oven door closed and do not for longer than 30 minutes at any one time Attention the oven door becomes very hot during operation Keep children away Rotisserie The oven is ...

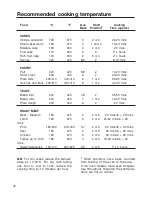
Страница 42: ...s Rich fruit cake 150 300 2 3 or 4 21 2 hours Scones 225 425 8 9 2 8 10 mins PASTRy Puff 225 425 8 9 2 10 20 mins Short crust 200 400 6 2 20 30 mins Plate tarts 200 210 400 410 6 1 or 2 30 35 mins Quiches and flans 200 210 400 410 6 1 or 2 40 45 mins yEAST Bread loaf 225 425 7 8 2 35 55 mins Bread rolls 220 425 7 1 or 2 15 20 mins Pizza dough 230 450 8 2 20 mins ROAST MEAT Beef Medium 190 375 5 2 ...

Страница 43: ...table protective clothing gloves is recommended when handling or cleaning of this appliance IMPORTANT Before any operation of cleaning and maintenance disconnect the appliance from the electrical network Attention The appliance gets very hot mainly around the cooking areas It is very impor tant that children are not left alone in the kitchen when you are cooking Do not use a steam cleaner because ...

Страница 44: ...iate product Always dry thoroughly IMPORTANT these parts must be cleaned very carefully to avoid scratching and abra sion You are advised to use a soft cloth and neutral soap CAuTION Do not use abrasive substances or non neutral detergents as these will irreparably damage the surface Glass control panel Clean using an appropriate product Always dry thoroughly Do not use harsh abrasive cleaners or ...

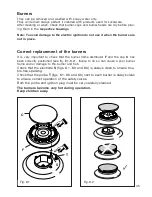
Страница 45: ...s It is very important to check that the burner flame distributor F and the cap C has been correctly positioned see fig 8 1 8 2 failure to do so can cause a poor burner flame and or damage to the burner and hob Check that the electrode S figs 8 1 8 3 and 8 6 is always clean to ensure trou ble free sparking Check that the probe T figs 8 1 8 3 and 8 6 next to each burner is always clean to ensure co...

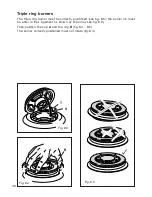
Страница 46: ...rs The triple ring burner must be correctly positioned see fig 8 5 the burner rib must be enter in their logement as shown by the arrow see fig 8 3 Then position the cap A and the ring B fig 8 4 8 5 The burner correctly positioned must not rotate fig 8 4 ...

Страница 47: ...t be correctly positioned see fig 8 6 the burner rib must be fitted as shown by the arrows Position the central small cap in its housing as shown by the arrows fig 8 7 Position the big cap in its housing as shown by the arrows fig 8 8 IMPORTANT NEVER unscrew the burner screws fig 8 9 T S ...

Страница 48: ...itable proprietary chemical cleaners may be used after first consulting with the manufacturers recommendations and testing a small sample of the oven cavity Abrasive cleaning agents or scouring pads cloths should not be used on the cavity surface NOTE The manufacturers of this appliance will accept no responsibili ty for damage caused by chemical or abrasive cleaning Attention Do not store flammab...

Страница 49: ...g 8 13A Attach the retaining rings to the hooks on the left and right hinges fig 8 13B Hold the door as shown in fig 8 13 Gently close the door and withdraw the lower hinge pins from their location fig 8 13C Withdraw the upper hinge pins from their location fig 8 13D Rest the door on a soft surface To replace the door repeat the above steps in reverse order ...

Страница 50: ...ur face which may result in shattering of the glass Reassembling the inner pane Make sure the door is locked open see fig Check the correct positioning of the no 4 four silicon rubbers D fig 8 14b Check that you are holding the pane the correct way You should be able to read the wording on it as it faces you Insert the inner pane in the left E and right F side guides fig 8 14c and gen tly let it s...

Страница 51: ...ss cover replace the bulb with a new one of the same specification and screw the cover back until it is hand tight NOTE Oven bulb replacement is not covered by your guarantee Other bulbs cannot be changed by yourself and should be replaced by an authorised CAPLE Service Engineer Bulbs other than the oven bulb are cov ered by the guarantee Helpful Advice IMPORTANT Cooker get hot Keep children away ...

Страница 52: ...rst 12 months To qualify for benefits under the guarantee you must be able to provide proof of date of purchase and the appliance must have been supplied installed and used for domestic purposes only in accordance with CAPLE instructions Consequential losses and accidental damage to the product are not covered by the guarantee This guarantee does not affect your statutory or common law rights CAPL...

Отзывы: