


20
EN
SAFETY INSTRUCTIONS
General Guidelines
Please read the following instructions carefully and use the product
accordingly.
Please keep this manual and hand it over when you transfer the product.
This summary may not include every detail of all variations and considered
steps. Please contact us when further information and help are needed.
Notes
• There is a risk of injury when using trampolines. To minimize the risk,
please follow the requirements of this manual. Usage, installation
suggestions, and safety information are included. Users and caretakers
should read this manual carefully and become familiar to every detail.
Everyone who uses this trampoline should be aware of his or her own
physical limitations and only jump within their individual skills.
•
Do not make any modifications to the product. Only original accessories
can beused. Only qualified technicians can repair the product; as improper
repairs can be dangerous to the user.
• For home and domestic use only. Not suitable for professional or medical
use.
•
Consult your doctor to assess if you are fit for a trampoline.
• Become familiar with the trampoline. Start with simple jumps, and then
you can move on to complicated jumps. Do not jump uncontrollably, and
watch for good body control and master different jumping techniques.
Assembly
• Two adults are recommended to complete assembly.
• Remove the packages and place all the accessories in open space. This
ves you an overview and will simplify the assembly procedures.
• Check the parts list to ensure there are no missing parts.
• Be careful when using tools or performing technical work for there is ways
a risk of injury.
• Create a safe environment; tools should not be placed at will.
• Dispose of packages in a way that cannot cause any danger.
• After installation, please make sure that all screws, bolts and nuts are
correctly installed and tightened, and all joints are firmly connected.
• Never install the trampoline in heavy rain, strong wind or storms,
especially inthunderstorms. It is recommended that the trampoline should
be taken apart and stored under bad weather condition.
• Use gloves when assembling or disassembling.
Содержание 10040711
Страница 2: ......
Страница 9: ...9 DE ZUSAMMENBAU Abdeckkissen ...
Страница 11: ...11 DE 2 J J D shape safety pin 1x B2 B2 A B1 B1 B1 B1 ...
Страница 13: ...13 DE 3 D K Installieren Sie den Handlauf D auf dem Trampolin A mit den Schrauben G und K G G K 2x 2x ...
Страница 14: ...14 DE 4 D E L Fixieren Sie die Haltestange E und den Handlauf D mit der Knopfschraube L L 1x ...
Страница 15: ...15 DE 5 C E I Fixieren Sie den Handlauf C mit Schraube I an der Haltestange E I 1x ...
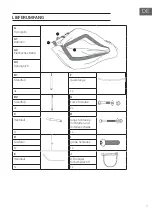
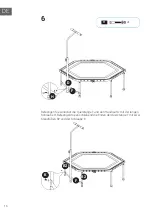
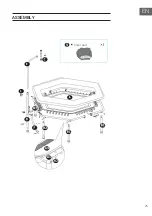
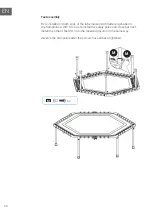
Страница 25: ...25 EN ASSEMBLY Cover pad ...
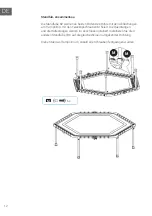
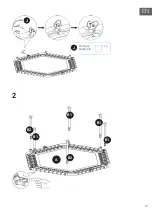
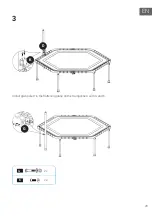
Страница 27: ...27 EN 2 J J D shape safety pin 1x B2 B2 A B1 B1 B1 B1 ...
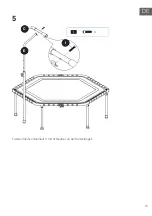
Страница 29: ...29 EN 3 D K Install grab pole D in the flattening place on the trampoline A with G and K G G K 2x 2x ...
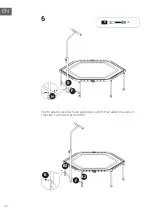
Страница 30: ...30 EN 4 D E L Attach grab pole E and D with L L 1x ...
Страница 31: ...31 EN 5 C E I Attach grab rail C and grab pole E with screw I I 1x ...
Страница 41: ...41 FR ASSEMBLAGE Coussin de couverture ...
Страница 43: ...43 FR 2 J J goupille de sécurité en forme de D 1x B2 B2 A B1 B1 B1 B1 ...
Страница 45: ...45 FR 3 D K Installez la main courante D sur le trampoline A avec les vis G et K G G K 2x 2x ...
Страница 46: ...46 FR 4 D E L Fixez la barre de maintien E et la main courante D avec la vis à bouton L L 1x ...
Страница 47: ...47 FR 5 C E I Fixez la main courante C avec la vis I sur la barre de maintien E I 1x ...
Страница 57: ...57 ES MONTAJE Cojín de la cubierta ...
Страница 59: ...59 ES 2 J J Pasador de seguridad 1x B2 B2 A B1 B1 B1 B1 ...
Страница 61: ...61 ES 3 D K Instale el brazo de agarre D en el trampolín A con los tornillos G y K G G K 2x 2x ...
Страница 62: ...62 ES 4 D E L Fije la barra de soporte E y el pasamanos D con el tornillo L L 1x ...
Страница 63: ...63 ES 5 C E I Fije el pasamanos C con el tornillo I a la barra de soporte E I 1x ...
Страница 73: ...73 IT ASSEMBLAGGIO Cuscino di copertura ...
Страница 75: ...75 IT 2 J J Perno di sicurezza a forma di D 1x B2 B2 A B1 B1 B1 B1 ...
Страница 77: ...77 IT 3 D K Installare il corrimano D sul tappeto elastico A con le viti G e K G G K 2x 2x ...
Страница 78: ...78 IT 4 D E L Fissare l asta di fissaggio E e il corrimano D con la vite a bottone L L 1x ...
Страница 79: ...79 IT 5 C E I Fissare il corrimano C all asta di fissaggio E con la vite I I 1x ...
Страница 83: ......
Страница 84: ......