Canvas ALMA 064-4023-0 Скачать руководство пользователя страница 87

39

CONSIGNES D’UTILISATION

FOYER MULTIMÉDIA DE 72 PO ALMA

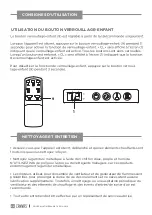
UTILISATION DE LA FONCTION DE MINUTERIE

Le foyer s’éteint automatiquement lorsque la minuterie atteint zéro minute.

1

6

Valeur d’affichage

30

30 minutes

1  heure

2 heures

3 heures

4 heures

Intervalle de minuterie

Valeur d’affichage

Intervalle de minuterie

Aucun

5 heures

6 heures

7 heures

8 heures

ARRÊT

UTILISATION DE LA TÉLÉCOMMANDE

INSTALLATION DES PILES

Lors du remplacement des piles, utilisez des piles AAA.

2. Insérez deux piles AAA fournies dans le compartiment à piles en vous assurant que les 

-

ment à piles.
3. Remettez le couvercle du compartiment à piles en place en vous assurant qu’il s’en-
clenche.

5. Appuyez sur le bouton d'alimentation, et voyez si les flammes du foyer
s'allument ou s'éteignent.

-

sayez.

Содержание ALMA 064-4023-0

Страница 1: ...TIONS HAVING TROUBLE TOLL FREE 1 888 670 6684 IMPORTANT Please read this manual carefully before beginning assembly of this product Keep this manual for future reference PRODUCT NO 064 4023 0 ALMA 72...

Страница 2: ...day d cor and all your outdoor living essentials CANVAS makes it easy to refresh your space to re ect your unique style and the way you live every day We would love to hear from you and welcome your t...

Страница 3: ...ign objects to enter any ventilation or exhaust opening as this may cause an electric shock or re or damage the appliance This appliance has hot and arcing or sparking parts inside Do not use it in ar...

Страница 4: ...Never locate the heater where it may fall into a bathtub or other water container 4 Do not run the power cord under carpeting Do not cover the power cord with throw rugs runners or the like Arrange th...

Страница 5: ...ately below a wall outlet receptacle 17 Do not slide insert on top of wood to avoid scratching wood surface 18 Do not place any objects on top of insert and top air intake vents as this will cause uni...

Страница 6: ...1 2 Left Side Panel Left Partition Panel 1 3 Right Side Panel Right Partition Panel Bottom Panel Centre Shelf Drawer Face Left Door Right Door Left Drawer Side Middle Crossbar Middle Stile 1 4 1 5 1...

Страница 7: ...CRIPTION THUMBNAIL QUANTITY 14 Right Drawer Side Drawer Back Drawer Bottom 2 15 16 2 2 Side Back Panel 17 19 20 Metal Support Rail Metal Leg Metal Support Leg 18 2 2 2 2 21 Drawer Bottom Support 2 ALM...

Страница 8: ...1 2 3 4 6 7 8 9 10 11 11 12x2 13x2 14x2 15x2 16x2 17 17 18 18 19 19 20 20 21x2 7 5 8 EXPLODED PARTS ALMA 72 MEDIA FIREPLACE...

Страница 9: ...4 J 4 K 24 Hinge 4 M N L 24 4 C 12 D 6 E 6 F 10 Wood Dowel Handle Larger Cam Bolt Larger Cam Lock Smaller Cam Bolt Smaller Cam Lock Screw 3 8x35 mm Screw 4x40 mm Screw 4x30 mm Screw 3 5x10 mm Screw 4x...

Страница 10: ...2 8 16 16 1 2 1 8 2 8 26 Q O P R Screw 3 5x12 mm Screw 3 5x12 mm Screw 4 7x12 5 mm Screw 4x10 mm Bolt M6x30 mm Screw 3x16 mm Anti Tip Restraint Wall Anchor Washer Bracket Bracket Back Panel Connector...

Страница 11: ...als back in the box Do not dispose of packaging materials until assembly is complete READ EACH STEP CAREFULLY Make sure you understand each step Or if you have any questions contact CANVAS customer se...

Страница 12: ...2 A 2 B B X2 Insert four Wood Dowels A into the designated holes of Centre Shelf 7 Repeat for the other Centre Shelf 7 Securely screw two Cam Bolts B and insert four Wood Dowels A into the designated...

Страница 13: ...els A into the designated holes of Right Side Panel 3 Separate Extension Slide I from Extension Rail with Stopper J as shown then attach Extension Rail with Stopper J by using three Screws K per Rail...

Страница 14: ...11 X1 A X6 B X2 4 X1 A B A 4 11 Securely screw two Cam Bolts B and insert four Wood Dowels A into the designated holes of Left Partition Panel 4 Insert two Wood Dowels A into the holes of Middle Stil...

Страница 15: ...holes of Middle Stile 11 Securely screw two Cam Bolts B and insert four Wood Dowels A into the designated holes of Right Partition Panel 5 Separate Extension Slide I from Extension Rail with Stopper J...

Страница 16: ...11 11 4 H H 5 16 STEP BY STEP GUIDE STEP 5 5 X1 11 X2 H X6 4 X1 Attach Middle Stile 11 onto Left Partition Panel 4 by using three Screws H Repeat for Right Partition Panel 5 ALMA 72 MEDIA FIREPLACE...

Страница 17: ...TEP 6 17 2 7 C 4 4 X1 7 X1 C X4 2 X1 Attach Left Side Panel 2 and Left Partition Panel 4 to Centre Shelf 7 by engaging four Cam Locks C Unfinished edge Unfinished edge Finished edge Finished edge ALMA...

Страница 18: ...STEP 7 7 C 5 3 5 X1 7 X1 C X4 3 X1 Attach Right Side Panel 3 and Right Partition Panel 5 to Centre Shelf 7 by engaging four Cam Locks C Unfinished edge Finished edge Finished edge Unfinished edge ALM...

Страница 19: ...P BY STEP GUIDE STEP 8 6 X1 G X8 19 5 2 4 6 G 3 Align and attach assembly from Step 6 and assembly from Step 7 to Top of Bottom Panel 6 by using eight Screws G ALMA 72 MEDIA FIREPLACE top of bottom pa...

Страница 20: ...Q X18 6 20 20 18 18 Q Attach Metal Support Rail 18 to Bottom Panel 6 by using five Screws Q Repeat for the other Metal Support Rail 18 Attach two Metal Support Legs 20 on Bottom Panel 6 by using four...

Страница 21: ...21 STEP BY STEP GUIDE STEP 10 19 X2 W V 19 Z 19 V X4 W X8 Z X1 Attach two Metal Legs 19 in place using two Washers V and four Bolts W per Leg by using provided Hex Key Z ALMA 72 MEDIA FIREPLACE...

Страница 22: ...22 STEP BY STEP GUIDE STEP 11 17 X2 F 17 17 Insert two Side Back Panels 17 to the slot of Partition Panels Side Panels and Bottom Panel ALMA 72 MEDIA FIREPLACE...

Страница 23: ...1 X1 10 X1 A X2 B X4 D X4 B D A 1 10 Securely screw four Cam Bolts B and four Cam Bolts D into the designated holes of Top Panel 1 I nsert two Wood Dowels A into the designated holes of Middle Crossb...

Страница 24: ...24 STEP BY STEP GUIDE STEP 13 1 X1 10 1 H 10 X1 H X3 Attach Middle Crossbar 10 on Top Panel 1 by using three Screws H ALMA 72 MEDIA FIREPLACE...

Страница 25: ...25 STEP BY STEP GUIDE STEP 14 2 1 1 X1 X4 C 2 E C X4 E Align and attach Top Panel 1 in place by engaging four Cam Locks C and four Cam Locks E ALMA 72 MEDIA FIREPLACE...

Страница 26: ...13 by using three Screws K Attach the Drawer Connector P in place with two Screws Q Repeat for the other Left Drawer Side 13 Attach Extension Slide I to Right Drawer Side 14 by using three Screws K At...

Страница 27: ...X2 14 13 X2 13 14 15 F 21 15 X2 21 X2 F X10 Attach Left Drawer Side 13 Right Drawer Side 14 and Drawer Bottom Support 21 to the Drawer back 15 by using five Screws F Repeat to assemble the other draw...

Страница 28: ...28 STEP BY STEP GUIDE STEP 17 X2 16 16 Insert the Drawer Bottom 16 to the slot of Drawer Back and Drawer Sides Repeat for the other drawer ALMA 72 MEDIA FIREPLACE x2...

Страница 29: ...P BY STEP GUIDE STEP 18 X2 12 D X2 D O 12 N N X2 O X4 Securely screw Cam Bolt D and attach Handle N to the Drawer Face 12 by using two Screws O Repeat for the other Drawer Face 12 ALMA 72 MEDIA FIREPL...

Страница 30: ...TEP BY STEP GUIDE STEP 19 X2 12 X2 E X8 R R E 12 Align and attach Drawer Face 12 in place by using four Screws R and engaging one Cam Lock E Repeat for the other Drawer Face 12 ALMA 72 MEDIA FIREPLACE...

Страница 31: ...9 X4 L X8 M X2 X4 O X2 aa M M L L O O aa aa 8 9 N N N Secure the two Hinges L in place with two Screws M per Hinge Attach Cushioning Cushion aa and Handle N to Left Door 8 with two Screws O Repeat for...

Страница 32: ...Insert two drawers one by one into your unit line up the extension slides on the drawer with the extension rails on the unit and push the drawer into the unit until the drawer is fully inserted The d...

Страница 33: ...t Door 8 by fastening the Hinges onto Left Side Panel with four Screws M per hinge Install Right Door 9 by fasten the Hinges onto Left Partition Panel with four Screws M per hinge Adjust the hinges by...

Страница 34: ...0 Put the insert into place Secure the insert by using Bracket xx and fasten the Bracket to insert by two Screws yy Attach the Anti tip Restraint S on top rear of mantel by using Washer V and Screw T...

Страница 35: ...are intended for use with solid wall applications only tile or concrete DO NOT USE WITH DRYWALL OR OTHER HOLLOW WALL APPLICATIONS 35 yy X6 zz X2 yy zz zz yy yy U U U V V V G G G Secure the insert by u...

Страница 36: ...36 ANTI TIP RESTRAINT WARNING TO REDUCE THE RISK OF SERIOUS INJURY AND AVOID THE POTENTIAL FOR FURNITURE TIPPING OVER INSTALL THE ANTI TIP RESTRAINT HARDWARE ALMA 72 MEDIA FIREPLACE...

Страница 37: ...ure unit indicator 2 main power 3 flame mode 4 heater control 5 and timer function 6 Press the power button 3 to turn the fireplace heater unit on and off Press the power button 3 once to turn the uni...

Страница 38: ...72 F 22 C The thermostat setting range is 50 86 F or 10 30 C The thermostat is adjustable by 2 F or 1 C increments These setting temperature are shown in the display 1 To change the temperature unit...

Страница 39: ...LING THE BATTERIES When replacing batteries use AAA batteries 1 Press down and slide back cover off the battery compartment 2 Insert two provided AAA batteries into the battery compartment making sure...

Страница 40: ...ble for the intended use Clean the battery contacts and also those of the device prior to battery installation Remove batteries from equipment when it is not to be used for an extended period of time...

Страница 41: ...ealth This symbol marked on the battery and or packaging indicates that the used battery shall not be treated as municipal waste Instead it should be left at an appropriate collection point for recycl...

Страница 42: ...ightness settings are shown in the display 1 1 INSTRUCTIONS FOR USE The remote control contains the main power 3 flame mode 4 heater control 5 timer function 6 flame brightness 7 heater boost 8 and ch...

Страница 43: ...heater at the full rated wattage Pressing the heater boost 8 button repeatedly will cycle through the following boost settings These heater boost intervals are shown in the display 1 1 Display value...

Страница 44: ...d safety lock 9 for 3 seconds INSTRUCTIONS FOR USE 44 1 9 CLEANING AND MAINTENANCE Make sure the unit is turned OFF unplugged and the heating elements are cool whenever you are cleaning the heater Cle...

Страница 45: ...z 65 kg MAXIMUM WEIGHT CAPACITY PER SHELF MAXIMUM WEIGHT CAPACITY PER DRAWER 44 lb 1 oz 11 lb 20 kg 5 kg WARNING For use with televisions weighing 143 lb 5 oz 65 kg or less Use with heavier television...

Страница 46: ...ower button several times and make sure the power is set to the ON position Power cord gets warm Normal operation Check your heater cord and plug connec tions Faulty wall outlet connections or loose p...

Страница 47: ...the stated warranty period when returned by the original purchaser with proof of purchase This product is not guaranteed against wear or breakage due to misuse and or abuse MODEL NO Made in China Imp...

Страница 48: ......

Страница 49: ...PO ALMA INSTRUCTIONS D ASSEMBLAGE VOUS RENCONTREZ DES PROBL MES NUM RO SANS FRAIS 1 888 670 6684 IMPORTANT Veuillez lire attentivement ce guide avant de proc der l assemblage de ce produit Conservez...

Страница 50: ...permet de rafra chir facilement votre espace pour qu il votre style unique et votre mode de vie Nous serions ravis de conna tre votre opinion et nous vous invitons nous faire part de vos commentaires...

Страница 51: ...s vous br ler vitez tout contact de la peau avec les surfaces chaudes loignez les mat riaux combustibles tels que les meubles Faites extr mement attention lorsque l appareil de chauffage est utilis en...

Страница 52: ...z les bou tons de commande vers la position d arr t puis retirez la fiche de la prise d alimentation 1 2 3 4 5 Ne branchez l appareil qu une prise correctement mise la terre Branchez toujours le foyer...

Страница 53: ...ne fonctionne pas bien N utilisez pas l appareil de chauffage s il est tomb ou a t endommag de quelque mani re que ce soit Coupez l alimentation au niveau du tableau de distribution et faites v rifie...

Страница 54: ...e Panneau de partition de droite Panneau inf rieur Tablette centrale Devanture Porte gauche Porte droite C t gauche du tiroir Barre transversale moyenne Montant interm diaire 1 4 1 5 1 6 1 7 2 8 1 9 1...

Страница 55: ...16 2 2 17 19 20 Rail de support en m tal Patte en m tal Patte de soutien en m tal 18 2 2 2 2 21 Support de fond de tiroir 2 R F RENCE DESCRIPTION ILLUSTRATION QUANTIT LISTE DES PI CES FOYER MULTIM DIA...

Страница 56: ...1 2 3 4 6 7 8 9 10 11 11 12x2 13x2 14x2 15x2 16x2 17 17 18 18 19 19 20 20 21x2 7 5 8 VUE CLAT E FOYER MULTIM DIA DE 72 PO ALMA...

Страница 57: ...N L 24 4 C 12 D 6 E 6 F 10 Goujon de bois Poign e Grand boulon came Grande came Petit boulon came Petite came Rail d extension avec but e R F RENCE DESCRIPTION ILLUSTRATION QUANTIT FOYER MULTIM DIA DE...

Страница 58: ...1 8 2 8 2 26 Q O P R Sangle anti basculement Cheville d ancrage Laveuse Support Support Tournevis Connecteur de tiroir FOYER MULTIM DIA DE 72 PO ALMA R F RENCE DESCRIPTION ILLUSTRATION QUANTIT LISTE D...

Страница 59: ...res pour l assemblage RETIRER LES MAT RIAUX D EMBALLAGE Remettez les mat riaux d emballage dans la bo te Ne les jetez pas avant d avoir termin l assemblage LIRE ATTENTIVEMENT CHAQUE TAPE Assurez vous...

Страница 60: ...E TAPE PAR TAPE Ins rez quatre goujons de bois A dans les trous d sign s de la tablette centrale 7 R p tez cette tape pour l autre tablette centrale 7 Vissez solidement deux boulons came B et ins rez...

Страница 61: ...si re I du rail J GUIDE TAPE PAR TAPE Vissez solidement deux boulons came B et ins rez quatre goujons de bois A dans les trous d sign s du panneau lat ral de droite 3 S parez la glissi re d extension...

Страница 62: ...LTIM DIA DE 72 PO ALMA GUIDE TAPE PAR TAPE Vissez solidement deux boulons came B et ins rez quatre goujons de bois A dans les trous d sign s du panneau de partition de gauche 4 Ins rez deux goujons de...

Страница 63: ...E 4 Ins rez deux goujons de bois A dans les trous du montant interm diaire 11 Vissez solidement deux boulons came B et ins rez quatre goujons de bois A dans les trous d sign s du panneau de partition...

Страница 64: ...X1 11 X2 H X6 4 X1 FOYER MULTIM DIA DE 72 PO ALMA GUIDE TAPE PAR TAPE Fixez le montant du milieu 11 sur le panneau de partition de gauche 4 au moyen de trois vis H R p tez cette tape pour le panneau...

Страница 65: ...ord non fini Bord non fini Bord fini Bord fini GUIDE TAPE PAR TAPE TAPE 6 Fixez le panneau lat ral de gauche 2 et le panneau de partition de gauche 4 la tablette centrale 7 en engageant quatre cames C...

Страница 66: ...ord non fini Bord fini Bord fini Bord non fini FOYER MULTIM DIA DE 72 PO ALMA GUIDE TAPE PAR TAPE TAPE 7 Fixez le panneau lat ral de droite 3 et le panneau de partition de droite 5 la tablette central...

Страница 67: ...5 2 4 6 G 3 haut du panneau inf rieur GUIDE TAPE PAR TAPE TAPE 8 Alignez et fixez l ensemble de l tape 6 et l ensemble de l tape 7 au panneau inf rieur 6 au moyen de huit vis G 19 FOYER MULTIM DIA DE...

Страница 68: ...UIDE TAPE PAR TAPE TAPE 9 Fixez le rail de support en m tal 18 au panneau inf rieur 6 au moyen de cinq vis Q R p tez cette tape pour l autre rail de support en m tal 18 Fixez deux pattes de support en...

Страница 69: ...V 19 Z 19 V X4 W X8 Z X1 GUIDE TAPE PAR TAPE TAPE 10 Fixez deux pattes en m tal 19 au moyen de deux rondelles V et quatre boulons W par patte l aide de la cl hexagonale fournie Z FOYER MULTIM DIA DE...

Страница 70: ...22 17 X2 F 17 17 FOYER MULTIM DIA DE 72 PO ALMA GUIDE TAPE PAR TAPE TAPE 11 Ins rez deux panneaux lat raux arri re 17 la fente des panneaux de partition des panneaux lat raux et du panneau inf rieur...

Страница 71: ...AR TAPE TAPE 12 Vissez solidement quatre boulons came B et quatre boulons came D dans les trous d sign s du panneau sup rieur 1 Ins rez deux goujons de bois A dans les trous d sign s de la barre trans...

Страница 72: ...24 1 X1 10 1 H 10 X1 H X3 FOYER MULTIM DIA DE 72 PO ALMA GUIDE TAPE PAR TAPE TAPE 13 Fixez la barre transversale du milieu 10 sur le panneau sup rieur 1 au moyen de trois vis H...

Страница 73: ...25 2 1 1 X1 X4 C 2 E C X4 E GUIDE TAPE PAR TAPE TAPE 14 Alignez et fixez le panneau sup rieur 1 en place en engageant quatre cames C et quatre cames E FOYER MULTIM DIA DE 72 PO ALMA...

Страница 74: ...che du tiroir 13 au moyen de trois vis K Fixez le connecteur du tiroir P en place au moyen de deux vis Q R p tez cette tape pour l autre c t gauche du tiroir 13 Fixez la glissi re d extension I au c t...

Страница 75: ...X10 x2 GUIDE TAPE PAR TAPE TAPE 16 Fixez le c t gauche du tiroir 13 le c t droit du tiroir 14 et le support inf rieur du tiroir 21 au dos du tiroir 15 au moyen de cinq vis F R p tez cette tape pour l...

Страница 76: ...28 X2 16 16 FOYER MULTIM DIA DE 72 PO ALMA x2 GUIDE TAPE PAR TAPE TAPE 17 Ins rez le fond du tiroir 16 la fente du dos du tiroir et des c t s du tiroir R p tez cette tape pour l autre tiroir...

Страница 77: ...12 N N X2 O X4 x2 GUIDE TAPE PAR TAPE TAPE 18 Vissez solidement le boulon came D et fixez la poign e N la devanture 12 au moyen de deux vis O R p tez cette tape pour l autre devanture 12 FOYER MULTIM...

Страница 78: ...X8 R R E 12 FOYER MULTIM DIA DE 72 PO ALMA x2 GUIDE TAPE PAR TAPE TAPE 19 Alignez et fixez la devanture 12 en place au moyen de quatre vis R et en engageant une came E R p tez cette tape pour l autre...

Страница 79: ...TAPE TAPE 20 Fixez les deux charni res L en place au moyen de deux vis M par charni re Fixez Coussin d amortissement aa et la poign e N la porte de gauche 8 au moyen de deux vis O R p tez cette tape p...

Страница 80: ...ce que le tiroir soit compl tement ins r Le tiroir devra tre pouss compl tement au fond au d part pour engager la glissi re facile et la fonction de fermeture douce REMARQUE Des rails de tiroir fermet...

Страница 81: ...s sur le panneau lat ral de gauche au moyen de quatre vis M par charni re Installez la porte de droite 9 en fixant les charni res sur le panneau de partition de gauche au moyen de quatre vis M par cha...

Страница 82: ...E 23 Ins rez l appareil dans le foyer Fixez l appareil l aide du support xx et fixez le support l appareil au moyen de deux vis yy Fixez la sangle anti basculement S en haut l arri re du manteau en ut...

Страница 83: ...s dans le mur et ins rez les chevilles d ancrage U Attachez l extr mit oppos e de la sangle anti basculement s au moyen de rondelle V et de vis H fix es dans les chevilles d ancrage murales tions de p...

Страница 84: ...OYER MULTIM DIA DE 72 PO ALMA SANGLE ANTI BASCULEMENT AVERTISSEMENT AFIN DE R DUIRE LES RISQUES DE BLESSURES GRAVES ET VITER LE POTENTIEL DE BASCULEMENT DES MEUBLES INSTALLEZ LES SANGLES ANTI BASCULEM...

Страница 85: ...COMMANDE UTILISATION DU BOUTON D ALIMENTATION de chauffage Appuyez nouveau pour teindre l appareil pendant 3 secondes r tablit le r glage d usine 3 1 2 3 4 5 6 CONSIGNES D UTILISATION FOYER MULTIM DIA...

Страница 86: ...MANDE DE CHAUFFAGE de chauffage La plage de r glage du thermostat est de 50 86 F ou de 10 30 C Le thermostat est r glable par incr ments de 2 F ou de 1 C Ces r glages de REMARQUE En mode party l appar...

Страница 87: ...fichage Intervalle de minuterie Aucun 5 heures 6 heures 7 heures 8 heures ARR T UTILISATION DE LA T L COMMANDE INSTALLATION DES PILES Lors du remplacement des piles utilisez des piles AAA 2 Ins rez de...

Страница 88: ...e la t l commande Achetez toujours des piles de taille et de qualit les plus adapt es l utilisation pr vue Nettoyez les contacts de la pile ainsi que ceux de l appareil avant d installer la pile Retir...

Страница 89: ...e Le recyclage des mat riaux contribuera conserver les ressources naturelles Pour de plus amples renseignements sur la collecte et le recyclage des piles usag es veuillez contacter votre municipalit l...

Страница 90: ...42 FOYER MULTIM DIA DE 72 PO ALMA foyer UTILISATION DE LA LUMINOSIT DE LA FLAMME 1 CONSIGNES D UTILISATION IDENTIFICATION DE LA T L COMMANDE 5 6 3 4 7 9 8 7...

Страница 91: ...UFFAGE mande uniquement sance nominale 1 Valeur d affichage 5 10 15 20 25 5 minutes 10 minutes 15 minutes 20 minutes 25 minutes Intervalle d augmentation de temp rature du foyer 30 Aucun 30 minutes AR...

Страница 92: ...z le foyer Nettoyez la garniture m tallique l aide d un chiffon doux propre et humide N UTILISEZ PAS de poli pour laiton ou de nettoyants m nagers car ces produits endommageront la garniture m talliqu...

Страница 93: ...TABLETTE CAPACIT DE POIDS MAXIMALE PAR TIROIR 44 lb 1 oz 11 lb 20 kg 5 kg FICHE TECHNIQUE 39 cm 72 po 182 9 cm po 67 2 cm DONN ES TECHNIQUES AVERTISSEMENT Pour une utilisation avec des t l viseurs pe...

Страница 94: ...que la fiche est fermement branch e dans la prise Les foyers consomment plus de courant que les petits appareils lectriques donc la surchauffe de la prise peut se produire m me si cela n a pas lieu av...

Страница 95: ...sont sales ou obstru es b L ensemble du foyer est d fectueux a V rifiez les entr es d air pour les obstructions ou l accumulation lev e de un nouvel ensemble de foyer ENTRETIEN DE VOTRE ARTICLE 1 2 3...

Страница 96: ...D INSPIRATION CANADIENNE MC...

Отзывы: