Canopus TwinPact 100 Скачать руководство пользователя страница 32

22

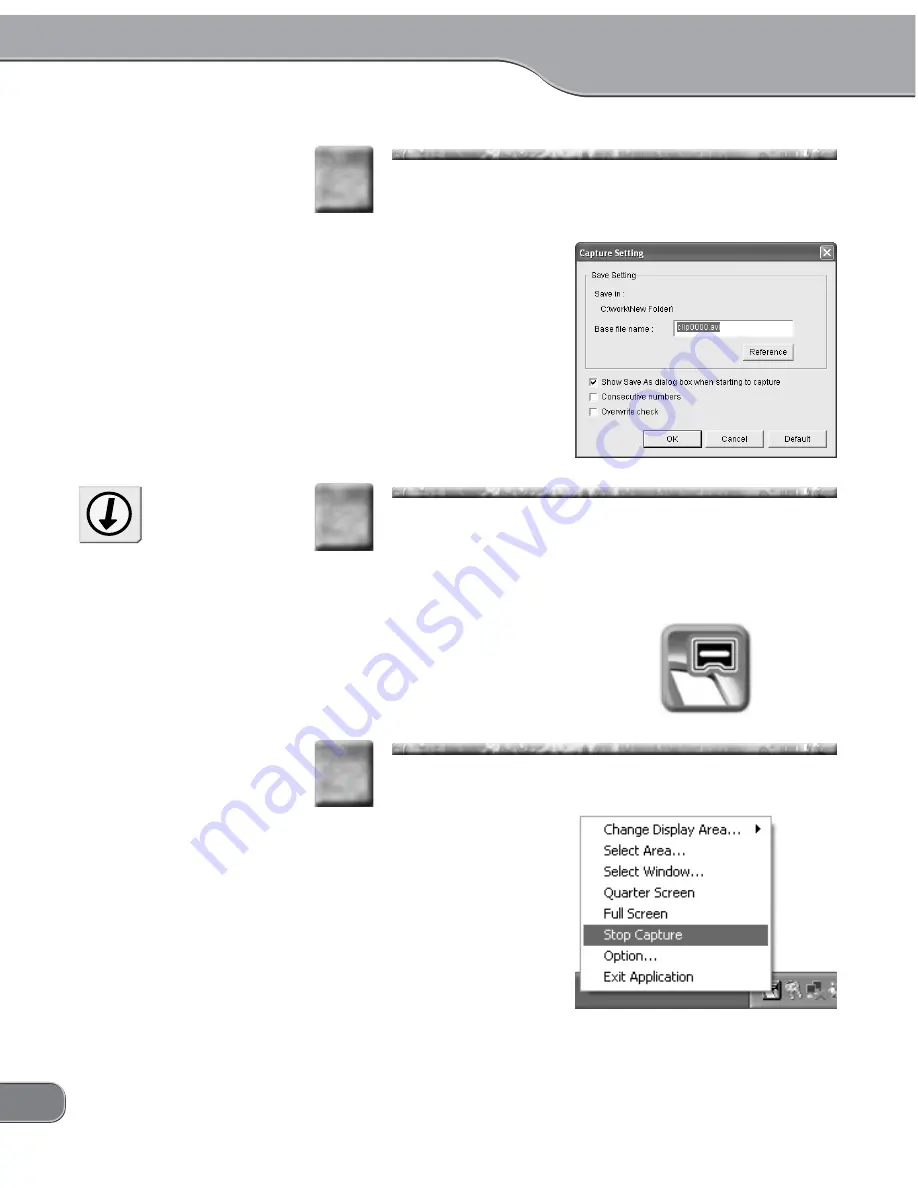
Enter your desired filename to save. If you want to
change the saving location, click [Reference] and
specify your desired location.

8

8

Click [OK].

> The [Capture Setting] screen is closed and the Twin Com-

mander will start capturing images on the computer screen
into the computer.

> While images are being captured, the icon on the task

tray blinks in red.

9

9

If the destination folder specified
to save the capture in does not
exist, the [Capture Settings]
screen appears again.

Tip

To stop capturing, click the icon and click [Stop Cap-
ture].

> The total time and number of frames will be displayed.

10

10

Содержание TwinPact 100

Страница 1: ...User Manual...

Страница 2: ...able Canopus Co Ltd warrants that for this period the product will be in good working order Should our product fail to be in good working order Canopus will at its option repair or replace it at no ad...

Страница 3: ...r body by touching a grounded metal surface Do not disassemble Do not disassemble Do not disassemble Do not disassemble Do not disassemble Do not remove the cover or modify the TwinPact 100 Fire elect...

Страница 4: ...s smoking Stop using the product when it is smoking Stop using the product when it is smoking Do not use the product in an abnormal condition like when it is smoking or emitting an odor It may result...

Страница 5: ...the Described method Do not setup other than the Described method Do not setup other than the Described method Do not setup other than the Described method Do not setup in a manner other than prescri...

Страница 6: ...nterference to radio or television reception which can be determined by turning the equipment off and on the user is encouraged to try and correct the interference by one or more of the following meas...

Страница 7: ...its logo are registered trademarks of Cano pus Co Ltd 8 TwinPact 100 is a trademark of Canopus Co Ltd 9 Microsoft and Windows are registered trademarks of Microsoft Corporation USA Apple Mac Macintosh...

Страница 8: ...Macintosh 14 Showing computer screen images on TV 18 Connections between TV monitor and computer 18 Displaying computer screen images on TV monitor 19 Capturing computer screen images into the compute...

Страница 9: ...nt 41 Other 42 Adjusting RGB input video using Twin Commander 44 Starting up Twin Commander for Windows 44 Starting up Twin Commander for Macintosh 45 Twin Commander menu and screens 46 Menu 46 Option...

Страница 10: ......

Страница 11: ......

Страница 12: ...to ana log to DV conversion such as noise reduction The improved ana log signal is also output to the analog terminal so that you can use the TwinPact 100 as a filter between analog devices by connec...

Страница 13: ...ation of tutorial video for software Capture screen action while operating the software such as move ment of the mouse pointer and save it as a video This is perfect for creating a tutorial video and...

Страница 14: ...nd cable DV cable 6 pin to 4 pin Remote controller Stereo mini plug cable VGA cable D sub 15 pin Applications CD ROM This CD ROM contains application programs that work with TwinPact 100 The programs...

Страница 15: ...you use the remote controller for the first time or replace the batteries load batteries into the remote controller as follows Battery specification Size AAA Open the battery cover on the back of the...

Страница 16: ...LOG LED Lights while the TwinPact 100 is receiving signals from the ana log terminal and converting them to DV signals 4 RGB LED Lights while the TwinPact 100 is receiving signals from the RGB termina...

Страница 17: ...DV connection 4 pin Connect this terminal to a DV device or computer NOTE When both VIDEO IN and S VIDEO IN terminals are used the S VIDEO terminal is always used Rear Rear Rear Rear Rear 1 2 3 4 8 9...

Страница 18: ...ector A DIP switches for video settings 2 Mode Switch Selector B DIP switches for setting VIDEO and AUDIO modes For more information on the Mode Switch Selector refer to Setting up TwinPact 100 P 34 T...

Страница 19: ...ode the TwinPact 100 converts DV signal coming from either of the 4 pin DV connector on the front of the unit or the 6 pin DV connector on the back into analog signal and then outputs it via the analo...

Страница 20: ...ng that screen on a TV monitor and outputs it via the video output connector 2 and 3 on P 7 In addition if sound is output from the computer s sound card to the audio input connector 5 on P 7 the soun...

Страница 21: ...D Free space of 20 MB or more IEEE1394 OHCI card Macintosh CPU PowerPC G3 600 MHz G4 466 MHz or faster G3 equipped with FireWire as standard or faster PowerPC G4 with L3 cache loaded is recommended Me...

Страница 22: ...CD ROM drive The CD ROM automatically starts up and the installation screen is displayed When the CD ROM does not automatically start up click the Start menu My Computer TWINP100 1 1 Click Next 2 2 W...

Страница 23: ...ify the desired folder The installation starts 4 4 Select your desired options and click Next The readme file and the completion screen will appear 5 5 Be sure to read the readme file since it contain...

Страница 24: ...g Twin Commander on a computer running Mac OS X You can install Twin Commander without TwinPact 100 connected with the computer Insert the Applications CD into the CD ROM drive The TWINP100 icon will...

Страница 25: ...nter your name and password and then click OK 3 3 Click Continue 4 4 Read the content carefully and click Continue Be sure to read the readme file since it contains content not covered in the manuals...

Страница 26: ...ent carefully and click Agree only if you agree to it If you do not agree to the term please notify customer support If you do not agree to the License Agreement you can not use this software 6 6 Sele...

Страница 27: ...17 Click Install The installation process starts 8 8 After the installation completes click Close The TwinPact 100 folder is created in the Applications folder 9 9...

Страница 28: ...omputer Connections between TV monitor and computer Connections between TV monitor and computer NOTE Before connecting disconnecting a DV cable be sure to turn OFF the power of your computer and TwinP...

Страница 29: ...itor Turn on the TV monitor and set it to the external input mode 1 1 External Input Press the POWER switch on the rear 2 2 Start up the computer 3 3 By pressing the INPUT SELECT switch on the front s...

Страница 30: ...the QuickTime DV format NOTE You need 230MB of free space in the hard disk to record a mo tion picture per one minute Check if the hard disk has enough free space for the re cording time When Scan Co...

Страница 31: ...o on the display area refer to Menus in Twin Commander menus and screens P 46 6 6 If a TV monitor has been con nected to the TwinPact 100 you can check the display area on the TV monitor as necessary...

Страница 32: ...Twin Com manderwillstartcapturingimagesonthecomputerscreen into the computer While images are being captured the icon on the task tray blinks in red 9 9 If the destination folder specified to save the...

Страница 33: ...23 Click OK 11 11 Playback the captured video and check the content 12 12...

Страница 34: ...essing the INPUT SELECT switch on the front switch the input mode to RGB IN The RGB LED will light 3 3 Display the software or video you want to capture on the screen 4 4 Start up the Twin Commander O...

Страница 35: ...apture option has not been check marked in the Cap ture tab page of the Preferences screen the TwinPact 100 starts capturing immediately Enter your desired filename to save If you want to change the s...

Страница 36: ...n and click Stop Cap ture A message will appear 10 10 Click OK 11 11 Playback the captured video and check the content 12 12 When you click the icon in Dock pressing Control key the same menu contents...

Страница 37: ...evices and computer Make connections between devices as shown in the figure NOTE Before connecting disconnecting a DV cable be sure to turn OFF the power of your computer and TwinPact 100 PC DV 6pin T...

Страница 38: ...will light 3 Start playing back the analog video you want to cap ture from a point a little before the part you need 4 Capture the video on your computer For how to capture the video on your computer...

Страница 39: ...e TwinPact 100 to an analog VCR and DV camera as shown in the figure Use the terminal on the front to connect with an analog VCR for input when copying digital video from DV camera to analog VCR DV ca...

Страница 40: ...ideo to DV camera Press the POWER switch on the rear 1 1 By pressing the INPUT SELECT switch on the front switch the input mode to ANALOG IN The ANALOG LED will light 2 2 Put the DV camera in the reco...

Страница 41: ...nitor Connecting DV camera and TV monitor Connecting DV camera and TV monitor Connecting DV camera and TV monitor Connect the TwinPact 100 to a TV monitor and DV camera as shown in the figure VCR Wall...

Страница 42: ...digital video on TV monitor atching digital video on TV monitor Press the POWER switch on the rear 1 1 By pressing the INPUT SELECT switch on the front switch the input mode to DV IN The DIGITAL LED...

Страница 43: ...video to analog VCR Press the POWER switch on the rear 1 1 By pressing the INPUT SELECT switch on the front switch the input mode to DV IN The DIGITAL LED will light 2 2 Put the analog VCR in the rec...

Страница 44: ...from the start Y C separation will not be applied to them Digital 3D Y C separation The composite signal is a mix of the luminance Y and chrominance C signals To compress the composite signal to the...

Страница 45: ...by TwinPact 100 however removes noise after detecting noise using the characteristic of noise noise has little relation to others in the time axis the advert effect to the image is kept minimal Becau...

Страница 46: ...OFF Normal ON Update No 3 Locked Audio Mode setting Allows you to select whether to use the Locked Audio mode or not Refer to Technical Information on P 56 OFF Locked ON Unlocked No 4 Audio Mode setti...

Страница 47: ...e out during DV input from OHCI card About Video Sync Mode Video Sync Mode is effective only for DV inputs When set to OFF The PLL operation is enabled to synchronize frame period and subcarrier perio...

Страница 48: ...l Image quality adjustment Image quality adjustment Image quality adjustment Image quality adjustment Image quality adjustment 2 1 4 3 6 5 7 8 1 Brightness Adjustment key Allows you to adjust the brig...

Страница 49: ...t to 700mV to brighten the screen Every time the RGB Gain key is pressed the setting is toggled between 700mV and 1000mV 7 Luminance Filter key Allows you to enable disable the luminance filter If the...

Страница 50: ...o move the zoom position up down right left 3 100 key Back to the previous zoom setting screen If this key is pressed when the screen has been zoomed the zoom is reverted to the default setting 100 di...

Страница 51: ...ip Screen adjustment Screen adjustment Screen adjustment Screen adjustment Screen adjustment 1 3 2 1 Screen Size Adjustment key Allows you to adjust the screen size After pressing the Screen Size Adju...

Страница 52: ...pattern changes in the following order 100 Color Bar Cross Hatch Red Gradient Green Gradient Blue Gradient All Waveforms 100 Color Bar To cancel the test pattern display press either of the OK Input S...

Страница 53: ...Reset key to restart the video playback 9 Reset key Cancels the current adjustment mode and returns to the previ ous screen In addition the screen size is reverted to the default setting 10 Function...

Страница 54: ...nnected from the computer NOTE Before turning ON the TwinPact 100 power be sure to set the Mode Switch Selector A No 3 to OFF PC TwinPact 100 is always in the RGB mode when Twin Commander is active Ti...

Страница 55: ...or Macintosh win Commander for Macintosh win Commander for Macintosh After connecting the TwinPact 100 to the computer and setting TwinPact 100 s POWER switch to ON boot up the computer 1 1 Open the A...

Страница 56: ...mmander menu and screens win Commander menu and screens win Commander menu and screens win Commander menu and screens Menu Menu Menu Menu Menu Here the menus for Twin Commander are described For Windo...

Страница 57: ...tside of the display area on the TV screen the TV screen moves its display area to the position where the mouse pointer is located This option is unavailable when the Full Screen option has been selec...

Страница 58: ...ighted frame in the screenshot indicates the display area CLICK CLICK You can also use the wheel but ton on your mouse to determine the area Vertical positioning Turn the wheel button to the rear to m...

Страница 59: ...e screenshot indicates the display area You can also use the wheel but ton of the mouse to switch the display area When turned to the rear top left bottom left bottom right top right top left When tur...

Страница 60: ...ts the Twin Commander Option screen Preferences screen Option screen Preferences screen Option screen Preferences screen Option screen Preferences screen Option screen Preferences screen If Option Pre...

Страница 61: ...on of the screen Flicker Filter Allows you to control the level of the filter to suppress flickering of the screen Luminance Filter Smoothes out jagged lines between black and white Chroma Filter Smoo...

Страница 62: ...e Pattern Select this option to suppress vertical stripes which are dis played when a part of the screen is zoomed This option comes into effect after the Option screen is closed NOTE If Suppress Vert...

Страница 63: ...pop up menu Switching to the full screen mode Starting video capturing Command Select an operation to which you want to assign a shortcut key Shift Ctrl Alt Shift Control Option Command Select a key...

Страница 64: ...erwrite check Select this option to have the Twin Commander to show the confirmation screen when a file under the same name with the filename specified for saving captured video exists on the com pute...

Страница 65: ...55 5 Info tab Shows the software version and the settings of the Mode Switch Selector of the TwinPact 100 Windows Macintosh...

Страница 66: ...devia tion is accumulated along with elapsed time however it results in sound drift On the other hand the Locked Audio mode ensures synchronization between audio and video by restricting the number o...

Страница 67: ...erminal during RGB input by setting the Mode Switch Selector Front terminal Input Stereo mini jack x 1 Rear terminal Input RGB input terminal 15 pin high density D sub connector x 1 Rear terminal Inpu...

Страница 68: ...h is ON Check that this product and DV analog devices are properly connected No sound is input out put when the RGB sig nal is input Check if the Audio Input setting Mode Switch Selector A No 4 is cor...

Отзывы: