background image

62

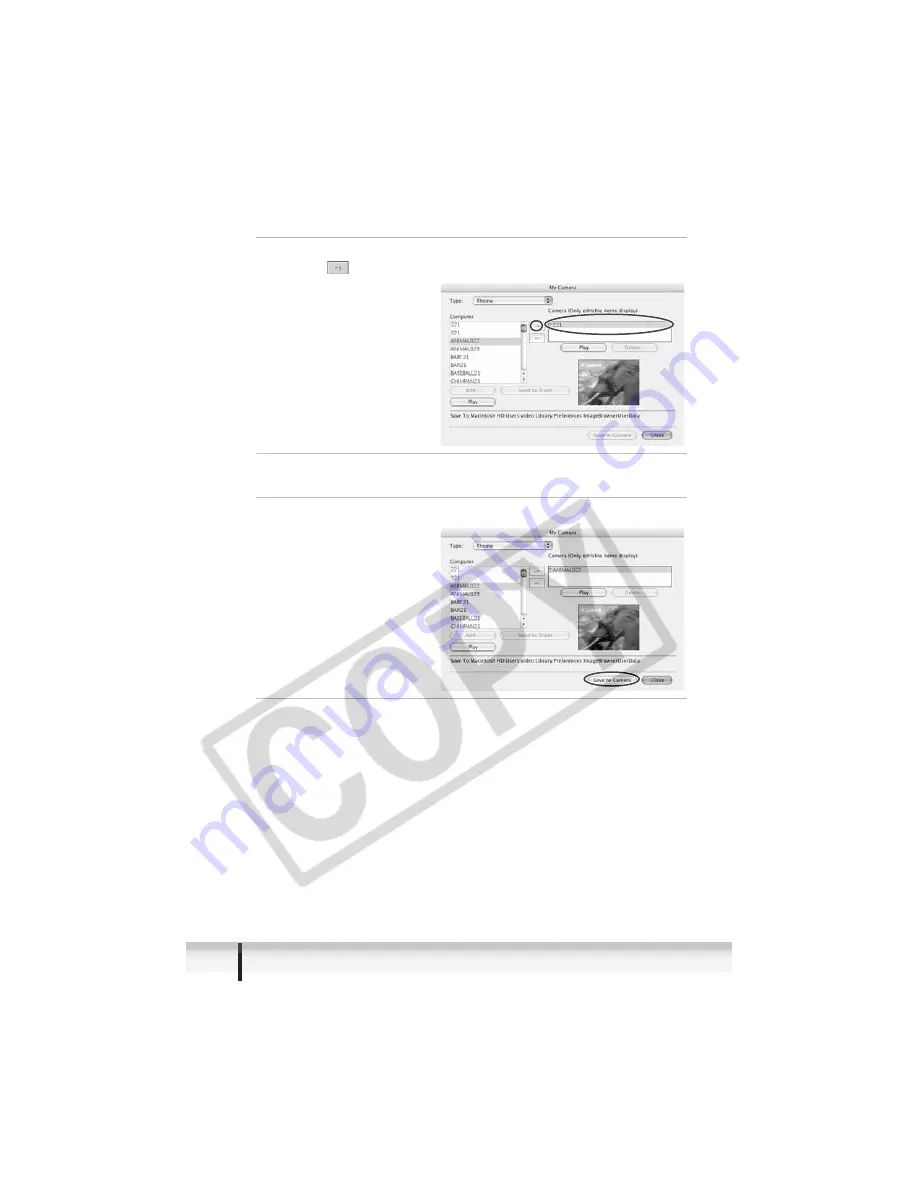
Applying the Camcorder Settings from the Computer

2

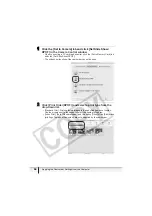
Select the setting you wish to replace in the [Camera] list 
and click 

 .

3

On the confirmation window, click [OK].

The selected setting replaces the old setting and appears in the [Camera] list. 

4

Click [Save to Camera].

5

On the confirmation window, click [OK].

If you wish to use this setting on the camcorder, change the My Camera Setting 
on the camcorder itself. Refer to the Camcorder Instruction Manual for details.

Содержание ZR200

Страница 1: ...E F Es Digital Video Software Instruction Manual Manuel d instruction Manual de Instrucciones Version 14...

Страница 2: ...CENSE RENT LEASE LOAN CONVEY OR OTHERWISE USE TRANSFER COPY TRANSLATE CONVERT TO ANOTHER PROGRAMMING LANGUAGE ALTER MODIFY DECOMPILE OR DISASSEMBLE THE SOFTWARE IN WHOLE OR IN PART EXCEPT AS EXPRESSLY...

Страница 3: ...ffect until expiration of all copyright interests in the SOFTWARE unless earlier terminated You may terminate this Agreement by destroying the SOFTWARE This Agreement will also terminate without notic...

Страница 4: ...or any intellectual property of Canon Nothing contained in Paragraph 1 shall be construed to give Canon any ownership rights in any images graphics or textual material that you save in connection with...

Страница 5: ...log Window 29 Organizing Images 30 Classifying the Images 30 Sort by the Shooting Date 30 Sort by the Star Rating 31 Renaming Multiple Files 33 Searching for Images 34 Applying Star Rating 36 Specifyi...

Страница 6: ...Settings 61 Adding Still Images to the My Camera Window 63 Applying DPOF Settings 63 Reviewing and Changing the Settings of the Camcorder 66 Uninstalling the Software 67 Uninstalling ImageBrowser and...

Страница 7: ...unction of the camcorder the software memory cards MultiMediaCards or SD Memory Cards personal computers or peripheral devices or due to use of a memory card not formatted by a Canon camcorder Tradema...

Страница 8: ...ng accessories to download recorded images from a memory card to your computer IFC 300PCU USB Cable DIGITAL VIDEO SOLUTION DISK The explanations in this manual use mainly Mac OS X version 10 3 screen...

Страница 9: ...ageBrowser and PhotoStitch do not operate on disks formatted with the Unix File System UFS A CD ROM drive is required to install the software OS Mac OS X version 10 1 5 10 2 10 3 Computer Model Comput...

Страница 10: ...till images with a background frame title and comments 54 Printing indexes 56 CameraWindow Selecting a method to download images in the Camera Control window 17 Viewing images recorded in a memory car...

Страница 11: ...e downloaded Two files are created in the camcorder for example MVI_0001 AVI and MVI_0001 THM MVI_0001 THM files cannot be downloaded but movies can still be played back on the computer Mac OS X versi...

Страница 12: ...ideo Software Install 5 Select Easy Installation and click Next To install the software individually select Custom Installation 6 Read the license agreement and click Agree 7 Review the installation s...

Страница 13: ...E 13 Installing the Digital Video Software Macintosh 8 When the Installation has finished message appears click OK 9 After the installation is complete restart the computer as prompted...

Страница 14: ...nd try reconnecting the camcorder Do not connect two or more camcorders to the same computer via the USB interface The connections may not operate correctly Never allow the computer to go into standby...

Страница 15: ...eading or writing from or to the memory card Failure to do so may cause memory card data to become corrupted Do not open the memory card cover remove the memory card or detach the USB cable Do not tur...

Страница 16: ...loading Images ImageBrowser 3 Select Other from When a camera is connected open 4 Select CameraWindow and click Open CameraWindow is normally installed in Applications Canon Utilities CameraWindow 5 C...

Страница 17: ...ck Open 4 Close Image Capture Downloading Images to the Computer Auto downloading 1 Connect the camcorder to the computer 14 2 Click Starts to download images ImageBrowser starts To start ImageBrowser...

Страница 18: ...rol window click Quit Applying Auto downloading Settings This task allows you to apply auto downloading settings You can specify the types of images and the destination folder 1 In the Camera Control...

Страница 19: ...Memory Card is activated during image transfer the images will not be marked as already transferred even having selected New images and downloaded 3 Specify the destination folder settings and click N...

Страница 20: ...mage is downloaded and click OK 5 Click Finish ImageBrowser starts To start ImageBrowser manually double click the folder in which you installed the program followed by the Canon Utilities and ImageBr...

Страница 21: ...E 21 Downloading Images ImageBrowser Macintosh Downloading the Selected Images 1 Connect the camcorder to the computer 14 2 Click Lets you select and download images CameraWindow appears...

Страница 22: ...wn the Option Shift key selects also all images between the 2 images Clicking on different images while holding down the Shift key selects multiple images 4 Confirm the settings and click Start Downlo...

Страница 23: ...a method to download the images Starts to download images CameraWindow appears and the images in the memory card are downloaded To apply auto downloading settings refer to Applying Auto downloading Se...

Страница 24: ...rs that you can use on your computer If you click the disclosure triangle on the left edge of the display you can switch between collapsing and expanding the contents of that folder Selecting the Favo...

Страница 25: ...anel from the View menu shows the detailed information You can change file name and comments Selecting a different image at the bottom of the Browser Area switches the displayed image List The images...

Страница 26: ...leased the bar The date time at which the images were shot appears on the red line You can change this date time by double clicking it on the display A window similar to the one below appears Specify...

Страница 27: ...indow 3 Selecting Images Allows to select all images and deselects images 4 Display Pattern Allows to change the appearances of the Browser Window 1 Canon Camera Opens CameraWindow 2 View Image Displa...

Страница 28: ...s adjusting colors and crop the image or registering other image Unable to use when the multiple images are selected 4 Number of Displays Allows you to display multiple images at the same time 5 Synch...

Страница 29: ...rom the icon Either drag the mouse on the image or specify the cropping area and click Crop Color Adjustment Dialog Window Selecting Edit still image Adjust Color from the Edit menu or selecting Adjus...

Страница 30: ...sort images into a folder according to the shooting date or Star Rating Sort by the Shooting Date 1 Select the images you wish to classify and select Organize Image Sort Images from the File menu 2 S...

Страница 31: ...tosh 3 Specify the sort settings and click OK The selected images are classified into the specific folder Sort by the Star Rating 1 Select the images you wish to classify and select Organize Image Sor...

Страница 32: ...32 Organizing Images 2 Select The files will be organized by Star Rating and click Next 3 Specify the sort settings and click OK...

Страница 33: ...ws you to rename multiple files at the same time or to rename and copy multiple files 1 Select the images you wish to rename and select Organize Image Rename from the File menu 2 Specify the settings...

Страница 34: ...ment or Keywords 1 Select a folder in the explorer view 2 Select Search from the File menu 3 Specify the search conditions and click Search Now The search results are displayed as thumbnails Select at...

Страница 35: ...d perform another search click Back and repeat steps 3 4 The images of the search result are displayed in the Search Results folder You can print or copy these images to another folder The images will...

Страница 36: ...d in the Browser Window The default setting of the Star Rating is two stars 1 Select the image to which you wish to apply the Star Rating 2 Select Change Star Rating from the Edit menu You can display...

Страница 37: ...es Macintosh 3 Place a check mark next to the keyword you wish to apply and click OK You can add and delete keywords or change the keyword list in the Manage Keywords window by selecting Keyword Manag...

Страница 38: ...images and click 2 Effect To change the order of images select an image and click Move Left or Move Right Operational instructions are displayed in the upper section of the window Plays back the movi...

Страница 39: ...ed to select a transition box in the Storyboard Area 5 Set the audio and click 4 Save You can add an MP3 AIFF or WAV file as audio 6 Select a file type and click Save Select the destination folder inp...

Страница 40: ...scene as a still image with a movie icon 1 In the Browser Area double click a thumbnail with a movie icon The Image Viewer window appears 2 Click the Play icon in the Image Viewer window The movie wil...

Страница 41: ...the size resolution or data for of selected still images and save them as new files and allows to save the shooting properties of the still images and movies to text files or copy them with new names...

Страница 42: ...d Edit and Save Image You can convert still images to another file type resize and save them as new files You can select the file type from BMP PICT JPEG and TIFF You can also specify a prefix to be a...

Страница 43: ...d Export as a Screensaver You can export and save the image as a screen saver When you have selected Export an Image as Wallpaper You can export and save the image as a desktop wallpaper This task can...

Страница 44: ...with JPEG compression can be saved to the memory card TIFF PICT Windows bitmap will be converted to JPEG compression and saved to the memory card You can also save still images to a memory card by usi...

Страница 45: ...will be recorded to the memory card When recording is complete the images will appear in the CameraWindow Saving Sample Images to the Memory Card You can save sample images for card mix to the memory...

Страница 46: ...e Set to Camera tab in the Camera Control window and Uploads images to the camera 4 Double click the CD ROM icon followed by the DVC CARD IMAGE folder The folders CAMERA CHROMA CARD ANIMATION CARD CHR...

Страница 47: ...ION CARD CHROMA or CARD LUMINANCE folder select the image you wish to copy to the camcorder and click Open 6 In the Add image window click Add The selected images will be recorded to the memory card W...

Страница 48: ...l message 1 Select the images you wish to send in the Browser Area 2 From the Internet menu select Create Image for Email 3 Specify the image size and click Next When you select Send without changing...

Страница 49: ...duction ratio relative to the original size of the image Quality Select the image quality The lower the quality the rougher the image becomes but the size of the file also becomes smaller Compress Use...

Страница 50: ...m the Browser Area to the new message window Click Preview to check the changed image The image will be saved to the Email Images folder in the explorer view section You can set the e mail software to...

Страница 51: ...nds Control with Mouse or Keypad Advances the slide show manually with the mouse or keyboard Repeat Continuously Runs the slide show in a loop Hides buttons Hides the buttons during the slide show Tra...

Страница 52: ...nstruction Manual to learn how to record in Stitch Assist mode The following instruction explains how to merge still images recorded in Stitch Assist mode with the camcorder Still images recorded in S...

Страница 53: ...layed in the upper section of the window 4 Click Start 5 Select 3 Save and then click Save Select the destination folder input the file name and click Save In the View the Saved Image window click Yes...

Страница 54: ...u can select the layout when printing still images Movies cannot be printed Do not open the memory card cover remove the memory card detach the USB cable or turn off the camcorder while data is being...

Страница 55: ...ges Click the still image and then the Edit menu and select Edit Caption Change the default number of still images printed per page Click this to rotate the selected still image Change the Layout Drag...

Страница 56: ...lows you to freely change the size and position of the still images for printing The other options allow you to print an index 4 Select a paper size and click OK The Print window opens allowing you to...

Страница 57: ...r Exif Print Still images shot with camcorders complying with the Exif 2 2 standard incorporate shooting settings information such as the shooting conditions and scene mode along with the image data T...

Страница 58: ...pherals such as microphones Check if your computer settings allow recording The sound cannot be played back on the camcorder 1 In the Browser Area select a still image and select Sound Record from the...

Страница 59: ...pied in AIFF format extension AIF to the same folder as the still image To remove sound from a still image select Sound Send to Trash from the File menu disappears and the copied sound file will be de...

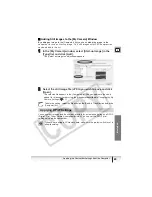
Страница 60: ...th the same word e g Animal Baseball You can use the pre recorded My Camera Settings 61 or add still images to the My Camera Settings 63 When you start the My Camera window form the Camera Control win...

Страница 61: ...tion self timer and shutter sound Displays the My Camera Settings saved on the computer Add an image sound file to the Computer list Deletes a setting from the Computer list Selects the type of the My...

Страница 62: ...the confirmation window click OK The selected setting replaces the old setting and appears in the Camera list 4 Click Save to Camera 5 On the confirmation window click OK If you wish to use this sett...

Страница 63: ...still image file JPEG you wish to save and click Open The selected file appears in the Computer list You can now save the newly added file to the camcorder using the procedures described in Changing t...

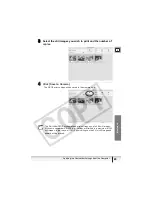
Страница 64: ...Set Slide Show DPOF The slide show function of the camcorder cannot be used 2 Click Print Order DPOF and select a print type from the drop down list Standard Print Prints selected images in the speci...

Страница 65: ...es 4 Click Save to Camera The DPOF print settings will be saved to the memory card The Edit Slide DPOF window allows print settings on up to 998 still images With some camcorders DPOF print settings a...

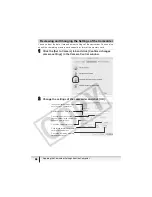
Страница 66: ...d 1 Click the Set to Camera tab and click Confirms changes camera settings in the Camera Control window 2 Change the settings of the camcorder and click OK Input a camcorder owner name here up to 31 c...

Страница 67: ...red to fix corrupted files Uninstalling ImageBrowser and PhotoStitch Move the program s folder into the Trash to uninstall programs such as ImageBrowser and PhotoStitch If the program folders contain...

Страница 68: ...onnection Ensure that you are using the correct cable and that its connectors are in good shape If you are experiencing operational problems detach the USB cable from the camcorder and computer and te...

Страница 69: ...1 800 828 4040 Mon Fri 9 AM to 8 PM Eastern Time CANADA Canon CANADA Inc Tel Canada 1 800 OK CANON 1 800 652 2666 ASIA Canon Hongkong Co Ltd 19 F The Metropolis Tower 10 Metropolis Drive Hunghom Kowlo...

Отзывы: