background image


86 

Scan Kiosk II V2.0 User’s Guide 

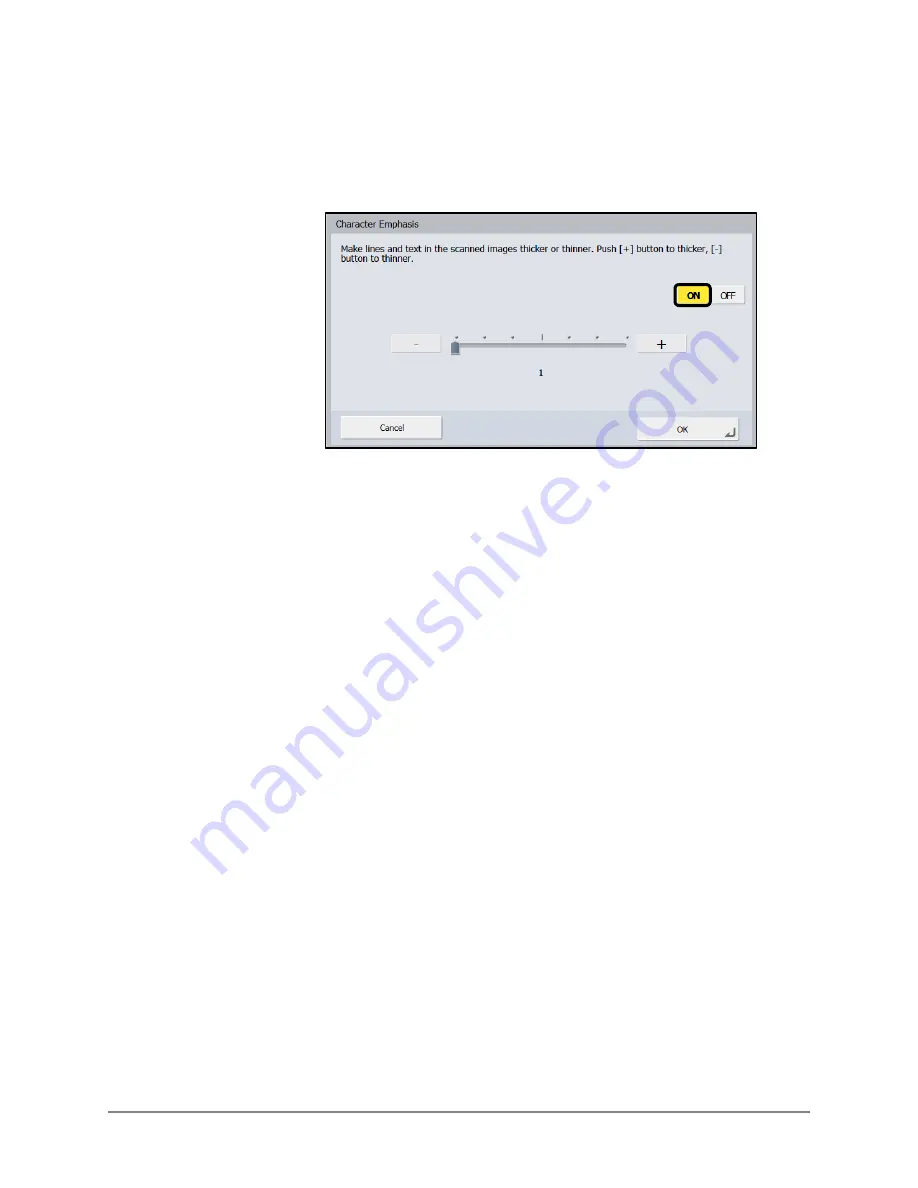
6.12 

If you want to darken or lighten text and lines in a scanned document, press 
the button next to <Character Emphasis>. 
 
6.12.1 

To specify the Character Emphasis setting, press [ON]. 


6.12.2 

Press [+] to the desired level to darken lines and text, or press [-] to 
lighten text and lines in a scanned document 

 press [OK]. 

 
If you do not want to adjust the darkness of lines and text, press 
[Cancel]. 
 
The Character Emphasis settings are complete. 


Содержание Scan Kiosk II

Страница 1: ...18001 20 UD2 001 Version 2 0 User s Guide...

Страница 2: ...2 Scan Kiosk II V2 0 User s Guide This page is intentionally left blank...

Страница 3: ...er 2 Using Scan Kiosk II V2 0 19 2 1 Logging On 19 2 2 Scanning to an E Mail Address 22 2 3 Scanning to an FTP Server 29 2 4 Scanning to a Shared Folder 36 2 5 Scanning to USB Memory 43 2 6 Scanning t...

Страница 4: ...w Address 185 3 3 2 Modifying an Address 206 3 3 3 Copying an Address 212 3 3 4 Deleting an Address 219 3 3 5 Exporting an Address 223 3 3 6 Importing an Address 228 3 4 Showing the Operation History...

Страница 5: ...is Manual The following symbols are used in this manual to explain procedures restrictions handling precautions and instructions that should be observed for safety WARNING Indicates a warning for oper...

Страница 6: ...marked with a circle as shown below When multiple keys and buttons can be pressed all keys and buttons are marked Example 1 Press FTP Hyperlinks When this manual is in its native PDF form the blue un...

Страница 7: ...the trademarks of their respective owners Copyright Copyright 2020 by Canon U S A Inc All rights reserved No part of this publication may be reproduced or transmitted in any form or by any means elect...

Страница 8: ...locations where a considerable amount of dust accumulates Avoid warm or humid locations such as in the vicinity of a water faucet water heater or humidifier Avoid locations where the fumes from ammon...

Страница 9: ...any way as this is extremely dangerous The power cord and AC adapter may become damaged if they are often stepped on or if heavy objects are placed on them Continued use of a damaged power cord and AC...

Страница 10: ...y to take the AC adapter apart or modify it in any way When cleaning the product turn the power OFF and disconnect the power cord from the power outlet Do not allow water or flammable substances alcoh...

Страница 11: ...keyboard and an overview of the User settings 1 1 Overview Scan Kiosk II V2 0 consists of a desktop Windows tablet PC and stand support for a specific series of DR scanners and optional USB keyboard S...

Страница 12: ...on Tablet PC Stand Provides a stable platform to which the tablet PC must be attached Touch Panel Display Touch this screen to operate the Scan Kiosk II V2 0 application Bottom View Serial Ports Not u...

Страница 13: ...ce s IP address Press User Settings to open the User Settings menu screen The button is grayed out when the user is in the User Settings menu Press Administrator Settings to open the Administrator Set...

Страница 14: ...o start the scan to shared folder flow and access the Address selection screen Press USB memory to start the scan to USB memory flow Press FAX to start the scan to fax flow FAX is only displayed if th...

Страница 15: ...B keyboard that is attached to the Windows tablet PC 1 3 1 Entering Characters Using the Virtual Keyboard If you touch a text box and the pop up virtual keyboard appears enter characters using the key...

Страница 16: ...ymbols press To go to the next field on the screen press Tab To change the layout of the keyboard press To fix the keyboard to the bottom of the screen press To enable a floating keyboard so that you...

Страница 17: ...Scan Kiosk II V2 0 User s Guide 17 2 When you have entered all characters press to close the keyboard...

Страница 18: ...r characters using that keyboard 1 Press the text boxes into which you want to enter characters make sure the cursor is focused in the text box enter characters If a virtual keyboard appears press to...

Страница 19: ...shared folder an e mail address if a mail server is configured and to USB memory 2 1 Logging On If the Administrator configured an Authentication server and log on credentials you must log on to the...

Страница 20: ...If the Administrator configured the List Type Login screen select your user name from the list enter your password in the Password text box For instructions on entering characters from the pop up vir...

Страница 21: ...from the Authentication Server drop down list select the Authentication Server enter your user name in the User name text box enter your password in the Password text box For instructions on entering...

Страница 22: ...an to an e mail address IMPORTANT The Administrator must set up a mail server before you can send a scanned document to an e mail address The Home screen only shows E mail if a mail server has been co...

Страница 23: ...erver has been configured by the Administrator My Address Book Contains all of your registered destinations that are stored on the device Shared Address Book Contains all of the shared registered dest...

Страница 24: ...mail address from the list To scroll through the list of e mail addresses press or To filter the list by name or number press 4 Press Next If you do not want to scan and send your document to the sele...

Страница 25: ...ttings see Specifying the Scan and Send Settings on p 65 IMPORTANT If Send the files immediately after scanning is set to ON in Send Settings of the Scan Send Settings screen scanning starts immediate...

Страница 26: ...ce the next document that you want to scan into the scanner press Continue to scan more documents When you are finished scanning press Complete Press Complete to go to the Preview and Send screen Pres...

Страница 27: ...the scanned file s size in KB Press to view different areas of the scanned image If the image is enlarged you can use your finger to move around the image Press to rotate the image 90 degrees each ti...

Страница 28: ...sent without displaying the Address Confirmation screen 9 Confirm the e mail addresses to which you want to send the scanned images press OK If an error message appears press OK check the address sett...

Страница 29: ...FTP Server This section describes how to scan to an e mail address IMPORTANT The Administrator must set up an FTP server before you can send a scanned document to it 1 From the Scan Kiosk II V2 0 Home...

Страница 30: ...erver has been configured by the Administrator My Address Book Contains all of your registered destinations that are stored on the device Shared Address Book Contains all of the shared registered dest...

Страница 31: ...TP server from the list To scroll through the list of FTP servers press or To filter the list by name or number press 4 Press Next If you do not want to scan and send your document to the selected FTP...

Страница 32: ...ttings see Specifying the Scan and Send Settings on p 65 IMPORTANT If Send the files immediately after scanning is set to ON in Send Settings of the Scan Send Settings screen scanning starts immediate...

Страница 33: ...ce the next document that you want to scan into the scanner press Continue to scan more documents When you are finished scanning press Complete Press Complete to go to the Preview and Send screen Pres...

Страница 34: ...the scanned file s size in KB Press to view different areas of the scanned image If the image is enlarged you can use your finger to move around the image Press to rotate the image 90 degrees each ti...

Страница 35: ...ent without displaying the Address Confirmation screen 9 Confirm the FTP server address to which you want to send the scanned images press OK If an error message appears press OK check the address set...

Страница 36: ...osk II V2 0 User s Guide 2 4 Scanning to a Shared Folder This section describes how to scan to a shared folder 1 From the Scan Kiosk II V2 0 Home screen press Shared folder The Address selection scree...

Страница 37: ...ress Book Contains all of your registered destinations that are stored on the device Shared Address Book Contains all of the registered destinations that are stored in a shared folder on an Address Bo...

Страница 38: ...ared folder from the list To scroll through the list of folders press or To filter the list by name or number press 4 Press Next If you do not want to scan and send your document to the selected folde...

Страница 39: ...ttings see Specifying the Scan and Send Settings on p 65 IMPORTANT If Send the files immediately after scanning is set to ON in Send Settings of the Scan Send Settings screen scanning starts immediate...

Страница 40: ...ce the next document that you want to scan into the scanner press Continue to scan more documents When you are finished scanning press Complete Press Complete to go to the Preview and Send screen Pres...

Страница 41: ...the scanned file s size in KB Press to view different areas of the scanned image If the image is enlarged you can use your finger to move around the image Press to rotate the image 90 degrees each ti...

Страница 42: ...image is sent without displaying the Address Confirmation screen 9 Confirm the shared folders to which you want to send the scanned images press OK If an error message appears press OK check the send...

Страница 43: ...cribes how to scan to a USB memory stick 1 Place the document you want to scan into the scanner 2 Insert your USB memory stick into one of the USB ports on the Scan Kiosk II V2 0 tablet PC 3 From the...

Страница 44: ...ectly in the Path text box press Go You can also press Down to go into the directory of folders on the USB memory stick that is displayed Free disk space xx MB shows how much space is left on your USB...

Страница 45: ...t of folders press or If you want to add new folders change the folder name or delete folders from your USB memory stick press Edit If you want to delete all files on your USB memory stick press Forma...

Страница 46: ...Settings see Specifying the Scan and Send Settings on p 65 IMPORTANT If Send the files immediately after scanning is set to ON in Send Settings of the Scan Send Settings screen scanning starts immedia...

Страница 47: ...e place the next document that you want to scan into the scanner press Continue to scan more documents When you are finished scanning press Complete Press Complete to go to the Preview and Send screen...

Страница 48: ...the scanned file s size in KB Press to view different areas of the scanned image If the image is enlarged you can use your finger to move around the image Press to rotate the image 90 degrees each ti...

Страница 49: ...e image is sent without displaying the Address Confirmation screen 11 Confirm the destination to which you want to send the scanned images press OK If an error message appears press OK check the send...

Страница 50: ...es how to scan to a fax server IMPORTANT The Administrator must set up a fax server before you can send a scanned document to it The Home screen only shows FAX if a fax server has been configured 1 Fr...

Страница 51: ...erver has been configured by the Administrator My Address Book Contains all of your registered destinations that are stored on the device Shared Address Book Contains all of the shared registered dest...

Страница 52: ...r number from the list To scroll through the list of Fax addresses press or To filter the list by name or number press 4 Press Next If you do not want to scan and send your document to the selected fa...

Страница 53: ...ttings see Specifying the Scan and Send Settings on p 65 IMPORTANT If Send the files immediately after scanning is set to ON in Send Settings of the Scan Send Settings screen scanning starts immediate...

Страница 54: ...ce the next document that you want to scan into the scanner press Continue to scan more documents When you are finished scanning press Complete Press Complete to go to the Preview and Send screen Pres...

Страница 55: ...the scanned file s size in KB Press to view different areas of the scanned image If the image is enlarged you can use your finger to move around the image Press to rotate the image 90 degrees each ti...

Страница 56: ...s sent without displaying the Address Confirmation screen 9 Confirm the fax address to which you want to send the scanned images press OK If an error message appears press OK check the address setting...

Страница 57: ...Scan Kiosk II V2 0 User s Guide 57 2 7 Scanning to a Printer This section describes how to scan to printer 1 From the Scan Kiosk II V2 0 Home screen press Printer The Print Settings screen appears...

Страница 58: ...P address of the printer you want to use in the Printer IP address text box If you want to connect to the printer through a firewall select the Use passive mode check box IMPORTANT The destination pri...

Страница 59: ...3 If the destination printer requires user credentials enter your user name in the User name text box enter your password in the Password text box If you want your credentials saved to the database s...

Страница 60: ...s SNMP enabled press Confirmation next to Check SNMP enabled printer status The result is displayed under Check SNMP enabled printer status 5 Press Next If you do not want to scan and send your docume...

Страница 61: ...ttings see Specifying the Scan and Send Settings on p 65 IMPORTANT If Send the files immediately after scanning is set to ON in Send Settings of the Scan Send Settings screen scanning starts immediate...

Страница 62: ...ce the next document that you want to scan into the scanner press Continue to scan more documents When you are finished scanning press Complete Press Complete to go to the Preview and Send screen Pres...

Страница 63: ...the scanned file s size in KB Press to view different areas of the scanned image If the image is enlarged you can use your finger to move around the image Press to rotate the image 90 degrees each ti...

Страница 64: ...without displaying the Address Confirmation screen 10 Confirm the IP address of the printer to which you want to send the scanned images press OK If an error message appears press OK check the address...

Страница 65: ...The procedure below demonstrates setting the scan and send settings from the E mail screen but the procedure is the same for all the Scan Kiosk II V2 0 user functions IMPORTANT The Home screen only s...

Страница 66: ...erver has been configured by the Administrator My Address Book Contains all of your registered destinations that are stored on the device Shared Address Book Contains all of the shared registered dest...

Страница 67: ...mail address from the list To scroll through the list of e mail addresses press or To filter the list by name or number press 4 Press Next If you do not want to scan and send your document to the sele...

Страница 68: ...Guide 5 Specify the Scan Settings 5 1 Under Scan Settings select the paper size of the document that you want to scan Use the scroll bar on the right to scroll through the list of paper sizes The def...

Страница 69: ...White Black and White Select to scan your document in black and white Error Diffusion Select to smooth out the pixels in a scanned document Text enhance Select to sharpen the text in a scanned docume...

Страница 70: ...70 Scan Kiosk II V2 0 User s Guide 5 3 From the Resolution drop down list select the resolution in which you want to scan your document The default scanning resolution is 150dpi...

Страница 71: ...et to less than 400dpi If you set Skip Blank Page the scanning speed may be reduced Simplex Select if you are scanning a one sided document Duplex Select if you are scanning a two sided document Skip...

Страница 72: ...72 Scan Kiosk II V2 0 User s Guide 6 To specify the detailed scan settings press Detailed Settings The Detailed Settings screen appears...

Страница 73: ...sensor and want the sensor to detect when two or more pages are fed together during a scan press the button next to Double feed detection by Ultrasonic Double feed detection by Ultrasonic is grayed ou...

Страница 74: ...n Area specify how much vertical space overlap in millimeters from the top position and bottom position of the page there should be before scanning stops when a double feed is detected press OK If you...

Страница 75: ...nt to specify the Double feed detection by length setting press OFF IMPORTANT Using the length of the first page of the document as a reference the scanner determines a double feed when it detects a d...

Страница 76: ...next to Document orientation 6 3 1 Press the desired angle you would like to rotate the scanned image press OK Select Auto to rotate the scanned image correctly based on the orientation of the text If...

Страница 77: ...d a scanned image press ON next to Remove Border If you do not want to remove a border around a scanned image press OFF 6 5 If you want to remove the punch holes from a scanned document press ON next...

Страница 78: ...ided document 180 degrees press ON next to Rotate 180 degrees Back Side If you do not want to specify the Rotate 180 degrees Back Side setting press OFF IMPORTANT To use this setting you must set the...

Страница 79: ...Scan Kiosk II V2 0 User s Guide 79 6 7 If you want to make sure that the scanned image is straight not askew press the button next to Deskew...

Страница 80: ...ects if the image is skewed while the document is being scanned and corrects the image Straightens with angle contents of fed documents Detects if the image and contents in the image are skewed while...

Страница 81: ...II V2 0 User s Guide 81 6 8 If you want to process the scanned image so that the background is smooth press ON next to Background smoothing If you do not want to set the Background smoothing setting...

Страница 82: ...her side of a scanned document press the button next to Bleed through reduction Specify this setting when scanning thin documents with text or images on both sides 6 9 1 To specify the Bleed through r...

Страница 83: ...hrough level the more the bleed through affect is reduced IMPORTANT Make sure to adjust the bleed through reduction level to match the type of document you are scanning Bleed through reduction cannot...

Страница 84: ...matically remove isolated 3 x 3 black dots on white backgrounds or isolated 3 x 3 white dots on black backgrounds press ON next to Erase Dot If you do not want to specify the Erase Dot setting press O...

Страница 85: ...an Kiosk II V2 0 User s Guide 85 6 11 If you want to remove protrusions in contours in scanned images press ON next to Erase Notch If you do not want to remove protrusions from scanned images press OF...

Страница 86: ...next to Character Emphasis 6 12 1 To specify the Character Emphasis setting press ON 6 12 2 Press to the desired level to darken lines and text or press to lighten text and lines in a scanned document...

Страница 87: ...User s Guide 87 6 13 To adjust the contrast of scanned images press the button next to Contrast 6 13 1 Press Low or High to adjust the contrast of colors in the scanned image 6 13 2 Press OK The cont...

Страница 88: ...d back sides have different densities and you want to change the brightness and contrast of these two sides press the button next to Back side Brightness contrast IMPORTANT The Back side Brightness co...

Страница 89: ...htness scale activates 6 14 1 1 Press Dark or Bright to adjust the back side brightness 6 14 2 To activate the back side contrast adjustment scale press the Use back side contrast check box A green ch...

Страница 90: ...nt to detect the color of your document automatically and scan it accordingly press the button next to Auto Color Detection Settings IMPORTANT The Auto Color Detection Settings button only activates w...

Страница 91: ...d white document is detected it is scanned as a grayscale image Color or Binary If a color document is detected it is scanned as a color image If a black and white document is detected it is scanned a...

Страница 92: ...92 Scan Kiosk II V2 0 User s Guide 7 Press OK The Detailed Scan Settings are complete If you do not want to specify the Detailed Scan Settings press Cancel...

Страница 93: ...2 0 User s Guide 93 8 To manually adjust the brightness of the scanned image press the scale marker and move it to the desired brightness setting or press Dark or Bright until the desired brightness s...

Страница 94: ...94 Scan Kiosk II V2 0 User s Guide 9 If you want to view your user name and e mail address details press Details view your information press Back to return to the Scan Send Settings screen...

Страница 95: ...Scan Kiosk II V2 0 User s Guide 95 10 Specify the Send Settings 10 1 If you want to change the file format of your scanned image press File Format press TIFF JPEG or PDF...

Страница 96: ...ettings press OK Quality Press High Compression or High Quality to select the compression rate of the TIFF file Multi page settings Select Single page Front back separate file to send each side of eac...

Страница 97: ...Scan Kiosk II V2 0 User s Guide 97 10 1 2 If you selected JPEG press High Compression or High Quality to select the compression rate of the JPEG file press OK...

Страница 98: ...ple pages Compression Select Standard or High Quality as the compression method for the PDF file OCR Select the OCR Character Recognition check box to make the text in the PDF file searchable If you s...

Страница 99: ...word press OK 10 1 3 3 If you want to set a password to restrict anyone from editing the document press the Use permissions password to restrict editing security settings check box press Permissions P...

Страница 100: ...100 Scan Kiosk II V2 0 User s Guide 10 1 4 Press OK The File Format settings are complete If you do not want to specify the File Format settings press Cancel...

Страница 101: ...raighten a scanned image if it was fed askew Prescan Select to scan the first page of a document so that you can view the results to adjust the brightness and contrast before scanning the entire docum...

Страница 102: ...05142016154030123 ddmmyyyy File name 14052016154030123 If Custom File Name settings are configured by the Administrator you can select Custom to add the custom file name to the file name of the scann...

Страница 103: ...the Home screen has been restricted by the Scan Kiosk II V2 0 Administrator Logout If you logged on to Scan Kiosk II V2 0 you are logged out after your image file is sent If you did not log on Logout...

Страница 104: ...he Batch Separation settings from the E mail screen but the procedure is the same for all the Scan Kiosk II V2 0 user functions IMPORTANT To enable the Batch Separation settings the Scan Kiosk Adminis...

Страница 105: ...server has been configured by the Administrator My Address Book Contains all of your registered destinations that are stored on the device Shared Address Book Contains all of the shared registered des...

Страница 106: ...mail address from the list To scroll through the list of e mail addresses press or To filter the list by name or number press 4 Press Next If you do not want to scan and send your document to the sel...

Страница 107: ...Scan Kiosk II V2 0 User s Guide 107 5 Press Send Settings 6 Press or until Batch Separation appears press the button next to Batch separation...

Страница 108: ...nt to have your file separated into batch files after a blank page is detected This enables you to create multiple page files Patchcode Select if you want to have your file separated into batch files...

Страница 109: ...pattern has different functions PATCH T When a PATCH T sheet is detected the file is separated at the start of the image of the next sheet You can specify whether to save the patch code sheet image by...

Страница 110: ...paper separated file If you do not want to save a PATCH T patch code sheet press OFF 7 3 If you selected Specified Pages enter the number of pages to scan before batch separation occurs 8 Press OK If...

Страница 111: ...you log on set to display your e mail address at the top of the address list and create Custom File Name and Index settings Job Button Settings Register and manage your job buttons Address Book Settin...

Страница 112: ...0 User s Guide 2 From the Scan Kiosk II V2 0 Home screen press User Settings The User Settings screen appears 3 Press User Administration The User Administration screen appears To go back to the previ...

Страница 113: ...box in the Password field enter a new password enter the same password in the Password confirmation field For instructions on entering characters from the virtual keyboard or USB keyboard see Enterin...

Страница 114: ...Book screen drop down list select My Address Book or Shared Address Book The default address book is My Address Book The Shared Address Book is stored in the Scan Kiosk II V2 0 application Any user w...

Страница 115: ...b Button or Shared Job Button The default job button screen is My Job Button screen You can use this screen to configure your user specific job button functions The Shared Job Button screen is configu...

Страница 116: ...e or Job Button screen The default screen is the Home screen If you want your initial screen to be the Job Button screen select Job Button screen IMPORTANT If the Administrator has restricted the use...

Страница 117: ...your e mail address to be selected by default and displayed at the top of the address list Your e mail address is displayed even if it has not been registered in the address book The default Send to...

Страница 118: ...118 Scan Kiosk II V2 0 User s Guide 5 If necessary press Custom file name to create a custom file name that is appended to your scanned files The Custom File Name screen appears...

Страница 119: ...between character strings in the file name and then select to use a hyphen or underscore character from the drop down list The default separator is Hyphen String Specify a text string to include in th...

Страница 120: ...able items on the Custom file name screen 5 1 2 To change the order position of an item in the file name select the item press Up or Down The file name changes as you make your selections as shown at...

Страница 121: ...phen You can change this to Underscore on the Custom File Name screen 5 1 4 If you want to reset the order of the items to the default order press Reset to default order The order of the items returns...

Страница 122: ...ect Hyphen or _ Underscore from the drop down list The Enable check box may have already been selected from the Set the order of information screen See step 5 1 3 Next to Custom file name at the top o...

Страница 123: ...structions on entering characters from the virtual keyboard or USB keyboard see Entering Characters on p 15 Next to Custom file name at the top of the screen the file name changes as you make your sel...

Страница 124: ...eck box next to User name The Enable check box may have already been selected from the Set the order of information screen See step 5 1 3 Next to Custom file name at the top of the screen the file nam...

Страница 125: ...te format The Enable check box may have already been selected from the Set the order of information screen See step 5 1 3 Next to Custom file name at the top of the screen the file name changes as you...

Страница 126: ...at The Enable check box may have already been selected from the Set the order of information screen See step 5 1 3 The time set on the device is used 5 8 If you want to add the device s name to the fi...

Страница 127: ...en there are one or more pages or when the Batch Separation function is set to On 5 9 1 Press the Start number text box enter the starting value of the counter 5 9 2 Press the Number of digits text bo...

Страница 128: ...8 Scan Kiosk II V2 0 User s Guide 6 If necessary press Index settings to specify the content of index files metadata that is attached to the user s scanned image files The Index Settings screen appear...

Страница 129: ...Scan Kiosk II V2 0 User s Guide 129 6 1 Press XML or CSV to select the file format of the index files CSV is the default file format...

Страница 130: ...Kiosk II V2 0 User s Guide 6 2 Press the button next to Set the order of information to configure the order of the items that are included in the index file and enable Index items on the Index setting...

Страница 131: ...items on the Index settings screen 6 2 2 To change the order position of an item in the index file select the item press Up or Down The items are added as you make your selections as shown at the bott...

Страница 132: ...x file press the Index string text box enter the text string press the Field name text box enter a name for the Index String field For instructions on entering characters from the virtual keyboard or...

Страница 133: ...l keyboard or USB keyboard see Entering Characters on p 15 The Enable check box may have already been selected from the Set the order of information screen See step 6 2 1 User is the default field nam...

Страница 134: ...eld For instructions on entering characters from the virtual keyboard or USB keyboard see Entering Characters on p 15 The Enable check box may have already been selected from the Set the order of info...

Страница 135: ...box enter a name for the Device Name field For instructions on entering characters from the virtual keyboard or USB keyboard see Entering Characters on p 15 The Enable check box may have already been...

Страница 136: ...or the File Name field File Size Press the File Size check box to include the file size in the index file Then enter a name for the File Size field Number of Pages Press the Number of Pages check box...

Страница 137: ...Scan Kiosk II V2 0 User s Guide 137 7 Press OK The User Administration settings are complete...

Страница 138: ...pplication 3 2 1 Creating a New Job Button and Specifying the Job Button Settings This section shows how to create a new job button and specify the job button settings 1 Log on to Scan Kiosk II V2 0 F...

Страница 139: ...Scan Kiosk II V2 0 User s Guide 139 3 Press Job Button Settings The Job Button Settings screen appears To go back to the previous screen press Back...

Страница 140: ...e Job Button Type drop down list select the type of Job Button you want to create If you select Shared Job Button any user who logs on to Scan Kiosk II V2 0 can use your shared job button If you do no...

Страница 141: ...Scan Kiosk II V2 0 User s Guide 141 5 Press Edit New Job Button The New Job Button screen appears...

Страница 142: ...142 Scan Kiosk II V2 0 User s Guide 6 Specify the Job Button Settings 6 1 To specify on which device this job button appears select the device from the Device drop down list...

Страница 143: ...m the virtual keyboard or USB keyboard see Entering Characters on p 15 If you want the job button name to be on two lines press ENTER on the keyboard to insert a line break NOTE Job buttons are sorted...

Страница 144: ...144 Scan Kiosk II V2 0 User s Guide 6 3 If necessary from the Color of Job Button drop down list select a color for the job button Blue is the default job button color...

Страница 145: ...ct this Job button drop down list press the desired action for the job button Skip Scan Setting Screen After the job button is pressed scanning starts automatically Display Scan Setting Screen After t...

Страница 146: ...tings for scanned image files press Modify next to Custom file name Settings 6 5 1 Press the File name text box enter a baseline name for the scanned image file For instructions on entering characters...

Страница 147: ...t this Job Button drop down list select the desired action for the job button Display the file name entry screen Select to provide the user the option to change the file name Skip the file name entry...

Страница 148: ...t None if you do not want to add the date to the image file IMPORTANT Select Custom to configure additional custom file name settings For instructions see step 5 of Configuring the User Administration...

Страница 149: ...ext to Scan Delivery Options 6 6 1 Specify the Scan and Send Settings for the job button press OK For instructions see Specifying the Scan and Send Settings on p 65 You can also press Edit Address Boo...

Страница 150: ...ttings for scanned image files press Modify next to Index settings 6 7 1 Press ON to attach index files metadata to the scanned image file after you press the job button and to activate the When you s...

Страница 151: ...entry screen Enables the user to change the index string Skip the index string entry screen Select if you do not want the user to change the index string IMPORTANT To configure additional Index setti...

Страница 152: ...s OK If you want to return the Job Button Settings to their default settings press Default If you do not want to specify the Job Button Settings press Cancel The Job Button Settings are complete and t...

Страница 153: ...Settings This section shows how to modify the job button settings 1 Log on to Scan Kiosk II V2 0 For instructions on logging on to Scan Kiosk II V2 0 see Logging On on p 19 2 From the Scan Kiosk II V2...

Страница 154: ...154 Scan Kiosk II V2 0 User s Guide 3 Press Job Button Settings The Job Button Settings screen appears To go back to the previous screen press Back...

Страница 155: ...Scan Kiosk II V2 0 User s Guide 155 4 From the Job Button Type drop down list select the type of Job Button you want to modify...

Страница 156: ...check box next to the job button that you want to modify press Edit Modify 6 Modify the job button settings as shown in steps 6 and 7 of Creating a New Job Button and Specifying the Job Button Settin...

Страница 157: ...ion shows how to copy a job button and register it as a new job button 1 Log on to Scan Kiosk II V2 0 For instructions on logging on to Scan Kiosk II V2 0 see Logging On on p 19 2 From the Scan Kiosk...

Страница 158: ...158 Scan Kiosk II V2 0 User s Guide 3 Press Job Button Settings The Job Button Settings screen appears To go back to the previous screen press Back...

Страница 159: ...Scan Kiosk II V2 0 User s Guide 159 4 From the Job Button Type drop down list select the type of Job Button you want to modify...

Страница 160: ...160 Scan Kiosk II V2 0 User s Guide 5 Select the check box next to the job button that you want to copy press Edit Copy The Copy screen appears...

Страница 161: ...Scan Kiosk II V2 0 User s Guide 161 6 Press OK A duplicate job button with the same name as the copied button is created...

Страница 162: ...162 Scan Kiosk II V2 0 User s Guide 7 If you want to modify the copied job button select the copied job button press Edit Modify...

Страница 163: ...as necessary press OK For instructions on specifying the Job Button Settings see Creating a New Job Button and Specifying the Job Button Settings on p 138 The new job button appears on the Job Button...

Страница 164: ...Button This section shows how to delete a job button 1 Log on to Scan Kiosk II V2 0 For instructions on logging on to Scan Kiosk II V2 0 see Logging On on p 19 2 From the Scan Kiosk II V2 0 Home scre...

Страница 165: ...Scan Kiosk II V2 0 User s Guide 165 3 Press Job Button Settings The Job Button Settings screen appears To go back to the previous screen press Back...

Страница 166: ...166 Scan Kiosk II V2 0 User s Guide 4 From the Job Button Type drop down list select the type of Job Button you want to modify...

Страница 167: ...lect the check box next to the job button that you want to delete press Edit Delete A confirmation message appears 6 Press Yes to delete the job button If you do not want to delete the selected job bu...

Страница 168: ...folder on a designated server as a file in the CSV format Export job buttons when you want to back them up or move them to a different server 1 Log on to Scan Kiosk II V2 0 For instructions on logging...

Страница 169: ...Scan Kiosk II V2 0 User s Guide 169 3 Press Job Button Settings The Job Button Settings screen appears To go back to the previous screen press Back...

Страница 170: ...170 Scan Kiosk II V2 0 User s Guide 4 From the Job Button Type drop down list select the type of Job Button you want to modify...

Страница 171: ...Scan Kiosk II V2 0 User s Guide 171 5 Select the check box next to the job button that you want to export press Edit Export You can export multiple job buttons at the same time...

Страница 172: ...ort the job button settings Press Connection test to check that the host name connected to the network successfully If the connection is successful OK is displayed If the connection failed NG No Good...

Страница 173: ...of the user who has access to the server Press the Password text box enter the user s password For instructions on entering characters from the virtual keyboard or USB keyboard see Entering Characters...

Страница 174: ...nter the folder path directly into the text box or press Browse to navigate to the folder If you press Browse and have entered invalid user credentials you must enter the user credentials again to gai...

Страница 175: ...Scan Kiosk II V2 0 User s Guide 175 10 Press OK The Job Button Export settings are complete...

Страница 176: ...mport a job button from a shared folder on a server to the Scan Kiosk II V2 0 application 1 Log on to Scan Kiosk II V2 0 For instructions on logging on to Scan Kiosk II V2 0 see Logging On on p 19 2 F...

Страница 177: ...Scan Kiosk II V2 0 User s Guide 177 3 Press Job Button Settings The Job Button Settings screen appears To go back to the previous screen press Back...

Страница 178: ...178 Scan Kiosk II V2 0 User s Guide 4 From the Job Button Type drop down list select the type of Job Button you want to modify...

Страница 179: ...Scan Kiosk II V2 0 User s Guide 179 5 Press Edit Import The Import screen appears...

Страница 180: ...Settings that you want to import Press Connection test to check that the host name connected to the network successfully If the connection is successful OK is displayed If the connection failed NG No...

Страница 181: ...of the user who has access to the server Press the Password text box enter the user s password For instructions on entering characters from the virtual keyboard or USB keyboard see Entering Characters...

Страница 182: ...b button settings file directly or press Browse to navigate to the file If you press Browse and your user credentials are not found you must enter the correct user credentials the domain of the folder...

Страница 183: ...ist select the action to perform when importing the job button setting file Replaces the whole data Deletes all currently registered job buttons and overwrites them with the imported job buttons Appen...

Страница 184: ...184 Scan Kiosk II V2 0 User s Guide 11 Press OK The Job Button Import settings are complete...

Страница 185: ...Shared Address Book For more information please contact your Scan Kiosk II V2 0 Administrator 3 3 1 Creating a New Address This section shows how to create a new address IMPORTANT Up to a total of 1 0...

Страница 186: ...186 Scan Kiosk II V2 0 User s Guide 2 From the Scan Kiosk II V2 0 Home screen press User Settings The User Settings screen appears...

Страница 187: ...Scan Kiosk II V2 0 User s Guide 187 3 Press Address Book Settings The Address Book Settings screen appears To go back to the previous screen press Back...

Страница 188: ...m the Address Book type drop down list select the address book type Shared Address Book or My Address Book from the Address type drop down list select the address type you want to create If you do not...

Страница 189: ...Scan Kiosk II V2 0 User s Guide 189 5 Press Edit New The New Address screen appears...

Страница 190: ...Kiosk II V2 0 User s Guide 5 1 If you selected E mail in step 4 press the Name text box enter a name for the sender s e mail address press the E mail address text box enter the sender s e mail address...

Страница 191: ...e Protocol drop down list select the protocol to use when sending files to shared folders You can select SMB WebDAV or WebDAV over SSL IMPORTANT Select WebDAV or WebDAV over SSL to activate the Port n...

Страница 192: ...box enter the fully qualified domain name of the computer that contains the publicly shared folder If necessary press Connection test to test the connection to the computer If the connection is succe...

Страница 193: ...e 193 5 2 4 If WebDAV or WebDAV over SSL was selected in step 5 2 1 press the Port number text box enter the port number for the HTTP connection The standard WebDAV port number is 80 The standard WebD...

Страница 194: ...ectly or press Browse to navigate to the folder If you press Browse you must enter the user credentials and then press OK IMPORTANT You must add a backslash to the end of the folder path This enables...

Страница 195: ...er account that has Write permissions for the shared folder If you want to save the password of the user account press the Save password check box IMPORTANT If the user credentials are not set the use...

Страница 196: ...Explicit An unencrypted FTP connection which switches to a secure SSL connection over port 21 prior to you being granted access to the FTP server FTPS Implicit An SSL connection that establishes insta...

Страница 197: ...ver in the Name text box 5 3 3 Press the Name text box enter the IP address or host name of the FTP server If necessary press Connection test to test the connection to the server If the connection is...

Страница 198: ...ter the new folder path directly or press Browse to navigate to the folder If you press Browse you must enter the user credentials and then press OK IMPORTANT You must add a backslash to the end of th...

Страница 199: ...n method to use for the SFTP protocol The Authentication Method drop down list is only active when SFTP is selected as the Protocol 5 3 6 If necessary press the Port number text box enter the port num...

Страница 200: ...access to the FTP server proceed to the next step 5 3 9 If you selected SFTP as the Protocol and Password Authentication as the Authentication Method press the Password text box enter your password to...

Страница 201: ...ave Pass check box 5 3 11 If you selected SFTP as the Protocol and Private Key Authentication as the Authentication Method press the Fingerprint text box enter the fingerprint shortened version of the...

Страница 202: ...elected FAX in step 4 press Edit New 5 4 1 Press the Name text box enter the fax machine s name 5 4 2 Press the FAX number text box enter the fax number press OK The FAX settings are complete If you d...

Страница 203: ...osk II V2 0 User s Guide 203 5 5 If you selected Group in step 4 press Edit New 5 51 Press the Name text box enter a name for the group 5 5 2 To add addresses to the group press Add The address list a...

Страница 204: ...he Address Book type drop down list select the address book that contains the addresses you want in the group from the Address type drop down list select the address types only E mail and Shared folde...

Страница 205: ...esses you want to include in the group press OK The addresses are added to the group 5 5 5 Press OK The Address Book Settings screen appears 6 Press OK The New Address settings are complete If you do...

Страница 206: ...incorrect and must be changed This section shows you how to view the detailed information of an address and then modify it if necessary 1 Log on to Scan Kiosk II V2 0 For instructions on logging on to...

Страница 207: ...Scan Kiosk II V2 0 User s Guide 207 3 Press Address Book Settings The Address Book Settings screen appears To go back to the previous screen press Back...

Страница 208: ...4 From the Address Book type drop down list select the address book type Shared Address Book or My Address Book from the Address type drop down list select the address type you want to modify To go ba...

Страница 209: ...Scan Kiosk II V2 0 User s Guide 209 5 Select the address you want to modify from the list press Detail Info The Detailed Information screen for the address appears...

Страница 210: ...210 Scan Kiosk II V2 0 User s Guide 6 Check the detailed information for the selected address determine what information needs to be changed press Back...

Страница 211: ...0 User s Guide 211 7 Make sure that the user you want to modify is still selected press Edit Modify 8 Modify the address For information on modifying the address see steps 5 1 to 6 of Creating a New...

Страница 212: ...ANT If editing is restricted for only one Address Book My Address Book or Shared Address Book it is only possible to copy addresses from the one restricted address book and move them into the unrestri...

Страница 213: ...Scan Kiosk II V2 0 User s Guide 213 3 Press Address Book Settings The Address Book Settings screen appears To go back to the previous screen press Back...

Страница 214: ...4 From the Address Book type drop down list select the address book type Shared Address Book or My Address Book from the Address type drop down list select the address type you want to modify To go ba...

Страница 215: ...Scan Kiosk II V2 0 User s Guide 215 5 Select the address you want to copy from the list press Edit Copy The Address Copy screen appears...

Страница 216: ...op down list select the address book destination to where you want to copy the address 7 Make sure a check mark appears by the address you selected in step 5 press OK The copied address appears in the...

Страница 217: ...sk II V2 0 User s Guide 217 8 If you want to modify the copied address select the copied address press Edit Modify Depending on the address type you selected the settings screen for that address type...

Страница 218: ...k II V2 0 User s Guide 9 Modify the address as necessary press OK For instructions on specifying the address settings see Creating a New Address on p 185 The new address appears in the address list as...

Страница 219: ...ion shows you how to delete an address from the selected address book 1 Log on to Scan Kiosk II V2 0 For instructions on logging on to Scan Kiosk II V2 0 see Logging On on p 19 2 From the Scan Kiosk I...

Страница 220: ...220 Scan Kiosk II V2 0 User s Guide 3 Press Address Book Settings The Address Book Settings screen appears To go back to the previous screen press Back...

Страница 221: ...4 From the Address Book type drop down list select the address book type Shared Address Book or My Address Book from the Address type drop down list select the address type you want to modify To go ba...

Страница 222: ...II V2 0 User s Guide 5 Select the address you want to delete press Edit Delete A confirmation screen appears 6 Press Yes If you do not want to delete the address press No The address is deleted from t...

Страница 223: ...ion shows you how to export an address from the selected address book 1 Log on to Scan Kiosk II V2 0 For instructions on logging on to Scan Kiosk II V2 0 see Logging On on p 19 2 From the Scan Kiosk I...

Страница 224: ...224 Scan Kiosk II V2 0 User s Guide 3 Press Address Book Settings The Address Book Settings screen appears To go back to the previous screen press Back...

Страница 225: ...0 User s Guide 225 4 From the Address Book type drop down list select the Address Book type Shared Address Book or My Address Book from the Address type drop down list select the kind of addresses yo...

Страница 226: ...226 Scan Kiosk II V2 0 User s Guide 5 Select the addresses you want to export press Edit Export You can export multiple addresses at the same time...

Страница 227: ...er s Guide 227 6 Enter the necessary information for each item press OK For instructions see Exporting a Job Button on p 168 The export starts and a confirmation message appears Press Yes The Export s...

Страница 228: ...tion shows you how to import an address into a selected address book 1 Log on to Scan Kiosk II V2 0 For instructions on logging on to Scan Kiosk II V2 0 see Logging On on p 19 2 From the Scan Kiosk II...

Страница 229: ...Scan Kiosk II V2 0 User s Guide 229 3 Press Address Book Settings The Address Book Settings screen appears To go back to the previous screen press Back...

Страница 230: ...230 Scan Kiosk II V2 0 User s Guide 4 From the Address Book type drop down list select the Address Book type Shared Address Book or My Address Book to where you want to import the address book data...

Страница 231: ...Scan Kiosk II V2 0 User s Guide 231 5 Press Edit Import You can import multiple addresses at the same time...

Страница 232: ...data that you want to import Press Connection test to check that the host name connected to the network successfully If the connection is successful OK is displayed If the connection failed NG No Goo...

Страница 233: ...of the user who has access to the server Press the Password text box enter the user s password For instructions on entering characters from the virtual keyboard or USB keyboard see Entering Characters...

Страница 234: ...the Address Book file text box or press Browse to navigate to the file If you press Browse and your user credentials are not found you must enter the correct user credentials the domain of the folder...

Страница 235: ...n importing the Address Book file Replaces the whole data Select this setting to overwrite the entire address book with the imported address book data Appends data Select this setting to add the impor...

Страница 236: ...236 Scan Kiosk II V2 0 User s Guide 11 Press OK A confirmation message appears 12 Press Back to return to the Address Book Settings screen The Import settings are complete...

Страница 237: ...your Scan Kiosk II V2 0 operation history The operation history list is in order by the most recent date and time 1 Log on to Scan Kiosk II V2 0 For instructions on logging on to Scan Kiosk II V2 0 se...

Страница 238: ...238 Scan Kiosk II V2 0 User s Guide 3 Press Show Operation History The Show Operation History screen appears To go back to the previous screen press Back...

Страница 239: ...check box next to the date and time of the desired operation that you want to view press Detail Info You can select only one operation at a time To scroll through the history list press or If you do n...

Страница 240: ...240 Scan Kiosk II V2 0 User s Guide 5 View the detailed information press Back The Show Operation History screen appears...

Страница 241: ...n Information This section shows how to display and verify the Scan Kiosk II V2 0 version information 1 From the Scan Kiosk II V2 0 Home screen press About The version information screen appears If yo...

Страница 242: ...242 Scan Kiosk II V2 0 User s Guide 2 View the version information press Close The Home screen appears...

Страница 243: ...6 Logging Off This section shows you how to log off the Scan Kiosk II V2 0 tablet PC if the Administrator configured log on credentials for you 1 From any Scan Kiosk II V2 0 screen press Logout You a...

Страница 244: ...ion shows you how to power OFF the Scan Kiosk II V2 0 tablet PC properly 1 From any Scan Kiosk II V2 0 screen press Power Off A confirmation screen appears 2 Press Yes If you do not want to power OFF...

Отзывы: