Canon Satera LBP7700C Скачать руководство пользователя страница 65


64

IMPORTANT


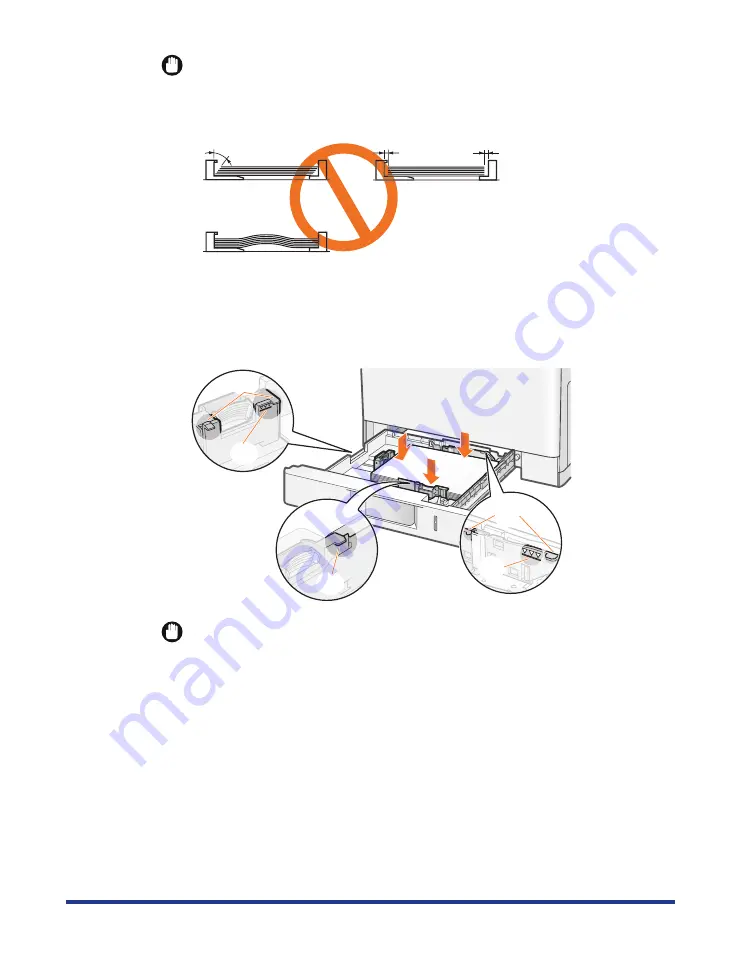
Be sure to align the paper guides with the paper.


If the paper guides are too loose or too tight, this may result in misfeeds or paper 
jams.


4


Hold down the paper, then set it under the hooks (A) on the 
paper guides.


Make sure that the paper stack does not exceed the load limit mark lines (B).

IMPORTANT


Do not load the paper stack which exceeds the load limit mark lines.


Be sure that the paper stack does not exceed the load limit mark lines. If the paper 
stack exceeds the load limit mark lines, this may result in misfeeds.

(A)

(B)

(A)

(A)

(B)

Содержание Satera LBP7700C

Страница 1: ...Laser Beam Printer User s Guide User s Guide ...

Страница 2: ...Size Paper in Cassette 1 18 Loading Paper in the Paper Cassette 18 Registering the Paper Size 22 Registering the Paper Type 23 Loading Standard Size Paper in Cassette 2 25 Loading Paper in the Paper Cassette 25 Specifying the Settings for the Paper Cassette 30 Registering the Paper Type 31 Loading Standard Size Paper Other Than Postcards and Envelopes in the Multi purpose Tray 33 Loading Paper in ...

Страница 3: ...ing Orientation 82 Registering the Paper Type 83 Registering a Custom Paper Size 85 Paper Loading Orientation 86 Paper Jams 88 Precautions When Removing Jammed Paper 89 Clearing Paper Jams MP Tray Area 91 Clearing Paper Jams Output Area Right Cover Area Duplex Unit Area or Cassette 1 2 Area 92 Clearing Paper Jams Cassette 2 Cover Area 101 Checking Paper Jams in the Paper Cassette 104 Clearing Pape...

Страница 4: ...cover 2 Press I of the power switch The printer initiates a self diagnostic test on the printer unit and optional accessories If the self diagnostic test result is normal The 印刷可 indicator green オンライン indicator green and 給紙元表示 indicator green are turned on and then the printer is ready to print 1 2 ...

Страница 5: ...d Turning Off the Printer 1 Check that the printer is not performing the following operations Printing While the printer is running a self diagnostic test immediately after turning the power on While the ジョブ indicator is on When any of the following messages appears 起動中です キャリブレーション中です Initializing NVRAM 2 Press リ リ リ リセ セ セ セッ ッ ッ ット ト ト ト 3 Select シ シ シ シャ ャ ャ ャッ ッ ッ ット ト ト トダ ダ ダ ダウ ウ ウ ウン ン ン ン...

Страница 6: ... はい い い い using and then press OK The process to turn the printer off is performed and the messages 実行中で す and シャットダウン実行中です 通知があるまで主電源を切らないでください appear 5 Confirm the message When the printer is ready to be turned off the message appears 6 Turn the printer off 1 Open the power switch cover 2 Press of the power switch 1 2 ...

Страница 7: ...en if the power of the printer is turned off power is consumed only slightly while the power plug is inserted into the AC power outlet To cut the power consumption completely unplug the power plug from the AC power outlet If the printer is not turned off immediately even after of the power switch is pressed The printer is cooling down the inside and stopping the printer processes Please wait a mom...

Страница 8: ...the Printer Online When printing from the computer the printer has to be online If not place the printer online using the following procedure 1 Press オ オ オ オン ン ン ンラ ラ ラ ライ イ イ イン ン ン ン The オンライン indicator turns on and the printer is online IMPORTANT If you cannot place the printer online If an error is occurring in the printer the printer does not come online Eliminate the cause of the error befo...

Страница 9: ...rinter offline using the following procedure 1 Press オ オ オ オン ン ン ンラ ラ ラ ライ イ イ イン ン ン ン The オンライン indicator goes off and the printer is offline IMPORTANT About the automatic online function The printer comes online automatically if left in the offline state for five minutes or longer If an error is occurring in the printer however the printer does not come online automatically ...

Страница 10: ...edge x long edge Paper Source Multi purpos e Tray Cassette 1 Cassette 2 Optional A4 210 0 mm x 297 0 mm B5 182 0 mm x 257 0 mm A5 148 0 mm x 210 0 mm Legal 8 50 in x 14 00 in Letter 8 50 in x 11 00 in Executive 7 25 in x 10 50 in Custom paper size Portrait 1 3 5 6 6 Custom paper size Landscape 2 4 7 8 9 Postcard 100 0 mm x 148 0 mm Reply postcard 148 0 mm x 200 0 mm 4 on 1 postcard 200 0 mm x 296 ...

Страница 11: ... 9 The custom size paper whose short edges are 148 0 to 215 9 mm and long edges are 210 0 to 355 6 mm can be loaded 10 YUUBIN 4 on 1 postcards cannot be used IMPORTANT About print speed The print speed may drop depending on the settings for the paper size paper type orientation and number of copies When you perform continuous printing the print speed may drop gradually Paper Type The following sho...

Страница 12: ...ize Short edges 98 4 to 215 9 mm Long edges 148 0 to 355 6 mm Long size Short edges 210 0 to 297 0 mm Long edges 457 3 to 1 200 0 mm The following plain paper is available for automatic 2 sided printing A4 B5 Legal Letter or Executive size paper Custom size paper whose short edges are 182 0 to 215 9 mm and long edges are 257 0 to 297 0 mm Recycled paper can be used as plain paper Heavy paper This ...

Страница 13: ...PORTANT Precautions when using labels Using the following types of labels may result in paper jams that are difficult to clear or may result in damage to the printer Peeled labels or partly used labels Coated labels that are easily peeled off from the backing sheet Labels with uneven adhesive The print speed drops when printing labels Postcard This printer can print postcards reply postcards and 4...

Страница 14: ... envelopes flatten the stack of envelopes to release any remaining air and press the fold lines along the edges tight Do not print on the reverse side glued side of envelopes The print speed drops when printing on envelopes NOTE When printing on envelopes They may become creased Printable Area NOTE If you want to extend the printable area Specify the following settings in the printer driver 1 Clic...

Страница 15: ...o 5 mm of the edges of the postcards IMPORTANT When printing on postcards It is recommended that you configure the document to print the data smaller than the printable area When printing data in the entire printable area you may not be able to obtain the optimum print quality 5 mm 5 mm 5 mm 5 mm 5 mm 5 mm 5 mm 5 mm 123 4567 200 mm 148 mm 5 mm 5 mm 5 mm 5 mm 123 4567 100 mm 148 mm ...

Страница 16: ...et 2 Select the Print with Upper Left of Sheet as Starting Point check box Paper Which Requires Attention Before Use Using the following types of paper may cause influence to the printout results or printer in some cases Paper That Was Stored Poorly Creased or folded paper Torn or damaged paper Wrinkled paper Curled paper Wet or moist paper Paper with rough edges Irregularly shaped paper Paper wit...

Страница 17: ...hat is thicker or thinner than the specified usable paper See Paper Type on p 10 IMPORTANT About paper with staples clips ribbons or tape This kind of paper may result in the printer malfunction or damage to the printer About paper that contains ink that melts burns evaporates or emits harmful gases at or lower than the heating temperature of the fixing unit This kind of paper may result in the pr...

Страница 18: ...sheets Reply postcard Approx 40 sheets 4 on 1 postcard Approx 50 sheets Envelope Approx 10 sheets Paper Type Paper Capacity 1 Plain paper Ex 80 g m2 Approx 200 sheets 2 Heavy paper Ex 120 g m2 Approx 40 sheets Heavy paper Ex 163 g m2 Approx 40 sheets Transparency black and white printing only Approx 50 sheets Label Approx 40 sheets Postcard Approx 40 sheets Reply postcard Approx 40 sheets 4 on 1 p...

Страница 19: ...assette Cassette 1 IMPORTANT Detailed information about usable paper See Paper Requirements on p 9 Loading Paper in the Paper Cassette 1 Pull out the paper cassette until it stops Paper Type Paper Size Plain paper 60 to 105 g m2 Heavy paper 106 to 163 g m2 A4 210 0 mm x 297 0 mm B5 182 0 mm x 257 0 mm A5 148 0 mm x 210 0 mm Letter 8 50 in x 11 00 in Executive 7 25 in x 10 50 in ...

Страница 20: ...osition of the size of the paper to be loaded Align the position of A with the size mark of the paper to be loaded The side paper guides move together Slide the rear paper guide 1 Hold the lock release lever 2 Slide the paper guide to the position of the size of the paper to be loaded Align the position of A with the size mark of the paper to be loaded A Top View 2 1 2 1 A ...

Страница 21: ...r guide CAUTION Be careful when handling paper Handle paper carefully not to cut your hands with the edges of the paper IMPORTANT Be sure to load standard size paper in landscape orientation when the long edges of the paper are parallel to the front side of the printer Paper Size Paper Guide Letter LTR Executive EXEC B5 JIS B5 ...

Страница 22: ...ad or logo See Paper Loading Orientation p 86 and load the paper in the proper orientation 4 Hold down the paper then set it under the hooks A on the paper guides Make sure that the paper stack does not exceed the load limit mark lines B IMPORTANT Do not load the paper stack which exceeds the load limit mark lines Be sure that the paper stack does not exceed the load limit mark lines If the paper ...

Страница 23: ...gister the size of the loaded paper Register the paper size using the following procedure IMPORTANT Precautions when specifying フ フ フ フリ リ リ リー ー ー ー The printer performs printing without checking the paper settings in the printer driver Make sure that the paper specified in the printer driver matches that loaded in the paper cassette before using the printer 1 Press 給 給 給 給紙 紙 紙 紙選 選 選 選択 択 択 択 2...

Страница 24: ...es not fix onto paper well and the printing comes out faint 5 Specify ラフ紙 for this item when a paper jam occurs or when you want to improve the fixation on printing coarse paper 75 to 90 g m2 with 普通紙 selected IMPORTANT Be sure to match the type of the loaded paper Normally you do not need to change the settings for the printer driver because the default setting for Paper Type in the printer drive...

Страница 25: ...system on which you cannot use the printer driver such as MS DOS and UNIX match the setting for デフォルト用紙種類 and the type of the loaded paper When フ フ フ フリ リ リ リー ー ー ー is specified The printer performs printing without checking the paper settings in the printer driver Make sure that the paper specified in the printer driver matches that loaded in the paper cassette before using the printer 1 Press 給...

Страница 26: ...tings Before printing from the printer driver for Windows or Macintosh Specify the paper size and paper type in the printer driver before printing Before printing from the BMLinkS printer driver See User s Manual for the BMLinkS printer driver Before printing from DOS UNIX or other operating systems Specify デフォルト用紙サイズ and デフォルト用紙種類 Paper Type Paper Size Plain paper 60 to 105 g m2 Heavy paper 106 t...

Страница 27: ... to be loaded Slide the side paper guides 1 Hold the lock release lever 2 Slide the paper guides to the position of the size of the paper to be loaded Align the position of A with the size mark of the paper to be loaded The side paper guides move together 2 A 1 Top View ...

Страница 28: ... Slide the paper guide to the position of the size of the paper to be loaded Align the position of A with the size mark of the paper to be loaded NOTE Size abbreviation on the paper guides Paper Size Paper Guide Legal LGL Letter LTR Executive EXEC B5 JIS B5 2 A 1 ...

Страница 29: ...s of the paper IMPORTANT Be sure to load standard size paper in landscape orientation when the long edges of the paper are parallel to the front side of the printer IMPORTANT Be sure to check the position of the paper guides If the paper guide is set at a wrong position this may result in misfeeds Paper cassette capacity Paper Type Paper Capacity Plain paper Ex 80 g m2 Approx 500 sheets ...

Страница 30: ...ad the paper in the proper orientation 4 Hold down the paper then set it under the hooks A on the paper guides Make sure that the paper stack does not exceed the load limit mark lines B IMPORTANT Do not load the paper stack which exceeds the load limit mark lines Be sure that the paper stack does not exceed the load limit mark lines If the paper stack exceeds the load limit mark lines this may res...

Страница 31: ...assette However you need to change the settings in the following cases When loading standard size paper again after using custom size paper When you want to specify フリー which does not check the paper size Install the printer turn it on and then change the settings for the paper cassette using the following procedure IMPORTANT Precautions when specifying フ フ フ フリ リ リ リー ー ー ー The printer performs p...

Страница 32: ...control panel according to the type of the loaded paper 1 If you want to print paper of 70 to 74 g m2 you can specify either of 普通紙 L or 普通紙 4 2 If you want to print paper of 100 to 105 g m2 you can specify either of 普通紙 or 厚紙 1 4 Paper to Be Used カ カ カ カセ セ セ セッ ッ ッ ット ト ト ト 2 2 2 2 用 用 用 用紙 紙 紙 紙種 種 種 種類 類 類 類 in the セ セ セ セッ ッ ッ ット ト ト トア ア ア アッ ッ ッ ップ プ プ プ Menu Plain paper 60 to 74 g m2 普通紙 L...

Страница 33: ...fault setting for Paper Type in the printer driver is set to Printer Default If you want to change the settings for the printer driver match the setting and カセット2用 紙種類 in the control panel If they do not match the message 以下の用紙をセット appears In this case the setting for カセット 2 用紙種類 is changed to that in the printer driver by pressing オンライン allowing you to continue printing For users who do not use t...

Страница 34: ...nting from the printer driver for Windows or Macintosh Specify the paper size and paper type in the printer driver before printing Before printing from the BMLinkS printer driver See User s Manual for the BMLinkS printer driver Before printing from DOS UNIX or other operating systems Specify デフォルト用紙サイズ and デフォルト用紙種類 Paper Type Paper Size Plain paper 60 to 105 g m2 Heavy paper 106 to 176 g m2 Label...

Страница 35: ...34 Loading Paper in the Multi purpose Tray 1 Open the multi purpose tray Holding the opening on the right side of the printer open the multi purpose tray 2 Pull out the auxiliary tray ...

Страница 36: ... auxiliary tray Be sure to pull out the auxiliary tray when loading paper in the multi purpose tray 3 When loading long size paper such as A4 etc open the tray extension 4 Spread the paper guides a little wider than the actual paper width ...

Страница 37: ...ore loading them If they are not fanned enough multiple sheets of paper may be fed at once causing paper jams When fanning or aligning the transparencies try to hold the edges to avoid touching the printing surface Take care not to mark or stain the printing surface of the transparencies with fingerprints dust or oil This may result in poor print quality 6 Gently load the paper stack under the loa...

Страница 38: ...s may result in misfeeds or paper jams If the paper is curled or folded at corners flatten it before loading it in the printer If you use paper that has been poorly cut multiple sheets of paper may be fed at once In this case fan the paper thoroughly and then align the edges of the stack properly on a hard flat surface NOTE When printing paper with a letterhead or logo See Paper Loading Orientatio...

Страница 39: ...atch the setting in the printer driver Match the paper type specified in the セットアップ menu and that specified in Output Size in the printer driver If they do not match the message 以下の用紙をセット appears In this case the setting for 手差しトレイ用紙サイズ is changed to that in the printer driver by pressing オンライン allowing you to continue printing For users who do not use the printer driver When you are printing from...

Страница 40: ... サ サ サイ イ イ イズ ズ ズ ズ using and and then press OK 3 Select a paper size using and and then press OK The paper size for the multi purpose tray is specified Registering the Paper Type Specify 手差しトレイ用紙種類 using the control panel according to the type of the loaded paper Paper to Be Used 手 手 手 手差 差 差 差し し し しト ト ト トレ レ レ レイ イ イ イ用 用 用 用紙 紙 紙 紙種 種 種 種類 類 類 類 in the セ セ セ セッ ッ ッ ット ト ト トア ア ア アッ ッ ッ ップ プ ...

Страница 41: ... the settings for the printer driver because the default setting for Paper Type in the printer driver is set to Printer Default If you want to change the settings for the printer driver match the setting and 手差しトレ イ用紙種類 in the control panel If they do not match the message 以下の用紙をセット appears In this case the setting for 手差しトレイ用紙種類 is changed to that in the printer driver by pressing オンライン allowing ...

Страница 42: ...for the multi purpose tray is specified Before printing Specify the following settings Before printing from the printer driver for Windows or Macintosh Specify the paper size and paper type in the printer driver before printing Before printing from the BMLinkS printer driver See User s Manual for the BMLinkS printer driver Before printing from DOS UNIX or other operating systems Specify デフォルト用紙サイズ...

Страница 43: ...mm YUUBIN 4 on 1 postcards cannot be used IMPORTANT Loading orientation of postcards Load postcards with the printing side facing down as follows Feeding direction Postcard Load the postcards so that the top edge is toward the back of the printer When printing on the address side When printing on the back side Load postcards with the printing side facing down Place the top edge toward the printer ...

Страница 44: ... the back of the printer Detailed information about usable paper See Paper Requirements on p 9 When printing on the address side When printing on the return side Load postcards with the printing side facing down Place the top edge toward the left When printing on the address side When printing on the back side Load postcards with the printing side facing down Place the top edge toward the printer ...

Страница 45: ...44 Loading Postcards in the Multi purpose Tray 1 Open the multi purpose tray Holding the opening on the right side of the printer open the multi purpose tray 2 Pull out the auxiliary tray ...

Страница 46: ...ry tray Be sure to pull out the auxiliary tray when loading paper in the multi purpose tray 3 When loading long size paper such as 4 on 1 postcard etc open the tray extension 4 Spread the paper guides a little wider than the actual postcard width ...

Страница 47: ...hen printing on reply postcards Match the paper settings and printing orientation specified in the application with the actual printing orientation Sample Double Japan Postcard Rotated If the postcards are curled Flatten the curls by warping them in the opposite direction before loading them When using postcards that have been poorly cut If you use postcards that have been poorly cut multiple shee...

Страница 48: ...to match the setting in the printer driver Match the paper type specified in the セットアップ menu and that specified in Output Size in the printer driver If they do not match the message 以下の用紙をセット appears In this case the setting for 手差しトレイ用紙サイズ is changed to that in the printer driver by pressing オンライン allowing you to continue printing For users who do not use the printer driver When you are printing ...

Страница 49: ...ト ト ト トレ レ レ レイ イ イ イ用 用 用 用紙 紙 紙 紙サ サ サ サイ イ イ イズ ズ ズ ズ using and and then press OK 3 Select a paper size using and and then press OK The paper size for the multi purpose tray is specified Registering the Paper Type Specify 手差しトレイ用紙種類 using the control panel according to the type of the loaded paper YUUBIN 4 on 1 postcards cannot be used Paper to Be Used 手 手 手 手差 差 差 差し し し しト ト ト トレ レ レ レイ イ イ イ...

Страница 50: ...d to that in the printer driver by pressing オンライン allowing you to continue printing For users who do not use the printer driver When you are printing from an operating system on which you cannot use the printer driver such as MS DOS and UNIX match the setting for デフォルト用紙種類 and the type of the loaded paper When フ フ フ フリ リ リ リー ー ー ー is specified The printer performs printing without checking the pa...

Страница 51: ...r for Windows or Macintosh Specify the paper size and paper type in the printer driver before printing Before printing from the BMLinkS printer driver See User s Manual for the BMLinkS printer driver Before printing from DOS UNIX or other operating systems Specify デフォルト用紙サイズ and デフォルト用紙種類 ...

Страница 52: ...GAGATA No 3 120 0 mm x 235 0 mm IMPORTANT Loading orientation of envelopes Load envelopes with the front side non glued side facing down as follows Feeding direction YOUNAGA No 3 Load the envelopes so that the flap is toward the left of the printer when they are viewed from the right side Close the flap Reverse the envelope and load it ...

Страница 53: ...the envelopes so that the flap is toward the back of the printer when they are viewed from the right side Detailed information about usable paper See Paper Requirements on p 9 Close the flap Reverse the envelope and load it ...

Страница 54: ...53 Loading Envelopes in the Multi purpose Tray 1 Open the multi purpose tray Holding the opening on the right side of the printer open the multi purpose tray 2 Pull out the auxiliary tray ...

Страница 55: ...IMPORTANT Be sure to pull out the auxiliary tray Be sure to pull out the auxiliary tray when loading paper in the multi purpose tray 3 Spread the paper guides a little wider than the actual envelope width ...

Страница 56: ...elopes on a flat surface flatten them to release any remaining air and be sure that the edges are pressed tightly 2 Loosen any stiff corners of the envelopes and flatten curls as shown in the figure 3 Align the edges of the envelopes on a flat surface ...

Страница 57: ...en handling envelopes Handle envelopes carefully not to cut your hands with the edges of the envelopes IMPORTANT Loading orientation of envelopes See the instruction described at the top of the procedure on p 51 Load envelopes with the front side non glued side facing down You cannot print on the reverse side glued side of envelopes Multi purpose tray capacity for envelopes Up to approximately 10 ...

Страница 58: ...to match the setting in the printer driver Match the paper type specified in the セットアップ menu and that specified in Output Size in the printer driver If they do not match the message 以下の用紙をセット appears In this case the setting for 手差しトレイ用紙サイズ is changed to that in the printer driver by pressing オンライン allowing you to continue printing For users who do not use the printer driver When you are printing ...

Страница 59: ...nd and then press OK 3 Select a paper size using and and then press OK The paper size for the multi purpose tray is specified Registering the Paper Type Specify 手差しトレイ用紙種類 using the control panel according to the type of the loaded paper IMPORTANT Be sure to match the type of the loaded paper If the setting for the paper type is different from that of the loaded paper this may result in crucial da...

Страница 60: ...rs who do not use the printer driver When you are printing from an operating system on which you cannot use the printer driver such as MS DOS and UNIX match the setting for デフォルト用紙種類 and the type of the loaded paper When フ フ フ フリ リ リ リー ー ー ー is specified The printer performs printing without checking the paper settings in the printer driver Make sure that the paper specified in the printer driver...

Страница 61: ...r for Windows or Macintosh Specify the paper size and paper type in the printer driver before printing Before printing from the BMLinkS printer driver See User s Manual for the BMLinkS printer driver Before printing from DOS UNIX or other operating systems Specify デフォルト用紙サイズ and デフォルト用紙種類 ...

Страница 62: ...e of the printer Short edges 210 0 to 215 9 mm Long edges 210 0 to 215 9 mm Landscape orientation when the long edges of the paper are parallel to the front side of the printer Short edges 148 0 to 215 9 mm Long edges 210 0 to 297 0 mm Can be loaded only when the LIPS LX printer driver is used IMPORTANT Detailed information about usable paper See Paper Requirements on p 9 Loading Custom Size Paper...

Страница 63: ... side of the printer if all the following conditions are fulfilled The LIPS LX printer driver is used カセット1 用紙サイズ is set to フリー The long edges of the paper is 215 9 mm or less When using paper that has been poorly cut If you use paper that has been poorly cut multiple sheets of paper may be fed at once In this case fan the paper thoroughly and then align the edges of the stack properly on a hard f...

Страница 64: ... paper guides 1 Hold the lock release lever 2 Slide the paper guides to be aligned with the loaded paper The side paper guides move together Slide the rear paper guide 1 Hold the lock release lever 2 Slide the paper guide to be aligned with the loaded paper 2 1 2 1 ...

Страница 65: ...aper then set it under the hooks A on the paper guides Make sure that the paper stack does not exceed the load limit mark lines B IMPORTANT Do not load the paper stack which exceeds the load limit mark lines Be sure that the paper stack does not exceed the load limit mark lines If the paper stack exceeds the load limit mark lines this may result in misfeeds A B A A B ...

Страница 66: ...he orientation of the loaded paper IMPORTANT Precautions when specifying フ フ フ フリ リ リ リー ー ー ー The printer performs printing without checking the paper settings in the printer driver Make sure that the paper specified in the printer driver matches that loaded in the paper cassette before using the printer Load paper in portrait orientation when the short edges of the paper are parallel to the fron...

Страница 67: ...er Specify ユーザ設定サイズ When paper is loaded in landscape orientation when the long edges of the paper are parallel to the front side of the printer Specify ユーザ設定サイズ R The loading orientation is specified Registering the Paper Type Specify カセット1用紙種類 using the control panel according to the type of the loaded paper Paper to Be Used カ カ カ カセ セ セ セッ ッ ッ ット ト ト ト 1 1 1 1 用 用 用 用紙 紙 紙 紙種 種 種 種類 類 類 類 in th...

Страница 68: ... the settings for the printer driver because the default setting for Paper Type in the printer driver is set to Printer Default If you want to change the settings for the printer driver match the setting and カセット1用 紙種類 in the control panel If they do not match the message 以下の用紙をセット appears In this case the setting for カセット 1 用紙種類 is changed to that in the printer driver by pressing オンライン allowing ...

Страница 69: ... the custom paper size in the printer driver previously For details on the procedure for registering a custom paper size see Help of the printer driver Before printing Specify the following settings Before printing from the printer driver for Windows or Macintosh Specify the paper size and paper type in the printer driver before printing Before printing from the BMLinkS printer driver See User s M...

Страница 70: ...r Short edges 210 0 to 215 9 mm Long edges 210 0 to 215 9 mm Landscape orientation when the long edges of the paper are parallel to the front side of the printer Short edges 148 0 to 215 9 mm Long edges 210 0 to 355 6 mm Can be loaded only when the LIPS LX printer driver is used IMPORTANT Detailed information about usable paper See Paper Requirements on p 9 Loading Custom Size Paper in the Paper C...

Страница 71: ... side of the printer if all the following conditions are fulfilled The LIPS LX printer driver is used カセット2 用紙サイズ is set to フリー The long edges of the paper is 215 9 mm or less When using paper that has been poorly cut If you use paper that has been poorly cut multiple sheets of paper may be fed at once In this case fan the paper thoroughly and then align the edges of the stack properly on a hard f...

Страница 72: ...3 Align the paper guides with the loaded paper Slide the side paper guides 1 Hold the lock release lever 2 Slide the paper guides to be aligned with the loaded paper The side paper guides move together 2 1 ...

Страница 73: ...d the lock release lever 2 Slide the paper guide to be aligned with the loaded paper IMPORTANT Be sure to align the paper guides with the paper If the paper guides are too loose or too tight this may result in misfeeds or paper jams 2 1 ...

Страница 74: ...e paper stack which exceeds the load limit mark lines Be sure that the paper stack does not exceed the load limit marks If the paper stack exceeds the load limit mark lines this may result in misfeeds 5 Set the paper cassette in the paper feeder Push it into the printer firmly CAUTION Precautions when inserting the paper cassette Be careful not to catch your fingers B B A A ...

Страница 75: ...ait orientation when the short edges of the paper are parallel to the front side of the printer if you use the LIPS LX printer driver 1 Press 給 給 給 給紙 紙 紙 紙選 選 選 選択 択 択 択 2 Select カ カ カ カセ セ セ セッ ッ ッ ット ト ト ト 2 2 2 2 用 用 用 用紙 紙 紙 紙サ サ サ サイ イ イ イズ ズ ズ ズ using and and then press OK 3 Select a loading orientation using and and then press OK When paper is loaded in portrait orientation when the short ...

Страница 76: ...need to change the settings for the printer driver because the default setting for Paper Type in the printer driver is set to Printer Default If you want to change the settings for the printer driver match the setting and カセット2用 紙種類 in the control panel If they do not match the message 以下の用紙をセット appears In this case the setting for カセット 2 用紙種類 is changed to that in the printer driver by pressing オ...

Страница 77: ... the custom paper size in the printer driver previously For details on the procedure for registering a custom paper size see Help of the printer driver Before printing Specify the following settings Before printing from the printer driver for Windows or Macintosh Specify the paper size and paper type in the printer driver before printing Before printing from the BMLinkS printer driver See User s M...

Страница 78: ...are parallel to the front side of the printer Short edges 148 0 to 215 9 mm Long edges 148 0 to 215 9 mm Landscape orientation when the long edges of the paper are parallel to the front side of the printer Short edges 98 4 to 215 9 mm Long edges 148 0 to 355 6 mm Can be loaded only when the LIPS LX printer driver is used IMPORTANT Detailed information about usable paper See Paper Requirements on p...

Страница 79: ...78 Loading Custom Size Paper in the Multi purpose Tray 1 Open the multi purpose tray Holding the opening on the right side of the printer open the multi purpose tray 2 Pull out the auxiliary tray ...

Страница 80: ...out the auxiliary tray Be sure to pull out the auxiliary tray when loading paper in the multi purpose tray 3 When loading long size paper open the tray extension 4 Spread the paper guides a little wider than the actual paper width ...

Страница 81: ... labels thoroughly before loading them If they are not fanned enough multiple sheets of paper may be fed at once causing paper jams 6 Gently load the paper stack under the load limit guides A until it touches the back of the tray CAUTION Be careful when handling paper Handle paper carefully not to cut your hands with the edges of the paper Tap the edges on a flat surface a few times Thoroughly fan...

Страница 82: ...er in the multi purpose tray Load the paper so that it is straight If the rear edge of the paper stack is not properly aligned this may result in misfeeds or paper jams If the paper is curled or folded at corners flatten it before loading it in the printer If you use paper that has been poorly cut multiple sheets of paper may be fed at once In this case fan the paper thoroughly and then align the ...

Страница 83: ...ure to match the setting in the printer driver Match the paper type specified in the セットアップ menu and that specified in Output Size in the printer driver If they do not match the message 以下の用紙をセット appears In this case the setting for 手差しトレイ用紙サイズ is changed to that in the printer driver by pressing オンライン allowing you to continue printing For users who do not use the printer driver When you are print...

Страница 84: ...e the LIPS LX printer driver 1 Press 給 給 給 給紙 紙 紙 紙選 選 選 選択 択 択 択 2 Select 手 手 手 手差 差 差 差し し し しト ト ト トレ レ レ レイ イ イ イ用 用 用 用紙 紙 紙 紙サ サ サ サイ イ イ イズ ズ ズ ズ using and and then press OK 3 Select a paper size using and and then press OK The paper size for the multi purpose tray is specified Registering the Paper Type Specify 手差しトレイ用紙種類 using the control panel according to the type of the loaded paper Pa...

Страница 85: ...ings for the printer driver because the default setting for Paper Type in the printer driver is set to Printer Default If you want to change the settings for the printer driver match the setting and 手差しトレ イ用紙種類 in the control panel If they do not match the message 以下の用紙をセット appears In this case the setting for 手差しトレイ用紙種類 is changed to that in the printer driver by pressing オンライン allowing you to co...

Страница 86: ...ister the custom paper size in the printer driver previously For details on the procedure for registering a custom paper size see Help of the printer driver Before printing Specify the following settings Before printing from the printer driver for Windows or Macintosh Specify the paper size and paper type in the printer driver before printing Before printing from the BMLinkS printer driver See Use...

Страница 87: ...pe Layout Portrait Layout Landscape Layout Paper cassette 1 sided printing With the printing side facing up With the printing side facing up With the printing side facing up With the printing side facing up Paper cassette automatic 2 sided printing With the front side facing down With the front side facing down Multi purpose tray 1 sided printing With the printing side facing down With the printin...

Страница 88: ...opes See Loading Postcards p 42 and Loading Envelopes p 51 When paper is loaded in portrait orientation 1 When paper is loaded in landscape orientation 2 Portrait Layout Landscape Layout Portrait Layout Landscape Layout Multi purpose tray automatic 2 sided printing With the front side facing up With the front side facing up Multi purpose tray manual 2 sided printing With the printing side facing d...

Страница 89: ...e messages appear one at a time Remove the jammed paper according to the displayed message See Precautions When Removing Jammed Paper on p 89 Removal Order Paper Jam Area Message Clearance Procedure 1 Multi purpose tray 手差しトレイ エリア Clearing Paper Jams MP Tray Area See p 91 3 2 4 5 7 6 1 Multi purpose Tray Paper Feeder Unit Optional Paper flow for 1 sided printing Paper flow for 2 sided printing Cas...

Страница 90: ...ammed paper Touching the fixing unit when it is still hot may result in burns The output slot is hot during and immediately after printing Do not touch the area surrounding the output slot as this may result in burns 2 Output area 排紙エリア Clearing Paper Jams Output Area Right Cover Area Duplex Unit Area or Cassette 1 2 Area See p 92 3 Inside the right cover 右カバーエリ ア 4 Duplex print transport area 両面ユ...

Страница 91: ...areful not to cut your hands with the edges of the paper Keep your hands and clothing away from the roller in the output area after removing jammed paper The roller may suddenly rotate and catch your hands or clothing resulting in personal injury IMPORTANT Precautions when operating the printer Leave the printer on when removing the jammed paper If the power is turned off the data being printed wi...

Страница 92: ...ving paper or clearing a paper jam Clearing Paper Jams MP Tray Area 1 Remove the jammed paper by pulling it gently in the direction of the arrow IMPORTANT If the jammed paper cannot be removed easily Do not try to remove it forcefully but proceed to Clearing Paper Jams Output Area Right Cover Area Duplex Unit Area or Cassette 1 2 Area See p 92 ...

Страница 93: ... Area or Cassette 1 2 Area 1 Open the right cover Check the inside of the right cover also After removing the paper jammed in the multi purpose tray check if paper is jammed inside the right cover See Clearing Paper Jams Output Area Right Cover Area Duplex Unit Area or Cassette 1 2 Area on p 92 ...

Страница 94: ...ed in the area shown in the figure remove the paper by pulling it gently in the direction of the arrow 3 If the paper is jammed in the area shown in the figure remove the paper by pulling it gently in the direction of the arrow ...

Страница 95: ...94 4 Remove the jammed paper by pulling it gently in the direction of the arrow ...

Страница 96: ...guide 6 If the paper is jammed in the area shown in the figure when the optional paper feeder is used remove the paper 1 Pull out the edge of the paper 2 Remove the paper by pulling it gently in the direction of the arrow 1 2 ...

Страница 97: ...96 7 While holding the tab A open the duplex cover A ...

Страница 98: ...97 8 Remove any jammed paper 1 Pull out the edge of the paper 2 Remove the paper by pulling it gently in the direction of the arrow 9 Close the duplex cover 1 2 ...

Страница 99: ...98 10 While raising the lever of the green projection A open the cover of the paper source A ...

Страница 100: ...be removed easily when it is jammed in the area shown in the figure do not try to remove it forcefully but proceed to Step 13 IMPORTANT If another message appears If the following messages appear clear the paper jam in the indicated area カセット 2 カバーエリア See Clearing Paper Jams Cassette 2 Cover Area on p 101 ...

Страница 101: ...mmed paper is output automatically The message disappears and the printer is ready to print IMPORTANT If a message does not disappear Paper or pieces of paper may remain in the area surrounding the paper cassette See the following pull out the paper cassette and then remove the paper or pieces of paper See Checking Paper Jams in the Paper Cassette on p 104 ...

Страница 102: ... 2 Cover Area 1 Open the right cover If paper is jammed remove the paper See Clearing Paper Jams Output Area Right Cover Area Duplex Unit Area or Cassette 1 2 Area on p 92 2 While holding the tab A open the right cover of Cassette 2 A ...

Страница 103: ...ling it gently in the direction of the arrow 4 If the paper cannot be removed easily when it is jammed in the area shown in the figure do not try to remove it forcefully but proceed to Step 5 5 Close the right cover of the paper cassette ...

Страница 104: ...essage disappears and the printer is ready to print IMPORTANT If a message does not disappear Paper or pieces of paper may remain in the area surrounding the paper cassette See the following pull out the paper cassette and then remove the paper or pieces of paper See Checking Paper Jams in the Paper Cassette on p 104 ...

Страница 105: ... message that indicates a paper jam does not disappear check the paper or pieces of paper that remain in the area surrounding the paper cassette using the following procedure 1 Open the right cover 2 Pull out a paper cassette in which a paper jam occurs ...

Страница 106: ...e jammed paper by pulling it gently in the direction of the arrow 4 Insert the paper cassette Push it into the printer firmly CAUTION Precautions when inserting the paper cassette Be careful not to catch your fingers ...

Страница 107: ...aper may be jammed inside the fixing unit See Clearing Paper Jammed inside the Fixing Unit p 106 and then remove the jammed paper Clearing Paper Jammed inside the Fixing Unit If the jammed paper cannot be found remove the paper inside the fixing unit using the following procedure CAUTION Precautions when removing jammed paper Make sure that the fixing unit is completely cool before removing the ja...

Страница 108: ...107 1 Remove the fixing unit from the printer 1 Hold the levers A inside the handles on both sides 2 Remove the fixing unit 1 A 2 ...

Страница 109: ...108 2 While holding the tab A open the cover of the fixing unit 3 Remove the jammed paper by pulling it gently in the direction of the arrow 4 Close the cover of the fixing unit A ...

Страница 110: ...it in the printer 1 Align the connecters on the right with each other 2 Install the fixing unit horizontally 3 Push the fixing unit to install it firmly The fixing unit is locked by the levers B on both sides A Front View 1 2 B 3 ...

Страница 111: ... the toner cartridge before printing a large amount of data Toner Colors トナー 交換 しばらくは継続して 印刷できます When a toner cartridge needs to be replaced soon The printer stops printing Pressing オンライン continues the job Have ready a new toner cartridge of the indicated color It is recommended that you replace the toner cartridge before printing a large amount of data Toner Colors トナー 交換 When a toner cartridge h...

Страница 112: ...o replace the toner cartridge with a new one Toner Colors トナー 確認 When there is a possibility that a toner cartridge has reached the end of its life You can continue printing for a while however as this may result in damage to the printer it is recommended to replace the toner cartridge with a new one Toner Colors トナー との接続を確認してくださ い When there is a possibility that a toner cartridge is not installe...

Страница 113: ...NG Do not dispose of a used toner cartridge in open flames This may cause the toner remaining inside the cartridges to ignite resulting in burns or fire CAUTION Be careful not to get toner on your hands or clothing If toner gets on your hands or clothing wash them immediately with cold water Washing with warm water sets the toner making it impossible to remove the toner stains IMPORTANT About repl...

Страница 114: ... each color You can check the status of the toner cartridges in the display on the control panel You can check the status of the toner cartridges also in the Status page in the Remote UI About the power of the printer You can replace the toner cartridges either when the power of the printer is turned on or when it is turned off 1 Gently open the front cover Icon Status The printer is ready to prin...

Страница 115: ...114 NOTE Order of the toner cartridges 2 Pull out the toner cartridge to be replaced 1 Hold the handle 2 Pull out the toner cartridge Yellow Magenta Cyan Black 1 2 ...

Страница 116: ...artridges hold them properly as shown in the figure Do not place it vertically or upside down Do not touch the high voltage contacts A This may result in poor print quality or damage to the printer NOTE Your cooperation to collect used toner cartridges would be appreciated A ...

Страница 117: ...ag with scissors be careful not to damage the toner cartridge IMPORTANT Do not touch the toner cartridge memory A or the electrical contacts B This may result in damage to the cartridge Keep the protective bag Keep the protective bag for the toner cartridge You will need it when you remove the toner cartridge for printer maintenance or other purposes A B ...

Страница 118: ...move the drum protective cover A CAUTION If toner gets into your eyes or mouth Wash them immediately with cold water and consult a physician IMPORTANT Be sure to perform this operation If toner is not distributed evenly this may result in deterioration in print quality Be sure to shake the toner cartridge gently If you do not shake the cartridge gently toner may spill out A ...

Страница 119: ...118 5 Holding the tab A remove the drum protective cover IMPORTANT Do not touch the drum A Print quality may deteriorate if you touch or damage the drum A at the top of the toner cartridge A A ...

Страница 120: ...ce or other purposes 6 Install the toner cartridge Fit the projection A of the toner cartridge into the guide B on the front cover to install the toner cartridge Push it into the printer firmly IMPORTANT Precautions when installing toner cartridges When handling the toner cartridges be careful not to let the drum impact the frame of the printer A B ...

Страница 121: ...front cover CAUTION Precautions when closing the front cover Be careful not to catch your fingers IMPORTANT If you cannot close the front cover Make sure that the toner cartridges are installed in the back of the printer firmly Do not try to forcefully close the front cover as this may damage the printer Do not leave the front cover open for a long time with the toner cartridges installed This may...

Страница 122: ...or other than the printer driver for this printer multiple data may be canceled NOTE About print jobs which cannot be canceled You may not be able to cancel a job even if ジョブを中止中です is displayed Also the following jobs cannot be canceled An encrypted secured print job for which a password is not entered yet A job stored in the box Delete such jobs using the Remote UI 1 Make sure that the ジ ジ ジ ジョ ョ...

Страница 123: ...press OK ジョブを中止中です appears and the print data being processed is canceled When ジョブを中止中です disappears the job cancellation completes NOTE While ジ ジ ジ ジョ ョ ョ ョブ ブ ブ ブを を を を中 中 中 中止 止 止 止中 中 中 中で で で です す す す is displayed You cannot operate the printer ...

Страница 124: ...ned to be printed on A4 size paper Be sure to load A4 size paper when printing the Status Print 1 Load A4 size paper in the multi purpose tray or paper cassette See Loading Standard Size Paper Other Than Postcards and Envelopes on p 18 2 Make sure that the printer is online If the printer is not online press オンライン 3 Press ユ ユ ユ ユー ー ー ーテ テ テ ティ ィ ィ ィリ リ リ リテ テ テ ティ ィ ィ ィ 4 Select 共 共 共 共通 通 通 通ス ス...

Страница 125: ...4 5 Select は は は はい い い い using and then press OK Status Print is printed NOTE Sample of Status Print This is a sample of Status Print The contents may differ from the Status Print printed by your printer ...

Страница 126: ...s Displayed See p 126 and then contact your local authorized Canon dealer n represents an alphanumeric character A problem has occurred inside the printer Following the procedure in If a Service Error or the Message Power OFF and ON Is Displayed See p 127 cycle the power of the printer n represents an alphanumeric character A problem has occurred while the printer is processing print data E001 nnn...

Страница 127: ...nected turn the computer off and then disconnect the USB cable from the printer 3 Unplug the power plug from the AC power outlet 4 Remove the ground wire from the ground terminal IMPORTANT Do not turn on the printer again A fixing unit error is displayed Do not turn on the printer after turning it off 2 Contact your local authorized Canon dealer 1 2 3 4 ...

Страница 128: ...wer switch 2 Wait at least 10 seconds before turning on the printer 1 Open the power switch cover 2 Press I of the power switch If the message does not reappear the printer is ready If the message reappears you need to request service Follow the procedure below and then contact your local authorized Canon dealer to request service 1 2 1 2 ...

Страница 129: ...able is connected turn the computer off and then disconnect the USB cable from the printer 3 Unplug the power plug from the AC power outlet 4 Remove the ground wire from the ground terminal 5 Contact your local authorized Canon dealer to request service When contacting your Canon dealer please report also the error code which you noted down in Step 3 1 2 3 4 ...

Страница 130: ...g messages are displayed alternately If an error state and warning state are occurring at the same time A warning message is not displayed Auto Error Skip For a message with this mark perform the following procedure according to the situation When you want to skip an error error skip and continue to print 1 Press オンライン to skip the error Printing is continued 2 If print data is missing or is not pr...

Страница 131: ...e Cause The ITB unit needs to be replaced soon Solution Although you can continue to print for a while have ready a new ITB unit E1 回収トナー容器交換準備 Warning Message Cause The waste toner container needs to be replaced soon Solution Although you can continue to print for a while have ready a new waste toner container E5 定着器交換準備 Warning Message Cause The fixing unit needs to be replaced soon Solution Alt...

Страница 132: ...aper source is selected Solution Specify the setting for 給紙モード in the 給紙選択 menu properly IMPORTANT While 以 以 以 以下 下 下 下の の の の用 用 用 用紙 紙 紙 紙を を を をセ セ セ セッ ッ ッ ット ト ト ト is displayed If the front cover is opened the message may disappear However be sure to follow the directions in the displayed message to change the paper 回収トナー容器交換 Cause The waste toner container is full Solution Replace the waste ...

Страница 133: ...The fixing unit is not installed or is not installed properly Solution 1 Open the right cover and check if the fixing unit is installed Solution 2 Install the fixing unit again If the message appears even after installing the fixing unit again contact your local authorized Canon dealer for servicing トナーに梱包材がついていま す 確認してください Cause The packing materials inside the front cover are not removed Solutio...

Страница 134: ... Clearing Paper Jams Output Area Right Cover Area Duplex Unit Area or Cassette 1 2 Area See p 92 Clearing Paper Jams Cassette 2 Cover Area See p 101 IMPORTANT If paper jams occur in the multiple areas simultaneously The paper jam areas are displayed alternately in the display If you have removed the jammed paper without opening any cover Be sure to open and close the right cover once and then pres...

Страница 135: ...ndscape orientation then print again Cause 3 When the LIPS LX printer driver was not used custom size paper was loaded in landscape orientation to be printed Solution Load the paper in portrait orientation then print again Cause 4 用紙長さ確認 in the 共通セットアップ menu 拡張機 能 options is set to する when the multi purpose tray or Cassette 1 is being used Solution Set 用紙長さ確認 to しない and then print again 用紙種類を確認してく...

Страница 136: ...tain print quality Solution Please wait a moment When the fixing unit cools down printing resumes Cause 2 If the printer is used continuously for an extended period of time the internal temperature of the printer increases activating a safety mechanism and pausing printing temporarily Solution Please wait a moment When the inside of the printer cools down printing resumes If the internal temperatu...

Отзывы: