background image

2

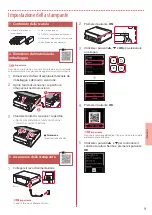
Impostazione della stampante

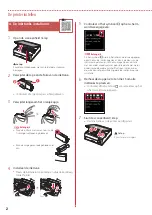
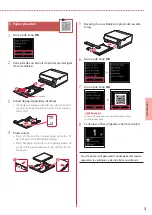
4. Installazione dei serbatoi 
d'inchiostro

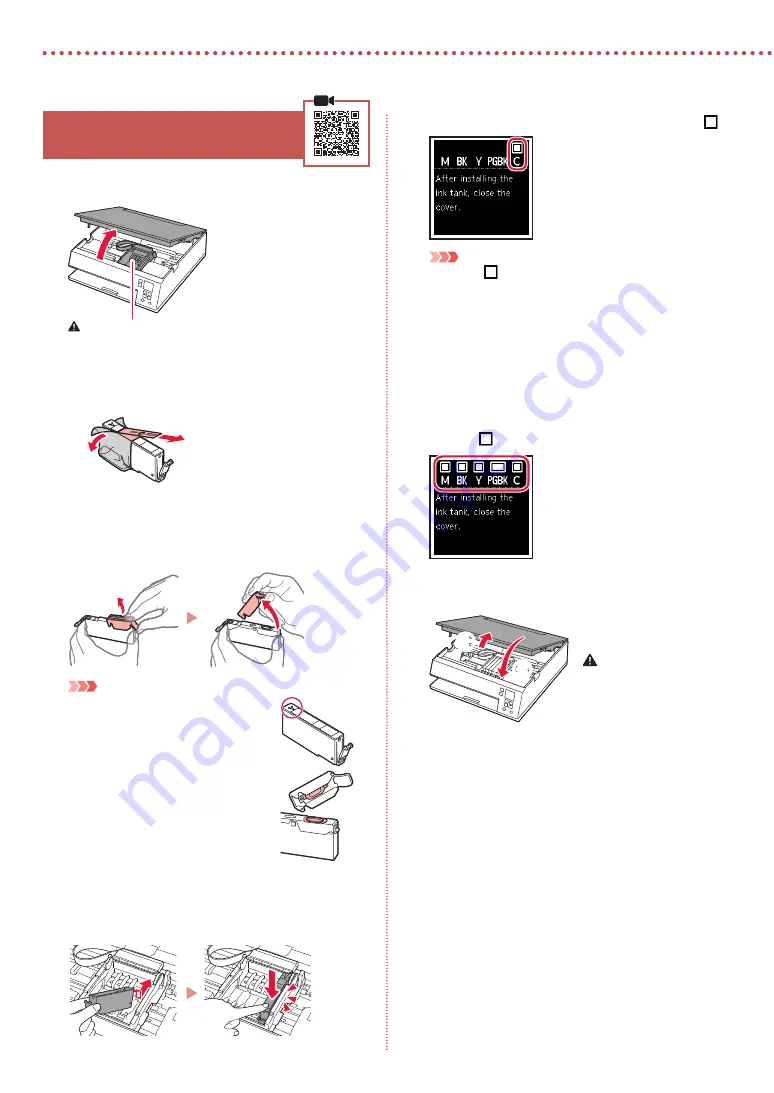
Aprire l'unità di scansione / coperchio.

 Attenzione

Non toccare il supporto della testina di stampa fino a 

quando non si ferma.

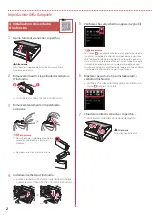
Rimuovere il nastro e la pellicola dal serbatoio 
d'inchiostro.

b

a

• 

Controllare che non vi sia rimasto del nastro.

Rimuovere lentamente il coperchietto 
arancione.

 Importante

• 

Non schiacciare il serbatoio d'inchiostro 

tenendo il foro dell'aria a forma di Y 

bloccato.

• 

Non toccare le aree mostrate in rosso.

Installare il serbatoio d'inchiostro.

• 

Inserire il serbatoio d'inchiostro nella testina di stampa 
e premere verso il basso finché non scatta in posizione.

Verificare che sullo schermo appaia il segno  .

 Importante

Se il segno 

 non appare sullo schermo nonostante sia stato 

installato il serbatoio d'inchiostro corrispondente, è possibile 

che il colore del serbatoio d'inchiostro sia sbagliato o che sia 

stato installato un serbatoio d'inchiostro non supportato dalla 

stampante, ad esempio con un numero di modello diverso. 

Installare un serbatoio d'inchiostro del colore esatto o utilizzare 

il serbatoio d'inchiostro fornito per l'impostazione.

Ripetere i passi da 2 a 5 per installare tutti i 
serbatoi d'inchiostro.

• 

Verificare che sulla schermata venga visualizzato un 
segno   per ciascun colore.

Chiudere l'unità di scansione / coperchio.

• 

Verrà avviata l'inizializzazione della stampante.

b

a

 Attenzione

Fare attenzione alle dita.

Содержание PIXMA TS6340

Страница 1: ...Informaci n de seguridad e informaci n importante ap ndice Para Come ar Leia Informa es Importantes e Sobre Seguran a adendo primeiro Guida Rapida Leggere innanzitutto Informazioni importanti e sulla...

Страница 2: ...tivos C mo sujetar la impresora Instalando a impressora p gina 1 Conectando a um computador smartphone ou tablet p gina 4 V deos instrucionais Segurando a impressora Installazione della stampante pagi...

Страница 3: ...aterials and orange tape 2 Open the scanning unit cover and remove the orange tape b a 3 Close the scanning unit cover Open the scanning unit cover fully and then close it Caution Watch your fingers a...

Страница 4: ...nd press down until it clicks 5 Check that the mark appears on the screen Important If the mark is not displayed on the screen even though you have installed the ink tank the color of the ink tank may...

Страница 5: ...r more sheets of Letter or A4 sized plain paper with the print side facing down Place the paper against the front paper guide and align the right paper guide to the width of the paper a b 5 Attach the...

Страница 6: ...xcept Windows 10 in S mode and macOS users For other operating systems continue setup by following the on screen instructions instead 6 Click Download 7 Run the downloaded file 8 Click Start Setup 9 F...

Страница 7: ...add your printer Connecting to a Smartphone If you are using multiple smartphones perform these steps on each smartphone Prepare the following before starting a Enable the Wi Fi setting on your smart...

Страница 8: ...Close the feed slot cover Follow the on screen instructions to set information for the loaded paper Copying Photo paper can only be loaded in the rear tray 1 Turn on the printer 2 Load Letter or A4 si...

Страница 9: ...e 2 Ouvrez l unit de num risation capot et retirez la bande orange b a 3 Fermez l unit de num risation capot Ouvrez compl tement l unit de num risation capot puis fermez la Attention Surveillez vos do...

Страница 10: ...e d impression et appuyez dessus jusqu ce qu un clic se produise 5 V rifiez que le symbole s affiche l cran Important Si le symbole ne s affiche pas l cran alors que vous avez install la cartouche d e...

Страница 11: ...2 feuilles de papier ordinaire au format Lettre ou A4 avec la face imprimer vers le bas Placez le papier contre le guide papier avant et alignez le guide papier droit sur la largeur du papier a b 5 F...

Страница 12: ...ws 10 en mode S et macOS Pour les autres syst mes d exploitation continuez la configuration en suivant les instructions l cran 6 Cliquez sur T l charger 7 Ex cutez le fichier t l charg 8 Cliquez sur C...

Страница 13: ...nnexion un smartphone Si vous utilisez plusieurs smartphones effectuez ces tapes sur chaque smartphone Pr parez les l ments suivants avant de d marrer a Activez le param tre Wi Fi sur votre smartphone...

Страница 14: ...tion Suivez les instructions l cran pour d finir les informations sur le papier charg Copie Le papier photo peut tre charg uniquement dans le r ceptacle arri re 1 Mettez l imprimante sous tension 2 Ch...

Страница 15: ...e Abdeckung und entfernen Sie das orangefarbene Klebeband b a 3 Schlie en Sie das Scan Modul die Abdeckung ffnen Sie das Scan Modul die Abdeckung vollst ndig und schlie en Sie es sie dann wieder Vorsi...

Страница 16: ...nrastet 5 berpr fen Sie ob das Zeichen auf dem Bildschirm angezeigt wird Wichtig Wenn das Zeichen nicht auf dem Bildschirm angezeigt wird obwohl Sie den Tintenbeh lter eingesetzt haben ist die Farbe d...

Страница 17: ...Blatt Normalpapier des Formats Letter oder A4 mit der bedruckbaren Seite nach unten ein Schieben Sie das Papier gegen die vordere Papierf hrung und richten Sie die rechte Papierf hrung an der Breite d...

Страница 18: ...nutzer von macOS Wenn Sie ein anderes Betriebssystem verwenden fahren Sie mit der Einrichtung fort indem Sie stattdessen die Anweisungen auf dem Bildschirm befolgen 6 Klicken Sie auf Herunterladen 7 F...

Страница 19: ...ngmiteinemSmartphone Wenn Sie mehrere Smartphones verwenden f hren Sie diese Schritte auf jedem Smartphone aus Bereiten Sie Folgendes vor bevor Sie beginnen a Aktivieren Sie die Wi Fi Einstellung auf...

Страница 20: ...weisungen auf dem Bildschirm um Informationen f r das eingelegte Papier festzulegen Kopieren Fotopapier kann nur in das hintere Fach eingelegt werden 1 Schalten Sie den Drucker ein 2 Legen Sie Normalp...

Страница 21: ...ranje tape en gooi het weg 2 Open de scaneenheid klep en verwijder de oranje tape b a 3 Sluit de scaneenheid klep Open de scaneenheid klep volledig en sluit deze vervolgens Let op Kijk uit met uw ving...

Страница 22: ...otdat hij klikt 5 Controleer of het symbool op het scherm wordt weergegeven Belangrijk Als het symbool niet op het scherm wordt weergegeven ook al hebt u de inkttank geplaatst dan is de kleur van de i...

Страница 23: ...llen normaal papier van Letter of A4 formaat met de afdrukzijde omlaag Plaats het papier tegen de voorste papiergeleider en lijn de rechterpapiergeleider uit met de breedte van het papier a b 5 Bevest...

Страница 24: ...or andere besturingssystemen gaat u verder met de installatie door in plaats daarvan de instructies op het scherm uit te voeren 6 Klik op Downloaden 7 Voer het gedownloade bestand uit 8 Klik op Beginn...

Страница 25: ...met een smartphone Als u meerdere smartphones gebruikt voert u deze stappen uit op elke smartphone Bereid het volgende voor voordat u begint a Schakel de Wi Fi instelling op uw smartphone in b Verbin...

Страница 26: ...uf Volg de instructies op het scherm om informatie over het geplaatste papier in te stellen Kopi ren Fotopapier kan alleen in de achterste lade worden geplaatst 1 Zet de printer aan 2 Plaats normaal p...

Страница 27: ...ggio e del nastro arancione 2 Aprire l unit di scansione coperchio e rimuovere il nastro arancione b a 3 Chiudere l unit di scansione coperchio Aprire completamente l unit di scansione coperchio quind...

Страница 28: ...verso il basso finch non scatta in posizione 5 Verificare che sullo schermo appaia il segno Importante Se il segno non appare sullo schermo nonostante sia stato installato il serbatoio d inchiostro co...

Страница 29: ...comune in formato Letter o A4 con il lato di stampa rivolto verso il basso Posizionare la carta contro la guida della carta anteriore e allineare la guida della carta di destra alla larghezza della c...

Страница 30: ...mode e macOS Per gli altri sistemi operativi continuare l impostazione seguendo le istruzioni visualizzate 6 Fare clic su Scarica 7 Eseguire il file scaricato 8 Fare clic su Avvia impostazione Start...

Страница 31: ...Connessione a uno smartphone Se si utilizzano pi smartphone eseguire questi passaggi su ciascuno smartphone Prima di iniziare effettuare quanto segue a Abilitare l impostazione Wi Fi sullo smartphone...

Страница 32: ...ore manuale Seguire le istruzioni visualizzate sullo schermo per impostare le informazioni per la carta caricata Copia La carta fotografica pu essere caricata solo nel vassoio posteriore 1 Accendere l...

Страница 33: ...balagem e a fita laranja 2 Abra a unidade de digitaliza o tampa e remova a fita laranja b a 3 Feche a unidade de digitaliza o tampa Abra totalmente a unidade de digitaliza o tampa e feche a em seguida...

Страница 34: ...na cabe a de impress o e pressione o para baixo at ouvir um clique 5 Verifique se a marca aparece na tela Importante Se a marca n o for exibida na tela mesmo que voc tenha instalado o cartucho de tint...

Страница 35: ...folhas de papel comum tamanho Letter ou A4 com o lado a ser impresso voltado para baixo Coloque o papel na guia do papel frontal e alinhe a guia do papel direita com a largura do papel a b 5 Coloque a...

Страница 36: ...xceto Windows 10 in S mode e usu rios do macOS Para outros sistemas operacionais continue a configura o seguindo as instru es na tela 6 Clique em Download 7 Execute o arquivo baixado 8 Clique em Inici...

Страница 37: ...essora Conectando a um smartphone Se voc estiver usando v rios smartphones execute estas etapas em cada smartphone Prepare o seguinte antes de iniciar a Ative a configura o Wi Fi no seu smartphone b C...

Страница 38: ...de alimenta o Siga as instru es na tela para definir informa es sobre o papel carregado Copiando Papel fotogr fico s pode ser carregado na bandeja traseira 1 Ligue a Impressora 2 Carregue o papel comu...

Страница 39: ...inta naranja 2 Abra la cubierta unidad de escaneado y elimine la cinta naranja b a 3 Cierre la cubierta unidad de escaneado Abra la cubierta unidad de escaneado completamente y luego ci rrela Precauci...

Страница 40: ...y emp jelo hacia abajo hasta que encaje en su sitio 5 Compruebe que la marca aparezca en la pantalla Importante Si la marca no se muestra en pantalla a pesar de haber instalado el dep sito de tinta es...

Страница 41: ...papel normal de tama o Carta o A4 con el lado de impresi n hacia abajo Coloque el papel delante de la gu a del papel frontal y alinee la gu a del papel derecha con el ancho del papel a b 5 Coloque la...

Страница 42: ...macOS Para otros sistemas operativos contin e con la configuraci n siguiendo las instrucciones en pantalla 6 Haga clic en Descargar 7 Ejecute el archivo descargado 8 Haga clic en Iniciar configuraci n...

Страница 43: ...ra Conexi n con un tel fono inteligente Si utiliza varios tel fonos inteligentes realice estos pasos en cada tel fono inteligente Prepare lo siguiente antes de empezar a Active la configuraci n de Wi...

Страница 44: ...a de alimentaci n Siga las instrucciones en pantalla para definir la informaci n para el papel cargado Copia El papel fotogr fico solo se puede cargar en la bandeja posterior 1 Encienda la impresora 2...

Страница 45: ...1 1 CD ROM Windows 2 1 2 b a 3 a b 3 1 2 ON 3 OK 4 OK QR 5 OK...

Страница 46: ...2 4 1 2 b a 3 Y 4 5 6 2 5 7 b a...

Страница 47: ...3 5 1 OK 2 a b 3 Letter A4 4 2 Letter A4 a b 5 a b 6 OK 7 OK QR 8...

Страница 48: ...6 a 4 6 a Smartphone smartphone 1 Canon 2 3 4 5 Windows Windows 10 in S mode macOS 6 7 8 Start Setup 9 smartphone 6 b Smartphone 5 CD ROM Windows EasySetup exe CD ROM 3 internet win CD ROM SETUP exe...

Страница 49: ...6 b 5 6 b Smartphone 1 Canon PRINT Inkjet SELPHY smartphone web Canon QR 2 3 Smartphone smartphone smartphone a Wi Fi smartphone b smartphone smartphone smartphone 6...

Страница 50: ...6 1 2 a b 3 a b 4 1 2 Letter A4 3 4 5 OK 6 Copy settings OK 7 OK 8 Start...

Страница 51: ...ra eventuellt f rpackningsmaterial och orange tejp 2 ppna skannerenheten luckan och ta bort den orange tejpen b a 3 St ng skannerenheten luckan ppna skannerenheten luckan helt och st ng den sedan F rs...

Страница 52: ...uvudet och tryck ned t tills den klickar 5 Kontrollera att markeringen visas p sk rmen Viktigt Om markeringen inte visas p sk rmen sedan du installerat bl ckbeh llaren kanske bl ckbeh llarens f rg r f...

Страница 53: ...2 eller fler blad med vanligt Letter eller A4 papper med utskriftssidan v nd ned t L gg papperet mot den fr mre pappersledaren och justera den h gra pappersledaren efter papperets bredd a b 5 S tt dit...

Страница 54: ...tom Windows 10 in S mode eller macOS F r andra operativsystem forts tter du f lja anvisningarna p sk rmen ist llet 6 Klicka p H mta 7 Starta den h mtade filen 8 Klicka p Starta inst llningar Start Set...

Страница 55: ...ll skrivaren Ansluta till en smarttelefon Om du anv nder flera smarttelefoner utf r du dessa steg p varje smarttelefon F rbered f ljande innan du b rjar a Aktivera inst llningen Wi Fi p smarttelefonen...

Страница 56: ...r matningsfacket F lj instruktionerna p sk rmen f r att ange information om det p fyllda papperet Kopiera Fotopapper kan endast fyllas p i det bakre facket 1 Sl p skrivaren 2 L gg i vanligt Letter ell...

Страница 57: ...uelt beskyttelsesmateriale og oransje tape 2 pne skanneenheten dekselet og fjern den oransje tapen b a 3 Lukk skanneenheten dekselet pne skanneenheten dekselet helt og lukk den det igjen Forsiktig Pas...

Страница 58: ...ivehodet og trykk den ned til den klikker 5 Sjekk at merket vises p skjermen Viktig Hvis merket ikke vises p skjermen selv om du har installert blekktanken kan det v re at fargen p blekktanken er feil...

Страница 59: ...gg inn 2 ett eller flere ark vanlig papir i Letter eller A4 format med utskriftssiden ned Plasser papiret mot fremre papirf rer og juster h yre papirf rer ut fra bredden p papiret a b 5 Fest kassettde...

Страница 60: ...dows 10 in S mode og macOS brukere Ved bruk av et annet operativsystem fortsetter du oppsettet ved i stedet f lge instruksjonene p skjermen 6 Klikk p Last ned 7 Kj r den nedlastede filen 8 Klikk p Sta...

Страница 61: ...oble til en smarttelefon Hvis du bruker flere smarttelefoner utf rer du disse trinnene p hver smarttelefon Klargj r f lgende f r du starter a Aktiver Wi Fi innstillingen p smarttelefonen b Koble smart...

Страница 62: ...instruksjonene p skjermen for angi informasjon for papiret som er lagt inn Kopiere Fotopapir kan kun legges i bakskuffen 1 Sl p skriveren 2 Legg inn vanlig papir i Letter eller A4 st rrelse 3 pne dok...

Страница 63: ...ballage og orange tape 2 bn scanningsenheden d kslet og fjern den orange tape b a 3 Luk scanningsenheden d kslet bn scanningsenheden d kslet helt og luk det derefter Forsigtig Pas p dine fingre a b 3...

Страница 64: ...edet og tryk ned indtil den klikker 5 Tjek at m rket vises p sk rmen Vigtigt Hvis m rket ikke vises p sk rmen selvom du har installeret bl kbeholderen er farven i bl kbeholderen muligvis forkert eller...

Страница 65: ...l g 2 eller flere ark almindeligt Letter eller A4 papir med udskriftssiden nedad Placer papiret mod det forreste papirstyr og juster derefter det h jre papirstyr med bredden af papiret a b 5 S t kasse...

Страница 66: ...ode og macOS brugere Hvis du bruger andre operativsystemer skal du forts tte konfigurationen ved at f lge instruktionerne p sk rmen i stedet 6 Klik p Hent 7 K r den downloadede fil 8 Klik p Start ops...

Страница 67: ...printer Tilslutning til en smartphone Hvis du bruger flere smartphones skal du udf re disse trin p hver smartphone Forbered f lgende inden start a Aktiv r indstillingen Wi Fi p din smartphone b Slut d...

Страница 68: ...rne p sk rmen for at angive oplysninger for det ilagte papir Kopiering Der kan kun l gges fotopapir i den bagerste bakke 1 T nd printeren 2 Il g almindeligt papir i Letter eller A4 st rrelse 3 bn doku...

Страница 69: ...i pakkausmateriaalit ja oranssi teippi 2 Avaa skannausyksikk kansi ja poista oranssi teippi b a 3 Sulje skannausyksikk kansi Avaa skannausyksikk kansi t ysin ja sitten sulje se Huomio Varo sormiasi a...

Страница 70: ...nna mustes ili Aseta mustes ili tulostusp h n ja paina sit alasp in kunnes se napsahtaa 5 Tarkista ett merkki tulee n kyviin n ytt n T rke Jos merkki ei n y n yt ss vaikka olet asentanut mustes ili n...

Страница 71: ...seta v hint n 2 Letter tai A4 kokoista arkkia tavallista paperia tulostuspuoli alasp in Aseta paperi edess olevaa paperiohjainta vasten ja kohdista oikeanpuoleinen paperiohjain paperin leveyteen a b 5...

Страница 72: ...indows paitsi Windows 10 in S mode ja macOS k ytt jille Jos k yt t muuta k ytt j rjestelm jatka asennusta n yt n ohjeiden mukaan 6 Valitse Lataa 7 Suorita ladattu tiedosto 8 Valitse Aloita asetukset S...

Страница 73: ...ita Yhdist minen lypuhelimeen Jos k yt t useita lypuhelimia suorita n m vaiheet jokaiselle lypuhelimelle Valmistele seuraavat ennen kuin aloitat a Ota Wi Fi asetus k ytt n lypuhelimessa b Yhdist lypuh...

Страница 74: ...atka asetetun paperin tietojen asettamista noudattamalla n yt ss n kyvi ohjeita Kopiointi Valokuvapaperia voi lis t ainoastaan takalokeroon 1 Kytke tulostimen virta 2 Aseta tavallista Letter tai A4 ko...

Страница 75: ...RMC Regulatory Model Code K10499 RMC Regulatory Model Code K10574...

Страница 76: ...Acceso al Manual en l nea Desde su navegador Acesse o Manual On line Do seu navegador Accedere al Manuale online Dal browser Online handleiding openen Via de browser Zugriff auf das Online Handbuch b...

Отзывы: