background image

5

ENGLISH

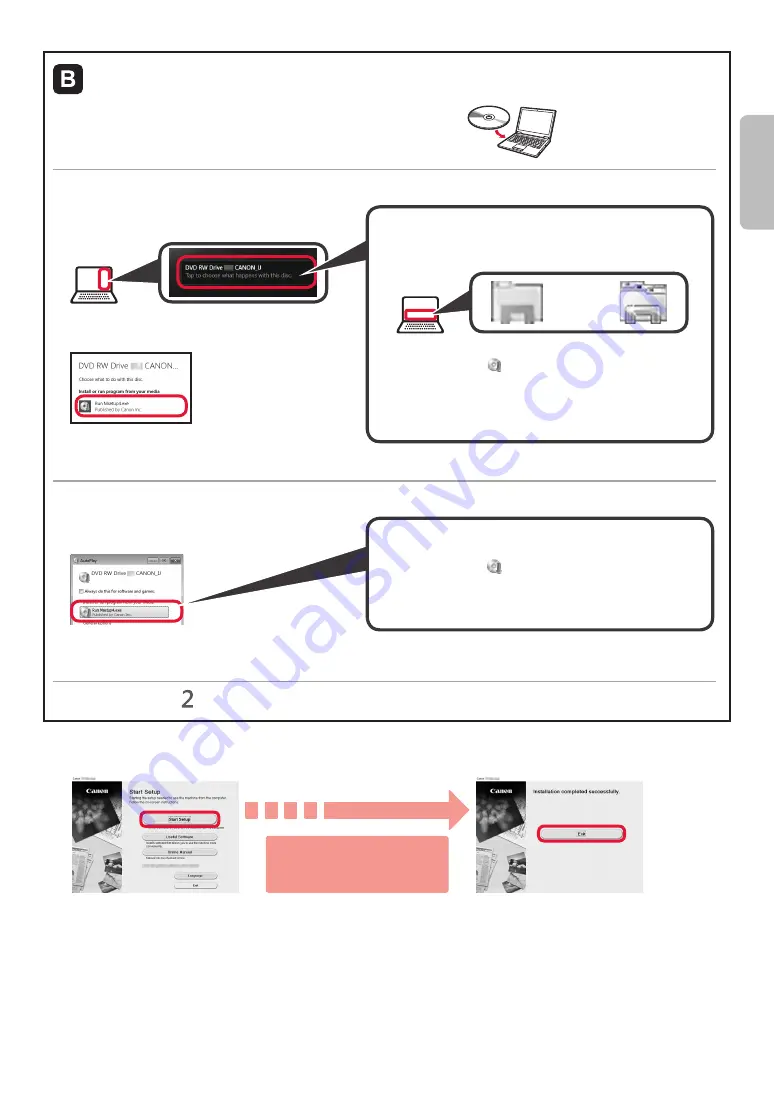
Using Setup CD-ROM (Windows Only)

Load the Setup CD-ROM in your computer.


■ When using Windows 10 or Windows 8.1:

When the following message appears on the right 

side of your computer screen, click it.

If the following screen appears, click 

Run  

Msetup4.exe

.

If the 

User Account Control

 dialog box appears, 

click 

Yes

.

When This Message Does Not Appear (or Has 

Disappeared)
1.  Click 

File Explorer

 on the taskbar.

or

2.  Click 

This PC

 on the left side of the opened window.

3.  Double-click the   CD-ROM icon on the right side of 

the window. 

If the contents of the CD-ROM appear, double-click 

Msetup4.exe

.

4.  Proceed to step 

d

.


■ When using Windows 7:

b

  When the 

AutoPlay

 screen appears, click 

Run 

Msetup4.exe

.

c

  If the 

User Account Control

 dialog box appears, 

click 

Continue

.

When 

AutoPlay

 Screen Does Not Appear

1.  Click 

Computer

 from the start menu.

2.  Double-click the   CD-ROM icon on the right side of 

the opened window. 

If the contents of the CD-ROM appear, double-click 

Msetup4.exe

.

Proceed to step   to continue.

Click 

Start Setup

.

The connection with your computer is now complete. You can print from your 

computer.

If the following screen appears, click 

Exit

.

Follow the on-screen 

instructions to proceed 

with the setup.

Содержание PIXMA TS5110

Страница 1: ...ia Informa es Importantes e Sobre Seguran a adendo primeiro Gu a de inicio Lea primero Informaci n de seguridad e informaci n importante ap ndice Getting Started Read Safety and Important Information...

Страница 2: ...ssora Filmes explicativos Instalaci n de la impresora p gina 1 Conexi n con el ordenador y con el tel fono inteligente o la tableta p gina 4 C mo sujetar la impresora Pel culas explicativas Installing...

Страница 3: ...cover 3 Remove the orange tape and the protective material and discard them 4 Close the scanning unit cover 5 Connect the power cord diagonally from the back Back Do not connect any cables except the...

Страница 4: ...package b Remove the protective tape a b Do not touch Be careful of ink on the protective tape 4 Set the Color FINE cartridge on the FINE cartridge holder on the left side Do not bump it against the...

Страница 5: ...g down b Slide the right paper guide to align it with the side of the paper stack c Align the paper stack with the paper guide in front a b c 4 Attach the cassette cover and insert the cassette The fo...

Страница 6: ...rowser etc on your computer b Input the following URL and access the Canon website c Select Set Up d Input the model name of your printer and click OK You can select a model name from the list e Click...

Страница 7: ...on on the right side of the window If the contents of the CD ROM appear double click Msetup4 exe 4 Proceed to step d When using Windows 7 b When the AutoPlay screen appears click Run Msetup4 exe c If...

Страница 8: ...tract with your service provider Up to 5 devices can be connected to the printer via wireless LAN connection directly 2 Check the display on the printer The screen turns off when no operation is made...

Страница 9: ...ppear see Preparation for Printer below to operate the printer and then wait for a while until the message appears Follow the on screen instructions to proceed with the setup The appropriate connectio...

Страница 10: ...inted photo on the platen glass and then press the OK button 3 a Load several sheets of photo paper with the print side facing up b Slide the right paper guide to align it with the side of the paper s...

Страница 11: ...e escaneado 3 Retire la cinta naranja y el material de protecci n y des chelos 4 Cierre la cubierta unidad de escaneado 5 Conecte el cable de alimentaci n en sentido diagonal desde la parte trasera At...

Страница 12: ...ra a b No tocar Tenga cuidado con la tinta de la cinta protectora 4 Coloque el cartucho FINE Color en el soporte de cartucho FINE en la parte izquierda No golpear contra los objetos de alrededor 5 Emp...

Страница 13: ...b Deslice la gu a del papel derecha para alinearla con el lado de la pila de papel c Alinee la pila de papel con la gu a del papel en primer plano a b c 4 Coloque la cubierta del cassette e inserte el...

Страница 14: ...b Escriba la URL siguiente y acceda al sitio web de Canon c Seleccione Configurar d Escriba el nombre del modelo de su impresora y haga clic en Aceptar Puede seleccionar un nombre de modelo de la list...

Страница 15: ...ensaje no se muestra o ya no aparece 1 Haga clic en el Explorador de archivos File Explorer de la barra de tareas o 2 Haga clic en Este equipo This PC en la parte izquierda de la ventana que se abra 3...

Страница 16: ...n su proveedor de servicios Se pueden conectar un m ximo de 5 dispositivos directamente a la impresora mediante la conexi n LAN inal mbrica 2 Compruebe la pantalla en la impresora Cuando el equipo no...

Страница 17: ...raci n para la impresora a continuaci n para hacer funcionar la impresora y espere un momento hasta que aparezca un mensaje Siga las instrucciones en pantalla para continuar con la configuraci n El m...

Страница 18: ...ar el papel fotogr fico en el cristal de la platina y luego pulse el bot n OK 3 a Cargue varias hojas de papel fotogr fico con el lado de impresi n hacia arriba b Deslice la gu a del papel derecha par...

Страница 19: ...a fita laranja e o material de prote o e descarte os 4 Feche a unidade de digitaliza o tampa 5 Conecte o cabo de alimenta o na diagonal a partir da parte de tr s Parte traseira N o conecte os cabos ai...

Страница 20: ...em b Remova a fita de prote o a b N o toque Cuidado com a tinta na fita de prote o 4 Coloque o cartucho FINE no suporte do cartucho FINE esquerda N o bata a contra as pe as em volta 5 Empurre para bai...

Страница 21: ...baixo b Deslize a guia do papel direita para alinh la pilha de papel c Alinhe a pilha de papel com a guia do papel frontal a b c 4 Coloque a tampa do cassete e insira o cassete A figura a seguir mostr...

Страница 22: ...computador b Digite a URL a seguir e acesse o site da Canon c Selecione Configurar d Informe o nome do modelo de sua impressora e clique em OK Voc pode selecionar um nome de modelo na lista e Clique e...

Страница 23: ...ta mensagem n o aparecer ou tiver desaparecido 1 Clique em Explorador de Arquivos File Explorer na barra de ferramentas ou 2 Clique em Este PC This PC no lado esquerdo da janela aberta 3 Clique duas v...

Страница 24: ...ato com seu provedor de servi o At 5 dispositivos podem ser diretamente conectados impressora por meio de uma conex o de LAN sem fio 2 Verifique a tela da impressora A tela desliga quando nenhuma oper...

Страница 25: ...se o Prepara o para a impressora abaixo para operar a impressora e aguarde at que a mensagem seja exibida Siga as instru es na tela para prosseguir com a configura o O m todo de conex o apropriado sel...

Страница 26: ...exposi o e em seguida pressione o bot o OK 3 a Coloque v rias folhas de papel fotogr fico com o lado a ser impresso voltado para cima b Deslize a guia do papel direita para alinh la pilha de papel a...

Страница 27: ...RMC Regulatory Model Code K10460...

Страница 28: ...Manual On line A partir do site A partir do atalho da rea de trabalho Acceso al Manual en l nea Desde el sitio web Desde el acceso directo del escritorio Access Online Manual From Web site From deskt...

Отзывы: