background image

2

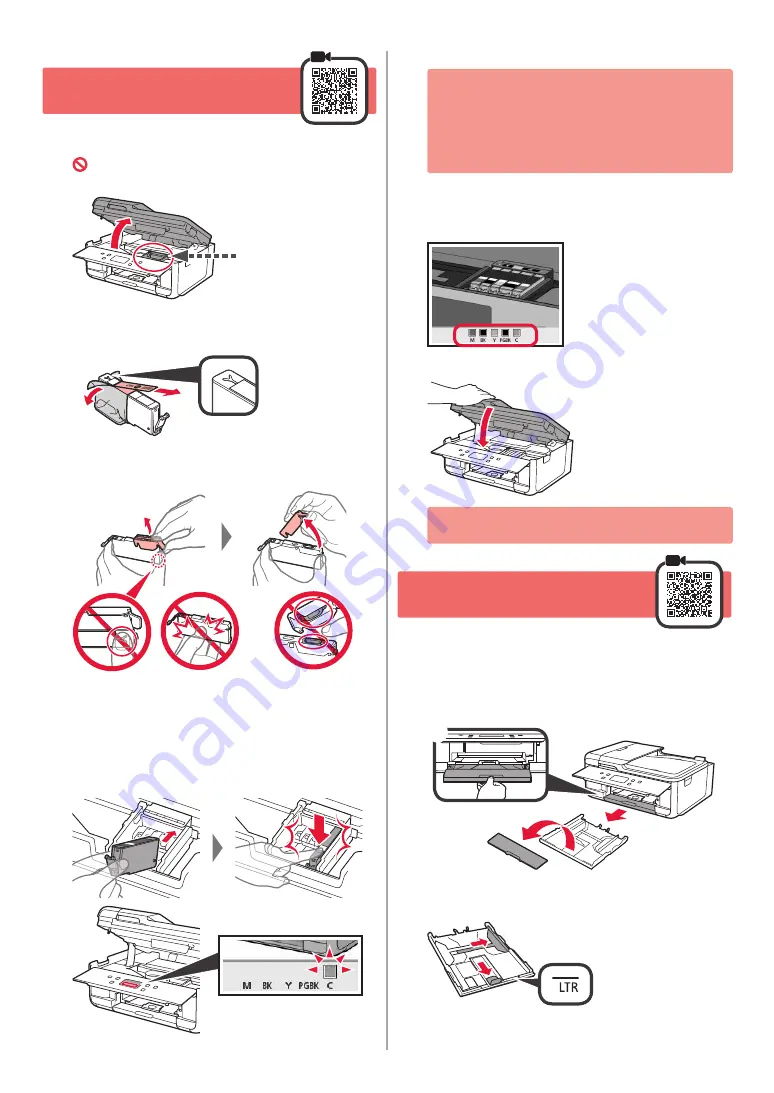
3.   Installing  Ink Tank 

Open the scanning unit / cover

.

  Do not touch the print head holder

 (A)

 until it 

stops.

(A)

a   

COMPLETELY remove the orange tape

.

b   

Remove the protective wrap.

a

b

Hook the orange cap with your finger to remove it 

GENTLY.

Do not push the both sides of the 

ink tank with the Y-shape air hole 

blocked.

Do not touch.

Insert the ink tank into the print head and push it 

down firmly until it snaps into place.

The color of the ink tank that you set appears on 

screen.

If the color is not displayed on the screen even 

though you have installed the ink tank, the color 

of the ink tank may be wrong or you may have 

installed an ink tank, such as one with a different 

model number, that is not supported by this printer. 

Either install an ink tank for the correct color or use 

the provided ink tank for setup.

Install all the ink tanks the same way as in step 

4

, and then confirm that all the colors appear on 

screen.

Close the scanning unit / cover

.

If an error message appears on the screen, make 

sure the ink tanks are installed correctly.

4.  Loading Paper / Aligning 

Print Head

To obtain a better print result, print a pattern for Print Head 

Alignment and scan it.

a   

Pull out the cassette

.

b   

Remove the cassette cover

.

a

b

Open the paper guides, and then align the guide in 

front with the mark of LTR.

Содержание PIXMA TR7520

Страница 1: ...D marrage Lire S curit et informations importantes addendum en premier Getting Started Read Safety and Important Information addendum first...

Страница 2: ...Connexion avec un ordinateur et un smartphone ou une tablette page 4 Manipulation de l imprimante Vid os explicatives Installing the Printer page 1 Connecting with Computer and Smartphone Tablet page...

Страница 3: ...hollows on the both sides of the printer with your fingers and open the scanning unit cover b Remove the orange tape b a 3 Close the scanning unit cover 4 Connect the power cord diagonally from the b...

Страница 4: ...led the ink tank the color of the ink tank may be wrong or you may have installed an ink tank such as one with a different model number that is not supported by this printer Either install an ink tank...

Страница 5: ...tte cover and insert the cassette 5 a Pull out the paper output tray b Open the output tray extension a b 6 If the following screen appears select OK 7 Make sure that a pattern is printed for Print He...

Страница 6: ...tc on your computer b Input the following URL and access the Canon website c Select Set Up d Input the model name of your printer and click OK You can select a model name from the list e Click Setup T...

Страница 7: ...of the window If the contents of the CD ROM appear double click Msetup4 exe 4 Proceed to step d When using Windows 7 b When the AutoPlay screen appears click Run Msetup4 exe c If the User Account Con...

Страница 8: ...rvice provider Up to 5 devices can be connected to the printer via wireless LAN connection directly 2 Check the display on the printer The screen turns off when no operation is made for about 10 minut...

Страница 9: ...a message saying Printer is not registered Perform printer setup does not appear see Preparation for Printer below to operate the printer and then wait for a while until the message appears Follow the...

Страница 10: ...ng from the website a Access the Canon website b Select Set Up c When the screen for selecting a model appears input the model name of your printer d Select Making Fax Ready for Use Opening from the m...

Страница 11: ...doigts dans les cavit s de chaque c t de l imprimante et ouvrez l unit de num risation capot b Retirez la bande orange b a 3 Fermez l unit de num risation capot 4 Branchez le cordon d alimentation en...

Страница 12: ...la couleur de la cartouche d encre est peut tre fausse ou vous avez peut tre install une cartouche d encre non prise en charge par l imprimante par exemple une cartouche avec un num ro de mod le diff...

Страница 13: ...de la cassette et ins rez la cassette 5 a Retirez le bac de sortie papier b Ouvrez l extension du bac de sortie papier a b 6 Si l cran suivant s affiche s lectionnez OK 7 Assurez vous qu un motif est...

Страница 14: ...suivante et acc dez au site Web Canon c S lectionnez Configuration d Entrez le nom de mod le de votre imprimante et cliquez sur OK Vous pouvez s lectionner un nom de mod le partir de la liste e Cliqu...

Страница 15: ...le contenu du CD ROM s affiche double cliquez sur Msetup4 exe 4 Passez l tape d Si vous utilisez Windows 7 b Lorsque l cran Lecture automatique appara t cliquez sur Ex cuter Msetup4 exe c Si la bo te...

Страница 16: ...e services Jusqu 5 p riph riques peuvent tre connect s directement l imprimante via une connexion r seau sans fil 2 V rifiez l affichage sur l imprimante L cran s teint si aucune action n est effectu...

Страница 17: ...est pas enregistr e Configurer l imprimante ne s affiche pas reportez vous la section Pr paration de l imprimante ci dessous pour faire fonctionner l imprimante et attendez que le message s affiche Su...

Страница 18: ...c dez au site Web Canon b S lectionnez Configuration c Lorsque l cran permettant de s lectionner un mod le appara t entrez le nom de mod le de votre imprimante d S lectionnez Pr paration du t l copieu...

Страница 19: ...RMC Regulatory Model Code K10458...

Страница 20: ...C 2017 XXXXXXXX Windows 10 Acc s au Manuel en ligne partir du site Web partir du raccourci du bureau Access Online Manual From Web site From desktop shortcut PRINTED IN XXXXXXXX IMPRIM XX XXXXXXXX QT6...

Отзывы: