background image

4

6-A.  Connexion à un ordinateur 


Mac OS

Windows

Vous devez configurer une connexion pour chaque ordinateur. Poursuivez la configuration à partir de l'étape 

1

 pour chaque ordinateur.

Démarrez le fichier de configuration pour la méthode   ou la méthode 

.

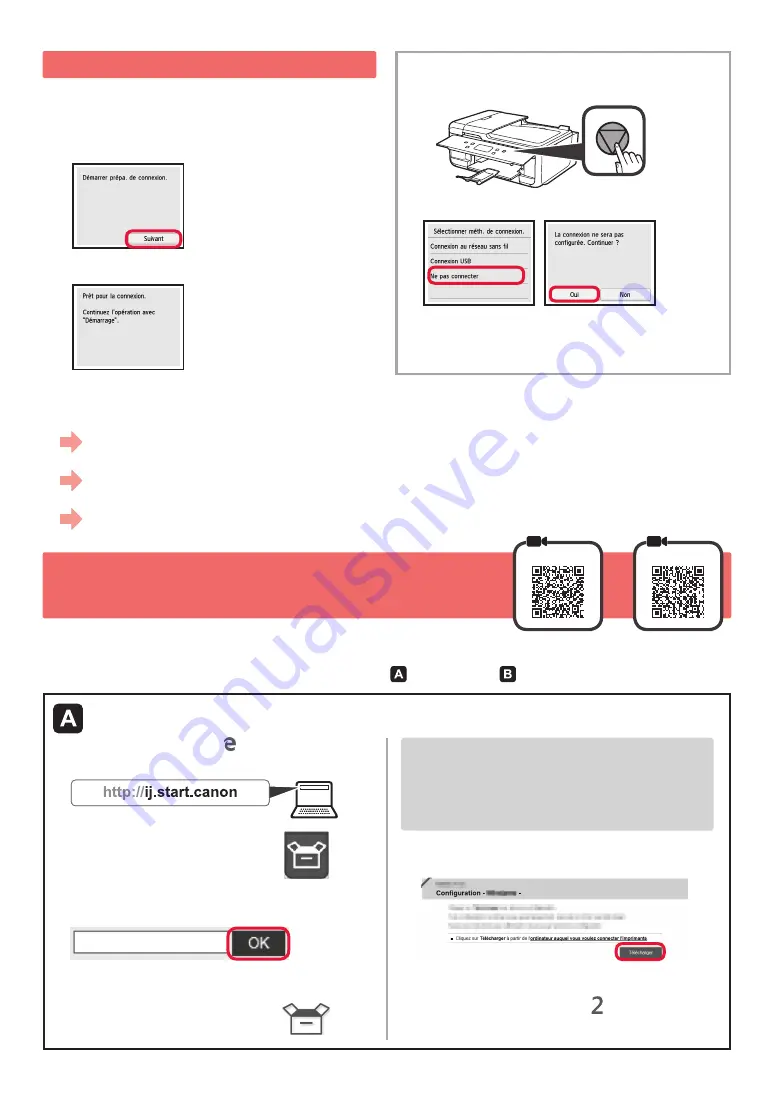
5. Préparation de la connexion

Dans la description suivante, les smartphones et les 

tablettes sont regroupés sous le terme smartphone.

Sélectionnez 

Suivant

.

Assurez-vous que l'écran suivant s'affiche.

Poursuivez avec l'étape correspondant à la manière dont 

vous utilisez l'imprimante.

Utiliser uniquement l'imprimante

Appuyez sur le bouton 

Arrêt (Stop)

 de l'imprimante.

Sélectionnez 

Ne pas connecter

 > 

Oui

 dans cet ordre.

La configuration est terminée.
Pour poursuivre la configuration de la télécopie, 

passez à la page 8.

Ouvrez un navigateur Web (   etc.) sur votre ordinateur.

Entrez l'URL suivante et accédez au site Web Canon

.

Sélectionnez 

Configuration

.

Entrez le nom de modèle de votre imprimante 

et cliquez sur 

OK

.

Vous pouvez sélectionner un nom de modèle à partir 

de la liste.

Cliquez sur 

Configuration

.

Les procédures pour Windows et Mac OS sont 

présentées ci-dessous. Si vous utilisez un ordinateur 

équipé d'un système d'exploitation autre que 

Windows ou Mac OS

 (

Chrome OS, par exemple) 

procédez à la configuration en fonction des 

instructions qui s'affichent à l'écran.

Cliquez sur 

Télécharger

 et téléchargez le fichier 

de configuration.

Exécutez le fichier téléchargé.

Poursuivez avec l'étape   à la page 

suivante pour continuer.

Téléchargement depuis Internet

•  Pour utiliser l'imprimante en la connectant uniquement à un ordinateur, ou à la fois à un ordinateur et à un smartphone

 « 6-A. Connexion à un ordinateur »

•  Pour utiliser l'imprimante en la connectant uniquement à un smartphone

 « 6-B. Connexion à un smartphone » à la page 6

•  Pour utiliser l'imprimante sans la connecter à un ordinateur ou à un smartphone

 « Utiliser uniquement l'imprimante »

Содержание PIXMA TR7520

Страница 1: ...D marrage Lire S curit et informations importantes addendum en premier Getting Started Read Safety and Important Information addendum first...

Страница 2: ...Connexion avec un ordinateur et un smartphone ou une tablette page 4 Manipulation de l imprimante Vid os explicatives Installing the Printer page 1 Connecting with Computer and Smartphone Tablet page...

Страница 3: ...hollows on the both sides of the printer with your fingers and open the scanning unit cover b Remove the orange tape b a 3 Close the scanning unit cover 4 Connect the power cord diagonally from the b...

Страница 4: ...led the ink tank the color of the ink tank may be wrong or you may have installed an ink tank such as one with a different model number that is not supported by this printer Either install an ink tank...

Страница 5: ...tte cover and insert the cassette 5 a Pull out the paper output tray b Open the output tray extension a b 6 If the following screen appears select OK 7 Make sure that a pattern is printed for Print He...

Страница 6: ...tc on your computer b Input the following URL and access the Canon website c Select Set Up d Input the model name of your printer and click OK You can select a model name from the list e Click Setup T...

Страница 7: ...of the window If the contents of the CD ROM appear double click Msetup4 exe 4 Proceed to step d When using Windows 7 b When the AutoPlay screen appears click Run Msetup4 exe c If the User Account Con...

Страница 8: ...rvice provider Up to 5 devices can be connected to the printer via wireless LAN connection directly 2 Check the display on the printer The screen turns off when no operation is made for about 10 minut...

Страница 9: ...a message saying Printer is not registered Perform printer setup does not appear see Preparation for Printer below to operate the printer and then wait for a while until the message appears Follow the...

Страница 10: ...ng from the website a Access the Canon website b Select Set Up c When the screen for selecting a model appears input the model name of your printer d Select Making Fax Ready for Use Opening from the m...

Страница 11: ...doigts dans les cavit s de chaque c t de l imprimante et ouvrez l unit de num risation capot b Retirez la bande orange b a 3 Fermez l unit de num risation capot 4 Branchez le cordon d alimentation en...

Страница 12: ...la couleur de la cartouche d encre est peut tre fausse ou vous avez peut tre install une cartouche d encre non prise en charge par l imprimante par exemple une cartouche avec un num ro de mod le diff...

Страница 13: ...de la cassette et ins rez la cassette 5 a Retirez le bac de sortie papier b Ouvrez l extension du bac de sortie papier a b 6 Si l cran suivant s affiche s lectionnez OK 7 Assurez vous qu un motif est...

Страница 14: ...suivante et acc dez au site Web Canon c S lectionnez Configuration d Entrez le nom de mod le de votre imprimante et cliquez sur OK Vous pouvez s lectionner un nom de mod le partir de la liste e Cliqu...

Страница 15: ...le contenu du CD ROM s affiche double cliquez sur Msetup4 exe 4 Passez l tape d Si vous utilisez Windows 7 b Lorsque l cran Lecture automatique appara t cliquez sur Ex cuter Msetup4 exe c Si la bo te...

Страница 16: ...e services Jusqu 5 p riph riques peuvent tre connect s directement l imprimante via une connexion r seau sans fil 2 V rifiez l affichage sur l imprimante L cran s teint si aucune action n est effectu...

Страница 17: ...est pas enregistr e Configurer l imprimante ne s affiche pas reportez vous la section Pr paration de l imprimante ci dessous pour faire fonctionner l imprimante et attendez que le message s affiche Su...

Страница 18: ...c dez au site Web Canon b S lectionnez Configuration c Lorsque l cran permettant de s lectionner un mod le appara t entrez le nom de mod le de votre imprimante d S lectionnez Pr paration du t l copieu...

Страница 19: ...RMC Regulatory Model Code K10458...

Страница 20: ...C 2017 XXXXXXXX Windows 10 Acc s au Manuel en ligne partir du site Web partir du raccourci du bureau Access Online Manual From Web site From desktop shortcut PRINTED IN XXXXXXXX IMPRIM XX XXXXXXXX QT6...

Отзывы: