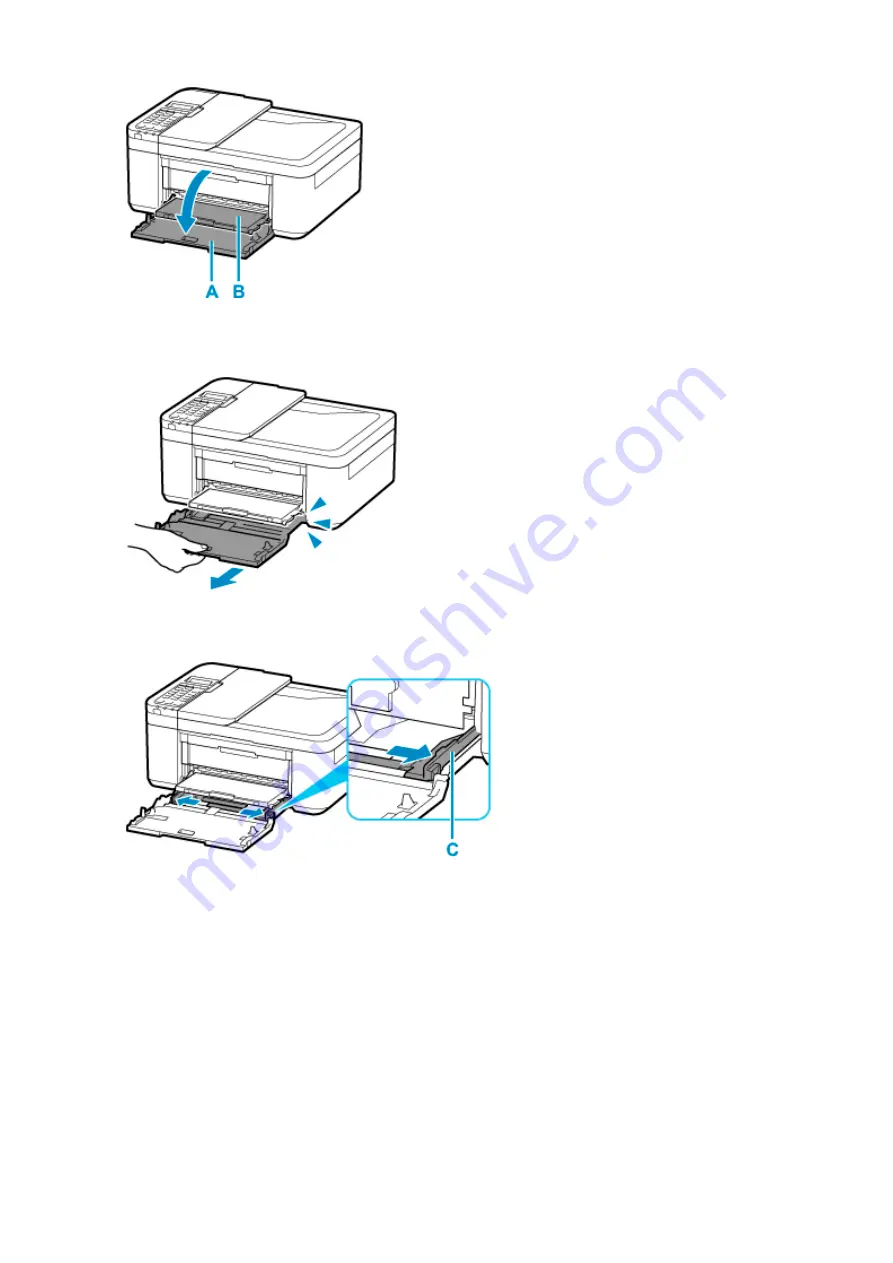
3.
Grab handle part of front cover and pull out cassette until it stops.
4.
Use the right paper guide (C) to slide both paper guides all the way out.
5.
Load paper stack in portrait orientation WITH PRINT SIDE FACING DOWN, and place it in
center of cassette.
Push the paper stack all the way to the back of the cassette.
89
Содержание PIXMA TR4550
Страница 1: ...TR4500 series Online Manual English...
Страница 29: ...Basic Operation Printing Photos from a Computer Printing Photos from a Smartphone Tablet Copying Faxing 29...
Страница 78: ...Note This setting item is not available depending on the printer you are using 8 Click Set 78...
Страница 81: ...Handling Paper Originals FINE Cartridges etc Loading Paper Loading Originals Replacing a FINE Cartridge 81...
Страница 82: ...Loading Paper Loading Plain Paper Loading Photo Paper Loading Envelopes 82...
Страница 104: ...104...
Страница 110: ...Replacing a FINE Cartridge Replacing a FINE Cartridge Checking Ink Status on the LCD Ink Tips 110...
Страница 136: ...Safety Safety Precautions Regulatory Information WEEE EU EEA 136...
Страница 161: ...Main Components Front View Rear View Inside View Operation Panel 161...
Страница 178: ...pqrs PQRS 7 tuv TUV 8 wxyz WXYZ 9 0 _ SP 2 Switch the input mode 2 SP indicates a space 178...
Страница 206: ...3 Press the OK button after deleting all the numbers and the letters 206...
Страница 218: ...Information about Paper Supported Media Types Paper Load Limit Unsupported Media Types Handling Paper Print Area 218...
Страница 225: ...Printing Printing from Computer Printing from Smartphone Tablet Printing Using Operation Panel Paper Settings 225...
Страница 232: ...Envelopes Envelope Envelope Greeting Cards Inkjet Greeting Card Others 232...
Страница 243: ...Note Selecting Scaled changes the printable area of the document 243...
Страница 261: ...In such cases take the appropriate action as described 261...
Страница 296: ...Printing Using Canon Application Software Easy PhotoPrint Editor Guide 296...
Страница 297: ...Printing Using a Web Service Using PIXMA MAXIFY Cloud Link Printing with Google Cloud Print 297...
Страница 316: ...Note To set the applications to integrate with see Settings Dialog Box 316...
Страница 329: ...ScanGear Scanner Driver Screens Basic Mode Tab Advanced Mode Tab 329...
Страница 354: ...Scanning Using Smartphone Tablet Using PIXMA MAXIFY Cloud Link Printing Scanning with Wireless Direct 354...
Страница 416: ...4 When a confirmation message is displayed click Yes 416...
Страница 424: ...Receiving Faxes Receiving Faxes Changing Paper Settings Memory Reception 424...
Страница 434: ...Other Useful Fax Functions Document Stored in Printer s Memory 434...
Страница 444: ...Network Communication Problems Cannot Find Printer on Network Network Connection Problems Other Network Problems 444...
Страница 470: ...Other Network Problems Checking Network Information Restoring to Factory Defaults 470...
Страница 475: ...Problems while Printing Scanning from Smartphone Tablet Cannot Print Scan from Smartphone Tablet 475...
Страница 487: ...If the measures above do not solve the problem contact your nearest Canon service center to request a repair 487...
Страница 502: ...Scanning Problems Windows Scanning Problems 502...
Страница 503: ...Scanning Problems Scanner Does Not Work ScanGear Scanner Driver Does Not Start 503...
Страница 506: ...Faxing Problems Problems Sending Faxes Problems Receiving Faxes Telephone Problems Poor Quality Fax Received 506...
Страница 507: ...Problems Sending Faxes Cannot Send a Fax Errors Often Occur When Send a Fax 507...
Страница 512: ...Problems Receiving Faxes Cannot Receive a Fax Cannot Print a Fax 512...
Страница 516: ...Telephone Problems Cannot Dial Telephone Disconnects During a Call 516...
Страница 531: ...Errors and Messages An Error Occurs Message Support Code Appears 531...
Страница 552: ...1250 Cause Paper output tray is closed What to Do Open the paper output tray to resume printing 552...


