background image

Solution Menu

Solution Menu


기기를


충분하게


사용할


있도록


다양한


기능과


정보를


모아


놓았습니다

!

: Windows Vista

*

구입한


국가


또는


지역에


따라


버튼이


다르게


표시됩니다

.


번의


클릭으로


다양한


어플리케이션


전자


안내서를


엽니다

.

바탕


화면

(Windows) 

또는

 Dock(Macintosh)


Canon Solution Menu


아이콘에서

 Solution Menu


시작할


있습니다

.

기기


설정에


대해


의문이


있으면

 Solution Menu

에서


설정을


변경하거나


문제


해결을


찾습니다

.(Change settings or find solutions to 

problems.)


클릭하여


My Printer


엽니다

(Windows

).

전자


안내서를


열려면

 Solution Menu

에서


왼쪽에서


보여준


버튼을


클릭합니다

.

Solution Menu

Solution Menu

是了解本機功能和資訊的途徑,以便充分地使用本機!

示例:

Windows Vista

*

根據購買的國家或地區的不同,顯示的按鈕也會有所不同。

只要按一下就可以開啟各種應用程式和電子手冊。

可以從桌面

(Windows)

Dock(Macintosh)

上的

Canon Solution Menu

圖示啟動

Solution Menu

如果有本機設定的問題,按一下

Solution Menu

中的

變更設定或尋找問題的解決方案。

(Change settings or find solutions to 

problems.)

以開啟

My Printer

(

僅在

Windows

環境下

)

要開啟電子手冊,在

Solution Menu

中按一下左側顯示的按鈕。

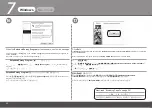
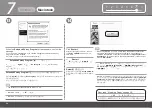
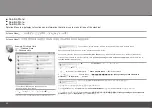
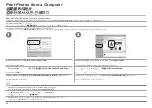
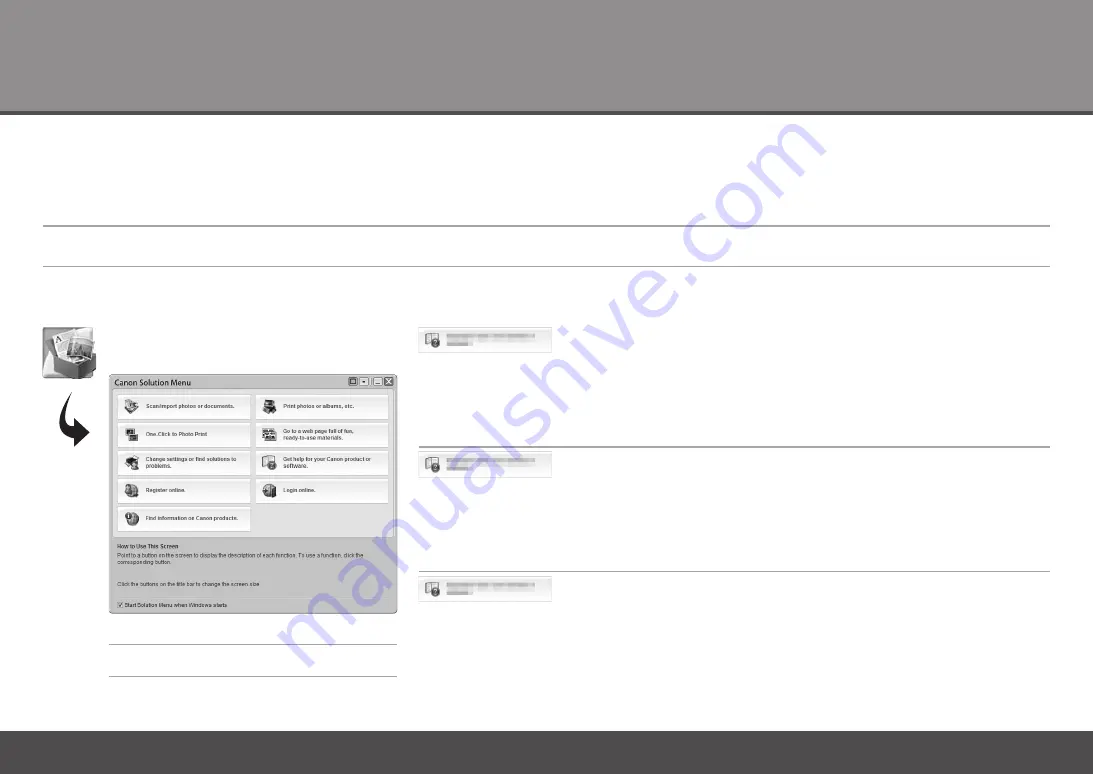
Solution Menu is a gateway to functions and information that allow you to make full use of the machine!

Solution Menu

Open various applications and on-screen manuals with a single click.

You can start Solution Menu from the 

Canon Solution Menu

 icon on the desktop (Windows) or on the Dock (Macintosh).

If you have a problem with machine settings, click the 

Change settings or find solutions to problems.

 in Solution Menu to 

open 

My Printer

 (Windows only).

*The buttons displayed vary depending on the 

 country or region of purchase.

Example: Windows Vista

To open the on-screen manual, click the button shown to the left in Solution Menu.

Содержание Pixma MX338

Страница 1: ...poration在美國和 或其他國家 地區 的商標或註冊商標 Windows Vista為 Microsoft Corporation在美國和 或其他國家 地區的商標或註冊商標 Macintosh和 Mac為 Apple Inc 在美國和其他國家 地區註冊的 商標 Make sure to read this manual before using the machine Please keep it in hand for future reference Getting Started Microsoft is a registered trademark of Microsoft Corporation Windows is a trademark or registered trademark of Microsoft Corporation in the U S and or o...

Страница 2: ...定傳真接收 安裝墨盒 FINE Cartridge 開啟電源 連接電話線 取下保護材料 準備 After Installing the Machine Loading Paper Install the Software Set Up for Fax Reception Install the FINE Cartridges Turn the Power On Connect the Telephone Line Remove the Protective Material Preparation Contents Symbols The following symbols are used to mark important instructions Observe these instructions Additional explanations Instructions that ...

Страница 3: ...包裝箱中包含的物品 開啟本機之前 移除所有的橙色膠帶和保護材料 手冊 安裝光碟 包含驅動程式 應用程式和電子手冊 保固單 USB電纜線是連接本機和電腦所必需的 Preparation Before turning on the machine remove all the orange tapes and the protective sheets Manuals Setup CD ROM containing the drivers applications and on screen manuals Warranty Check the Included Items A USB cable is necessary to connect the machine with your computer ...

Страница 4: ...勿將本機安裝在物件可能掉落在其上的位置 物件可能會掉落到後端托盤中 導致本機出現故障 請勿在文件蓋板上放置任何物件 開啟文件蓋板時 物件可能會掉落到後端托盤中 導致本機出現 故障 選擇位置 Power Cord A BS Type Use in the UK Ireland and other countries where BS Type plugs are used B EUR Type Use in EU countries and other countries where EUR Type plugs are used Choosing a Location Do not install the machine where an object may fall on it The object may fall into the Rear Tray resulting in ma...

Страница 5: ...單元 機蓋 B 直至其鎖定到位 掃描單元支架 C 自動地固定 拉橙色保護膠帶 D 並移除保護材 料 E 然後 輕輕地抬起掃描單元 機蓋 B 並折疊掃描單元支 架 C 然後輕輕地關閉掃描單元 機蓋 B Remove the Protective Material Open the Paper Output Tray A Lift the Scanning Unit Cover B until it locks into place Then lift the Scanning Unit Cover B slightly and fold the Scanning Unit Support C then gently close the Scanning Unit Cover B Pull the orange protective tape D and remove the protecti...

Страница 6: ...傳真 請檢查電話線路類型 關於詳細資訊 請參閱電子手冊 基本指南 中的 確認電話線路連接 Connect the Telephone Line This section describes the basic method of telephone line connection To use the machine as a fax a telephone line needs to be connected For other connection methods refer to the on screen manual Basic Guide When not using as a fax When using as both a fax and telephone When using as a fax only Go to 4 Turn the Power On on page...

Страница 7: ...英國使用者 根據需要使用 B T 轉接器進行連接 僅作為傳真機使用時 使用隨附的電話電纜線 A 連接本機與電話線路 轉到第 6 頁的 4 開啟電源 Only when connecting a telephone Do not connect the machine and a telephone in parallel to the same telephone line using a distribution adapter The machine may not operate properly Remove the telephone connector cap B then connect a telephone with the telephone line cable Users in the UK Use a B T adapter for connection as r...

Страница 8: ... 按鈕 C 為 LCD 選擇語言 然後按 OK 按鈕 如果 LCD 螢幕上顯示的不是所需的語言 按返回按鈕 D 返回至語言選擇 Language selection 螢幕 Turn the Power On Plug the power cord into the left side of the machine then connect the other end to the wall outlet Turn on the machine A Do NOT connect the USB cable at this stage Make sure that the Document Cover B is closed Use the or button C on the Operation Panel to select the language for the LCD then pr...

Страница 9: ...家或地區 然後按 OK 按鈕 국가 선택 화면은 구입한 국가 또는 지역에 따라 표시되지 않을 수 있습니다 根據購買時所在國家或地區的不同 可能不會顯示國家 地區選擇螢幕 The Country select screen may not be displayed depending on the country or region of purchase The standby screen is displayed Use the or button C on the Operation Panel to select the country or region of use then press the OK button ...

Страница 10: ...文件蓋板 D 並將其與掃描單元 機蓋 一起抬起 如果墨盒 FINE Cartridge 固定座返回至右側 關閉掃描單元 機蓋 並重新開啟 如果墨盒 FINE Cartridge 固定座未移出 確保本機已開啟 Install the FINE Cartridges Be sure to use the supplied FINE Cartridges Lift the Scanning Unit Cover A until it locks into place Handle the FINE Cartridges carefully Do not drop or apply excessive pressure to them The Scanning Unit Support E is fixed automatically If the FINE Cartridge Holder re...

Страница 11: ...上拉墨盒鎖定蓋 從包裝盒中取出黑色墨盒 Black FINE Cartridge 按照箭頭的方向拉橙色保護膠帶 H 並輕輕地將其移除 注意 請勿讓取下的保護膠帶上的墨水弄髒雙手或周圍工作區 Open the Ink Cartridge Locking Cover on the right side Pinch G firmly and pull up the cover Remove the Black FINE Cartridge from its box Be careful not to stain your hands or surrounding work area with ink on the removed protective tape Pull the orange protective tape H in the direction of the arrow and ...

Страница 12: ...墨盒 向下推動墨盒鎖定蓋的 直至聽到喀嗒聲以使其完全地關閉 直視墨盒鎖定蓋 並檢查其正確地鎖定 沒有傾斜 將彩色墨盒 Color FINE Cartridge 以同樣的方法插入左側墨盒 FINE Cartridge 固定座 Push down of the Ink Cartridge Locking Cover until you hear a click to close it completely View the Ink Cartridge Cover straight on and check that it is locked correctly not at an angle Insert the Color FINE Cartridge into the left FINE Cartridge Holder in the same way Place the Black FI...

Страница 13: ...幕 大約 1 2 分鐘 並轉到下一步驟 一旦安裝墨盒 FINE Cartridge 請勿將其隨意取出 如果 LCD螢幕上顯示錯誤訊息 確保墨盒 FINE Cartridge 已正確安裝 Wait until the standby screen appears on the LCD about 1 2 minutes and go to the next step Once you have installed the FINE Cartridges do not remove them unnecessarily Lift the Scanning Unit Cover A slightly and fold the Scanning Unit Support E then gently close the Scanning Unit Cover A If an error messag...

Страница 14: ...鈴 自動接收傳真 僅作為傳真機使用時 可以隨時變更接收模式 關於詳細資訊 請參閱電子手冊 基本指南 Set Up for Fax Reception Select a receive mode according to your needs to receive faxes easily If you are not using the machine as a fax go to 7 Install the Software on page 15 When a telephone is connected to the machine the telephone rings for incoming calls regardless of the selected mode When you want to receive only faxes FAX only mode When a ...

Страница 15: ... 此服務可能不可 用 When using as both a fax and telephone When you want to switch the line between fax and telephone automatically FAX priority mode When a call arrives Voice call The machine rings Pick up the handset then press the Stop button to answer the call Fax call The machine does not ring Faxes are received automatically When you receive more voice calls than faxes TEL priority mode When a call a...

Страница 16: ...然後按功能表按鈕 B 顯示傳真設定 FAX settings 螢幕 按 OK按鈕 顯示接收模式設定 Receive mode settings 螢幕 使用 或 按鈕 C 選擇接收模式 然後按 OK 按鈕 返 回傳真功能表時 按一下返回按鈕 D 顯示所選接收模式 Press the FAX button A then press the Menu button B The FAX menu screen is displayed Press the OK button The Receive mode settings screen is displayed Use the or button C to select a receive mode then press the OK button When the FAX menu returns press the Back button ...

Страница 17: ...動時所在 的螢幕繼續安裝過程 不支援 Mac OS 9 Mac OS X Classic環境或 Mac OS X 10 3 8或更早版本 轉到第 16 頁 轉到第 23 頁 Install the Software Quit all running applications before installation To use the machine by connecting it to a computer software including the drivers needs to be copied installed to the computer s hard disk The screens below are based on Windows Vista operating system Ultimate Edition hereafter referred to as ...

Страница 18: ... 或尋找新增硬體精靈 Found New Hardware Wizard 對話方塊 取下連接到電腦的 USB電纜線 對話方塊可能關閉 在這種情況下 從 繼續操作 按一下取消 Cancel 退出對話方塊 從 繼續操作 關閉本機 A 在本機關閉之前運行噪音會持續大約 25 秒鐘 確保電源按鈕 A 停止閃爍 If the Found New Hardware or Found New Hardware Wizard dialog box appears Click Cancel to quit the dialog box Proceed from Remove the USB cable connected to your computer TURN OFF THE MACHINE A Operating noise continues for about 25 seconds until t...

Страница 19: ...碟機 安裝程式應該會自動地啟動 轉到步驟 轉到步驟 如果程式未自動啟動 按兩下電腦上的光碟圖示 出現光碟機內容時 按兩下 MSETUP4 EXE 出現自動播放 AutoPlay 螢幕 按一 下執行 Msetup4 exe Run Msetup4 exe 出現使用者帳戶控制 User Account Control 對話方塊 按一下繼續 Continue 如果在隨後的步驟中出現相同的對話方塊 按 一下繼續 Continue AutoPlay screen appears click Run Msetup4 exe User Account Control dialog box appears click Continue If the same dialog box reappears in subsequent steps click Continue Turn on the comput...

Страница 20: ...螢幕說明繼續安裝 選擇居住地 然後按一下下一步 Next 如果出現選擇語言 Select Language 螢幕 選擇一種語言 然後 按一下下一步 Next 選擇國家或地區 然後按一下下一步 Next 僅在步驟 中的螢幕上選擇了歐洲 中東 非洲 Europe Middle East Africa 或亞洲 Asia 時才會顯示 Click Easy Install Drivers application software and on screen manuals are installed automatically If you want to select particular items to install click Custom Install and follow the on screen instructions to proceed with the installat...

Страница 21: ...합니다 按一下安裝 Install 將光標移動到項目上以顯示說明 仔細閱讀許可協定 License Agreement 螢幕並按一下 是 Yes 出現請允許所有安裝精靈進程 Please Allow All Install Wizard Processes 螢幕時 按一下下一步 Next 安裝開始 安裝過程中 按照螢幕上的全部說明安裝軟體 Click Install Move the cursor over items to display explanations Read the License Agreement screen carefully and click Yes When the Please Allow All Install Wizard Processes screen appears click Next Installation starts During in...

Страница 22: ... 然後確認訊 息 按一下下一步 Next 安裝後 如果直線未對齊或列印效果未如理想 可能需 要校準列印頭 請參閱電子手冊 基本指南 中的 列 印變得模糊不清或顏色不正確時 When the Printer Connection screen appears connect the machine to the computer with a USB cable The USB port is located on the back center of the machine When the machine is recognized by the computer a message appears on the screen If installation does not continue after 10 minutes click Help on the screen in st...

Страница 23: ...經註冊 則會出現產品註冊 Product Registration 螢幕 按一下下一步 Next 可能需要等待一段時間才能出現下一螢幕 僅按一下下一步 Next 僅在選擇居住地 Select Your Place of Residence 螢幕上選擇了 歐洲 中東 非洲 Europe Middle East Africa 時 才會顯示使 用者註冊 User Registration 螢幕 To register later click Cancel User registration can be started from the Canon Solution Menu icon For details refer to Solution Menu on page 32 Click Next If connected to the Internet the user registratio...

Страница 24: ...o not agree 將不安裝 Extended Survey Program 這對本機的功能無任何影響 按一下退出 Exit 如果顯示重新啟動 Restart 確保選擇立即重新啟動系統 推薦 Restart the system now recommended 核 取方塊 然後按一下重新啟動 Restart 重新啟動電腦之後 取出安裝光碟並妥善保管 下一步 請閱讀第29頁的 8 載入紙張 Click Exit If Restart is displayed make sure that the Restart the system now recommended check box is selected then click Restart When the Extended Survey Program screen appears confirm the message If y...

Страница 25: ...纜線連接本機與電腦 確保本機已開啟 USB 連接埠位於本機後部中間位置 開啟電腦 然後將安裝光碟插入到光碟 機 按兩下 Setup 圖示 如果光碟資料夾未自動地開啟 按兩下桌面上的 CANON_IJ 圖示 Connect the machine to the computer with a USB cable Make sure the machine is turned on Double click the Setup icon Turn on the computer then insert the Setup CD ROM into the CD ROM drive If the CD ROM folder does not open automatically double click the CANON_IJ icon on the desktop The USB port i...

Страница 26: ...說明操作 選擇居住地 然後按一下 Next 如果出現 Select Language 螢幕 選擇一種語言 然後按一下 Next 選擇國家或地區 然後按一下 Next 僅在步驟 中的螢幕上選擇了 Europe Middle East Africa 或 Asia 時才會顯示 Enter your administrator name and password Click OK If you do not know your administrator name or password click Help then follow the on screen instructions Select your place of residence then click Next If the Select Language screen appears select a language then...

Страница 27: ...l 並根據 螢幕說明繼續安裝 按一下 Install 將光標移動到項目上以顯示說明 仔細閱讀 License Agreement 螢幕並按一下 Yes 安裝開始 安裝過程中 按照螢幕上的全部說明安裝軟體 Click Easy Install Drivers application software and on screen manuals are installed automatically If you want to select particular items to install click Custom Install and follow the on screen instructions to proceed with the installation Click Install Move the cursor over items to display explan...

Страница 28: ...정확하지 않은 경우 를 참조하십시오 按一下 Next 按一下 Next 安裝後 如果直線未對齊或列印效果未如理想 可能需要校準列印頭 請參閱電子手冊 基本指南 中的 列印變 得模糊不清或顏色不正確時 Click Next Click Next If straight lines are misaligned or print quality is not satisfactory after installation you may need to align the Print Head Refer to When Printing Becomes Faint or Colors Are Incorrect in the on screen manual Basic Guide ...

Страница 29: ... Menu 如果已經註冊 則會出現 Product Registration 螢幕 僅在 Select Your Place of Residence 螢幕上選擇了 Europe Middle East Africa 時 才會顯示 User Registration 螢幕 Click Next If connected to the Internet the user registration page appears Follow the on screen instructions to register your machine You will need your product serial number which is located on the inside of the machine To register later click Cancel User regist...

Страница 30: ...子手冊 基本指南 中的 儲存掃描的資料 下一步 請閱讀第 29 頁的 8 載入紙張 出現 Extended Survey Program 螢幕時 確認此訊息 如果同意 按一下 Agree 如果按一下 Do not agree 將不安裝 Extended Survey Program 這對本機的功能無任何影響 Mac OS X 10 3 9環境下不會出現此螢幕 Click Restart After restarting the computer remove the Setup CD ROM and keep it in a safe place When using Mac OS X v 10 3 9 before using the Operation Panel on the machine to save scanned originals to the computer it i...

Страница 31: ...리로 이동합니다 인쇄면이 위로 향하게 하여 용지를 세로 방향으로 로드합니다 가운데에 용지를 로드합니다 載入紙張 開啟托紙架 A 移動導紙器 B 至兩端邊緣 將紙張列印面向上縱向載入 在中央載入紙張 Loading Paper Open the Paper Support A Move the Paper Guides B to both edges Load paper in portrait orientation with the printing side facing up Load paper in the center ...

Страница 32: ...가 완료되었습니다 滑動左右導紙器 B 使其緊靠紙張的兩側 確認已載入的紙張未超過標記線 C 關於可以使用的媒體大小和類型的詳細資訊 請參閱電子手冊 基本指南 中的 載入紙張 至此 本機安裝完成 Slide the left and right Paper Guides B against both edges of the paper For details on media sizes and types you can use refer to Loading Paper in the on screen manual Basic Guide Machine installation is now complete Confirm that the loaded paper does not exceed the line C ...

Страница 33: ...疑難排解 的資訊 關於開啟電子手冊的詳細資訊 請參閱第 32 頁 After Installing the Machine Manuals Safety Precautions For proper use read safety precautions before using the machine Safety and Environment Information Getting Started this manual Describes how to set up and use your machine Introduces the machine and its functions the included manuals and application software Basic Guide on screen manuals Describes the basic op...

Страница 34: ...啟動 Solution Menu 如果有本機設定的問題 按一下 Solution Menu 中的變更設定或尋找問題的解決方案 Change settings or find solutions to problems 以開啟 My Printer 僅在 Windows環境下 要開啟電子手冊 在 Solution Menu 中按一下左側顯示的按鈕 Solution Menu is a gateway to functions and information that allow you to make full use of the machine Solution Menu Open various applications and on screen manuals with a single click You can start Solution Menu from the Canon...

Страница 35: ...或者 可以使用本機的操作面板輕鬆地列印自己的作品 關於如何使用應用程式軟體和本機的詳細資訊 請參閱電子手冊 基本指南 和 進階指南 Various application software are installed on the computer along with the drivers You can print creative items by correcting enhancing photos using the applications Alternatively use the Operation Panel on the machine to print your own items easily Try Using the Machine For details on how to use the application software and the mach...

Страница 36: ... 上放置任何重量超過 4 4 lb 2 0 kg 的物件 請勿按壓原稿或在原稿上置放重物 使原稿承受的壓力超 過 4 4lb 2 0kg 否則可能導致掃描器發生故障或原稿玻璃 碎裂 Try Copying For details refer to 8 Loading Paper on page 29 This section explains with Plain Paper For various copying procedures refer to Copying in the on screen manual Basic Guide You can copy a document by simply placing it on the Platen Glass and pressing the Start button Load a sheet of A4 or Letter si...

Страница 37: ...까지 문서 커버 A 를 열지 마십시오 關閉文件蓋板 A 按影印按鈕 D 然後按黑白按鈕 E 或彩色按鈕 F 影印將開始 列印後移除文件 請勿開啟文件蓋板 A 直至影印完成 Close the Document Cover A press the COPY button D then press the Black button E or the Color button F Copying will start Remove the document after printing Do not open the Document Cover A until copying is complete ...

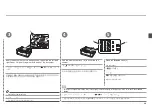
Страница 38: ...行相片列印 One Click to Photo Print Easy PhotoPrint EX啟動 選擇想要列印的影像 然後按一下佈置 列印 Layout Print 選擇相片時 份數會設定為 1 關於更多資訊 請參閱電子手冊 進階指南 關於啟動 Solution Menu的詳細資訊 請參閱第 32 頁的 Solution Menu Print Photos from a Computer In Solution Menu click One Click to Photo Print Select the image you want to print then click Layout Print Easy PhotoPrint EX starts When a photo is selected the number of copies is set to 1 For more i...

Страница 39: ...를 참조하십시오 縱向載入一張相片紙 將紙張列印面向上載入 按一下列印 Print 列印將開始 在 Macintosh 環境下 如果顯示列印 Print 螢幕 按一下列印 Print 開始列印 關於詳細資訊 請參閱第 29 頁的 8 載入紙張 Load a sheet of photo paper in portrait orientation Load paper with the printing side facing up For details refer to 8 Loading Paper on page 29 Click Print Printing will start On Macintosh if the Print screen is displayed click Print to start printing ...

Страница 40: ...兩端邊緣 關於支援的文件和影像品質 濃度 亮度 等設定的詳細資訊 請參閱 電子手冊 基本指南 Send Faxes Press the FAX button B This section explains how to send a fax in black and white from the ADF Auto Document Feeder A Confirm that the fax standby screen is displayed For other procedures to send faxes refer to Faxing in the on screen manual Basic Guide For details on supported documents and settings for image quality density brightness etc...

Страница 41: ...的 兩端 將文件面向上放置 使用數字鍵 E 輸入傳真號碼 按黑白按鈕 F 傳真傳送 關於傳送方資訊的詳細資訊 請參閱電子手冊 基本指南 中的 指定本機的基本設定 Insert the document until a beep sounds then slide the left and right Paper Guides D against both ends of the document Use the Numeric buttons E to enter the fax number Press the Black button F The fax is sent Place the document face up For details on sender information refer to Specifying the Basic Settings for the M...

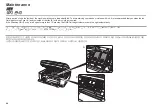
Страница 42: ...托盤內側 B 如果掃描單元 機蓋 開啟超過 10 分鐘 墨盒 FINE Cartridge 固定座自動地移至右側 After a period of use the inside of the machine may become stained with ink To avoid staining your hands or clothes with ink it is recommended that you clean the Ink Cartridge Locking Cover A and the inside of the tray B with a dry cloth as required If the Scanning Unit Cover is left open for more than 10 minutes the FINE Cartridge Holder mo...

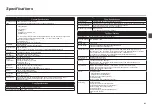
Страница 43: ...horizontal vertical max 1200 dpi x 2400 dpi Interpolated resolution max 19200 dpi x 19200 dpi Gradation Input Output Gray 16 bit 8 bit Color 48 bit 24 bit RGB each 16 bit 8 bit Copy Specifications Multiple copy Max 99 pages Intensity adjustment 9 positions Auto intensity AE copy Reduction Enlargement 25 400 1 unit Fax Specifications Applicable line Public Switched Telephone Network PSTN Compatibil...

Страница 44: ...ith Windows Vista XP or 2000 pre installed Some functions may not be available with Windows Media Center To upgrade from Windows XP to Windows Vista first uninstall software bundled with the Canon inkjet printer Macintosh Hard Disk must be formatted as Mac OS Extended Journaled or Mac OS Extended Specifications are subject to change without notice About Consumables Consumables ink tanks FINE Cartr...

Страница 45: ...描尺寸 A4 Letter 8 5 11 7 216 297mm 原稿玻璃 8 5 14 0in 216 356mm ADF 掃描解析度 最大光學解晰度 水平 垂直 1200dpi 2400dpi 最大插值解析度 19200dpi 19200dpi 色階 輸入 輸出 灰階 16 位元 8 位元 彩色 48 位元 24 位元 紅 R 綠 G 藍 B 各 16 位元 8 位元 影印規格 多份影印 最多 99 頁 強度調整 9 級 自動強度調整 AE 影印 縮小 放大 25 400 以 1 為單位 傳真規格 適用線路 公眾電話交換網路 PSTN 相容性 G3 Super G3 黑白和彩色傳真 資料壓縮系統 MH MR MMR JPEG 數據機類型 傳真數據機 數據機速度 33600 31200 28800 26400 24000 21600 19200 16800 14400 12000 960...

Страница 46: ...nternet Explorer 6 0或更新 Safari 硬碟空間 600MB 注釋 用於綑綁軟體安裝 700MB 注釋 用於綑綁軟體安裝 光碟機 必需 顯示器 XGA 1024 768 Windows 注釋 只有預先安裝了 Windows Vista XP 或 2000 的電腦才能保證正常工作 某些功能在 Windows Media Center上可能不可用 要將 Windows XP升級至 Windows Vista 首先解除安裝 Canon 噴墨印表機綑綁的軟體 必須將硬碟格式化為 Mac OS Extended Journaled 或 Mac OS Extended 規格如有變更 恕不另行通知 關於耗材 耗材 墨水盒 墨盒 FINE Cartridges 停止生產後 5 年內還可以買到 電子手冊的附加系統要求 瀏覽器 Easy Guide Viewer 注釋 必須安裝 Micr...

Страница 47: ...기 A4 Letter 8 5 11 7 216 297mm 평판 유리 8 5 14 0in 216 356mm ADF 스캔 해상도 최대 광학 해상도 가로 세로 1200dpi 2400dpi 최대 보간 해상도 19200dpi 19200dpi 명암 입력 출력 회색 16bit 8bit 컬러 48bit 24bit RGB 각 16bit 8bit 복사 사양 다중 복사 최대 99페이지 농도 조절 9위치 자동 농도 AE 복사 축소 확대 25 400 1 유닛 팩스 사양 적용 회선 공중 전화망 PSTN 호환성 G3 Super G3 모노 및 컬러 팩스 데이터 압축 시스템 MH MR MMR JPEG 모뎀 종류 팩스 모뎀 모뎀 속도 33600 31200 28800 26400 24000 21600 19200 16800 14400 12000 ...

Страница 48: ... 설치용 CD ROM 드라이 브 필수 디스플레이 XGA 1024 768 Windows 참고 조작은 Windows Vista XP 또는 2000이 미리 설치된 PC에서만 보장될 수 있습니다 일부 기능은 Windows Media Center에서 적용되지 않을 수 있습니다 Windows XP를 Windows Vista로 업그레이드하려면 우선 Canon 잉크젯 프린터 번들 소프트웨어를 삭제하십시오 Macintosh 하드 디스크는 반드시 Mac OS Extended Journaled 또는 Mac OS Extended로 포맷되어야 합니다 사양은 예고 없이 변경될 수 있습니다 소모품 정보 소모품 잉크 탱크 FINE 카트리지 은 생산이 중단된 후 5년 동안 구입할 수 있습니다 전자 안내서를 위한 추가 시스템 요구사항 브라...

Страница 49: ...r Singapore 098632 CANON HONGKONG CO LTD 19 F The Metropolis Tower 10 Metropolis Drive Hunghom Kowloon Hong Kong CANON KOREA BUSINESS SOLUTIONS INC 168 12 Samseong Dong Gangnam gu Seoul Korea www canon bs co kr www canon asia com 다음 잉크 카트리지는 이 기기와 호환됩니다 以下墨盒與本機相容 The following ink cartridges are compatible with this machine ...

Отзывы: