background image

(8/23) 


No. 

Name 

Function 

Remarks 

(1) 

Test Print 

Service test print 

Service test print: 

- Model name 

- ROM version 

-  Ink absorber counter value (ink amount in the ink 

absorber) 

-  USB serial number 

- Destination 

- EEPROM information 

-  Barcode (model name + destination), etc. 

(2) EEPROM 


EEPROM 

information 

print 

The dialog box opens to select the paper source. 

Select 

Rear tray

, and click 

OK

EEPROM information print: 

- Model name 

- Destination 

- ROM version 

-  Ink absorber counter value (ink amount in the ink 

absorber) 

- Print information 

-  Error information, etc. 

(3) 

Nozzle Check 

Nozzle check pattern print The dialog box opens to select the paper source. 

Select 

Rear tray

, and click 

OK

The same nozzle check pattern as the one in the 

user mode is printed. 

(4) 

Integration 

Unified inspection pattern 

print 

The dialog box opens to select the paper source. 

Select 

Rear tray

, and click 

OK

The unified inspection pattern (for reduction of time 

required for the inspection) is printed. 

(5)* EEPROM 

EEPROM 

information 

saving 

When no printing can be performed due to a 

problem, the EEPROM information is displayed on 

the computer or is saved to the computer as a text 

file. 

To save the EEPROM information, click 

Save As

 in 

the EEPROM information window, and specify a 

desired location and file name. 

(6) CD-R 


CD-R check pattern print


Not used.   

(7) 

LF / Eject 


LF / Eject correction 

pattern print


Not used.


(8) Left 

Margin


Left margin pattern print


Not used.


(9)* Auto 

Cleaning


Enabling / disabling of 

automatic print head 

cleaning


Automatic print head cleaning prior to printing 

(disabled at default). 

Select this option to enable the cleaning. 


(10) Deep 

Cleaning 


Print head deep cleaning


Cleaning of both Black and Color at the same time. 

(11) Main 


Main ink absorber counter 

resetting


Set a sheet of A4 or Letter sized plain paper in the 

rear tray. After the ink absorber counter is reset, the 

counter value (in %) is printed automatically. 


Содержание PIXMA iP2700

Страница 1: ...e 1 2 Service Call Errors by Cyclic Blinking of Alarm and Power Lamps 2 ADJUSTMENT SETTINGS 2 1 Service Mode 2 2 User Mode 2 3 Special Notes on Servicing 2 4 Grease Application 3 EXTERNAL VIEW PARTS L...

Страница 2: ...nting resumes from the next paper Remove the jammed paper and press the Resume Cancel button Ink cartridge not properly installed 1687 4 times An ink cartridge is not installed properly Open the print...

Страница 3: ...orrect position If the error is not cleared the ink cartridge may be defective Replace the ink cartridge Multiple ink cartridges of the same color installed 1487 7 times More than one ink cartridge of...

Страница 4: ...unt After the operation it is recorded in the printer EEPROM that the function to detect the remaining ink amount was disabled Ink cartridge not recognized region code error 1684 14 times The followin...

Страница 5: ...ction for detecting the remaining ink level will be disabled Replace the empty ink cartridge immediately after the printing The resulting print quality is not satisfactory if printing is continued und...

Страница 6: ...times An error occurred in the ASF cam sensor during paper feeding from the rear tray 1 Part replacement ASF PE sensor unit Drive unit Logic board Internal temperature error 5400 6 times The internal...

Страница 7: ...e Resume Cancel button is pressed the Alarm and Power LEDs light alternately Alarm in orange and Power in green starting with Alarm LED iv When the Power LED lights in green the printer is ready for t...

Страница 8: ...and click OK The unified inspection pattern for reduction of time required for the inspection is printed 5 EEPROM EEPROM information saving When no printing can be performed due to a problem the EEPR...

Страница 9: ...sed 18 Left Margin Correction Left margin correction value setting Not used 19 Ink Absorber Counter Ink absorber counter setting See Ink absorber counter setting below 20 Wetting Liquid Counter Wettin...

Страница 10: ...the printer driver Maintenance tab Set a sheet of plain paper A4 or Letter in the rear tray Ink cartridge settings Perform from the printer driver Maintenance tab Specify the ink cartridge to be used...

Страница 11: ...ality is proper and the print head is free from contacting the paper If the print quality is not proper or the print head contacts the paper adjust the head to paper distance in the following procedur...

Страница 12: ...rber replacement The following two replacement methods are available for the iP2700 iP2770 iP2780 Difficultie s Ink absorber volume to be replaced Print yield after replacement Time required Partial R...

Страница 13: ...ink absorber QC2 8308 Absorber for Partial Replacement iii Install 2 pieces of the new ink absorber QC2 8308 with one on top of the other though only one is installed when shipped from the production...

Страница 14: ...comes full Note 1 In the following cases estimation of the ink absorber life will not be properly given The printer is not connected to a computer The time is not properly set in the computer The ink...

Страница 15: ...revious models the ASF sensor PE sensor and LF encoder sensor were directly soldered to the logic board However in the iP2700 iP2770 iP2780 connectors are adopted for their connection for higher servi...

Страница 16: ...ray Paper jam in the rear tray Cover open sensor Detects opening and closing of the front cover The carriage does not move to the center LF encoder sensor Detects the number of times the LF encoder ro...

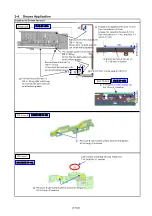
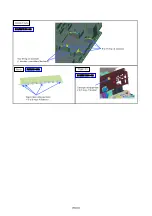
Страница 17: ...of the rail Z 450 45 mg 10 mm from the both ends X can be left without grease Back surface of the rail Y 150 15 mg 10 mm from the both ends X can be left without grease Front surface of the rail Y 220...

Страница 18: ...9 to 18 mg x 4 locations 9 to 18 mg x 4 locations 1 location one side of the boss Platen FLO I L KG 107A Eject roller sliding portions 4 5 to 9 mg x 4 locations Trigger Arm M O LYKO TE PG 641 Carriage...

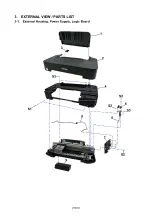
Страница 19: ...19 23 3 EXTERNAL VIEW PARTS LIST 3 1 External Housing Power Supply Logic Board...

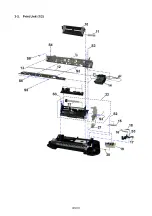
Страница 20: ...20 23 3 2 Print Unit 1 2...

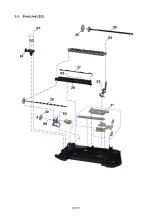
Страница 21: ...21 23 3 3 Print Unit 2 2...

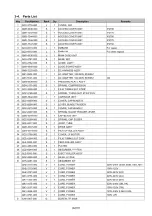
Страница 22: ...CARRIAGE UNIT 15 QC2 8300 000 S 1 COVER CAP BLADE B 16 QC2 8296 000 S 1 LEVER BLADE TRIGGER 17 QC2 8315 000 S 1 COVER CAP BLADE F 18 QC2 8297 000 S 1 SPRING BLADE TRIGGER LEVER 19 QM3 4019 000 S 1 CA...

Страница 23: ...4 S3 XA9 1493 000 G SCREW TP M3x8 S4 XA9 1752 000 G SCREW TAP WASHER HEAD M3x12 S5 XA9 1818 S6 XB1 2260 305 G SCREW MACH TRUSS HEAD M2 6x3 S7 XB1 2300 605 G SCREW MACHINE M3x6 S8 XB6 7300 605 G SCREW...

Отзывы: