manualshive.com logo in svg
background image

SERVICE

MANUAL

with

Parts Catalog

imageFORMULA


P-208

P-208II

COPYRIGHT 

© 

201

5

 CANON INC.

CANON  imageFORMULA P-208

/P-208II

  Rev. 0 PRINTED IN U.S.A.

March 11, 2015 

Rev. 0

Содержание P-208

Страница 1: ...SERVICE MANUAL with Parts Catalog imageFORMULA P 208 P 208II COPYRIGHT 2015 CANON INC CANON imageFORMULA P 208 P 208II Rev 0 PRINTED IN U S A March 11 2015 Rev 0...

Страница 2: ...COPYRIGHT CANON ELECTRONICS INC 2012 Use of this manual should be strictly supervised to avoid disclosure of confidential information...

Страница 3: ...pter 3 Disassembly and Reassembly Disassembly method reassembly method Chapter 4 Installation and Maintenance Installation method maintenance method Chapter 5 Troubleshooting Service mode and troubles...

Страница 4: ...L COMPONENTS 2 18 1 Layout of Electrical Components 2 18 VIII PARTS LAYOUT ON EACH PCB 2 19 1 Control PCB 2 19 CHAPTER 3 DISASSEMBLY REASSEMBLY I EXTERNAL PARTS 3 1 1 Bottom Cover 3 1 2 Operation Sect...

Страница 5: ...Analog 5 27 1 Analog sensor 5 27 2 Write firm 5 28 F Scan test 5 29 1 Scan 5 29 G Other Functions 5 30 1 Recovery of Log Files 5 30 III LIST OF FAILURES 5 33 1 Operation Failures 5 33 2 Image Failures...

Страница 6: ......

Страница 7: ...CHAPTER 1 GENERAL DESCRIPTION COPYRIGHT CANON ELECTRONICS INC 2012 CANON P 208 FIRST EDITION I PRODUCT OUTLINE 1 1 II NAME OF PARTS 1 6 III USER OPERATION 1 7...

Страница 8: ......

Страница 9: ...y functions 3 Reading Speed A4 200dpi Black White Grayscale 8 ppm 16 ipm Color 8 ppm 16 ipm 4 Service ability Installation By user Separation pad User replacement Periodically maintenance by service t...

Страница 10: ...Installation By user 9 Option 1 Wi Fi Unit WU10 2 Carrying case 10 Consumable parts Commercial goods 1 Separation pad User replacement 11 Bundle software 1 ISIS TWAIN driver CaptureOnTouch 2 Others de...

Страница 11: ...tings and other conditions 22 Document feed path Straight path with horizontal No eject tray 23 Document size 1 Width 50 8 to 216 mm 2 Length 70 to 356 mm 24 Document weight thickness 52 to 209 g m2 0...

Страница 12: ...1 4 COPYRIGHT CANON ELECTRONICS INC 2012 CANON P 208 FIRST EDITION CHAPTER 1 GENERAL DESCRIPTION External dimensions mm 70 55 5 76 5 40 312 5 Figure 1 101...

Страница 13: ...wer cord The power cord of this machine is a USB cable The power supply of this machine is turned ON OFF when the pickup tray is opened or closed 2 Power OFF on disassembling When disassembling and as...

Страница 14: ...eder Cover Note1 2 Document Feed Tray Note2 3 Document Guides 4 Feed Inlet 5 Start Button 6 USB Connector Note1 In this document the Feeder Cover may be referred to as the Upper Unit Note2 In this doc...

Страница 15: ...t switch at the rear of the scanner for setting whether to operate the scanner as a storage device Figure 1 302 ON The scanner is recognized as a storage device by the computer Starting Cap tureOnTouc...

Страница 16: ...fan the pages Tab Figure 1 304 2 Scan A basic operational procedure in Cap tureOnTouch Lite is sown below CaptureOnTouch Lite is a scanning ap plication that comes pre installed in the scanner It can...

Страница 17: ...screen appears Figure 1 307 3 Set the scanning method Figure 1 308 4 Click the Start button 5 Refer to the user manual for further de tails 3 Cleaning a Paper Jam 1 Remove any documents remaining in...

Страница 18: ......

Страница 19: ...ANON ELECTRONICS INC 2012 CANON P 208 FIRST EDITION I OUTLINE 2 1 II READING SYSTEM 2 6 III FEED SYSTEM 2 8 IV CONTROL SYSTEM 2 11 V POWER SUPPLY 2 15 VI OPTION 2 17 VII LAYOUT OF ELECTRICAL COMPONENT...

Страница 20: ......

Страница 21: ...stem reads image data from image sensors 2 Feed system This system performs from document pickup to document ejection 3 Control system This system is comprised of an image processing section and a fee...

Страница 22: ...s shown below Figure 2 102 1 Pickup tray 2 Document pressure 3 Feed roller 4 Separation pad 5 Registration roller drive 6 Registration roller follower 7 Eject roller drive 8 Eject roller follower 9 De...

Страница 23: ...ION 2 3 CHAPTER 2 FUNCTION OPERATION 3 Motor Drive This machine has a feed motor A DC motor with an encoder that detects rotation speed is used as the feed motor Control PCB Feed motor M Registration...

Страница 24: ...ATION 4 Electrical Circuits An overview of the electrical circuits block diagram of this machine is shown below Control PCB Feed motor With encoder CIS unit upper CIS unit lower Start switch USB cable...

Страница 25: ...u pick up 2 sheets of document and perform Scan Ahead without temporarily suspending the machine is shown below Once the machine starts scanning it activates the feed motor to feed the docu ment Start...

Страница 26: ...CIS unit and reading cover The CIS unit consists of CIS PCB lens array LED R G B light guide and case The reading glass and white reference sheet are mounted on the reading cover Photosensitive pixel...

Страница 27: ...ample when the lower reading unit reads the white reference data the LED emitted from the lower unit is reflected from the white reference sheet on the upper unit to be input to the sensor on the CIS...

Страница 28: ...stem is shown below 26 0 10 5 15 7 mm Figure 2 301 1 Pickup tray 2 Document pressure 3 Feed roller 4 Separation pad 5 Registration roller drive 6 Registration roller follower 7 Eject roller drive 8 Ej...

Страница 29: ...ng edge of a document and the trailing edge of the next document the drive speed of the feed roller is slightly lower than the drive speed of the registration roller and eject roller If it is left as...

Страница 30: ...trailing edge of the document was not detected even though the document has been fed for the maximum specified length after the leading edge of the document was detected by the registration sensor 4 F...

Страница 31: ...he function list of major ICs are shown below The function of electric double layer capacitor is shown in V POWER SUPPLY Image data control block Electric double layer capacitor block DC DC converter...

Страница 32: ...IC17 18 AFE Analog processor Performs analog gain offset adjustment and A D conversion IC19 20 21 FLASH Memory Stores firmware and OnTouch Lite 8 MB x 3 Note IC14 EEPROM Stores each setting IC24 SD R...

Страница 33: ...rection Resolution conversion Color black white detection Analog processor Gain adjustment Offset adjustment A D conversion Scanner controller LED light control 12 bit 8 bit Color Color correction thr...

Страница 34: ...igital signals in the analog processor Then the image data is transferred to the scanner controller and converted from 12 bits to 8 bits After that the image data is output to the computer through USB...

Страница 35: ...supply if the load increases the fol lowing components are provided 1 Feed motor with an encoder 2 Electric double layer capacitor EDLC The encoder detects that the feed load increases and the number...

Страница 36: ...CANON ELECTRONICS INC 2012 CANON P 208 FIRST EDITION CHAPTER 2 FUNCTION OPERATION 5 VDC 0 5 A USB2 0 Electric double layer capacitor Power supply IC IC CIS unit upper CIS unit lower Feed motor Bus pow...

Страница 37: ...nt AP mode This mode is used in places where LAN environments do not exist WU10 devices themselves function as access points and connect with terminals one by one 1 Access Point mode Figure 2 601 2 St...

Страница 38: ...S11 SW13 PS12 Q15 LED3 Figure 2 701 Category Name Location Symbol Auto Start switch Control PCB SW13 Tray switch Power switch Control PCB SW12 Switches Start switch Control PCB SW11 Motor Feed motor B...

Страница 39: ...PCB 1 Control PCB J102 SW11 SW12 PS11 PS12 SW13 J101 J103 Figure 2 801 Connector Description J101 25P CIS unit upper CIS unit lower J102 USB cable J103 8P Feed motor Table 2 801 Symbol Description SW1...

Страница 40: ......

Страница 41: ...BLY COPYRIGHT CANON ELECTRONICS INC 2012 CANON P 208 FIRST EDITION I EXTERNAL PARTS 3 1 II UPPER UNIT 3 3 III BASE UNIT 3 10 The products shown in the figures in this chapter may be partially differen...

Страница 42: ......

Страница 43: ...ure 3 102 After tightening the screw push in the bottom cover until the fitting parts 2 is hooked 2 Operation Section Cover 1 Remove the control PCB Page 3 10 2 Remove 1 screw 1 self tapping BH M2 5x6...

Страница 44: ...ECTRONICS INC 2012 CANON P 208 FIRST EDITION CHAPTER 3 DISASSEMBLY REASSEMBLY 3 Pickup Tray 1 Remove the operation section cover Page 3 1 2 Unhook the fitting parts 1 at both ends and remove the picku...

Страница 45: ...t Note Handle the FPC carefully so that it is not bent Figure 3 201 3 Release the right and left locks of the upper unit 1 unhook the fitting parts 2 on the FPC side and then unhook the fitting parts...

Страница 46: ...fitting parts on both sides unhooked so that the unit is not tilted Figure 3 204 Notes on assembling If the reading unit is tilted when installing it the springs for raising and lowering the unit may...

Страница 47: ...o the CIS unit Figure 3 207 4 Clean the out side including the glass surface to prevent dust from entering the reading unit 5 While removing 9 pairs of the fitting parts 1 in order from the end side r...

Страница 48: ...te 2 in the direction of the arrow un hook the fitting parts 3 lift and remove the top cover base 4 Figure 3 210 Note If the reinforcing plate is not held the follower roller holder may come out Perfo...

Страница 49: ...rt of the center of the shaft must touch the end surface of the spring 5 Registration Roller Follower 1 Remove the top cover base according to the steps in Eject Roller Follower Un hook two pairs of f...

Страница 50: ...ollower roller with a bear ing and the one way clutch Figure 3 215 Note Install the follower roller so that the side with the bearing 1 faces outward 3 Insert the one way clutch fitting part 1 into th...

Страница 51: ...arrow and assemble it to the fitting parts 2 of the upper unit Figure 3 219 6 Slide the shaft so that the flat part of the center of the shaft touches the end surface of the spring and install the fol...

Страница 52: ...he bottom cover Page 3 1 2 Remove the 2 cables 2 connected with the control PCB 1 and remove the con trol PCB Figure 3 301 3 Pull out the switch slide plate 1 from the switch Figure 3 302 Notes on ass...

Страница 53: ...The gear at the end may be detached from the shaft Figure 3 303 3 Remove the plate spring 1 Figure 3 304 Notes on assembling Push in the bearing until it is fully fitted 3 Registration Roller Drive 1...

Страница 54: ...ation roller 1 Note The gears at both ends may be de tached from the shaft Figure 3 307 4 Feed Roller 1 Remove the control PCB Page 3 10 2 Remove the light guide and sintered bearing according to the...

Страница 55: ...in the form of helix Insert the cable into its original position and install the motor 6 Lower Reading Unit 1 Remove the entire upper unit Page 3 3 2 Remove the eject roller drive Page 3 11 3 Remove t...

Страница 56: ...Push all the fitting parts in until they fit completely Makes sure there is no gap or space Install the CIS unit so that it matches the direction of the reading cover If it is installed incorrectly th...

Страница 57: ...CHAPTER 4 INSTALLATION MAINTENANCE COPYRIGHT CANON ELECTRONICS INC 2012 CANON P 208 FIRST EDITION I INSTALLATION 4 1 II PARTS TO BE REPLACED 4 3 III MAINTENANCE 4 4...

Страница 58: ......

Страница 59: ...or higher Memory 1 GB or more Hard disk 3 GB or more of free space required for installation of all software USB interface Hi speed USB 2 0 Monitor Resolution 1024 x 768 XGA or higher Optical drive Ab...

Страница 60: ...Login using an account with Administrator privileges 2 Before installing the software exit all other applications 3 Load the setup disk into the DVD drive of the computer 4 The setup menu starts autom...

Страница 61: ...by Users The product life of this product is 50 000 sheets and the product life of the separation pad is also 50 000 sheets However it is necessary to replace it when pickup failures or document jams...

Страница 62: ...a soft clean dry cloth to wipe the main body 2 Feed path Use such as air blowers to remove any dust and paper particles that have accumulated on the feed path 3 Reading glass Use a soft clean and dry...

Страница 63: ...e For this machine no periodical mainte nance item by the service technicians is specified However when visiting a user check whether the reading glasses and the rollers are dirty If they are very dir...

Страница 64: ......

Страница 65: ...G COPYRIGHT CANON ELECTRONICS INC 2012 CANON P 208 FIRST EDITION I ERROR DISPLAY 5 1 II SERVICE MODE 5 2 III LIST OF FAILURES 5 33 IV OPERATION TROUBLESHOOTING 5 34 V IMAGE TROUBLESHOOTING 5 38 VI AFT...

Страница 66: ......

Страница 67: ...t button flashes When the capacitor is charged immedi ately after the power is switched ON the start button flashes slowly Start button Figure 5 101 2 Computers Error messages are displayed on the scr...

Страница 68: ...service tool is an integrated tool that consists of a common EXE file and product specific DLL files The system requirements for the com puter are equivalent to those indicated in the user manual The...

Страница 69: ...COPYRIGHT CANON ELECTRONICS INC 2012 CANON P 208 FIRST EDITION 5 3 CHAPTER 5 TROUBLESHOOTING Motor Sensor Firmware Analog Scan test Figure 5 201b...

Страница 70: ...Registration Auto Automatic adjustment of the reading start position 13 Registration Manual Manual adjustment of the reading start position 14 Light Adjust the shading correction value 15 Regist sens...

Страница 71: ...37 Main voltage Main voltage data display 38 Cover sensor Upper unit sensor data display 39 Main current Main current data display 40 Write file Save above information on the computer 41 Scan test 42...

Страница 72: ...e files within the Tools folder for this product into that folder However you should copy by only overwriting with newer files If you are not sure whether a file is newer or not check the Modified dat...

Страница 73: ...of this machine to ON or OFF Note If OFF install the driver beforehand The functions of the service tool are the same regardless of whether it is set to ON or OFF 4 Connect the USB cable open the doc...

Страница 74: ...igure 5 206 Note Do not run any other application software such as CaptureOnTouch or turn off the machine while the service tool is running If the tool becomes unresponsive you should restart the comp...

Страница 75: ...or select Exit Application from the File menu in the toolbar However if Firmware version up is performed remove and reinstall the USB cable at the end to reset the power properly Refer to the Firmwar...

Страница 76: ...to the scanner Operation Procedure 1 Enter the 8 characters training as the password 2 The screen is the same as in the real procedure and can be operated in the same way except for some buttons that...

Страница 77: ...y firmware MCON Motor controller Note Version of the main body firmware can also be confirmed on the user s driver screen 3 Serial number This mode is used to check the serial number Figure 5 212 Seri...

Страница 78: ...tem by mistake Change it only if neces sary Figure 5 216 Display Details Total Total scanning count Jam 1 Number of documents jams in the pickup section Pickup delay jam pickup error count Jam 2 Numbe...

Страница 79: ...n is selected values are displayed validly and can be modified Figure 5 217 If the Apply button on the information screen is selected the values are saved and if the Cancel button is selected they are...

Страница 80: ...n which a registration sensor is installed This mode can be used together with other adjustment items For details refer to All Adjustment sheet The dedicated sheet is required to execute this mode How...

Страница 81: ...ack part 5 mm Figure 5 222 Note If it stops in the middle when using A4 size or LTR size paper due to the computer specifications set to half the size Note that you should cut that paper perfectly str...

Страница 82: ...e of error screen is shown below Figure 5 226 2 Registration Manual Normally registration adjustment is performed in automatic mode but this manual adjustment is used to fine adjust results of automat...

Страница 83: ...on values since the reading point differs between the white ref erence sheet inside of the reading unit and the actual document If the scanned image quality is degraded perform this adjustment Also pe...

Страница 84: ...e sheet is fed and a progress screen is displayed Figure 5 231 5 Even after the sheet has been ejected the data may be processed inside the ma chine The progress screen disappears and a caution screen...

Страница 85: ...he regist sensor does not detect a document correctly because the ambient amount of light is very different and so on Also run this mode after replacing the control PCB on which the sensor is installe...

Страница 86: ...ack lines are written as a shading sheet For details on how to write black lines refer to Adjustment sheets in Registration Auto Operation Procedure 1 Clean feed path roller and reading glass 2 Load a...

Страница 87: ...screen is dis played Do not turn OFF the machine or perform any operations until the comple tion screen is displayed Figure 5 238 C Motor Sensor 1 CIS LED This mode is used to check the LED built in t...

Страница 88: ...sensor the sensor name appears 1 Front including the operation section Figure 5 241 If you open the pickup tray the cover sensor lights up If you place paper on the document sensor the document sensor...

Страница 89: ...lution dpi 100 200 300 400 600 Mode Gray Color Direction Forward Note Initial values are underlined Table 5 203 D Firmware There are two methods for updating the firmware One is to select and execute...

Страница 90: ...e initial screen select Firm Regis tration Or select Registration of Firm form the scanner in the task bar of the initial screen or other screens Figure 5 245 2 The following screen is displayed only...

Страница 91: ...t file the folder name is decided to match them Furthermore an ini file that contains the setting conditions is saved at the same time The following shows an example of the folder Figure 5 249 6 Selec...

Страница 92: ...uring loading If the power is turned OFF it returns to its original state when restarted but this is not guaranteed For registered firmware In this mode the file saved in the service tool is selected...

Страница 93: ...een is dis played select the file 3 Writing starts automatically and the pro gress screen is displayed The rest of the procedure is the same as in For registered firmware Note This automatically detec...

Страница 94: ...ESHOOTING 2 Write firm When Write file on the lower right side of the analog screen is selected displayed information can be saved in a text file The operation procedure is the same as that in A Infor...

Страница 95: ...image is displayed If multiple sheets are scanned the second last scanned image is displayed Move the image by dragging the mouse 3 Image 2 If only one sheet is scanned the scanned back image is disp...

Страница 96: ...ed in Image 1 G Other Functions 1 Recovery of Log Files The software for this machine collects log files of user usage status information and is equipped with a function for recov ering these log file...

Страница 97: ...File Settings screen the type of log file can be set to Full or Mini The default setting is Mini If you need the Full information set to Full and click the OK button Then perform the steps to reproduc...

Страница 98: ...ar has passed For users who does not want to increase the disk usage ask the users to delete these as necessary from the save loca tions shown below 1 Windows XP C Documents and Settings All Users App...

Страница 99: ...Failure System Software Hard ware Connec tion Dirt dust Docu ment Set tings 1 Power does not come ON X X 2 No scanner is found X X 3 Scanner does not start X X X X 4 Scanning does not feed properly X...

Страница 100: ...USB hub used Bus power type cannot be used Self power type can be used but it is not guaranteed YES Remove Tray switch Control PCB 4 Was the problem solved by replacing of control PCB YES Done Table 5...

Страница 101: ...the user that CaptureOnTouch Lite cannot be started System If the Auto Start switch is ON 5 If the Auto Play screen is not displayed can Cap tureOnTouch Lite be started manually from the Explorer YES...

Страница 102: ...on of the docu ment guide correct NO Correct the position Setting documents 4 Are many documents set YES Reduce the number of documents 5 Are the separation pad and rollers installed properly NO Assem...

Страница 103: ...y stop occur frequently YES Perform steps in 4 Scanner Does Not Feed Properly 3 Is the memory sufficient NO Increase the memory 4 Are other applications run ning YES Close the unneces sary application...

Страница 104: ...ON P 208 FIRST EDITION CHAPTER 5 TROUBLESHOOTING V IMAGE TROUBLESHOOTING Image Sample Document Normal B W All black All white All streaked Too dark Too light Streaks 1 Streaks 2 Streaks 3 Wrong size A...

Страница 105: ...O Change the setup Change Contrast if necessary System 3 Was the problem solved by resetting the power of the scanner or restarting the computer YES Done 4 Reading related cables connected properly NO...

Страница 106: ...3 Is the feed path clean NO Clean it CIS unit 4 Is the inside of the CIS unit clean NO Clean or replace the reading unit Light Adjustment 5 Have you executed Light in service mode NO Execute Light Ad...

Страница 107: ...adjust ment 4 Have you executed Reg istration in service mode NO Execute Registration Adjustment Table 5 506 6 Text Cannot be Seen When the background includes colors or patterns text may be hidden b...

Страница 108: ...lt Action NO Set it Setup of Moire Re duction 1 Is Moire Reduction set YES Increase the resolu tion Set to High Quality Moire Reduction Table 5 508 8 The image of the photograph is not good The reprod...

Страница 109: ...d reassembling the machine Control PCB 1 Execute All in service mode 2 Change the value in the Counter in ser vice mode 3 Input the serial number into Serial num ber in service mode Reading Unit Execu...

Страница 110: ......

Страница 111: ...APPENDIX COPYRIGHT CANON ELECTRONICS INC 2012 CANON P 208 FIRST EDITION I ELECTRICAL BLOCK DIAGRAM A 1 II LIST OF SPECIAL TOOL A 2 III PARTS CATALOG A 3...

Страница 112: ......

Страница 113: ...unit lower Feed motor with encoder CIS unit upper Upper unit sensor Tray switch Start switch AutoStart switch USB cable mini connector Document sensor J103 J101 J102 8 7 6 4 3 2 5 1 8 7 6 4 3 2 5 1 8...

Страница 114: ...Rank Usage Remarks 1 Shading sheet TKM 0326 TKM 0332 B For the light adjustment 10 sheets set 2 Registration adjustment sheet B For the registration adjustment Created of copy paper or shading sheet...

Страница 115: ...Figure 100 APPENDIX III PARTS CATALOG 1 External Cover COPYRIGHT CANON ELECTRONICS INC 2012 CANON P 208 FIRST EDITION A 3...

Страница 116: ...1 4 1 5 MA2 9974 000 MA2 8926 000 MA2 9975 000 MG1 4791 020 MG1 4789 000 1 COVER OPERATION LABEL ENERGY STAR BLACK BUTTON START SEPARATION PAD UNIT TRAY PICKUP DR P208 1 1 P 208 DR 208II P 208II 6 1 7...

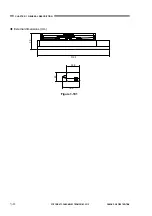
Страница 117: ...COPYRIGHT CANON ELECTRONICS INC 2012 CANON P 208 FIRST EDITION A 5 APPENDIX 2 Upper Unit Figure 200...

Страница 118: ...ER SHAFT SPRING TORSION 8 N 2 9 1 10 1 11 N 1 12 MA2 9985 000 MA2 9941 000 MA2 9958 000 MA2 9953 000 MA2 9957 000 1 HOOK SPRING TORSION LEFT MOUNT UPPER UNIT GUIDE LIGHT SPRING TORSION RIGHT 13 1 14 1...

Страница 119: ...COPYRIGHT CANON ELECTRONICS INC 2012 CANON P 208 FIRST EDITION A 7 APPENDIX 3 Base Unit Figure 300...

Страница 120: ...ENT SPRING TORSION GEAR SPUR Z49 11 1 12 2 13 1 14 N 1 15 MS2 0290 000 MS2 0293 000 MA2 9972 000 MS1 1047 000 MA2 9965 000 N 1 GEAR SPUR Z28 16 GEAR SPUR Z17 ROLLER EJECT SUPPORT SHAFT PLATE GROUNDING...

Страница 121: ...188 000 300 04 1 300 13 1 300 20 1 300 14 1 100 01 1 200 05 1 100 03 1 200 15 1 300 19 1 MS1 1047 000 MS1 2608 000 MS1 2609 000 MS1 2610 000 200 19 1 300 09 1 200 07 2 300 11 1 300 18 1 300 10 1 200 0...

Страница 122: ......

Страница 123: ...Prepared by Quality Assurance Center Canon Electronics Inc 3 5 10 Shibakoen Minato ku Tokyo 105 0011 Japan FIRST EDITION DEC 2012 63999a...

Страница 124: ...1212TG...

Отзывы: