Canon MG5100 series Скачать руководство пользователя страница 780

Advanced Guide

 > 

About Bluetooth Communication

 > 

Basic Procedure for Printing via Bluetooth Communication

 > Printing

with Computers

B011

Printing with Computers

When using Bluetooth communication, also refer to the computer's instruction manual.
When printing from a Bluetooth compliant device other than a computer, see 

Printing with Bluetooth

Compliant Devices other than a Computer

.

Note

Depending on your application software, operations may differ. For details, refer to your software
application's instruction manual.
The steps described in this section are for printing in Windows 7.
Bluetooth communication distance: Approx. 33 ft./10 m in normal environment.
The distance may vary depending on the radio conditions or the communication equipment.

1.

Turn on the printer and load paper.

2.

Create a document or open a file to print using an appropriate application software.

3.

Open the printer properties dialog box.

1. Select Print on the application software's File menu.

The Print dialog box opens.
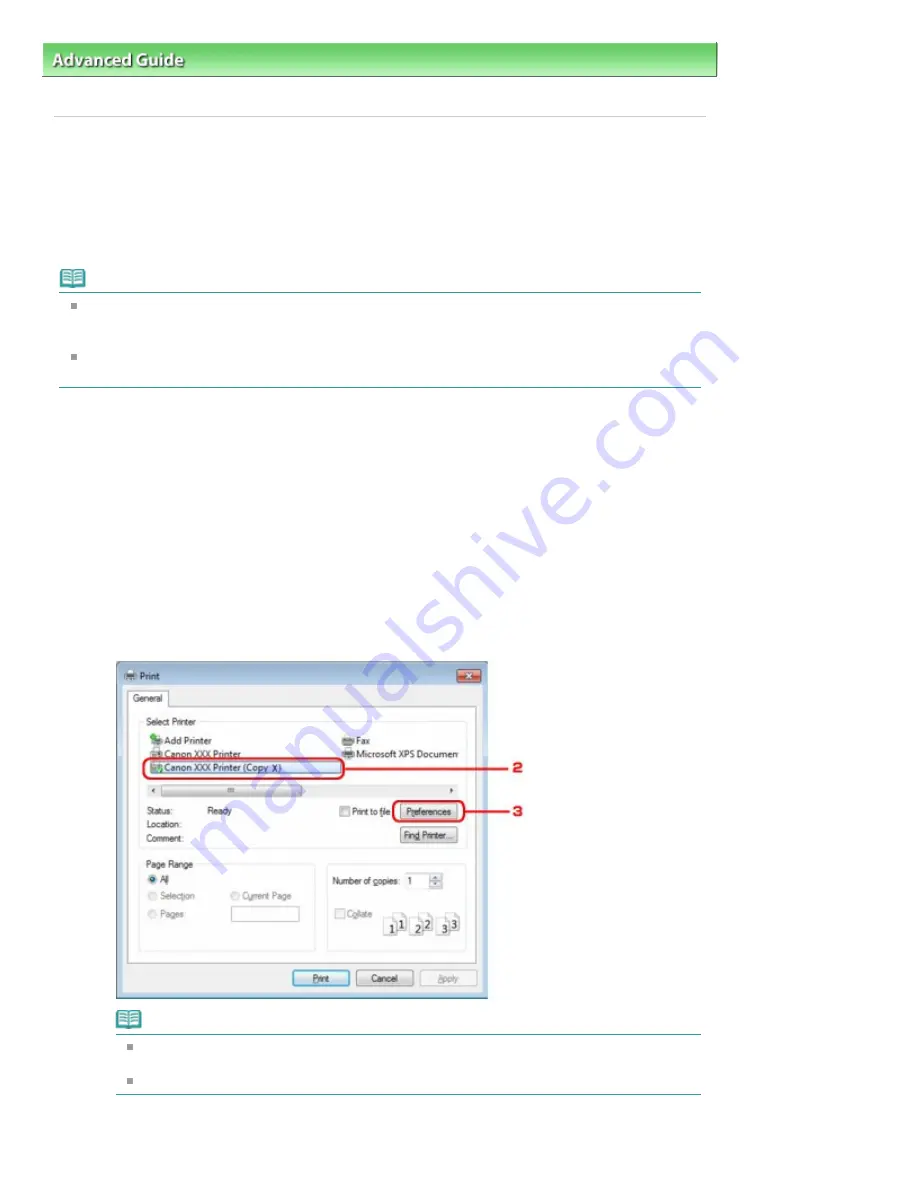
2.

Select the printer to which you attached the Bluetooth unit such as Canon XXX Printer (Copy X)
from Select Printer.

3. Click Preferences (or Properties).

The Quick Setup sheet of the Printing Preferences dialog box is displayed.

Note

The printer registered on Add a Bluetooth Device (Bluetooth Devices except for Windows

7) is displayed as Canon XXX Printer (Copy X).
"X" is a device name or a digit. The number of digits may differ depending on the printer.

4.

Specify the required settings.

Strana 780 z celkového počtu 948

Printing with Computers

Содержание MG5100 series

Страница 1: ...ejto príručky MC 4874 V1 00 Základná príručka Obsahuje súhrnné informácie o tomto výrobku Rozšírená príručka Podrobne opisuje funkciu tohto výrobku Riešenie problémov Strana 1 z celkového počtu 948 Canon MG5100 series On screen Manual ...

Страница 2: ...funkcií skenovania Tlač z počítača Tlač fotografií Easy PhotoPrint EX Tlač dokumentov Tlač webových stránok Easy WebPrint EX Spustenie rôznych softvérových aplikácií Ďalšie použitie Tlač súborov PDF uložených na pamäťovej karte alebo na disku USB flash Tlač šablón napríklad papiera na poznámky Tlač fotografií priamo z digitálneho fotoaparátu alebo mobilného telefónu Nastavenia zariadenia Vkladanie...

Страница 3: ...e základné úkony s ktorými sa musíte oboznámiť pred jeho používaním Hlavné súčasti Pohľad spredu Pohľad zozadu Vnútorné súčasti Ovládací panel Ako sa pohybovať v ponukách na displeji LCD Výber ponúk na obrazovke HOME Výber ponuky alebo položky nastavenia Ďalšie úkony Na začiatok strany Strana 3 z celkového počtu 948 Prehľad zariadenia ...

Страница 4: ...možno vložiť jeden alebo viacero hárkov rovnakej veľkosti a typu papiera ktoré sa však automaticky budú podávať po jednom Pozrite si časť Vkladanie papiera 4 Vodiace lišty papiera Posunutím ich zarovnajte s bočnými hranami balíka papiera 5 Displej LCD Liquid Crystal Display displej z tekutých kryštálov Zobrazuje správy položky ponúk a prevádzkový stav Na displeji LCD môžete tiež skontrolovať fotog...

Страница 5: ...lava nie je chránená 11 Indikátor NAPÁJANIE POWER Po zapnutí zariadenia začne blikať a potom ostane svietiť na zeleno 12 Port priamej tlače Umožňuje priamu tlač zo zariadenia kompatibilného so štandardom PictBridge napríklad digitálneho fotoaparátu alebo voliteľnej jednotky Bluetooth BU 30 Pozrite si časť Tlač fotografií priamo z digitálneho fotoaparátu alebo mobilného telefónu Do tohto portu môže...

Страница 6: ...é Nedotýkajte sa kovového krytu Kým zariadenie tlačí alebo skenuje originály pomocou počítača neodpájajte ani znova nepripájajte kábel USB 16 Zadný kryt Pri odstraňovaní zaseknutého papiera ho odpojte 17 Konektor napájacieho kábla Zasuňte sem dodaný napájací kábel Vnútorné súčasti 18 Indikátory Atrament Ink V závislosti od stavu kazety s atramentom svietia alebo blikajú na červeno Pozrite si časť ...

Страница 7: ...Kryt zásuvky na kartu Pred vložením pamäťovej karty ho otvorte Pozrite si časť Vkladanie pamäťovej karty Poznámka Podrobné informácie o vkladaní kaziet s atramentom nájdete v tlačenej príručke Prvé spustenie Ovládací panel 1 Tlačidlá Funkcia Function Používajú sa na výber ponúk na obrazovke HOME alebo ponuky funkcií ktorá sa zobrazuje v spodnej časti displeja LCD Pozrite si časť Výber ponuky alebo...

Страница 8: ...u ak práve prebieha tlač kopírovanie alebo skenovanie 7 Tlačidlo Farebne Color Spúšťa farebnú tlač kopírovanie alebo skenovanie Keď je toto tlačidlo dostupné svieti na modro 8 Tlačidlo Čiernobielo Black Spúšťa čiernobiele kopírovanie skenovanie atď Keď je toto tlačidlo dostupné svieti na modro 9 Tlačidlo Naspäť Back Na displeji LCD sa opätovne zobrazí predchádzajúca obrazovka Na začiatok strany St...

Страница 9: ...é na tlač Výber ponúk na obrazovke HOME Výber ponuky alebo položky nastavenia Ďalšie úkony Výber ponúk na obrazovke HOME Obrazovka HOME sa zobrazí po zapnutí zariadenia alebo stlačení tlačidla DOMOV HOME Obrazovka HOME pozostáva z troch obrazoviek na ktorých sa zobrazujú ponuky na vytváranie kópií tlač fotografií skenovanie originálov a pod Pomocou tlačidla alebo môžete prepínať medzi jednotlivými...

Страница 10: ... postupne zobrazovať ukážky fotografií uložených na pamäťovej karte alebo disku USB flash Požadované fotografie môžete vybrať a vytlačiť Podrobné informácie nájdete v príručke on screen manual Rozšírená príručka Document print Môžete vytlačiť dokumenty súbory PDF naskenované a uložené pomocou zariadenia Pozrite si časť Tlač súborov PDF uložených na pamäťovej karte alebo na disku USB flash Special ...

Страница 11: ...e tlačidla alebo posúvacieho kolieska F I Položky vyberte pomocou tlačidla alebo Alebo J Položky vyberte otáčaním posúvacieho kolieska pomocou prsta Ak je v tejto príručke uvedené že možno použiť posúvacie koliesko tak je táto skutočnosť uvedená aj v prevádzkovom postupe tzn tlačidlo alebo posúvacie koliesko Používanie tlačidiel Funkcia Nasledujúca časť obsahuje príklad používania obrazovky výberu...

Страница 12: ...ich zmenu nastavení tlače môžete pomocou tlačidla alebo posúvacieho kolieska F vybrať príslušnú položku a pomocou tlačidla alebo vybrať príslušnú možnosť Potom stlačte tlačidlo OK G Na obrazovke Print settings ponuky Photo napríklad možno kvalitu tlače zmeniť nasledujúcim spôsobom 1 Pomocou tlačidla alebo posúvacieho kolieska vyberte položku Print qlty 2 Pomocou tlačidla alebo vyberte položku High...

Страница 13: ...dnom riadku Pomocou tlačidla alebo posúvacieho kolieska vyberte príslušnú ponuku a stlačte tlačidlo OK Ďalšie úkony Návrat na predchádzajúcu obrazovku Na predchádzajúcu obrazovku sa môžete vrátiť stlačením tlačidla Naspäť Back N Zrušenie úlohy kopírovania tlačovej úlohy alebo úlohy skenovania Prebiehajúcu tlačovú úlohu úlohu kopírovania alebo skenovania môžete zrušiť stlačením tlačidla Stop O Stra...

Страница 14: ...Na začiatok strany Strana 14 z celkového počtu 948 Ako sa pohybovať v ponukách na displeji LCD ...

Страница 15: ...bo z nich vytvoriť nálepky Tlač fotografií uložených na pamäťovej karte alebo na disku USB flash Zmena nastavení Používanie rôznych funkcií Funkcie na obrazovke Photo menu Funkcie na obrazovke Fun photo print Ďalšie užitočné funkcie Vkladanie pamäťovej karty Pred vložením pamäťovej karty Vkladanie pamäťovej karty Vyberanie pamäťovej karty Zapojenie disku USB flash Zapojenie disku USB flash Odpojen...

Страница 16: ...ite si časť Pred vložením pamäťovej karty Disk USB flash 1 na ktorom sú uložené fotografie Pozrite si časť Zapojenie disku USB flash Fotografický papier určený na tlač Pozrite si časť Použiteľné typy médií 1 Zariadenie dokáže načítať až 2 000 fotografií 1 Pripravte tlač 1 Zapnite zariadenie Pozrite si časť Pohľad spredu 2 Vložte papier Pozrite si časť Vkladanie papiera V tomto príklade sme vložili...

Страница 17: ...a Vložte ju do zásuvky na kartu TAK ABY STRANA S NÁLEPKOU SMEROVALA DOĽAVA Informácie o pamäťových kartách kompatibilných so zariadením a miestach ich vkladania nájdete v časti Vkladanie pamäťovej karty Disk USB flash Zapojte ho do portu priamej tlače Pozrite si časť Zapojenie disku USB flash V časti Select photo print sa zobrazí obrazovka výberu fotografií A Disk USB flash Strana 17 z celkového p...

Страница 18: ...l Rozšírená príručka Obrazové údaje uložené na disku USB flash môžete tlačiť bez ohľadu na nastavenie položky Read write attribute 3 Vyberte fotografie ktoré chcete vytlačiť 1 Pomocou tlačidla alebo posúvacieho kolieska C zobrazte požadovanú fotografiu Poznámka Počas načítavania fotografií sa na displeji LCD môže zobraziť ikona Ak na zobrazenie fotografie používate tlačidlo alebo posúvacie koliesk...

Страница 19: ...k chcete zmeniť nastavenia pomocou tlačidla alebo posúvacieho kolieska vyberte položku ktorú chcete zmeniť a pomocou tlačidla alebo vyberte príslušnú možnosť Po potvrdení alebo zmene nastavení stlačte tlačidlo OK čím sa vrátite na obrazovku výberu fotografií Pozrite si časti Základné úkony na obrazovke nastavení a Zmena nastavení Poznámka Na obrazovke Print settings môžete zadať možnosť Photo fix ...

Страница 20: ...er podať z nesprávneho zdroja papiera alebo nemusí tlačiť v správnej kvalite Pozrite si časť Zdroje papiera na vkladanie papiera 3 Print qlty Kvalita tlače Vyberte kvalitu tlače High alebo Standard 4 Border Vyberte tlač s okrajom alebo bez okraja Bordered alebo Borderless Poznámka Ak sa po výbere nastavenia Borderless líši pomer výšky k šírke od obrazových údajov v závislosti od veľkosti použitého...

Страница 21: ...úcom výbere položky Photo Ak je kombinácia niektorých položiek nastavenia neplatná na neplatnej položke sa zobrazí ikona Stlačením ľavého tlačidla Funkcia Function vyberte položku Error details a prečítajte si chybové hlásenie Potom opravte nastavenia Na začiatok strany Strana 21 z celkového počtu 948 Tlač fotografií uložených na pamäťovej karte alebo na disku U ...

Страница 22: ... Na obrazovke HOME možno tiež vybrať položku Fun photo print alebo Slide show Pozrite si časť Výber ponúk na obrazovke HOME Podrobné informácie o položke Slide show nájdete v príručke on screen manual Rozšírená príručka Tlač všetkých fotografií Ak je vybratá položka Print all photos môžete naraz vytlačiť všetky fotografie uložené na pamäťovej karte alebo na disku USB flash Takisto môžete vytlačiť ...

Страница 23: ...grafiu Pomocou položky List view mode zobrazíte deväť miniatúr Režim Skip mode umožňuje posúvať sa v skupinách s 10 alebo 100 fotografiami alebo podľa dátumu Položka Trimming mode umožňuje orezať fotografie Standard view mode List view mode Skip mode Trimming mode Orezanie fotografií Na obrazovke Trimming môžete pomocou tlačidla alebo alebo posúvacieho kolieska zmeniť veľkosť orezania a pomocou tl...

Страница 24: ...k na obrazovke Print settings vyberiete v položke Print date alebo Print file no možnosť ON vybraté fotografie budete môcť vytlačiť s dátumom snímania alebo číslom súboru Print date Print file no Na začiatok strany Strana 24 z celkového počtu 948 Používanie rôznych funkcií ...

Страница 25: ... Exif 2 2 alebo 2 21 TIFF kompatibilnom so štandardom Exif 2 2 alebo 2 21 Ak sa pamäťová karta naformátuje v počítači môže sa stať že nebude kompatibilná so zariadením Pamäťové karty ktoré nevyžadujú adaptér na karty Pamäťové karty SD Secure Digital Pamäťové karty SDHC MultiMediaCard MultiMediaCard Plus Pamäťové karty Compact Flash CF Podporuje karty typu I II 3 3 V Microdrive Memory Stick Memory ...

Страница 26: ...ccess Keď indikátor Prístup Access bliká zariadenie práve používa pamäťovú kartu V takom prípade sa nedotýkajte oblasti okolo zásuvky na kartu Poznámka Pokiaľ je možnosť Read write attribute nastavená na hodnotu Writable from PC nemožno tlačiť obrazové údaje uložené na pamäťovej karte ani na ňu ukladať naskenované údaje pomocou ovládacieho panela zariadenia Po použití zásuvky na kartu ako jednotky...

Страница 27: ...m ich vložte do zásuvky na kartu podľa obrázka nižšie Do ľavej zásuvky na kartu vkladajte nasledujúce typy pamäťových kariet Memory Stick Duo Memory Stick PRO Duo Memory Stick Micro s adaptérom veľkosti Duo Do strednej zásuvky na kartu vkladajte nasledujúce typy pamäťových kariet Pamäťové karty SD Secure Digital pamäťové karty SDHC MultiMediaCard MultiMediaCard Plus miniSD Card miniSDHC Card micro...

Страница 28: ...araz viac ako jednu kartu 4 Zatvorte kryt zásuvky na kartu Vyberanie pamäťovej karty Dôležité Ak ste zásuvku na kartu používali ako jednotku pamäťovej karty počítača pred fyzickým vybratím pamäťovej karty zo zariadenia musíte v počítači vykonať operáciu bezpečného odstránenia Ak ste pripojili zariadenie pomocou kábla USB kliknite pravým tlačidlom myši na ikonu vymeniteľného disku a potom na možnos...

Страница 29: ... údaje z pamäťovej karty alebo ich na ňu zapisuje Ak počas blikania indikátora Prístup Access vyberiete pamäťovú kartu alebo vypnete zariadenie môže dôjsť k poškodeniu údajov uložených na pamäťovej karte 3 Zatvorte kryt zásuvky na kartu Na začiatok strany Strana 29 z celkového počtu 948 Vkladanie pamäťovej karty ...

Страница 30: ...ájdete v odseku Obrazové údaje ktoré možno tlačiť v časti Pred vložením pamäťovej karty 1 Do portu priamej tlače zapojte disk USB flash Skontrolujte správnu orientáciu disku USB flash a potom ho zapojte vodorovne do portu priamej tlače Odpojenie disku USB flash 1 Skontrolujte či zariadenie nečíta z disku USB flash údaje alebo ich naň nezapisuje Na displeji LCD skontrolujte či sa dokončilo načítava...

Страница 31: ...nie Pri kopírovaní môžete použiť rôzne postupy napríklad zväčšiť zmenšiť alebo skopírovať dve pôvodné strany na jeden hárok papiera Vytváranie kópií Zmena nastavení Používanie rôznych funkcií kopírovania Na začiatok strany Strana 31 z celkového počtu 948 Kopírovanie ...

Страница 32: ...nály ktoré možno použiť Papier na tlač Pozrite si časť Použiteľné typy médií 1 Pripravte sa na kopírovanie 1 Zapnite zariadenie Pozrite si časť Pohľad spredu 2 Vložte papier Pozrite si časť Vkladanie papiera V tomto príklade kontrolujeme či je v kazete vložený obyčajný papier veľkosti A4 Poznámka Do kazety vložte obyčajný papier veľkosti A4 B5 A5 alebo Letter Iné veľkosti alebo typy papiera vklada...

Страница 33: ...obe umiestnenia originálov nájdete v časti Umiestnenie originálov Znaky napísané alebo čiary nakreslené pomocou svetlého farebného pera alebo zvýrazňovača sa nemusia správne skopírovať 2 Spustite kopírovanie 1 Pomocou tlačidla alebo A zadajte počet kópií Počet kópií možno zmeniť pomocou posúvacieho kolieska 2 Pomocou tlačidla alebo B určte zväčšenie V tomto príklade sme vybrali možnosť 100 3 Pomoc...

Страница 34: ...edkov tlače si môžete pozrieť stlačením stredného tlačidla Funkcia Function E počas kopírovania originálu ktorý je položený na plochom predlohovom skle Informácie nájdete v príručke on screen manual Rozšírená príručka Ak stlačením ľavého tlačidla Funkcia Function F vyberiete možnosť Copy menu budete môcť použiť rôzne funkcie kopírovania napríklad Borderless copy Pozrite si časť Používanie rôznych ...

Страница 35: ... nemusí tlačiť v správnej kvalite Pozrite si časť Zdroje papiera na vkladanie papiera 5 Print qlty Kvalita tlače Vyberte kvalitu tlače podľa originálu ktorý chcete kopírovať Standard High atď Dostupné nastavenia kvality tlače závisia od papiera vybratého v ponuke Type 6 2 sided Umožňuje kopírovať jednu stranu dvoch originálov na obe strany jedného papiera Po výbere položky 2 sided stlačte pravé tl...

Страница 36: ...k nastavenia neplatná na neplatnej položke sa zobrazí ikona Stlačením ľavého tlačidla Funkcia Function vyberte položku Error details a prečítajte si chybové hlásenie Potom opravte nastavenia Ak vyberiete možnosť Fast pričom je nastavený typ média Plain paper a kvalita nie je taká dobrá ako ste očakávali vyberte možnosť Standard alebo High a skúste kopírovať znova Na začiatok strany Strana 36 z cel...

Страница 37: ...rait Vďaka tomu môžete kopírovať jednu stranu dvoch originálov na obe strany jedného papiera Ak chcete zmeniť nastavenia stlačením pravého tlačidla Funkcia Function vyberte položku Print settings Originály na výšku Long side stapling Short side stapling Originály na šírku Long side stapling Short side stapling 2 on 1 copy 4 on 1 copy Po výbere možnosti 2 on 1 copy alebo 4 on 1 copy sa zobrazí obra...

Страница 38: ...4 on 1 copy Borderless copy Frame erase copy Na začiatok strany Strana 38 z celkového počtu 948 Používanie rôznych funkcií kopírovania ...

Страница 39: ... vytlačených fotografií Vytlačené fotografie môžete opätovne vytlačiť v rozličných rozloženiach Opätovná tlač vytlačených fotografií Používanie rôznych funkcií Tlač fotografií v rozličných rozloženiach Korekcia fotografií Na začiatok strany Strana 39 z celkového počtu 948 Opätovná tlač fotografií z vytlačených fotografií ...

Страница 40: ...te si pripraviť Vytlačené fotografie Papier na tlač fotografií Pozrite si časť Použiteľné typy médií 1 Pripravte opätovnú tlač vytlačených fotografií 1 Zapnite zariadenie Pozrite si časť Pohľad spredu 2 Vložte papier Pozrite si časť Vkladanie papiera do zadného zásobníka V tomto príklade sme vložili fotografický papier veľkosti 10 x 15 cm 4 x 6 do zadného zásobníka 3 Opatrne otvorte výstupný zásob...

Страница 41: ...liš veľký Fotografie nie sú umiestnené príliš blízko k okraju plochého predlohového skla Fotografie menšie ako približne 25 mm 1 palec na hranu sa nenaskenujú správne Typy fotografií uvedené nižšie sa nemusia správne naskenovať Fotografie ktoré nie sú pravouhlé alebo majú nepravidelný tvar napríklad vystrihnuté fotografie Fotografie ktoré sú úplne biele Fotografie s bielymi okrajmi Okraje fotograf...

Страница 42: ... size vybratá možnosť 4 x6 10x15cm a či je v ponuke Type vybratý typ vloženého fotografického papiera Ak chcete zmeniť nastavenia pomocou tlačidla alebo posúvacieho kolieska vyberte položku ktorú chcete zmeniť a pomocou tlačidla alebo vyberte príslušnú možnosť Pozrite si časť Zmena nastavení Poznámka Ak ste na obrazovke Print settings vybrali v ponuke Photo fix možnosť Manual correction stlačením ...

Страница 43: ...otografií v rozličných rozloženiach Môžete vybrať niektoré z rozložení a vytlačiť fotografie iným spôsobom než použitím funkcie Select and print Sticker print Print all photos Korekcia fotografií Ak ste na obrazovke Print settings vybrali v ponuke Photo fix možnosť Manual correction môžete fotografie opraviť manuálne Môžete napríklad upraviť jas kontrast a vyváženie farieb alebo obnoviť vyblednuté...

Страница 44: ...oftvérovej aplikácie Naskenované údaje môžete tiež uložiť na pamäťovú kartu alebo disk USB flash vložený v zariadení Ukladanie naskenovaných údajov do počítača Prípravy na skenovanie pomocou ovládacieho panela Ukladanie naskenovaných údajov do počítača Zmena nastavení Používanie rôznych funkcií skenovania Na začiatok strany Strana 44 z celkového počtu 948 Skenovanie ...

Страница 45: ...vaním originálov skontrolujte nasledujúce skutočnosti Sú nainštalované potrebné softvérové aplikácie ovládače MP Drivers a program MP Navigator EX Ak ste ovládače MP Drivers a program MP Navigator EX nenainštalovali alebo odinštalovali nainštalujte ich z disku Inštalačný disk CD ROM Setup CD ROM Ak chcete nainštalovať ovládače MP Drivers a program MP Navigator EX počas inštalácie Custom Install vy...

Страница 46: ...nt alebo Photo stlačením pravého tlačidla Funkcia Function vyberte položku Scan settings a v nastavení Scan size vyberte veľkosť originálu Pozrite si časť Zmena nastavení Znaky napísané alebo čiary nakreslené pomocou svetlého farebného pera alebo zvýrazňovača sa nemusia správne naskenovať 3 Stlačením tlačidla Farebne Color alebo Čiernobielo Black spustite skenovanie Spustí sa program MP Navigator ...

Страница 47: ...o program Always use this program for this action a kliknite na tlačidlo OK Zmena nastavení Ak ste v ponuke Doc type vybrali možnosť Document alebo Photo stlačením pravého tlačidla Funkcia Function vyberte na pohotovostnej obrazovke skenovania položku Scan settings Môžete vybrať požadovanú položku napríklad veľkosť skenovania formát údajov alebo rozlíšenie a zmeniť jej nastavenie Informácie o zmen...

Страница 48: ...o samostatný obrázok 2 Táto položka nastavenia nie je dostupná ak ste v ponuke Doc type vybrali možnosť Photo Poznámka Ak v položke Save Forward vyberiete inú možnosť než PC dostupné položky nastavenia sa budú líšiť Podrobné informácie nájdete v príručke on screen manual Rozšírená príručka Na začiatok strany Strana 48 z celkového počtu 948 Ukladanie naskenovaných údajov do počítača ...

Страница 49: ...a pamäťovú kartu alebo disk USB flash prípadne ich v počítači pripojiť k e mailu Na pohotovostnej obrazovke skenovania stlačte ľavé tlačidlo Funkcia Function a vyberte položku Save Forward Podrobné informácie nájdete v príručke on screen manual Rozšírená príručka PC Attach to E mail Memory card USB flash drive Na začiatok strany Strana 49 z celkového počtu 948 Používanie rôznych funkcií skenovania...

Страница 50: ...t EX dodaného so zariadením môžete poľahky tlačiť fotografie zhotovené pomocou digitálneho fotoaparátu Tlač fotografií Easy PhotoPrint EX Používanie rôznych funkcií programu Easy PhotoPrint EX Tlač dokumentov Tlač webových stránok Easy WebPrint EX Spustenie rôznych softvérových aplikácií Solution Menu EX Easy WebPrint EX Na začiatok strany Strana 50 z celkového počtu 948 Tlač z počítača ...

Страница 51: ...čas inštalácie Custom Install 1 Pripravte tlač 1 Skontrolujte či je zariadenie zapnuté Pozrite si časť Pohľad spredu 2 Vložte papier Pozrite si časť Vkladanie papiera V tomto príklade sme vložili fotografický papier veľkosti 10 x 15 cm 4 x 6 do zadného zásobníka Poznámka Obyčajný papier veľkosti A4 alebo Letter vkladajte do kazety a iné veľkosti alebo typy papiera napríklad fotografický papier do ...

Страница 52: ...ete Imported Image B Prípadne pomocou tlačidla šípka nadol môžete zmeniť počet kópií na nulu Vybratú fotografiu môžete tiež opraviť alebo vylepšiť Podrobné informácie nájdete v príručke on screen manual Rozšírená príručka Môžete zaznamenať a vytlačiť snímku videa Pozrite si časť Používanie rôznych funkcií programu Easy PhotoPrint EX 3 Kliknite na tlačidlo Select Paper 4 Vyberte typ vloženého papie...

Страница 53: ...rderless full Zobrazí sa ukážka s vybratým rozložením na ktorej môžete skontrolovať požadovaný výsledok tlače Poznámka Môžete zmeniť orientáciu fotografie alebo orezať fotografie ktoré chcete vytlačiť Podrobné informácie o týchto úkonoch nájdete v príručke on screen manual Rozšírená príručka 2 Kliknite na tlačidlo Print Poznámka Ak chcete zrušiť prebiehajúcu tlačovú úlohu stlačte tlačidlo Stop na ...

Страница 54: ...Na začiatok strany Strana 54 z celkového počtu 948 Tlač fotografií Easy PhotoPrint EX ...

Страница 55: ...ľko užitočných funkcií programu Easy PhotoPrint EX Podrobné informácie nájdete v príručke on screen manual Rozšírená príručka Vytváranie vlastných výtlačkov Z fotografií si môžete vytvoriť album alebo kalendár Album Calendar Stickers Layout Print Vytváranie fotografií z videí Zo zaznamenaných snímok videa môžete vytvoriť fotografie Na začiatok strany Strana 55 z celkového počtu 948 Používanie rôzn...

Страница 56: ...kladanie papiera V tomto príklade kontrolujeme či je v kazete vložený obyčajný papier veľkosti A4 Poznámka Obyčajný papier veľkosti A4 B5 A5 alebo Letter vkladajte do kazety a iné veľkosti alebo typy papiera napríklad fotografický papier do zadného zásobníka 3 Opatrne otvorte výstupný zásobník papiera a potom aj jeho vysúvaciu časť 4 Použitím vhodnej softvérovej aplikácie vytvorte alebo otvorte do...

Страница 57: ...k vyberiete iné veľkosti alebo typy papiera napríklad fotografický papier zariadenie podá papier zo zadného zásobníka Ak vyberiete nesprávnu veľkosť papiera alebo typ média zariadenie môže papier podať z nesprávneho zdroja papiera alebo nemusí tlačiť v správnej kvalite 3 Kliknite na tlačidlo OK Poznámka Ak sa chcete dozvedieť podrobné informácie o funkciách ovládača tlačiarne kliknutím na položky ...

Страница 58: ...piera Monitor stavu tlačiarne zobrazíte kliknutím na ikonu tlačiarne na paneli úloh V operačnom systéme Windows Vista v ďalšom texte označovanom ako systém Windows Vista alebo Windows XP kliknite na ikonu Canon XXX Printer kde XXX je názov zariadenia na paneli úloh Ak sa rovné čiary vytlačia nezarovnané alebo ak sú výsledky tlače neuspokojivé upravte polohu tlačovej hlavy Pozrite si časť Zarovnani...

Страница 59: ...né reprodukovať alebo upravovať diela iných osôb chránené autorskými právami s výnimkou osobného použitia domáceho použitia alebo použitia v rámci obmedzeného rozsahu definovaného autorskými právami Navyše reprodukovanie alebo úpravy fotografií ľudí môžu porušovať práva na zobrazenie osôb Poznámka Informácie o inštalácii a spustení aplikácie Easy WebPrint EX nájdete v časti Easy WebPrint EX Funkci...

Страница 60: ...Na začiatok strany Strana 60 z celkového počtu 948 Tlač webových stránok Easy WebPrint EX ...

Страница 61: ...talácie Custom Install Ponuky sa zobrazujú v oblasti ponúk kategórií na hlavnej obrazovke aplikácie Solution Menu EX Kliknutím na príslušnú ponuku v oblasti ponúk kategórií zobrazíte ikony funkcií dostupných v tejto ponuke Tieto ikony sa zobrazia v oblasti funkčných ikon na hlavnej obrazovke Počet a typy ikon alebo ponúk zobrazených na hlavnej obrazovke sa môžu líšiť v závislosti od vášho zariaden...

Страница 62: ...erom ponuky Help Settings a kliknutím na ikonu Solution Menu EX s Help Spustenie softvérových aplikácií z aplikácie Solution Menu EX Z aplikácie Solution Menu EX môžete spustiť príslušnú softvérovú aplikáciu a takisto priamo používať funkcie tejto softvérovej aplikácie Nasledujúci postup umožňuje spustiť aplikáciu Solution Menu EX a vybrať napríklad funkciu Photo Print programu Easy PhotoPrint EX ...

Страница 63: ...Ak aplikácia Easy WebPrint EX nie je nainštalovaná v oblasti oznámení na paneli úloh sa môže zobraziť upozornenie na inštaláciu aplikácie Easy WebPrint EX Ak chcete aplikáciu Easy WebPrint EX nainštalovať kliknite na zobrazené upozornenie a postupujte podľa pokynov na obrazovke Aplikáciu Easy WebPrint EX môžete nainštalovať aj z disku Inštalačný disk CD ROM Setup CD ROM Aplikáciu Easy WebPrint EX ...

Страница 64: ...položkami nastavenia zariadenia a funkciou priamej tlače z digitálneho fotoaparátu alebo mobilného telefónu Tlač súborov PDF uložených na pamäťovej karte alebo na disku USB flash Tlač šablón napríklad papiera na poznámky Tlač fotografií priamo z digitálneho fotoaparátu alebo mobilného telefónu Tlač fotografií zo zariadenia kompatibilného so štandardom PictBridge Tlač fotografií z bezdrôtového komu...

Страница 65: ...o you want to print Vyberte možnosť Print documents a potom stlačte tlačidlo OK Zobrazí sa zoznam dokumentov Vyberte požadovaný dokument Súbory PDF ktoré možno tlačiť Pomocou ovládacieho panela zariadenia možno tlačiť nasledujúce dokumenty súbory PDF Podrobné informácie o tlači nájdete v príručke on screen manual Rozšírená príručka Súbory PDF vytvorené skenovaním pomocou zariadenia pokiaľ je polož...

Страница 66: ...odrobné informácie nájdete v príručke on screen manual Rozšírená príručka Ak chcete pomocou zariadenia tlačiť šablóny na obrazovke HOME vyberte položku Special print a potom položku Template print Pozrite si časť Výber ponúk na obrazovke HOME Na nasledujúcich obrázkoch sú zobrazené dva príklady šablón ktoré možno vytlačiť Papier na poznámky Milimetrový papier Na začiatok strany Strana 66 z celkové...

Страница 67: ...tBridge je štandard určený na priamu tlač fotografií bez použitia počítača z pripojených zariadení akými sú digitálny fotoaparát digitálna videokamera alebo mobilný telefón vybavený fotoaparátom PictBridge Zariadenie označené touto značkou je kompatibilné so štandardom PictBridge Formát tlačiteľných obrazových údajov Zariadenie podporuje snímky zhotovené pomocou fotoaparátu kompatibilného so štand...

Страница 68: ...drobné informácie o týchto úkonoch nájdete v príručke on screen manual Rozšírená príručka Na začiatok strany Strana 68 z celkového počtu 948 Tlač fotografií priamo z digitálneho fotoaparátu alebo mobilné ...

Страница 69: ...úži na výber formátu dátumu ktorý sa zobrazí na displeji LCD alebo vytlačí na papier Read write attribute Umožňuje vybrať či sa má zásuvka na kartu na zariadení použiť ako jednotka pamäťovej karty počítača Quiet mode setting Túto funkciu zapnite v prípade že chcete znížiť prevádzkový hluk zariadenia napríklad pri používaní zariadenia v noci pri kopírovaní tlači z pamäťovej karty tlači zo zariadeni...

Страница 70: ... kvalitu tlače a iné nastavenia pri tlači zo zariadenia kompatibilného so štandardom PictBridge Language selection Umožňuje zmeniť jazyk hlásení a ponúk zobrazených na displeji LCD Reset setting Umožňuje obnoviť predvolené nastavenia zariadenia Neobnovia sa však hodnoty zarovnania tlačovej hlavy nastavenie položky Read write attribute ani jazyk nastavený v položke Language selection Na začiatok st...

Страница 71: ...iginálov ktoré chcete kopírovať alebo skenovať Vkladanie papiera Zdroje papiera na vkladanie papiera Vkladanie papiera do kazety Vkladanie papiera do zadného zásobníka Vkladanie fotografického papiera Vkladanie obálok Použiteľné typy médií Nevhodné typy médií Umiestnenie originálov Umiestnenie originálov Spôsob vkladania originálov pre jednotlivé funkcie Originály ktoré možno použiť Na začiatok st...

Страница 72: ...jednotlivých zdrojov papiera nájdete v časti Vkladanie papiera do kazety alebo Vkladanie papiera do zadného zásobníka Vkladanie obyčajného papiera do kazety Pokiaľ používate obyčajný papier veľkosti A4 B5 A5 alebo Letter vložte ho do kazety Ak v nastaveniach tlače na ovládacom paneli alebo v ovládači tlačiarne vyberiete obyčajný papier veľkosti A4 B5 A5 alebo Letter počas tlače bude zariadenie aut...

Страница 73: ...Na začiatok strany Strana 73 z celkového počtu 948 Vkladanie papiera ...

Страница 74: ...iadení nájdete v časti Použiteľné typy médií 1 Pripravte papier Zarovnajte okraje papiera Ak je papier zvlnený vyrovnajte ho Poznámka Pred vložením úhľadne zarovnajte okraje papiera Ak papier vložíte bez zarovnania okrajov môže sa zaseknúť Ak je papier zvlnený chyťte skrútené rohy a jemne ich ohýbajte v opačnom smere kým sa papier úplne nevyrovná Podrobné informácie o spôsobe vyrovnávania zvlnenéh...

Страница 75: ...vysúvaciu časť Poznámka Po vložení papiera Pri kopírovaní alebo tlači pomocou zariadenia bez použitia počítača vyberte veľkosť a typ vloženého papiera v ponukách Page size a Type na obrazovke s nastaveniami tlače Pozrite si odsek Zmena nastavení v časti Tlač fotografií uložených na pamäťovej karte alebo na disku USB flash alebo odsek Zmena nastavení v časti Vytváranie kópií Pri tlači pomocou počít...

Страница 76: ...Na začiatok strany Strana 76 z celkového počtu 948 Vkladanie papiera do kazety ...

Страница 77: ...ť k zaseknutiu papiera 1 Pripravte papier Pozrite si krok č 1 v časti Vkladanie papiera do kazety Zarovnajte okraje papiera Ak je papier zvlnený vyrovnajte ho 2 Vložte papier 1 Otvorte podperu papiera zdvihnite ju a sklopte 2 Opatrne otvorte výstupný zásobník papiera a potom aj jeho vysúvaciu časť 3 Posunutím roztvorte vodiace lišty papiera A a vložte papier do stredu zadného zásobníka tak aby STR...

Страница 78: ...čku limitu vkladania papiera D Poznámka Po vložení papiera Pri kopírovaní alebo tlači pomocou zariadenia bez použitia počítača vyberte veľkosť a typ vloženého papiera v ponukách Page size a Type na obrazovke s nastaveniami tlače Pozrite si odsek Zmena nastavení v časti Tlač fotografií uložených na pamäťovej karte alebo Strana 78 z celkového počtu 948 Vkladanie papiera do zadného zásobníka ...

Страница 79: ...anie kópií Pri tlači pomocou počítača vyberte veľkosť a typ vloženého papiera v ponukách Printer Paper Size a Media Type v ovládači tlačiarne Pozrite si časť Tlač dokumentov Na začiatok strany Strana 79 z celkového počtu 948 Vkladanie papiera do zadného zásobníka ...

Страница 80: ...hy a okraje obálok a vyrovnajte ich Ak sú obálky zvlnené chyťte ich za oba protiľahlé konce a jemne ich ohnite v opačnom smere Ak je roh chlopne na obálke zložený vyrovnajte ho Pomocou pera pritlačte vstupný okraj obálky a vyrovnajte ohyb Obrázky znázornené vyššie zobrazujú bočný pohľad na vstupný okraj obálky Dôležité Ak nie sú obálky ploché alebo ak ich okraje nie sú zarovnané môžu sa v zariaden...

Страница 81: ...trana C Strana s adresou Poznámka Dajte pozor aby obálky výškou nepresahovali značku limitu vkladania papiera D 3 V ovládači tlačiarne zadajte nastavenia 1 V ponuke Commonly Used Settings na karte Quick Setup vyberte položku Envelope 2 V okne Envelope Size Setting vyberte položku DL Env alebo Comm Env 10 3 V ponuke Orientation vyberte položku Landscape Dôležité Ak správne nenastavíte veľkosť obálk...

Страница 82: ...arne a v ponuke Commonly Used Settings vyberte možnosť Envelope Potom v ponuke Additional Features začiarknite políčko Rotate 180 degrees Podrobné informácie o nastaveniach ovládača tlačiarne nájdete v časti Tlač dokumentov Na začiatok strany Strana 82 z celkového počtu 948 Vkladanie obálok ...

Страница 83: ...sti od typu papiera či okolitých podmienok vysoká nízka teplota alebo vlhkosť môže byť vkladanie maximálneho množstva papiera problematické V takých prípadoch znížte počet hárkov vkladaného papiera na menej ako polovicu možno použiť 100 percentne recyklovaný papier Obálky Nastavenie typu média Ovládač tlačiarne Envelope Limit vkladania papiera Zadný zásobník 10 obálok Limit vkladania pre výstupný ...

Страница 84: ...panel Plus Semi gloss Ovládač tlačiarne Photo Paper Plus Semi gloss Matte Photo Paper MP 101 Nastavenie typu média Ovládací panel Matte Ovládač tlačiarne Matte Photo Paper Limit vkladania papiera Zadný zásobník 10 hárkov veľkosti A4 Letter 8 5 x 11 13 x 18 cm 5 x 7 alebo 20 x 25 cm 8 x 10 20 hárkov veľkosti 10 x 15 cm 4 x 6 Limit vkladania pre výstupný zásobník papiera Odporúča sa aby ste pred nep...

Страница 85: ...isku USB flash vyberte na obrazovke Fun photo print možnosť Sticker print Ak je vybratá možnosť Sticker print nemožno vybrať typ papiera Pozrite si časť Funkcie na obrazovke Fun photo print Ak chcete na nálepky vytlačiť fotografie uložené v mobilnom telefóne v ponuke Setup vyberte položku Device settings a v časti Mobile phone print settings nastavte veľkosť strany Stickers Informácie nájdete v pr...

Страница 86: ...8 50 x 26 61 palca zadný zásobník Hmotnosť papiera 17 až 28 lb 64 až 105 g m 2 okrem originálneho papiera od spoločnosti Canon Nepoužívajte ťažší ani ľahší papier s výnimkou originálneho papiera od spoločnosti Canon pretože sa môže zaseknúť v zariadení Poznámky ku skladovaniu papiera Tesne pred tlačou vyberte z balenia len potrebný počet hárkov papiera Pokiaľ netlačíte vložte nepoužitý papier späť...

Страница 87: ...2 okrem originálneho papiera od spoločnosti Canon papier tenší ako pohľadnica vrátane obyčajného papiera alebo poznámkového papiera orezaného na malú veľkosť pri tlači na papier menšej veľkosti ako A5 obrázkové pohľadnice pohľadnice s prilepenými fotografiami alebo nálepkami obálky s dvojitými chlopňami alebo so samolepiacimi prúžkami obálky s reliéfnym alebo upraveným povrchom obálky ktorých lepi...

Страница 88: ...a ploché predlohové sklo 1 Položte originál na ploché predlohové sklo 1 Otvorte kryt dokumentov Dôležité Na kryt dokumentov neklaďte žiadne predmety Po otvorení krytu dokumentov spadnú do zadného zásobníka a spôsobia poruchu zariadenia 2 Na ploché predlohové sklo umiestňujte originály tak aby STRANA URČENÁ NA SKENOVANIE SMEROVALA NADOL Dbajte na to aby bol originál správne otočený pre danú funkciu...

Страница 89: ...Na začiatok strany Strana 89 z celkového počtu 948 Umiestnenie originálov ...

Страница 90: ...can size zadajte štandardnú veľkosť A4 Letter a pod ak chcete skenovať originály Pomocou softvérovej aplikácie v počítači v ponuke Document Type vyberte dokumenty časopisy alebo texty v ponuke Document Size vyberte štandardnú veľkosť A4 Letter a pod Originál umiestnite tak aby STRANA URČENÁ NA SKENOVANIE SMEROVALA NADOL a zarovnajte ju so značkou zarovnania Dôležité Zariadenie nedokáže skenovať šr...

Страница 91: ...TRANA URČENÁ NA SKENOVANIE SMEROVALA NADOL a nachádzala sa aspoň 10 mm 0 4 palca od okrajov plochého predlohového skla Umiestnenie dvoch alebo viacerých originálov na ploché predlohové sklo Dve alebo viac vytlačených fotografií naskenujte pomocou položky Photo reprint Na obrazovke Scan Ak chcete skenovať dve alebo viac vytlačených fotografií pohľadníc alebo vizitiek v ponuke Doc type vyberte možno...

Страница 92: ...ne 10 stupňov Fotografie v šikmej polohe s dlhšou stranou najmenej 180 mm 7 1 palca nemožno upraviť Fotografie ktoré nie sú pravouhlé alebo majú nepravidelný tvar napríklad vystrihnuté fotografie sa nemusia správne naskenovať Na začiatok strany Strana 92 z celkového počtu 948 Spôsob vkladania originálov pre jednotlivé funkcie ...

Страница 93: ... alebo noviny Vytlačená fotografia pohľadnica vizitka alebo disk BD DVD CD a pod Veľkosť š x d Max 216 x 297 mm 8 5 x 11 7 palca Poznámka Hrubé originály napríklad knihy môžete na ploché predlohové sklo vložiť po odobratí krytu dokumentov zo zariadenia Podrobné informácie o spôsobe odobratia a nasadenia krytu dokumentov nájdete v príručke on screen manual Rozšírená príručka Na začiatok strany Stra...

Страница 94: ...a vykonať keď sa papier nepodáva správne Výmena kazety s atramentom Postup výmeny Kontrola stavu atramentu Keď je tlač nejasná alebo sa tlačia nesprávne farby Tlač vzorky na kontrolu dýz Prezeranie vzorky na kontrolu dýz Čistenie tlačovej hlavy Hĺbkové čistenie tlačovej hlavy Zarovnanie tlačovej hlavy Čistenie valčeka podávača papiera Čistenie podložky v kazete Na začiatok strany Strana 94 z celko...

Страница 95: ...ní použitých kaziet s atramentom sa môžu upchať dýzy Okrem toho pri použití takýchto kaziet nebude zariadenie schopné správne informovať o čase výmeny kaziet s atramentom Kazetu s atramentom po vložení nevyberajte zo zariadenia a nenechávajte ju vonku Spôsobí to vyschnutie kazety s atramentom a pri jej opätovnom vložení nemusí zariadenie správne fungovať Ak chcete zabezpečiť optimálnu kvalitu tlač...

Страница 96: ...lo bliká Stlačte úchytku A a zdvihnutím vyberte kazetu s atramentom Nedotýkajte sa páčky zaistenia tlačovej hlavy B Dôležité S kazetou s atramentom zaobchádzajte opatrne Predídete tak zašpineniu oblečenia alebo okolia Prázdnu kazetu s atramentom znehodnoťte v súlade s miestnymi zákonmi a predpismi týkajúcimi sa znehodnocovania spotrebného materiálu Poznámka Naraz nevyberajte viac ako jednu kazetu ...

Страница 97: ...a L C atrament môže vystreknúť alebo zariadenie nemusí správne tlačiť 2 Kazetu s atramentom držte tak aby oranžový ochranný kryt D smeroval nahor a zároveň dávajte pozor aby ste neblokovali vzduchový otvor v tvare písmena L C 3 Oranžový ochranný kryt D pomaly otočte o 90 stupňov vo vodorovnom smere a odstráňte ho Strana 97 z celkového počtu 948 Výmena kazety s atramentom ...

Страница 98: ... Skontrolujte či sa indikátor atramentu rozsvietil načerveno Dôležité Ak je kazeta s atramentom vložená nesprávne nebudete môcť tlačiť Kazetu s atramentom vložte správne otočenú podľa štítka na držiaku tlačovej hlavy Kým nebudú vložené všetky kazety s atramentom nebudete môcť tlačiť Vložte všetky kazety s atramentom 6 Mierne zdvihnite skenovaciu jednotku kryt a potom ju opatrne zatvorte Poznámka A...

Страница 99: ...Na začiatok strany Strana 99 z celkového počtu 948 Výmena kazety s atramentom ...

Страница 100: ...ícii informácie o zostávajúcej hladine atramentu v časti A sa zobrazuje symbol Príklad V kazete s atramentom sa míňa atrament Pripravte novú kazetu s atramentom Poznámka Stav atramentu môžete skontrolovať aj prostredníctvom obrazovky na displeji LCD ktorá sa zobrazuje počas tlače Pomocou indikátorov atramentu 1 Skontrolujte či je zariadenie zapnuté a opatrne otvorte výstupný zásobník papiera 2 Dví...

Страница 101: ...e on screen manual Rozšírená príručka Indikátor atramentu nesvieti Kazeta s atramentom nie je vložená správne alebo je vypnutá funkcia detekcie hladiny zostávajúceho atramentu Ak kazeta s atramentom nie je vložená správne zatláčajte na značku Tlačiť na kazete s atramentom kým kazeta s atramentom s kliknutím nezapadne na miesto Ak s kliknutím nezapadne na miesto skontrolujte či je zo spodnej časti ...

Страница 102: ...m svietia načerveno V opačnom prípade si pozrite informácie v časti Kontrola stavu atramentu a vykonajte príslušné opatrenia Zvýšením kvality tlače v nastaveniach ovládača tlačiarne môžete zlepšiť výsledky tlače Podrobné informácie nájdete v príručke on screen manual Rozšírená príručka Ak sú výsledky tlače rozmazané alebo nerovnomerné Krok č 1 Pozrite si časť Tlač vzorky na kontrolu dýz Pozrite si...

Страница 103: ...lavy Poznámka Operácie údržby môžete vykonávať aj z počítača Podrobné informácie nájdete v príručke on screen manual Rozšírená príručka Na začiatok strany Strana 103 z celkového počtu 948 Keď je tlač nejasná alebo sa tlačia nesprávne farby ...

Страница 104: ...azete vložený aspoň jeden hárok obyčajného papiera veľkosti A4 alebo Letter 3 Opatrne otvorte výstupný zásobník papiera a potom aj jeho vysúvaciu časť 4 Vytlačte vzorku na kontrolu dýz 1 Na obrazovke HOME vyberte položku Setup Pozrite si časť Výber ponúk na obrazovke HOME Zobrazí sa obrazovka Setup menu 2 Vyberte položku Maintenance a stlačte tlačidlo OK Zobrazí sa obrazovka Maintenance 3 Vyberte ...

Страница 105: ...brazovke s potvrdením vyberte vzorku ktorá sa približuje vytlačenej vzorke na kontrolu dýz V prípade stavu A bez chýbajúcich čiar a vodorovných bielych pruhov na vzorke 1 aj 2 1 Čistenie sa nevyžaduje Vyberte možnosť All A a stlačte tlačidlo OK 2 Prečítajte si hlásenie a stlačte tlačidlo OK Opätovne sa zobrazí obrazovka Maintenance Poznámka Stlačením tlačidla DOMOV HOME opustíte obrazovku Setup a ...

Страница 106: ...otvrdením čistenia 2 Vyberte možnosť Yes a stlačte tlačidlo OK Zariadenie začne čistiť tlačovú hlavu Pozrite si časť Čistenie tlačovej hlavy Na začiatok strany Strana 106 z celkového počtu 948 Prezeranie vzorky na kontrolu dýz ...

Страница 107: ...yberte položku Setup Pozrite si časť Výber ponúk na obrazovke HOME Zobrazí sa obrazovka Setup menu 2 Vyberte položku Maintenance a stlačte tlačidlo OK Zobrazí sa obrazovka Maintenance 3 Vyberte položku Cleaning a stlačte tlačidlo OK Zobrazí sa obrazovka s potvrdením 4 Vyberte možnosť Yes a stlačte tlačidlo OK Zariadenie začne čistiť tlačovú hlavu Kým zariadenie neskončí čistenie tlačovej hlavy nev...

Страница 108: ...Na začiatok strany Strana 108 z celkového počtu 948 Čistenie tlačovej hlavy ...

Страница 109: ...azovke HOME Zobrazí sa obrazovka Setup menu 2 Vyberte položku Maintenance a stlačte tlačidlo OK Zobrazí sa obrazovka Maintenance 3 Vyberte položku Deep cleaning a stlačte tlačidlo OK Zobrazí sa obrazovka s potvrdením 4 Vyberte možnosť Yes a stlačte tlačidlo OK Zariadenie začne hĺbkovo čistiť tlačovú hlavu Kým zariadenie neskončí hĺbkové čistenie tlačovej hlavy nevykonávajte iné činnosti Potrvá to ...

Страница 110: ...vá hlava je zrejme poškodená Obráťte sa na servisné stredisko Poznámka Stlačením tlačidla DOMOV HOME opustíte obrazovku Setup a zobrazíte obrazovku HOME Na začiatok strany Strana 110 z celkového počtu 948 Hĺbkové čistenie tlačovej hlavy ...

Страница 111: ...era veľkosti A4 alebo Letter Použite biely papier ktorý je čistý na obidvoch stranách 1 Skontrolujte či je zariadenie zapnuté 2 Skontrolujte či je v kazete vložený aspoň jeden hárok obyčajného papiera veľkosti A4 alebo Letter 3 Opatrne otvorte výstupný zásobník papiera a potom aj jeho vysúvaciu časť 4 Vytlačte hárok na zarovnanie tlačovej hlavy 1 Na obrazovke HOME vyberte položku Setup Pozrite si ...

Страница 112: ...dlo OK 5 Naskenovaním hárka na zarovnanie tlačovej hlavy upravte polohu tlačovej hlavy 1 Skontrolujte hlásenie a na ploché predlohové sklo položte hárok na zarovnanie tlačovej hlavy Hárok na zarovnanie tlačovej hlavy položte VYTLAČENOU STRANOU SMEROM NADOL a značku v jeho ľavom hornom rohu zarovnajte so značkou zarovnania 2 Opatrne zatvorte kryt dokumentov a stlačte tlačidlo OK Zariadenie začne sk...

Страница 113: ...lačovej hlavy odstráňte hárok na zarovnanie tlačovej hlavy z plochého predlohového skla Poznámka Stlačením tlačidla DOMOV HOME opustíte obrazovku Setup a zobrazíte obrazovku HOME Ak ani po nastavení polohy tlačovej hlavy podľa uvedeného postupu nie sú výsledky tlače uspokojivé nastavte jej polohu manuálne prostredníctvom počítača Podrobné informácie nájdete v príručke on screen manual Rozšírená pr...

Страница 114: ...o OK Zobrazí sa obrazovka Maintenance 3 Vyberte položku Roller cleaning a stlačte tlačidlo OK Zobrazí sa obrazovka s potvrdením 4 Vyberte možnosť Yes a stlačte tlačidlo OK 5 Vyberte zdroj papiera ktorý chcete vyčistiť Rear tray alebo Cassette a stlačte tlačidlo OK 4 Vyčistite valček podávača papiera bez papiera 1 Podľa hlásenia odstráňte papier zo zdroja papiera vybratého v bode 5 kroku č 3 2 Stla...

Страница 115: ...HOME opustíte obrazovku Setup a zobrazíte obrazovku HOME Ak sa po čistení valčeka podávača papiera problém nevyrieši obráťte sa na servisné stredisko Na začiatok strany Strana 115 z celkového počtu 948 Čistenie valčeka podávača papiera ...

Страница 116: ...o viac hárkov papiera Podľa nasledujúceho postupu vyčistite podložku v kazete Musíte si pripraviť vatový tampón 1 Vytiahnite kazetu zo zariadenia a vyberte všetok papier 2 Navlhčeným vatovým tampónom vyčistite podložku A smerom do strán Dôležité Vyčistenú podložku dosucha utrite Ak sa problém nevyriešil obráťte sa na servisné stredisko Na začiatok strany Strana 116 z celkového počtu 948 Čistenie p...

Страница 117: ... príručka Riešenie problémov Obsah Príloha Príloha Zákonné obmedzenia týkajúce sa používania výrobku a obrázkov Rady týkajúce sa používania zariadenia Na začiatok strany Strana 117 z celkového počtu 948 Príloha ...

Страница 118: ...radu Vkladové certifikáty Poštové známky znehodnotené alebo nepoužité Identifikačné symboly a insígnie Vojenské alebo povolávacie dokumenty Šeky alebo platobné príkazy vydané orgánmi štátnej správy Technické preukazy pre motorové vozidlá a vlastnícke certifikáty Cestovné šeky Stravné lístky Pasy Imigračné doklady Interné kolky znehodnotené alebo nepoužité Obligácie alebo iné krátkodobé dlžobné úpi...

Страница 119: ... pigmentový atrament PGBK Farbiaci atrament sa používa najmä na tlač fotografií obrázkov a pod a pigmentový atrament na tlač textových dokumentov Používajú sa na iné účely takže ak sa niektorý z nich minie nebude sa namiesto neho používať druhý Ak sa niektorý z nich minie musíte vymeniť kazetu s atramentom Tieto dva druhy atramentu sa používajú automaticky podľa typu papiera určeného na tlač alebo...

Страница 120: ... Media Type v ovládači tlačiarne Ak nevyberiete typ papiera nemusíte dosiahnuť uspokojivý výsledok tlače Pozrite si časť Použiteľné typy médií Existujú rôzne typy papiera papier so špeciálnou vrstvou na povrchu určený na tlač fotografií v optimálnej kvalite alebo papier vhodný na tlač dokumentov Ponuka Type na ovládacom paneli alebo ponuka Media Type v ovládači tlačiarne obsahuje odlišné predvolen...

Страница 121: ...tni bližšie k týmto spotrebičom z dôvodu rušenia žiarivkami nemusí správne fungovať Ako zabezpečiť optimálnu kvalitu tlače Kľúčom pri tlači v optimálnej kvalite je zabránenie vyschnutiu a upchatiu tlačovej hlavy Na zabezpečenie optimálnej kvality tlače vždy postupujte podľa nasledujúcich krokov Zástrčku napájacieho kábla vytiahnite podľa nasledujúceho postupu 1 Stlačením tlačidla ZAP ON na zariade...

Страница 122: ...o pot alebo potriete vytlačenú oblasť zvýrazňovačom alebo farbou v závislosti od typu papiera sa atrament môže rozmazať Farby sú nerovnomerné a výsledky tlače rozmazané Tip Podľa vytlačenej vzorky na kontrolu dýz skontrolujte či nie sú upchaté dýzy Ak sú dýzy upchaté farby môžu byť nerovnomerné alebo sa môžu rozmazať výsledky tlače V takom prípade Vytlačte vzorku na kontrolu dýz Na vytlačenej vzor...

Страница 123: ...hotoPrint EX Výber fotografie Výber papiera Tlač Vytvorenie albumu Spustenie programu Easy PhotoPrint EX Výber papiera a rozloženia Výber fotografie Úpravy Tlač Tlač kalendárov Spustenie programu Easy PhotoPrint EX Výber papiera a rozloženia Výber fotografie Úpravy Tlač Tlač nálepiek Spustenie programu Easy PhotoPrint EX Výber papiera a rozloženia Výber fotografie Úpravy Tlač Rozloženie tlače Spus...

Страница 124: ...vať uložený súbor Z ktorej strany zobrazeného obrázka začína tlač Ako možno tlačiť s rovnakými okrajmi Čo znamená označenie C1 alebo C4 Nastavenia tlače fotografií Tlač živých fotografií Redukcia šumu na fotografiách Orezanie fotografií funkcia Tlač fotografií Tlač dátumov na fotografie funkcia Tlač fotografií Tlač viacerých fotografií na jednu stranu Tlač zoznamu Tlač fotografií na doklady funkci...

Страница 125: ...d tlačou Nastavenie rozmerov papiera vlastná veľkosť Zmena kvality tlače a korekcia obrazových údajov Výber kombinácie úrovne kvality tlače a spôsobu poltónovania Tlač farebného dokumentu v monochromatickom režime Nastavenie korekcie farieb Optimálna tlač obrazových údajov fotografií Úprava farieb pomocou ovládača tlačiarne Tlač pomocou profilov ICC Úprava vyváženia farieb Úprava jasu Úprava inten...

Страница 126: ...t Tlač fotografií podľa nastavení funkcie DPOF DPOF print Tlač fotografií spolu s informáciami o ich nasnímaní Captured info print Tlač fotografií na doklady ID photo size print Vytvorenie kalendára Calendar print Používanie funkcie prezentácie Spôsob používania funkcie prezentácie Tlač dokumentov súborov PDF Tlač dokumentov súborov PDF uložených na pamäťovej karte alebo na disku USB flash Tlač fo...

Страница 127: ...Pripojenie naskenovaných údajov k e mailu pomocou ovládacieho panela zariadenia Položky nastavenia na ovládacom paneli zariadenia Príloha Rôzne nastavenia skenovania Výber odpovede na príkazy z ovládacieho panela použitím programu MP Navigator EX Skenovanie pomocou dodaného aplikačného softvéru Čo je to MP Navigator EX dodaný softvér skenera Skúsme skenovať Spustenie programu MP Navigator EX Jedno...

Страница 128: ...port Dialógové okno Nastavenie skenovania Scan Settings Fotografie alebo dokumenty Photos Documents Dialógové okno Uložiť Save Dialógové okno Uložiť ako súbor PDF Save as PDF file Dialógové okno Nastavenia súborov PDF PDF Settings Obrazovka Pamäťová karta Memory Card okno Naskenovať alebo importovať Scan Import Okno Zobraziť a použiť View Use Okno Vytvoriť alebo upraviť súbor PDF Create Edit PDF f...

Страница 129: ... programu ScanGear ovládača skenera Spustenie programu ScanGear ovládača skenera Skenovanie v základnom režime Skenovanie v rozšírenom režime Skenovanie v režime automatického skenovania Skenovanie viacerých dokumentov naraz pomocou programu ScanGear ovládača skenera Oprava obrázkov a úprava farieb pomocou programu ScanGear ovládača skenera Oprava obrázkov funkcie Neostrá maska Unsharp Mask Znížen...

Страница 130: ...entu s prispôsobením na jednu stranu 2 on 1 copy Kopírovanie štyroch strán dokumentu s prispôsobením na jednu stranu 4 on 1 copy Kopírovanie bez okrajov Borderless copy Kopírovanie hrubých originálov napríklad kníh Frame erase copy Riešenie problémov Riešenie problémov Ak sa objaví chyba Zariadenie sa nedá zapnúť Na displeji LCD sa zobrazuje chybové hlásenie Na displeji LCD nie je nič zobrazené Na...

Страница 131: ...adnom zásobníku Papier sa zasekol vo vnútri zariadenia v transportnej jednotke Pri automatickej obojstrannej tlači sa neodstránil zaseknutý papier V iných prípadoch Na obrazovke počítača sa zobrazuje hlásenie Zobrazuje sa hlásenie Error Number B200 A printer error has occurred Turn the printer off and unplug the power cord of the printer from the power supply Then contact the service center Zobraz...

Страница 132: ... počas skenovania pracovať Po aktualizácii systému Windows nefunguje skener Problémy so softvérom E mailový softvérový program ktorý chcete používať sa nezobrazuje na obrazovke výberu e mailového softvérového programu Naskenovaný obrázok sa tlačí zväčšený alebo zmenšený Naskenovaný obrázok je zväčšený alebo zmenšený na monitore počítača Naskenovaný obrázok sa nedá otvoriť Problémy s programom MP N...

Страница 133: ... tably Obsah Používanie okna Vysvetlenie Tlač tejto príručky Vyhľadávanie dokumentov pomocou kľúčových slov Zaregistrovanie dokumentov v Príručke Symboly použité v tomto dokumente Ochranné známky a licencie Na začiatok strany Strana 133 z celkového počtu 948 Ako používať túto príručku ...

Страница 134: ... časti príručky on screen manual v okne s vysvetlením na pravej strane sa zobrazia dokumenty s týmto názvom Keď kliknete na ikonu ktorá sa nachádza naľavo od ikony zobrazia sa názvy dokumentov na nižších úrovniach Poznámka Kliknutím na tlačidlo zatvoríte alebo zobrazíte tablu s obsahom Na začiatok strany Strana 134 z celkového počtu 948 Používanie tably Obsah ...

Страница 135: ...a príslušný dokument 2 Kurzor sa presunie na začiatok tohto dokumentu Okno používané pri vysvetľovaní ovládania Táto príručka on screen manual opisuje okno ktoré sa zobrazuje pri používaní operačného systému Windows 7 Home Premium v ďalšom texte označovaného ako systém Windows 7 Na začiatok strany Strana 135 z celkového počtu 948 Používanie okna Vysvetlenie ...

Страница 136: ...na tlačidlo a následným kliknutím na položku Nastavenia možností Option Settings zobrazte dialógové okno Nastavenia možností Option Settings Potom môžete nastaviť operáciu tlače Vytlačiť názov dokumentu a číslo strany Print document title and page number Ak je začiarknuté toto políčko v hlavičke vo vrchnej časti dokumentu sa vytlačia názov príručky a číslo strany Vytlačiť farbu pozadia a obrázky P...

Страница 137: ...yberte tlačiareň ktorú chcete použiť a podľa potreby zadajte jednoduché nastavenia tlače 3 Kliknite na položku Spustiť tlač Start Printing Zobrazí sa hlásenie potvrdzujúce počet strán určených na tlač 4 Spustite tlač Potvrďte počet strán ktoré chcete vytlačiť a potom kliknite na voľbu Áno Yes Vytlačia sa aktuálne zobrazené dokumenty Tlač vybratých dokumentov Môžete vybrať a vytlačiť požadované dok...

Страница 138: ...na tlač Documents to Be Printed 2 Vyberte dokumenty ktoré chcete vytlačiť V zozname Dokumenty na tlač Documents to Be Printed začiarknite políčka vedľa názvov dokumentov ktoré chcete vytlačiť Poznámka Ak chcete začiarknuť všetky políčka vedľa názvov dokumentov kliknite na možnosť Vybrať všetky Select All Ak chcete zrušiť začiarknutie všetkých políčok vedľa názvov dokumentov kliknite na možnosť Vym...

Страница 139: ...strany Page Setup vyberte tlačiareň ktorú chcete použiť a podľa potreby zadajte jednoduché nastavenia tlače 3 Kliknite na položku Spustiť tlač Start Printing Zobrazí sa hlásenie potvrdzujúce počet strán určených na tlač 4 Spustite tlač Potvrďte počet strán ktoré chcete vytlačiť a potom kliknite na voľbu Áno Yes Vytlačia sa všetky dokumenty Dôležité Na vytlačenie všetkých dokumentov budete potrebov...

Страница 140: ... slov oddeľte ich medzerou Poznámka Môžete zadať najviac 10 kľúčových slov alebo 255 znakov určených na vyhľadanie Nerozlišujú sa veľké a malé písmená Program dokáže vyhľadávať aj kľúčové slová ktoré obsahujú medzery Ak chcete pohodlne a rýchlo vyhľadávať dokumenty ktoré si chcete prečítať zadávajte kľúčové slová podľa nasledujúcich pokynov Ak sa chcete dozvedieť ako pracuje funkcia ktorú používat...

Страница 141: ...slovom Documents Containing Any Keyword Dokumenty ktoré obsahujú aspoň jedno zo zadaných kľúčových slov 4 Zobrazte dokument ktorý si chcete prečítať V zozname výsledkov vyhľadávania dvakrát kliknite na názov dokumentu ktorý si chcete prečítať alebo ho vyberte a stlačte kláves Enter Keď sa zobrazia dokumenty zodpovedajúce tomuto názvu nájdené kľúčové slová v týchto dokumentoch sa zvýraznia Poznámka...

Страница 142: ...známka Dokumenty môžete do Príručky pridať aj nasledujúcimi spôsobmi Ak dokument pridáte do Príručky na table s obsahom sa na ikone dokumentu zobrazí značka V zozname Naposledy zobrazené dokumenty Recently Displayed Documents dvakrát kliknite na názov dokumentu ktorý chcete pridať do Príručky alebo vyberte požadovaný dokument a stlačte kláves Enter čím ho zobrazíte Potom kliknite na tlačidlo Prida...

Страница 143: ...e a stlačíte kláves Enter daný dokument sa zobrazí v okne s vysvetlením Poznámka Ak chcete dokument odstrániť zo zoznamu Zoznam Príručky List of My Manual vyberte jeho názov v zozname a kliknite na tlačidlo Vymazať Delete alebo stlačte kláves Delete Na začiatok strany Strana 143 z celkového počtu 948 Zaregistrovanie dokumentov v Príručke ...

Страница 144: ...držiavať kvôli bezpečnej prevádzke Upozornenie Nedodržanie týchto pokynov môže spôsobiť poranenie alebo materiálne škody spôsobené nesprávnou prevádzkou zariadenia Tieto pokyny musíte dodržiavať kvôli bezpečnej prevádzke Dôležité Pokyny obsahujúce dôležité informácie Tieto informácie si určite prečítajte Poznámka Pokyny obsahujú poznámky k obsluhe a dodatočné vysvetlenia Na začiatok strany Strana ...

Страница 145: ...ných krajinách Bonjour je ochranná známka spoločnosti Apple Inc registrovaná v USA a iných krajinách Adobe Adobe Photoshop Adobe RGB a Adobe RGB 1998 sú registrované ochranné známky alebo ochranné známky spoločnosti Adobe Systems Incorporated v USA alebo iných krajinách Bluetooth je ochranná známka spoločnosti Bluetooth SIG Inc U S A na ktorú má spoločnosť Canon Inc licenciu Poznámka Oficiálny náz...

Страница 146: ...Rozšírená príručka Tlač z počítača Tlač z počítača Tlač pomocou dodaného aplikačného softvéru Tlač pomocou iného aplikačného softvéru Na začiatok strany Strana 146 z celkového počtu 948 Tlač z počítača ...

Страница 147: ...ografií Vytvorenie albumu Tlač kalendárov Tlač nálepiek Rozloženie tlače Tlač prémiového obsahu Oprava a zlepšenie fotografií Vytváranie fotografií z videí Preberanie fotografií z lokalít na ich zdieľanie Otázky a odpovede Nastavenia tlače fotografií Ďalšie nastavenia Na začiatok strany Strana 147 z celkového počtu 948 Tlač pomocou dodaného aplikačného softvéru ...

Страница 148: ... has Easy LayoutPrint installed Easy LayoutPrint will be replaced by Easy PhotoPrint EX Note See Help of Easy PhotoPrint EX for descriptions of Easy PhotoPrint EX screens Click Help in a screen or dialog box or select Easy PhotoPrint EX Help from the Help menu Help appears About Exif Print Easy PhotoPrint EX supports Exif Print Exif Print is a standard for enhancing the communication between digit...

Страница 149: ... EX is started by selecting a function from Solution Menu EX Menu does not appear in the step button area on the left side of the screen PREMIUM Contents Print is not displayed in Menu of Easy PhotoPrint EX To print premium content start Easy PhotoPrint EX from Solution Menu EX Keep these points in mind when using PREMIUM Contents Print To print with Easy PhotoPrint EX you need to download and ins...

Страница 150: ...Photo Professional will be displayed File Formats Extensions Supported by Easy PhotoPrint EX Easy PhotoPrint EX Photo Print file el6 Easy PhotoPrint EX Album file el1 Easy PhotoPrint EX Stickers file el2 Easy PhotoPrint EX Calendar file el4 Easy PhotoPrint EX Layout file el5 Easy PhotoPrint EX PREMIUM Contents file el7 Page top Strana 150 z celkového počtu 948 What Is Easy PhotoPrint EX ...

Страница 151: ...ps 1 Starting Easy PhotoPrint EX 2 Selecting a Photo 3 Selecting the Paper 4 Printing Try This Correcting and Enhancing Photos Creating Still Images from Videos Downloading Images from Photo Sharing Sites Printing Vivid Photos Reducing Photo Noise Cropping Photos Photo Print Printing Dates on Photos Photo Print Printing Multiple Photos on One Page Printing an Index Printing ID Photos ID Photo Prin...

Страница 152: ...How Can I Move or Copy the Saved File Which Side of the Displayed Image Does the Printing Start from How Do I Print with Even Margins Page top Strana 152 z celkového počtu 948 Printing Photos ...

Страница 153: ...e Printing Photos Starting Easy PhotoPrint EX A011 Starting Easy PhotoPrint EX 1 From the Start menu select All Programs Canon Utilities Easy PhotoPrint EX Easy PhotoPrint EX Easy PhotoPrint EX starts and Menu appears Page top Strana 153 z celkového počtu 948 Starting Easy PhotoPrint EX ...

Страница 154: ... not be affected 2 Select the folder that contains the image you want to print from the folder tree area The images in the folder will be displayed as thumbnails miniatures Important If Easy PhotoPrint EX is started from another application MP Navigator EX ZoomBrowser EX or Digital Photo Professional the folder tree area will not be displayed The images selected in the application will be displaye...

Страница 155: ...mported Images To print two or more copies of an image click Up arrow until the number of copies you want is reached To reduce the number of copies shown in the box click Down arrow You can change the order of photos using the list located at the top right corner of the screen You can select the printing order from Sort by Date and Sort by Name Note You can correct or enhance the selected image be...

Страница 156: ...paper to be used Printer Paper Source Paper Size Media Type Note The paper sizes and media types may vary depending on the printer See Help for details The paper sources may vary depending on the printer and the media type Note You can print photos with more vivid colors or you can reduce the photo noise Printing Vivid Photos Reducing Photo Noise See Help for details on the Select Paper screen Pag...

Страница 157: ...eviewed and print results will not be affected 2 Select a layout you want to use Click a borderless layout to print borderless photos Note The layouts that can be selected may vary depending on the printer paper size and media type 3 Click Print Important The photo print settings will be discarded if you exit Easy PhotoPrint EX without saving the settings It is recommended that you save the printe...

Страница 158: ...ce the selected image before printing Correcting and Enhancing Photos You can specify advanced Photo Print settings number of copies print quality etc in the Preferences dialog box To display the Preferences dialog box click Settings or select Preferences from the File menu See Help for details on the Layout Print screen Page top Strana 158 z celkového počtu 948 Printing ...

Страница 159: ...ecting a Photo 4 Editing 5 Printing Try This Correcting and Enhancing Photos Creating Still Images from Videos Downloading Images from Photo Sharing Sites Changing Layout Changing Background Adding Photos Swapping Positions of Photos Replacing Photos Changing Position Angle and Size of Photos Cropping Photos Framing Photos Printing Dates on Photos Attaching Comments to Photos Adding Text to Photos...

Страница 160: ...Questions and Answers How Can I Move or Copy the Saved File What Is C1 or C4 Page top Strana 160 z celkového počtu 948 Creating an Album ...

Страница 161: ... Creating an Album Starting Easy PhotoPrint EX A021 Starting Easy PhotoPrint EX 1 From the Start menu select All Programs Canon Utilities Easy PhotoPrint EX Easy PhotoPrint EX Easy PhotoPrint EX starts and Menu appears Page top Strana 161 z celkového počtu 948 Starting Easy PhotoPrint EX ...

Страница 162: ...ons dialog box select Front or Front Back for Cover and click Options Select the Double page album checkbox to enable the spread page layout consisting of two page master In a double page album you can arrange an image across the left and right pages You can customize the page numbers position font size etc in the Page Number Settings dialog box To display the Page Number Settings dialog box selec...

Страница 163: ... inside pages or back cover You can customize the date position size color etc in the Date Settings dialog box To display the Date Settings dialog box select the Print date checkbox in the Change Layout dialog box and click Date Settings 5 If you want to change the background click Background The Change Background dialog box appears In the Change Background dialog box you can paint the background ...

Страница 164: ... EX or ZoomBrowser EX the folder tree area will not be displayed The images selected in the application will be displayed as thumbnails Note You can also use still images captured from videos Creating Still Images from Videos You can also use images downloaded from photo sharing sites on the Internet Downloading Images from Photo Sharing Sites 3 Select the image s you want to print and click one o...

Страница 165: ...e in the selected image area select the image you want to delete and click Delete Imported Image To delete all images from the selected image area click Delete All Imported Images Note You can correct or enhance the selected image before printing Correcting and Enhancing Photos See Help for details on the Select Images screen Page top Strana 165 z celkového počtu 948 Selecting a Photo ...

Страница 166: ...nging Position Angle and Size of Photos Cropping Photos Framing Photos Printing Dates on Photos Attaching Comments to Photos Adding Text to Photos Important The edit information will be discarded if you exit Easy PhotoPrint EX without saving the edited album It is recommended that you save the item if you want to edit it again The page numbers on the front and back covers of the album are displaye...

Страница 167: ...pears only when the Leave the inside of front cover blank Leave the inside of back cover blank checkbox is selected in the Cover Options dialog box Saving Note See Help for details on the Edit screen Page top Strana 167 z celkového počtu 948 Editing ...

Страница 168: ...Duplex Printing checkbox after selecting a printer that supports automatic duplex printing and media type that supports duplex printing Select this checkbox to print on both sides of the paper automatically The paper sources may vary depending on the printer and the media type You can set a custom print quality level in the Print Quality Settings dialog box To display the Print Quality Settings di...

Страница 169: ...3 Click Print Note See Help for details on the Print Settings screen Page top Strana 169 z celkového počtu 948 Printing ...

Страница 170: ...out 3 Selecting a Photo 4 Editing 5 Printing Try This Correcting and Enhancing Photos Creating Still Images from Videos Downloading Images from Photo Sharing Sites Changing Layout Changing Background Adding Photos Swapping Positions of Photos Replacing Photos Changing Position Angle and Size of Photos Cropping Photos Framing Photos Printing Dates on Photos Adding Text to Photos Setting Calendar Di...

Страница 171: ...Opening Saved Files Questions and Answers How Can I Move or Copy the Saved File Page top Strana 171 z celkového počtu 948 Printing Calendars ...

Страница 172: ...Printing Calendars Starting Easy PhotoPrint EX A041 Starting Easy PhotoPrint EX 1 From the Start menu select All Programs Canon Utilities Easy PhotoPrint EX Easy PhotoPrint EX Easy PhotoPrint EX starts and Menu appears Page top Strana 172 z celkového počtu 948 Starting Easy PhotoPrint EX ...

Страница 173: ...t can be selected You can add holidays to your calendar Setting Holidays 3 Select a layout for Design If necessary make advanced settings on the calendar and set the background Note You can customize the calendar display font colors of the dates and days of the week position and size of the calendar etc Setting Calendar Display You can paint the background in a single color or paste an image file ...

Страница 174: ...Note See Help for details on the Page Setup screen Page top Strana 174 z celkového počtu 948 Selecting the Paper and Layout ...

Страница 175: ...l Images from Videos You can also use images downloaded from photo sharing sites on the Internet Downloading Images from Photo Sharing Sites 3 Select the image s you want to print and click Import to Inside Pages The selected image s is are displayed in the selected image area You can also select the image s you want to print by dragging it them into the selected image area Note To delete an image...

Страница 176: ...e You can correct or enhance the selected image before printing Correcting and Enhancing Photos See Help for details on the Select Images screen Page top Strana 176 z celkového počtu 948 Selecting a Photo ...

Страница 177: ... Swapping Positions of Photos Replacing Photos Changing Position Angle and Size of Photos Cropping Photos Framing Photos Printing Dates on Photos Adding Text to Photos Setting Calendar Display Setting Holidays Important The edit information will be discarded if you exit Easy PhotoPrint EX without saving the edited calendar It is recommended that you save the item if you want to edit it again Savin...

Страница 178: ...See Help for details on the Edit screen Page top Strana 178 z celkového počtu 948 Editing ...

Страница 179: ...es of the paper Automatic appears if you select the Duplex Printing checkbox after selecting a printer that supports automatic duplex printing and media type that supports duplex printing Select this checkbox to print on both sides of the paper automatically The paper sources may vary depending on the printer and the media type You can set a custom print quality level in the Print Quality Settings...

Страница 180: ...3 Click Print Note See Help for details on the Print Settings screen Page top Strana 180 z celkového počtu 948 Printing ...

Страница 181: ...3 Selecting a Photo 4 Editing 5 Printing Try This Correcting and Enhancing Photos Creating Still Images from Videos Downloading Images from Photo Sharing Sites Adding Photos Swapping Positions of Photos Replacing Photos Changing Position Angle and Size of Photos Cropping Photos Printing Dates on Photos Adding Text to Photos Saving Opening Saved Files Questions and Answers How Can I Move or Copy th...

Страница 182: ...Page top Strana 182 z celkového počtu 948 Printing Stickers ...

Страница 183: ... Printing Stickers Starting Easy PhotoPrint EX A051 Starting Easy PhotoPrint EX 1 From the Start menu select All Programs Canon Utilities Easy PhotoPrint EX Easy PhotoPrint EX Easy PhotoPrint EX starts and Menu appears Page top Strana 183 z celkového počtu 948 Starting Easy PhotoPrint EX ...

Страница 184: ...Print date Use the same image in all frames Note Paper sizes other than Photo Stickers cannot be selected You can customize the date position size color etc in the Date Settings dialog box To display the Date Settings dialog box select the Print date checkbox and click Date Settings Select the Use the same image in all frames checkbox to use the same image in all the frames on the page Note See He...

Страница 185: ... Images from Videos You can also use images downloaded from photo sharing sites on the Internet Downloading Images from Photo Sharing Sites 3 Select the image s you want to print and click Import to Inside Pages The selected image s is are displayed in the selected image area You can also select the image s you want to print by dragging it them into the selected image area Note To delete an image ...

Страница 186: ...e You can correct or enhance the selected image before printing Correcting and Enhancing Photos See Help for details on the Select Images screen Page top Strana 186 z celkového počtu 948 Selecting a Photo ...

Страница 187: ...tions of Photos Replacing Photos Changing Position Angle and Size of Photos Cropping Photos Printing Dates on Photos Adding Text to Photos Important The edit information will be discarded if you exit Easy PhotoPrint EX without saving the edited stickers It is recommended that you save the item if you want to edit it again Saving Note See Help for details on the Edit screen Page top Strana 187 z ce...

Страница 188: ... may vary depending on the printer and the media type You can set a custom print quality level in the Print Quality Settings dialog box To display the Print Quality Settings dialog box select Custom for Print Quality and click Quality Settings You can adjust the printing position in the Adjust Print Position dialog box To display the Adjust Print Position dialog box click Print Position You can sp...

Страница 189: ...See Help for details on the Print Settings screen Page top Strana 189 z celkového počtu 948 Printing ...

Страница 190: ... Paper and Layout 3 Selecting a Photo 4 Editing 5 Printing Try This Correcting and Enhancing Photos Creating Still Images from Videos Downloading Images from Photo Sharing Sites Changing Layout Adding Photos Swapping Positions of Photos Replacing Photos Changing Position Angle and Size of Photos Cropping Photos Printing Dates on Photos Adding Text to Photos Saving Opening Saved Files Questions and...

Страница 191: ...How Can I Move or Copy the Saved File Page top Strana 191 z celkového počtu 948 Printing Layout ...

Страница 192: ...e Printing Layout Starting Easy PhotoPrint EX A151 Starting Easy PhotoPrint EX 1 From the Start menu select All Programs Canon Utilities Easy PhotoPrint EX Easy PhotoPrint EX Easy PhotoPrint EX starts and Menu appears Page top Strana 192 z celkového počtu 948 Starting Easy PhotoPrint EX ...

Страница 193: ...ings section Paper Size Orientation Print date Note See Help on the paper size that can be selected You can customize the date position size color etc in the Date Settings dialog box To display the Date Settings dialog box select the Print date checkbox and click Date Settings 3 Select a layout from Layouts Note The layouts may vary depending on the Orientation Note See Help for details on the Pag...

Страница 194: ...Page top Strana 194 z celkového počtu 948 Selecting the Paper and Layout ...

Страница 195: ...Images from Videos You can also use images downloaded from photo sharing sites on the Internet Downloading Images from Photo Sharing Sites 3 Select the image s you want to print and click Import to Inside Pages The selected image s is are displayed in the selected image area You can also select the image s you want to print by dragging it them into the selected image area Note To delete an image i...

Страница 196: ...e You can correct or enhance the selected image before printing Correcting and Enhancing Photos See Help for details on the Select Images screen Page top Strana 196 z celkového počtu 948 Selecting a Photo ...

Страница 197: ...apping Positions of Photos Replacing Photos Changing Position Angle and Size of Photos Cropping Photos Printing Dates on Photos Adding Text to Photos Important The edit information will be discarded if you exit Easy PhotoPrint EX without saving the edited layout It is recommended that you save the item if you want to edit it again Saving Note See Help for details on the Edit screen Strana 197 z ce...

Страница 198: ...Page top Strana 198 z celkového počtu 948 Editing ...

Страница 199: ...f you select the Duplex Printing checkbox after selecting a printer that supports automatic duplex printing and media type that supports duplex printing Select this checkbox to print on both sides of the paper automatically The paper sources may vary depending on the printer and the media type You can set a custom print quality level in the Print Quality Settings dialog box To display the Print Qu...

Страница 200: ...3 Click Print Note See Help for details on the Print Settings screen Page top Strana 200 z celkového počtu 948 Printing ...

Страница 201: ...ontent See Downloading Premium Content for details on how to download content You may only use the content downloaded or printed for personal purposes You may not use the content for commercial purposes Steps 1 Starting Easy PhotoPrint EX 2 Selecting the Paper and Layout 3 Selecting a Photo 4 Editing 5 Printing Try This Correcting and Enhancing Photos Creating Still Images from Videos Downloading ...

Страница 202: ...Saving Opening Saved Files Questions and Answers How Can I Move or Copy the Saved File Page top Strana 202 z celkového počtu 948 Printing Premium Content ...

Страница 203: ...Easy PhotoPrint EX 1 From the Start menu select All Programs Canon Utilities Solution Menu EX then click Solution Menu EX Solution Menu EX starts 2 Select Photo Print then click the PREMIUM Contents Print icon Easy PhotoPrint EX starts and the Page Setup screen of PREMIUM Contents Print appears Strana 203 z celkového počtu 948 Starting Easy PhotoPrint EX ...

Страница 204: ...PREMIUM Contents Print is not displayed in Menu of Easy PhotoPrint EX To print premium content start Easy PhotoPrint EX from Solution Menu EX following the steps above Keep these points in mind when using PREMIUM Contents Print To print with Easy PhotoPrint EX you need to download and install the exclusive content See Downloading Premium Content for details on how to download content Page top Stra...

Страница 205: ... menu to check the allowed number of print copies usage period supported paper sizes etc of the selected layout When Calendars is Selected for Contents Type 2 Set the following items in the Design Settings section Design Orientation 3 Select a layout from Layouts Important The layout does not appear if the allowed number of print copies was exceeded or the usage period has elapsed Note The layouts...

Страница 206: ...f the days of the week in the Calendar Settings dialog box To display the Calendar Settings dialog box click Advanced Note See Help for details on the Page Setup screen Page top Strana 206 z celkového počtu 948 Selecting the Paper and Layout ...

Страница 207: ...ges or Local Images for View Note View does not appear depending on the selected content 3 Select the folder that contains the image you want to print from the folder tree area The images in the folder will be displayed as thumbnails miniatures Note The folder tree area is displayed only when Local Images are available You can also use still images captured from videos depending on the selected co...

Страница 208: ...e To delete an image in the selected image area select the image you want to delete and click Delete Imported Image To delete all images from the selected image area click Delete All Imported Images Note You can correct or enhance the selected image before printing depending on the selected content Correcting and Enhancing Photos See Help for details on the Select Images screen Page top Strana 208...

Страница 209: ...ting 1 Click Edit The Edit screen appears Note In the actual screen the content you are creating is displayed instead of the gray areas shown above 2 Edit the content if necessary Note Available editing functions vary depending on the selected content Adding Photos Swapping Positions of Photos Replacing Photos Changing Position Angle and Size of Photos Cropping Photos Adding Text to Photos Importa...

Страница 210: ...ded if you exit Easy PhotoPrint EX without saving the edited item It is recommended that you save the item if you want to edit it again Saving Note See Help for details on the Edit screen Page top Strana 210 z celkového počtu 948 Editing ...

Страница 211: ...es displayed may vary depending on the selected content printer and paper size The paper sources may vary depending on the printer and the media type You can set a custom print quality level in the Print Quality Settings dialog box To display the Print Quality Settings dialog box select Custom for Print Quality and click Quality Settings Select the Borderless Printing checkbox to print each page o...

Страница 212: ...3 Click Print Note See Help for details on the Print Settings screen Page top Strana 212 z celkového počtu 948 Printing ...

Страница 213: ... Fix This function will automatically analyze the captured scene and apply suitable corrections Using the Auto Photo Fix Function Red Eye Correction Function You can correct red eyes caused by a camera flash Using the Red Eye Correction Function Face Brightener Function You can brighten dark faces caused by bright background Using the Face Brightener Function Face Sharpener Function You can sharpe...

Страница 214: ...You can also blur the outline of the subjects or remove the base color Adjusting Images Page top Strana 214 z celkového počtu 948 Correcting and Enhancing Photos ...

Страница 215: ...or select Preferences from the File menu Once image is corrected with Auto Photo Fix and saved it cannot be corrected again with Auto Photo Fix Also Auto Photo Fix may not be available for images edited using an application digital camera etc manufactured by other companies 1 Select photos in the Select Images screen then click Correct Enhance Images The Correct Enhance Images window appears Note ...

Страница 216: ...es at once select the Apply to all images checkbox Select the Prioritize Exif Info checkbox to apply corrections primarily based on the settings made at the time of shooting Deselect this checkbox to apply corrections based on the image analysis results It is recommended that you normally select this setting 5 Click Save Selected Image or Save All Corrected Images You can save corrected images as ...

Страница 217: ...x and select the Enable Red Eye Correction checkbox 1 Select photos in the Select Images screen then click Correct Enhance Images The Correct Enhance Images window appears Note You can also display the Correct Enhance Images window by clicking Correct Enhance Images in the Layout Print or Edit screen In that case only the image displayed in Preview can be corrected enhanced See Correct Enhance Ima...

Страница 218: ...the result Click Reset Selected Image to undo the correction operation If you want to apply the correction to all the selected images at once select the Apply to all images checkbox Manual Correction 3 Click Manual then click Correct Enhance 4 Click Red Eye Correction Note Effect levels can be changed using the slider below Red Eye Correction Move the cursor over the image The shape of the cursor ...

Страница 219: ...ection operation 6 Click Save Selected Image or Save All Corrected Images You can save corrected images as new files Note To save only the image you like click Save Selected Image To save all images click Save All Corrected Images Only JPEG Exif data format is available for corrected images 7 Click Exit Important The corrections will be lost if you exit before saving corrected images Page top Stra...

Страница 220: ...1 Select photos in the Select Images screen then click Correct Enhance Images The Correct Enhance Images window appears Note You can also display the Correct Enhance Images window by clicking Correct Enhance Images in the Layout Print or Edit screen In that case only the image displayed in Preview can be corrected enhanced See Correct Enhance Images Window for details on the Correct Enhance Images...

Страница 221: ...k appears on the upper left of the image Note You can also drag to rotate the selected area Click Compare to display the images before and after the correction side by side so that you can compare and check the result Click Undo to undo the preceding correction operation 6 Click Save Selected Image or Save All Corrected Images You can save corrected images as new files Note To save only the image ...

Страница 222: ...Important The corrections will be lost if you exit before saving corrected images Page top Strana 222 z celkového počtu 948 Using the Face Brightener Function ...

Страница 223: ...w appears Note You can also display the Correct Enhance Images window by clicking Correct Enhance Images in the Layout Print or Edit screen In that case only the image displayed in Preview can be corrected enhanced See Correct Enhance Images Window for details on the Correct Enhance Images window 2 Select the image you want to correct from the thumbnail list in the Correct Enhance Images window Th...

Страница 224: ...set Selected Image to undo the correction operation If you want to apply the correction to all the selected images at once select the Apply to all images checkbox Manual Correction 3 Click Manual then click Correct Enhance 4 Click Face Sharpener Note Effect levels can be changed using the slider below Face Sharpener Move the cursor over the image The shape of the cursor changes to Cross 5 Drag to ...

Страница 225: ... result Click Undo to undo the preceding correction operation 6 Click Save Selected Image or Save All Corrected Images You can save corrected images as new files Note To save only the image you like click Save Selected Image To save all images click Save All Corrected Images Only JPEG Exif data format is available for corrected images 7 Click Exit Important The corrections will be lost if you exit...

Страница 226: ...hance Images window appears Note You can also display the Correct Enhance Images window by clicking Correct Enhance Images in the Layout Print or Edit screen In that case only the image displayed in Preview can be corrected enhanced See Correct Enhance Images Window for details on the Correct Enhance Images window 2 Select the image you want to enhance from the thumbnail list in the Correct Enhanc...

Страница 227: ...t Selected Image to undo the enhancement operation If you want to apply the enhancement to all the selected images at once select the Apply to all images checkbox Manual Enhancement 3 Click Manual then click Correct Enhance 4 Click Digital Face Smoothing Note Effect levels can be changed using the slider below Digital Face Smoothing Move the cursor over the image The shape of the cursor changes to...

Страница 228: ...sult Click Undo to undo the preceding enhancement operation 6 Click Save Selected Image or Save All Corrected Images You can save enhanced images as new files Note To save only the image you like click Save Selected Image To save all images click Save All Corrected Images Only JPEG Exif data format is available for enhanced images 7 Click Exit Important The enhancements will be lost if you exit be...

Страница 229: ...ges window by clicking Correct Enhance Images in the Layout Print or Edit screen In that case only the image displayed in Preview can be corrected enhanced See Correct Enhance Images Window for details on the Correct Enhance Images window 2 Select the image you want to enhance from the thumbnail list in the Correct Enhance Images window The image appears in Preview Note If only one image is select...

Страница 230: ...ent side by side so that you can compare and check the result Click Undo to undo the preceding enhancement operation 6 Click Save Selected Image or Save All Corrected Images You can save enhanced images as new files Note To save only the image you like click Save Selected Image To save all images click Save All Corrected Images Only JPEG Exif data format is available for enhanced images 7 Click Ex...

Страница 231: ...ng Correct Enhance Images in the Layout Print or Edit screen In that case only the image displayed in Preview can be adjusted See Correct Enhance Images Window for details on the Correct Enhance Images window 2 Select the image you want to adjust from the thumbnail list in the Correct Enhance Images window The image appears in Preview Note If only one image is selected the thumbnail list does not ...

Страница 232: ...ct Enhance Images window for details Click Defaults to reset all adjustments 5 Click Save Selected Image or Save All Corrected Images You can save adjusted images as new files Note To save only the image you like click Save Selected Image To save all images click Save All Corrected Images Only JPEG Exif data format is available for adjusted images 6 Click Exit Important The adjustments will be los...

Страница 233: ...nce Images window click Correct Enhance Images in the Select Images or Edit screen or in the Layout Print screen of Photo Print 1 Task Area 2 Toolbar 1 Task Area Available tasks and settings may vary between the Auto and Manual tabs Click the Auto or Manual tab to display the corresponding tab Auto Tab Use the functions in the Auto tab to apply corrections and enhancements to the entire image Stra...

Страница 234: ...ote Exif is a standard format for embedding various shooting data in digital camera images JPEG For Photo Print you can apply suitable corrections based on Exif information automatically by selecting Enable Auto Photo Fix in Color correction for printing on the Advanced tab of the Preferences dialog box and selecting the Prioritize Exif Info checkbox Red Eye Correction Corrects red eyes Note For P...

Страница 235: ... sharpen the entire image Use Correct Enhance to correct enhance specific areas Adjust Brightness Adjusts the overall image brightness Move the slider to the left to darken and right to brighten the image Contrast Adjusts the contrast of the image Adjust the contrast when the image is flat due to lack of contrast Move the slider to the left to decrease and right to increase the contrast of the ima...

Страница 236: ...ghlight and Shadow Move the Highlight slider to the left to brighten the image Move the Midtone slider to the left to brighten and right to darken the image Move the Shadow slider to the right to darken the image Color Balance Adjust the vividness and color tone of the image Move the Color Balance slider to the left or right to emphasize the corresponding color Note These are complementary color p...

Страница 237: ...der Note For Photo Print red eyes are automatically corrected when printing by selecting Enable Auto Photo Fix in Color correction for printing on the Advanced tab of the Preferences dialog box and selecting the Enable Red Eye Correction checkbox To correct manually deselect the checkbox Face Brightener Corrects the entire image to brighten the facial area in and around the selected area You can a...

Страница 238: ...displayed in the thumbnail list Exit Click to close the Correct Enhance Images window 2 Toolbar Toolbar Zoom In Zoom Out Displays the enlarged or reduced preview of the image Full Screen Displays the entire image in Preview Compare Displays the Compare Images window You can compare the images before and after the correction enhancement adjustment side by side The image before the correction enhanc...

Страница 239: ... utility such a change is not reflected in still images captured from the video Therefore color tones may differ between videos and captured still images 1 In the Select Images screen click Capture frames from video The Video Frame Capture window and Select Video dialog box appear Note You can also display the Video Frame Capture window by clicking Capture frames from video in the Add Image dialog...

Страница 240: ...ay the frame you want to capture and click Capture The captured still image is displayed in the Captured frame s area Important You can capture up to 150 frames from one video 5 Select the image s you want to save and click Save When the Save dialog box appears specify the save location and file name then click Save Note Only JPEG Exif data format is available for saving created still images 6 Cli...

Страница 241: ... Movie Print window is displayed via Solution Menu EX you can print the captured still images To print specify the printer and media in the Print area then click Print When you print from the Movie Print window images are automatically cropped Therefore images will be printed with the left and right sides cut off If you want to adjust the cropping area before printing save the captured still image...

Страница 242: ...hic driver video card or its utility such a change is not reflected in still images captured from the video Therefore color tones may differ between videos and captured still images To display the Video Frame Capture window click Capture frames from video in the Select Images screen or Add Image dialog box To display the Add Image dialog box select the page you want to add images to in the Edit sc...

Страница 243: ...g the still images selected in the Captured frame s area Auto Frame Capture Settings Area You can capture multiple still images according to the settings Note Use Down arrow Up arrow to show hide the Auto Frame Capture Settings area Start time End time Displays the start end time of the time range from which to capture still images Total captures Displays the number of still images to be captured ...

Страница 244: ...back Mute Clear mute Switches audio OFF ON Playback Slider Displays the video playback progress Current playback time is displayed to the left of the slider Set start time Set end time Set the start end time of the time range from which to capture still images automatically Note These buttons are displayed only when the Auto Frame Capture Settings area is displayed Time Range Slider Displays the t...

Страница 245: ...ons Select this checkbox to reduce the jaggies roughness in images Apply to all frames Select this checkbox to correct all the images displayed in the thumbnail list OK Applies Noise Reduction to the selected images or all images Noise will be reduced to make the images more vivid Note Correction may take time depending on your environment When the Enhance resolutions checkbox is selected Noise Re...

Страница 246: ...r the correction side by side The image before the correction is displayed on the left and the image after the correction is displayed on the right of the window Sort by Time Displays the captured still images in the order of the time code Note See Creating Still Images from Videos for details on how to create still images from videos Page top Strana 246 z celkového počtu 948 Video Frame Capture M...

Страница 247: ... of people may infringe on portrait rights You may be required permission of way to use the work from copyright holder when using the work of others except for personal use use within the home or other use within the limited scope as defined by the copyright Please check the details carefully of the web page of work in the photo sharing site Please also check terms of service in the photo sharing ...

Страница 248: ...small depending on the language of the search text In that case entering English search text may increase search results 5 Select the image s you want to download The selected image s is are displayed in the Selections area Note You can select up to 300 images Click Cancel all image selections to cancel all image selections in the Selections area Click Cancel image selection to cancel the selectio...

Страница 249: ...ed by Flickr To display the Import Photos from Photo Sharing Sites window click Import photos from photo sharing sites in the Select Images screen or Add Image dialog box To display the Add Image dialog box select the page you want to add images to in the Edit screen then click Add Image 1 Settings and Operation Buttons Area 2 Toolbar 3 Thumbnail Window 4 Selections Area 1 Settings and Operation B...

Страница 250: ... You must show the title and licensor of the original work along with your creation You may not use the work for commercial purposes You may not modify the work Attribution Non Commercial Share Alike CC license You must show the title and licensor of the original work along with your creation You may not use the work for commercial purposes Even if your creation is built upon the work of others yo...

Страница 251: ...e Thumbnail window Important Some images such as images in formats other than JPEG do not appear Save Selected Image Saves the image selected in the Selections area Save Selected Images Saves all the images displayed in the Selections area Exit Click to close the Import Photos from Photo Sharing Sites window 2 Toolbar Select all images Selects all the images in the page displayed in the Thumbnail ...

Страница 252: ...ight click a thumbnail and select Open web page of work from the displayed menu to start a browser and display the page of a photo sharing site on which the image is posted 4 Selections Area Thumbnails of the images selected in the Thumbnail window are displayed along with the number of images number of selected images number of search results Cancel all image selections Cancels all image selectio...

Страница 253: ...ion Software Questions and Answers A200 Questions and Answers How Can I Move or Copy the Saved File Which Side of the Displayed Image Does the Printing Start from How Do I Print with Even Margins What Is C1 or C4 Page top Strana 253 z celkového počtu 948 Questions and Answers ...

Страница 254: ... el1 Data is automatically created in the same folder that contains the MyAlbum el1 file If you want to move or copy the MyAlbum el1 file to another folder move or copy the MyAlbum el1 Data folder as well The MyAlbum el1 Data folder contains the photos used in the album Note The icons may vary depending on the items Important Do not change the Data folder name otherwise you will not be able to dis...

Страница 255: ...e Displayed Image Does the Printing Start from As shown below printing starts from the left side of the image displayed in the Layout Print screen Outputs the paper in the direction as the arrow indicates See your printer manual for details on how to load paper to print on the front back etc Page top Strana 255 z celkového počtu 948 Which Side of the Displayed Image Does the Printing Start fr ...

Страница 256: ...he image and printer To always print with even margins select the Always crop images when selecting a layout with margins checkbox on the Advanced tab of the Preferences dialog box To display the Preferences dialog box click Settings in the Layout Print screen or select Preferences from the File menu Crop the photo to apply even margins individually Cropping Photos Photo Print Note This setting is...

Страница 257: ...4 are printed as page numbers The C1 and C4 represent the front cover and back cover respectively C1 Front cover C2 Inside the front cover C3 Inside the back cover C4 Back cover Note C2 C3 appears only when the Leave the inside of front cover blank Leave the inside of back cover blank checkbox is selected in the Cover Options dialog box Page top Strana 257 z celkového počtu 948 What Is C1 or C4 ...

Страница 258: ...ettings Printing Vivid Photos Reducing Photo Noise Cropping Photos Photo Print Printing Dates on Photos Photo Print Printing Multiple Photos on One Page Printing an Index Printing ID Photos ID Photo Print Printing Photo Information Saving Photos Opening Saved Files Page top Strana 258 z celkového počtu 948 Photo Print Settings ...

Страница 259: ... a photo before printing Important This function is available only with a printer that supports Vivid Photo This function is not available when Enable ICC Profile is selected on the Advanced tab of the Preferences dialog box Note Even if you select the Vivid Photo checkbox this effect applies only to the print result The original image or preview image will not be affected Page top Strana 259 z ce...

Страница 260: ...to Noise Reduction checkbox in the Select Paper screen to reduce noise in the image and make the printed photos more vivid Important This function is not available when Enable ICC Profile is selected on the Advanced tab of the Preferences dialog box Note When the noise is severe change Normal to Strong The noise reduction effect applies only to the print result The original image or preview image ...

Страница 261: ...image to adjust the area to be cropped and click OK Note To move the cropping area place the cursor within the white frame and drag it Drag the white lines to enlarge reduce the cropping area Select the The Rule of Thirds checkbox to display white broken lines To create a balanced composition drag any of the intersecting points white squares or white broken lines over the main subject of the photo...

Страница 262: ...Page top Strana 262 z celkového počtu 948 Cropping Photos Photo Print ...

Страница 263: ...t To print the date the photo was taken on the photo click Date Settings in the Layout Print screen then select the Print date checkbox in the Date Settings dialog box Note The date is displayed in the short date format mm dd yyyy etc specified in your operating system See Help for details on setting dates Page top Strana 263 z celkového počtu 948 Printing Dates on Photos Photo Print ...

Страница 264: ...ils on how to select photos Selecting a Photo The available number of photos and layout may vary depending on the media type Photos are arranged in the following order Example Borderless x4 You can change the printing order in Printing Order on the Print tab of the Preferences dialog box You can select the printing order from By Date By Name and By Selection To display the Preferences dialog box c...

Страница 265: ...dex cannot be printed if you select any of the following paper sizes Credit Card You can print up to 80 images on one page Note See the following section for details on how to select photos Selecting a Photo Photos are arranged in the following order Example Index x20 You can change the printing order in Printing Order on the Print tab of the Preferences dialog box You can select the printing orde...

Страница 266: ...Page top Strana 266 z celkového počtu 948 Printing an Index ...

Страница 267: ...t Print screen Note The number of frames per page varies depending on the size of the ID photo to create Check the number of frames in the layouts displayed in the Layout Print screen then specify the number of copies in the Select Images screen You can select two or more images and print different types of ID photos on one page See the following section for details on how to select photos Selecti...

Страница 268: ... the Preferences dialog box click Settings or select Preferences from the File menu ID photos can only be printed on 4 x6 10x15cm paper Page top Strana 268 z celkového počtu 948 Printing ID Photos ID Photo Print ...

Страница 269: ...if information side by side To print them select Letter 8 5 x11 or A4 for Paper Size in the Select Paper screen and select Captured Info from the layouts in the Layout Print screen Note See the following section for details on how to select photos Selecting a Photo This function is available only on paper sizes Letter 8 5 x11 and A4 Page top Strana 269 z celkového počtu 948 Printing Photo Informat...

Страница 270: ...the Layout Print screen When the Save As dialog box appears specify the save location and file name then click Save Important If you edit a saved file and save it again the file will be overwritten To save a file again with a new name or to a different location select Save As from the File menu and save Note Save will not be displayed in the Select Images or Select Paper screen Page top Strana 270...

Страница 271: ...les cannot be displayed on Explorer 2 Select the file you want to open and click Open The Layout Print screen appears 3 Edit the file if necessary Note Easy PhotoPrint EX supports the following file format extension Easy PhotoPrint EX Photo Print file el6 You can open files created with Easy PhotoPrint EX with the following methods besides from Library in Menu Click Open in the step button area of...

Страница 272: ...Page top Strana 272 z celkového počtu 948 Opening Saved Files ...

Страница 273: ... Background Adding Photos Swapping Positions of Photos Replacing Photos Changing Position Angle and Size of Photos Cropping Photos Framing Photos Printing Dates on Photos Attaching Comments to Photos Adding Text to Photos Saving Setting Holidays Setting Calendar Display Opening Saved Files Page top Strana 273 z celkového počtu 948 Other Settings ...

Страница 274: ...s increased Images will move from the subsequent pages to fill all the frames in the new layout If the number of layout frames is decreased Pages with the new layout will be added until all the images on the pages with the current layout can be fitted If you change the current layout for the front or back cover to one that has fewer layout frames any image that does not fit in the new layout will ...

Страница 275: ...ut the following will happen If the number of layout frames is increased Images will move from the subsequent pages to fill all the frames in the new layout If the number of layout frames is decreased Pages with the new layout will be added until all the images on the pages with the current layout can be fitted Note The layouts that can be selected may vary depending on the Paper Size and Orientat...

Страница 276: ...Page top Strana 276 z celkového počtu 948 Changing Layout ...

Страница 277: ...in the Page Setup screen or select the page you want to change the background of in the Edit screen then click Change Background Note The screen s for Album printing is are used as example s in the following descriptions The screen s may vary depending on what you create Select the type of background you want to use in the Change Background dialog box When Select from samples Is Selected Select th...

Страница 278: ... can download additional materials for free Internet connection is required to access the website Internet connection fees apply Exit Easy PhotoPrint EX before installing backgrounds When Single color Is Selected Select the color you want to use from Standard color or Custom color and click OK When Image file Is Selected Set Image File Path and Image Layout then click OK Strana 278 z celkového poč...

Страница 279: ...Note See Help for details on how to set the background in the Change Background dialog box Page top Strana 279 z celkového počtu 948 Changing Background ...

Страница 280: ... images captured from videos Creating Still Images from Videos You can also use images downloaded from photo sharing sites on the Internet Downloading Images from Photo Sharing Sites For PREMIUM Contents Print View appears depending on the selected content You can set to select images from PREMIUM Contents Images or Local Images For PREMIUM Contents Print the folder tree area is not displayed when...

Страница 281: ...Note In the Add Image dialog box you can select all images at one time or change the display size and order of the thumbnails See Help for details Page top Strana 281 z celkového počtu 948 Adding Photos ...

Страница 282: ...s Click Swap Image Positions in the Edit screen Note The screen s for Album printing is are used as example s in the following descriptions The screen s may vary depending on what you create Select the target and source images you want to swap then click Swap When you finish swapping all images you want to swap click Back to Edit Page top Strana 282 z celkového počtu 948 Swapping Positions of Phot...

Страница 283: ... replace with from the thumbnail window and click OK Important You cannot select multiple images in the Replace Image dialog box Note If you select multiple images in the Edit screen and use the replacement function all the images selected in the Edit screen will be replaced with the image selected in the Replace Image dialog box When images are replaced the following settings of the old image are...

Страница 284: ...Page top Strana 284 z celkového počtu 948 Replacing Photos ...

Страница 285: ... image of which you want to change the position or size in the Edit screen and click Edit Image or double click the image Note The screen s for Album printing is are used as example s in the following descriptions The screen s may vary depending on what you create Set the Center Position Rotation and Size then click OK Note You can also change the position and size of an image by dragging it in th...

Страница 286: ...For PREMIUM Contents Print you cannot use Free Rotate See Help for details on the position and size of images Page top Strana 286 z celkového počtu 948 Changing Position Angle and Size of Photos ...

Страница 287: ...is function may not be available depending on the selected image Select the image you want to crop in the Edit screen and click Edit Image or double click the image Click the Crop tab in the Edit Image dialog box Note The screen s for Album printing is are used as example s in the following descriptions The screen s may vary depending on what you create Drag the white squares on the image to adjus...

Страница 288: ...Page top Strana 288 z celkového počtu 948 Cropping Photos ...

Страница 289: ...int Select the image you want to frame in the Edit screen and click Edit Image or double click the image Click the Frame tab in the Edit Image dialog box Note The screen s for Album printing is are used as example s in the following descriptions The screen s may vary depending on what you create Select the frame you want to use from Frames and click OK Important You cannot print dates on framed ph...

Страница 290: ...ication Click Search frames to access the Canon website from which you can download additional materials for free Internet connection is required to access the website Internet connection fees apply Exit Easy PhotoPrint EX before installing frames Search frames will be displayed only if Album has been selected See Help for details on frames Page top Strana 290 z celkového počtu 948 Framing Photos ...

Страница 291: ...rint the date on in the Edit screen and click Edit Image or double click the image Click the Date tab in the Edit Image dialog box Note The screen s for Album printing is are used as example s in the following descriptions The screen s may vary depending on what you create Select the Show date checkbox Set the Text Orientation Position Font Size and Color then click OK Important You cannot print d...

Страница 292: ...te The date is displayed in the short date format mm dd yyyy etc specified in your operating system See Help for details on setting dates Page top Strana 292 z celkového počtu 948 Printing Dates on Photos ...

Страница 293: ... to bottom in a comment box Important You cannot attach comments to Calendar Stickers Layout Print and PREMIUM Contents Print Select the image you want to attach comments to in the Edit screen and click Edit Image or double click the image Click the Comments tab in the Edit Image dialog box Note The screen s for Album printing is are used as example s in the following descriptions The screen s may...

Страница 294: ...checkboxes of the items you want to display and enter comments Set the size and color of font and position of the comments etc then click OK Note See Help for details on comments Page top Strana 294 z celkového počtu 948 Attaching Comments to Photos ...

Страница 295: ...you want to enter text in a preset text box select it and click Edit Text Box Note The screen s for Album printing is are used as example s in the following descriptions The screen s may vary depending on what you create Select the Text tab in the Edit Text Box dialog box and enter text then click OK Note In the Edit Text Box dialog box you can change the position angle and size of the text You ca...

Страница 296: ...Page top Strana 296 z celkového počtu 948 Adding Text to Photos ...

Страница 297: ...ing descriptions The screen s may vary depending on what you create When the Save As dialog box appears specify the save location and file name then click Save Important If you edit a saved file and save it again the file will be overwritten To save a file again with a new name or to a different location select Save As from the File menu and save Note Save will not be displayed in the Page Setup o...

Страница 298: ...olidays in the Calendar General Settings dialog box to display the Holiday Settings dialog box To add a holiday click Add The Add Edit Holiday dialog box appears To edit a saved holiday select it and click Edit To delete a holiday select it and click Delete To delete all the saved holidays within your calendar period click Clear In the Add Edit Holiday dialog box that appears by clicking Add or Ed...

Страница 299: ...oliday Name and specify the date Select the Set as Holiday checkbox to display that day as a holiday in your calendar Note See Help for details on each dialog box Page top Strana 299 z celkového počtu 948 Setting Holidays ...

Страница 300: ...on size etc Click Settings in the Page Setup screen of Calendar or select a calendar in the Edit screen and click Setup Calendar to display the Calendar Settings dialog box Important The Position Size tab is displayed only when the Calendar Settings dialog box is displayed from the Edit screen Note See Help for details on the Calendar Settings dialog box Page top Strana 300 z celkového počtu 948 S...

Страница 301: ... for Windows 7 Windows Vista or thumbnail view Important When using 64 bit editions of Windows 7 Windows Vista or Windows XP the contents of files cannot be displayed on Explorer 2 Select the file you want to open and click Open The Edit screen appears Important Files saved from PREMIUM Contents Print cannot be opened from Library 3 Edit the file if necessary Note See the following sections for de...

Страница 302: ...EMIUM Contents file el7 You can open files created with Easy PhotoPrint EX with the following methods besides from Library in Menu Click Open in the step button area of each screen then select the file you want to edit Double click the file From the File menu click Open then select the file you want to edit You can also open a recently used file by clicking the file name shown in the File menu Pag...

Страница 303: ...ého aplikačného softvéru Tlač pomocou iného aplikačného softvéru Rôzne spôsoby tlače Zmena kvality tlače a korekcia obrazových údajov Prehľad ovládača tlačiarne Na začiatok strany Strana 303 z celkového počtu 948 Tlač pomocou iného aplikačného softvéru ...

Страница 304: ...ing Margin Execute Borderless Printing Fit to Page Printing Scaled Printing Page Layout Printing Poster Printing Booklet Printing Duplex Printing Stamp Background Printing Registering a Stamp Registering Image Data to be Used as a Background Printing an Envelope Switching the Paper Source to Match the Purpose Displaying the Print Results before Printing Setting Paper Dimensions Custom Size Page to...

Страница 305: ...er Size settings are automatically switched to the values that were preset 3 Select the print quality For Print Quality select High Standard or Fast according to your purpose 4 Select the paper source Select Automatically Select Rear Tray Cassette Continuous Autofeed or Paper Allocation that matches your purpose for Paper Source Important The paper source settings that can be selected may differ d...

Страница 306: ...s from the next time as well Effects tab cannot be used when the XPS printer driver is used Click Save to register the specified settings For instructions on registering settings see Registering a Frequently Used Printing Profile Page top Strana 306 z celkového počtu 948 Printing with Easy Setup ...

Страница 307: ...rinter driver setup window 2 Select the paper size Select a page size from the Page Size list on the Page Setup tab 3 Set Orientation Select Portrait or Landscape for Orientation Check Rotate 180 degrees check box when you want to perform printing with the original being rotated 180 degrees 4 Complete the setup Click OK When you execute print the document will be printed with the selected page siz...

Страница 308: ...Page top Strana 308 z celkového počtu 948 Setting a Page Size and Orientation ...

Страница 309: ...nted For Copies on the Page Setup tab specify the number of copies to be printed 3 Specify the print order Check the Print from Last Page check box when you want to print from the last page in order and uncheck the check box when you want to print from the first page Check the Collate check box when you are printing multiple copies of a document and want to print out all pages in each copy togethe...

Страница 310: ...pplication and this printer driver the number of copies may be multiplied numbers of the two settings or the specified printing order may not be enabled Print from Last Page and Collate appear grayed out and are unavailable when Booklet is selected for Page Layout Print from Last Page appears grayed out and is unavailable when Poster is selected for Page Layout Note By setting both Print from Last...

Страница 311: ...driver setup window 2 Specify the side to be stapled Check the position of the stapling margin from Staple Side on the Page Setup tab The printer analyzes the Orientation and Page Layout settings and automatically selects the best staple position When you want to change the setting select from the list 3 Set the margin width If necessary click Specify Margin and set the margin width and then click...

Страница 312: ...a is printed with the specified staple side and margin width Important Staple Side and Specify Margin appear grayed out and are unavailable when Borderless Poster or Booklet is selected for Page Layout Scaled is selected for Page Layout When Duplex Printing is also selected only Staple Side can be specified Page top Strana 312 z celkového počtu 948 Setting the Stapling Margin ...

Страница 313: ... print data such as a photo without providing any margin around it set borderless printing The procedure for performing borderless printing is as follows You can also set borderless printing in Additional Features on the Quick Setup tab Setting Borderless Printing 1 Open the printer driver setup window 2 Set borderless printing Select Borderless from the Page Layout list on the Page Setup tab Clic...

Страница 314: ...erless printing the print quality may deteriorate at the top and bottom of the sheet or stains may form When the ratio of the height to the width differs from the image data a portion of the image may not be printed depending on the size of the media used In this case crop the image data with an application software according to the paper size Note When Plain Paper is selected for Media Type on th...

Страница 315: ...border before printing Page top Strana 315 z celkového počtu 948 Execute Borderless Printing ...

Страница 316: ...age printing Select Fit to Page from the Page Layout list on the Page Setup tab 3 Select the paper size for the data Using Page Size select the page size that is set with your application 4 Select the print paper size Select the size of the paper loaded in the machine from the Printer Paper Size list When the Printer Paper Size is smaller than the Page Size the page image will be reduced When the ...

Страница 317: ...the settings preview on the left side of the printer driver 5 Complete the setup Click OK When you execute print the document will be enlarged or reduced to fit to the page size Page top Strana 317 z celkového počtu 948 Fit to Page Printing ...

Страница 318: ...g Select Scaled from the Page Layout list on the Page Setup tab 3 Select the paper size for the data Using Page Size select the page size that is set with your application 4 Set the scaling rate by using one of the following methods Select a Printer Paper Size When the printer paper size is smaller than the Page Size the page image will be reduced When the printer paper size is larger than the Pag...

Страница 319: ...l be printed with the specified scale Important When the application software which you created the original has the scaled printing function configure the settings on your application software You do not need to configure the same setting in the printer driver When Scaled is selected the Staple Side list box appears grayed out and is unavailable when Duplex Printing is not selected Note Strana 31...

Страница 320: ...Selecting Scaled changes the printable area of the document Page top Strana 320 z celkového počtu 948 Scaled Printing ...

Страница 321: ...elect Page Layout from the Page Layout list on the Page Setup tab The current settings are displayed in the settings preview on the left side of the printer driver 3 Select the print paper size Select the size of the paper loaded in the machine from the Printer Paper Size list Setting the layout of two pages of the document from left to right is complete 4 Set the number of pages to be printed on ...

Страница 322: ...ge the page arrangement order select an icon from the list to change the page placement order Page Border To print a page border around each document page check this check box 5 Complete the setup Click OK on the Page Setup tab When you execute print the specified number of pages will be arranged on each sheet of paper in the specified order Page top Strana 322 z celkového počtu 948 Page Layout Pr...

Страница 323: ...e print like a poster The procedure for performing poster printing is as follows Setting Poster Printing 1 Open the printer driver setup window 2 Set poster printing Select Poster from the Page Layout list on the Page Setup tab The current settings are displayed in the settings preview on the left side of the printer driver 3 Select the print paper size Select the size of the paper loaded in the m...

Страница 324: ... page select Pages and enter the page number you want to print To specify multiple pages enter the page numbers by separating them with commas or by entering a hyphen between the page numbers Note You can also specify the print range by clicking the pages in the settings preview 5 Complete the setup Click OK on the Page Setup tab When you execute print the document will be divided into several pag...

Страница 325: ...he page selection click OK When you execute print only specified pages will be printed Important When Poster is selected the Duplex Printing Staple Side and Print from Last Page appear grayed out and are unavailable Since poster printing enlarges the document when printing it the print results may become coarse Page top Strana 325 z celkového počtu 948 Poster Printing ...

Страница 326: ... center The procedure for performing booklet printing is as follows 1 Open the printer driver setup window 2 Set booklet printing Select Booklet from the Page Layout list on the Page Setup tab The current settings are displayed in the settings preview on the left side of the window 3 Select the print paper size Select the size of the paper loaded in the machine from the Printer Paper Size list 4 S...

Страница 327: ...ou execute print the document is automatically printed first on one side of a sheet of paper and then on the opposite side When the printing is complete fold the paper at the center of the margin and make a booklet Important Booklet cannot be selected when a media type other than Plain Paper Hagaki A or Hagaki is selected for Media Type on the Main tab When Booklet is selected Duplex Printing Stap...

Страница 328: ...having to turn over the paper 1 Open the printer driver setup window 2 Set automatic duplex printing Check the Duplex Printing check box on the Page Setup tab and confirm that Automatic is checked 3 Select the layout Select Normal size or Fit to Page Scaled or Page Layout from the Page Layout list 4 Set the print area When you perform duplex printing the print area of the document becomes slightly...

Страница 329: ...m the list 6 Set the margin width If necessary click Specify Margin and set the margin width and then click OK 7 Complete the setup Click OK on the Page Setup tab When you execute print duplex printing will be started Performing Duplex Printing Manually You can perform the duplex printing manually 1 Open the printer driver setup window 2 Set duplex printing Check the Duplex Printing check box and ...

Страница 330: ...plex Printing appears grayed out and is unavailable When Borderless Poster or Booklet is selected from the Page Layout list Duplex Printing and Staple Side appear grayed out and are unavailable After printing the front page there is an ink drying wait time before starting to print the back page Operation stops temporarily Do not touch the paper during the time You can change the ink drying wait ti...

Страница 331: ...nt data It also allows you to print date time and user name The Background function allows you to print a light illustration behind the document data The procedure for performing stamp background printing is as follows Printing a Stamp CONFIDENTIAL IMPORTANT and other stamps that are used often in companies are pre registered 1 Open the printer driver setup window 2 Click Stamp Background Stamp on...

Страница 332: ...ly printed in the foreground of the document Print semitransparent stamp Check this check box to print a semi transparent stamp on the document This function is available only when the XPS printer driver is used Stamp first page only To print the stamp only on the first page check this check box 5 Complete the setup Click OK on the Page Setup tab When you execute print the data is printed with the...

Страница 333: ...lected the Stamp Background Stamp button appears grayed out and is unavailable Note The stamp and background are not printed on blank sheets inserted with the Insert blank page function of booklet printing Related Topics Registering a Stamp Registering Image Data to be Used as a Background Page top Strana 333 z celkového počtu 948 Stamp Background Printing ...

Страница 334: ...ange and register some of the settings of an existing stamp Unnecessary stamps can be deleted at any time The procedure for registering a new stamp is as follows Registering a New Stamp 1 Open the printer driver setup window 2 Click Stamp Background Stamp on the Page Setup tab The Stamp Background Stamp dialog box opens Note With the XPS printer driver the Stamp Background button has become the St...

Страница 335: ... Outline You can select the color of the stamp by clicking Select Color Important Stamp Text appears grayed out and is unavailable when Date Time User Name is selected Placement tab Select the stamp position from the Position list You can also select Custom from the Position list and specify coordinates for X Position and Y Position You can also change the stamp position by dragging the stamp in t...

Страница 336: ...ck OK when the confirmation message appears 5 Complete the setup Click OK The Stamp Background Stamp dialog box opens again The registered title appears in the Stamp list Deleting an Unnecessary Stamp 1 Click Define Stamp in the Stamp Background Stamp dialog box The Stamp Settings dialog box opens 2 Select the stamp to be deleted Select the title of the stamp you want to delete from the Stamps lis...

Страница 337: ...as a new background You can also change and register some of the settings of an existing background An unnecessary background can be deleted at any time The procedure for registering image data to be used as a background is as follows Registering New Background 1 Open the printer driver setup window 2 Click Stamp Background on the Page Setup tab The Stamp Background dialog box opens Note With the ...

Страница 338: ... the slider to the right To print the background at the original bitmap intensity move the slider to the rightmost position 6 Save the background Click the Save settings tab and enter a title in the Title box and then click Save Click OK when the confirmation message appears 7 Complete the setup Click OK The Stamp Background dialog box opens again The registered title appears in the Background lis...

Страница 339: ...he Background list Deleting an Unnecessary Background 1 Click Select Background in the Stamp Background dialog box The Background Settings dialog box opens 2 Select the background to be deleted Select the title of the background you want to delete from the Backgrounds list on the Save settings tab and then click Delete Click OK when the confirmation message appears 3 Complete the setup Click OK Th...

Страница 340: ...nual Basic Guide The procedure for performing envelope printing is as follows 1 Load an envelope into the machine Fold down the envelope flap Orient the envelope so that the address side is on top and the flap is on the left and then load the envelope vertically in the rear tray 2 Open the printer driver setup window 3 Select the media type Select Envelope from Commonly Used Settings on the Quick ...

Страница 341: ...nt the information is printed on the envelope Important When you execute envelope printing guide messages are displayed To hide the guide messages check the Do not show this message again check box To show the guide again click the View Printer Status button on the Maintenance tab and start the Canon IJ Status Monitor Then click Envelope Printing from Display Guide Message of the Option menu and c...

Страница 342: ...t the paper source From the Paper Source list on the Main tab select the paper source that matches your purpose Automatically Select Plain paper whose Page Size is Letter 8 5 x11 A5 A4 or B5 is fed from the cassette Other sizes of plain paper and paper types other than plain paper are fed from the rear tray Rear Tray Paper is always fed from the rear tray Cassette Paper is always fed from the cass...

Страница 343: ...the cassette Paper Allocation When the media type for the print data is plain paper and the paper size matches the paper allocation setting the printer automatically feeds paper from the cassette If not the printer feeds paper from the rear tray To change the paper allocation settings click Paper Allocation specify the Paper Size to be loaded in the cassette and then click OK When you load frequen...

Страница 344: ...can display and check the print result before printing The procedure for displaying the print result before printing is as follows You can also set the print results display on the Quick Setup tab 1 Open the printer driver setup window 2 Set the preview Check the Preview before printing check box on the Main tab 3 Complete the setup Click OK When you execute print the Canon IJ Preview opens and di...

Страница 345: ...ab 1 Set the custom size in the application software On your application s paper size feature specify the custom size Important When the application software that created the document has a function for specifying the height and width values use the application software to set the values When the application software does not have such a function or if the document does not print correctly use the...

Страница 346: ...Width and Height of the paper to be used Then click OK 5 Complete the setup Click OK on the Page Setup tab When you execute print the data is printed with the specified paper size Page top Strana 346 z celkového počtu 948 Setting Paper Dimensions Custom Size ...

Страница 347: ...ection Optimal Photo Printing of Image Data Interpreting the ICC Profile Adjusting Colors with the Printer Driver Printing with ICC Profiles Adjusting Color Balance Adjusting Brightness Adjusting Intensity Adjusting Contrast Simulating an Illustration Representing Image Data with a Single Color Presenting Image Data with Vivid Colors Smoothing Jagged Outlines Changing Color Properties to Improve C...

Страница 348: ...Halftoning Method You can individually set the combined representation method for the print quality level and the halftoning method The procedure for setting the print quality level and the halftoning method is as follows 1 Open the printer driver setup window 2 Select the print quality Select Custom for Print Quality on the Main tab and click Set The Custom dialog box opens Strana 348 z celkového...

Страница 349: ...fixed rules to express the halftones Diffusion places the dots randomly to express the halftones 4 Complete the setup Click OK on the Main tab When you execute print the image data is printed with the selected print quality level and halftoning method Important Certain quality levels and halftoning methods cannot be selected depending on the settings of Media Type Note If part of an object is not ...

Страница 350: ...grayscale printing Check the Grayscale Printing check box on the Main tab 3 Complete the setup Click OK When you execute print the document is converted to grayscale data It allows you to print the color document in monochrome Important When the Grayscale Printing check box is checked the printer driver processes image data as sRGB data In this case actual colors printed may differ from those in t...

Страница 351: ...Note During Grayscale Printing color inks may be used as well as black ink Page top Strana 351 z celkového počtu 948 Printing a Color Document in Monochrome ...

Страница 352: ...ectively select ICM or ICC Profile Matching When you want to use an application software to specify a printing ICC profile select None The procedure for specifying color correction is as follows You can also set color correction on the Quick Setup tab by choosing Photo Printing under Commonly Used Settings and then choosing Color Intensity Manual Adjustment under Additional Features 1 Open the pri...

Страница 353: ...n paper in an application software to print data 4 Complete the setup Click OK on the Main tab When you execute print the data is printed with the specified color correction method Important When ICM is disabled in the application software ICM is unavailable for Color Correction and the printer may not be able to print the image data properly When the Grayscale Printing check box on the Main tab i...

Страница 354: ...r space Adobe RGB or sRGB of the image data or the application software to be used There are two typical printing methods Check the color space Adobe RGB or sRGB of the image data and the application software to be used and then select the printing method suited to your purpose Adjusting Colors with the Printer Driver Describes the procedure for printing sRGB data by using the color correction fun...

Страница 355: ... them use a printing ICC profile in the application software and select settings for color management The procedure for adjusting colors with the printer driver is as follows 1 Open the printer driver setup window 2 Select the media type Select the type of paper loaded in the machine from the Media Type list on the Main tab 3 Select the print quality For Print Quality select High Standard or Fast ...

Страница 356: ...setup Click OK on the Main tab When you execute print the printer driver adjusts the colors when printing the data Related Topics Selecting a Combination of the Print Quality Level and a Halftoning Method Specifying Color Correction Adjusting Color Balance Adjusting Brightness Adjusting Intensity Adjusting Contrast Page top Strana 356 z celkového počtu 948 Adjusting Colors with the Printer Driver ...

Страница 357: ...space of the input ICC profile specified in the image data To use this printing method use your application software to select color management items and specify an input ICC profile and a printing ICC profile in the image data Even if you print using a printing ICC profile that you created yourself or one for special Canon paper from your application software be sure to select color management it...

Страница 358: ...fy an ICC Profile with the Printer Driver and then Print Print from an application software that cannot identify input ICC profiles or does allow you to specify one by using the color space of the input ICC profile sRGB found in the data When printing Adobe RGB data you can print the data with the Adobe RGB color space even if the application software does not support Adobe RGB 1 Open the printer ...

Страница 359: ...anual Color Adjustment dialog box opens 5 Select color correction Click Matching tab and select ICM or ICC Profile Matching for Color Correction 6 Select the input profile Select an Input Profile that matches the color space of the image data For sRGB data or data without an input ICC profile Select Standard For Adobe RGB data Strana 359 z celkového počtu 948 Printing with ICC Profiles ...

Страница 360: ... color regions Select this method to print image data with colors that are close to the original colors Absolute Colorimetric When Relative Colorimetric is selected white spots are reproduced as white spots of the paper background color However when Absolute Colorimetric is selected how the white spots are reproduced depends on the image data Important When Windows XP SP2 or Windows XP SP3 is used...

Страница 361: ...t to adjust the color balance slightly The following sample shows the case when color balance is used to intensify cyan and to diminish yellow so that the overall colors are more uniform No adjustment Adjust color balance The procedure for adjusting color balance is as follows You can also set color balance on the Quick Setup tab by choosing Photo Printing under Commonly Used Settings and then cho...

Страница 362: ...e settings preview on the left side of the printer driver After adjusting each color click OK Important Adjust the slider gradually 4 Complete the setup Click OK on the Main tab When you execute print the document is printed with the adjusted color balance Important When the Grayscale Printing check box on the Main tab is checked Cyan Magenta and Yellow appear grayed out and are unavailable Relate...

Страница 363: ...lected Dark is selected The procedure for adjusting brightness is as follows You can also set brightness on the Quick Setup tab by choosing Photo Printing under Commonly Used Settings and then choosing Color Intensity Manual Adjustment under Additional Features 1 Open the printer driver setup window 2 Select the manual color adjustment On the Main tab select Manual for Color Intensity and click Se...

Страница 364: ...s printed at the specified brightness Related Topics Selecting a Combination of the Print Quality Level and a Halftoning Method Specifying Color Correction Adjusting Color Balance Adjusting Intensity Adjusting Contrast Page top Strana 364 z celkového počtu 948 Adjusting Brightness ...

Страница 365: ... choosing Photo Printing under Commonly Used Settings and then choosing Color Intensity Manual Adjustment under Additional Features 1 Open the printer driver setup window 2 Select the manual color adjustment Select Manual for Color Intensity on the Main tab and click Set The Manual Color Adjustment dialog box opens 3 Adjust intensity Moving the Intensity slider to the right intensifies darkens the...

Страница 366: ...print the image data is printed with the adjusted intensity Related Topics Selecting a Combination of the Print Quality Level and a Halftoning Method Specifying Color Correction Adjusting Color Balance Adjusting Brightness Adjusting Contrast Page top Strana 366 z celkového počtu 948 Adjusting Intensity ...

Страница 367: ...follows You can also set contrast on the Quick Setup tab by choosing Photo Printing under Commonly Used Settings and then choosing Color Intensity Manual Adjustment under Additional Features 1 Open the printer driver setup window 2 Select the manual color adjustment On the Main tab select Manual for Color Intensity and click Set The Manual Color Adjustment dialog box opens 3 Adjust the contrast Mo...

Страница 368: ...tab When you execute print the image is printed with the adjusted contrast Related Topics Selecting a Combination of the Print Quality Level and a Halftoning Method Specifying Color Correction Adjusting Color Balance Adjusting Brightness Adjusting Intensity Page top Strana 368 z celkového počtu 948 Adjusting Contrast ...

Страница 369: ...inal profile and colors The procedure for performing Simulate Illustration is as follows 1 Open the printer driver setup window 2 Set the Simulate Illustration If necessary check the Simulate Illustration check box on the Effects tab and adjust the Contrast Moving the slider to the right lightens the image data and moving the slider to the left darkens the image data The current settings are displ...

Страница 370: ...raph to a sepia tone image The procedure for performing Monochrome Effects is as follows 1 Open the printer driver setup window 2 Set Monochrome Effects Check the Monochrome Effects check box on the Effects tab and select your desired color When you use Select Color move the Color slider to specify the color you want The current settings are displayed in the settings preview on the left side of th...

Страница 371: ...t When the Grayscale Printing check box on the Main tab is checked Monochrome Effects appears grayed out and is unavailable Page top Strana 371 z celkového počtu 948 Representing Image Data with a Single Color ...

Страница 372: ...d sceneries while maintaining the human skin color natural By using this function you can make vivid hues appear even more vivid The procedure for performing Vivid Photo is as follows You can also set vivid photos on the Quick Setup tab by choosing Photo Printing under Commonly Used Settings and then choosing Additional Features 1 Open the printer driver setup window 2 Set Vivid Photo Check the Vi...

Страница 373: ...ation It allows you to print smooth outlines This feature is especially useful when printing low resolution images from Web pages The procedure for performing Image Optimizer is as follows 1 Open the printer driver setup window 2 Set image optimizer Check the Image Optimizer check box on the Effects tab 3 Complete the setup Click OK The photos and graphics will be adjusted and printed with smooth ...

Страница 374: ...It may take longer to complete printing when the image optimizer is used Page top Strana 374 z celkového počtu 948 Smoothing Jagged Outlines ...

Страница 375: ...sure and underexposure The procedure for performing Photo Optimizer PRO is as follows 1 Open the printer driver setup window 2 Set Photo Optimizer PRO Check the Photo Optimizer PRO check box on the Effects tab Normally there is no need to check the Apply Throughout Page check box Images within each page are optimized on an image by image basis Note Check the Apply Throughout Page check box when pr...

Страница 376: ...ound is set in the Stamp Background dialog box on the Page Setup tab Define Stamp is selected in the Stamp Background dialog box on the Page Setup tab and the bitmapped stamp is configured Note Depending on images the Photo Optimizer PRO may have no discernible effect Page top Strana 376 z celkového počtu 948 Changing Color Properties to Improve Coloration ...

Страница 377: ...reduce the digital camera noise and improve the image quality of the digital print The procedure for performing Photo Noise Reduction is as follows 1 Open the printer driver setup window 2 Set Photo Noise Reduction Check the Photo Noise Reduction check box on the Effects tab and select Normal or Strong for the level 3 Complete the setup Click OK When you execute print the image will be printed wit...

Страница 378: ...noise still bothers you Depending on application software or resolution of image data effects of digital camera noise reduction may not be obvious When this function is used for other than photos taken by digital cameras image may be distorted Page top Strana 378 z celkového počtu 948 Reducing Photo Noise ...

Страница 379: ... the Printer Driver Overview of the Printer Driver Printer Driver Operations Canon IJ Printer Driver XPS Printer Driver How to Open the Printer Driver Setup Window Maintenance Tab Canon IJ Status Monitor Canon IJ Preview Page top Strana 379 z celkového počtu 948 Overview of the Printer Driver ...

Страница 380: ...ingle Color Presenting Image Data with Vivid Colors Smoothing Jagged Outlines Changing Color Properties to Improve Coloration Reducing Photo Noise Changing Machine Settings from Your Computer Changing the Print Options Registering a Frequently Used Printing Profile Setting the Paper Source for Plain Paper Managing the Machine Power Reducing the Machine Noise Changing the Machine Operation Mode Per...

Страница 381: ...iver Help You can display the Help describing the driver setting items through the printing preferences screen of the Canon IJ printer driver To view all descriptions of a tab Click the Help button on each tab A dialog box opens displaying a description of each item on the tab You can also click the link found in the description of an item to display a description of the linked dialog box To see a...

Страница 382: ...he XPS printer driver the standard IJ printer driver must already be installed on your computer Easy PhotoPrint EX My Printer and other application software distributed with the printer do not support the XPS printer driver Installing the XPS Printer Driver Load the Setup CD ROM that comes with the machine and then select XPS Printer Driver from Custom Install to install the driver Using the XPS P...

Страница 383: ... Driver Setup Window through the Start Menu Follow the procedure below to perform maintenance operations such as print head cleaning or to configure printing profile that are common for all application software 1 Select items from the Start menu as shown below If you are using Windows 7 select the Start menu Devices and Printers If you are using Windows Vista select the Start menu Control Panel Ha...

Страница 384: ...hine maintenance or change the settings of the machine Features Cleaning the Print Heads Cleaning the Paper Feed Rollers Aligning the Print Head Position Checking the Print Head Nozzles Setting the Paper Source for Plain Paper Cleaning Inside the Machine Managing the Machine Power Related Features Reducing the Machine Noise Changing the Machine Operation Mode Page top Strana 384 z celkového počtu ...

Страница 385: ...tomatically when data is sent to the printer When launched the Canon IJ Status Monitor appears as a button on the task bar Click the button of the status monitor displayed on the task bar The Canon IJ Status Monitor appears Note To open the Canon IJ Status Monitor when the printer is not printing open the printer driver setup window and click View Printer Status on the Maintenance tab The informat...

Страница 386: ...ent layout print order and number of pages You can also change the media type and paper source settings When you want to display a preview before printing open the printer driver setup window click the Quick Setup tab or the Main tab and check the Preview before printing check box When you do not want to display a preview before printing uncheck the check box Important If you are using the XPS pri...

Страница 387: ...ej karty alebo disku USB flash Photo Používanie funkcií tlače zábavných fotografií Používanie funkcie prezentácie Tlač dokumentov súborov PDF Tlač fotografií z vytlačených fotografií Photo reprint Používanie funkcií opätovnej tlače fotografií Tlač z mobilného telefónu alebo tlač šablóny Special print Na začiatok strany Strana 387 z celkového počtu 948 Tlač pomocou ovládacieho panela zariadenia ...

Страница 388: ... pomocou ovládacieho panela zariadenia Kopírovanie Kopírovanie Vytváranie kópií Položky nastavenia Zmenšenie alebo zväčšenie kópie Zobrazenie obrazovky s ukážkou Na začiatok strany Strana 388 z celkového počtu 948 Kopírovanie ...

Страница 389: ...enia 3 Vložte papier 4 Umiestnite originál na ploché predlohové sklo Poznámka Podrobnosti o typoch a podmienkach pre originály ktoré možno kopírovať nájdete v časti Vkladanie papiera a originálov 5 V prípade potreby zadajte nastavenia 1 Copies počet kópií Zadajte pomocou tlačidla alebo 2 Magnif zväčšenie Zadajte v rozsahu 25 až 400 pomocou tlačidiel Keď tlačidlá podržíte stlačené hodnota zväčšenia...

Страница 390: ...ovania a určiť rozličné rozloženia Spôsob výberu užitočných položiek v ponuke kopírovania Poznámka Ak chcete obnoviť nastavenia zväčšenia intenzity a počtu kópií stlačte tlačidlo Stop 6 Stlačením tlačidla Farebne Color nastavte farebné kopírovanie stlačením tlačidla Čiernobielo Black čiernobiele kopírovanie Zariadenie spustí kopírovanie Po dokončení kopírovania odstráňte originál z plochého predlo...

Страница 391: ...j kombinácii na displeji LCD sa zobrazí hlásenie Error details V takom prípade potvrďte hlásenie stlačením ľavého tlačidla Funkcia Function a potom zmeňte nastavenie Nastavenia veľkosti strany typu média a pod sa zachovajú aj po vypnutí zariadenia Keď z ponuky kopírovania spustíte kopírovanie pre ktoré nie je zadané nastavenie k dispozícii na displeji LCD sa zobrazí hlásenie The specified function...

Страница 392: ...te v položke Print qlty možnosť Standard alebo High a skúste kopírovať znova Ak chcete kopírovať v odtieňoch sivej vyberte v položke Print qlty možnosť High Odtiene sivej nahrádzajú čiernobiele kopírovanie rôznymi odtieňmi sivej farby 6 2 sided Zadajte nastavenie obojstranného kopírovania Kopírovanie na obe strany papiera Two sided copy 7 Layout Vyberte rozloženie Kopírovanie dvoch strán dokumentu...

Страница 393: ... alebo zväčší obraz tak aby sa zmestil na stranu Nastavenie položky Magnif Fit to page Poznámka V závislosti od originálu sa po výbere možnosti Fit to page nemusí veľkosť strany zistiť správne V takom prípade vyberte iné nastavenie ako Fit to page Predvolený pomer Môžete vybrať jeden z predvolených pomerov zväčšenia alebo zmenšenia kópie Vyberte vhodný pomer veľkosti originálu a veľkosti strany Na...

Страница 394: ... maximálny pomer kopírovania a 25 MIN minimálny pomer kopírovania Ak kopírujete na médium rovnakej veľkosti ako originál vyberte možnosť SameMagnification Na začiatok strany Strana 394 z celkového počtu 948 Zmenšenie alebo zväčšenie kópie ...

Страница 395: ...jú Preto neotvárajte kryt dokumentov ani neodstraňujte originál z plochého predlohového skla kým sa kopírovanie nedokončí 1 Ukážka originálu Zobrazí sa originál umiestnený na plochom predlohovom skle Ak je zobrazený obrázok zošikmený pozrite si časť Vkladanie papiera a originálov a originál umiestnite správne Potom znova zobrazte obrazovku s ukážkou a skontrolujte ukážku originálu 2 Veľkosť strany...

Страница 396: ...Kopírovanie na obe strany papiera Two sided copy Kopírovanie dvoch strán dokumentu s prispôsobením na jednu stranu 2 on 1 copy Kopírovanie štyroch strán dokumentu s prispôsobením na jednu stranu 4 on 1 copy Kopírovanie bez okrajov Borderless copy Kopírovanie hrubých originálov napríklad kníh Frame erase copy Na začiatok strany Strana 396 z celkového počtu 948 Používanie užitočných funkcií kopírova...

Страница 397: ... 5 Pomocou tlačidiel vyberte ponuku kopírovania Vyberte požadovanú ponuku kopírovania a postupujte podľa pokynov na obrazovke Podrobné informácie o postupoch dostupných v ponuke Standard copy nájdete v časti Vytváranie kópií Podrobné informácie o postupoch dostupných v inej ponuke kopírovania nájdete v časti Používanie užitočných funkcií kopírovania Poznámka Ak sa po výbere inej ponuky kopírovania...

Страница 398: ...j obrazovke kopírovania stlačte pravé tlačidlo Funkcia Function Zobrazí sa obrazovka nastavení tlače 2 Pomocou tlačidiel vyberte možnosť 2 sided 3 Skontrolujte či je možnosť 2 sided zadaná a stlačte pravé tlačidlo Funkcia Function Zobrazí sa obrazovka Stapling side of print paper 4 Pomocou tlačidiel vyberte stranu zošitia a potom stlačte tlačidlo OK Zobrazí sa obrazovka nastavení tlače Na pohotovo...

Страница 399: ...ými funkciami v ponuke Layout na obrazovke nastavení tlače vyberte možnosť 2 on 1 copy alebo 4 on 1 copy Podrobné informácie o funkcii 2 on 1 copy alebo 4 on 1 copy nájdete v nasledujúcich častiach Kopírovanie dvoch strán dokumentu s prispôsobením na jednu stranu 2 on 1 copy Kopírovanie štyroch strán dokumentu s prispôsobením na jednu stranu 4 on 1 copy Ak kopírujete čiernobielo použitím možnosti ...

Страница 400: ...í rozloženia postupujte nasledujúcim spôsobom 1 Na pohotovostnej obrazovke kopírovania stlačte pravé tlačidlo Funkcia Function Zobrazí sa obrazovka nastavení tlače 2 Pomocou tlačidiel vyberte možnosť Layout 3 Skontrolujte či je zadaná možnosť 2 on 1 copy a stlačte pravé tlačidlo Funkcia Function Zobrazí sa obrazovka 2 on 1 copy layout 4 Pomocou tlačidiel vyberte rozloženie a potom stlačte tlačidlo...

Страница 401: ... túto ponuku kopírovania používate v kombinácii s inými funkciami na obrazovke nastavení tlače vyberte v ponuke 2 sided možnosť 2 sided Po naskenovaní druhého hárka originálu sa zobrazí obrazovka Document setting Podľa pokynov na obrazovke naskenujte tretí a štvrtý hárok originálu Podrobné informácie o funkcii Two sided copy nájdete v časti Kopírovanie na obe strany papiera Two sided copy Ak sa po...

Страница 402: ...rozloženie Pri určovaní rozloženia postupujte nasledujúcim spôsobom 1 Na pohotovostnej obrazovke kopírovania stlačte pravé tlačidlo Funkcia Function Zobrazí sa obrazovka nastavení tlače 2 Pomocou tlačidiel vyberte možnosť Layout 3 Skontrolujte či je zadaná možnosť 4 on 1 copy a stlačte pravé tlačidlo Funkcia Function Zobrazí sa obrazovka 4 on 1 copy layout 4 Pomocou tlačidiel vyberte rozloženie a ...

Страница 403: ... funkciami môžete skopírovať osem pôvodných strán na jeden hárok papiera V takom prípade sa na každú stranu papiera skopírujú štyri pôvodné strany Keď túto ponuku kopírovania používate v kombinácii s inými funkciami na obrazovke nastavení tlače vyberte v ponuke 2 sided možnosť 2 sided Po naskenovaní štvrtého hárka originálu sa zobrazí obrazovka Document setting Podľa pokynov na obrazovke naskenujt...

Страница 404: ...če Položky nastavenia 5 Stlačením tlačidla Farebne Color nastavte farebné kopírovanie stlačením tlačidla Čiernobielo Black čiernobiele kopírovanie Zariadenie spustí kopírovanie Poznámka Keďže sa kopírovaný obrázok zväčší tak aby vyplnil celú stranu na okrajoch môže dôjsť k jemnému orezaniu Podľa potreby môžete zmeniť šírku orezania okrajov pôvodného obrázka Ak je však veľkosť presahovania veľká or...

Страница 405: ... tlače Položky nastavenia 5 Stlačením tlačidla Farebne Color nastavte farebné kopírovanie stlačením tlačidla Čiernobielo Black čiernobiele kopírovanie Zariadenie spustí kopírovanie Poznámka Zatvorte kryt dokumentov Okolo obrazu sa môže objaviť úzky čierny okraj Táto funkcia odstraňuje iba čierne okraje Ak je skenovaná kniha príliš tenká alebo sa zariadenie používa v blízkosti okna alebo v jasnom p...

Страница 406: ...lash Photo Tlač fotografií uložených na pamäťovej karte alebo na disku USB flash Zobrazovanie a tlač fotografií Select photo print Tlač všetkých fotografií uložených na pamäťovej karte alebo na disku USB flash Print all photos Položky nastavenia Používanie užitočných funkcií zobrazenia Na začiatok strany Strana 406 z celkového počtu 948 Jednoduchá tlač fotografií z pamäťovej karty alebo disku US ...

Страница 407: ...e alebo disk USB flash zapojíte skôr ako na obrazovke HOME vyberiete položku Photo zobrazí sa obrazovka s potvrdením Na tejto obrazovke vyberte súbor ktorý chcete vytlačiť Na zobrazenej obrazovke vyberte možnosť Print photos a potom stlačte tlačidlo OK Ak na pamäťovej karte alebo disku USB flash nie sú uložené žiadne fotografické údaje ktoré možno vytlačiť na displeji LCD sa zobrazí hlásenie Data ...

Страница 408: ...ívania funkcie prezentácie 5 Pomocou tlačidiel vyberte ponuku tlače alebo užitočnú funkciu a potom stlačte tlačidlo OK Vyberte požadovanú ponuku tlače alebo užitočnú funkciu a postupujte podľa pokynov na obrazovke Na začiatok strany Strana 408 z celkového počtu 948 Tlač fotografií uložených na pamäťovej karte alebo na disku ...

Страница 409: ...e HOME 3 Do zásuvky na kartu vložte pamäťovú kartu alebo do portu priamej tlače zapojte disk USB flash Zobrazí sa obrazovka výberu fotografií Dôležité Pamäťovú kartu a disk USB flash nemôžete používať súčasne Poznámka Informácie o spôsobe vloženia pamäťovej karty alebo zapojenia disku USB flash a informácie o typoch pamäťových kariet kompatibilných so zariadením nájdete v časti Tlač fotografií Ak ...

Страница 410: ...a 5 Menu Stlačením ľavého tlačidla Funkcia Function zobrazíte obrazovku Photo menu Poznámka Ak chcete zadať počet kópií jednotlivých fotografií pomocou tlačidiel zobrazte fotografiu ktorú chcete vytlačiť Po zobrazení požadovanej fotografie zadajte počet kópií pomocou tlačidla alebo 6 Stlačte tlačidlo Farebne Color Zariadenie začne tlačiť Poznámka Ak chcete zrušiť tlač stlačte tlačidlo Stop Počas t...

Страница 411: ...vaní fotografií do tlačového frontu nemožno zobraziť obrazovku HOME zmeniť ponuku tlače ani tlačiť z počítača alebo iných zariadení Pri pridávaní fotografií do tlačového frontu nemožno na obrazovke s potvrdením nastavení tlače vybrať nastavenie položky Page size ani Type Nastavenie je rovnaké ako nastavenie fotografie ktorá je zaradená do tlačového frontu Ak chcete zrušiť pridanie fotografie do tl...

Страница 412: ...azí sa obrazovka výberu dátumu snímania Vytlačia sa fotografie z vybratého intervalu dátumov Pomocou tlačidiel vyberte dátumy snímania a pomocou tlačidla OK nastavte počiatočný a konečný dátum Po nastavení konečného dátumu sa zobrazí obrazovka s potvrdením nastavení tlače Poznámka Dátum ktorý treba zadať sa zobrazí podľa nastavenia položky Date display format v ponuke Device user settings ktorá sa...

Страница 413: ...adné nastavenie tlače Spôsob zobrazenia obrazovky s potvrdením nastavení tlače sa líši v závislosti od príslušnej ponuky tlače V ponuke Select photo print na obrazovke Photo alebo Slide show Ak na obrazovke výberu fotografií stlačíte pravé tlačidlo Funkcia Function zobrazí sa nasledujúca obrazovka V ponuke Print all photos na obrazovke Photo Pred tlačou sa zobrazí nasledujúca obrazovka V každej po...

Страница 414: ...Funkcia Function a potom zmeňte nastavenie Nastavenia veľkosti strany typu média a pod sa zachovajú aj po výbere inej ponuky tlače alebo vypnutí zariadenia 1 Page size Vyberte veľkosť strany vloženého papiera 2 Type typ média Vyberte typ média vloženého papiera 3 Print qlty kvalita tlače Nastavte kvalitu tlače podľa fotografie 4 Border tlač s okrajmi alebo bez okrajov Vyberte tlač s okrajmi alebo ...

Страница 415: ...nia na fotografiách Poznámka Dátum snímania sa tlačí podľa nastavenia položky Date display format v ponuke Device user settings ktorá sa nachádza v časti Device settings ponuky Setup Device user settings 8 Print file no Aktivácia alebo deaktivácia tlače čísla súboru na fotografiách Poznámka Ak sú splnené obe podmienky uvedené nižšie a položky Print date a Print file no sú nastavené na hodnotu ON v...

Страница 416: ... zúbkovaných obrysov na tlač 6 Brightness Úprava jasu 7 Contrast Úprava kontrastu 8 Color balance Úprava vyváženia farieb Napríklad zvýšením úrovne červenej alebo žltej môžete upraviť zafarbenie pokožky 9 Effect Aplikovanie špeciálnych efektov na fotografiu napríklad tlač v hnedastých tónoch alebo efekt skicovanej ilustrácie Na začiatok strany Strana 416 z celkového počtu 948 Položky nastavenia ...

Страница 417: ...zenia a pomocou tlačidla OK ho nastavte Možno vybrať nasledujúce spôsoby Poznámka V závislosti od ponuky tlače nemožno niektoré spôsoby zobrazenia vybrať Spôsob zobrazenia sa zachová aj po výbere inej ponuky tlače Standard view mode Fotografie sa zobrazia jednotlivo Príslušnú fotografiu môžete vybrať pomocou tlačidiel List view mode Naraz sa zobrazí deväť fotografií Príslušnú fotografiu môžete vyb...

Страница 418: ...nge view mode 2 Pomocou tlačidiel vyberte položku Trimming mode a potom stlačte tlačidlo OK Zobrazí sa obrazovka Trimming 3 Vyberte oblasť ktorú chcete vytlačiť Túto oblasť môžete orezať pomocou nasledujúcich tlačidiel Tlačidlá a Umiestnenie rámčeka orezania Tlačidlo alebo prípadne posúvacie koliesko Nastavenie veľkosti rámčeka orezania Ľavé tlačidlo Funkcia Function Zmena pomeru strán rámčeka ore...

Страница 419: ...meniť znova zobrazte obrazovku Trimming Ak chcete po nastavení orezania zrušiť orezanie znova zobrazte obrazovku Trimming a stlačte pravé tlačidlo Funkcia Function Na začiatok strany Strana 419 z celkového počtu 948 Tlač určenej oblasti Trimming mode ...

Страница 420: ... Pomocou tlačidiel vyberte spôsob preskakovania Možno vybrať nasledujúce spôsoby Scroll one by one Fotografie sa budú posúvať jednotlivo Scroll by 10 photos Fotografie sa budú posúvať po 10 fotografiách Scroll by 100 photos Fotografie sa budú posúvať po 100 fotografiách Skip by date Fotografie sa budú preskakovať podľa dátumu poslednej zmeny 4 Pomocou tlačidla premiestnite kurzor na výber fotograf...

Страница 421: ...Device user settings Na začiatok strany Strana 421 z celkového počtu 948 Preskakovanie fotografií podľa ich počtu alebo dátumu nasní ...

Страница 422: ...rafií na jeden hárok papiera Layout print Tlač na nálepky Sticker print Tlač zoznamu fotografií Photo index print Tlač fotografií podľa nastavení funkcie DPOF DPOF print Tlač fotografií spolu s informáciami o ich nasnímaní Captured info print Tlač fotografií na doklady ID photo size print Vytvorenie kalendára Calendar print Na začiatok strany Strana 422 z celkového počtu 948 Používanie funkcií tla...

Страница 423: ...mpatibilných so zariadením nájdete v časti Tlač fotografií Ak sú na pamäťovej karte alebo disku USB flash uložené súbory s fotografiami aj súbory PDF a pamäťovú kartu vložíte alebo disk USB flash zapojíte skôr ako na obrazovke HOME vyberiete položku Fun photo print alebo Photo zobrazí sa obrazovka s potvrdením Na tejto obrazovke vyberte súbor ktorý chcete vytlačiť Na zobrazenej obrazovke vyberte m...

Страница 424: ...ačte tlačidlo OK Možno vybrať nasledujúce spôsoby vkladania Paste automatically Môžete vložiť fotografie z vybratého intervalu dátumov alebo všetky fotografie Ak chcete vložiť fotografie z vybratého intervalu dátumov podľa pokynov na obrazovke zadajte počiatočný a konečný dátum Paste one by one Po zobrazení obrazovky výberu fotografií vložte fotografie podľa pokynov na obrazovke Poznámka Iné možno...

Страница 425: ...9 Stlačte tlačidlo Farebne Color Zariadenie začne tlačiť Na začiatok strany Strana 425 z celkového počtu 948 Tlač viacerých fotografií na jeden hárok papiera Layout print ...

Страница 426: ...nie užitočných funkcií zobrazenia 6 Pomocou tlačidiel vyberte rámček a potom stlačte tlačidlo OK Stlačením stredného tlačidla Funkcia Function môžete fotografie upraviť orezaním Túto oblasť môžete orezať pomocou nasledujúcich tlačidiel Tlačidlá a Umiestnenie rámčeka orezania Tlačidlo alebo prípadne posúvacie koliesko Nastavenie veľkosti rámčeka orezania Stredné tlačidlo Funkcia Function Otočenie r...

Страница 427: ... stlačte tlačidlo OK Zobrazí sa obrazovka s potvrdením nastavení tlače 8 Stlačte tlačidlo Farebne Color Zariadenie začne tlačiť Na začiatok strany Strana 427 z celkového počtu 948 Tlač na nálepky Sticker print ...

Страница 428: ... x 10 72 fotografií 127 0 x 177 8 mm 5 x 7 35 fotografií 101 6 x 152 4 mm 4 x 6 24 fotografií Wide 101 6 x 180 6 mm 28 fotografií 4 Pomocou tlačidiel vyberte spôsob zadania rozsahu tlače a potom stlačte tlačidlo OK Ak chcete tlačiť fotografie z vybratého intervalu dátumov podľa pokynov na obrazovke zadajte počiatočný a konečný dátum 5 Vložte papier do zadného zásobníka 6 Pomocou tlačidiel vyberte ...

Страница 429: ...e začne tlačiť Poznámka Zariadenie podporuje nasledujúce funkcie DPOF Verzia Založené na verzii 1 00 Podporované typy obrázkov Exif TIFF a JFIF Štýl tlače Štandardná tlač Standard Print Tlač fotografií ktoré boli pomocou funkcie DPOF označené ako Štandardná tlač Standard Print Štýl tlače Tlač zoznamu Index Print Tlač zoznamu fotografií ktoré boli pomocou funkcie DPOF označené ako Tlač zoznamu Inde...

Страница 430: ...ktorý obrázok alebo aký počet kópií sa má vytlačiť Na začiatok strany Strana 430 z celkového počtu 948 Tlač fotografií podľa nastavení funkcie DPOF DPOF print ...

Страница 431: ...ntervalu dátumov Ak chcete informácie vytlačiť na okraji zoznamu fotografií z vybratého intervalu dátumov podľa pokynov na obrazovke zadajte počiatočný a konečný dátum 4 Vložte papier do zadného zásobníka 5 Pomocou tlačidiel vyberte veľkosť strany podľa vloženého papiera a potom stlačte tlačidlo OK 6 Pomocou tlačidiel vyberte typ média podľa vloženého papiera a potom stlačte tlačidlo OK Ak vyberie...

Страница 432: ...idlo OK 7 Pomocou tlačidiel vyberte fotografiu ktorú chcete vytlačiť a stlačte tlačidlo OK Poznámka Iné možnosti Používanie užitočných funkcií zobrazenia 8 Orežte oblasť ktorú chcete vytlačiť a potom stlačte tlačidlo OK Túto oblasť môžete orezať pomocou nasledujúcich tlačidiel Tlačidlá a Umiestnenie rámčeka orezania Tlačidlo alebo prípadne posúvacie koliesko Nastavenie veľkosti rámčeka orezania St...

Страница 433: ...fotografii na šírku vyberte formát na šírku a pri fotografii na výšku vyberte formát na výšku 5 Vložte papier do zadného zásobníka Dôležité Papier vkladajte na výšku 6 Pomocou tlačidiel vyberte veľkosť strany podľa vloženého papiera a potom stlačte tlačidlo OK 7 Pomocou tlačidiel vyberte typ média podľa vloženého papiera a potom stlačte tlačidlo OK 8 Pomocou tlačidiel vyberte fotografiu ktorú chce...

Страница 434: ... na hodnotu ON vytlačí sa iba dátum snímania Keď fotografiu tlačíte pomocou funkcie Calendar print nemôžete súčasne vytlačiť dátum snímania aj číslo súboru Ak chcete vytlačiť číslo súboru nastavte možnosť Print date na hodnotu OFF 12 Stlačte tlačidlo Farebne Color Zariadenie začne tlačiť Na začiatok strany Strana 434 z celkového počtu 948 Vytvorenie kalendára Calendar print ...

Страница 435: ...ač pomocou ovládacieho panela zariadenia Používanie funkcie prezentácie Používanie funkcie prezentácie Spôsob používania funkcie prezentácie Na začiatok strany Strana 435 z celkového počtu 948 Používanie funkcie prezentácie ...

Страница 436: ...ebo disku USB flash uložené súbory s fotografiami aj súbory PDF a pamäťovú kartu vložíte alebo disk USB flash zapojíte skôr ako na obrazovke HOME vyberiete položku Slide show alebo Photo zobrazí sa obrazovka s potvrdením Na tejto obrazovke vyberte súbor ktorý chcete vytlačiť Na zobrazenej obrazovke vyberte možnosť Print photos a potom stlačte tlačidlo OK Ak na pamäťovej karte alebo disku USB flash...

Страница 437: ...ction zmeniť nastavenia tlače Položky nastavenia Ak chcete pokračovať v pozastavenej prezentácii stlačte tlačidlo OK Počas tlače môžete v pozastavenej prezentácii pokračovať stlačením pravého tlačidla Funkcia Function Ak sa tlač nedokončí zobrazenú fotografiu môžete vytlačiť opätovným pozastavením prezentácie a stlačením tlačidla Farebne Color Ak chcete prezentáciu zrušiť stlačte tlačidlo DOMOV HO...

Страница 438: ...ieho panela zariadenia Tlač dokumentov súborov PDF Tlač dokumentov súborov PDF Tlač dokumentov súborov PDF uložených na pamäťovej karte alebo na disku USB flash Na začiatok strany Strana 438 z celkového počtu 948 Tlač dokumentov súborov PDF ...

Страница 439: ...rípona pdf S výnimkou nasledujúcich údajov Šifrované údaje Údaje obsahujúce obrázky naskenované s veľkosťou 9 601 pixlov alebo viac vo zvislom aj vodorovnom smere Podrobné informácie o vytváraní súborov PDF pomocou programu MP Navigator EX nájdete v časti Používanie obrázkov v programe MP Navigator EX 1 Skontrolujte či je zariadenie zapnuté 2 Vložte obyčajný papier do kazety 3 Na obrazovke HOME vy...

Страница 440: ...avého tlačidla Funkcia Function zobrazte obrazovku Details Ak sa na súbor PDF vzťahuje jedna z nasledujúcich podmienok nemožno ho vytlačiť Informácie na obrazovke Details sa nedajú zobraziť V položke Created with sa zobrazujú iné znaky ako text MP Navigator EX Súbory PDF vytvorené pomocou iného aplikačného softvéru než program MP Navigator EX aplikačný softvér dodávaný spolu so zariadením nemožno ...

Страница 441: ... sa nemusia vytlačiť tenké čiary v dokumente alebo sa obrázky môžu vytlačiť nezarovnané V prípade niektorých súborov PDF sa môže pred začatím tlače alebo v jej priebehu zobraziť chybové hlásenie Podrobné informácie nájdete v časti Na displeji LCD sa zobrazuje chybové hlásenie Na začiatok strany Strana 441 z celkového počtu 948 Tlač dokumentov súborov PDF uložených na pamäťovej ka ...

Страница 442: ...z vytlačených fotografií Photo reprint Tlač fotografií z vytlačených fotografií Photo reprint Tlač z vytlačených fotografií Položky nastavenia Tlač určenej oblasti Trimming Na začiatok strany Strana 442 z celkového počtu 948 Tlač fotografií z vytlačených fotografií Photo reprint ...

Страница 443: ...otografiu vytlačiť funkcia Photo reprint Základný postup tlače z vytlačených fotografií nájdete v časti Opätovná tlač fotografií z vytlačených fotografií Z vytlačených fotografií môžete tiež vytvoriť nálepku s fotografiou a vytlačiť všetky naskenované fotografie Podrobné informácie o užitočných funkciách nájdete v časti Používanie funkcií opätovnej tlače fotografií Na začiatok strany Strana 443 z ...

Страница 444: ...ačením ľavého tlačidla Funkcia Function a potom zmeňte nastavenie Nastavenia veľkosti strany typu média a pod v ponukách Select and print a Print all photos sa zachovajú aj po výbere inej ponuky opätovnej tlače alebo vypnutí zariadenia Obrazovka Print settings obrazovka s potvrdením nastavení tlače Na tejto obrazovke zadajte základné nastavenie opätovnej tlače Poznámka Spôsob zobrazenia obrazovky ...

Страница 445: ...a napríklad jas alebo kontrast a opätovne vytlačiť fotografie Obrazovka Manual correction Obrazovka Manual correction Ak chcete zobraziť túto obrazovku vyberte v položke Photo fix hodnotu Manual correction a potom stlačte pravé tlačidlo Funkcia Function 1 Face brightener Zjasnenie tmavej tváre na fotografii nasnímanej proti svetlu 2 Fade restoration Korekcia farieb pri tlači fotografií ktoré časom...

Страница 446: ...liesko Nastavenie veľkosti rámčeka orezania Ľavé tlačidlo Funkcia Function Zmena pomeru strán rámčeka orezania Stredné tlačidlo Funkcia Function Otočenie rámčeka orezania Stláčaním tohto tlačidla môžete prepínať medzi orientáciou rámčeka orezania na výšku a na šírku Poznámka V závislosti od ponuky opätovnej tlače nemožno niektoré tlačidlá používať 3 Stlačením tlačidla OK dokončite výber oblasti or...

Страница 447: ...če fotografií Používanie funkcií opätovnej tlače fotografií Spôsob výberu ponuky opätovnej tlače Opätovná tlač fotografie na nálepky Sticker print Opätovná tlač všetkých fotografií Print all photos Na začiatok strany Strana 447 z celkového počtu 948 Používanie funkcií opätovnej tlače fotografií ...

Страница 448: ... nájdete v časti Vkladanie papiera a originálov 4 Postupujte podľa pokynov na obrazovke a potom spustite skenovanie vytlačenej fotografie stlačením tlačidla OK Zobrazí sa obrazovka Reprint from printed photo 5 Pomocou tlačidiel vyberte ponuku opätovnej tlače a potom stlačte tlačidlo OK Vyberte požadovanú ponuku opätovnej tlače a postupujte podľa pokynov na obrazovke Základný postup tlače z vytlače...

Страница 449: ...iba jeden hárok s nálepkami 4 Skontrolujte či je vybraté rozloženie Stickers x16 a stlačte tlačidlo OK Poznámka Ak je na displeji LCD vybratá iná možnosť ako Stickers x16 pomocou tlačidiel vyberte možnosť Stickers x16 5 Pomocou tlačidiel vyberte fotografiu ktorú chcete opätovne vytlačiť a stlačte tlačidlo OK Zobrazí sa obrazovka s potvrdením nastavení tlače Poznámka Ak sa na fotografii zobrazí iko...

Страница 450: ...eru ponuky opätovnej tlače 2 Vyberte položku Print all photos a potom stlačte tlačidlo OK Zobrazí sa obrazovka s potvrdením nastavení tlače 3 Vložte papier do zadného zásobníka 4 Pomocou tlačidla alebo zadajte počet kópií V prípade potreby zmeňte nastavenia tlače Položky nastavenia 5 Stlačením tlačidla Farebne Color nastavte farebnú tlač stlačením tlačidla Čiernobielo Black čiernobielu tlač Zariad...

Страница 451: ...Special print Tlač z mobilného telefónu alebo tlač šablóny Special print Tlač z mobilného telefónu prostredníctvom komunikácie Bluetooth Tlač šablón napríklad linajkového alebo milimetrového papiera Na začiatok strany Strana 451 z celkového počtu 948 Tlač z mobilného telefónu alebo tlač šablóny Special print ...

Страница 452: ...tvom komunikácie Bluetooth nájdete v časti Komunikácia Bluetooth Poznámka Fotografie možno tlačiť z mobilných telefónov podporujúcich profil OPP Object Push Profile alebo BIP Basic Imaging Profile V závislosti od mobilného telefónu nemusí byť tlač možná aj keď mobilný telefón podporuje vyššie uvedené profily Informácie o profiloch ktoré mobilný telefón podporuje nájdete v príručke k mobilnému tele...

Страница 453: ...chlosť tlače sa môže líšiť v závislosti od nasledujúcich podmienok Prítomnosť prekážok medzi komunikačnými zariadeniami a rádiové podmienky Prítomnosť magnetického poľa statickej elektriny alebo elektromagnetickej interferencie Citlivosť prijímača a výkon antény komunikačného zariadenia Videosúbory nemožno tlačiť V závislosti od zariadenia sa údaje uložené na pamäťovej karte nemusia vytlačiť Údaje...

Страница 454: ...uetooth settings Informácie o jednotlivých položkách nastavenia nájdete v časti Bluetooth settings 1 Skontrolujte či je zariadenie zapnuté 2 Pripojte voliteľnú jednotku Bluetooth BU 30 Jednotku Bluetooth BU 30 zapojte do portu priamej tlače 3 Na obrazovke HOME vyberte položku Setup Poznámka Podrobné informácie o výbere ponúk na obrazovke HOME nájdete v časti Prehľad zariadenia 4 Vyberte položku De...

Страница 455: ...riadkovania Nastavenie na displeji LCD Notebook paper 1 8 mm spacing Notebook paper 2 7 mm spacing Notebook paper 3 6 mm spacing Milimetrový papier Môžete si vybrať z dvoch veľkostí štvorčekov Nastavenie na displeji LCD Graph paper 1 Graph 5 mm Graph paper 2 Graph 3 mm Poznámka Milimetrový papier nemožno tlačiť na papier veľkosti B5 Kontrolný zoznam Môžete vytlačiť poznámkový blok so začiarkavacím...

Страница 456: ...eľkosti A4 B5 alebo Letter 3 Na obrazovke HOME vyberte položku Special print Poznámka Podrobné informácie o výbere ponúk na obrazovke HOME nájdete v časti Prehľad zariadenia 4 Vyberte položku Template print a stlačte tlačidlo OK 5 Pomocou tlačidiel vyberte šablónu ktorú chcete vytlačiť a stlačte tlačidlo OK Šablóny ktoré možno vytlačiť 6 Pomocou tlačidiel zadajte nastavenia veľkosti strany a obojs...

Страница 457: ...ním tlačidla Farebne Color vytlačíte nasledujúcu šablónu Notebook paper 1 Notebook paper 2 Notebook paper 3 Graph paper 1 Graph paper 2 Handwriting paper Stlačením tlačidla Čiernobielo Black vytlačíte nasledujúcu šablónu Checklist Staff paper 1 Staff paper 2 Weekly schedule Monthly schedule Na začiatok strany Strana 457 z celkového počtu 948 Tlač šablón napríklad linajkového alebo milimetrového pa...

Страница 458: ...vanie obrázkov Skenovanie pomocou ovládacieho panela zariadenia Skenovanie pomocou dodaného aplikačného softvéru Skenovanie pomocou iného aplikačného softvéru Ďalšie skenovacie postupy Na začiatok strany Strana 458 z celkového počtu 948 Skenovanie ...

Страница 459: ...Rozšírená príručka Skenovanie Skenovanie obrázkov Skenovanie obrázkov Skenovanie obrázkov Pred skenovaním Umiestnenie dokumentov Na začiatok strany Strana 459 z celkového počtu 948 Skenovanie obrázkov ...

Страница 460: ...kačného softvéru môžete navyše používať podrobné nastavenia Vyberte si vhodný skenovací postup Ukladanie naskenovaných údajov na pamäťovú kartu alebo disk USB flash pomocou ovládacieho panela zariadenia Odosielanie naskenovaných údajov do počítača pomocou ovládacieho panela zariadenia Skenovanie pomocou dodaného aplikačného softvéru Skenovanie pomocou iného aplikačného softvéru Na začiatok strany ...

Страница 461: ...riginál určený na skenovanie vyhovuje požiadavkám na originály ukladané na ploché predlohové sklo Ak údaje odosielate do počítača podrobné informácie nájdete v časti Umiestnenie dokumentov Ak údaje ukladáte na pamäťovú kartu alebo disk USB flash podrobné informácie nájdete v časti Vkladanie papiera a originálov Na začiatok strany Strana 461 z celkového počtu 948 Pred skenovaním ...

Страница 462: ...gnment mark of the Platen Photos that have been cut to various shapes and documents smaller than 1 18 inches 3 cm square cannot be cropped accurately when scanning Reflective disc labels may not be scanned properly For Photos Postcards Business Cards or BD DVD CD For Magazines Newspapers or Text Documents Placing a Single Document Place the document face down on the Platen with 0 39 inches 1 cm or...

Страница 463: ...laten and documents and between documents Portions placed on the diagonally striped area cannot be scanned more than 0 39 inches 1 cm Note You can place up to 12 documents You can place up to 4 documents when the Compress scanned images when transferring checkbox is selected on the General Tab of the Preferences dialog box Positions of slanted documents 10 degrees or less are corrected automatical...

Страница 464: ...flash pomocou ovládacieho panela zariadenia Odosielanie naskenovaných údajov do počítača pomocou ovládacieho panela zariadenia Pripojenie naskenovaných údajov k e mailu pomocou ovládacieho panela zariadenia Položky nastavenia na ovládacom paneli zariadenia Príloha Rôzne nastavenia skenovania Na začiatok strany Strana 464 z celkového počtu 948 Skenovanie pomocou ovládacieho panela zariadenia ...

Страница 465: ...eme žiadnu zodpovednosť za poškodenie ani stratu údajov z akéhokoľvek dôvodu a to ani počas záručnej lehoty 1 Skontrolujte či je zariadenie zapnuté 2 Na obrazovke HOME vyberte položku Scan Zobrazí sa obrazovka Save Forward to Poznámka Podrobné informácie o výbere ponúk na obrazovke HOME nájdete v časti Prehľad zariadenia Ak sa na displeji LCD zobrazí pohotovostná obrazovka skenovania na odosielani...

Страница 466: ...unkcia Function môžete originál znova naskenovať Ak na obrazovke nastavení skenovania vyberiete v položke Format možnosť PDF alebo Compact PDF na obrazovke s ukážkou môžete stlačením pravého tlačidla Funkcia Function otočiť skenovaný obrázok Ukladanie spustite stlačením tlačidla OK Ak na obrazovke nastavení skenovania vyberiete v položke Format iné nastavenie ako PDF alebo Compact PDF Zariadenie z...

Страница 467: ...o zásuvky na kartu Pomocou programu MP Navigator EX môžete optimalizovať alebo tlačiť naskenované údaje uložené na pamäťovej karte Podrobné informácie nájdete v časti Import obrázkov uložených na pamäťovej karte Import naskenovaných údajov uložených na disku USB flash do počítača Naskenované údaje uložené na disku USB flash môžete naimportovať do počítača Po naskenovaní údajov pripojte disk USB fl...

Страница 468: ...ajte disk USB flash ani nevypínajte zariadenie Poznámka Ak používate disk USB flash vybavený indikátorom prístupu podľa príručky dodanej s týmto diskom skontrolujte či sa v ňom dokončil zápis 2 Odpojte disk USB flash Uchopte disk USB flash a vodorovne ho vytiahnite zo zariadenia Na začiatok strany Strana 468 z celkového počtu 948 Ukladanie naskenovaných údajov na pamäťovú kartu alebo d ...

Страница 469: ...obrazovke HOME nájdete v časti Prehľad zariadenia Ak sa na displeji LCD zobrazí pohotovostná obrazovka skenovania na odosielanie údajov do počítača pripojeného pomocou kábla USB stlačením ľavého tlačidla Funkcia Function zobrazte obrazovku Save Forward to 3 Do zásuvky na kartu vložte pamäťovú kartu alebo do portu priamej tlače zapojte disk USB flash Dôležité Pamäťovú kartu a disk USB flash nemôžet...

Страница 470: ...ať medzi zobrazením zoznamu a ukážky Po výbere formátu údajov PDF sa na displeji LCD zobrazí len prvá strana údajov vo formáte PDF 6 Vyberte súbor ktorý chcete odstrániť a potom stlačte tlačidlo OK 7 Na obrazovke s potvrdením vyberte možnosť Yes a potom stlačte tlačidlo OK Zariadenie odstráni súbor Na začiatok strany Strana 470 z celkového počtu 948 Odstraňovanie naskenovaných údajov z pamäťovej k...

Страница 471: ...né k počítaču Pri skenovaní obrázkov pomocou zariadenia alebo keď je počítač v režime spánku alebo pohotovostnom režime nezapájajte ani neodpájajte kábel USB Cieľ a názov súboru sú zadané v programe MP Navigator EX V programe MP Navigator EX môžete zadať cieľ a názov súboru Podrobné informácie ako vykonávať nastavenia alebo úvodné nastavenia nájdete v časti Karta Scanner Button Settings ukladanie ...

Страница 472: ...vení skenovania vyberiete v položke Format iné nastavenie ako PDF alebo Compact PDF Spustí sa skenovanie a obrázky sa odošlú do počítača podľa nastavení zadaných v programe MP Navigator EX Ak na obrazovke nastavení skenovania vyberiete v položke Format nastavenie PDF alebo Compact PDF Originály môžete skenovať bez prerušenia Po dokončení skenovania prvého originálu sa zobrazí obrazovka s potvrdení...

Страница 473: ...tlačiť Ak originály skenujete z počítača pomocou programu MP Navigator EX naskenované obrázky môžete v programe MP Navigator EX upraviť Môžete ich napríklad optimalizovať alebo orezať Naskenované obrázky môžete upravovať alebo tlačiť aj pomocou dodaného aplikačného softvéru a tak ich lepšie využiť Skúsme skenovať Poznámka V zariadení môžete pôvodné dokumenty skenovať aj pomocou aplikačného softvér...

Страница 474: ...správne pripojené k počítaču Pri skenovaní obrázkov pomocou zariadenia alebo keď je počítač v režime spánku alebo pohotovostnom režime nezapájajte ani neodpájajte kábel USB E mailový softvér a názov súboru sú zadané v programe MP Navigator EX V programe MP Navigator EX môžete zadať e mailový softvér a názov súboru Podrobné informácie o tom ako vykonávať nastavenia alebo úvodné nastavenia nájdete v...

Страница 475: ...Nastavenia odosielania e mailov nájdete v inštalačnej príručke e mailového softvéru Ak na obrazovke nastavení skenovania vyberiete v položke Format nastavenie PDF alebo Compact PDF Originály môžete skenovať bez prerušenia Po dokončení skenovania prvého originálu sa zobrazí obrazovka s potvrdením či chcete pokračovať v skenovaní Na ploché predlohové sklo položte nasledujúci originál a stlačte tlači...

Страница 476: ...or EX Ver4 0 ako aplikačný softvér ktorý chcete použiť Potom vyberte príkaz Pre túto akciu vždy použiť tento program Always use this program for this action a kliknite na tlačidlo OK Odteraz sa bude program MP Navigator EX spúšťať automaticky Na začiatok strany Strana 476 z celkového počtu 948 Pripojenie naskenovaných údajov k e mailu pomocou ovláda ...

Страница 477: ... zadať vo vybratej kombinácii na displeji LCD sa zobrazí hlásenie Error details V takom prípade potvrďte hlásenie stlačením ľavého tlačidla Funkcia Function a potom zmeňte nastavenie Nastavenia veľkosti skenovania rozlíšenia a formátu údajov sa zachovajú aj po vypnutí zariadenia Keď z ponuky skenovania spustíte skenovanie pre ktoré nie je zadané nastavenie k dispozícii na displeji LCD sa zobrazí h...

Страница 478: ...lebo pruhovaných vzorov Ak na naskenovanom obrázku spozorujete nerovnomerné odtiene alebo pruhovaný vzor vyberte možnosť ON Poznámka Aj keď je pre toto nastavenie vybratá možnosť ON môže sa prejaviť efekt moiré pokiaľ je položka Unsharp mask nastavená na hodnotu ON V takom prípade nastavte položku Unsharp mask na hodnotu OFF 7 Unsharp mask Možno zvýrazniť obrysy malých znakov alebo tenkých objekto...

Страница 479: ...arious Scan Settings S010 Appendix Various Scan Settings Specifying how to respond when scanning using the Operation Panel of the machine Selecting a Response to Commands from the Operation Panel Using MP Navigator EX Page top Strana 479 z celkového počtu 948 Appendix Various Scan Settings ...

Страница 480: ...r EX MP Navigator EX enables you to specify how to respond when scanning using the Operation Panel of the machine 1 Start MP Navigator EX Starting MP Navigator EX 2 Click Preferences The Preferences dialog box opens Note The Preferences dialog box can also be opened by clicking Preferences in the One click Mode screen 3 On the Scanner Button Settings tab specify Event and Actions Strana 480 z celk...

Страница 481: ... Scanner Button Settings Tab Attach to E mail 4 Click OK The operation will be performed according to the settings when you start scanning using the Operation Panel of the machine Page top Strana 481 z celkového počtu 948 Selecting a Response to Commands from the Operation Pane ...

Страница 482: ...MP Navigator EX dodaný softvér skenera Skúsme skenovať Užitočné funkcie programu MP Navigator EX Používanie obrázkov v programe MP Navigator EX Obrazovky programu MP Navigator EX Príloha Otváranie iných súborov než naskenovaných obrázkov Na začiatok strany Strana 482 z celkového počtu 948 Skenovanie pomocou dodaného aplikačného softvéru ...

Страница 483: ...s Software This software allows you to scan multiple documents at one time or scan images larger than the Platen You can also save scanned images attach them to e mail or print them using the supplied applications Screens There are two types of MP Navigator EX Main Menu Navigation Mode screen and One click Mode screen Navigation Mode Screen You can start various tasks from the Navigation Mode scre...

Страница 484: ...ges saved on memory cards View Use Window Use the View Use window to select what you want to do with the scanned images Note See File Formats for data formats extensions supported by MP Navigator EX Page top Strana 484 z celkového počtu 948 What Is MP Navigator EX Supplied Scanner Software ...

Страница 485: ...ith Auto Scan Scanning documents photos magazines etc from the Platen Scanning Photos and Documents Scanning two or more photos small documents at one time Scanning Multiple Documents at One Time Scanning images larger than the Platen Scanning Images Larger than the Platen Stitch Assist Scanning easily according to purpose scan and save attach to e mail etc Easy Scanning with One click Page top St...

Страница 486: ...MP Navigator EX Starting MP Navigator EX 1 From the Start menu select All Programs Canon Utilities MP Navigator EX 4 0 MP Navigator EX 4 0 MP Navigator EX starts Starting One click Mode 1 Click Switch Mode at the bottom left of the screen The One click Mode screen appears Strana 486 z celkového počtu 948 Starting MP Navigator EX ...

Страница 487: ...tartup checkbox in the Navigation Mode screen to always open the Navigation Mode screen at startup If this checkbox is not selected the last used screen appears at startup Page top Strana 487 z celkového počtu 948 Starting MP Navigator EX ...

Страница 488: ... and BD DVD CD To scan other documents specify the document type Scanning Photos and Documents 1 Place the document on the Platen Placing Documents 2 Start MP Navigator EX and open the Navigation Mode screen Starting MP Navigator EX 3 In Scan Import click Auto Scan 4 Click Specify as required Set the preferences if you want to apply suitable corrections based on the document type When setting is c...

Страница 489: ...The scanned images appear in the Thumbnail window 6 Edit the scanned images as required Use Edit Tools to rotate images select a part of an image etc See the Edit Tools in Auto Scan Screen Scan Import Window for details Note First select images to edit Selected images are outlined in orange Drag the mouse or use Shift arrow keys to select multiple images You can also select images by dragging and ...

Страница 490: ...7 Save the scanned images Saving Saving as PDF Files Page top Strana 490 z celkového počtu 948 Easy Scanning with Auto Scan ...

Страница 491: ...Scan photos and documents placed on the Platen 1 Place the document on the Platen Placing Documents 2 Start MP Navigator EX and open the Navigation Mode screen Starting MP Navigator EX 3 In Scan Import click Photos Documents Platen 4 Select Document Type according to the document to be scanned Strana 491 z celkového počtu 948 Scanning Photos and Documents ...

Страница 492: ...x from the One click Mode screen and scan with Color Mode set to Color 5 Click Specify to set the document size and scanning resolution as required When setting is completed click OK Scan Settings Dialog Box Photos Documents Important When scanning a large document such as an A4 size photo align its corner with the corner at the arrow alignment mark of the Platen and specify the document size in t...

Страница 493: ...Window for details Note First select images to edit Selected images are outlined in orange Drag the mouse or use Shift arrow keys to select multiple images You can also select images by dragging and dropping them into the Selected Images area 8 Save the scanned images Saving Saving as PDF Files Page top Strana 493 z celkového počtu 948 Scanning Photos and Documents ...

Страница 494: ...hat case start ScanGear scanner driver then adjust the cropping frames scan areas in whole image view and scan again Photos that have a whitish border Documents printed on white paper hand written text business cards etc Thin documents Thick documents Scanning Multiple Documents in Whole Image View 1 Place the documents on the Platen Placing Documents 2 Start MP Navigator EX and open the Navigatio...

Страница 495: ...Select Auto Detect Multiple Documents for Document Size When setting is completed click OK Scan Settings Dialog Box Photos Documents 6 Click Scan Strana 495 z celkového počtu 948 Scanning Multiple Documents at One Time ...

Страница 496: ...mages as required Use Edit Tools to rotate images select a part of an image etc See the Edit Tools in Photos Documents Platen Screen Scan Import Window for details Note First select images to edit Selected images are outlined in orange Drag the mouse or use Shift arrow keys to select multiple images You can also select images by dragging and dropping them into the Selected Images area 8 Save the s...

Страница 497: ...s Note If you want to preview the images before scanning use ScanGear Scanning Multiple Documents at One Time with ScanGear Scanner Driver Page top Strana 497 z celkového počtu 948 Scanning Multiple Documents at One Time ...

Страница 498: ...n 1 Start MP Navigator EX and open the Navigation Mode screen Starting MP Navigator EX Note You can complete from scanning to saving etc at one time by simply clicking the corresponding icon in the One click Mode screen Stitch Assist is available from the One click Mode screen as well by changing the document size Click the corresponding icon and select Stitch Assist for Document Size Then skip ah...

Страница 499: ...r Document Size then specify the scanning resolution as required When setting is completed click OK Scan Settings Dialog Box Photos Documents 5 Click Scan Strana 499 z celkového počtu 948 Scanning Images Larger than the Platen Stitch Assist ...

Страница 500: ...f the document face down on the Platen 7 Click Scan The left half of the document is scanned and appears in the Stitch assist window Note Click Cancel to cancel the scan Strana 500 z celkového počtu 948 Scanning Images Larger than the Platen Stitch Assist ...

Страница 501: ... as required Use the icons to swap the left and right halves rotate the image 180 degrees or enlarge reduce the image Swap Left Right Swaps the left and right halves Important This function is not available while the image is enlarged reduced Rotate 180 Rotates right half of the image 180 degrees Strana 501 z celkového počtu 948 Scanning Images Larger than the Platen Stitch Assist ...

Страница 502: ...t orientation You can drag the right half of the image from right to left or up and down to adjust the position If the left and right halves do not match due to a slanted document place the document correctly and click Back then scan again 11 Click Next 12 Drag the mouse to specify the area to be saved then click OK The combined image is created When scanning is completed the Scan Complete dialog ...

Страница 503: ...13 Save the scanned images Saving Saving as PDF Files Page top Strana 503 z celkového počtu 948 Scanning Images Larger than the Platen Stitch Assist ...

Страница 504: ...ime by simply clicking the corresponding icon 1 Place the document on the Platen Placing Documents 2 Start MP Navigator EX Starting MP Navigator EX The MP Navigator EX Navigation Mode screen or One click Mode screen appears Navigation Mode Screen One click Mode Screen Note Skip ahead to Step 4 if One click Mode screen is open 3 Click One click Strana 504 z celkového počtu 948 Easy Scanning with On...

Страница 505: ...ode Screen 5 Select Document Type according to the document to be scanned 6 Set the document size and scanning resolution as required 7 Start scanning Starts scanning Note Click Cancel to cancel the scan Page top Strana 505 z celkového počtu 948 Easy Scanning with One click ...

Страница 506: ...ages quickly Correcting enhancing images automatically Correcting Enhancing Images Automatically Correcting enhancing images manually Correcting Enhancing Images Manually Adjusting color characteristics such as brightness and contrast Adjusting Images Searching for lost images Searching Images Classifying and sorting images Classifying Images into Categories Page top Strana 506 z celkového počtu 9...

Страница 507: ...select images saved on a memory card or computer Importing Images Saved on a Memory Card Opening Images Saved on a Computer 2 Click Edit Convert then click Fix photo images on the list The Correct Enhance Images window opens Note The Correct Enhance Images window can also be opened by clicking Image Correction Enhancement on the Toolbar or in the Zoom in dialog box In that case only the target ima...

Страница 508: ... available for images edited using an application digital camera etc manufactured by other companies Note The Face Sharpener and Digital Face Smoothing effect levels can be changed using the slider that appears by clicking the corresponding buttons When you apply Auto Photo Fix dark backlit photos will be corrected automatically If the image is not corrected enough using Auto Photo Fix it is recom...

Страница 509: ... Image or Save All Corrected Images You can save corrected enhanced images as new files Note To save only the images you like select them and click Save Selected Image To save all images click Save All Corrected Images The file format of corrected enhanced images is JPEG Exif Adobe RGB images are saved as sRGB images 8 Click Exit Important The corrections enhancements will be lost if you exit befo...

Страница 510: ...d on a memory card or computer Importing Images Saved on a Memory Card Opening Images Saved on a Computer 2 Click Edit Convert then click Fix photo images on the list The Correct Enhance Images window opens Note The Correct Enhance Images window can also be opened by clicking Image Correction Enhancement on the Toolbar or in the Zoom in dialog box In that case only the target image outlined in ora...

Страница 511: ...oothing or Blemish Remover Note The Face Brightener Face Sharpener and Digital Face Smoothing effect levels can be changed using the slider that appears by clicking the corresponding buttons Move the cursor over the image The shape of the cursor changes to Cross 6 Drag to select the area you want to correct enhance then click OK that appears over the image Strana 511 z celkového počtu 948 Correcti...

Страница 512: ...ments applied to the selected image 7 Click Save Selected Image or Save All Corrected Images You can save corrected enhanced images as new files Note To save only the images you like select them and click Save Selected Image To save all images click Save All Corrected Images The file format of corrected enhanced images is JPEG Exif 8 Click Exit Important The corrections enhancements will be lost i...

Страница 513: ...s saved on a memory card or computer Importing Images Saved on a Memory Card Opening Images Saved on a Computer 2 Click Edit Convert then click Fix photo images on the list The Correct Enhance Images window opens Note The Correct Enhance Images window can also be opened by clicking Image Correction Enhancement on the Toolbar or in the Zoom in dialog box In that case only the target image outlined ...

Страница 514: ... of the thumbnail and preview image Note Click Advanced to make fine adjustments to the image brightness and color tone See Advanced in the descriptions of the Correct Enhance Images window for details Click Defaults to reset all adjustments Click Reset Selected Image to cancel all corrections enhancements and adjustments applied to the selected image 6 Click Save Selected Image or Save All Correc...

Страница 515: ...lected Image To save all images click Save All Corrected Images The file format of adjusted images is JPEG Exif 7 Click Exit Important The adjustments will be lost if you exit before saving adjusted images Page top Strana 515 z celkového počtu 948 Adjusting Images ...

Страница 516: ...ently Saved Images or a selected folder and its subfolders See Starting MP Navigator EX to start MP Navigator EX Quick Search In Text box on the Toolbar enter a word or phrase included in the file name Exif information or PDF text of the image you want to search for then click Search For Exif information text in Maker Model Description and User Comment is searched Advanced Search Click Search on t...

Страница 517: ...les that enables keyword search see PDF Settings Dialog Box Password protected PDF files cannot be searched Category You can search for images by category Modified Date To search for images that have been updated in a specific time period enter the first and last dates of the period Shooting Date To search for images captured in a specific time period enter the first and last dates of the period N...

Страница 518: ... be searched Search subfolders Select this checkbox to search subfolders Case sensitive Select this checkbox to match case Match all criteria Searches for files that meet all the specified criteria Match any criteria Searches for files that meet any of the specified criteria Start Search Starts search Related Topic View Use Window Page top Strana 518 z celkového počtu 948 Searching Images ...

Страница 519: ...version the classification information on the second latest version is transferred upon initial startup After the initial startup the classification information cannot be transferred 1 Scan documents into MP Navigator EX and save them then open the View Use window from the Navigation Mode screen Note See Let s Try Scanning to scan images into MP Navigator EX You can also select images saved on a m...

Страница 520: ...mages is selected in the View Use window Note Some images may not be detected correctly and thus may be classified into wrong categories In that case drag and drop the image to the correct category Images saved in network folders may not be classified You can search for images by category See Searching Images for details Creating Custom Categories 1 In the View Use window sort images by category a...

Страница 521: ...Related Topic View Use Window Page top Strana 521 z celkového počtu 948 Classifying Images into Categories ...

Страница 522: ...orresponding sections below for details on using images files Creating editing PDF files from scanned images Creating Editing PDF Files Printing multiple scanned images at one time or printing at specific size quality etc Printing Documents Printing scanned photos Printing Photos Sending scanned images via e mail Sending via E mail Correcting enhancing scanned images or converting them to text Edi...

Страница 523: ...ettings Specify the destination folder file name and file type Save Dialog Box Important You cannot select JPEG Exif when Document Type is Text OCR You cannot select JPEG Exif when Black and White is selected for Color Mode on the Advanced Mode tab of ScanGear scanner driver Note By default the scanned images are saved in the following folders Windows 7 MP Navigator EX folder in My Pictures folder...

Страница 524: ...aved according to the settings To further use edit the scanned images on MP Navigator EX click Open saved location in the Save Complete dialog box Creating Editing PDF Files Printing Documents Printing Photos Sending via E mail Editing Files Page top Strana 524 z celkového počtu 948 Saving ...

Страница 525: ...DF Files Save images scanned with MP Navigator EX as PDF files 1 Select the checkboxes of the images you want to save then click Save as PDF file 2 In the Save as PDF file dialog box specify the save settings Specify the file type file name and destination folder Save as PDF file Dialog Box Strana 525 z celkového počtu 948 Saving as PDF Files ...

Страница 526: ... Pictures folder You can set passwords for PDF files Setting Passwords for PDF Files 3 Click Save Scanned images are saved according to the settings To further use edit the scanned images on MP Navigator EX click Open saved location in the Save Complete dialog box Creating Editing PDF Files Printing Documents Printing Photos Sending via E mail Editing Files Page top Strana 526 z celkového počtu 94...

Страница 527: ...X Note See Let s Try Scanning to scan images into MP Navigator EX You can also select images saved on a memory card or computer Importing Images Saved on a Memory Card Opening Images Saved on a Computer Creating Editing PDF Files with MP Navigator EX 1 Select images and click PDF Note You can select PDF JPEG TIFF and BMP files 2 Click Create Edit PDF file on the list Important For PDF files you ca...

Страница 528: ...or details on the Create Edit PDF file window 5 Click Save Selected Pages or Save All Pages The Save as PDF file dialog box opens Save as PDF file Dialog Box Important You cannot save images scanned at 10501 pixels or more in the vertical and horizontal directions If a password protected PDF file is edited the passwords will be deleted Reset the passwords in the Save as PDF file dialog box Setting...

Страница 529: ... system starts Important Password protected PDF files cannot be opened in applications not supporting PDF security Files may not open if an application that can be associated with PDF files is not installed 3 Use the application to edit print the file For details refer to the application s manual Important In some applications the commands print edit etc restricted by Permissions Password may diff...

Страница 530: ...ages Note See Let s Try Scanning to scan images into MP Navigator EX You can also select images saved on a memory card or computer Importing Images Saved on a Memory Card Opening Images Saved on a Computer 2 Click Print then click Print Document on the list Important If a password protected PDF file is selected you will be prompted to enter the password Opening Editing Password protected PDF Files...

Страница 531: ...nting after last page is spooled 6 After printing return the setting on the Advanced tab to Start printing immediately Windows Vista Windows XP 1 From the Start menu select Control Panel 2 Click Printer Windows XP Printers and Faxes 3 Right click the icon of your printer and click Properties The printer properties dialog box opens 4 Click the Advanced tab 5 Select Spool print documents so program ...

Страница 532: ... images saved on a memory card or computer Importing Images Saved on a Memory Card Opening Images Saved on a Computer When Printing Photos Using Easy PhotoPrint EX Easy PhotoPrint EX enables you to print scanned photos at high quality or to layout and print images 1 Select images and click Print 2 Click Print Photo or Print Album on the list Easy PhotoPrint EX starts See Printing with the Bundled ...

Страница 533: ...int Photo Dialog Box 4 Click Print Starts printing Note To cancel while spooling click Cancel To cancel while printing click Cancel Printing in the confirmation window for the printer status To open a confirmation window for the printer status click printer icon on the taskbar Page top Strana 533 z celkového počtu 948 Printing Photos ...

Страница 534: ...API refer to the manual of the e mail software program Note If an e mail software program is not selected manually attach the scanned and saved image to e mail 1 Scan documents into MP Navigator EX and save them then open the View Use window from the Navigation Mode screen and select images Note Only PDF and JPEG files can be attached to e mail See Let s Try Scanning to scan images into MP Navigat...

Страница 535: ...mages via e mail Click Set to open a dialog box and select a compression type from High Low Compression Standard or Low High Compression 4 Click OK Files are saved according to the settings and the e mail software program starts 5 Specify the recipient enter the subject and message then send e mail For details refer to the manual of the e mail software program Page top Strana 535 z celkového počtu...

Страница 536: ...ved on a memory card or computer Importing Images Saved on a Memory Card Opening Images Saved on a Computer Correcting Photo Images You can correct enhance images in the Correct Enhance Images window 1 Select images and click Edit Convert 2 Click Fix photo images on the list The Correct Enhance Images window opens 3 Correct enhance images in the Correct Enhance Images window Note See Correct Enhan...

Страница 537: ...document to be scanned When scanning multiple documents you can collect the extracted text into one file General Tab Text displayed in Notepad included with Windows is for guidance only Text in the image of the following types of documents may not be detected correctly Documents containing text with font size outside the range of 8 points to 40 points at 300 dpi Slanted documents Documents placed ...

Страница 538: ...asswords in a safe place for future reference Password protected PDF files cannot be opened in applications not supporting PDF security In some applications the commands print edit etc restricted by Permissions Password may differ from those in MP Navigator EX Password protected PDF files cannot be searched by text from the View Use Window Passwords cannot be set when images are automatically save...

Страница 539: ...s PDF file dialog box opens 4 Select the Password security settings checkbox The Password Security Settings dialog box opens Note You can also open the Password Security Settings dialog box by clicking Set then selecting Password Security for Security in the PDF Settings dialog box 2 Select the Require a password to open the document or Use a password to restrict printing and editing of the docume...

Страница 540: ...e enter the password and click OK The Save as PDF file dialog box returns Important If you close the Save as PDF file dialog box without clicking Save the settings in the Password Security Settings dialog box will be deleted Passwords are deleted once the file is edited Reset the passwords when saving edited files Note If you set the passwords via the PDF Settings dialog box the PDF Settings dialo...

Страница 541: ...Related Topic Opening Editing Password protected PDF Files Page top Strana 541 z celkového počtu 948 Setting Passwords for PDF Files ...

Страница 542: ...other applications or whose passwords were set with other applications Only MP Navigator EX version 1 1 and 2 0 or later supports opening editing and printing password protected PDF files Passwords are case sensitive You can create or edit up to 99 pages at one time using MP Navigator EX Entering a Password to Open a File 1 In the View Use window select the PDF file you want to open and click Zoom...

Страница 543: ...ialog box Note To reopen the file after closing the Zoom in dialog box re enter the password Entering a Password Permissions Password to Edit or Print a File 1 In the View Use window select PDF files and click PDF or Print Strana 543 z celkového počtu 948 Opening Editing Password protected PDF Files ...

Страница 544: ... well the Document Open Password will be required then the Permissions Password will be required 3 Enter the password and click OK The corresponding dialog box opens Important If a password protected PDF file is edited the passwords will be deleted Reset the passwords Setting Passwords for PDF Files Related Topic Setting Passwords for PDF Files Page top Strana 544 z celkového počtu 948 Opening Edi...

Страница 545: ...rt Window View Use Images on your Computer Tab View Use Window Create Edit PDF file Window Print Document Dialog Box Print Photo Dialog Box Send via E mail Dialog Box Correct Enhance Images Window Custom Scan with One click Tab One click Mode Screen Auto Scan Dialog Box Save Dialog Box One click Mode Screen Scan Settings Dialog Box One click Mode Screen PDF Dialog Box Mail Dialog Box OCR Dialog Bo...

Страница 546: ... accompanies the machine View Use Images on your Computer Tab One click You can complete from scanning to saving etc at one time by simply clicking the corresponding icon Custom Scan with One click Tab Switch Mode Switches to One click Mode screen In the One click Mode screen you can complete from scanning to saving etc at one time by simply clicking the corresponding icon One click Mode Screen Sh...

Страница 547: ...Page top Strana 547 z celkového počtu 948 Navigation Mode Screen ...

Страница 548: ...and documents placed on the Platen Photos Documents Platen Screen Scan Import Window Memory Card Opens the Scan Import window with Memory Card selected Import images saved on memory cards Memory Card Screen Scan Import Window Switch Mode Switches to One click Mode screen In the One click Mode screen you can complete from scanning to saving etc at one time by simply clicking the corresponding icon ...

Страница 549: ...Page top Strana 549 z celkového počtu 948 Scan Import Documents or Images Tab ...

Страница 550: ...ndows 7 MP Navigator EX folder in My Pictures folder Windows Vista MP Navigator EX folder in Pictures folder Windows XP MP Navigator EX folder in My Pictures folder Specify Folder Opens the View Use window with Specify Folder selected You can open and use images saved in specific folders Recently Saved Images Opens the View Use window with Recently Saved Images selected You can open and use Scanne...

Страница 551: ...references dialog box you can make advanced settings to MP Navigator EX functions Preferences Dialog Box Guide Opens this guide Related Topic Opening Images Saved on a Computer Page top Strana 551 z celkového počtu 948 View Use Images on your Computer Tab ...

Страница 552: ... opens and you can specify the scan save settings Save Dialog Box One click Mode Screen Save as PDF file Scan documents and save them as PDF files When you click this icon the PDF dialog box opens and you can specify the scan save and application settings PDF Dialog Box Attach to E mail Scan documents or photos and attach them to e mail When you click this icon the Mail dialog box opens and you ca...

Страница 553: ...t used screen appears Preferences The Preferences dialog box opens In the Preferences dialog box you can make advanced settings to MP Navigator EX functions Preferences Dialog Box Guide Opens this guide Important The following restrictions apply when you scan with Document Type set to Auto Mode in the Save dialog box or Custom dialog box When you want to convert text in the scanned image to text d...

Страница 554: ... and BD DVD CD Important The following types of documents cannot be scanned correctly To scan other documents specify the document type A4 size photos Text documents smaller than 2L 5 inches x 7 inches 127 mm x 178 mm such as paperback pages with the spine cut off Documents printed on thin white paper Long narrow documents such as panoramic photos Scanning Photos and Documents Reflective disc labe...

Страница 555: ... not to apply suitable corrections based on the document type Scan Settings Dialog Box Auto Scan Scan Scanning starts Clear Delete all images in the Thumbnail window Note Images not saved on a computer will be deleted To keep important images use Save or other methods to save them to a computer before clicking Clear Save Save the selected images Click to open the Save dialog box and specify the sa...

Страница 556: ...e the image by double clicking it Display Size Changes the size of images in the Thumbnail window Sort by Sorts the images in the Thumbnail window by category or by date ascending or descending Thumbnail Window Thumbnail Window Scanned images are displayed When you select the checkbox of an image the image appears in the Selected Images area Note Thumbnails may appear as when there is not enough m...

Страница 557: ...get image outlined in orange in the Selected Images area Selected Images Area Images selected in the Thumbnail window are displayed Related Topic Easy Scanning with Auto Scan Page top Strana 557 z celkového počtu 948 Auto Scan Screen Scan Import Window ...

Страница 558: ...not be scanned correctly See Placing Documents for details on how to place documents Recommended Image Correction Select this checkbox to apply suitable corrections automatically based on the document type Important When this checkbox is selected the files can be saved in JPEG Exif or PDF format only Scanning may take longer than usual when this checkbox is selected The color tone may change from ...

Страница 559: ...dow 4 Selected Images Area Settings and Operation Buttons View Use Click this when you want to open images and PDF files saved on your computer The View Use window opens View Use Window Auto Scan Click this when you want to scan documents by automatically detecting the document type etc The screen for scanning with Auto Scan appears Auto Scan Screen Scan Import Window Photos Documents Platen Displ...

Страница 560: ... scanner driver checkbox Open Scanner Driver ScanGear starts See ScanGear Scanner Driver Screens for details on ScanGear screens Note This button changes to Scan when you deselect the Use the scanner driver checkbox Clear Delete all images in the Thumbnail window Note Images not saved on a computer will be deleted To keep important images use Save or other methods to save them to a computer before...

Страница 561: ...Enlarges the target image outlined in orange You can also enlarge the image by double clicking it Display Size Changes the size of images in the Thumbnail window Sort by Sorts the images in the Thumbnail window by category or by date ascending or descending Thumbnail Window Thumbnail Window Scanned images are displayed When you select the checkbox of an image the image appears in the Selected Imag...

Страница 562: ...lection Cancels the selection of the target image outlined in orange in the Selected Images area Selected Images Area Images selected in the Thumbnail window are displayed Related Topic Scanning Photos and Documents Page top Strana 562 z celkového počtu 948 Photos Documents Platen Screen Scan Import Window ...

Страница 563: ...scanned images when transferring checkbox is selected on the General Tab of the Preferences dialog box Document Size Select the size of the document to be scanned When you select Custom a screen in which you can specify the document size appears Select a Units then enter the Width and Height and click OK Important When you select Auto Detect the image may not be scanned at the correct position and...

Страница 564: ...s Printed photos and pictures are displayed as a collection of fine dots Moire is a phenomenon where uneven gradation or a stripe pattern appears when such photos or pictures printed with fine dots are scanned Descreen is the function for reducing this moire effect Important You cannot select this checkbox when Document Type is Color Photo Black and White Photo or Text OCR Note Scanning takes long...

Страница 565: ...al when you enable Correct slanted document Detect the orientation of text documents and rotate images Select this checkbox to detect the orientation of the document from the scanned text and rotate the scanned image to the correct orientation Select the language of the document to be scanned in Document Language Important You cannot select this checkbox when Document Type is Color Photo or Black ...

Страница 566: ...cument Type is Color Photo or Black and White Photo You cannot select this checkbox when Document Size is Stitch Assist Defaults Restore the default settings Page top Strana 566 z celkového počtu 948 Scan Settings Dialog Box Photos Documents ...

Страница 567: ...f the machine For details on how to enable writing refer to Setting Up the Card Slot as the Memory Card Drive of the Computer File name Enter the file name of the image to be saved up to 64 characters When saving multiple files 4 digits are appended to each file name Save as type Select a file type to save the scanned images Select JPEG Exif TIFF or BMP Important You cannot select JPEG Exif when D...

Страница 568: ...specified in Save in with the current date and save scanned files in it A subfolder with a name such as 2010_01_01 Year_Month_Date will be created If this checkbox is not selected files are saved directly in the folder specified in Save in Page top Strana 568 z celkového počtu 948 Save Dialog Box ...

Страница 569: ...anned images as PDF files You can save multiple documents as one PDF file or add pages to a PDF file created with MP Navigator EX Important You cannot save images scanned at 10501 pixels or more in the vertical and horizontal directions When Opened from the Scan Import Window When Opened from the View Use Window Save as type Select a PDF file type to save the scanned images Strana 569 z celkového ...

Страница 570: ...splayed when you select PDF Add Page for Save as type and specify the PDF file to which images are added To change the file click Browse to specify another one Important Images can only be added to PDF files created with MP Navigator EX You cannot specify PDF files created with other applications PDF files edited in other applications cannot be specified as well File name Enter the file name of th...

Страница 571: ... depending on the document language Only text documents written in languages that can be selected from Document Language are supported The orientation of the following types of documents may not be corrected as the text cannot be detected correctly Resolution is outside the range of 300 dpi to 600 dpi Font size is outside the range of 8 points to 48 points Documents containing special fonts effect...

Страница 572: ...e if you repeatedly save them with high compression Important Compression type cannot be set when Color Mode is Black and White Compression type cannot be set when scanning by selecting PDF on the Operation Panel of the machine Security Set passwords for opening editing and printing the created PDF files Important This function is not available when images are automatically saved after scanning No...

Страница 573: ...w Use Click this when you want to open images and PDF files saved on your computer The View Use window opens View Use Window Auto Scan Click this when you want to scan documents by automatically detecting the document type etc The screen for scanning with Auto Scan appears Auto Scan Screen Scan Import Window Photos Documents Platen Click this when you want to scan photos documents magazines and ot...

Страница 574: ...king it You can check all pages when you select a PDF file Refresh Refreshes the Thumbnail window contents Display Size Changes the size of images in the Thumbnail window Sort by Sorts the images in the Thumbnail window by date ascending or descending Thumbnail Window Thumbnail Window Images saved on the memory card are displayed by year or month year When you select the checkbox of an image the i...

Страница 575: ...Related Topic Importing Images Saved on a Memory Card Page top Strana 575 z celkového počtu 948 Memory Card Screen Scan Import Window ...

Страница 576: ...puter 1 Display Setting Items 2 Image Handling Buttons 3 Toolbar 4 Thumbnail Window 5 Selected Images Area Important For PDF files only those created with MP Navigator EX are displayed You cannot display PDF files created with other applications PDF files edited in other applications cannot be displayed as well Display Setting Items Scan Import Click this when you want to scan photos documents mag...

Страница 577: ...o the right Image date is the scanned or sent date Click Clear History to clear all data date folders and images displayed in Recently Saved Images Note The actual image files are not deleted Search The advanced search options opens Searching Images Jump to Main Menu Jumps to the Main Menu Important Jump to Main Menu is not displayed when the window is opened directly from Solution Menu EX Image H...

Страница 578: ...ker Model Description and User Comment is searched Note Search images in My Box Scanned Imported Images Recently Saved Images or a selected folder and its subfolders Refresh Refreshes the Thumbnail window contents Display Size Changes the size of images in the Thumbnail window Sort by Sorts the images in the Thumbnail window by category date ascending or descending or name ascending or descending ...

Страница 579: ...our custom categories Unclassified Displays images that are not classified Images N The number of images classified into the category is displayed Selected n The number of images with the checkbox selected is displayed Note This portion is displayed only when one or more images are selected Close All Open All You can hide or show all images in the displayed categories This button is displayed only...

Страница 580: ...log box you can add delete categories displayed in Custom Categories See Classifying Images into Categories for details Classify Images Images imported from hard disks or memory cards appear in Unclassified Click Classify Images to classify them automatically This button is displayed only when My Box Scanned Imported Images or Specify Folder is displayed Note Classification may take time if there ...

Страница 581: ...images scanned at 10501 pixels or more in the vertical and horizontal directions If a password protected PDF file is edited the passwords will be deleted Reset the passwords Setting Passwords for PDF Files You can create or edit up to 99 pages at one time using MP Navigator EX Rearrange Pages You can move the selected image outlined in orange Moves the selected image to the top Moves the selected ...

Страница 582: ...Box for details on the Save as PDF file dialog box Save All Pages Opens the Save as PDF file dialog box Specify the save settings and save all pages in the list as one PDF file or save all pages as separate PDF files Note See Save as PDF file Dialog Box for details on the Save as PDF file dialog box Finish Closes the Create Edit PDF file window Toolbar Rotate Left Rotates the page 90 degrees count...

Страница 583: ...e image displayed in Preview Full screen Displays the entire image Thumbnail Mode Switches to Thumbnail Mode The pages are displayed in thumbnail view Page top Strana 583 z celkového počtu 948 Create Edit PDF file Window ...

Страница 584: ...r Source Select paper source Page Layout Select a print type Normal size Printing Print one image per sheet Scaled Printing Print images at the selected scale enlarged or reduced Fit to Page Printing Print an image at the paper size enlarged or reduced Borderless Printing Print the image on an entire sheet of paper without borders Page Layout Printing 2 on 1 Layout and print two images on a sheet ...

Страница 585: ...ted 90 degrees depending on its size Scale Select a scale from the list Important At normal size 100 some images may be printed small or with some portions cropped In that case select Auto to resize the print in proportion to the paper size Paper Size Select the size of paper for printing Match the size to the size of the paper set in the machine Note Selectable paper sizes depend on the selected ...

Страница 586: ...oling click Cancel To cancel while printing click Cancel Printing in the confirmation window for the printer status To open a confirmation window for the printer status click printer icon on the taskbar Close Close the Print Document dialog box Page top Strana 586 z celkového počtu 948 Print Document Dialog Box ...

Страница 587: ...te Double click an image to display it in a different window Printer Select the printer to use Properties Displays the selected printer s advanced setting screen Paper Size Select the size of paper for printing Match the size to the size of the paper set in the machine Media Type Select the type of paper for printing Print quality may be fixed depending on the paper type Page Layout Select a print...

Страница 588: ...ut is Normal size Printing For others the image is automatically rotated according to the aspect ratio of the paper Copies Specify the number of copies to print Vivid Photo Select this checkbox to print the image in vivid colors Preview before printing Select this checkbox to display the print result before printing Print Starts printing Note Only the images in the Thumbnail window with the checkb...

Страница 589: ...e program set up on the General tab of the Preferences dialog box is displayed Select the e mail software program you want to use Adjust attachment file size When the file type is JPEG selecting this checkbox allows you to resize the images Select a size from Size Save in Displays the folder in which to save the images To change the folder click Browse to specify another one If resized the resized...

Страница 590: ...Page top Strana 590 z celkového počtu 948 Send via E mail Dialog Box ...

Страница 591: ...de for comparison 1 Task Area 2 Toolbar Important Image correction enhancement cannot be applied to PDF files or black and white binary files Note The Correct Enhance Images window can also be opened by clicking Image Correction Enhancement in the Zoom in dialog box It may take a while to correct large images See View Use Window for details on the View Use window Task Area Available tasks and sett...

Страница 592: ...nkles You can adjust the effect level using the slider Apply to all images Automatically corrects enhances all images displayed in the thumbnail list OK Applies the selected effect to the selected image or all images Reset Selected Image Cancels all corrections and enhancements applied to the selected image Save Selected Image Saves the corrected enhanced image the selected one Save All Corrected ...

Страница 593: ...e image Blur Blurs the outline of the subjects to soften the image Move the slider to the right to soften the image Show through Removal Removes show through of text from the reverse side or removes the base color Adjust the show through level to prevent text on the reverse side of thin document or the base color of the document from appearing on the image Move the slider to the right to increase ...

Страница 594: ...reducing the cast color and increasing the complementary color Colorcast is a phenomenon where a specific color affects the entire picture due to the weather or ambient strong colors It is usually difficult to correct the image completely by adjusting only one color pair It is recommended that you find a portion in the image where it should be white and adjust all three color pairs so that the por...

Страница 595: ... selected area You can adjust the effect level using the slider Blemish Remover Removes moles in the selected area OK Applies the selected effect to the specified area Undo Cancels the latest correction enhancement Reset Selected Image Cancels all corrections and enhancements applied to the selected image Save Selected Image Saves the corrected enhanced image the selected one Save All Corrected Im...

Страница 596: ... to move the trimming area Note Place the main subjects along the broken white lines or at the intersections to create a balanced image Enlarge Enlarges the displayed image Reduce Reduces the displayed image Full screen Displays the entire image in Preview Compare Opens a window in which you can compare the images before and after the correction enhancement side by side The source image appears on...

Страница 597: ...Page top Strana 597 z celkového počtu 948 Correct Enhance Images Window ...

Страница 598: ...s When you click this icon the PDF dialog box opens and you can specify the scan save and application settings PDF Dialog Box Mail Scan documents or photos and attach them to e mail When you click this icon the Mail dialog box opens and you can specify the scan save and e mail software program settings Mail Dialog Box OCR Scan text documents then extract text in the image and display it in Notepad...

Страница 599: ...can with Document Type set to Auto Mode in the Save dialog box or Custom dialog box When you want to convert text in the scanned image to text data specify Document Type do not select Auto Mode Related Topic Easy Scanning with One click Page top Strana 599 z celkového počtu 948 One click Mode Screen ...

Страница 600: ... mm such as paperback pages with the spine cut off Documents printed on thin white paper Long narrow documents such as panoramic photos Reflective disc labels may not be scanned properly Place documents correctly according to the type of document to be scanned Otherwise documents may not be scanned correctly See Placing Documents for details on how to place documents Note To reduce moire click ano...

Страница 601: ...anned images when transferring checkbox is selected on the General Tab of the Preferences dialog box When Save as type is JPEG Exif You can specify a compression type for JPEG files Select High Low Compression Standard or Low High Compression Important This setting is not available when the Compress scanned images when transferring checkbox is selected on the General Tab of the Preferences dialog ...

Страница 602: ...X Apply Saves and applies the specified settings Click Cancel instead of Apply to cancel the specified settings Cancel Cancels the specified settings The current screen closes Defaults Returns all settings in the screen to their defaults Scan Scans and saves documents with the specified settings When Save as type is Auto a confirmation appears Click Open Manual to open this guide if it is installe...

Страница 603: ...upported by Auto Mode are photos postcards business cards magazines newspapers text documents and BD DVD CD The following types of documents cannot be scanned correctly with Auto Mode In that case specify the document type or size A4 size photos Text documents smaller than 2L 5 inches x 7 inches 127 mm x 178 mm such as paperback pages with the spine cut off Documents printed on thin white paper Lo...

Страница 604: ...ich you can make advanced scan settings Scan Settings Dialog Box One click Mode Screen Save Settings Automatically save the image to your computer after scanning it Select this to save the images to your computer as specified after scanning them The File name Save as type and Save in settings will be displayed Important If you select this function you will not be able to set passwords for PDF file...

Страница 605: ...creating PDF files See PDF Settings Dialog Box for details Save in Displays the folder in which to save the scanned images To change the folder click Browse to specify another one By default the scanned images are saved in the following folders Windows 7 MP Navigator EX folder in My Pictures folder Windows Vista MP Navigator EX folder in Pictures folder Windows XP MP Navigator EX folder in My Pict...

Страница 606: ...Use window or Explorer after saving the images Start scanning by clicking the one click button Select this checkbox to start scanning when you click an icon in One click Mode Apply Saves and applies the specified settings Click Cancel instead of Apply to cancel the specified settings Cancel Cancels the specified settings The current screen closes Defaults Returns all settings in the screen to thei...

Страница 607: ...t Place documents correctly according to the type of document to be scanned Otherwise documents may not be scanned correctly See Placing Documents for details on how to place documents Color Mode Select how to scan the document Color This mode renders the image in 256 levels 8 bit of R ed G reen and B lue Grayscale This mode renders the image in 256 levels 8 bit of black and white Black and White ...

Страница 608: ...nctions are not available when the Scan Settings dialog box is opened from the OCR dialog box Auto Photo Fix is not available when Color Mode is Grayscale or Black and White Auto Document Fix is not available when Color Mode is Black and White Auto Photo Fix and Auto Document Fix are not available when the Compress scanned images when transferring checkbox is selected on the General Tab of the Pre...

Страница 609: ...ritten documents Documents containing both vertical and horizontal lines tables Note Scanning takes longer than usual when you enable Correct slanted document Detect the orientation of text documents and rotate images Select this checkbox to detect the orientation of the document from the scanned text and rotate the scanned image to the correct orientation Select the language of the document to be...

Страница 610: ...Defaults Restore the default settings Page top Strana 610 z celkového počtu 948 Scan Settings Dialog Box One click Mode Screen ...

Страница 611: ...r PDF Add Page PDF Save each of the selected images as a separate PDF file PDF Multiple Pages Save multiple images in one PDF file Note PDF Multiple Pages is displayed when multiple images are scanned PDF Add Page Add the scanned images to a PDF file The images are added to the end of the PDF file You cannot rearrange the pages of the PDF file to which the images are added Important Images can onl...

Страница 612: ...pe and specify the PDF file to which images are added To change the file click Browse to specify another one Important Images can only be added to PDF files created with MP Navigator EX You cannot specify PDF files created with other applications PDF files edited in other applications cannot be specified as well Rotate Left 90 Rotate Right 90 Rotates scanned images 90 degrees counter clockwise or ...

Страница 613: ...Page top Strana 613 z celkového počtu 948 Save Dialog Box ...

Страница 614: ...formation specified on the right side of the screen Advanced Information Settings Area You can input Exif information such as the title and shooting data Select the checkbox of the items you want to specify and select or enter information Apply the Same Setting of Input Items Automatically Select this checkbox to automatically display the information you specified for the previous image Apply Afte...

Страница 615: ...an Settings Document Type Select the type of document to be scanned Color Mode Select how to scan the document Document Size Select the size of the document to be scanned When you select Custom a screen in which you can specify the document size appears Select a Units then enter the Width and Height and click OK Important When you select Auto Detect the image may not be scanned at the correct posi...

Страница 616: ...one PDF file PDF Add Page Add the scanned images to a PDF file The images are added to the end of the PDF file You cannot rearrange the pages of the PDF file to which the images are added Important Images can only be added to PDF files created with MP Navigator EX You cannot specify PDF files created with other applications PDF files edited in other applications cannot be specified as well Images ...

Страница 617: ... image After scanning you can set the passwords in the Save as PDF file dialog box Setting Passwords for PDF Files Application Settings Open with Specify an application with which to open scanned images Drag and drop the icon of an application that supports the file format displayed in Save as type The specified application starts after images are scanned Important Depending on the specified appli...

Страница 618: ...zontal directions Save as type Select a PDF file type to save the scanned images PDF Save each of the selected images as a separate PDF file PDF Multiple Pages Save multiple images in one PDF file Note PDF Multiple Pages is displayed when multiple images are scanned PDF Add Page Add the scanned images to a PDF file The images are added to the end of the PDF file You cannot rearrange the pages of t...

Страница 619: ...ecified as well Rotate Left 90 Rotate Right 90 Rotates scanned images 90 degrees counter clockwise or clockwise Select the image you want to rotate and click Rotate Left 90 or Rotate Right 90 File name Enter the file name of the image to be saved up to 64 characters When saving multiple files 4 digits are appended to each file name Save in Displays the folder in which to save the PDF files To chan...

Страница 620: ...Select how to scan the document Document Size Select the size of the document to be scanned When you select Custom a screen in which you can specify the document size appears Select a Units then enter the Width and Height and click OK Important When you select Auto Detect the image may not be scanned at the correct position and size In that case change the size to the actual document size A4 Lette...

Страница 621: ...hen Save as type is JPEG Exif You can specify a compression type for JPEG files Select High Low Compression Standard or Low High Compression Important This setting is not available when the Compress scanned images when transferring checkbox is selected on the General Tab of the Preferences dialog box When Save as type is PDF or PDF Multiple Pages Make advanced settings for creating PDF files See P...

Страница 622: ...ton is not displayed when the dialog box is opened directly from Solution Menu EX Apply Saves and applies the specified settings Click Cancel instead of Apply to cancel the specified settings Cancel Cancels the specified settings The current screen closes Defaults Returns all settings in the screen to their defaults Scan Scans documents with the specified settings When scanning is completed attach...

Страница 623: ...ings Document Type Select the type of document to be scanned Color Mode Select how to scan the document Document Size Select the size of the document to be scanned When you select Custom a screen in which you can specify the document size appears Select a Units then enter the Width and Height and click OK Resolution Select the resolution at which to scan documents Resolution Use the scanner driver...

Страница 624: ...s scanned images when transferring checkbox is selected on the General Tab of the Preferences dialog box Save in Displays the folder in which to save the scanned images To change the folder click Browse to specify another one By default the scanned images are saved in the following folders Windows 7 MP Navigator EX folder in My Pictures folder Windows Vista MP Navigator EX folder in Pictures folde...

Страница 625: ...ing multiple languages For further procedures refer to the application s manual Reset Cancels the application setting Set Allows you to select an application Important Depending on the specified application the text may not be extracted correctly or the application may not start Start scanning by clicking the one click button Select this checkbox to start scanning when you click an icon in One cli...

Страница 626: ...to Mode are photos postcards business cards magazines newspapers text documents and BD DVD CD The following types of documents cannot be scanned correctly with Auto Mode In that case specify the document type or size A4 size photos Text documents smaller than 2L 5 inches x 7 inches 127 mm x 178 mm such as paperback pages with the spine cut off Documents printed on thin white paper Long narrow docu...

Страница 627: ...ecify Opens the Scan Settings dialog box in which you can make advanced scan settings Scan Settings Dialog Box One click Mode Screen Save Settings Automatically save the image to your computer after scanning it Select this to save the images to your computer as specified after scanning them The File name Save as type and Save in settings will be displayed File name Enter the file name of the image...

Страница 628: ...saved in the following folders Windows 7 MP Navigator EX folder in My Pictures folder Windows Vista MP Navigator EX folder in Pictures folder Windows XP MP Navigator EX folder in My Pictures folder Save to a Subfolder with Current Date Select this checkbox to create a subfolder in the folder specified in Save in with the current date and save scanned files in it A subfolder with a name such as 201...

Страница 629: ...ng Set Allows you to select an application to start Start scanning by clicking the one click button Select this checkbox to start scanning when you click an icon in One click Mode Apply Saves and applies the specified settings Click Cancel instead of Apply to cancel the specified settings Cancel Cancels the specified settings The current screen closes Defaults Returns all settings in the screen to...

Страница 630: ... Preferences dialog box you can specify general MP Navigator EX settings and how to respond when scanning using the Operation Panel via the General and Scanner Button Settings tabs Note See the corresponding sections below for details on each tab General Tab Scanner Button Settings Tab Save to PC Scanner Button Settings Tab Attach to E mail Page top Strana 630 z celkového počtu 948 Preferences Dia...

Страница 631: ... images may not be scanned at the correct positions and sizes Business cards panorama photos and bordered photos may not be cropped accurately when scanned In that case deselect the Compress scanned images when transferring checkbox and scan again The following restrictions apply when the Compress scanned images when transferring checkbox is selected Text OCR cannot be selected for Document Type i...

Страница 632: ...ccur if you set the destination to a network folder Be sure to specify a local folder Application to run Displays the applications that can be started via MP Navigator EX Install the applications from the Setup CD ROM that accompanies the machine For Attach to E mail you can select an e mail software program to start For Open PDF file the application associated with the file extension pdf by the o...

Страница 633: ...When the checkbox is not selected you can scan up to 10 pages at one time Page top Strana 633 z celkového počtu 948 General Tab ...

Страница 634: ...etting Items on the Operation Panel of the Machine for details on the items to be set using the Operation Panel of the machine Event Select Event Displays the scan modes that can be selected on the Operation Panel of the machine Select Save to PC Document Type Displays the document types that can be selected on the Operation Panel of the machine Actions Scan Settings Document Size Set this item us...

Страница 635: ...e settings Select a file format for items detected as documents and for items detected as photos When JPEG Exif is Selected Click Set to specify a compression type for JPEG files Select High Low Compression Standard or Low High Compression Important This setting is not available when the Compress scanned images when transferring checkbox is selected on the General Tab of the Preferences dialog box...

Страница 636: ...r in My Pictures folder Save to a Subfolder with Current Date Select this checkbox to create a subfolder in the folder specified in Save in with the current date and save scanned files in it A subfolder with a name such as 2010_01_01 Year_Month_Date will be created If this checkbox is not selected files are saved directly in the folder specified in Save in Open the save dialog box after scanning t...

Страница 637: ...e Setting Items on the Operation Panel of the Machine for details on the items to be set using the Operation Panel of the machine Event Select Event Displays the scan modes that can be selected on the Operation Panel of the machine Select Attach to E mail Document Type Displays the document types that can be selected on the Operation Panel of the machine Actions Scan Settings Document Size Set thi...

Страница 638: ...ed settings for creating PDF files See PDF Settings Dialog Box for details Important Use the Operation Panel of the machine to set the compression type for saving Save in Displays the folder in which to save the scanned images To change the folder click Browse to specify another one By default the scanned images are saved in the following folders Windows 7 MP Navigator EX folder in My Pictures fol...

Страница 639: ... Important Place documents correctly according to the type of document to be scanned Otherwise documents may not be scanned correctly See Placing Documents for details on how to place documents Document Size Set this item using the Operation Panel of the machine Scanning Resolution Set this item using the Operation Panel of the machine Recommended Image Correction Select this checkbox to apply sui...

Страница 640: ...mall fonts Documents with small amount of text Documents containing figures images Hand written documents Documents containing both vertical and horizontal lines tables Note Scanning takes longer than usual when you enable Correct slanted document Detect the orientation of text documents and rotate images Select this checkbox to detect the orientation of the document from the scanned text and rota...

Страница 641: ...Restore the default settings Page top Strana 641 z celkového počtu 948 Scan Settings Dialog Box Scanner Button Settings ...

Страница 642: ... Files Other than Scanned Images You can save or print data other than scanned images using MP Navigator EX Using images saved on a memory card Importing Images Saved on a Memory Card Using images saved on a computer Opening Images Saved on a Computer Page top Strana 642 z celkového počtu 948 Appendix Opening Files Other than Scanned Images ...

Страница 643: ...t make sure that the Access Lamp of the machine is not flashing then remove the memory card Then insert another memory card The machine s Card Slot memory card may become inaccessible In that case restart the machine or turn it off and reconnect the USB cable 1 Insert a memory card containing images PDF files into the machine s Card Slot For details on how to insert a memory card into the machine ...

Страница 644: ...tor EX folder in Pictures folder Windows XP MP Navigator EX folder in My Pictures folder Save to a Subfolder with Current Date Select this checkbox to create a subfolder in the folder specified in Save in with the current date and save imported files in it A subfolder with a name such as 2010_01_01 Year_Month_Date will be created If this checkbox is not selected files are saved directly in the fol...

Страница 645: ...ee the corresponding sections below for details on using the imported images and PDF files Creating Editing PDF Files Printing Documents Printing Photos Sending via E mail Editing Files Page top Strana 645 z celkového počtu 948 Importing Images Saved on a Memory Card ...

Страница 646: ...s Specify Folder or Recently Saved Images Click My Box Scanned Imported Images to open images saved in My Box Scanned Imported Images click Specify Folder to open images saved in a specific folder or click Recently Saved Images to open recently saved images Note If the Show this window at startup checkbox is not selected the last used screen appears If the Scan Import window is displayed click Vie...

Страница 647: ... want to do with them See the corresponding sections below for details on using images Creating Editing PDF Files Printing Documents Printing Photos Sending via E mail Editing Files Page top Strana 647 z celkového počtu 948 Opening Images Saved on a Computer ...

Страница 648: ...č skenera Skenovanie s rozšírenými nastaveniami pomocou programu ScanGear ovládača skenera Oprava obrázkov a úprava farieb pomocou programu ScanGear ovládača skenera Obrazovky programu ScanGear ovládača skenera Príloha Užitočné informácie o skenovaní Na začiatok strany Strana 648 z celkového počtu 948 Skenovanie pomocou iného aplikačného softvéru ...

Страница 649: ...an results or set document type and output size etc when scanning documents It is useful when you want to scan in a specific color tone as it allows you to make various corrections and adjust brightness contrast etc Screens There are three modes Basic Mode Advanced Mode and Auto Scan Mode Switch modes by clicking a tab on the upper right of the screen Note ScanGear starts in the last used mode Set...

Страница 650: ...Auto Scan Mode Use the Auto Scan Mode tab to scan easily by simply placing the document on the Platen and clicking Scan Page top Strana 650 z celkového počtu 948 What Is ScanGear Scanner Driver ...

Страница 651: ...king simple image corrections Scanning in Basic Mode Scanning documents after making advanced image corrections and brightness color adjustments Scanning in Advanced Mode Scanning with a simple operation Scanning in Auto Scan Mode Scanning multiple documents at one time after making image corrections and color adjustments Scanning Multiple Documents at One Time with ScanGear Scanner Driver Page to...

Страница 652: ... from the Navigation Mode screen of MP Navigator EX 1 Start MP Navigator EX and open the Navigation Mode screen Starting MP Navigator EX 2 In Scan Import click Photos Documents Platen The Scan Import window opens 3 Select the Use the scanner driver checkbox then click Open Scanner Driver The ScanGear screen appears One click Mode Screen Follow these steps to start ScanGear from the One click Mode ...

Страница 653: ...low these steps example to start ScanGear from an application The procedure varies depending on the application For details refer to the application s manual 1 Start the application 2 On the File menu of the application select Select Source and select the machine 3 Select the command to scan a document Scan Import Acquire image etc The ScanGear screen appears Page top Strana 653 z celkového počtu ...

Страница 654: ...case click Thumbnail on the Toolbar to switch to whole image view and scan Photos that have a whitish border Documents printed on white paper hand written text business cards etc Thin documents Thick documents The following types of documents cannot be cropped correctly Documents smaller than 1 18 inches 3 cm square Photos that have been cut to various shapes 1 Place the document on the Platen the...

Страница 655: ...f the cropping frame scan area on the preview image Adjusting Cropping Frames 7 Set Image corrections as required 8 Click Scan Starts scanning Note Click Information to open a dialog box in which you can check the current scan settings document type etc ScanGear s response after scanning can be specified in Status of ScanGear dialog after scanning on the Scan tab of the Preferences dialog box Scan...

Страница 656: ...ocuments may not be cropped correctly In that case click Thumbnail on the Toolbar to switch to whole image view and scan Photos that have a whitish border Documents printed on white paper hand written text business cards etc Thin documents Thick documents The following types of documents cannot be cropped correctly Documents smaller than 1 18 inches 3 cm square Photos that have been cut to various...

Страница 657: ...ew first 5 Set Output Settings Output Settings 6 Adjust the cropping frame scan area correct image and adjust colors as required Adjusting Cropping Frames Image Settings Color Adjustment Buttons 7 Click Scan Starts scanning Note Click Information to open a dialog box in which you can check the current scan settings document type etc ScanGear s response after scanning can be specified in Status of ...

Страница 658: ...he Basic Mode tab or the Advanced Mode tab Scanning in Basic Mode Scanning in Advanced Mode 1 Place the document on the Platen then start ScanGear scanner driver Placing Documents Starting ScanGear Scanner Driver 2 Click the Auto Scan Mode tab The Auto Scan Mode tab appears Note Select the Execute recommended image correction checkbox to apply suitable corrections automatically according to the ty...

Страница 659: ...Related Topic Auto Scan Mode Tab Page top Strana 659 z celkového počtu 948 Scanning in Auto Scan Mode ...

Страница 660: ... white paper hand written text business cards etc Thin documents Thick documents Scanning Multiple Documents in Whole Image View The following types of documents cannot be cropped correctly Documents smaller than 1 18 inches 3 cm square Photos that have been cut to various shapes Note See Scanning in Auto Scan Mode to scan easily by automatically detecting the document type You can also scan multi...

Страница 661: ... as required Note You can correct each image separately Select the frame you want to correct In thumbnail view you can only create one cropping frame scan area per image To create multiple cropping frames in an image scan in whole image view Scanning Multiple Documents in Whole Image View 7 Select the images you want to scan Select the checkboxes of the images you want to scan Strana 661 z celkové...

Страница 662: ...n changes to Whole Image 2 Adjust the scan areas cropping frames Adjust the size and position of the cropping frame scan area on the preview image You can also create two or more cropping frames If an area is not specified the document will be scanned at the document size Auto Crop If an area is specified only the portion in the specified area will be scanned Adjusting Cropping Frames 3 Set Destin...

Страница 663: ...fter scanning can be specified in Status of ScanGear dialog after scanning on the Scan tab of the Preferences dialog box Scan Tab Page top Strana 663 z celkového počtu 948 Scanning Multiple Documents at One Time with ScanGear S ...

Страница 664: ...ewing and changing the color tone of the entire image to scan Adjusting Colors Using a Color Pattern Brightening colors that have faded with time or due to colorcast Adjusting Saturation and Color Balance Adjusting images that are too dark or bright or too flat due to lack of contrast Adjusting Brightness and Contrast Adjusting the color tone using histogram a graph showing brightness distribution...

Страница 665: ...s and correct faded colors when scanning images Setting Items Click Arrow of a function and select an item from the pull down menu Important Do not apply these functions to images without moire dust scratches or faded colors The color tone may be adversely affected See Image Settings for details and precautions on each function Note See Scanning in Advanced Mode to start the Advanced Mode tab of S...

Страница 666: ...h photos or pictures printed with fine dots are scanned Descreen is the function for reducing this moire effect Reducing dust and scratches Set Reduce Dust and Scratches to Low Medium or High according to the degree of dust and scratches None Medium Correcting photos that have faded with time or due to colorcast Set Fading Correction to Low Medium or High according to the degree of fading or color...

Страница 667: ...ht Correction to Low Medium or High according to the degree of backlight None Medium Correcting shadows that appear between pages when scanning open booklets Set Gutter Shadow Correction to Low Medium or High according to the degree of shadows None Medium Page top Strana 667 z celkového počtu 948 Correcting Images Unsharp Mask Reduce Dust and Scratch ...

Страница 668: ...tern You can preview color changes and reproduce natural colors by using the color pattern function in ScanGear scanner driver s Basic Mode tab Color Adjustment Correct colors that have faded with time or due to colorcast Colorcast is a phenomenon where a specific color affects the entire picture due to the weather or ambient strong colors Strana 668 z celkového počtu 948 Adjusting Colors Using a ...

Страница 669: ...s you adjust them Below is an example of correcting a bluish image Since Blue and Green are too strong click the Yellow and Magenta arrows to correct Before After Note Color adjustments are applied only to the scan area cropping frame or the frame selected in thumbnail view You can select multiple frames or cropping frames by clicking them while pressing the Ctrl key You can also select a color to...

Страница 670: ...uration vividness You can brighten colors that have faded with time etc Move Slider under Saturation to the left to decrease the saturation darken the image and to the right to increase the saturation brighten the image You can also enter a value 127 to 127 Saturation decreased Original image Saturation increased Note The natural color tone of the original image may be lost if you increase saturat...

Страница 671: ...ucing the cast color and increasing the complementary color It is usually difficult to correct the image completely by adjusting only one color pair It is recommended that you find a portion in the image where it should be white and adjust all three color pairs so that the portion turns white You can also enter a value 127 to 127 Below is an example of an image in which the Cyan Red pair has been ...

Страница 672: ...n arrow to switch to detailed view Click Up arrow to return to the previous view Click Defaults to reset all adjustments in the current window Channel Each dot of an image is a mixture of Red Green and Blue in various proportions gradation These colors can be adjusted individually as a channel Master Adjust the Red Green and Blue combined Red Adjust the Red channel Green Adjust the Green channel B...

Страница 673: ...e between the brighter and darker parts of an image Increasing contrast will increase the difference thus sharpening the image Decreasing contrast will decrease the difference thus softening the image Move Slider under Contrast to the left to decrease and right to increase the contrast of the image You can also enter a value 127 to 127 Decreased contrast Original image Increased contrast Note Incr...

Страница 674: ...s a mixture of Red Green and Blue in various proportions gradation These colors can be adjusted individually as a channel Master Adjust the Red Green and Blue combined Red Adjust the Red channel Green Adjust the Green channel Blue Adjust the Blue channel Note Only Grayscale will be displayed in Channel when Color Mode is Grayscale Reading Histograms You can see the histogram of a specified area fo...

Страница 675: ...d white point All parts to the right of White point Slider will turn white level 255 When Image Adjustment is set to anything but None the adjustments shown below are performed automatically Moving the Black point and White point Sliders Move the Black point Slider or White point Slider to adjust brightness Images with more data distributed to the highlight side Move the Black point Slider toward ...

Страница 676: ...ogram to change the setting The point clicked with Black point Dropper will be the darkest point You can also enter a value 0 to 245 The point clicked with Mid point Dropper will be the middle of the tonal range You can also enter a value 5 to 250 The point clicked with White point Dropper will be the brightest point You can also enter a value 10 to 255 Click Dropper for Gray Balance and click the...

Страница 677: ...of Red Green and Blue in various proportions gradation These colors can be adjusted individually as a channel Master Adjust the Red Green and Blue combined Red Adjust the Red channel Green Adjust the Green channel Blue Adjust the Blue channel Note Only Grayscale will be displayed in Channel when Color Mode is Grayscale Reading Tone Curves With ScanGear scanning images via a scanner is the input an...

Страница 678: ... in a bright toned image when viewed on a monitor Underexposure Concave curve The midtone data of the input side is stretched toward the shadow of the output side resulting in a dark toned image when viewed on a monitor High contrast S curve The highlight and shadow of the input side are enhanced resulting in a high contrast image Reverse the negative positive image Downward sloping line The input...

Страница 679: ...Edit custom curve You can drag specific points on the Tone Curve to freely adjust the brightness of the corresponding areas Page top Strana 679 z celkového počtu 948 Adjusting Tone Curve ...

Страница 680: ...color as black or white By adjusting the threshold level you can sharpen text in a document or reduce show through in newspapers This function is available when Color Mode is Black and White In ScanGear scanner driver s Advanced Mode tab click Threshold Note Click Defaults to reset all adjustments in the current window Adjusting Threshold Move Slider to the right to increase the threshold value an...

Страница 681: ...ns describe ScanGear scanner driver s screens and functions and how to use ScanGear Basic Mode Tab Advanced Mode Tab Input Settings Output Settings Image Settings Color Adjustment Buttons Auto Scan Mode Tab Preferences Dialog Box Scanner Tab Preview Tab Scan Tab Color Settings Tab Page top Strana 681 z celkového počtu 948 ScanGear Scanner Driver Screens ...

Страница 682: ...was opened Settings and Operation Buttons Select Source Photo Color Scan color photos Magazine Color Scan color magazines Newspaper Grayscale Scan text and line drawings in black and white Document Grayscale Scan documents and photos in black and white Select this mode to create high resolution black and white images Note When you select a document type the unsharp mask function will be active The...

Страница 683: ...y the item selected in Destination Flexible Allows you to freely adjust the cropping frames In thumbnail view Drag the mouse over a thumbnail to display a cropping frame When a cropping frame is displayed the portion within the cropping frame will be scanned When no cropping frame is displayed each frame is scanned individually In whole image view When no cropping frame is displayed the entire Pre...

Страница 684: ...items listed in Output Size List Important You cannot delete predefined output sizes such as A4 and 1024 x 768 pixels Note Save up to 10 items An error message appears when you enter a value outside the setting range Enter a value within the setting range Note For details on whether or how the cropping frame is initially displayed on a preview image see Cropping Frame on Previewed Images in Previe...

Страница 685: ... pages when scanning open booklets Important For precautions on using this function see Gutter Shadow Correction Color Pattern Allows you to adjust the image s overall color You can correct colors that have faded due to colorcast etc and reproduce natural colors while previewing color changes Adjusting Colors Using a Color Pattern Important This setting is not available when you select Color Match...

Страница 686: ...ew Uncheck All Frames This button is available when two or more frames are displayed Deselects the checkbox of the image in thumbnail view Select All Frames This button is available when two or more frames are displayed Selects the image in thumbnail view and the image will be outlined in blue Select All Cropping Frames This button is available when there are two or more cropping frames All croppi...

Страница 687: ...ed no outline The settings will not be applied Double click a frame to zoom in on the image Click Frame Advance at the bottom of the screen to display the previous or next frame Double click the frame again to return the display to its non magnified state When Whole Image is displayed on the Toolbar Items on the Platen are scanned and displayed as a single image All portions in the cropping frames...

Страница 688: ...Related Topic Scanning in Basic Mode Page top Strana 688 z celkového počtu 948 Basic Mode Tab ...

Страница 689: ...lbar 3 Preview Area Note The displayed items vary by document type and how the screen was opened Settings and Operation Buttons Favorite Settings You can name and save a group of settings Input Settings Output Settings Image Settings and Color Adjustment Buttons on Advanced Mode tab and load it as required It is convenient to save a group of settings if you will be using it repeatedly You can also...

Страница 690: ...t the image s overall brightness or contrast and adjust its highlight and shadow values histogram or balance tone curve Color Adjustment Buttons Zoom Zooms in on an image or the portion within the cropping frame When the image is zoomed in Zoom changes to Undo Click Undo to return the display to its non magnified state In thumbnail view When multiple images are displayed in thumbnail view clicking...

Страница 691: ... take time to process the images if the total size of the scanned images exceeds a certain size In that case a warning message appears It is recommended that you reduce the total size To continue scan in whole image view Preferences The Preferences dialog box opens and you can make scan preview settings Preferences Dialog Box Close Closes ScanGear scanner driver Toolbar Toolbar You can adjust or r...

Страница 692: ...sult will be reflected in the scanned image The image returns to its original state when you preview again Auto Crop Displays and adjusts the cropping frame automatically to the size of the document displayed in the Preview area The scan area is reduced every time you click this button if there are croppable areas within the cropping frame Check All Frames This button is available when two or more...

Страница 693: ... Only the images with the checkbox selected will be scanned Note When multiple images are previewed different outlines indicate different selection status Focus Frame thick blue outline The displayed settings will be applied Selected Frame thin blue outline The settings will be applied to the Focus Frame and Selected Frames simultaneously You can select multiple images by clicking them while press...

Страница 694: ...ayed image In thumbnail view you can only create one cropping frame per image In whole image view you can create multiple cropping frames Adjusting Cropping Frames Related Topic Scanning in Advanced Mode Page top Strana 694 z celkového počtu 948 Advanced Mode Tab ...

Страница 695: ...ns have a limit to the amount of scan data they can receive ScanGear scanner driver can scan data that is of 21000 pixels x 30000 pixels or less If you change Paper Size after previewing the preview image will be deleted Note If you are not sure which size you should select for Paper Size set Paper Size to Full Platen then measure the size of the document and enter the values into Width and Height...

Страница 696: ...just the cropping frame size by entering the values into Width and Height Click Change Aspect Ratio and change it to Keep Aspect Ratio to maintain the aspect ratio when you specify the cropping frame size Important Input size settings are available only when Output Size in Output Settings is Flexible If you select a size other than Flexible a cropping frame calculated from Output Size and Output R...

Страница 697: ...ze for printing or displaying Select Add Delete to set custom size and save it as a new output size option Flexible You can specify the output resolution and scale and adjust the cropping frame In thumbnail view Drag the mouse over a thumbnail to display a cropping frame When a cropping frame is displayed the portion within the cropping frame will be scanned When no cropping frame is displayed eac...

Страница 698: ... when Destination is Print but you can only select pixels when Destination is Image display The name of the added size appears in Output Size List Click Save to save the items listed in Output Size List Delete To delete an item select it in Output Size List and click Delete Click Save to save the items listed in Output Size List Important You cannot delete predefined output sizes such as A4 and 10...

Страница 699: ...message appears when you click Scan It is recommended that you adjust the settings to reduce Data Size To continue scan in whole image view Page top Strana 699 z celkového počtu 948 Output Settings ...

Страница 700: ...ge Settings Image Settings allows you to set the following items Image Adjustment When Image Adjustment is set the brightness of the specified portion of the image is optimized Images can be adjusted according to the automatically detected document type or the specified document type The result of the adjustment will be reflected in the entire image None Image Adjustment will not be applied Auto A...

Страница 701: ...ON some moire effects may remain if Unsharp Mask is set to ON In that case set Unsharp Mask to OFF Selecting Magazine Color in Select Source on the Basic Mode tab has the same effect as setting Descreen to ON on the Advanced Mode tab Reduce Dust and Scratches Scanned photos may contain white dots caused by dust or scratches Use this function to reduce such noise None Dust and scratches will not be...

Страница 702: ...he gradation and sharpness of the image Important Grain Correction may not be effective if the scan area is too small Backlight Correction Use this function to correct photos that have been shot against light When you change the Backlight Correction setting the result will be reflected in the preview image None Backlight correction will not be applied Low Select this to correct slightly backlit ph...

Страница 703: ...ce exceeding 4 4 lbs 2 0 kg If you press heavily the scanner may not work correctly or you might break the glass Align the document with the edge of the Platen If not the shadow will not be corrected properly Shadows may not be corrected properly depending on the document If the page background is not white shadows may not be detected correctly or may not be detected at all While scanning press do...

Страница 704: ...u adjust the image via the Color Adjustment Buttons the results will be reflected in the preview image Click a Color Adjustment Button to set the following items Saturation Color Balance Adjust the saturation vividness and color tone of the image Use this function to brighten colors that have faded with time or due to colorcast Colorcast is a phenomenon where a specific color affects the entire pi...

Страница 705: ...is screen For a color image select a color in Channel to check either Red Green or Blue or select Master to check three colors together If you place the cursor on the preview image the portion will be enlarged and its RGB values only L when Color Mode is Grayscale before and after the adjustments will be displayed Threshold Set the boundary threshold at which black and white are divided By adjusti...

Страница 706: ...elect the saved item from the pull down menu To delete an item select it in Tone Curve Settings List or Threshold Settings List and click Delete Click Save to save settings displayed in Tone Curve Settings List or Threshold Settings List Note Save up to 20 items Defaults Reset all adjustments saturation color balance brightness contrast histogram and tone curve Page top Strana 706 z celkového počt...

Страница 707: ...e Advanced Mode tab and scan A4 size photos Text documents smaller than 2L 5 inches x 7 inches 127 mm x 178 mm such as paperback pages with the spine cut off Documents printed on thin white paper Long narrow documents such as panoramic photos Scanning in Basic Mode Scanning in Advanced Mode Reflective disc labels may not be scanned properly Place documents correctly according to the type of docume...

Страница 708: ...ct this checkbox to display the thumbnails of scanned images in a different window Scan Scanning starts Note When scanning starts the progress will be displayed Click Cancel to cancel the scan When scanning is completed a dialog box prompting you to select the next action may open Follow the prompt to complete For details see Status of ScanGear dialog after scanning in Scan Tab Preferences dialog ...

Страница 709: ...cify a folder to save images temporarily and a music file to play during or at the end of a scan Scanner Tab Preview Tab Allows you to select what to do with Preview when ScanGear is started and how to display cropping frames after previewing images You can also select the cropping size for thumbnails of scanned documents Preview Tab Scan Tab Allows you to select what to do with ScanGear after sca...

Страница 710: ... Settings You can set the machine to play music during at the end of a scan Select the Play Music During Scanning or Play Sound When Scanning is Completed checkbox then click Browse and specify a sound file You can specify the following files MIDI file mid rmi midi Audio file wav aif aiff MP3 file mp3 Calibration Settings When you set Execute at Every Scan to ON the scanner will be calibrated ever...

Страница 711: ...Page top Strana 711 z celkového počtu 948 Scanner Tab ...

Страница 712: ...ed The Color Adjustment Button settings the Toolbar settings and the Advanced Mode tab settings are also saved None No preview image will be displayed at startup Note Select None if you do not want to save the preview image Cropping Frame on Previewed Images Select how to display cropping frames after previewing images Execute Auto Cropping on Previewed Images The cropping frame will automatically...

Страница 713: ...he standard size Standard The standard size Smaller Displays 95 in width and height of the area displayed for the standard size Note When you change the Cropping Size for Thumbnail View setting the preview images will be refreshed and cropped to the new size As the preview images are refreshed the color adjustments and other settings applied to them are reset Page top Strana 713 z celkového počtu ...

Страница 714: ...lly Select this to return to the original application when scanning is completed Do not close ScanGear automatically Select this to return to the ScanGear screen for another scan when scanning is completed Display the dialog to select next action Select this to open a screen and select what to do when scanning is completed Note Even if Do not close ScanGear automatically or Display the dialog to s...

Страница 715: ...e monitor and printer colors Color Adjustment Buttons will be disabled This function is available when Color Mode is Color Source Scanner Select scanner profile Target Select target profile Monitor Select this to display preview image with optimum correction for monitor Defaults Returns to the default Color Matching settings None Select this to disable color correction provided by ScanGear scanner...

Страница 716: ...d the colors of the original image are not accurately reflected in the monitor Click Defaults to return to the default Monitor Gamma value 2 20 Note Refer to the manual of your monitor to check its gamma value If it is not written in the manual contact the manufacturer Page top Strana 716 z celkového počtu 948 Color Settings Tab ...

Страница 717: ...ping frame scan area Adjusting Cropping Frames Selecting the best resolution Resolution Learning about file formats File Formats Learning about Color Matching Color Matching Matching the colors between the document and monitor See Monitor Gamma in the following section Color Settings Tab Page top Strana 717 z celkového počtu 948 Appendix Useful Information on Scanning ...

Страница 718: ...l key 3 Unselected Cropping Frame stationary thin broken lines The settings will not be applied Note Active Cropping Frame and Selected Cropping Frames are displayed in whole image view Initial Cropping Frame In thumbnail view Cropping frame is not displayed initially Drag the mouse over a frame to create a cropping frame In whole image view A cropping frame Active Cropping Frame is displayed auto...

Страница 719: ...ees by clicking Switch Aspect Ratio However Switch Aspect Ratio is not available when Output Size is Flexible Creating Multiple Cropping Frames In thumbnail view You can only create one cropping frame per image In whole image view Click and drag the mouse in a space outside the existing cropping frame to create a new cropping frame in the Preview area The new cropping frame will be the Active Crop...

Страница 720: ...e latest cropping frame Note Create up to 12 cropping frames Scanning takes longer than usual when multiple cropping frames are selected Deleting Cropping Frames In thumbnail view To delete a cropping frame click an area outside the cropping frame on an image In whole image view To delete a cropping frame select it and click Remove Cropping Frame on the Toolbar Alternatively press the Delete key W...

Страница 721: ...600 dpi With a color printer specifying the resolution at half the resolution of the printer should be fine For example if you want to print scanned paper photos using a 600 dpi color printer you should set the resolution to 300 dpi However with a high resolution printer printing takes longer than usual if you set the resolution to half the resolution of the printer Example of Appropriate Resoluti...

Страница 722: ...on 600 dpi Image resolution printing resolution 300 dpi Appropriate Resolution Settings Set the resolution according to the use of the scanned image Note Although you can change Output Resolution in ScanGear it is recommended that you scan at the default value For displaying on a monitor 150 dpi For printing 300 dpi When Output Size is set to Flexible in ScanGear s Advanced Mode tab Select Source ...

Страница 723: ...uples If the file is too large the processing speed will slow down significantly and you will experience inconvenience such as lack of memory Set the minimum required resolution according to the use of the image Page top Strana 723 z celkového počtu 948 Resolution ...

Страница 724: ...information such as the date of image capture camera model shutter speed shooting mode and comments to JPEG files The file format version must be Exif 2 2 or later in order to print on a Direct Print compatible printer TIFF Standard File Extension tif A file format featuring a relatively high compatibility between various computers and applications Some TIFF files are incompatible TIFF is suitable...

Страница 725: ...canner Driver Output Profile Target sRGB OS Application Application Printer Driver Monitor Printer ScanGear converts the image s color space from the scanner s color space to sRGB When displaying on a monitor the image s color space is converted from sRGB to the monitor s color space based on the operating system s monitor settings and the application s working space settings When printing the ima...

Страница 726: ...ovanie Ďalšie skenovacie postupy Ďalšie skenovacie postupy Skenovanie pomocou ovládača WIA Skenovanie pomocou ovládacieho panela iba pre Windows XP Na začiatok strany Strana 726 z celkového počtu 948 Ďalšie skenovacie postupy ...

Страница 727: ...tion s manual Scanning with WIA Driver 2 0 The following is an example of scanning using Windows Fax and Scan 1 Place the document on the Platen Placing Documents 2 Click Scan from New on the File menu The scan setting screen appears 3 Specify the settings Scanner The currently set product name is displayed To change the scanner click Change and select the product you want to use Profile Select Ph...

Страница 728: ...images as separate files Select this checkbox to preview or scan multiple images as separate files 4 Click Preview to preview the image The preview image appears on the right 5 Click Scan When scanning is completed the scanned image appears in the application Scanning with WIA Driver 1 0 The following is an example of scanning using Paint 1 Place the document on the Platen Placing Documents 2 Clic...

Страница 729: ...st of the image thus sharpening the image You can also enter a value 127 to 127 Resolution DPI Enter the resolution Specify a value between 50 dpi and 600 dpi Resolution Picture type Select the type of scan you want for your document Reset Click to restore the original settings 5 Click Preview to preview the image The preview image appears on the right Drag to specify the scan area 6 Click Scan Wh...

Страница 730: ...double click WIA Canon model name The Scanner and Camera Wizard dialog box opens 3 Click Next 4 Select Picture type according to the document to be scanned Note To scan with the values previously set in Custom settings select Custom 5 Click Custom settings to set the preferences as required Brightness Move the slider to adjust the brightness Move it to the left to darken and right to brighten the ...

Страница 731: ...7 to 127 Resolution DPI Enter the resolution Specify a value between 50 dpi and 600 dpi Resolution Picture type Select the type of scan you want for your document Reset Click to restore the original settings 6 Click Preview to preview the image The preview image appears on the right Drag to specify the scan area 7 Click Next and follow the instructions Page top Strana 731 z celkového počtu 948 Sca...

Страница 732: ...tibilného zariadenia Tlač fotografií priamo z kompatibilného zariadenia Tlač fotografií priamo zo zariadenia kompatibilného so štandardom PictBridge Na začiatok strany Strana 732 z celkového počtu 948 Tlač fotografií priamo z kompatibilného zariadenia ...

Страница 733: ...ictBridge Tlač fotografií priamo zo zariadenia kompatibilného so štandardom PictBridge Tlač fotografií priamo zo zariadenia kompatibilného so štandardom PictBridge Informácie o nastaveniach tlače pomocou štandardu PictBridge Na začiatok strany Strana 733 z celkového počtu 948 Tlač fotografií priamo zo zariadenia kompatibilného so štanda ...

Страница 734: ...red pripojením kompatibilného zariadenia vybrať režim tlače kompatibilný so štandardom PictBridge Po pripojení k multifunkčnému zariadeniu budete možno musieť ručne zapnúť kompatibilné zariadenie alebo vybrať režim prehrávania Pred pripojením k multifunkčnému zariadeniu vykonajte na zariadení kompatibilnom so štandardom PictBridge všetky potrebné operácie podľa pokynov v príručke tohto kompatibiln...

Страница 735: ...onuku nastavení nastavenia zmeňte v multifunkčnom zariadení Nastavenia v zariadení 6 Spustite tlač zo zariadenia kompatibilného so štandardom PictBridge Dôležité Nikdy neodpájajte kábel USB počas tlače ak to výslovne neumožňuje zariadenie kompatibilné so štandardom PictBridge Pri odpájaní kábla USB medzi zariadením kompatibilným so štandardom PictBridge a multifunkčným zariadením postupujte podľa ...

Страница 736: ...lcov A4 8 5 x 11 palcov Letter 10 1 x 18 cm 4 x 7 1 palca 2 1 Môže sa vybrať len na niektorých zariadeniach kompatibilných so štandardom PictBridge značky Canon V závislosti od zariadenia sa nemusí dať vybrať 2 Na zariadení kompatibilnom so štandardom PictBridge od inej spoločnosti ako spoločnosť Canon sa môže zobraziť symbol Hi Vision Typ papiera Paper type Predvolené nastavenie Default výber pod...

Страница 737: ... Môže sa vybrať len na niektorých zariadeniach kompatibilných so štandardom PictBridge značky Canon V závislosti od zariadenia sa nemusí dať vybrať Orezanie Trimming Predvolené nastavenie Default Vypnuté Bez orezania Off No trimming Zapnuté On postupujte podľa nastavenia fotoaparátu Vypnuté Off Nastavenia v zariadení Nastavenia tlače prostredníctvom štandardu PictBridge môžete určiť na obrazovke P...

Страница 738: ...Rozšírená príručka Údržba Údržba Čistenie zariadenia Zarovnanie tlačovej hlavy Vykonávanie údržby z počítača Na začiatok strany Strana 738 z celkového počtu 948 Údržba ...

Страница 739: ...nia Čistenie Čistenie vonkajších častí zariadenia Čistenie plochého predlohového skla a krytu dokumentov Čistenie vnútra zariadenia čistenie spodnej platne Čistenie výčnelkov vnútri zariadenia Na začiatok strany Strana 739 z celkového počtu 948 Čistenie zariadenia ...

Страница 740: ...i zariadenia a spôsobiť napríklad zablokovanie tlačovej hlavy alebo slabé výsledky tlače Používajte mäkkú handričku Na čistenie zariadenia nikdy nepoužívajte prchavé kvapaliny ako riedidlo benzén acetón ani iné chemické čistidlá pretože môžu spôsobiť poruchu zariadenia alebo poškodenie jeho povrchu Čistenie vonkajších častí zariadenia Čistenie plochého predlohového skla a krytu dokumentov Čistenie...

Страница 741: ...ečistoty na povrchu V prípade potreby pred čistením vyhlaďte záhyby na handričke Dôležité Pred čistením vždy vypnite zariadenie a vytiahnite zástrčku napájacieho kábla z elektrickej siete Nepoužívajte toaletný papier papierové utierky hrubé tkaniny ani podobné materiály pretože by mohli poškriabať povrch Na začiatok strany Strana 741 z celkového počtu 948 Čistenie vonkajších častí zariadenia ...

Страница 742: ...a z elektrickej siete Čistou mäkkou handričkou ktorá nepúšťa vlákna jemne utrite ploché predlohové sklo A a vnútornú stranu krytu dokumentov bielu plochu B Dávajte pozor aby najmä na plochom predlohovom skle nezostali žiadne zvyšky Dôležité Vnútorná strana krytu dokumentov biela plocha B sa môže ľahko poškodiť a preto ju utierajte opatrne Na začiatok strany Strana 742 z celkového počtu 948 Čisteni...

Страница 743: ...vke HOME nájdete v časti Prehľad zariadenia 4 Vyberte možnosť Maintenance a potom stlačte tlačidlo OK Zobrazí sa obrazovka Maintenance 5 Pomocou tlačidiel vyberte možnosť Bottom plate cleaning a potom stlačte tlačidlo OK Zobrazí sa obrazovka s potvrdením 6 Pomocou tlačidiel vyberte možnosť Yes a potom stlačte tlačidlo OK 7 Podľa pokynov na obrazovke vyberte zo zadného zásobníka všetok papier 8 Pod...

Страница 744: ... vykonajte čistenie spodnej platne Ak sa po opätovnom čistení problém nevyrieši môžu byť znečistené výčnelky vo vnútri zariadenia Vyčistite ich podľa pokynov Čistenie výčnelkov vnútri zariadenia Poznámka Pri opätovnom čistení spodnej platne použite nový hárok papiera Na začiatok strany Strana 744 z celkového počtu 948 Čistenie vnútra zariadenia čistenie spodnej platne ...

Страница 745: ...ariadenia Ak sú výčnelky vnútri zariadenia znečistené vatovým tampónom alebo podobným materiálom z nich zotrite atrament Dôležité Pred čistením vždy vypnite zariadenie a vytiahnite zástrčku napájacieho kábla z elektrickej siete Na začiatok strany Strana 745 z celkového počtu 948 Čistenie výčnelkov vnútri zariadenia ...

Страница 746: ...Rozšírená príručka Údržba Zarovnanie tlačovej hlavy Zarovnanie tlačovej hlavy Zarovnanie tlačovej hlavy Na začiatok strany Strana 746 z celkového počtu 948 Zarovnanie tlačovej hlavy ...

Страница 747: ...e vložený aspoň jeden hárok obyčajného papiera veľkosti A4 alebo Letter 3 Opatrne otvorte výstupný zásobník papiera a potom aj jeho vysúvaciu časť 4 Vytlačte hárok na zarovnanie tlačovej hlavy 1 Na obrazovke HOME vyberte položku Setup Poznámka Podrobné informácie o výbere ponúk na obrazovke HOME nájdete v časti Prehľad zariadenia Zobrazí sa obrazovka Setup menu 2 Vyberte možnosť Maintenance a poto...

Страница 748: ...o OK 5 Naskenovaním hárka na zarovnanie tlačovej hlavy upravte polohu tlačovej hlavy 1 Skontrolujte hlásenie a na ploché predlohové sklo položte hárok na zarovnanie tlačovej hlavy Hárok na zarovnanie tlačovej hlavy položte VYTLAČENOU STRANOU SMEROM NADOL aznačku v jeho ľavom hornom rohu zarovnajte so značkou zarovnania 2 Opatrne zatvorte kryt dokumentov a potom stlačte tlačidlo OK Zariadenie začne...

Страница 749: ...Po nastavení polohy tlačovej hlavy odstráňte hárok na zarovnanie tlačovej hlavy z plochého predlohového skla Poznámka Stlačením tlačidla DOMOV HOME opustíte obrazovku Setup a zobrazíte obrazovku HOME Ak ani po nastavení polohy tlačovej hlavy podľa uvedeného postupu nie sú výsledky tlače uspokojivé nastavte jej polohu manuálne prostredníctvom počítača Zarovnanie polohy tlačovej hlavy Ak chcete vytl...

Страница 750: ...ávanie údržby z počítača Čistenie tlačových hláv Čistenie valčekov podávača papiera Zarovnanie polohy tlačovej hlavy Kontrola dýz tlačovej hlavy Čistenie vnútorných častí zariadenia Na začiatok strany Strana 750 z celkového počtu 948 Vykonávanie údržby z počítača ...

Страница 751: ... Complete cleaning The Nozzle Check dialog box opens after the confirmation message 5 Check the results To check whether the print quality has improved click Print Check Pattern To cancel the check process click Cancel If cleaning the head once does not resolve the print head problem clean it once more Deep Cleaning Deep Cleaning is more thorough than cleaning Perform deep cleaning when two Cleani...

Страница 752: ...requently will rapidly deplete your printer s ink supply Consequently perform cleaning only when necessary Note If there is no sign of improvement after Deep Cleaning switch off the machine wait 24 hours and then perform Deep Cleaning again If there is still no sign of improvement the ink may have run out or the print head may be worn For details on the remedial action to be taken see Machine Move...

Страница 753: ... be properly fed 2 Open the printer driver setup window 3 Click Roller Cleaning on the Maintenance tab The Roller Cleaning dialog box opens 4 Select Rear Tray or Cassette and click OK The confirmation message appears 5 Execute paper feed roller cleaning Make sure that the machine is on and click OK Paper feed roller cleaning starts 6 Complete paper feed roller cleaning After the rollers have stopp...

Страница 754: ...s on the Maintenance tab The Custom Settings dialog box opens 3 Switch head alignment to manual Check the Align heads manually check box 4 Transmit the settings Click Send and when the confirmation message appears click OK 5 Click Print Head Alignment on the Maintenance tab The Start Print Head Alignment dialog box opens 6 Load paper in the machine Load three sheets of A4 size or Letter size plain...

Страница 755: ...ite streaks A Less noticeable horizontal white streaks B More noticeable horizontal white streaks 9 Confirm the displayed message and click OK The second pattern is printed Important Do not open the Scanning Unit Cover while printing is in progress 10 Check the printed pattern Enter the numbers of the patterns with the least amount of streaks in the associated boxes Clicking the patterns with the ...

Страница 756: ...splayed message and click OK The third pattern is printed Important Do not open the Scanning Unit Cover while printing is in progress 12 Check the printed pattern Enter the numbers of the patterns with the least noticeable horizontal stripes in the associated boxes Clicking the patterns with the least noticeable horizontal stripes in the preview window will automatically set their numbers in the a...

Страница 757: ...ces the least noticeable horizontal white stripes A Less noticeable horizontal white stripes B More noticeable horizontal white stripes Note To print and check the current setting open the Start Print Head Alignment dialog box and click Print Alignment Value Page top Strana 757 z celkového počtu 948 Aligning the Print Head Position ...

Страница 758: ...lick Initial Check Items to display the items that you need to check before printing the nozzle check pattern 3 Load paper in the machine Load a sheet of A4 size or Letter size plain paper into the cassette 4 Print a nozzle check pattern Make sure that the machine is on and click Print Check Pattern Printing of the nozzle check pattern begins Click OK when the confirmation message appears The Patt...

Страница 759: ...aning The procedure for performing bottom plate cleaning is as follows Bottom Plate Cleaning 1 Open the printer driver setup window 2 Click Bottom Plate Cleaning on the Maintenance tab The Bottom Plate Cleaning dialog box opens 3 Load paper in the machine As instructed in the dialog box fold the A4 size or Letter size plain paper in half horizontally and then unfold the sheet Load the paper into t...

Страница 760: ...ava na používanie jednotky Bluetooth Tlač údajov prostredníctvom komunikácie Bluetooth Základný postup pri tlači prostredníctvom komunikácie Bluetooth Nastavenie komunikácie Bluetooth Riešenie problémov Technické parametre Na začiatok strany Strana 760 z celkového počtu 948 Komunikácia Bluetooth ...

Страница 761: ...Rozšírená príručka Komunikácia Bluetooth Opatrenia pri manipulácii Opatrenia pri manipulácii Preprava produktu Na začiatok strany Strana 761 z celkového počtu 948 Opatrenia pri manipulácii ...

Страница 762: ...t be used in countries or regions other than the country or region where it was purchased due to local laws and regulations Please note that the use of this product in such countries or regions may lead to penalties and that Canon should not be liable for such punishment Page top Strana 762 z celkového počtu 948 Shipping the Product ...

Страница 763: ...ríprava na používanie jednotky Bluetooth Príprava na používanie jednotky Bluetooth Jednotka Bluetooth Pripojenie k tlačiarni a odpojenie od tlačiarne Na začiatok strany Strana 763 z celkového počtu 948 Príprava na používanie jednotky Bluetooth ...

Страница 764: ... Bluetooth enabled device such as a computer or mobile phone is possible Note Communication is possible in a range of up to about 33 ft 10 m depending on the conditions below Printing speed may vary depending on the following conditions Presence of obstacles between the communication equipment and radio wave conditions Presence of magnetic fields static electricity or electromagnetic interference ...

Страница 765: ...to the Printer Attach the Bluetooth unit to the Direct Print Port A of the printer in accordance with the following procedure The external appearance may differ depending on the printer you are using 1 Make sure that the printer is turned on Make sure that the POWER lamp is lit 2 Insert the Bluetooth unit to the Direct Print Port of the printer Detach the cap from the Bluetooth unit Store the cap ...

Страница 766: ...Port of the printer in accordance with the following procedure 1 Remove the Bluetooth unit from the Direct Print Port of the printer Important Make sure that the lamp on the Bluetooth unit is neither lit nor flashing before you remove the Bluetooth unit Important Store the Bluetooth unit with the cap attached Page top Strana 766 z celkového počtu 948 Attaching to and Removing from the Printer ...

Страница 767: ...nikácie Bluetooth Tlač údajov prostredníctvom komunikácie Bluetooth Príprava Inštalácia ovládačov MP Drivers Nastavenie tlačiarne Registrácia tlačiarne Odstránenie tlačiarne Na začiatok strany Strana 767 z celkového počtu 948 Tlač údajov prostredníctvom komunikácie Bluetooth ...

Страница 768: ...later is installed and Bluetooth Devices is displayed in Printers and Other Hardware under Control Panel Bluetooth Stack for Windows by Toshiba Version 3 00 10 or later is installed For more information about how to confirm the version of Bluetooth Stack for Windows by Toshiba see Check 2 Is unsupported Bluetooth driver used In order to connect the Bluetooth unit and print via Bluetooth communicat...

Страница 769: ... XP computer Authenticate the printer as a Bluetooth device using Bluetooth Settings When the computer which has Bluetooth Stack for Windows by Toshiba or the program attached to the Bluetooth adapter of the option manufactured by Toshiba is used the computer can register a printer easily Bluetooth Settings can be started by clicking Start and selecting All Programs TOSHIBA Bluetooth and Bluetooth...

Страница 770: ...ready been installed In this case move to the next step Setting the Printer Before connecting the Bluetooth unit to the printer for wireless printing first the USB cable must be connected between the printer and computer and the MP Drivers must be installed If you reinstall the MP Drivers perform Custom Install on the Setup CD ROM then select MP Drivers Page top Strana 770 z celkového počtu 948 In...

Страница 771: ...h settings screen on the LCD For information about how to display the Bluetooth settings screen refer to Changing the Machine Settings on the LCD Note If the Bluetooth settings screen is not displayed on the LCD the Bluetooth unit may not be attached correctly Remove the Bluetooth unit from the printer and attach it once again For details see Attaching to and Removing from the Printer If the Bluet...

Страница 772: ...ed for easy identification of the printer you will use See Bluetooth settings Screen After checking the device name use the OK button on the printer to finish setting After checking the Bluetooth settings using the LCD register the printer on your computer Registering the Printer Page top Strana 772 z celkového počtu 948 Setting the Printer ...

Страница 773: ...ooth device first delete the registered printer and then re register it See Deleting the Printer It may vary depending on how you authenticate the computer s In Windows 7 or Windows Vista In Windows XP In Windows 7 or Windows Vista The following procedure is described assuming that Windows 7 has been installed in your computer 1 Log into a user account with the administrator privilege 2 Click Cont...

Страница 774: ...u set a passkey on the printer select Enter the device s pairing code and input the passkey then click Next For more information about setting a passkey see Bluetooth settings Screen 5 When This device has been successfully added to this computer is displayed click Close In Windows Vista when This wireless device is paired with this computer is displayed click Close Now the settings for printing v...

Страница 775: ...to a user account with the administrator privilege 2 Click Control Panel Printers and Other Hardware then Bluetooth Devices 3 Click Add on the Devices sheet Add Bluetooth Device Wizard will start 4 Make sure that the printer is turned on check the My device is set up and ready to be found check box and then click Next 5 Select the device name of the printer and click Next Strana 775 z celkového po...

Страница 776: ...ant to register displayed in the printer list 6 Select Don t use a passkey and then Next Note If you set a passkey on the printer select Use the passkey found in the documentation and input the passkey then click Next For more information about a passkey see Bluetooth settings Screen 7 Click Finish Strana 776 z celkového počtu 948 Registering the Printer ...

Страница 777: ...he device name selected at step 5 is registered on the Devices sheet and click OK Now the settings for printing via Bluetooth communication are ready Page top Strana 777 z celkového počtu 948 Registering the Printer ...

Страница 778: ...dware and Sound When using Windows XP click Control Panel then Printers and Faxes under Printers and Other Hardware 3 Click the icon of the printer used for printing via Bluetooth communication 4 Select Remove device When using Windows Vista select Delete from the Organize menu When using Windows XP select Delete from the File menu In Windows Vista or Windows XP Continue following the procedure be...

Страница 779: ...cie Bluetooth Základný postup pri tlači prostredníctvom komunikácie Bluetooth Tlač pomocou počítača Tlač pomocou iných zariadení kompatibilných s komunikáciou Bluetooth ako počítač Na začiatok strany Strana 779 z celkového počtu 948 Základný postup pri tlači prostredníctvom komunikácie Bluet ...

Страница 780: ...tance may vary depending on the radio conditions or the communication equipment 1 Turn on the printer and load paper 2 Create a document or open a file to print using an appropriate application software 3 Open the printer properties dialog box 1 Select Print on the application software s File menu The Print dialog box opens 2 Select the printer to which you attached the Bluetooth unit such as Cano...

Страница 781: ...and so on Note You can specify the advanced print settings on Main sheet and Page Setup sheet For details on the print settings refer to Various Printing Methods 3 Click OK The Print dialog box is displayed 5 Click Print or OK to print the document Printing begins Note Strana 781 z celkového počtu 948 Printing with Computers ...

Страница 782: ...ncel Printing on the printer status monitor After printing is canceled a sheet of paper may be ejected with no printing results To display the printer status monitor click Canon XXX Printer Copy X on the taskbar X is a device name or a digit The number of digits may differ depending on the printer Page top Strana 782 z celkového počtu 948 Printing with Computers ...

Страница 783: ...es above For details of profiles refer to your product s instruction manual 1 Turn on the printer and load paper 2 Select Special print on the HOME screen Note For details on how to select a menu on the HOME screen refer to Overview of the Machine 3 Select Print from mobile phone then use the OK button to confirm the selection Note You can change the print settings by using the right Function butt...

Страница 784: ...stavenie komunikácie Bluetooth Nastavenie komunikácie Bluetooth Nastavenie tlače prostredníctvom komunikácie Bluetooth Obrazovka nastavení komunikácie Bluetooth Na začiatok strany Strana 784 z celkového počtu 948 Nastavenie komunikácie Bluetooth ...

Страница 785: ...ed on the LCD 2 Display the Bluetooth settings screen on the LCD For information about how to display the Bluetooth settings screen refer to Changing the Machine Settings on the LCD 3 Select the contents which you want to set on the LCD Bluetooth settings Screen Note For information about how to set a media type and a paper size when printing from a mobile phone refer to Changing the Machine Setti...

Страница 786: ...creen 4 Change passkey You can change the passkey The passkey refers to an identification number to be determined It is used to prevent unwanted access from other Bluetooth devices The initial value is set to 0000 Change passkey Screen Select device name Screen Allows you to set the device name of the printer on a Bluetooth device In the example used for this explanation the model name is set to M...

Страница 787: ...inting through the Bluetooth communication After setting the security mode we recommend making a trial print through Bluetooth communication If printing does not start change the security mode and try again Setting a passkey will prevent unwanted access from other Bluetooth devices You can change the passkey on the Change passkey screen Disable Default setting When you register the printer you are...

Страница 788: ...Page top Strana 788 z celkového počtu 948 Bluetooth settings Screen ...

Страница 789: ...á príručka Komunikácia Bluetooth Riešenie problémov Riešenie problémov Riešenie problémov Tlačiareň sa nedá zaregistrovať Tlač sa nespustí Na začiatok strany Strana 789 z celkového počtu 948 Riešenie problémov ...

Страница 790: ...Troubleshooting This section describes how to solve the problems occurred during the use of the Bluetooth unit Problems related to the printer s hardware MP Drivers installation and so on are also described in Troubleshooting Page top Strana 790 z celkového počtu 948 Troubleshooting ...

Страница 791: ... with the administrator privilege and click Control Panel then Hardware and Sound Make sure that the Add a Bluetooth Device is displayed in the dialog Windows Vista except for Toshiba Windows Vista computers Log into a user account with the administrator privilege and click Control Panel then Hardware and Sound Make sure that the Bluetooth Devices icon is displayed in the dialog Windows XP SP2 or ...

Страница 792: ...ter 1 Display the Bluetooth settings screen on the LCD of the printer For information about how to display the Bluetooth settings screen refer to Changing the Machine Settings on the LCD 2 Select Access refusal setting 3 Select OFF then use the OK button on the printer to confirm the selection Page top Strana 792 z celkového počtu 948 Printer Cannot be Registered ...

Страница 793: ...stem used Receiver sensitivity and antenna performance of the communication equipment Change the printer installation place or move the printer closer to the computer Check 3 Is the printer to be used selected correctly Follow the procedure described below to select the printer to which the Bluetooth unit is attached The steps described in this section are for printing in Windows 7 1 Log into a us...

Страница 794: ...communication and click Properties Make sure that Printing HCRP on the Services sheet is checked If Printing HCRP is not checked or the Printing HCRP service is not detected follow the procedure below and register the printer again The steps described in this section are for printing in Windows 7 1 Click Control Panel then Devices and Printers under Hardware and Sound When using Windows Vista Cont...

Страница 795: ...s XP If you have installed the MP Drivers after registering the printer as a Bluetooth device on Add a Bluetooth Device Bluetooth Devices in Windows Vista or Windows XP delete the printer and then register it again For more information about the procedure see Preparation Page top Strana 795 z celkového počtu 948 Printing Does Not Start ...

Страница 796: ...f the following conditions is needed Add a Bluetooth Device is displayed in Hardware and Sound under Control Panel Bluetooth Stack for Windows by Toshiba Version 7 00 00 or later is installed Microsoft Windows Vista Satisfying any one of the following conditions is needed Bluetooth Devices is displayed in Hardware and Sound under Control Panel Bluetooth Stack for Windows by Toshiba Version 5 10 04...

Страница 797: ...čka Zmena nastavení zariadenia Zmena nastavení zariadenia Zmena nastavení zariadenia na displeji LCD Zmena nastavení zariadenia z počítača Na začiatok strany Strana 797 z celkového počtu 948 Zmena nastavení zariadenia ...

Страница 798: ... displeji LCD Zmena nastavení zariadenia na displeji LCD Plain paper feed settings Print settings Device user settings Mobile phone print settings Bluetooth settings PictBridge print settings Language selection Reset setting Na začiatok strany Strana 798 z celkového počtu 948 Zmena nastavení zariadenia na displeji LCD ...

Страница 799: ...erte položku Setup Poznámka Podrobné informácie o výbere ponúk na obrazovke HOME nájdete v časti Prehľad zariadenia 3 Vyberte položku Device settings a potom stlačte tlačidlo OK Zobrazí sa obrazovka Device settings 4 Pomocou tlačidiel vyberte požadovanú položku nastavenia a potom stlačte tlačidlo OK Zobrazí sa obrazovka nastavenia pre vybratú položku 5 Pomocou tlačidiel vyberte požadovanú ponuku a...

Страница 800: ...t settings Device user settings Mobile phone print settings Bluetooth settings PictBridge print settings Language selection Reset setting Na začiatok strany Strana 800 z celkového počtu 948 Zmena nastavení zariadenia na displeji LCD ...

Страница 801: ...d settings U083 Plain paper feed settings Nastavenie zdroja obyčajného papiera veľkosti A4 Letter A5 a B5 Poznámka Do kazety možno vložiť papier veľkosti A4 Letter A5 alebo B5 Iné veľkosti papiera vkladajte do zadného zásobníka Na začiatok strany Strana 801 z celkového počtu 948 Plain paper feed settings ...

Страница 802: ...nené nasledujúce podmienky pri kopírovaní bez okrajov pri tlači vytlačených fotografií je položka Border nastavená na hodnotu Borderless Poznámka Ak výtlačky obsahujú okraje aj pri tlači bez okrajov problém skúste vyriešiť tak že pre toto nastavenie vyberiete možnosť Extended amount Large Auto photo fix setting Ak je vybratá možnosť ON môžete vybrať či sa v nasledujúcich prípadoch budú fotografie ...

Страница 803: ...a zruší nastavenie Writable from PC a po opätovnom zapnutí zariadenia sa obnoví nastavenie Not writable from PC Quiet mode setting Túto funkciu v zariadení zapnite v prípade že chcete znížiť prevádzkový hluk napríklad pri tlači v noci Zapnutím tejto funkcie sa zníži hluk vytváraný v nasledujúcich prípadoch Kopírovanie Tlač z pamäťovej karty alebo disku USB flash Tlač z vytlačených fotografií Tlač ...

Страница 804: ...retržitého zadávania po stlačení a podržaní tlačidla alebo pri nastavovaní počtu kópií pomeru priblíženia pri zmene fotografie zobrazenej na displeji LCD atď Na začiatok strany Strana 804 z celkového počtu 948 Device user settings ...

Страница 805: ... 1 Page size Vyberte veľkosť strany pri tlači fotografií uložených v mobilnom telefóne 2 Type Typ média Vyberte typ média pri tlači fotografií uložených v mobilnom telefóne 3 Image optimizer Ak chcete pri tlači korigovať a zjemniť zúbkované obrysy vyberte možnosť ON 4 Layout Vyberte rozloženie fotografií pri tlači podľa použitého papiera Tlač nálepiek Nálepky x 16 Tlač na papier iný ako nálepky S ...

Страница 806: ...ble začne platiť prístupový kľúč nastavený na obrazovke Change passkey Nastavením prístupového kľúča zabránite nežiaducemu prístupu z iných zariadení s rozhraním Bluetooth Môžete vybrať jeden z nasledujúcich režimov zabezpečenia Mode 2 V tomto režime sa zabezpečenie uplatňuje na úrovni služby Pri tlači prostredníctvom komunikácie Bluetooth bude potrebný prístupový kľúč Po nastavení režimu zabezpeč...

Страница 807: ...média Pri tlači priamo zo zariadenia kompatibilného so štandardom PictBridge vyberte typ média Pri nastavovaní technológie PictBridge v multifunkčnom zariadení nastavte v zariadení kompatibilnom so štandardom PictBridge možnosť Typ papiera Paper type na hodnotu Predvolené nastavenie Default 3 Print qlty kvalita tlače Pri tlači priamo zo zariadenia kompatibilného so štandardom PictBridge vyberte kv...

Страница 808: ...rafovaním s bleskom V závislosti od typu fotografie sa efekt červených očí nemusí opraviť prípadne sa môžu opraviť aj iné časti než oči Obrazovka Manual correction Položku Photo fix nastavte na hodnotu Manual correction a stlačením pravého tlačidla Funkcia Function zobrazte obrazovku znázornenú nižšie 1 Vivid photo Oživenie zelenej a modrej farby 2 PhotoOptimizer pro Automatická optimalizácia jasu...

Страница 809: ...dtieňa Napríklad zvýšením úrovne červenej alebo žltej môžete upraviť zafarbenie pokožky 9 Effect Aplikovanie špeciálnych efektov na fotografiu napríklad tlač v hnedastých tónoch alebo efekt skicovanej ilustrácie Na začiatok strany Strana 809 z celkového počtu 948 PictBridge print settings ...

Страница 810: ...í zariadenia Zmena nastavení zariadenia na displeji LCD Language selection U081 Language selection Umožňuje zmeniť jazyk hlásení a ponúk zobrazených na displeji LCD Na začiatok strany Strana 810 z celkového počtu 948 Language selection ...

Страница 811: ... U082 Reset setting Môžete obnoviť predvolené nastavenia Poznámka Nemožno obnoviť predvolené hodnoty nasledujúcich položiek nastavenia Jazyk zobrazený na displeji LCD Aktuálna poloha tlačovej hlavy Nastavenie možnosti Read write attribute Na začiatok strany Strana 811 z celkového počtu 948 Reset setting ...

Страница 812: ...enia z počítača Zmena možností tlače Uloženie často používaného profilu tlače Nastavenie zdroja papiera pre obyčajný papier Riadenie napájania zariadenia Zníženie hluku zariadenia Zmena prevádzkového režimu zariadenia Na začiatok strany Strana 812 z celkového počtu 948 Zmena nastavení zariadenia z počítača ...

Страница 813: ...source during printing differs from the driver settings or printing fails The procedure for changing the print options is as follows 1 Open the printer driver setup window 2 Click Print Options on the Page Setup tab The Print Options dialog box opens Note When the XPS printer driver is used certain functions are not available 3 Change the individual settings If necessary change the setting of each...

Страница 814: ...Page top Strana 814 z celkového počtu 948 Changing the Print Options ...

Страница 815: ...ering a printing profile is as follows Registering a Printing Profile 1 Open the printer driver setup window 2 Set the necessary items From Commonly Used Settings on the Quick Setup tab select the printing profile to be used and if necessary change the settings after Additional Features You can also register necessary items on the Main Page Setup and Effects tabs Note Effects tab cannot be used wh...

Страница 816: ...red will be deleted from Commonly Used Settings Registered print settings cannot be saved and preserved If a profile is deleted register the print settings again Deleting Unnecessary Printing Profile 1 Select the printing profile to be deleted Select the printing profile you want to delete from the Commonly Used Settings list on the Quick Setup tab 2 Delete the printing profile Click Delete When t...

Страница 817: ...er Source Setting for Plain Paper dialog box opens Note If the machine is off or bi directional communication is disabled a message may appear because the computer cannot collect the machine status If this happens click OK to display the most recent settings specified on your computer 3 Transmit the settings Select the paper source for plain paper and then click the Send button The selected settin...

Страница 818: ...nter power is as follows Power Off The Power Off function turns off the machine When you use this function you will not be able to turn the machine on from the printer driver 1 Open the printer driver setup window 2 Execute power off Click Power Off on the Maintenance tab When the confirmation message appears click OK The machine power switches off and the Maintenance tab is displayed again Page t...

Страница 819: ...f the following items Do not use quiet mode The operating noise is at normal volume Always use quiet mode Select this option when you wish to reduce the operating noise Use quiet mode within specified time The operating noise can be reduced during a specified period of time Set the Start time and End time when you wish the quiet mode to be activated Important The time specified in Start time and i...

Страница 820: ...is check box to use this function Align heads manually Usually the Print Head Alignment function on the Maintenance tab is set to automatic head alignment but you can change it to manual head alignment If the printing results are unsatisfactory even after you execute automatic head alignment see Aligning the Print Head Position and execute manual head alignment Check this check box to perform the ...

Страница 821: ...y sa neposúva na miesto vyhradené na výmenu Papier sa správne nepodáva Papier sa nepodáva zo zdroja papiera určeného v ovládači tlačiarne Zaseknutý papier Na obrazovke počítača sa zobrazuje hlásenie Nedá sa správne tlačiť pomocou automatickej obojstrannej tlače Pre používateľov systému Windows Na zariadení kompatibilnom so štandardom PictBridge sa zobrazuje chybové hlásenie Nedá sa správne tlačiť ...

Страница 822: ... chyba napríklad sa v tlačiarni minie alebo zasekne papier automaticky sa zobrazí hlásenie s návodom na riešenie problému Vykonajte príslušné opatrenia uvedené v hlásení Hlásenie sa môže líšiť v závislosti od verzie operačného systému Na začiatok strany Strana 822 z celkového počtu 948 Ak sa objaví chyba ...

Страница 823: ... napájacieho kábla bezpečne zasunutá do konektora napájacieho kábla na zariadení a potom zariadenie znovu zapnite Kontrola č 3 Odpojte zariadenie od napájacieho zdroja potom ho znova pripojte a po približne piatich minútach znova zapnite Ak sa problém nevyriešil obráťte sa na servisné stredisko Na začiatok strany Strana 823 z celkového počtu 948 Zariadenie sa nedá zapnúť ...

Страница 824: ...na kazete s atramentom bliká Vložených je viacero kaziet s atramentom rovnakej farby Indikátor na kazete s atramentom bliká Skontrolujte či sú kazety s atramentom vložené v správnych polohách Bežná údržba The remaining level of the ink cannot be correctly detected Replace the ink tank U130 Množstvo zostávajúceho atramentu sa nedá správne určiť Indikátor na kazete s atramentom bliká Vymeňte kazetu ...

Страница 825: ...mienok môže poškodiť tlačiareň Ak chcete pokračovať v tlači aj za týchto podmienok musíte vypnúť funkciu zisťovania úrovne zostávajúceho atramentu Stlačte a podržte tlačidlo Zastaviť Stop na zariadení aspoň na 5 sekúnd a potom ho uvoľnite Týmto spôsobom uložíte do pamäte vypnutie funkcie zisťovania úrovne zostávajúceho atramentu Spoločnosť Canon nepreberá zodpovednosť za poruchy a problémy ktoré m...

Страница 826: ...K to continue printing Contact the service center Absorbér odpadového atramentu je takmer plný V tlači pokračujte stlačením tlačidla OK na zariadení Obráťte sa na servisné stredisko Printer error has occurred Contact the service center Vyskytla sa chyba zariadenia Obráťte sa na servisné stredisko Timeout error has occurred Pri kopírovaní sa po určitom čase vyskytla chyba Stlačením tlačidla OK chyb...

Страница 827: ...zariadenie kompatibilné so štandardom PictBridge pripojené prostredníctvom rozbočovača USB odstráňte rozbočovač a zariadenie pripojte priamo k multifunkčnému zariadeniu B200 Printer error has occurred Unplug the power cord and contact the service center Vypnite zariadenie a napájací kábel odpojte od zdroja napájania Obráťte sa na servisné stredisko Printer error has occurred Turn off power then ba...

Страница 828: ...Read write attribute nastavte na hodnotu Not writable from PC Power was not turned off correctly the last time Press the ON button when turning power off Naposledy ste napájací kábel pravdepodobne odpojili kým bolo zariadenie zapnuté Stlačením tlačidla OK zrušte stav chyby Poznámka Informácie o tom ako odpojiť napájací kábel nájdete v časti Poznámka k odpojeniu napájacieho kábla Cannot print the d...

Страница 829: ...tor NAPÁJANIE POWER nesvieti Zariadenie nie je zapojené Zapojte napájací kábel a stlačte tlačidlo ZAP ON Ak indikátor NAPÁJANIE POWER svieti Displej LCD je možno v režime šetriča displeja Na ovládacom paneli stlačte iné tlačidlo než ZAP ON Na začiatok strany Strana 829 z celkového počtu 948 Na displeji LCD nie je nič zobrazené ...

Страница 830: ... Podrobné informácie o výbere ponúk na obrazovke HOME nájdete v časti Prehľad zariadenia 3 Vyberte položku Device settings a potom stlačte tlačidlo OK Zobrazí sa obrazovka Device settings 4 Štyrikrát stlačte tlačidlo a potom stlačte tlačidlo OK Ak je k zariadeniu pripojená jednotka Bluetooth šesťkrát stlačte tlačidlo a potom stlačte tlačidlo OK 5 Pomocou tlačidiel vyberte jazyk displeja LCD a poto...

Страница 831: ...vakrát kliknite na súbor MSETUP4 EXE Poznámka Ak sa ikona disku CD ROM nezobrazí skúste nasledujúce kroky Vyberte disk CD ROM z počítača a znovu ho vložte Reštartujte počítač Ak sa ikona nezobrazí vyskúšajte iné disky a zistite či sa zobrazia Ak sa iné disky zobrazia znamená to že sa vyskytol problém s diskom Inštalačný disk CD ROM Setup CD ROM V takom prípade sa obráťte na servisné stredisko Ak n...

Страница 832: ...nova vložte disk CD ROM a spustením inštalácie Easy Install nainštalujte ovládače MP Drivers V iných prípadoch Podľa postupu uvedeného v inštalačnej príručke znovu nainštalujte ovládače MP Drivers Ak sa ovládače MP Drivers nenainštalovali správne odinštalujte ich reštartujte počítač a potom ovládače znovu nainštalujte Odstránenie nepotrebných ovládačov MP Drivers Pri opätovnej inštalácii ovládačov...

Страница 833: ...talačný disk CD ROM Setup CD ROM spustite inštaláciu Custom Install a vyberte položku Easy WebPrint EX čím túto aplikáciu nainštalujete v počítači Poznámka Ak aplikácia Easy WebPrint EX nie je nainštalovaná v počítači v oblasti oznámení na paneli úloh sa môže zobraziť správa s výzvou na jej inštaláciu Ak chcete aplikáciu Easy WebPrint EX nainštalovať kliknite na správu a postupujte podľa pokynov n...

Страница 834: ...ipojenie prostredníctvom rozhrania Hi Speed USB Podporuje port USB na počítači pripojenie prostredníctvom rozhrania Hi Speed USB Podporuje kábel USB alebo rozbočovač USB pripojenie prostredníctvom rozhrania Hi Speed USB Používajte certifikovaný kábel Hi Speed USB Odporúča sa používať kábel dlhý najviac 3 metre 10 stôp Podporuje operačný systém vášho počítača pripojenie prostredníctvom rozhrania Hi...

Страница 835: ...B flash pomocou zariadenia Skontrolujte pomocou ovládacieho panela na zariadení Položky nastavenia Tlač z vytlačenej fotografie pomocou zariadenia Skontrolujte pomocou ovládacieho panela na zariadení Položky nastavenia Tlač zo zariadenia kompatibilného so štandardom PictBridge Skontrolujte pomocou zariadenia kompatibilného so štandardom PictBridge Tlač fotografií priamo zo zariadenia kompatibilnéh...

Страница 836: ...vytlačila Žiadne výsledky tlače Tlač je rozmazaná Farby sú skreslené Biele pruhy Čiary nie sú zarovnané Vytlačený papier sa zvlnil alebo obsahuje atramentové škvrny Na papieri sú šmuhy Vytlačený povrch je poškriabaný Na rube papiera sú šmuhy Po stranách výtlačku sú vytlačené zvislé čiary Farby nie sú rovnomerné alebo majú pruhy Na začiatok strany Strana 836 z celkového počtu 948 Výsledky tlače nie...

Страница 837: ...osť tlačených údajov mimoriadne veľká Na hárku Page Setup kliknite na položku Print Options Potom v zobrazenom dialógovom okne začiarknite políčko Prevent loss of print data Kontrola č 2 Je na pevnom disku počítača dostatok miesta Odstráňte nepotrebné súbory a uvoľnite miesto na disku Na začiatok strany Strana 837 z celkového počtu 948 Nedá sa tlačiť do konca tlačovej úlohy ...

Страница 838: ...rany vytlačiť Ak tomu chcete zabrániť v ovládači tlačiarne vyberte možnosť Use reduced printing Dôležité Zmenšená tlač môže ovplyvniť rozloženie v závislosti od dokumentu 1 Otvorte okno nastavenia ovládača tlačiarne Otvorenie okna nastavenia ovládača tlačiarne Kliknite sem Ovládač tlačiarne Prv než kliknutím sem otvoríte okno nastavenia ovládača tlačiarne ukončite všetky spustené aplikácie 2 Na ka...

Страница 839: ...ače Tlač je rozmazaná Farby sú skreslené Biele pruhy U313 Žiadne výsledky tlače Tlač je rozmazaná Farby sú skreslené Biele pruhy Žiadne výsledky tlače Tlač je rozmazaná Farby sú skreslené Biele pruhy Strana 839 z celkového počtu 948 Žiadne výsledky tlače Tlač je rozmazaná Farby sú skreslené ...

Страница 840: ...tlačovej hlavy a hĺbkovom čistení tlačovej hlavy nájdete v časti Bežná údržba Ak sa vzorka na kontrolu dýz nevytlačí správne Skontrolujte či niektorá kazeta s farebným atramentom nie je prázdna Ak sa vzorka na kontrolu dýz nevytlačí správne a kazeta obsahuje dostatok atramentu vyčistite tlačovú hlavu a znovu vyskúšajte tlač vzorky na kontrolu dýz Ak sa problém neodstráni ani po dvojnásobnom čisten...

Страница 841: ... kopírovaní si pozrite aj nasledujúce časti Kontrola č 7 Skontrolujte či je pôvodný dokument správne položený na ploché predlohové sklo Vkladanie papiera a originálov Kontrola č 8 Je originál položený na plochom predlohovom skle stranou určenou na kopírovanie nadol Kontrola č 9 Kopírujete výtlačok z tohto zariadenia Tlačte priamo z pamäťovej karty disku USB flash alebo digitálneho fotoaparátu aleb...

Страница 842: ...čovej hlavy problém nevyrieši vykonajte manuálne zarovnanie tlačovej hlavy podľa časti Zarovnanie polohy tlačovej hlavy Kontrola č 3 Je veľkosť tlačených údajov mimoriadne veľká Na hárku Page Setup kliknite na položku Print Options Potom v zobrazenom dialógovom okne začiarknite políčko Prevent loss of print data Kontrola č 4 Tlačí sa s použitím funkcie rozloženia strany alebo okraja na zošitie Pok...

Страница 843: ...ačiarne a skúste tlačiť znova Ak na tlač obrázkov s vysokou intenzitou používate obyčajný papier papier môže absorbovať príliš veľa atramentu čím sa zvlní a odrie sa Pri tlači z počítača Intenzitu môžete skontrolovať v ovládači tlačiarne Pri kopírovaní Položky nastavenia Kontrola č 3 Používate na tlač fotografií fotografický papier Pri tlači údajov s vysokou sýtosťou farieb akými sú fotografie ale...

Страница 844: ...č bez okrajov Ak sa používaný papier nehodí na tlač bez okrajov môže sa znížiť kvalita tlače na horných a spodných okrajoch papiera Oblasť tlače Kontrola č 3 Vyrovnajte zvlnenie a vložte papier Pri obyčajnom papieri Obráťte papier a opätovne ho vložte tak aby ste tlačili na druhú stranu Ak papier necháte dlhší čas vložený v zadnom zásobníku môže sa zvlniť V takom prípade vložte papier opačnou stra...

Страница 845: ...nie tak aby bránilo odretiu papiera Ak nastavíte možnosť Prevent paper abrasion rýchlosť tlače sa môže znížiť Po dokončení tlače vypnite nastavenie Prevent paper abrasion V opačnom prípade zostane toto nastavenie zapnuté pre všetky následné tlačové úlohy Nastavenie pomocou ovládacieho panela Stlačte tlačidlo DOMOV HOME postupne vyberte možnosti Setup Device settings a Print settings a potom nastav...

Страница 846: ...ené Vyčistite ploché predlohové sklo Čistenie plochého predlohového skla a krytu dokumentov Kontrola č 8 Je valček podávača papiera znečistený Vyčistite valček podávača papiera Bežná údržba Poznámka Čistením sa valček opotrebúva preto ho čistite len v prípade potreby Kontrola č 9 Je vnútro zariadenia znečistené Pri obojstrannej tlači sa môže vnútro zariadenia zašpiniť atramentom a spôsobiť tak šmu...

Страница 847: ...rolujte správu a kliknite na tlačidlo OK Kontrola č 11 Je papier poškriabaný od iného vloženého papiera V závislosti od typu média sa pri podávaní zo zadného zásobníka môže papier poškriabať od iného vloženého papiera V takom prípade vkladajte hárky jednotlivo Na začiatok strany Strana 847 z celkového počtu 948 Na papieri sú šmuhy Vytlačený povrch je poškriabaný ...

Страница 848: ...nia papiera a kvality tlače Výsledky tlače nie sú uspokojivé Kontrola č 2 Vyčistením spodnej platne vyčistite vnútro zariadenia Čistenie vnútra zariadenia čistenie spodnej platne Poznámka Vnútro tlačiarne sa môže zašpiniť pri tlači bez okrajov obojstrannej tlači alebo príliš častej tlači Na začiatok strany Strana 848 z celkového počtu 948 Na rube papiera sú šmuhy ...

Страница 849: ...ytlačiť zvislé čiary Nastavte správnu veľkosť papiera zodpovedajúcu vloženému papieru Výsledky tlače nie sú uspokojivé Poznámka Smer zvislých čiar sa môže líšiť v závislosti od obrazových údajov alebo nastavenia tlače Zariadenie vykoná v prípade potreby automatické čistenie na zachovanie čistých výtlačkov Pri čistení sa spotrebuje malé množstvo atramentu Aj keď sa atrament obyčajne vystrekuje do a...

Страница 850: ... čistení tlačovej hlavy a hĺbkovom čistení tlačovej hlavy nájdete v časti Bežná údržba Ak sa vzorka na kontrolu dýz nevytlačí správne Skontrolujte či niektorá kazeta s farebným atramentom nie je prázdna Ak sa vzorka na kontrolu dýz nevytlačí správne a kazeta obsahuje dostatok atramentu vyčistite tlačovú hlavu a znovu vyskúšajte tlač vzorky na kontrolu dýz Ak sa problém neodstráni ani po dvojnásobn...

Страница 851: ...sné stredisko Kontrola č 3 Zarovnajte tlačovú hlavu Zarovnanie tlačovej hlavy Poznámka Ak sa zarovnaním tlačovej hlavy problém nevyrieši vykonajte manuálne zarovnanie tlačovej hlavy podľa časti Zarovnanie polohy tlačovej hlavy Na začiatok strany Strana 851 z celkového počtu 948 Farby nie sú rovnomerné alebo majú pruhy ...

Страница 852: ...tia červeným svetlom Ak indikátor atramentu nesvieti zatláčajte na kazete s atramentom na značku kým kazeta s kliknutím nezapadne na miesto Kontrola č 5 Skontrolujte či je kábel USB spoľahlivo zasunutý do zariadenia aj počítača Ak je zariadenie pripojené k počítaču pomocou kábla USB skontrolujte nasledujúce skutočnosti Ak používate zariadenie na prenos signálu napríklad rozbočovač USB odpojte ho p...

Страница 853: ... na ikonu Canon XXX Printer kde XXX je názov zariadenia a vyberte položku Vlastnosti Properties 4 Kliknite na kartu Porty Ports a skontrolujte nastavenia portu Skontrolujte či je v stĺpci Tlačiareň Printer zobrazená tlačiareň Canon XXX Printer a či je pre možnosť Tlačiť s použitím nasledovných portov Print to the following port s vybratý port s názvom USBnnn kde n je číslo Ak je nastavenie nespráv...

Страница 854: ...nie Tlačová hlava a okolité časti vnútri zariadenia sa môžu veľmi zahriať Nikdy sa nedotýkajte tlačovej hlavy ani okolitých častí Kontrola č 2 Je vložený papier Skontrolujte či je v zadnom zásobníku alebo kazete vložený papier Ak sa v zariadení minul papier vložte ho Kontrola č 3 Obsahujú tlačené dokumenty veľa fotografií alebo ilustrácií Keďže pri tlači veľkého množstva údajov napríklad fotografi...

Страница 855: ...bkové čistenie tlačovej hlavy Ak sa hĺbkovým čistením tlačovej hlavy problém nevyrieši vypnite zariadenie a po 24 hodinách vykonajte ďalšie hĺbkové čistenie tlačovej hlavy Ak sa problém neodstráni ani po dvojnásobnom hĺbkovom čistení tlačovej hlavy Ak sa hĺbkovým čistením tlačovej hlavy problém nevyrieši tlačová hlava je pravdepodobne poškodená Obráťte sa na servisné stredisko Kontrola č 2 Neminul...

Страница 856: ...liš vysoká kvalita tlače V ovládači tlačiarne zvýšte rýchlosť tlače Nastavením uprednostňovania rýchlosti sa tlač zrýchli 1 Otvorte okno nastavenia ovládača tlačiarne Otvorenie okna nastavenia ovládača tlačiarne Kliknite sem Ovládač tlačiarne Prv než kliknutím sem otvoríte okno nastavenia ovládača tlačiarne ukončite všetky spustené aplikácie 2 Na karte Main nastavte možnosť Print Quality na hodnot...

Страница 857: ... kryt Podrobné informácie o odstránení chyby nájdete v časti Na displeji LCD sa zobrazuje chybové hlásenie Kontrola č 3 Nebola skenovacia jednotka kryt tlačiarne otvorená minimálne 10 minút Ak bola skenovacia jednotka kryt otvorená minimálne 10 minút držiak tlačovej hlavy sa posunie doprava aby sa tlačová hlava chránila pred vyschnutím Zatvorením a opätovným otvorením skenovacej jednotky krytu sa ...

Страница 858: ...rane s príslušnou značkou veľkosti strany Papier vložte tak aby strana určená na tlač smerovala NADOL Pravú stranu balíka papiera zarovnajte s pravou stranou kazety a potom posunutím zarovnajte vodiacu lištu papiera na ľavej strane s ľavou stranou balíka papiera Vkladanie papiera a originálov Kontrola č 2 Skontrolujte či papier na ktorý sa tlačí nie je príliš hrubý ani zvlnený Vkladanie papiera a ...

Страница 859: ...alček podávača papiera Bežná údržba Poznámka Čistením sa valček opotrebúva preto ho čistite len v prípade potreby Kontrola č 8 Ak sa z kazety podajú dva alebo viac hárkov súčasne vyčistite vnútorný priestor kazety Informácie o čistení vnútorného priestoru kazety nájdete v časti Bežná údržba Kontrola č 9 Je zadný kryt úplne zatvorený Ak zadný kryt nie je úplne zatvorený papier sa môže zaseknúť Potl...

Страница 860: ...Na začiatok strany Strana 860 z celkového počtu 948 Papier sa správne nepodáva ...

Страница 861: ...ačného softvéru podľa nastavenia ovládača tlačiarne alebo kliknite na položku Print Options na karte Page Setup v ovládači tlačiarne a začiarknite políčko Disable the paper source setting of the application software na obrazovke Print Options Ak je nastavenie zdroja papiera v aplikačnom programe odlišné od nastavenia v ovládači tlačiarne prednosť má nastavenie v aplikačnom softvéri Na začiatok str...

Страница 862: ... papier pred vypnutím zariadenia zrušte tlač stlačením tlačidla Stop Papier sa zasekol v otvore na výstup papiera alebo v zadnom zásobníku Papier sa zasekol vo vnútri zariadenia v transportnej jednotke Pri automatickej obojstrannej tlači sa neodstránil zaseknutý papier V iných prípadoch Na začiatok strany Strana 862 z celkového počtu 948 Zaseknutý papier ...

Страница 863: ...papier vytiahnuť vypnite zariadenie a znovu ho zapnite Papier sa možno vysunie automaticky 2 Znovu vložte papier a stlačte tlačidlo OK na zariadení Ak ste v kroku č 1 vypli zariadenie zrušia sa všetky tlačové úlohy v tlačovom fronte V prípade potreby zopakujte tlač Poznámka Pri opätovnom vkladaní papiera skontrolujte či používate papier vhodný na tlač a či ho správne vkladáte Vkladanie papiera a o...

Страница 864: ...aly vytiahnite papier Poznámka Dávajte pozor aby ste sa nedotkli častí vnútri zariadenia Ak nemôžete papier vytiahnuť vypnite zariadenie a znovu ho zapnite Papier sa možno vysunie automaticky 3 Pripevnite zadný kryt Potlačte ľavú stranu zadného krytu kým sa úplne nezatvorí Ak sa nepodarilo vybrať papier v kroku č 2 4 Vyberte kazetu 5 Pomaly vytiahnite papier Strana 864 z celkového počtu 948 Papier...

Страница 865: ...vate správny papier a či ho správne vkladáte do zariadenia Vkladanie papiera a originálov 7 Znova vložte kazetu do zariadenia a potom stlačte tlačidlo OK na zariadení Ak ste v kroku č 2 zariadenie vypli všetky tlačové úlohy v tlačovom fronte sa zrušia V prípade potreby zopakujte tlač Ak papier nemôžete odstrániť alebo sa papier vnútri zariadenia roztrhol prípadne sa chyba zaseknutia papiera opakuj...

Страница 866: ...na to aby skenovacia jednotka kryt ostala bezpečne zatvorená 4 Pomaly vytiahnite zaseknutý papier aby sa neroztrhol Poznámka Po vybratí papiera zariadenie ihneď vráťte do pôvodnej polohy 5 Zvlnený papier zarovnajte a potom ho znova vložte do kazety V prípade potreby znovu vložte papier do zadného zásobníka Poznámka Pri opätovnom vkladaní papiera do zariadenia skontrolujte či používate správny papi...

Страница 867: ...Na začiatok strany Strana 867 z celkového počtu 948 Pri automatickej obojstrannej tlači sa neodstránil zaseknutý p ...

Страница 868: ...tvoru na výstup papiera Kontrola č 2 Nenachádzajú sa cudzie predmety v zadnom zásobníku Ak sú v zadnom zásobníku cudzie predmety vypnite zariadenie odpojte ho z napájania a cudzí predmet vyberte Kontrola č 3 Je zadný kryt úplne zatvorený Kontrola č 4 Je papier zvlnený Kontrola č 3 Vyrovnajte zvlnenie a vložte papier Na začiatok strany Strana 868 z celkového počtu 948 V iných prípadoch ...

Страница 869: ...gain If this doesn t clear the error see the user s guide for more detail sú alfanumerické znaky ktoré závisia od chyby ktorá sa vyskytla Zobrazuje sa číslo 5100 alebo 5110 Skontrolujte či nie je zablokovaný pohyb držiaka tlačovej hlavy Zrušte tlač z počítača a vypnite zariadenie Potom vyberte zaseknutý papier alebo ochranný materiál ktorý bráni v pohybe držiaka tlačovej hlavy a znovu zapnite zari...

Страница 870: ...anon XXX Printer kde XXX je názov zariadenia a vyberte položku Vlastnosti Properties 4 Kliknite na kartu Porty Ports a skontrolujte nastavenia portu Skontrolujte či je v stĺpci Tlačiareň Printer zobrazená tlačiareň Canon XXX Printer a či je pre možnosť Tlačiť s použitím nasledovných portov Print to the following port s vybratý port s názvom USBnnn kde n je číslo Ak je nastavenie nesprávne Znova na...

Страница 871: ...tému Windows Iné chybové hlásenia Kontrola Ak sa chybové hlásenie zobrazí mimo monitora stavu tlačiarne skontrolujte nasledujúce skutočnosti Údaje nemožno dočasne ukladať z dôvodu nedostatočného miesta na disku Could not spool successfully due to insufficient disk space Odstránením nepotrebných súborov zvýšte množstvo voľného miesta na disku Údaje nemožno dočasne ukladať z dôvodu nedostatočnej pam...

Страница 872: ...rame prieskumu Kliknite na tlačidlo Do not agree Obrazovka s potvrdením sa zatvorí a prieskum sa momentálne preskočí Obrazovka s potvrdením sa zobrazí znovu po dvoch mesiacoch Odinštalovanie programu Inkjet Printer Scanner Fax Extended Survey Program Ak chcete odinštalovať program Inkjet Printer Scanner Fax Extended Survey Program kliknite na tlačidlo Uninstall a pokračujte podľa pokynov na obrazo...

Страница 873: ...ke a vyberiete možnosť Yes obrazovka s potvrdením sa zobrazí v čase nasledujúceho prieskumu Ak vyberiete možnosť No informácie sa budú odosielať automaticky Poznámka Ak vyberiete možnosť Odinštalovať Uninstall alebo Odstrániť Remove program Inkjet Printer Scanner Fax Extended Survey Program sa odinštaluje Pokračujte podľa pokynov na obrazovke Na začiatok strany Strana 873 z celkového počtu 948 Na ...

Страница 874: ... ovládača tlačiarne Poznámka V závislosti od verzie aplikačného programu nemusí byť obojstranná tlač dostupná Na karte Main v okne nastavenia ovládača tlačiarne skontrolujte či je typ vloženého papiera vhodný na automatickú obojstrannú tlač Ak chcete prepnúť na manuálnu obojstrannú tlač postupujte nasledujúcim spôsobom Otvorte okno nastavenia ovládača tlačiarne na karte Page Setup zrušte začiarknu...

Страница 875: ... Ak používate systém Windows 7 1 Použitím správcovských oprávnení sa prihláste ako používateľ 2 V ponuke Štart Start vyberte položku Zariadenia a tlačiarne Devices and Printers 3 Pravým tlačidlom myši kliknite na ikonu Canon XXX Printer kde XXX je názov zariadenia a vyberte možnosť Vlastnosti skenovania Scan properties Ak sa zobrazí obrazovka Kontrola používateľských kont User Account Control klik...

Страница 876: ...lo Pokračovať Continue 4 Na obrazovke WIA Canon XXX ser Properties kde XXX je názov zariadenia kliknite na kartu Udalosti Events 5 V časti Akcie Actions vyberte možnosť Spustiť nasledovný program Start this program a potom v rozbaľovacej ponuke vyberte aplikáciu MP Navigator EX Ver4 0 V rozbaľovacej ponuke Vyberte udalosť Select an event vyberte požadovanú udalosť a potom vyberte aby sa pre každú ...

Страница 877: ...ončí Zariadenie automaticky spustí tlač keď bude pripravené No paper Chýba papier Vložte papier do zadného zásobníka a na displeji zariadenia kompatibilného so štandardom PictBridge vyberte možnosť Pokračovať Continue Ak chcete obnoviť tlač namiesto výberu možnosti Pokračovať Continue na zariadení môžete tiež stlačiť tlačidlo OK na multifunkčnom zariadení Paper jam Zaseknutie papiera Výberom polož...

Страница 878: ...brazuje chybové hlásenie vykonajte príslušné opatrenia Hardware Error Hardvérová chyba Vyskytli sa chyby kazety s atramentom Vymeňte kazetu s atramentom Bežná údržba Na začiatok strany Strana 878 z celkového počtu 948 Na zariadení kompatibilnom so štandardom PictBridge sa zob ...

Страница 879: ... U335 Nedá sa správne tlačiť z bezdrôtového komunikačného zariadenia Kontrola Dá sa tlačiť prostredníctvom komunikácie Bluetooth Tlač z mobilného telefónu prostredníctvom komunikácie Bluetooth Na začiatok strany Strana 879 z celkového počtu 948 Nedá sa správne tlačiť z bezdrôtového komunikačného zaria ...

Страница 880: ...ky ani pinzety Mohli by ste poškodiť zariadenie Poznámka Pre nasledujúce pamäťové karty sú potrebné špeciálne adaptéry Tieto karty zasúvajte do zariadenia s nasadeným adaptérom miniSD Card miniSDHC Card microSD Card microSDHC Card xD Picture Card xD Picture Card typu M xD Picture Card typu H Memory Stick Micro RS MMC MMCmobile Na začiatok strany Strana 880 z celkového počtu 948 Nemožno vybrať pamä...

Страница 881: ...ot Appear Scan Quality Image Displayed on the Monitor Is Poor Scanned Image Is Surrounded by Extra White Areas Cannot Scan Multiple Documents at One Time Cannot Scan Properly in Auto Scan Mode Slow Scanning Speed There is not enough memory Message Is Displayed Computer Stops Operating during Scanning Scanner Does Not Work After Upgrading Windows Page top Strana 881 z celkového počtu 948 Problems w...

Страница 882: ...ure that the machine is turned on Check 2 Connect the USB cable to a different USB port on the computer Check 3 If the USB cable is connected to a USB hub remove it from the USB hub and connect it to a USB port on the computer Check 4 Restart the computer Page top Strana 882 z celkového počtu 948 Scanner Does Not Work ...

Страница 883: ... CD ROM into the computer s disc drive then select Custom Install and install MP Drivers Check 2 On the File menu of the application select Select Source and select the machine Important Do not select the model name that includes WIA in it Note The operation may differ depending on the application Check 3 Start from a TWAIN compliant application Page top Strana 883 z celkového počtu 948 ScanGear S...

Страница 884: ...m the USB hub and connect it to a USB port on the computer Check 5 Make sure that the MP Drivers is installed If it is not installed insert the Setup CD ROM into the computer s disc drive then select Custom Install and install MP Drivers Check 6 On the File menu of the application select Select Source and select the machine Note The operation may differ depending on the application Check 7 Make su...

Страница 885: ...reen resolution Advanced settings On the Monitor tab of the displayed dialog box set Colors to High Color 16 bit or True Color 32 bit Windows Vista From the Start menu select Control Panel Appearance and Personalization Adjust screen resolution to open the Display Settings dialog box Set the color depth to Medium 16 bit or Highest 32 bit Windows XP From the Start menu select Control Panel Display ...

Страница 886: ...Color Settings Tab Page top Strana 886 z celkového počtu 948 Scan Quality Image Displayed on the Monitor Is Poor ...

Страница 887: ...view of ScanGear scanner driver to automatically display the cropping frame scan area according to the document size You can also manually specify the scan area in thumbnail view or when there are white margins along the document for example in photos or when you want to create custom cropping frames Adjusting Cropping Frames Page top Strana 887 z celkového počtu 948 Scanned Image Is Surrounded by...

Страница 888: ...not Scan Multiple Documents at One Time Check 1 Make sure that the documents are placed correctly on the Platen Placing Documents Check 2 Scan each item individually Some applications do not support multiple image scanning Page top Strana 888 z celkového počtu 948 Cannot Scan Multiple Documents at One Time ...

Страница 889: ...can Mode Check 1 Make sure that the documents are placed correctly on the Platen Placing Documents Check 2 Multiple image scanning may not be supported Some applications do not support multiple image scanning In that case scan each item individually Page top Strana 889 z celkového počtu 948 Cannot Scan Properly in Auto Scan Mode ...

Страница 890: ...ion Check 2 Set Fading Correction Grain Correction etc to None Image Settings Check 3 In MP Navigator EX deselect the Correct slanted document Detect the orientation of text documents and rotate images checkbox and scan again Scan Settings Dialog Box Photos Documents Scan Settings Dialog Box One click Mode Screen Scan Settings Dialog Box Scanner Button Settings Page top Strana 890 z celkového počt...

Страница 891: ... Message Is Displayed S909 There is not enough memory Message Is Displayed Check 1 Exit other applications and try again Check 2 Reduce the resolution or output size and scan again Resolution Page top Strana 891 z celkového počtu 948 There is not enough memory Message Is Displayed ...

Страница 892: ...free hard disk space then scan again Error message may appear if there is not enough hard disk space to scan and save when the image size is too large such as when scanning a large document at high resolution Check 3 For Location of Temporary Files in MP Navigator EX specify a folder on a drive with sufficient free space General Tab Check 4 Multiple devices may be connected to USB ports Disconnect...

Страница 893: ... Windows 7 or Windows Vista a confirmation warning dialog box may appear when installing uninstalling or starting up software This dialog box appears when administrative rights are required to perform a task If you are logged on to an administrator account follow the on screen instructions 2 When a confirmation appears click Yes 3 When uninstallation is complete click OK MP Navigator EX is uninsta...

Страница 894: ...are Program You Want to Use Does Not Appear in the Screen for Selecting an E mail Software Program Scanned Image Is Printed Enlarged Reduced Scanned Image Is Enlarged Reduced on the Computer Monitor Scanned Image Does Not Open Page top Strana 894 z celkového počtu 948 Software Problems ...

Страница 895: ...are supported Images are attached to the mail message automatically Microsoft Outlook Windows Mail Windows Vista Outlook Express Windows XP Check 2 If an e mail software program does not operate properly check that the program s MAPI is enabled To enable MAPI refer to the manual of the e mail software program Check 3 If using an e mail software program other than the ones listed above select None ...

Страница 896: ...ftware Problems Scanned Image Is Printed Enlarged Reduced S932 Scanned Image Is Printed Enlarged Reduced Check Set the printing size in the application Page top Strana 896 z celkového počtu 948 Scanned Image Is Printed Enlarged Reduced ...

Страница 897: ... application s manual If you have any questions contact the manufacturer of the application Note You cannot reduce the image size in Paint To reduce the display size open the images in an application Check 2 Change the resolution setting in ScanGear scanner driver and scan again The higher the resolution the larger the resulting image will be Resolution Page top Strana 897 z celkového počtu 948 Sc...

Страница 898: ...ck If the file format is not supported by the application scan the image again and save it in a popular file format such as JPEG For details refer to the application s manual If you have any questions contact the manufacturer of the application Page top Strana 898 z celkového počtu 948 Scanned Image Does Not Open ...

Страница 899: ...t Size Position or Size of the Image Cannot be Detected Correctly When Scanning Using the Operation Panel Document Is Placed Correctly but the Scanned Image Is Slanted Document Is Placed Correctly but the Orientation Changes in the Scanned Image Page top Strana 899 z celkového počtu 948 MP Navigator EX Problems ...

Страница 900: ...e documents are placed correctly on the Platen Placing Documents Check 2 Set Document Size to the actual document size and scan again If the matching size is not found scan at a larger size and trim the image See the Toolbar Trimming in Correct Enhance Images Window for details Page top Strana 900 z celkového počtu 948 Cannot Scan at the Correct Size ...

Страница 901: ...t the documents are placed correctly on the Platen Placing Documents Check 2 Check that the settings are correctly set according to the document If you cannot scan properly with Auto Scan specify the document type and size When Scanning Using the Operation Panel Setting Items on the Operation Panel of the Machine When Scanning Using MP Navigator EX Scanning Photos and Documents Page top Strana 901...

Страница 902: ...t the Scanned Image Is Slanted Check In MP Navigator EX deselect the Correct slanted document checkbox and scan again Scan Settings Dialog Box Photos Documents Scan Settings Dialog Box One click Mode Screen Scan Settings Dialog Box Scanner Button Settings Page top Strana 902 z celkového počtu 948 Document Is Placed Correctly but the Scanned Image Is Sla ...

Страница 903: ... Changes in the Scanned Image Check In MP Navigator EX deselect the Detect the orientation of text documents and rotate images checkbox and scan again Scan Settings Dialog Box Photos Documents Scan Settings Dialog Box One click Mode Screen Scan Settings Dialog Box Scanner Button Settings Page top Strana 903 z celkového počtu 948 Document Is Placed Correctly but the Orientation Changes i ...

Страница 904: ...talovaný ovládač tlačiarne Ak nie je nainštalovaný ovládač tlačiarne v aplikácii Solution Menu EX sa nezobrazí ponuka služby CREATIVE PARK PREMIUM Nainštalujte ovládač tlačiarne a znova sa pokúste o prístup k službe CREATIVE PARK PREMIUM Kontrola č 6 Je zariadenie vybraté v aplikácii Solution Menu EX Ak zariadenie nie je vybraté v aplikácii Solution Menu EX v aplikácii Solution Menu EX sa nezobraz...

Страница 905: ...tača skontrolujte či sú originálne atramentové kazety Canon pre všetky farby správne vložené a potom znova vytlačte obsah na stránke služby CREATIVE PARK PREMIUM Kontrola č 5 Prebiehajú v zariadení operácie Ak v zariadení prebiehajú operácie na obrazovke počítača sa zobrazí chybové hlásenie Podľa pokynov na obrazovke počítača skontrolujte či sa príslušná operácia dokončila a znova vytlačte obsah s...

Страница 906: ...ikácie Bluetooth na obrazovke počítača sa zobrazí chybové hlásenie Pripojte zariadenie pomocou kábla USB a znova vytlačte obsah služby CREATIVE PARK PREMIUM Na začiatok strany Strana 906 z celkového počtu 948 Nemožno používať obsah služby CREATIVE PARK PREMIUM ...

Страница 907: ...te napájací kábel z elektrickej zásuvky a obráťte sa na predajcu alebo servisné stredisko Nikdy sa nepokúšajte zariadenie opravovať ani rozoberať sami Pokusy zákazníkov opraviť alebo rozobrať zariadenie budú dôvodom ukončenia záruky bez ohľadu na to či záručná lehota vypršala Skôr než sa obrátite na servisné stredisko zistite si nasledujúce skutočnosti Názov produktu Názov zariadenia sa nachádza n...

Страница 908: ...Zariadenie pracuje ale atrament sa nevystrekuje Nedajú sa nainštalovať ovládače MP Drivers Tlač sa nespustí Kopírovanie alebo tlač sa zastaví ešte pred dokončením Chyba zápisu Chyba výstupu Chyba komunikácie Výsledky tlače nie sú uspokojivé Zaseknutý papier Papier sa správne nepodáva Na začiatok strany Strana 908 z celkového počtu 948 Často kladené otázky ...

Страница 909: ...a in the Print Options dialog box Page Layout Poster Booklet Duplex Printing manually Specify Margin Print from Last Page Collate and Stamp Background Stamp on the Page Setup tab Since the resolution in the preview display differs from the printing resolution text and lines in the preview display may appear different from the actual print result With some applications the printing is divided into ...

Страница 910: ...t list on the Page Setup tab the selected printing function may not be effective depending on the version of Word If this happens follow the procedure below 1 Open Word s Print dialog box 2 Open the printer driver setup window specify Page Layout on the Page Setup tab and click OK 3 Without starting printing close the Print dialog box 4 Open Word s Print dialog box again 5 Open the printer driver ...

Страница 911: ...sing the application Make sure that you have adequate disk space available when scanning large images at high resolutions For example at least 300 MB of free space is required to scan an A4 document at 600 dpi in full color ScanGear and WIA driver cannot be used at the same time Do not enter the computer into sleep or hibernate state during scanning Calibration may take time if the machine is conn...

Страница 912: ...d retry When image size is too large such as when scanning large images at high resolution your computer may not respond or the progress bar may remain at 0 depending on the application In that case cancel the action for example by clicking Cancel on the progress bar then increase the operating system s virtual memory or reduce the image size resolution and retry Alternatively scan the image via M...

Страница 913: ...pätovná tlač histórie tlače Odstránenie nežiaducej tlačovej úlohy Interpretácia profilu ICC Aktualizácia ovládačov MP Drivers Odinštalovanie príručiek on screen manual Preprava zariadenia Otvorenie okna nastavenia ovládača tlačiarne Poznámka k odpojeniu napájacieho kábla Zdieľanie tlačiarne v sieti Prevzatie prémiového obsahu Na začiatok strany Strana 913 z celkového počtu 948 Príloha ...

Страница 914: ...er Pro Platinum PT 101 Photo Paper Plus Glossy II PP 201 Matte Photo Paper MP 101 Tlač bez okrajov na akomkoľvek inom type papiera môže podstatne znížiť kvalitu tlače alebo spôsobiť zmenu farebných odtieňov výtlačkov Tlač bez okrajov na obyčajnom papieri môže spôsobiť zníženú kvalitu výtlačkov Použite ich len na testovaciu tlač Tlačiť bez okrajov na obyčajnom papieri môžete len pri tlači z počítač...

Страница 915: ...mm 6 90 x 9 80 palca 10 x 15 cm 4 x 6 94 8 x 144 4 mm 3 73 x 5 69 palca 10 x 20 cm 4 x 8 94 8 x 195 2 mm 3 73 x 7 69 palca 13 x 18 cm 5 x 7 120 2 x 169 8 mm 4 73 x 6 69 palca 20 x 25 cm 8 x 10 196 4 x 246 0 mm 7 73 x 9 69 palca Wide 94 8 x 172 6 mm 3 73 x 6 80 palca Túto veľkosť papiera možno použiť len pri tlači z počítača Odporúčaná oblasť tlače Oblasť tlače Na začiatok strany Strana 915 z celko...

Страница 916: ... Veľkosť Oblasť tlače šírka x výška Letter 203 2 x 271 4 mm 8 00 x 10 69 palca Legal 203 2 x 347 6 mm 8 00 x 13 69 palca Túto veľkosť papiera možno použiť len pri tlači z počítača Odporúčaná oblasť tlače Oblasť tlače Na začiatok strany Strana 916 z celkového počtu 948 Formát Letter a Legal ...

Страница 917: ...ače šírka x výška Európska DL European DL 103 2 x 179 6 mm 4 06 x 7 07 palca Bežná obálka US č 10 US Comm Env 10 98 0 x 200 9 mm 3 86 x 7 91 palca Túto veľkosť papiera možno použiť len pri tlači z počítača Odporúčaná oblasť tlače Na začiatok strany Strana 917 z celkového počtu 948 Obálky ...

Страница 918: ... krytu dokumentov Držte kryt dokumentov vo zvislej polohe a potom ho vytiahnite Nasadenie krytu dokumentov Podľa nasledujúceho obrázka vložte oba závesy A krytu dokumentov do držiaka B a potom oba závesy zasuňte vo zvislom smere Na začiatok strany Strana 918 z celkového počtu 948 Ako odpojiť a nasadiť kryt dokumentov ...

Страница 919: ...ME vyberte položku Setup Poznámka Podrobné informácie o výbere ponúk na obrazovke HOME nájdete v časti Prehľad zariadenia 3 Vyberte položku Device settings a potom stlačte tlačidlo OK 4 Pomocou tlačidiel vyberte možnosť Device user settings a potom stlačte tlačidlo OK 5 Pomocou tlačidiel vyberte možnosť Read write attribute a potom stlačte tlačidlo OK 6 Nastavte atribút čítania alebo zápisu Not wr...

Страница 920: ...Na začiatok strany Strana 920 z celkového počtu 948 Nastavenie zásuvky na kartu ako jednotky pamäťovej karty ...

Страница 921: ...e Canon IJ XPS Preview is as follows Print Combine Documents Delete Document Reset Documents View Thumbnails Move Document Move Page Delete Page Note Click View Thumbnails to view all print pages of the print document selected from the Document Name list To hide the print pages click View Thumbnails again Editing and Printing a Print Job When printing multiple documents or pages you can combine do...

Страница 922: ... the Edit menu select Move Page from Pages and select the appropriate item Deleting print documents and print pages To delete a print document select the target document from the Document Name list and on the Edit menu choose Document and then Delete Document To delete a print page click View Thumbnails from the Option menu and select the print page to be deleted Next on the Edit menu select Delet...

Страница 923: ... displayed in the preview Important To limit the number of print history registrations click History Entry Limit on the File menu If the limit on the number of registration is exceeded the print history registrations are deleted starting from the oldest one 2 Selecting a print document From the Document Name list select the document to be printed 3 Executing print Click Print Related Topic Display...

Страница 924: ...ayed on the task bar The Canon IJ Status Monitor appears 2 Display the print jobs Click Display Print Queue The print queue window opens 3 Delete the print jobs Select Cancel All Documents from the Printer menu When the confirmation message appears click Yes The deletion of the print job is complete Important Users who have not been granted access permission for printer management cannot delete th...

Страница 925: ...appear as follows 1 is the model name of the printer 2 is the media type This notation corresponds to the following media type GL Photo Paper Plus Glossy II PT Photo Paper Pro Platinum SG Photo Paper Plus Semi gloss MP Matte Photo Paper 3 is the print quality The print quality is divided into 5 levels ranging from high speed to high quality As the number decreases the print quality becomes higher ...

Страница 926: ...zácia ovládačov MP Drivers Získanie najnovších ovládačov MP Drivers Odstránenie nepotrebných ovládačov MP Drivers Pred inštaláciou ovládačov MP Drivers Inštalácia ovládačov MP Drivers Na začiatok strany Strana 926 z celkového počtu 948 Aktualizácia ovládačov MP Drivers ...

Страница 927: ...te through the Internet and download the latest MP Drivers for your model Important You can download the MP Drivers for free but any Internet access charges incurred are your responsibility Before installing the latest MP Drivers delete the previously installed version For information on how to delete the MP Drivers see Deleting the Unnecessary MP Drivers Related Topics Before Installing the MP Dr...

Страница 928: ...to continue When you are logged on to a standard account switch to an administrator account and restart the operation from the beginning 2 Execute the uninstaller Click Execute When the confirmation message appears click Yes When all the files have been deleted click Complete The deletion of the MP Drivers is complete Important Printer driver and scanner driver ScanGear will be deleted when you un...

Страница 929: ...e menu select Run as administrator and then click Server Properties When the User Account Control dialog box appears click Continue Click the Drivers tab In the Installed printer drivers list click the printer to delete 4 Delete the printer driver When you click Remove Remove Driver And Package dialog box is displayed Select Remove driver and driver package and then click OK In the confirmation di...

Страница 930: ...fer to the Install the Software in the manual Getting Started Turn off the machine Checking the Personal Computer Settings Terminate all running applications In Windows 7 Windows Vista log on as a user who has the administrator account In Windows XP log on as the computer administrator Important Before installing the latest MP Drivers delete the previously installed version For instructions on del...

Страница 931: ...ot agree to the terms of the Software License Agreement you cannot install this software Installation of the MP Drivers begins After the Installation Complete window is displayed check that the machine and the computer are connected through a cable To select the connection port for your machine manually check the Select printer port check box and click Manual Selection At the Select Port window se...

Страница 932: ...Page top Strana 932 z celkového počtu 948 Installing the MP Drivers ...

Страница 933: ...ovaním príručiek on screen manual ukončite všetky otvorené príručky on screen manual 1 Kliknite na položky Štart Start Všetky programy All Programs Canon XXX Manual kde XXX je názov zariadenia Uninstall 2 Po zobrazení potvrdzujúcej správy kliknite na tlačidlo OK Poznámka Keď sa zobrazí hlásenie vyžadujúce reštartovanie počítača kliknutím na tlačidlo OK reštartujte počítač Na začiatok strany Strana...

Страница 934: ...o poškodenie zariadenia a tak znemožniť tlač 3 Zasuňte podperu papiera a vysúvaciu časť výstupného zásobníka zatvorte výstupný zásobník papiera a potom sklopte displej LCD 4 Odpojte kábel tlačiarne od počítača aj od zariadenia a potom zo zariadenia vytiahnite zástrčku napájacieho kábla 5 Pomocou lepiacej pásky zabezpečte všetky kryty na zariadení aby sa počas prenosu neotvorili Potom zariadenie za...

Страница 935: ...avenia tlače spoločné pre všetok aplikačný softvér 1 V ponuke Štart Start vyberte nasledujúce položky V systéme Windows 7 vyberte v ponuke Štart Start položku Zariadenia a tlačiarne Devices and Printers V systéme Windows Vista vyberte ponuku Štart Start položky Ovládací panel Control Panel Hardvér a zvuk Hardware and Sound Tlačiarne Printers V systéme Windows XP vyberte ponuku Štart Start položky ...

Страница 936: ...ndikátor NAPÁJANIE POWER Ak napájací kábel odpojíte kým je zariadenie zapnuté tlačová hlava môže zaschnúť alebo sa upchať a môže sa tiež znížiť kvalita tlače 1 Stlačením tlačidla ZAP ON vypnite zariadenie 2 Uistite sa že nesvieti indikátor NAPÁJANIE POWER 3 Odpojte napájací kábel Technické parametre napájacieho kábla sa líšia v závislosti od krajiny alebo oblasti použitia Na začiatok strany Strana...

Страница 937: ... use this printer through the network is as follows When you execute print the data is sent to the printer through the print server system Important In case an error occurred when a document is printed by the client system to a shared printer the error message of Canon IJ Status Monitor will be displayed both on the client system and the print server system For regular printing Canon IJ Status Mon...

Страница 938: ...and then select Printer properties Sharing tab from the displayed File menu If you are using Windows Vista press the Alt key on your keyboard and then select Run as administrator Sharing from the displayed File menu If you are using Windows XP select Sharing from the File menu Important In Windows 7 or Windows Vista a confirmation warning dialog box may appear when starting installing or uninstall...

Страница 939: ...e icon for the printer that you have configured on the print server system to be shared and then click Next Note If the icon for the printer is not displayed check that the printer is actually connected to the print server It may take some time for the icon for the printer to appear 4 Complete the setup Take the appropriate action as described on the screen and then click Finish If you are using W...

Страница 940: ...em Click the icon for the printer that you have configured on the print server system to be shared and then click Next Note If the icon for the printer is not displayed check that the printer is actually connected to the print server 4 Complete the setup Take the appropriate action as described on the screen and then click Finish The icon for the shared printer will be created in the Printers and ...

Страница 941: ...nd Faxes window on the print server system Uncheck Notify when remote documents are printed on the Advanced tab and then restart the computer The bi directional communication function is disabled and the correct printer status may not be recognized If a client user opens the printer driver properties to display the properties when using Windows 7 press the Alt key and select Printer properties fro...

Страница 942: ...Page top Strana 942 z celkového počtu 948 Restrictions on Printer Sharing ...

Страница 943: ...Solution Menu EX Solution Menu EX starts 2 Select Canon Web Service then click the CREATIVE PARK PREMIUM icon The CREATIVE PARK PREMIUM website appears Important Internet connection is required to access the website Internet connection fees apply 3 Select a category 4 Select and download the content you want to print Note The application required for printing depends on the downloaded content You ...

Страница 944: ...to album is an easy task if you use Easy PhotoPrint EX All you need to do is select which photos to use select a layout then load paper into your printer and print After you bind the printed sheets you ll have the one and only album of your memories You can change the layout and background and attach comments to photos You can also select the size and orientation You can arrange a photo across the...

Страница 945: ...alendar using your favorite photos It ll be exciting to turn the calendar pages You can use all kinds of photos You can also create 2 month 6 month and 12 month calendars Create Stickers Create stickers easily with Easy PhotoPrint EX Create stickers of your favorite photos and share them with your friends CHECK You can add text to photos Strana 945 z celkového počtu 948 Using Easy PhotoPrint EX ...

Страница 946: ...Page top Strana 946 z celkového počtu 948 Using Easy PhotoPrint EX ...

Страница 947: ... can scan easily by navigating through MP Navigator EX screens You can also save print scanned images using MP Navigator EX Scan Small Documents at One Time You can scan multiple small documents photos cards etc at one time It is useful as you do not need to scan multiple times Scan Large Documents You can easily scan documents that are larger than the Platen using MP Navigator EX It allows you to...

Страница 948: ...images as PDF files or attach them to e mail automatically Scan and Correct Enhance Photos You can easily correct enhance scanned photos using MP Navigator EX You do not need to use other applications For details on how to use MP Navigator EX refer to Scanning with the Bundled Application Software Page top Strana 948 z celkového počtu 948 Using MP Navigator EX ...

Отзывы: