background image

20

3

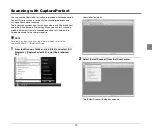
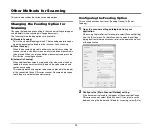
Select the scanner you are using (the name of the 
connected Canon DR-series scanner should be followed 
by “w/flatbed”), and click [Settings].

The [Configure Device Settings] dialog box appears.

IMPORTANT

If the flatbed and the Canon DR-series scanner are connected 
properly, “w/flatbed” should appear after the scanner name. If 
only the scanner name appears, try reinstalling the software 
included on the setup disc provided with the flatbed.

4

Click [OK] to finish scanner selection.

5

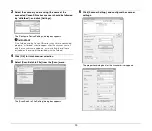
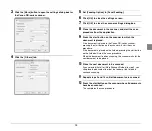
Select [Scan Batch to File] from the [Scan] menu.

The [Scan Batch to File Setting] dialog box appears.

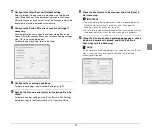
6

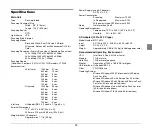
Click [Scanner Setting], and configure the scanner 
settings.

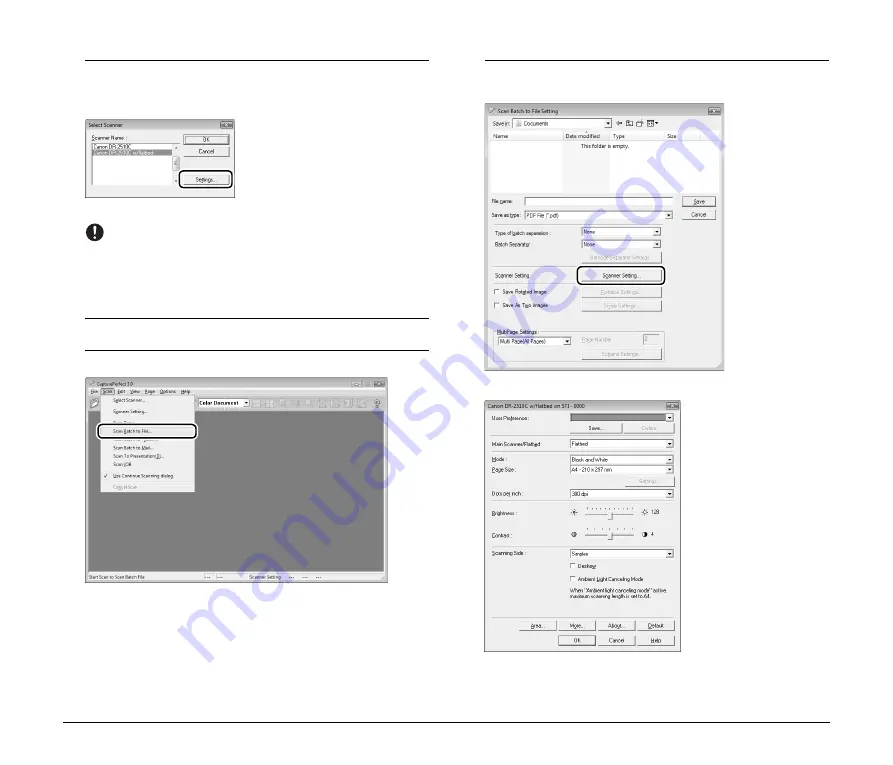
The properties dialog box for the scanner driver appears.

Содержание M181011

Страница 1: ...User Manual Please read this manual before operating this scanner After you finish reading this manual store it in a safe place for future reference ...

Страница 2: ...copy of the SOFTWARE solely for a back up purpose or copy the SOFTWARE onto the permanent storage device e g a hard disk of your computer and retain the original for a back up purpose Except as expressly permitted under the applicable law any other copying of the SOFTWARE is a violation of this Agreement You must reproduce and include the copyright notice on the back up copy 3 SUPPORT AND UPDATE C...

Страница 3: ...ANON Should you have any questions concerning this Agreement or if you desire to contact Canon for any reason please write to Canon s local affiliate International ENERGY STAR Office Equipment Program As an ENERGY STAR Partner Canon Electronics Inc has determined that this machine meets the ENERGY STAR Program guidelines for energy efficiency The International ENERGY STAR Office Equipment Program ...

Страница 4: ...NALS OF SCANNED DOCUMENTS YOU THE CUSTOMER ARE RESPONSIBLE FOR INSPECTING THE SCANNED IMAGES AND VERIFYING THAT DATA IS INTACT THE MAXIMUM LIABILITY OF CANON ELECTRONICS INC UNDER THIS WARRANTY IS LIMITED TO THE PURCHASE PRICE OF THE PRODUCT COVERED BY THE WARRANTY FCC REGULATIONS For 120 V model Document Scanner Model M181011 This device complies with Part 15 of the FCC Rules Operation is subject...

Страница 5: ...01 is identical to model M181011 Model Flatbed Scanner Unit 101 is the sales name of model M181011 Table of Contents Setup Guide 6 Introduction 10 Symbols Used in This Manual 10 Important Safety Instructions 11 Installation Location 11 AC Adapter 11 Moving the Flatbed 12 Handling 12 Disposal 13 When Sending the Flatbed for Repairs 13 Features 13 Names and Functions of Parts 14 Documents 15 Placing...

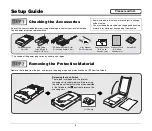
Страница 6: ...ype B Length 1 8 m 2 AC Adapter Power Cord Connected length 2 6 m User Manual This Document Warranty Card U S A and Canada only Setup Disc Registration Card U S A and Canada only Releasing the Lock Switch The flatbed is shipped with the internal scanning unit locked into place Before using the flatbed set the lock switch on the underside of the flatbed to the position to release the scanning unit ...

Страница 7: ...allation Do not connect the scanners to the computer before installing the software Log on to Windows as an Administrator Close all other applications before installing the software Make sure that the driver for the connected Canon DR series document scanner is already installed If you connect a scanner and turn it ON before you install the software the following wizard screen will appear If this ...

Страница 8: ...u own multiple Canon DR series scanners with the exception of the Canon DR series scanner connected to the flatbed do not connect any other scanners to the computer regardless of compatibility Proper functioning is not guaranteed if multiple scanners are connected When connecting the flatbed and the Canon DR series scanner do not use the USB cable supplied with the DR series scanner Instead use th...

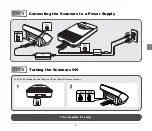
Страница 9: ...9 Connecting the Scanners to a Power Supply Turning the Scanners ON Turn ON the flatbed first and then turn ON the Canon DR series scanner This completes the setup ...

Страница 10: ... restrictions handling precautions and instructions that should be observed for safety WARNING Indicates a warning concerning operations that may lead to death or injury to persons if not performed correctly To use the machine safely always pay attention to these warnings CAUTION Indicates a caution concerning operations that may lead to injury to persons or damage to property if not performed cor...

Страница 11: ... Room temperature 50 F to 90 5 F 10 C to 32 5 C Humidity 20 to 80 RH Avoid installing the flatbed near equipment that generates a magnetic field e g speakers televisions or radios AC Adapter Connect the AC adapter only to a power outlet of the rated voltage and power supply frequency 120 V 60 Hz or 220 240 V 50 60 Hz depending on your region Do not connect other electrical equipment to the same po...

Страница 12: ... power outlet regularly and clean the area around the base of the power plug s metal pins and the power outlet with a dry cloth to ensure that all dust and grime is removed If the power cord is connected for a long period of time in a damp dusty or smoky location dust can build up around the power plug and become damp This may cause a short circuit and result in a fire If the flatbed makes strange...

Страница 13: ...to do so may result in a condensation error Disposal When disposing the flatbed or AC adapter make sure to follow the local ordinances and laws or consult with your local authorized Canon dealer or service representative When Sending the Flatbed for Repairs If you need to send the flatbed out for repairs use the packing box in which it came Firmly secure the flatbed with packaging material when yo...

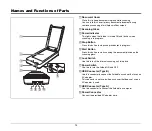
Страница 14: ...op scan procedures in progress E Start Button Press this button to start scanning the document placed on the scanning glass F Lock Switch Use this to lock the internal scanning unit into place G Power Switch Use this to turn the flatbed ON and OFF H USB Connector Type B Use this connector to connect the flatbed to a scanner that uses an AC adapter This connector is not used when a scanner that doe...

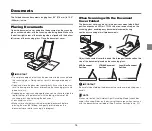
Страница 15: ...ner of the scanning glass when placing the document You cannot scan film Make sure to straighten wrinkled or curled documents before placing them on the flatbed and gently press down on the document cover while scanning is in progress When Scanning with the Document Cover Folded The document cover can be set to two positions when folded Each position exposes an A5R or LTR A4 size area respectively...

Страница 16: ...s document The software that operates the connected Canon DR series scanner ISIS TWAIN driver must also be installed The flatbed cannot operate as a stand alone unit A Canon DR series scanner must be connected Both the flatbed and the connected Canon DR series scanner must be turned ON to scan using the flatbed If the flatbed is turned ON but the Canon DR series scanner is turned OFF you cannot sc...

Страница 17: ...Supported by the Flatbed Duplex scanning Folio Reverse side Staple Detection Manual Feeding Verify Count Addon Batch Separation Hi Speed Text Enhancement Drop out color custom JPEG Transfer Advanced Text Enhancement Skip Blank Page Back side settings Double Feed Detection Imprinter Patchcode Speed priority Auto brightness Custom color enhance Rapid recovery system Prescan Margin Support Function ...

Страница 18: ... 3 Press the start button on the flatbed The job function or CaptureOnTouch starts and the document placed on the flatbed is scanned automatically IMPORTANT Do not move the document placed on the scanning glass while the power indicator is flashing and scanning is in progress NOTE Registered jobs can also be assigned to the buttons on the connected Canon DR series scanner start button or job butto...

Страница 19: ...the Scan Batch to File setting When you use this scanning method documents that are scanned one sheet at a time on the flatbed are saved to the same image file NOTE For details on how to scan using other methods refer to the CapturePerfect 3 0 Operation Guide 1 From the Windows Taskbar click Start and select All Programs CapturePerfect 3 0 and CapturePerfect 3 0 CapturePerfect starts 2 Select Sele...

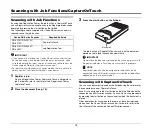
Страница 20: ...nner are connected properly w flatbed should appear after the scanner name If only the scanner name appears try reinstalling the software included on the setup disc provided with the flatbed 4 Click OK to finish scanner selection 5 Select Scan Batch to File from the Scan menu The Scan Batch to File Setting dialog box appears 6 Click Scanner Setting and configure the scanner settings The properties...

Страница 21: ...ngs on p 22 10 Specify the file name and format for the image file to be saved For details on other settings in the Scan Batch to File Setting dialog box refer to the CapturePerfect 3 0 Operation Guide 11 Place the documents to be scanned and click Save to start scanning IMPORTANT The method for placing documents differs depending on the Feeding Option setting For details see Changing the Feeding ...

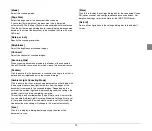
Страница 22: ... of the Main Scanner Flatbed setting If you change the Main Scanner Flatbed option midway through configurations any settings configured before the change will be disabled User Preference Enter a name and click Save You can recall the name and its configurations in the settings dialog box whenever necessary Main Scanner Flatbed Select Flatbed to scan the document placed on the flatbed Select Main ...

Страница 23: ...ge Ambient Light Canceling Mode Click to ensure that if you are scanning documents on the flatbed with the document cover open light that enters from the edges of the document is removed in the scanned images Depending on the nature of the ambient light and other scanning condition settings the ambient light may not be completely removed This setting is only available when Page Size is set to A4 o...

Страница 24: ...ditional documents are placed after a document finishes feeding the scanner automatically detects these documents and continues scanning This feeding option only applies to documents placed in the feeder of the connected Canon DR series scanner Documents placed on the flatbed are not detected automatically Configuring the Feeding Option This section describes how to set Feeding Option to Panel Fee...

Страница 25: ...n DR series scanner pressing the start button on the scanner will start the scan procedure If the document is placed on the flatbed pressing the start button on the flatbed will start the scan procedure When the document finishes scanning the scanner waits for the next document to be placed 10 Place the next document to be scanned If you selected Auto for Main Scanner Flatbed in step 2 you can pla...

Страница 26: ...eeding Option Standard Example 2 Scan different document types to a single image file By configuring the following settings you can scan multiple documents of different types e g multiple pages of a book and multiple document sheets to a single file Main Scanner Flatbed Auto Feeding Option Panel Feeding For example perform the following to scan a multipage application form and a passport 1 Start t...

Страница 27: ...connecting the flatbed directly to the computer Problem 3 White lines or streaks appear in scanned images Solution Clean the scanning glass If a sticky substance such as glue or correction fluid is found carefully wipe with just enough pressure to clean the area where the lines appear If the problem cannot be solved by cleaning the internal glass may be scratched In this case contact your local au...

Страница 28: ... shock Cleaning the Flatbed Use a cloth dampened with water and thoroughly wrung out to clean the outside of the flatbed and use a clean dry cloth to wipe the flatbed dry Cleaning the Scanning Glass and Pressure Board If streaks appear in scanned images or if scanned documents become dirty the scanning glass and pressure board may be dirty Be sure to clean them regularly 1 Open the document cover ...

Страница 29: ... mm W x D x H Weight without AC adapter Approximately 7 7 lb 3 5 kg Power Supply using AC adapter DC 24 V 2 2 A Power Consumption Scanning Maximum 15 2 W In Sleep mode Maximum 5 1 W With power turned OFF Maximum 0 5 W Noise Not more than 59 dB Operating Environment Temperature 10 C to 32 5 C 50 F to 90 5 F Humidity 20 to 80 RH AC Adapter 100 to 240 V type Model Number MG1 4314 Input AC 100 to 240 ...

Страница 30: ...30 External Dimensions Diagram 11 4 290 mm 20 2 513 mm 21 8 554 mm 19 8 504 mm 3 11 79 mm ...

Страница 31: ...HERLANDS CANON LATIN AMERICA INC 703 WATERFORD WAY SUITE 400 MIAMI FLORIDA 33126 U S A CANON AUSTRALIA PTY LTD 1 THOMAS HOLT DRIVE NORTH RYDE SYDNEY N S W 2113 AUSTRALIA CANON SINGAPORE PTE LTD 1 HARBOUR FRONT AVENUE 04 01 KEPPEL BAY TOWER SINGAPORE 098632 CANON HONGKONG COMPANY LTD 19TH FLOOR THE METROPOLIS TOWER 10 METROPOLIS DRIVE HUNGHOM KOWLOON HONG KONG CANON KOREA BUSINESS SOLUTIONS INC 168...

Отзывы: