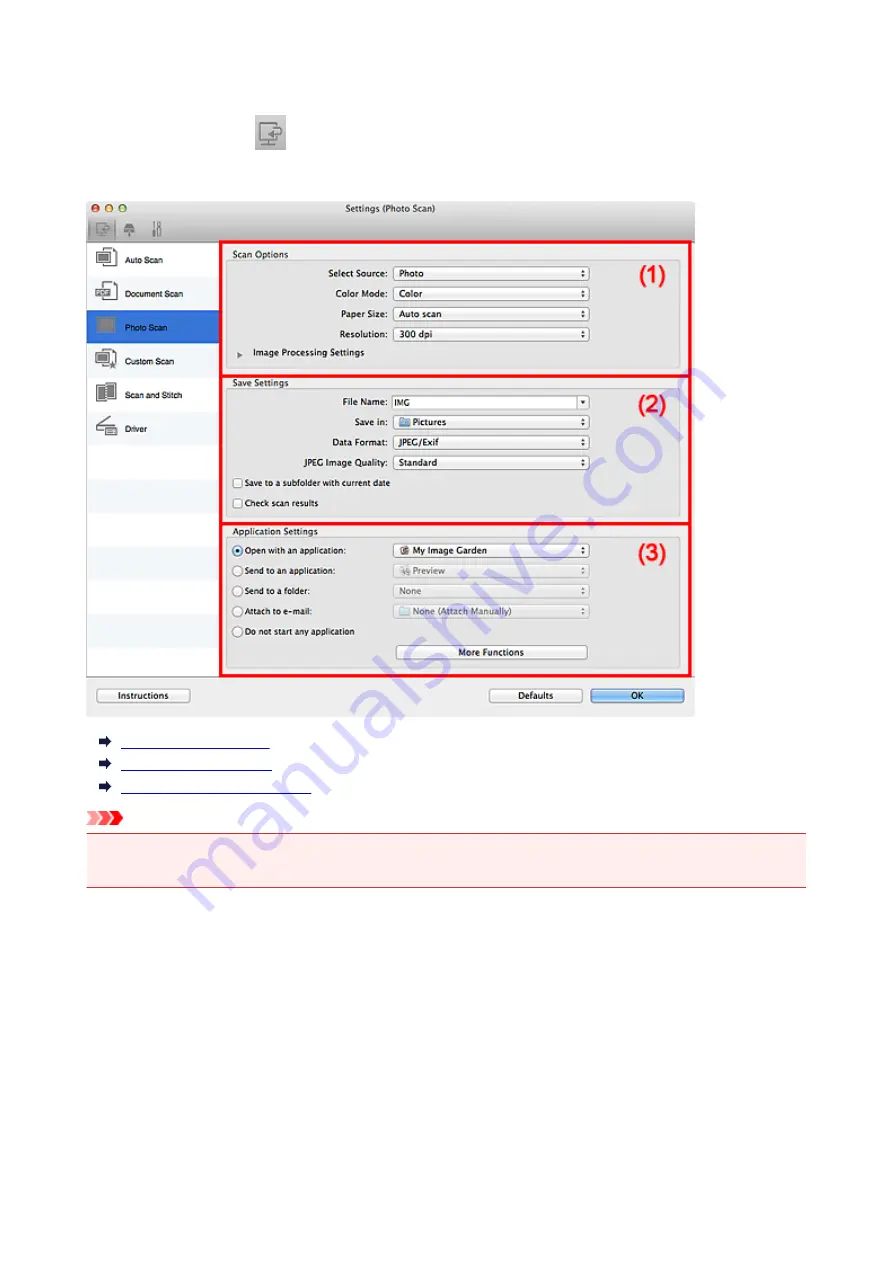
Settings (Photo Scan) Dialog
Click
Photo Scan
on the
(Scanning from a Computer) tab to display the
Settings (Photo Scan)
dialog.
In the
Settings (Photo Scan)
dialog, you can make advanced scan settings to scan items as photos.
(1) Scan Options Area
(2) Save Settings Area
(3) Application Settings Area
Important
• When the Settings dialog is displayed from My Image Garden, the setting items for
Application
Settings
do not appear.
(1) Scan Options Area
Select Source
Photo
is selected.
Color Mode
Select the color mode in which to scan the item.
Paper Size
Select the size of the item to be scanned.
When you select
Custom
, a screen in which you can specify the paper size appears. Select a
Unit
,
then enter the
Width
and
Height
, and then click
OK
.
73
Содержание LiDE220
Страница 20: ...Safety Guide Safety Precautions Regulatory and Safety Information 20 ...
Страница 27: ...Placing Items Place the Item on the Platen Items You Can Place How to Place Items 27 ...
Страница 38: ...Scanning Scanning from a Computer Scanning Using the Scanner Buttons 38 ...
Страница 53: ...5 Select Select Source according to the items to be scanned 6 Select Auto scan for Paper Size then click OK 53 ...
Страница 72: ...Defaults You can restore the settings in the displayed screen to the default settings 72 ...
Страница 87: ...Defaults You can restore the settings in the displayed screen to the default settings 87 ...
Страница 122: ...122 ...
Страница 137: ...137 ...
Страница 204: ...Useful Information on Scanning Adjusting Cropping Frames in the Image Stitch Window Resolution Data Formats 204 ...
Страница 220: ...Troubleshooting Search Each Function Problems with Scanning Problems with Installation Downloading 220 ...
Страница 221: ...Problems with Scanning Problems with Scanning Scan Results Not Satisfactory 221 ...


