


019A-07H
1
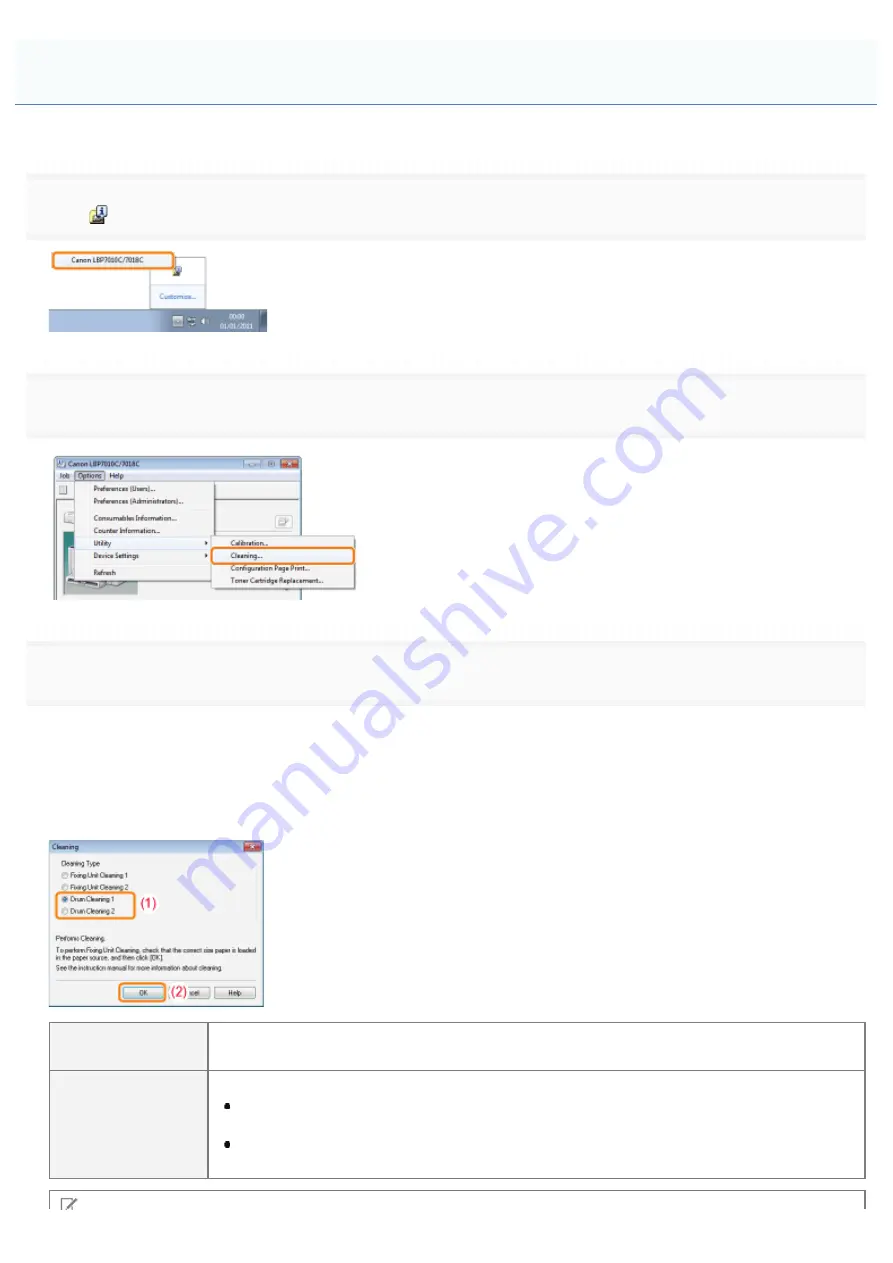
Click [
] displayed in the task tray, and then select a printer name.
2
3
Select [Cleaning Type].
(1) Select [Drum Cleaning 1] or [Drum Cleaning 2] depending on the symptoms.
(2) Click [OK].
ĺ
The message <Cleaning> appears in the Printer Status Window, and the printer starts cleaning the
photosensitive drum.
[Drum Cleaning 1]
Select when short white streaks (lines) appear at equal distance on the images (especially in a
high-humidity environment).
[Drum Cleaning 2]
Select when the following circumstances occur.
Long black streaks (lines) appear on the images (especially in a low temperature
environment).
Short black streaks (lines), smudge marks, or white points appear at equal distance on the
images (especially in a high temperature environment).
Cleaning the Photosensitive Drum of the Printer
㻥㻟㻌㻛㻌㻟㻠㻟
Содержание LBP7010C
Страница 1: ...㻝㻌㻛㻌㻟㻠㻟 ...
Страница 19: ...7 Click Exit When the following screen appears you can remove the CD ROM 㻝㻥㻌㻛㻌㻟㻠㻟 ...
Страница 35: ...If the laser beam should escape and enter your eyes exposure may cause damage to your eyes 㻟㻡㻌㻛㻌㻟㻠㻟 ...
Страница 74: ...The packing materials may be changed in form or placement or may be added or removed without notice 㻣㻠㻌㻛㻌㻟㻠㻟 ...
Страница 78: ...11 Press down the lock release lever on both sides 12 Close the front cover 13 Close the top cover 㻣㻤㻌㻛㻌㻟㻠㻟 ...
Страница 85: ...NOTE Calibration time It takes approximately 57 seconds 㻤㻡㻌㻛㻌㻟㻠㻟 ...
Страница 92: ...㻥㻞㻌㻛㻌㻟㻠㻟 ...
Страница 106: ...Close the covers after you finish checking Next install the printer Installing the Printer 㻝㻜㻢㻌㻛㻌㻟㻠㻟 ...
Страница 111: ...019A 027 Installing the Printer Driver Uninstalling the Printer Driver Driver Installation 㻝㻝㻝㻌㻛㻌㻟㻠㻟 ...
Страница 120: ...When the installation is complete an icon and folder for this printer will be created After Installation 㻝㻞㻜㻌㻛㻌㻟㻠㻟 ...
Страница 135: ...17 Click Exit When the following screen appears you can remove the CD ROM 㻝㻟㻡㻌㻛㻌㻟㻠㻟 ...
Страница 137: ...If the User Account Control dialog box appears Click Yes or Continue 㻝㻟㻣㻌㻛㻌㻟㻠㻟 ...
Страница 156: ...㻝㻡㻢㻌㻛㻌㻟㻠㻟 ...
Страница 177: ...3 Click OK For details on the basic printing procedure see Basic Printing Procedure 㻝㻣㻣㻌㻛㻌㻟㻠㻟 ...
Страница 181: ...For details on the basic printing procedure see Basic Printing Procedure 㻝㻤㻝㻌㻛㻌㻟㻠㻟 ...
Страница 183: ...3 Click OK For details on the basic printing procedure see Basic Printing Procedure 㻝㻤㻟㻌㻛㻌㻟㻠㻟 ...
Страница 186: ...3 Click OK Then the Page Setup sheet reappears 㻝㻤㻢㻌㻛㻌㻟㻠㻟 ...
Страница 190: ... Black and White Color 3 Click OK For details on the basic printing procedure see Basic Printing Procedure 㻝㻥㻜㻌㻛㻌㻟㻠㻟 ...
Страница 197: ...4 Click OK For details on the basic printing procedure see Basic Printing Procedure 㻝㻥㻣㻌㻛㻌㻟㻠㻟 ...
Страница 201: ...3 Click OK For details on the basic printing procedure see Basic Printing Procedure 㻞㻜㻝㻌㻛㻌㻟㻠㻟 ...
Страница 203: ...4 Click OK For details on the basic printing procedure see Basic Printing Procedure 㻞㻜㻟㻌㻛㻌㻟㻠㻟 ...
Страница 207: ...4 Click OK For details on the basic printing procedure see Basic Printing Procedure 㻞㻜㻣㻌㻛㻌㻟㻠㻟 ...
Страница 211: ... Low 㻞㻝㻝㻌㻛㻌㻟㻠㻟 ...
Страница 221: ...4 Confirm the settings then click OK ĺ The printer folder reappears 㻞㻞㻝㻌㻛㻌㻟㻠㻟 ...
Страница 273: ...4 Click OK 㻞㻣㻟㻌㻛㻌㻟㻠㻟 ...
Страница 282: ...For details on the procedure for loading paper see Loading Paper 㻞㻤㻞㻌㻛㻌㻟㻠㻟 ...
Страница 316: ...If you specify Special Settings C4 printing speed drops 㻟㻝㻢㻌㻛㻌㻟㻠㻟 ...
Страница 341: ...㻟㻠㻝㻌㻛㻌㻟㻠㻟 ...


