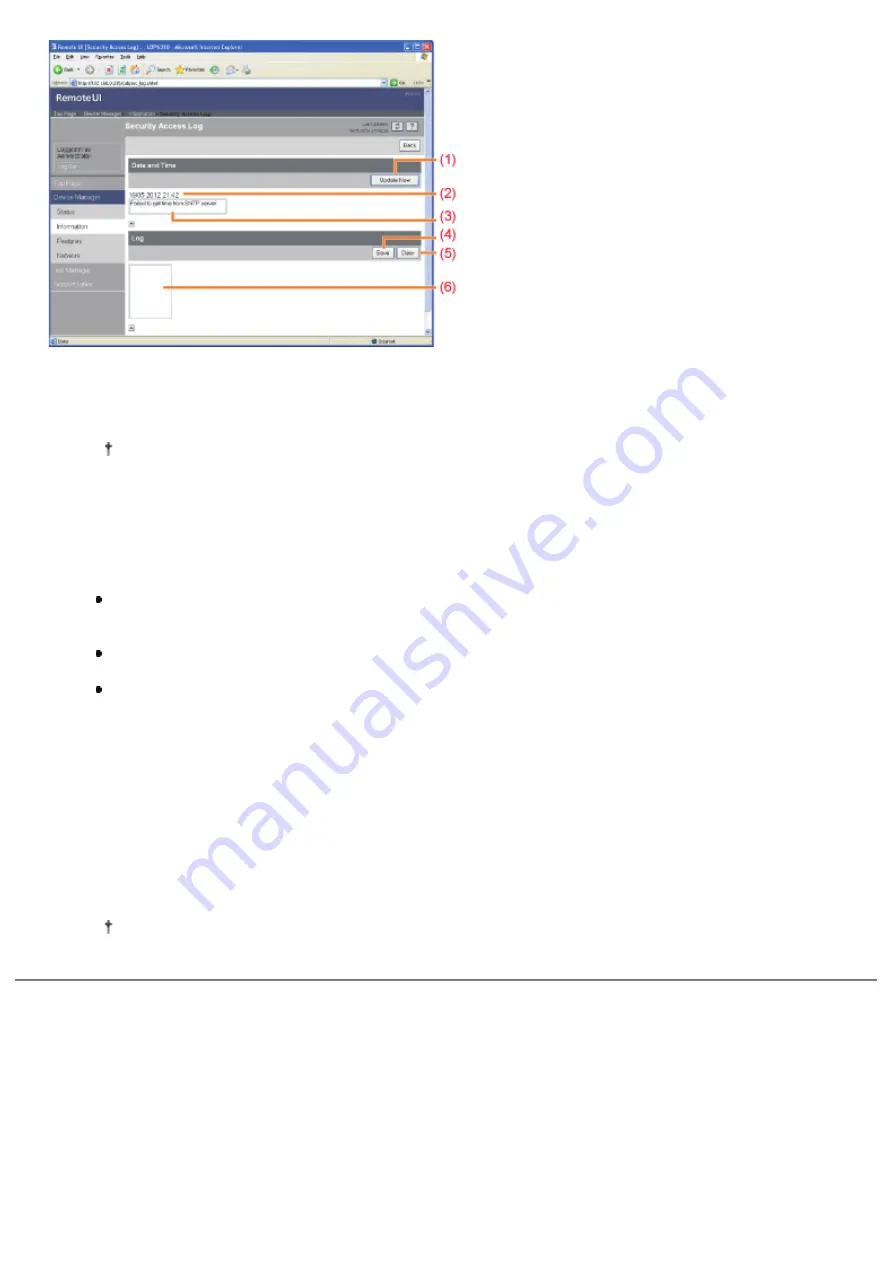
(1)
[Update Now]
Clicking this button obtains information about the date and time from the SNTP server.
Reflects the obtained status to [Date and Time] and [SNTP Server Log] according to success or failure of obtaining
information.
For details on the SNTP settings, see "
Configuring the Protocol Settings
(2)
[Date and Time]
Displays the date and time obtained from the SNTP server.
The local time of the printer is displayed when the time and date could not be obtained for some reason, such as
that the SNTP server address is not specified.
(3)
[SNTP Server Log]
Displays the obtained status from the SNTP server.
When succeeded in obtaining the status
Synchronized with the SNTP server at <The date and time when they were obtained>.
Next synchronization in <The date and time when they are to be obtained next>.
While in the process of obtaining the status
Getting time from SNTP Server.
When failed to obtain the status
Failed to get time from SNTP Server.
(4)
[Save]
Saves the obtained security access log in text format.
(5)
[Clear]
Clears the obtained security access logs.
(6)
[Security Access Log]
Displays the obtained security access logs.
The date and time when the access was blocked, IP address, port number, and restriction type
*
are displayed.
*
"PRINT" (Rejected TCP/IP Print Jobs), "SNMP" (Rejected SNMP Monitoring or Setting Changes), or "SLP"
(Rejected Multicast Discoveries)
Up to 100 security access logs can be obtained.
When the number of logs exceeds 100, the logs are deleted starting from the oldest one.
㻟㻢㻠㻌㻛㻌㻠㻡㻞
Содержание LBP6310dn
Страница 1: ...㻝㻌㻛㻌㻠㻡㻞 ...
Страница 20: ...7 Click Exit When the following screen appears you can remove the CD ROM 㻞㻜㻌㻛㻌㻠㻡㻞 ...
Страница 37: ...If the laser beam should escape and enter your eyes exposure may cause damage to your eyes 㻟㻣㻌㻛㻌㻠㻡㻞 ...
Страница 45: ...This printer supports Raw only It does not support LPR 㻠㻡㻌㻛㻌㻠㻡㻞 ...
Страница 50: ...Paper Feeder Unit PF 44 㻡㻜㻌㻛㻌㻠㻡㻞 ...
Страница 99: ...07K5 024 Installing the Printer Driver Uninstalling the Printer Driver Driver Installation 㻥㻥㻌㻛㻌㻠㻡㻞 ...
Страница 110: ...When the installation is complete an icon and folder for this printer will be created After Installation 㻝㻝㻜㻌㻛㻌㻠㻡㻞 ...
Страница 116: ...If you want to change the network settings for the printer see Changing the Network Settings for the Printer 㻝㻝㻢㻌㻛㻌㻠㻡㻞 ...
Страница 122: ...See You Cannot Install the Printer Driver and install the printer driver again 㻝㻞㻞㻌㻛㻌㻠㻡㻞 ...
Страница 125: ...When the installation is complete an icon and folder for this printer will be created After Installation 㻝㻞㻡㻌㻛㻌㻠㻡㻞 ...
Страница 131: ...㻝㻟㻝㻌㻛㻌㻠㻡㻞 ...
Страница 146: ... Registering a Custom Paper Size 㻝㻠㻢㻌㻛㻌㻠㻡㻞 ...
Страница 157: ...㻝㻡㻣㻌㻛㻌㻠㻡㻞 ...
Страница 173: ...6 Set the paper drawer in the printer Next register a paper size Registering the Paper Size 㻝㻣㻟㻌㻛㻌㻠㻡㻞 ...
Страница 185: ...3 Click OK For details on the basic printing procedure see Basic Printing Procedure 㻝㻤㻡㻌㻛㻌㻠㻡㻞 ...
Страница 189: ...For details on the basic printing procedure see Basic Printing Procedure 㻝㻤㻥㻌㻛㻌㻠㻡㻞 ...
Страница 192: ...5 Click OK For details on the basic printing procedure see Basic Printing Procedure 㻝㻥㻞㻌㻛㻌㻠㻡㻞 ...
Страница 194: ...Click OK For details on the basic printing procedure see Basic Printing Procedure 㻝㻥㻠㻌㻛㻌㻠㻡㻞 ...
Страница 197: ...3 Click OK Then the Page Setup sheet reappears 㻝㻥㻣㻌㻛㻌㻠㻡㻞 ...
Страница 206: ...4 Click OK For details on the basic printing procedure see Basic Printing Procedure 㻞㻜㻢㻌㻛㻌㻠㻡㻞 ...
Страница 210: ...3 Click OK For details on the basic printing procedure see Basic Printing Procedure 㻞㻝㻜㻌㻛㻌㻠㻡㻞 ...
Страница 212: ...4 Click OK For details on the basic printing procedure see Basic Printing Procedure 㻞㻝㻞㻌㻛㻌㻠㻡㻞 ...
Страница 218: ...4 Click OK For details on the basic printing procedure see Basic Printing Procedure 㻞㻝㻤㻌㻛㻌㻠㻡㻞 ...
Страница 220: ...4 Click OK For details on the basic printing procedure see Basic Printing Procedure 㻞㻞㻜㻌㻛㻌㻠㻡㻞 ...
Страница 228: ... 3 Click Yes 4 Click OK ĺ The setting screen of the printer driver reappears 㻞㻞㻤㻌㻛㻌㻠㻡㻞 ...
Страница 263: ...6 Click Reset After completing the reset the settings are effective 㻞㻢㻟㻌㻛㻌㻠㻡㻞 ...
Страница 269: ...5 Clicking Yes initializes the network settings 㻞㻢㻥㻌㻛㻌㻠㻡㻞 ...
Страница 271: ...9 Enter exit then press the ENTER key on your keyboard ĺ Command Prompt closes 㻞㻣㻝㻌㻛㻌㻠㻡㻞 ...
Страница 273: ...If the message Turn the device off and then on again appears Click OK and then cycle the power of the printer 㻞㻣㻟㻌㻛㻌㻠㻡㻞 ...
Страница 282: ...Click Finish 8 Click Close 9 Click Apply 10 Click OK 㻞㻤㻞㻌㻛㻌㻠㻡㻞 ...
Страница 318: ... Link Enter the link name URL Enter the URL of the link Comments Enter a comment for the link 㻟㻝㻤㻌㻛㻌㻠㻡㻞 ...
Страница 320: ...㻟㻞㻜㻌㻛㻌㻠㻡㻞 ...
Страница 333: ...Checking Print Logs 1 Start the Remote UI Starting the Remote UI 2 Select Print Log from the Job Manager menu 㻟㻟㻟㻌㻛㻌㻠㻡㻞 ...
Страница 336: ... Printing Cannot Be Performed via the Print Server 㻟㻟㻢㻌㻛㻌㻠㻡㻞 ...
Страница 345: ...㻟㻠㻡㻌㻛㻌㻠㻡㻞 ...
Страница 350: ...9 Click OK 㻟㻡㻜㻌㻛㻌㻠㻡㻞 ...
Страница 354: ...㻟㻡㻠㻌㻛㻌㻠㻡㻞 ...
Страница 359: ...5 Click OK 㻟㻡㻥㻌㻛㻌㻠㻡㻞 ...
Страница 362: ...To check the obtained security access logs Checking the Security Access Logs 㻟㻢㻞㻌㻛㻌㻠㻡㻞 ...
Страница 394: ...You need administrator rights to change the setting Contact your system administrator 4 Click OK 㻟㻥㻠㻌㻛㻌㻠㻡㻞 ...
Страница 399: ...㻟㻥㻥㻌㻛㻌㻠㻡㻞 ...
Страница 443: ...07K5 098 Basic Operations Various Information for Windows Appendix 㻠㻠㻟㻌㻛㻌㻠㻡㻞 ...


