Canon LASERBASE MF5700 Series Скачать руководство пользователя страница 63

9-6

T

ro

u

b

lesh

ooting

9

12

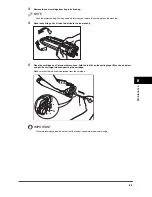
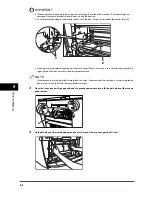
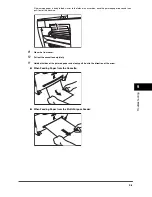
Push the paper release levers back to their original position and close the face up cover.

IMPORTANT

Be sure to push the paper release levers back to their original position. If the levers are left pushed down, the 
paper jam error will not be resolved.

Never push down the paper release levers while printing. This could result in damage to the fixing assembly.
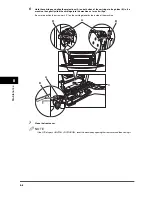
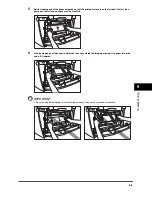
13

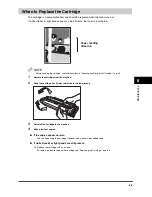
Insert the cartridge back into the machine, then close the front cover.

For details, see "Replacing the Cartridge," on p. 8-6.

IMPORTANT

After you replace the cartridge and close the front cover, the machine should be ready for operating. If the machine 
returns to the ready state for operating, troubleshooting has been successful. If the machine does not return to the 
ready state for operating, confirm that the paper release levers are pushed back to their original position, and 
check to see that jammed paper is not left in the machine.
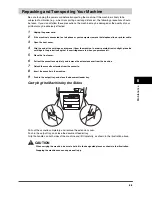
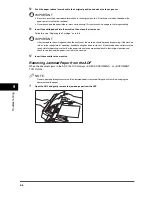
14

Insert the cassette to the machine.

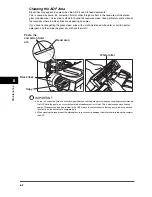
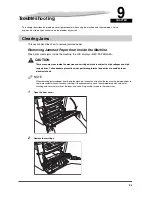
Removing Jammed Paper from the ADF

When the document jams in the ADF, the LCD displays <CHECK DOCUMENT>, or <DOCUMENT 
TOO LONG>.

NOTE

Do not open the platen glass cover until the jammed paper is removed. Doing so will result in damaging the 
document and the paper.
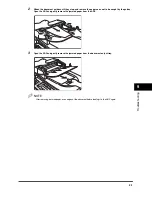
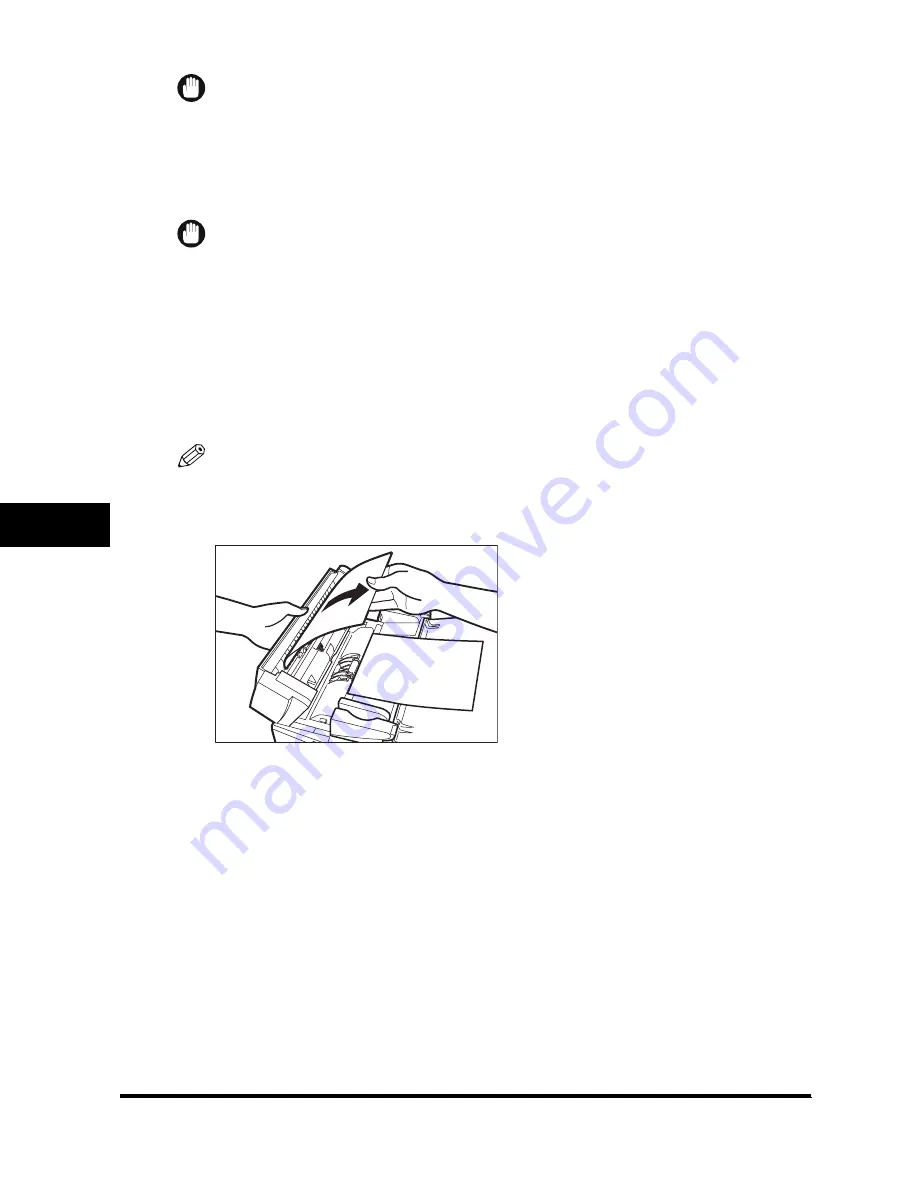
1

Open the ADF and gently remove the jammed paper from the ADF.

Содержание LASERBASE MF5700 Series

Страница 1: ...Please read this guide before operating this equipment After you finish reading this guide store it in a safe place for future reference Series...

Страница 2: ...0 model Set Up Sheet Introduction on Use Quick Reference Guide Copying and Printing Instructions Troubleshooting User s Guide This Manual CD ROM Fax Instructions Troubleshooting Facsimile Guide Softwa...

Страница 3: ...of EC Directive 1999 5 EC We declare that this product conforms to the EMC requirements of EC Directive 1999 5 EC at nominal mains input 230 V 50Hz although the rated input of the product is 200 240...

Страница 4: ...Energy Star guidelines for energy efficiency Super G3 is a phrase used to describe the new generation of fax machines that use ITU T V 34 standard 33 6Kbps modems Super G3 High Speed Fax machines allo...

Страница 5: ...Purpose Feeder 2 6 Loading an Envelope in the Multi Purpose Feeder 2 7 Specifying the Paper Size and Type Common for Cassette and Multi Purpose Feeder 2 8 Specifying the Paper Size 2 8 Specifying the...

Страница 6: ...rming and Deleting a Copy Job 7 2 Confirming and Deleting a Print Job 7 3 Confirming and Deleting a Report Job 7 3 Chapter 8 Maintenance Periodic Cleaning 8 1 Cleaning the Exterior 8 1 Cleaning the Sc...

Страница 7: ...Settings Accessing the Machine Settings 10 1 Menu Descriptions 10 1 PAPER SETTINGS 10 1 COMMON SETTINGS 10 2 COPY SETTINGS 10 4 PRINTER SETTINGS 10 5 TIMER SETTINGS 10 5 Chapter 11 Appendix Specifica...

Страница 8: ...yed in the LCD The following are a few examples of how messages in the LCD are expressed in this manual The messages are indicated within angle brackets If MEMORY FULL is displayed the machine cannot...

Страница 9: ...s manual are those taken when no optional equipment is attached to the LaserBase MF5770 The model LaserBase MF5770 is used for illustration purposes in this manual When there is any difference between...

Страница 10: ...using the information in Chapter 9 Troubleshooting If you cannot solve the problem or if you think your machine needs servicing contact your local authorized Canon dealer or the Canon help line Main C...

Страница 11: ...eder Used when printing paper one by one manually i Cassette Holds the paper supply j Telephone line jack Connect the telephone cable Only for the MF5750 MF5770 models k External device jack Connect a...

Страница 12: ...s cable b Ethernet port Connect the network cable Only for the MF5770 model c Face up cover Open it when you output paper face up or remove jammed paper d Power socket Connect the power cord e Extensi...

Страница 13: ...ey Adjusts the copy exposure j Energy Saver key Sets or cancels the energy saver mode manually The key lights green when the energy saver mode is set and goes off when the mode is canceled k Status Mo...

Страница 14: ...tory Hook Redial Pause R 01 02 03 04 05 06 07 08 09 10 11 12 Menu ABC DEF GHI JKL MNO PQRS TUV WXYZ T 1 2 3 4 5 6 7 8 9 0 OK COPY FAX SCAN c d e f g h i j k m o n a b p q r s l Menu 1 2 3 4 5 6 7 8 9...

Страница 15: ...mode is as follows Copy Mode Scan Mode NOTE When the machine is plugged in the LCD displays INITIALIZING for a while then the standby display appears The standby display in the Fax mode appears only...

Страница 16: ...ror message appears and the Alarm indicator flashes When no paper is loaded in the cassette When paper is loaded in the multi purpose feeder When the message TONER SUPPLY LOW appears The machine will...

Страница 17: ...not upright If the paper is curled uncurl it before loading it in the cassette or multi purpose feeder Failure to do so will cause paper creases and a paper jam Unacceptable Paper Do not copy on the f...

Страница 18: ...cassette or the multi purpose feeder Printing Areas Please note that the term printing area represents both the recommended area for optimum print quality and the entire area where the machine can te...

Страница 19: ...edges of the paper IMPORTANT Do not load paper from the back of the machine with the cassette in place Doing so may damage the paper feeding assembly inside the machine NOTE The paper in the multi pu...

Страница 20: ...ot adjusted correctly for the size of the paper the quality of your printouts may be adversely affected 3 Fan the paper stack first then tap the edges on a flat surface to even the stack 4 Load the pa...

Страница 21: ...of paper at the same time Do not load extra paper when there is still paper left in the cassette If you load extra paper while making copies remove the loaded paper first Then put it together with th...

Страница 22: ...in the multi purpose feeder NOTE The paper in the multi purpose feeder is fed prior to the paper in the cassette 1 Slide the paper guides to the mark of the desired paper size IMPORTANT If the paper g...

Страница 23: ...Feeder on p 2 8 Loading an Envelope in the Multi Purpose Feeder Use the multi purpose feeder when you want to copy or print an envelope one by one IMPORTANT The recommended envelopes are COM10 MONARC...

Страница 24: ...ry the paper size has already been set to A4 Each time you change the paper size you load in the cassette or the multi purpose feeder it is necessary to specify the paper size according to the followi...

Страница 25: ...s Plain paper 64 g m2 to 90 g m2 PLAIN PAPER PLAIN PAPER L 1 Heavy paper 91 g m2 to 128 g m2 HEAVY PAPER HEAVY PAPER H 2 Transparency TRANSPARENCY Envelope HEAVY PAPER HEAVY PAPER H 2 1 If paper curls...

Страница 26: ...up from the output area Select the area depending on your purpose by opening or closing the face up cover Paper Type and Paper Output Area Select the suitable paper output area depending on the paper...

Страница 27: ...ay result in paper jams Face Up Paper Output Area The paper is delivered with the printed side up from the face up paper output at the rear of the machine This way is convenient for printing on transp...

Страница 28: ...n the ADF Remove all fasteners staples paper clips etc before loading the document in the ADF To prevent document jams in the ADF do not use any of the following Platen Glass ADF Type of Document Plai...

Страница 29: ...ee Document Requirements on p 3 1 Placing a Document on the Platen Glass 1 Open the platen glass cover 2 Place your document face down on the platen glass Use the paper size marks on the left side of...

Страница 30: ...ze document on the platen glass 3 Gently lower the platen glass cover The document is now ready for scanning Loading Documents in the ADF 1 Fan the edges that will feed into the machine first then tap...

Страница 31: ...he first page Wait until all pages of your document have been scanned before starting a new job 30 sheets or paper stack within 8 mm thickness including curled sheets guaranteed or 50 sheets 80 g m2 o...

Страница 32: ...TE When documents are loaded in the ADF the scanning unit moves to the position shown above and stays there When documents are not loaded in the ADF the scanning unit moves to scan it Scanning unit 3...

Страница 33: ...e is selected in the printer box See the Software Guide for details on printing Follow this procedure if it is not selected 1 Open the Printers and Faxes Windows 98 Me 2000 Printers folder On Windows...

Страница 34: ...required settings click OK 7 Click Print or OK Printing starts NOTE To cancel printing click Cancel Canceling Printing 1 Open the Printers and Faxes Windows 98 Me 2000 Printers folder On Windows XP S...

Страница 35: ...the document on the platen glass or load it in the ADF For details on how to place or load documents see Setting Up Documents on p 3 2 2 Press COPY 3 Use the numeric keys to enter the number of copie...

Страница 36: ...everal times to display DIRECT 100 ratio press OK You can also return the ratio to 100 using a custom copy ratio See Enlarging Reducing Using Custom Copy Ratios below Enlarging Reducing Using Custom C...

Страница 37: ...et Adjusting the Exposure Density You can adjust the copy exposure automatically or manually according to how light or dark your document is Adjusting Automatically 1 Press Exposure twice to select th...

Страница 38: ...ient when you make multiple copies of multiple page documents When Loading Documents in the ADF 1 Load documents face up in the ADF For details on how to load documents in the ADF see Loading Document...

Страница 39: ...how to place documents on the platen glass see Placing a Document on the Platen Glass on p 3 2 2 Press Collate 2on1 COL appears in the LCD 3 Use the numeric keys to enter the number of copies you want...

Страница 40: ...ow to load documents in the ADF see Loading Documents in the ADF on p 3 3 2 Press Collate 2on1 twice 2ON1 appears in the LCD 3 Use the numeric keys to enter the number of copies you want You can set u...

Страница 41: ...ment on the platen glass 6 Press Start Repeat steps 5 and 6 to scan all documents After scanning every two sheets the quantity of copies of the document specified in step 3 will be printed out 7 Press...

Страница 42: ...p 5 3 Press Exposure to select the scanning exposure See Adjusting the Exposure Density on p 5 3 Press Enlarge Reduce to select the copy ratio See Setting Enlarging Reducing on p 5 2 Press Collate 2o...

Страница 43: ...dows 98 Me 2000 Click Start on the Windows task bar select Settings Control Panel double click Scanners and Cameras 2 Make sure there is the corresponding scanner driver name or icon Scanning Methods...

Страница 44: ...ocessed according to your settings When you use Start for the first time a folder with the scanning date will be created in the My Pictures folder in the My Documents folder and your document will be...

Страница 45: ...COPY STATUS RX TX STATUS RX TX STATUS TX RX LOG TX RX LOG PRINT STATUS PRINT STATUS REPORT STATUS REPORT STATUS COPY STATUS Only for the MF5750 MF5770 models NOTE Status Monitor is disabled in the Sc...

Страница 46: ...return to the standby display NOTE For detailed information on all fax features see the Facsimile Guide Confirming Transmission Results Follow the procedure below to confirm the sending or receiving r...

Страница 47: ...press for YES NOTE To cancel deleting the job press for NO Once the job is deleted the job cannot be restored The LCD can display characters in ASCII cord Using characters other than those in ASCII co...

Страница 48: ...the memory are backed up only for about 3 minutes Do not use tissue paper paper towels or similar materials for cleaning they can stick to the components or generate static charges Use a soft cloth to...

Страница 49: ...r or a mild neutral detergent and then wipe the glass dry with another cloth IMPORTANT Paste ink correction fluid and other foreign matter can soil the platen glass when you send a document through th...

Страница 50: ...ng the Cartridge on p 8 4 1 Remove the cartridge from the machine 2 Rock the cartridge 5 or 6 times to distribute the toner evenly 3 Reinstall the cartridge in the machine 4 Make a few test copies If...

Страница 51: ...extended period of time Handling and Storing the Cartridge This section describes the precautions to ensure optimum copy quality Handling Precautions WARNING Do not throw the cartridge into open flame...

Страница 52: ...at the side with the written instructions faces up Then place the bagged cartridge into its shipping box Store the unused cartridge out of direct sunlight For partially used opened cartridges place th...

Страница 53: ...re the cartridge in a dark location Recycling Used Cartridges In order to make effective use of the earth s natural resources and protect the environment we urge you to recycle used cartridges by retu...

Страница 54: ...the cartridge 5 or 6 times to distribute the toner evenly 5 Place the cartridge on a flat and stable surface Fold the tab A on the sealing tape B as shown below and pull it out straight while supporti...

Страница 55: ...n the machine then gently slide the cartridge into the machine as far as it will go Be sure to position the arrow mark C on the cartridge towards the inside of the machine 7 Close the front cover NOTE...

Страница 56: ...ine In order to avoid direct sunlight place the cartridge in the protective bag that the cartridge came in when you purchased it 5 Close the front cover 6 Pull out the cassette completely and remove t...

Страница 57: ...perature can become very high or low Avoid rough roads excessive vibration may damage the machine or adversely affect the quality of your printouts Place a cover over the machine Do not leave the mach...

Страница 58: ...JAM CAUTION There are some areas inside the machine and cartridge which are subject to high voltages and high temperatures Take adequate precaution when performing internal inspections to avoid burns...

Страница 59: ...t touch the transfer roller as its surface is very delicate and susceptible to finger oil and scratches which may lead to print deterioration NOTE Do not expose the cartridge to light for more than 5...

Страница 60: ...e inside of the roll then gently pull the rolled up paper out of the machine 6 If the leading edge of the paper is visible but has not entered the imaging area pull the paper forwards and roll it inwa...

Страница 61: ...oner on the paper will stain the machine and cause a permanent reduction in print quality 7 Gently pull the jammed paper between the output rollers until the leading edge emerges from the machine 8 Ca...

Страница 62: ...e the jammed paper loose and then pull it out of the machine 9 Close the front cover 10 Pull out the cassette completely 11 Hold both sides of the jammed paper and slowly pull it out in the direction...

Страница 63: ...cartridge and close the front cover the machine should be ready for operating If the machine returns to the ready state for operating troubleshooting has been successful If the machine does not retur...

Страница 64: ...paper so as not to be caught by the guides Open the ADF and gently remove the jammed paper from the ADF 3 Open the ADF and gently remove the jammed paper from the document output tray NOTE After remo...

Страница 65: ...ument Requirements on p 3 1 Cause 2 The ADF roller rotates without feeding documents Remedy Fan the edge that will feed into the machine first then tap the edge of multiple page documents on a flat su...

Страница 66: ...Jammed Paper from the ADF on p 9 6 to clear the paper jam in the ADF Cause 2 You tried to reserve more than 10 copy jobs Remedy The machine can store up to 10 copy jobs in memory Wait until the curren...

Страница 67: ...act your local authorized Canon dealer or the Canon help line TONER SUPPLY LOW Cause The toner is running low Remedy Remove and rock the cartridge several times to distribute toner evenly Then reinsta...

Страница 68: ...ate quantity of sheets A Make sure the paper stack in the cassette or the paper in the multi purpose feeder does not exceed the capacity of the cassette or multi purpose feeder See Loading Paper on p...

Страница 69: ...type of the paper you are using See Print Media Requirements on p 2 1 Q Is the proper paper loaded correctly A Be sure to fan the paper stack before loading it in the cassette This keeps the sheets of...

Страница 70: ...cartridge See Install cartridge in the Set Up Sheet Q Is the cassette inserted completely into the machine A Insert the cassette as far as it will go See Load paper in the Set Up Sheet Q Did you conn...

Страница 71: ...y See Replacing the Cartridge on p 8 6 Q Is the exposure adjusted correctly A Adjust the exposure correctly using Exposure See Adjusting the Exposure Density on p 5 3 Copies are dirty Q Is the platen...

Страница 72: ...in PAPER SETTINGS of the Menu See Specifying the Paper Type on p 2 9 The printouts are missing when you make copies on rough paper Q Is the paper type set correctly A Select TRANSPARENCY in PAPER TYPE...

Страница 73: ...rized Canon dealer or the Canon help line Printout does not match paper size Q Is the paper stack loaded and aligned correctly in the cassette or is paper loaded in the multi purpose feeder correctly...

Страница 74: ...tly after a minute or more See Connect power cord in the Set Up Sheet Nothing appears in the LCD Q Is the power cord plugged in securely A Check that the power cord is plugged securely into the machin...

Страница 75: ...or the Canon help line Do not attempt to disassemble or repair the machine yourself IMPORTANT Attempting to repair the machine yourself may void the limited warranty If you need to contact your local...

Страница 76: ...e settings changed in the Menu do not return automatically to the settings you set previously Change to the previous settings again if necessary To specify or register the settings of the fax function...

Страница 77: ...o clear function activates the standby display of the selected mode appears COPY The Copy mode is selected as default FAX The Fax mode is selected as default SCAN The Scan mode is selected as default...

Страница 78: ...printing end tone sounds 1 to 3 1 6 SCAN DONE TONE Sets the scanning end tone settings ERROR ONLY A scanning end tone sounds only when any error occurs while scanning 1 to 3 1 OFF The scanning end to...

Страница 79: ...tio The preset copy ratios will change when the paper size group is changed 4 STANDARD COPY QTY Selects the copy quantity 1 to 99 1 5 AUTO SORT Sets the auto sort function OFF The auto sort function i...

Страница 80: ...the LCD DD MM YYYY YYYY MM DD MM DD YYYY 3 AUTO CLEAR Sets the auto clear function If the machine remains idle for a set amount of time the display returns to the standby mode ON Sets the time until t...

Страница 81: ...to 80 reference Photoconductive Material Organic Photosensitive Conductor Copying System Indirect Electrostatic Transfer System Developing System Toner Projection System Fixing System Canon s RAPID Fu...

Страница 82: ...me Platen glass Approx 15 sec ADF Approx 17 sec A4 or LTR size direct Manual Exposure Control Cassette Feeding except just after being restored from energy saver mode Copy Speed Direct A4 20 cpm LTR 2...

Страница 83: ...print media requirements 2 1 problems 9 13 setting enlarging reducing 5 2 specifying the paper size 2 8 specifying the paper type 2 9 Customer support 1 1 D DATE SETUP setting 10 5 DATE TIME SETTING s...

Страница 84: ...T TRAY FULL message 9 9 P Paper acceptable paper 2 1 cassette 1 2 feeding problems 9 10 jam 2 1 9 1 9 6 loading 2 3 orientation 2 9 output area 2 10 printing area 2 2 requirements 2 1 type 2 9 2 10 Pa...

Страница 85: ...1 STANDARD COPY QTY setting 10 4 STANDARD EXPOSURE setting 10 4 Standby display 1 6 Start key 1 4 Status Monitor key 1 4 using 7 1 STD IMAGEQUALITY setting 10 4 Stop Reset key 1 4 SUMMER TIME setting...

Страница 86: ...ed Kingdom CANON DEUTSCHLAND GmbH Europark Fichtenhain A10 47807 Krefeld Germany CANON ITALIA S p A Via Milano 8 20097 San Donato Milanese MI Italy CANON LATIN AMERICA INC 703 Waterford Way Suite 400...

Отзывы: