background image

Add

itional Copy

 Fun

c

ti

o

n

s

2

2-59

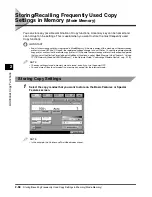
Storing/Recalling Frequently Used Copy Settings in Memory (Mode Memory)

2

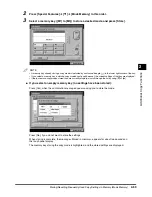
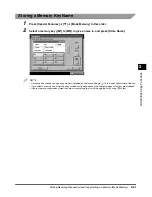
Press [Special Features] 

 [

 [Mode Memory] in this order.

3

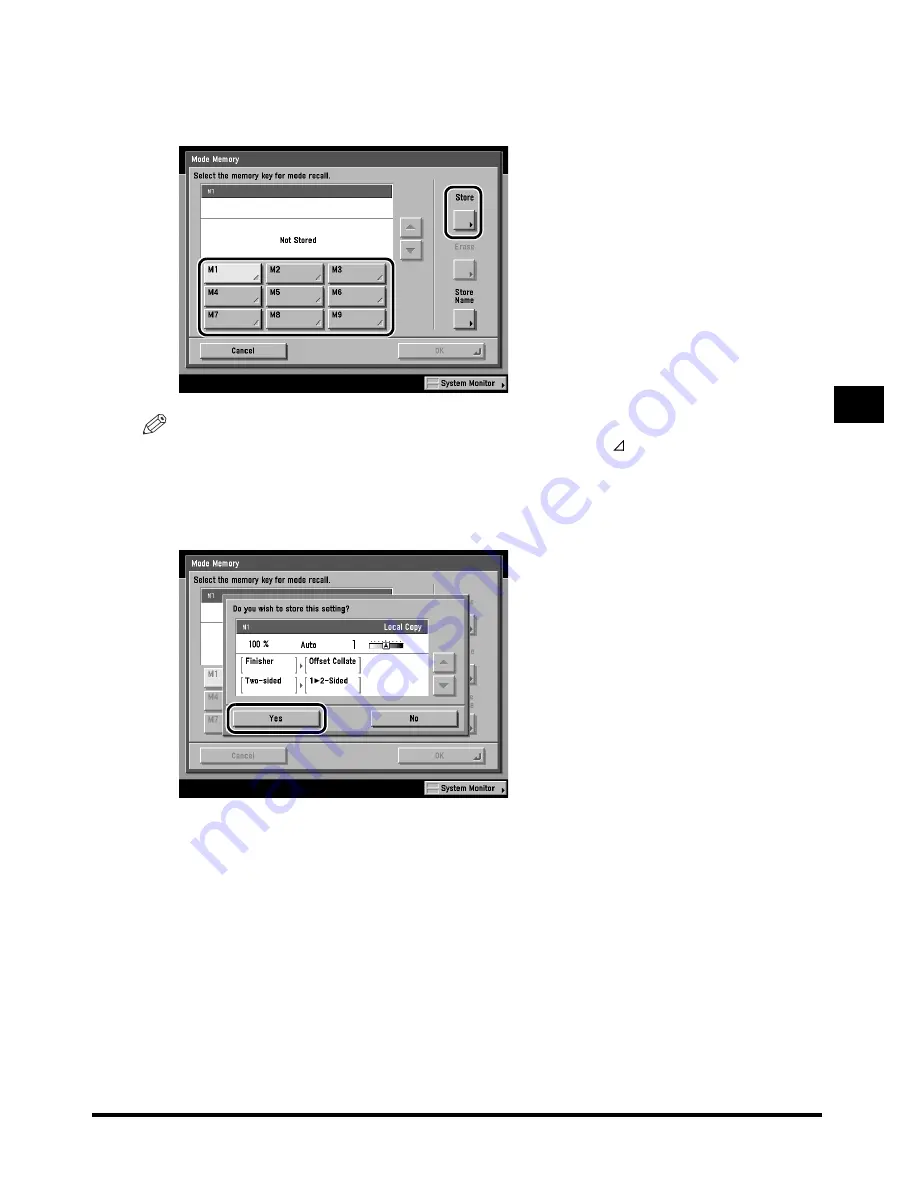
Select a memory key ([M1] to [M9]) to store a desired mode, and press [Store].

NOTE

• A memory key already storing a copy mode is indicated by a coloured triangle (

) in the lower right corner of the key.

• If you select a memory key in which a copy mode has already been set, the current settings of that key are displayed.
• If there are more copy modes stored than are currently displayed, scroll through the list by using [

] or [

].

If you select an empty memory key (no settings have been stored):

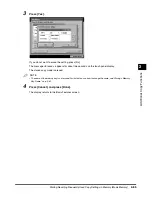
Press [Yes], when the confirmation message appears asking you to store the mode.

Press [No], if you do not want to store the settings.

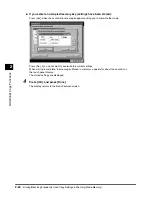
When storing is complete, the message <Stored in memory.> appears for about two seconds on 
the touch panel display.

The memory key storing the copy mode is highlighted, and the stored settings are displayed.

Содержание IR3320i

Страница 1: ...Canon iR3320i iR2220i iR3320N Copying Guide...

Страница 2: ...panying CD ROM Basic Operations Troubleshooting Reference Guide Copying Instructions Copying Guide This Document Mail Box Instructions Mail Box Guide Sending and Fax Instructions iR3320i iR2220i Sendi...

Страница 3: ...nstructions PCL Driver Guide PCL Printer Driver Installation and Instructions PS Driver Guide Fax Driver Installation and Instructions Fax Driver Guide Installing MEAP Applications and Using the Login...

Страница 4: ...ications of the Copy Function Appendix Chapter 1 Chapter 2 Chapter 3 Chapter 4 A considerable effort has been made to make sure that this manual is free of inaccuracies and omissions However as we are...

Страница 5: ...ection Auto Paper Selection 1 28 Manual Paper Selection 1 30 Adjusting Exposure and Image Quality Copy Exposure 1 33 Adjusting Copy Exposure 1 33 Selecting Image Quality 1 34 Automatic Adjustment of E...

Страница 6: ...Adding Front and Back Covers Sheet Insertions and Chapter Pages to Copy Sets Cover Sheet Insertion 2 5 Making Copies for Use as a Booklet Booklet 2 12 Making Copies with Sheets of Paper Interleaved Be...

Страница 7: ...Numbers Page Numbering 2 81 Chapter 3 Setting Storing Specifications of the Copy Function Copy Settings Table 3 2 Setting Standard Keys 3 3 Setting Automatic Collate 3 5 Setting Image Orientation Pri...

Страница 8: ...ressed in the following way Control Panel Keys Key icon Example Touch Panel display Keys Key Name Example Cancel Done WARNING Indicates a warning concerning operations that may lead to death or injury...

Страница 9: ...or options are not displayed on the touch panel display The keys which you should press are marked with as shown below When multiple keys can be pressed on the touch panel display all keys are marked...

Страница 10: ...untries Windows is a registered trademark of Microsoft Corporation in the United States and or other countries Other products and company names herein may be the trademarks of their respective owners...

Страница 11: ...Adjusting Copy Exposure 1 33 Selecting Image Quality 1 34 Automatic Adjustment of Exposure and Image Quality 1 37 Changing the Exposure During Printing 1 38 Changing the Copy Ratio Copy Ratio 1 39 Enl...

Страница 12: ...Sided Copies from Two Sided Originals 2 1 Sided 1 82 Making Two Sided Copies from Facing Pages in a Book Book 2 Sided 1 85 Reserved Copying 1 88 Interrupting the Current Job to Make Priority Copies I...

Страница 13: ...ssary However when you want to use this machine as a remote copy printer set the Image Orientation Priority On or Off in the Copy Settings See Setting Image Orientation Priority on p 3 6 You can scan...

Страница 14: ...opy one sided two sided originals and facing pages of an original such as a book on both the front and back sides of the paper You may also make one sided copies from a two sided original p 1 33 Press...

Страница 15: ...el display This screen is divided into two screens Pressing or displays the next previous screen The Special Features screen displays special functions available for copying In some cases when a funct...

Страница 16: ...g mode This mode enables you to insert a sheet between each transparency when copying transparencies p 2 21 When you select Center Corner Shift Press to select or cancel the Shift mode This mode enabl...

Страница 17: ...his mode enables you to automatically reduce two four or eight originals to fit on a one sided or two sided copy sheet p 2 45 When you select 1 To 2 Press to select or cancel the Image Separation mode...

Страница 18: ...t load all of the originals to be copied all at once p 2 56 Press to notify the user through e mail that the copy job has been completed Special Features Screen 2 2 The screen displayed shows the seco...

Страница 19: ...py an original with the image reversed as if it were in a reflection in a mirror p 2 75 Press to select or cancel the Sharpness mode This mode enables you to make copies of original images reproduced...

Страница 20: ...the Reference Guide Main Power and Control Panel Power See Chapter 1 Before You Start Using This Machine in the Reference Guide Routine Maintenance See Chapter 5 Routine Maintenance in the Reference G...

Страница 21: ...r 1 Before You Start Using This Machine in the Reference Guide 2 Place your originals NOTE For instructions on placing originals see Chapter 1 Before You Start Using This Machine in the Reference Guid...

Страница 22: ...ze desired collating function and output device and set exposure image quality copy ratio and Two Sided modes 4 Set the copy mode on the Special Features screen The Special Features screen is divided...

Страница 23: ...or instructions on setting the number of copies see Entering the Copy Quantity on p 1 17 6 Press Copying starts When scanning is complete remove the original IMPORTANT You cannot change copy mode sett...

Страница 24: ...output tray If the Card Reader C1 optional is attached remove the Control Card See Chapter 7 Handling Optional Equipment in the Reference Guide If you have set up Department ID Management press See Ch...

Страница 25: ...ou want to stop a copy job Press NOTE After you have pressed several copies may have been output from the machine For instructions on how to cancel a copy job see Chapter 2 Checking Various Job Operat...

Страница 26: ...rations Basic Copying 1 When you want to interrupt a copy job To interrupt a copy job when you need to make priority copies press Interrupt See Interrupting the Current Job to Make Priority Copies Int...

Страница 27: ...nged For details contact your service representative Specifying the Required Number of Copies 1 Press numeric keys to enter the desired copy quantity 1 to 999 The copy quantity appears in the upper ri...

Страница 28: ...g the Copy Quantity l 1 Press to clear the entered number 2 Press numeric keys to re enter the copy quantity 1 to 999 The copy quantity appears in the upper right side of the touch panel display IMPOR...

Страница 29: ...lecting an output device or select the output device before selecting the copy settings Both of these options are described below Making the copy settings before selecting an output device If you set...

Страница 30: ...Settings on p 3 14 For cascade copying the Paper Select screen of this machine is displayed Select the paper drawer on the machine that is loaded with the same paper size as the remote copy printers T...

Страница 31: ...before selecting a remote copying device You can select only a remote copy printer that supports the selected copy settings 1 Place your originals select a copy mode and press Select Output Device The...

Страница 32: ...inter if an error occurs in either this machine or the remote copy printer Off Does not assign the remaining copy job to the normally operating printer if an error occurs in either this machine or the...

Страница 33: ...ob is not processed in the following cases The machine is scanning originals for the Cascade Copy mode The Cascade Copy mode is used in combination with the Cover Sheet Insertion mode The Cascade Copy...

Страница 34: ...ote copying before you select the copy settings The available copy settings will include only those settings supported by the machines you have selected 1 Place your originals and press Select Output...

Страница 35: ...inter if an error occurs in either this machine or the remote copy printer Off Does not assign the remaining copy job to the normally operating printer if an error occurs in either this machine or the...

Страница 36: ...opy job has almost finished The number of copies is less than six If Error Recovery for Cascade Copy is set to On a machine in which an error occurs cannot resume the remaining copy job even when the...

Страница 37: ...atio of 100 the periphery of the original may be cut slightly on the copy For details see Chapter 8 Appendix in the Reference Guide If you select the Entire Image mode the copied image is automaticall...

Страница 38: ...e in combination with the Shift mode or the Cover Sheet Insertion mode you cannot use the Automatic Paper Selection mode The following types of originals cannot be copied by using Automatic Paper Sele...

Страница 39: ...Basic Copying 1 1 29 Selecting the Copy Paper Size Paper Select 2 Select Auto and press Done The following screen is displayed 3 Press Copying starts...

Страница 40: ...make copies after manually selecting the paper size and type of paper such as colour or recycled loaded in the paper drawer 1 Place your originals and press Paper Select NOTE The default setting is A...

Страница 41: ...ded vertically and this icon indicates that the paper is set horizontally Paper sizes with the suffix R such as A4R indicate that the paper is loaded in the paper drawer or in the stack bypass horizon...

Страница 42: ...standard size press Free Size When loading envelopes press Envelope To select an inch series paper size press inch size 3 Press Done The display returns to the Basic Features screen and the selected...

Страница 43: ...printing See Changing the Exposure During Printing on p 1 38 Adjusting Copy Exposure Use this procedure to manually adjust the copy exposure to the most appropriate level for the original 1 Place you...

Страница 44: ...When the Photo Mode in Copy Settings is On you can select Printed Image or Photo after pressing the drop down list See Setting the Photo Mode for the Copy Function on p 3 9 If the original is a transp...

Страница 45: ...h may occur If this happens you can soften this moir effect by using the Sharpness mode See Making Sharp Contrast Copies Sharpness on p 2 75 1 Place your originals and press the text drop down list an...

Страница 46: ...exposure Press or to move the indicator to the left to make the exposure lighter or to the right to make the exposure darker 3 Press Copying starts NOTE To cancel the copy exposure adjustment press A...

Страница 47: ...s and press A The exposure is automatically adjusted to the level best suited to the quality of the original NOTE If the original is a transparency you may not be able to use Automatic Exposure Contro...

Страница 48: ...yed while printing Press or to move the indicator between the icons to the left to make the exposure lighter or to the right to make the exposure darker The printing exposure changes When printing is...

Страница 49: ...ly in the following cases When enlarging A4 size originals to A3 size paper When enlarging A5 sized originals to A3 size paper When reducing A3 sized originals to A4 size with Auto Orientation set to...

Страница 50: ...hanging the Copy Ratio Copy Ratio Basic Copying 1 1 Place your originals and press Paper Select 2 Select Auto and press Done The display returns to the Basic Features screen NOTE The default setting i...

Страница 51: ...uction ratio To enlarge select a preset enlargement ratio Then press Done The display returns to the Basic Features screen and the selected copy ratio is displayed 5 Press Copying starts NOTE To retur...

Страница 52: ...Zoom Designation You can reduce or enlarge images by any copy ratio in 1 increments The available copy ratios are from 25 to 800 when the original is placed on the platen glass and from 25 to 400 when...

Страница 53: ...The display returns to the Basic Features screen and the selected copy ratio is displayed If you enter a value outside the setting range a message prompting you to enter the appropriate value appears...

Страница 54: ...the feeder IMPORTANT When the machine is operating in the Auto mode you cannot use the Automatic Paper Selection and Image Repeat Auto modes You cannot copy highly transparent originals such as transp...

Страница 55: ...ginals and press Paper Select 2 Select the paper size and press Done The display returns to the Basic Features screen IMPORTANT Select a paper size other than Auto If you select Auto the copy ratio wi...

Страница 56: ...starts NOTE To return the copy ratio to 100 press 1 1 To cancel this setting press Copy Ratio Auto in this order To cancel all settings and return the machine to the Standard mode press If the origina...

Страница 57: ...immed slightly on the copy However if you set the Entire Image mode the copied image is slightly reduced proportionately to the paper and image size As a result the entire image is reproduced without...

Страница 58: ...mode is automatically set when you set the Entire Image mode Calculating the Copy Ratio Based on the Original and Copy Paper Sizes Zoom Program You can change the copy ratio by specifying the original...

Страница 59: ...o Zoom Specify the same copy ratio for the vertical and horizontal directions Making copies with different XY copy ratios XY Zoom Specify different copy ratios for the vertical and horizontal directio...

Страница 60: ...1 50 Changing the Copy Ratio Copy Ratio Basic Copying 1 Making Copies with the Same XY Copy Ratio Zoom 1 Place your originals and press Copy Ratio 2 Press Zoom Program...

Страница 61: ...same type of measurement for the record size For example if you enter the width of the original for Original Size enter the width of the record for Copy Size The machine will automatically calculate...

Страница 62: ...he copy ratio to 100 press 1 1 To cancel this setting press Copy Ratio Zoom Program Cancel in this order To cancel all settings and return the machine to the Standard mode press Making Copies with Dif...

Страница 63: ...hen entering values in millimetres you can use numeric keys and Place the original on the platen glass if the zoom ratio is more than 400 The display returns to the Basic Features screen and the selec...

Страница 64: ...entry function to On in the Additional Functions beforehand See Chapter 3 Selecting and Storing Settings to Suit Your Needs in the Reference Guide For details on how to enter the values in inches see...

Страница 65: ...laced on the platen glass and from 25 to 400 when the original is placed in the feeder The following two XY Zoom modes are available Manually specifying the copy ratio XY Zoom You can manually specify...

Страница 66: ...aper Selection If you do not select the paper size the copy ratio is automatically set to the size of the paper loaded in paper drawer 1 When you set the copy ratio in Auto XY Zoom mode Auto Orientati...

Страница 67: ...Basic Copying 1 1 57 Changing the Copy Ratio Copy Ratio 1 Place your originals and press Copy Ratio 2 Press XY Zoom...

Страница 68: ...a value outside the setting range a message prompting you to enter the appropriate value appears on the screen IMPORTANT Select a paper size other than Auto when setting Auto XY Zoom If you select Au...

Страница 69: ...Copy Ratio Copy Ratio 4 Press Copying starts NOTE To return the copy ratio to 100 press 1 1 To cancel this setting press Copy Ratio XY Zoom Cancel in this order To cancel all settings and return the m...

Страница 70: ...vailable for each optional unit 1 If Tray A is selected as a designated tray from the Additional Functions screen Common Settings Tray Designation screen Offset is applied If it is not selected Rotate...

Страница 71: ...s follows When Staple is set The copies are automatically collated into sets arranged in page order and automatically stapled The output is as shown below If you select Corner Top Left Staple Copy Set...

Страница 72: ...Combination Image Separation Booklet Transparency Interleaving Form Composition and Page Numbering modes Folds may appear differently depending on the type or quantity of paper NOTE Place the origina...

Страница 73: ...Hole Punch is set The machine punches 2 or 4 holes in the copied sheets When Rotate is set If originals of the same size are placed the pages are aligned and the copy sets are output in alternating di...

Страница 74: ...e your originals in the feeder and press Finisher NOTE When Auto Collate is set to On the Collate mode or the Offset Collate mode is automatically set when you place the originals in the feeder See Se...

Страница 75: ...ress Hole Punch When Saddle Finisher G1 and Puncher Unit J1 G1 are attached and Tray A exit slot is selected When Saddle Finisher G1 and Puncher Unit J1 G1 are attached and Tray A exit slot is not sel...

Страница 76: ...display returns to the Basic Features screen IMPORTANT If you select Auto after selecting Rotate make sure you select a paper size that can be rotated If you do not the paper might not be rotated and...

Страница 77: ...Place your originals in the feeder and press Finisher NOTE When Auto Collate is set to On the Collate mode or the Offset Collate mode is automatically set when you place the originals in the feeder Se...

Страница 78: ...ress Hole Punch When Saddle Finisher G1 and Puncher Unit J1 G1 are attached and Tray A exit slot is selected When Saddle Finisher G1 and Puncher Unit J1 G1 are attached and Tray A exit slot is not sel...

Страница 79: ...fied mode is set and the display returns to the Basic Features screen IMPORTANT If you select Auto after selecting Rotate make sure you set a paper size that can be rotated If you do not the paper mig...

Страница 80: ...1 Place your originals in the feeder and press Finisher NOTE When Auto Collate is set to On the Collate mode or the Offset Collate mode is automatically set when you place the originals in the feeder...

Страница 81: ...her When you want hole punches made press Hole Punch When Saddle Finisher G1 and Puncher Unit J1 G1 are attached and Tray A exit slot is selected When Saddle Finisher G1 and Puncher Unit J1 G1 are att...

Страница 82: ...isher J1 is attached the saddle stitch position cannot be selected For details of the saddle stitch position see Chapter 8 Appendix in the Reference Guide When you select Staple with the Saddle Finish...

Страница 83: ...s Saddle Stitch and press Next Select the paper size and press OK The specified mode is set and the display returns to the Basic Features screen NOTE You can adjust the saddle stitch position See Chap...

Страница 84: ...en glass follow the instructions that appear on the touch panel display Press one time for each original When scanning is complete press Done Copying starts NOTE To cancel this setting press Finisher...

Страница 85: ...be printed on both sides Paper weight 64 g m2 to 80 g m2 When combined with the Different Size Originals mode two sided copying cannot be performed The different sized originals will be printed as on...

Страница 86: ...MPORTANT Place the originals horizontally when copying A4R or A5R size originals If these originals are placed vertically the back sides of the copies will be printed upside down NOTE If there are an...

Страница 87: ...Basic Copying 1 1 77 Two Sided Copying Two Sided 2 Press 1 2 Sided If Option is pressed select the type of two sided copy and press Done...

Страница 88: ...ided 4 Press When the original is placed on the platen glass follow the instructions that appear on the touch panel display Press one time for each original When scanning is complete press Done Copyin...

Страница 89: ...y turns over two sided originals placed in the feeder to make two sided copies 1 Place your originals in the feeder and press Two sided NOTE When Auto Collate is set to On the Collate mode or the Offs...

Страница 90: ...1 80 Two Sided Copying Two Sided Basic Copying 1 2 Press 2 2 Sided If Option is pressed select the type of two sided orientation for both the original and the copy Then press Done...

Страница 91: ...ided 4 Press When the original is placed on the platen glass follow the instructions that appear on the touch panel display Press one time for each original When scanning is complete press Done Copyin...

Страница 92: ...If these originals are placed vertically the back sides of the copies will be printed upside down NOTE To copy two sided originals placed on the platen glass use the Job Build mode See Copying Separa...

Страница 93: ...Basic Copying 1 1 83 Two Sided Copying Two Sided 2 Press 2 1 Sided If Option is pressed select the type of two sided original and press Done...

Страница 94: ...OK The display returns to the Basic Features screen and 2 1 Sided is displayed above Two sided 4 Press Copying starts NOTE To cancel this setting press Two sided Cancel in this order To cancel all se...

Страница 95: ...n the original is placed in the feeder When using this feature select A4 size paper When copying with the Front Back Two Sided mode the front side of the first two sided page and the back side of the...

Страница 96: ...the platen glass and press Two sided If you want to make copies in page order begin copying from the first page and work your way forward Place the original face down so that its top edge is aligned w...

Страница 97: ...select Front Back Two sided the front and back sides of a page are copied onto the front and back sides of a single sheet The display returns to the Basic Features screen and Book 2 Sided is displaye...

Страница 98: ...not included in this count You can set a different modes for each job 1 Press Done on the pop up screen that is displayed while printing If the job displayed on the touch panel display is a function o...

Страница 99: ...Basic Copying 1 1 89 Reserved Copying 3 Press to scan your originals Scanning starts If the following screen is displayed press OK After the current job is complete repeat the operation...

Страница 100: ...ong copy job IMPORTANT If you select Interrupt mode you cannot use the Remote Copying and Cascade Copying modes NOTE You can make interrupt copies if the machine is ready to scan 1 Press Interrupt If...

Страница 101: ...opy mode only press The Interrupt mode will not be cancelled 3 Press When the Interrupt mode starts Interrupt is displayed in grey Once the original is scanned remove it from the machine When the inte...

Страница 102: ...make multiple copies in the Collate Offset Collate Rotate Collating Staple Cover Sheet Insertion or Booklet modes Sample Set is not displayed when you set the Group mode If you select Sample Set you...

Страница 103: ...hange the setting press Change Settings set a new mode and press Done To change the number of copies use numeric keys To change the exposure press or To make two sided copies press 2 Sided Copy To sel...

Страница 104: ...ecking a Sample Set Before Copying Sample Set Basic Copying 1 When you change the copy settings the machine starts to print from the first set To copy another sample set press Sample Set Repeat the pr...

Страница 105: ...ecking the Copy Mode Settings Setting Confirmation When copy mode settings are selected you can check the current settings in a list 1 Press Setting Confirmation on the Basic Features screen The displ...

Страница 106: ...s Done When 10 or more copy modes have been set use to bring up the next screen To return to the previous screen press The display returns to the Basic Features screen NOTE The mark on some keys indic...

Страница 107: ...1 Changing or Cancelling a Selected Copy Mode Setting Confirmation Cancel Use the Setting Confirmation screen to change or cancel selected functions 1 Press Setting Confirmation on the Basic Features...

Страница 108: ...ress The selected copy mode settings screen appears NOTE The mark on some keys indicates there are additional screens for setting their functions Press the key to see the other functions To cancel a s...

Страница 109: ...Changing or Cancelling a Selected Copy Mode Setting Confirmation Cancel To cancel a mode Press Cancel The display returns to the Setting Confirmation screen 3 Press Done The display returns to the Ba...

Страница 110: ...1 100 Changing or Cancelling a Selected Copy Mode Setting Confirmation Cancel Basic Copying 1...

Страница 111: ...s Margin 2 25 Erasing Shadows and Frame Lines from Copies Frame Erase 2 29 Making Copies by Erasing the Frame Around the Original Original Frame Erase 2 31 Making Copies Erasing the Book Frame Book Fr...

Страница 112: ...Inverting Original Images Nega Posi 2 68 Making Copies with the Original Image Repeated Image Repeat 2 70 Making Copies with the Original Image Reversed Mirror Image 2 73 Making Sharp Contrast Copies...

Страница 113: ...ration Booklet Transparency Interleaving Different Size Originals Binding Erase and Image Repeat modes Place the original on the platen glass The Two Page Separation mode cannot be used when the origi...

Страница 114: ...ons 2 2 Press Two page Separation and press Done The specified mode is set and the display returns to the Basic Features screen 3 Press Copying starts NOTE To cancel this setting press Special Feature...

Страница 115: ...e Separation Booklet Transparency Interleaving Image Repeat Mirror Image and Form Composition modes If you use Different Size Originals with Auto Paper Selection you cannot select the Cover Sheet Inse...

Страница 116: ...er Adds a front cover sheet to each set of copies You may also copy on this cover sheet Back Cover Adds a back cover sheet to each set of copies You may also copy on this back cover Printed front cove...

Страница 117: ...the pages of copy sets Since a chapter page is always copied on one side this function is useful when you want to divide the copy by chapter 1 Place your originals in the feeder and press Special Feat...

Страница 118: ...essing the mode key again 3 Press Paper Select and select the paper source for each feature and press Next When you select only the Chapter Page mode proceed to step 5 IMPORTANT Select the same paper...

Страница 119: ...Cover Sheet Insertion 4 Select whether to copy onto the front cover back cover or insertion sheet and press Next If neither Sheet Insertion nor Chapter Page is selected press OK and proceed to step 6...

Страница 120: ...se the machine will print the image of your original document s first or last page right on top of the preprinted paper If you select Printed for the front cover the machine will insert an additional...

Страница 121: ...to insert 10 or more sheets use or to scroll to the insertion positions To cancel a specific sheet insertion page setting press or and press the desired page and press 6 Press Done The specified mode...

Страница 122: ...on Image Separation Shift No Key Entry Transparency Interleaving Margin Different Size Originals Frame Erase Image Repeat Mirror Image Form Composition and Page Numbering modes When you place horizont...

Страница 123: ...e Offset Collate mode is automatically set at the point when you place the originals in the feeder See Setting Automatic Collate on p 3 5 2 Select the original size and press Next If two sided origina...

Страница 124: ...ional Copy Functions 2 3 Select the paper size and press Next If the Saddle Finisher G1 optional is not attached press OK and proceed to step 5 Only A3 and A4R size paper can be selected If you select...

Страница 125: ...nd proceed to step 5 Place the paper for the cover page face down in the stack bypass IMPORTANT The paper used for the cover page must be the same size as the other pages The paper used for the main t...

Страница 126: ...d the sheets are output to a tray The booklet tray can hold up to 10 sets of copies at a time for saddle stitching Saddle stitching is not performed when there is only one sheet When you set the Bookl...

Страница 127: ...inisher Two Sided Two Page Separation Cover Sheet Insertion Image Combination Image Separation Booklet Image Repeat Mirror Image Form Composition and Page Numbering modes You cannot make more than one...

Страница 128: ...nals in the feeder and press Special Features Transparency Interleaving in this order NOTE When Auto Collate is set to On the Collate mode or the Offset Collate mode is automatically set when you plac...

Страница 129: ...nd decide whether to copy on the interleaf sheet or leave the interleaf sheet blank and press Next 4 Select the size of the interleaf sheets and press OK Done in this order The specified mode is set a...

Страница 130: ...h original When scanning is complete press Done Copying starts The copies are printed with the copied side face down The transparency is first followed by the interleaf sheet NOTE In the Transparency...

Страница 131: ...nation with the Automatic Paper Selection mode When the machine is operating in the Shift with No Key Entry mode you cannot use the Remote or Cascade Copy Image Combination Image Separation Booklet an...

Страница 132: ...irection refers not to the direction in which the original is placed on the platen glass or in the feeder but to the direction that you want the original image shifted if the original image is viewed...

Страница 133: ...e direction and enter the desired value If you make a mistake when entering a value press on the touch panel display and enter the correct value If you want to enter values in inches press Inch Set th...

Страница 134: ...lue Press on the right or left side to enter the value and press OK Done in this order The diagonal directional arrow is displayed The specified mode is set and the display returns to the Basic Featur...

Страница 135: ...ant the copies placed in a ring binder IMPORTANT When the machine is operating in the Margin mode you cannot use the Booklet Image Repeat and Mirror Image modes When the Margin mode is set the entire...

Страница 136: ...oceed to make copies in the usual way 2 1 Sided Set the margin for the back only If you are using the Margin and Two Sided modes together and copying an original that does not have a margin follow the...

Страница 137: ...creen If you select Top Margin or Bottom Margin Use or to set the margin 1 mm to 20 mm Then press OK Done in this order When entering values in millimetres you can use numeric keys and If you enter th...

Страница 138: ...th Margins Margin Additional Copy Functions 2 3 Press Copying starts NOTE To cancel this setting press Special Features Margin Cancel in this order To cancel all settings and return the machine to the...

Страница 139: ...ct one of these modes the previously set mode is cancelled Original Frame Erase Erases the dark borders and frame lines that appear around the copy when the original is smaller than the selected paper...

Страница 140: ...klet Image Repeat Mirror Image and Page Numbering modes Binding Erase Erases the shadows that appear on copies from binding holes on the original IMPORTANT When the machine is operating in the Binding...

Страница 141: ...rame Erase and set the frame width area to erase by pressing or and press Next When entering values in millimetres you can use numeric keys and If you enter the value with numeric keys you can change...

Страница 142: ...the entered value by pressing or The screen for the next step is displayed If you enter a value outside the setting range a message prompting you to enter an appropriate value appears on the screen N...

Страница 143: ...y returns to the Basic Features screen IMPORTANT You can set the Original Frame Erase mode only for the original paper sizes shown on the touch panel display NOTE To select an inch series paper size p...

Страница 144: ...Frame Erase and press Center and Sides to set the frame width to erase by using or and press Next When entering values in millimetres you can use numeric keys and to clear your entries If you enter th...

Страница 145: ...n change the entered value by pressing or The screen for the next step is displayed If you enter a value outside the setting range a message prompting you to enter an appropriate value appears on the...

Страница 146: ...series paper size press Inch size 4 Press Copying starts NOTE To cancel this setting press Special Features Frame Erase Cancel in this order To cancel all settings and return the machine to the Stand...

Страница 147: ...urface of the original that you want to scan is viewed as face up with the top edge at the top 3 Set the width of the binding erase by pressing or and press OK Done in this order When entering values...

Страница 148: ...l Functions beforehand See Chapter 3 Selecting and Storing Settings to Suit Your Needs in the Reference Guide The default setting is 18 mm for the binding erase width The Maximum binding erase width a...

Страница 149: ...tire Image Saddle Stitch Two Sided Two Page Separation Cover Sheet Insertion Image Separation Shift No Key Entry Booklet Transparency Interleaving Different Size Originals Original Frame Erase Book Fr...

Страница 150: ...8 On 1 Reduces eight 1 sided or four 2 sided originals to fit onto one side or both sides of a copy sheet 1 Place your originals in the feeder and press Special Features Image Combination in this ord...

Страница 151: ...and press Next When copying a two sided original with the Image Combination mode press 2 Sided Original after selecting the original size After pressing 2 Sided Original select the type of 2 sided or...

Страница 152: ...Single Copy Sheet Image Combination Additional Copy Functions 2 3 Select the desired Image Combination feature and press Next To make a two sided copy press 2 Sided Copy After pressing 2 Sided Copy s...

Страница 153: ...eet Image Combination Press Option to select the order of the layout and press Done NOTE If you do not specify an image print order by selecting Option the images are printed in the following order 2...

Страница 154: ...The machine automatically selects the copy ratio depending on the selected paper size Also the Centre Shift mode is automatically set when you set the Image Combination mode 5 Press When the original...

Страница 155: ...Different Size Originals Frame Erase Image Repeat and Form Composition modes If you use the Remote Copying or Cascade Copying mode while the machine is operating in Image Separation mode you cannot se...

Страница 156: ...outputs the sections in an enlarged form as four 1 sided copies or two 2 sided copies NOTE You can place A4 size originals horizontally or vertically when using this feature 1 Place your original on t...

Страница 157: ...h Section on a Separate Copy Sheet Image Separation You can reduce the output of pages without images blank output by setting the layout of the last original To make a two sided copy press 2 Sided Cop...

Страница 158: ...ge Separation Additional Copy Functions 2 Press Option to select the image print order and press Done NOTE If you do not specify an image Print order by selecting Option the images are printed in the...

Страница 159: ...ot select Automatic Paper Selection in the Image Separation mode NOTE The machine automatically selects the copy ratio depending on the selected paper size 4 Press When there are multiple originals fo...

Страница 160: ...ed together You cannot set Automatic Paper Selection when you select the Different Size Original mode in combination with the Shift or Cover Sheet Insertion modes The Auto Orientation will not be perf...

Страница 161: ...returns to the Basic Features screen 3 Press When the original is placed on the platen glass follow the instructions that appear on the touch panel display Press one time for each original When scann...

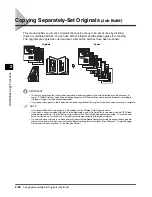
Страница 162: ...red copy mode If you place the originals in the feeder remove each original from the original output area when scanning is complete NOTE If you place differently sized originals in the feeder set the...

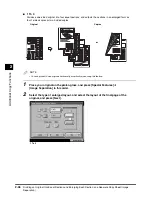
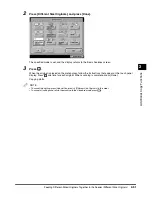
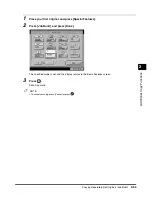
Страница 163: ...Originals Job Build 1 Place your first original and press Special Features 2 Press Job Build and press Done The specified mode is set and the display returns to the Basic Features screen 3 Press Scann...

Страница 164: ...anges before pressing You can adjust the Exposure and the Image Quality See Adjusting Exposure and Image Quality Copy Exposure on p 1 33 You can change the setting of the original type One sided Two s...

Страница 165: ...forget to set or cancel the 2 Sided Original mode according to the type of originals you place next Repeat this procedure as necessary 5 After the last original is scanned press Done z NOTE To cancel...

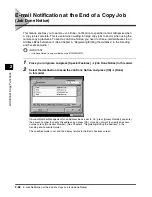
Страница 166: ...egistering Editing the Address in the Sending and Facsimile Guide IMPORTANT Job Done Notice is only available on the iR3320i iR2220i 1 Place your originals and press Special Features Job Done Notice i...

Страница 167: ...ent settings see Chapter 1 Various Sending Methods in the Sending and Facsimile Guide You cannot select multiple destinations 3 Press Copying starts NOTE To cancel the settings press Special Features...

Страница 168: ...stered settings change to Local Printer To use the registered remote copy printer confirm that the remote copy printer is ON update the remote copy printer after the specified period that you set at t...

Страница 169: ...ich a copy mode has already been set the current settings of that key are displayed If there are more copy modes stored than are currently displayed scroll through the list by using or If you select a...

Страница 170: ...d Press Yes when the confirmation message appears asking you to overwrite the mode Press No if you do not want to overwrite the current settings When storing is complete the message Stored in memory a...

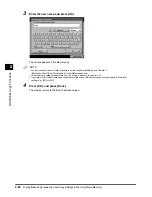
Страница 171: ...mory key M1 to M9 to give a name to and press Store Name NOTE A memory key already storing a copy mode is indicated by a coloured triangle in the lower right corner of the key If you select a memory k...

Страница 172: ...ow to enter characters on the touch panel display see Chapter 1 Before You Start Using This Machine in the Reference Guide The maximum number of characters you can assign a memory key name is 10 If yo...

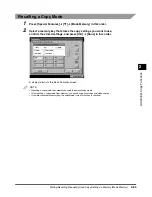
Страница 173: ...ory key that stores the copy settings you want to use confirm the stored settings and press OK Done in this order A display returns to the Basic Features screen NOTE Recalling a copy mode from memory...

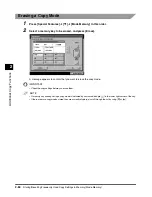
Страница 174: ...a memory key to be erased and press Erase A message appears to confirm that you want to erase the copy mode IMPORTANT Check the copy settings before you erase them NOTE A memory key already storing a...

Страница 175: ...ase the setting press No The message Erased appears for about two seconds on the touch panel display The stored copy mode is erased NOTE The name of the memory key is not erased For instructions on ho...

Страница 176: ...copy modes remain in memory after you turn OFF the power The Standard mode cannot be recalled or stored Identical copy modes that are stored are counted as one setting Even if a remote copy printer is...

Страница 177: ...efore 2 Before or 3 Before Confirm the settings and press OK Done in this order The display returns to the Basic Features screen NOTE You can also check the other copy settings that are stored in memo...

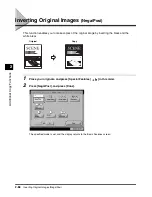
Страница 178: ...Posi This function enables you to make copies of the original image by inverting the black and the white areas 1 Place your originals and press Special Features in this order 2 Press Nega Posi and pre...

Страница 179: ...tions 2 2 69 Inverting Original Images Nega Posi 3 Press Copying starts NOTE To cancel this setting press Special Features Nega Posi in this order To cancel all settings and return the machine to the...

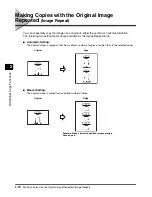
Страница 180: ...either the vertical or horizontal direction The following two setting methods are available for the Image Repeat mode Automatic Setting The original image is copied so that the maximum number of copie...

Страница 181: ...on modes When the machine is operating in the Image Repeat automatic setting mode you cannot use the Automatic Paper Selection Auto and Auto XY Zoom modes in addition to the modes mentioned above 1 Pl...

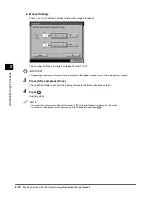
Страница 182: ...from 1 to 20 IMPORTANT Depending on how many times you have manually set the image to repeat some of the images may overlap 3 Press OK and press Done The specified mode is set and the display returns...

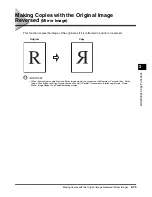
Страница 183: ...function copies the image of the original as if it is reflected in a mirror or reversed IMPORTANT When the machine is operating in the Mirror Image mode you cannot use the Remote or Cascade Copy Entir...

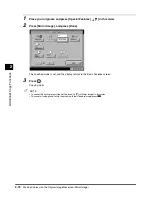
Страница 184: ...ss Special Features in this order 2 Press Mirror Image and press Done The specified mode is set and the display returns to the Basic Features screen 3 Press Copying starts NOTE To cancel this setting...

Страница 185: ...fter contrast use Low as the setting Low If you make copies of an original containing half tones such as in a printed photograph using the Photo mode moir or screen clash may occur However by using Lo...

Страница 186: ...s OK Done in this order To copy text and lines clearly the setting should be towards High To copy photographs the setting should be towards Low The specified mode is set and the display returns to the...

Страница 187: ...Interleaving Image Repeat and Page Numbering modes To copy in the Form Composition mode the Image form must be stored in the memory of the machine See Chapter 3 Selecting and Storing Settings to Suit...

Страница 188: ...e more than eight stored image forms press or to display the other images When you wish to combine images on the back of the copy sheet as well as the front press Back and select the desired image for...

Страница 189: ...per size and press Start Print Press Cancel to cancel the sample print The following screen is displayed after the sample prints Press Yes to set the sample image as the image form for composition The...

Страница 190: ...ss Done The specified mode is set and the display returns to the Basic Features screen 4 Press Copying starts NOTE To cancel this setting press Special Features Form Composition Cancel in this order T...

Страница 191: ...IMPORTANT When the machine is operating in the Page Numbering mode you cannot use the Remote or Cascade Copy Saddle Stitch Entire Image Shift No Key Entry Booklet Transparency Interleaving Frame Eras...

Страница 192: ...Numbering Additional Copy Functions 2 1 Place your originals and press Special Features Page Numbering in this order 2 Select the type of numbering Numbers Only or Numbers with Hyphens select the pos...

Страница 193: ...pages inserted after the first page in operations for sheet insertion chapter page and back cover but only prints page numbers on the body pages Do not number Does not count page number the pages ins...

Страница 194: ...m Select a page number size from among Small Medium and Large 10 5 pt 12 0 pt and 14 0 pt You can select Black or White for the page number colour Select White to print page numbers on a dark backgrou...

Страница 195: ...ob Duration Display 3 7 Setting Auto Orientation 3 8 Setting the Photo Mode for the Copy Function 3 9 Changing the Current Standard Settings 3 10 Storing New Standard Settings for Copying 3 10 Initial...

Страница 196: ...Manuals for the Machine on p ii The Copy Settings screen is made up of several screens Use and to scroll to the screen you want and make the required settings Additional Functions Available Settings A...

Страница 197: ...in addition to the Copy Ratio Finisher and Two Sided Mode keys on the Basic Features screen the Special Features screen or the memory keys containing stored copy settings in Mode Memory 1 Call up the...

Страница 198: ...py Function 3 3 Select the desired mode to be stored as a Standard Key and press OK The specified mode is set 4 Press Done repeatedly until the Basic Features screen appears Example The stored Standar...

Страница 199: ...u set the originals on the feeder the collate mode is automatically selected as listed below Offset Collate When Finisher J1 is attached or Saddle Finisher G1 is attached Tray A exit slot is selected...

Страница 200: ...py the image in the same direction as the original IMPORTANT This setting is not available when the Finisher J1 is attached NOTE When the Image Orientation Priority is set to On the copies will take l...

Страница 201: ...The job duration time is shown as the Print Time on the screen displayed during printing The job duration time is not displayed for the Remote or Cascade Copy Transparency Interleaving Cover Sheet Ins...

Страница 202: ...as follows Copy Settings Auto Orientation 2 Select On or Off and press OK The specified mode is set NOTE If you enlarge A4 or A5 size originals to A3 size Auto Orientation will not function even if i...

Страница 203: ...in the Copy function When the Photo Mode is On this enables you to select Printed Image or Photo when making copies with the image quality setting on the Basic Features screen NOTE The default settin...

Страница 204: ...gs change to Local Printer To use the stored remote copy printer as the Default Setting it is necessary to register the Standard Settings again NOTE The default settings are as follows Copy Quantity 1...

Страница 205: ...The settings displayed are the currently set copy settings Press or to display other copy modes that do not fit in the display area Press No if you do not want to store the displayed settings as the S...

Страница 206: ...Function 3 The message Stored in memory appears for about two seconds on the touch panel display 4 Press Done repeatedly until the Basic Features screen appears Initialising the Standard Settings 1 Ca...

Страница 207: ...settings and press Yes Press No if you do not want to initialise the Standard Settings and you return to the screen in step 2 The Standard Settings are initialised The message Initialized appears for...

Страница 208: ...an be confirmed added or deleted You can set up to seven remote copy printers on this machine NOTE If you set Department IDs and Passwords for the registered remote copy printers make sure their setti...

Страница 209: ...ntering values press or Backspace and input the correct values You can also erase all the values you have entered by pressing 4 To move the remote copy printer you are registering to the top of the li...

Страница 210: ...atedly until the Basic Features screen appears Confirming a Remote Device 1 Call up the desired screen as follows Copy Settings Store Remote Device 2 Select the Remote Copy Printer to be checked and p...

Страница 211: ...press OK If you power the remote copy printer back on or reattach the Finisher you need to refresh the information of the remote copy printer by pressing Get Information 4 Press Done repeatedly until...

Страница 212: ...remote copy printer is not displayed press or to scroll to the desired remote copy printer NOTE When you set the remote or cascade copy mode the remote copy printer cannot be deleted 3 Press Yes If y...

Страница 213: ...ing from 5 to 30 seconds in 1 second increments NOTE Jobs that reach the timeout limit without arriving at the remote copy printer are deleted The default timeout setting is 30 seconds 1 Call up the d...

Страница 214: ...NOTE When the Copy Settings of this machine are initialised the settings stored in the other remote copy printers are also initialised When a remote copy printer is printing or selected as a printing...

Страница 215: ...ons of the Copy Function 3 3 21 Restoring Settings to Their Default Copy Settings The message Initialized appears for about two seconds on the touch panel display 3 Press Done repeatedly until the Bas...

Страница 216: ...3 22 Restoring Settings to Their Default Copy Settings Setting Storing Specifications of the Copy Function 3...

Страница 217: ...CHAPTER 4 1 4 Appendix Available Combinations of Functions Chart 4 2 Index 4 6...

Страница 218: ...c Exposure Control Printed Image Photo Text Text Photo Automatic Paper Selection Automatic Paper Selection Auto Orientation Auto Drawer Switching Stack Bypass Collate Group Rotate Collating Rotate Gro...

Страница 219: ...inted Image Photo Text Text Photo Automatic Paper Selection Automatic Paper Selection Auto Orientation Auto Drawer Switching Stack Bypass Collate Group Rotate Collating Rotate Grouping Offset Collate...

Страница 220: ...in Bottom Margin Shift Centre Corner Shift Shift No Key Entry Front Cover Sheet Insertion Printed Blank Chapter Page Transparency Interleaving Booklet Booklet Saddle Stitch Front Cover Printed Blank S...

Страница 221: ...e Transparency Interleaving Booklet Booklet Saddle Stitch Add Cover Printed Blank Sample Set Different Size Originals Job Build Sharpness Nega Posi Image Repeat Mirror Image Form Composition Page Numb...

Страница 222: ...2 46 2 1 Sided 1 82 2 2 Sided 1 79 2 On 1 2 39 4 On 1 2 40 8 On 1 2 40 A A 1 37 Auto 1 44 Auto Collate 3 5 Auto Orientation 3 8 Auto Paper Selection 1 28 B Back Cover 2 6 Basic Features Screen 1 3 Bi...

Страница 223: ...1 19 Chapter Page 2 7 Collate 1 61 Copy Exposure 1 33 Copy Ratio 1 39 Copy Settings 3 2 Cover Sheet Insertion 2 5 D Different Size Originals 2 50 E Entire Image 1 47 F Finisher 1 60 Form Composition...

Страница 224: ...on Priority 3 6 Image Repeat 2 70 Image Separation 2 45 Initialize Copy Settings 3 20 Interrupt Mode 1 90 J Job Build 2 52 Job Done Notice 2 56 Job Duration Display 3 7 M Manual Paper Selection 1 30 M...

Страница 225: ...ote Device Transmission Timeout 3 19 Reserved Copying 1 88 Rotate 1 63 S Saddle Stitch 1 62 Sample Set 1 92 Select Output Device 1 19 Setting Confirmation 1 95 Sharpness 2 75 Sheet Insertion 2 7 Shift...

Страница 226: ...10 Index Appendix 4 T Text mode 1 34 Text Photo mode 1 34 Transparency Interleaving 2 17 Two page Separation 2 3 Two sided 1 75 X XY Zoom 1 52 1 55 Z Zoom 1 50 Zoom Designation 1 42 Zoom Program 1 48...

Страница 227: ...late 3 5 Auto Orientation 3 8 Auto Paper Selection 1 28 B Back Cover 2 6 Basic Features Screen 1 3 Binding Erase 2 36 Book 2 Sided 1 85 Book Frame Erase 2 34 Booklet 2 12 C Cancel 1 97 Cascade copying...

Страница 228: ...61 H Hole Punch 1 63 I Image Combination 2 39 Image Orientation Priority 3 6 Image Repeat 2 70 Image Separation 2 45 Initialize Copy Settings 3 20 Interrupt Mode 1 90 J Job Build 2 52 Job Done Notice...

Страница 229: ...g 1 19 Remote Device Transmission Timeout 3 19 Reserved Copying 1 88 Rotate 1 63 S Saddle Stitch 1 62 Sample Set 1 92 Select Output Device 1 19 Setting Confirmation 1 95 Sharpness 2 75 Sheet Insertion...

Страница 230: ...1 4 1 T Text mode 1 34 Text Photo mode 1 34 Transparency Interleaving 2 17 Two page Separation 2 3 Two sided 1 75 X XY Zoom 1 52 1 55 Z Zoom 1 50 Zoom Designation 1 42 Zoom Program 1 48...

Отзывы: