background image

Important

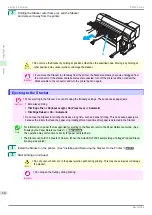
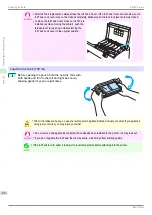
After Ink Tank replacement, always close the Ink Tank Cover. If the Ink Tank Cover cannot close, some
Ink Tank Lock Lever may not be closed completely. Make sure all ink tank lock levers are fully closed.

To close the Ink Tank Cover when no Ink Tank is
installed (as when moving the printer), push the
release lever (a) as shown while returning the
Ink Tank Lock Lever to the original position.

BK

MBK

GY

Y

M

a


iPF850 Series


Replacing Ink Tanks

Basic Guide


Consumables and Maintenance

Ink Tanks

47


Содержание IPF850

Страница 1: ...ng Problems Regarding Paper 111 Printing does not start 123 The printer stops during a print job 125 Problems with the printing quality 126 Cannot print over a network 133 Installation problems 134 HP...

Страница 2: ...wer cable from the outlet as soon as possible to prevent fire and electrical shocks Do not install the printer near sources of strong electromagnetic fields whether equipment that generates such field...

Страница 3: ...de the printer may cause personal injuries Pacemakers Warning This printer generates a low level magnetic field Anyone wearing a pacemaker who experiences discomfort while working around the printer s...

Страница 4: ...tor matches the connection point on the printer During printing turn on the ventilation system in the room We recommend ensuring ample space for installation Legal Notices Legal Notices FCC Regulation...

Страница 5: ...Windows is a trademark or registered trademark of Microsoft Corporation in the U S and or other countries Mac Mac OS Bonjour and OS X are trademarks of Apple Inc registered in the U S and other count...

Страница 6: ...aper Reference Guide This guide describes about the types and specifications of the available media on the printer Setup Guide Quick Guide Basic Guide User s Guide Paper Reference Guide To view the Us...

Страница 7: ...nces or Printing Preferences to display the Printing Preferences dialog box with the printer name added to the title 5 Select the Support sheet and click the User Man ual button iPF850 Series To view...

Страница 8: ...ence Guide from imagePROGRAF Print monitor are as follows 1 Install the software See Installing the Software Mac OS P 98 2 Click System Preferences icon in the Dock 3 Click Printers Scanners Print Sca...

Страница 9: ...5 Click Utility 6 Click Open Printer Utility 7 Click Support iPF850 Series To view the User s Guide or Paper Reference Guide Basic Guide Preface Manuals for this printer 9...

Страница 10: ...llow these cautions Important Indicates important information and restrictions that definitely are to be followed during operation Be sure to read this information to prevent troubles malfunctions or...

Страница 11: ...s and software screens Figures in this user manual may be different from the actual appearance of the printer in some cases Screens depicted in this user manual for the printer driver or other softwar...

Страница 12: ...core The printer comes equipped with the 2 Inch Paper Core Attachment installed Using the 2 Inch Paper Core Attachment Using the 3 Inch Paper Core Attachment Roll Holder Side Holder Stopper Side Roll...

Страница 13: ...he paper on both ends of the roll This may cause feeding problems Note For details on supported sizes and types of roll paper see Paper Sizes or the Paper Reference Guide See Paper Sizes User s Guide...

Страница 14: ...the roll touches the flange a of the Roll Holder Important When loading a roll be careful to avoid hitting the printer hard with the roll This may damage the Roll Holder 4 Insert the attachments for...

Страница 15: ...the Roll 1 Upper and Roll 2 Lower holders If the Stacker is installed on the printer first remove the Stacker from the printer See Installing and Removing the Stacker On the Printer P 30 Important Al...

Страница 16: ...oaded in Roll 1 Upper but Roll 1 Upper is not selected as the paper source a message asking you whether or not to change paper is displayed Press or to select Load and then press the OK button Remove...

Страница 17: ...Paper Feed Slot a Advance the roll until the buzzer sounds Important Be careful not to soil the printing surface of roll paper as you insert it in the slot This may affect the printing quality We reco...

Страница 18: ...nd length of the paper Not prin ted A menu for selection of the type and length of paper is shown on the Display Screen Press or to select the type and length of paper loaded and then press the OK but...

Страница 19: ...d then press the OK button Remove the paper and proceed to the next step 3 Holding the Roll Unit Lever a pull out the Roll Unit 4 Holding the Roll Holder so that the side with the white gear faces the...

Страница 20: ...into the printer 7 Press the OK button The paper is now advanced 8 Once paper feeding starts you will need to do the following based on the ManageRemainRoll setting and the barcode printed on rolls Se...

Страница 21: ...and Removing the Stacker On the Printer P 30 Note If you need to cut a printed roll select Paper Cutting in the printer menu and cut the roll at the desired position See Specifying the Cutting Method...

Страница 22: ...l 8 Holding the Roll Holder flange a remove the holder from the Roll Holder Slot Note For instructions on removing the Roll Holder from rolls see Removing the Roll Holder from Rolls User s Guide 9 Low...

Страница 23: ...select Roll 2 Lower and then press the OK button 5 Press or to select Yes and then press the OK button The roll is rewound Important If you have selected ManageRemainRoll On in the Control Panel menu...

Страница 24: ...r instructions on removing the Roll Holder from rolls see Removing the Roll Holder from Rolls User s Guide To load new paper in the printer at this point see Loading Rolls in the Printer P 15 9 In a c...

Страница 25: ...sheets do not touch the floor directly Note Before loading sheets make sure the printer is clean inside the Top Cover and around the Ejection Guide If these areas are dirty we recommend cleaning them...

Страница 26: ...t lengthwise and printing side up insert it between the Platen a and the Paper Retainer b Align the edges of the sheet as follows 1 Align the sheet with the Paper Alignment Line c at right 2 Align the...

Страница 27: ...though the suction may produce a noise when paper is loaded in some positions it does not indicate a problem If the noise is distracting try moving the paper over slightly to the left or right up to 1...

Страница 28: ...he OK button The Paper Menu is displayed 3 Press or to select Eject Paper and then press the OK button 4 Press or to select Cut Sheet and then press the OK button 5 Press or to select Yes and then pre...

Страница 29: ...When ejecting to the Stacker Use with the Stacker installed on the printer This can be used when printing on supported roll paper See Ejecting to the Stacker P 34 When ejecting to the Output Stacker U...

Страница 30: ...ter off attach the cable and then turn the printer on again The Stacker Canopy may become difficult to open depending on how it is stored If this happens have two peo ple hold the handles on the left...

Страница 31: ...e of the Docking unit left and Docking unit right Caution Do not move the Stacker by holding at positions other than the specified ones Moving it by holding at other positions may cause injuries or da...

Страница 32: ...straight If you do not push it in straight the printer or stacker may be dam aged 5 Turn the Stacker on and check that both of the lamps on the Stacker are lit If only one of the lamps on the Stacker...

Страница 33: ...a is closed and then unlock all of the casters on the Stacker stand Important If the Stacker contains printed documents open the Canopy and clear away all of the printed docu ments then close the Can...

Страница 34: ...load is On or Automatic Do not use the Stacker for printing that takes a long time such as banner printing This can cause paper jams because the rollers that feed the paper stop rotating after a fixed...

Страница 35: ...moving printed documents remove them all at once so that there is no printed document left in the Stacker Once removed do not return the printed documents back into the Stacker If there are any printe...

Страница 36: ...od of time This may cause uneven colors of the printed documents etc Close the Output Stacker when you are not using the Output Stacker If you install it on the Stacker while the Output Stacker is ope...

Страница 37: ...l used ink tanks in another model of printer This will prevent correct ink level detection which may damage the printer or cause other problems We recommend using up an Ink Tank in the course of print...

Страница 38: ...initialization immediately after turning on the printer or during printhead clean ing Ink may leak out Note Ink Tank replacement is possible even during printing when print jobs are being canceled or...

Страница 39: ...ring printing may deteriorate print quality 2 Lift the stopper a of the Ink Tank Lock Lever for the color to replace Lift the Ink Tank Lock Lever until it stops and then push it down to the front Note...

Страница 40: ...es quickly if there is no ink left Important Avoid hitting the printer when replacing an Ink Tank Handle the printer gently when replacing tanks Jolting the printer during printing may deteriorate pri...

Страница 41: ...tanks according to local regulations Load the Ink Tank 330 ml 1 Before opening the pouch tilt the Ink Tank to the left and right gently seven or eight times Important Do not remove and agitate ink tan...

Страница 42: ...OK button and insert the Ink Tank into the holder facing as shown with the ink holes down Important Ink tanks cannot be loaded in the holder if the color or orientation is incorrect If the Ink Tank do...

Страница 43: ...hen push it down until it clicks into place 5 Make sure the Ink Lamp is lit in red Note If the Ink Lamp is not lit in red reload the tank 6 Close the Ink Tank Cover iPF850 Series Replacing Ink Tanks B...

Страница 44: ...the new Ink Tank with both hands and tilt it to the left and right as shown shaking gently it seven or eight times Caution 700 ml ink tanks are heavy so use your whole arm to agitate it instead of jus...

Страница 45: ...cing as shown with the ink holes down Important Ink tanks cannot be loaded in the holder if the color or orientation is incorrect If the Ink Tank does not fit in the holder do not force it into the ho...

Страница 46: ...en push it down until it clicks into place 5 Make sure the Ink Lamp is lit in red Note If the Ink Lamp is not lit in red reload the tank 6 Close the Ink Tank Cover M Replacing Ink Tanks iPF850 Series...

Страница 47: ...mpletely Make sure all ink tank lock levers are fully closed To close the Ink Tank Cover when no Ink Tank is installed as when moving the printer push the release lever a as shown while returning the...

Страница 48: ...zles of the Printhead you remove Handle the Printhead carefully during re placement The ink may stain clothing Do not open the Printhead pouch until immediately before installation After removing the...

Страница 49: ...structions are displayed on the Display Screen Replace the Printhead 1 Remove the Stacker from the printer See Installing and Removing the Stacker On the Printer P 30 2 Open the Top Cover Instructions...

Страница 50: ...u have wrung out completely to wipe it clean Move the Carriage out of the way manually if the Carriage is concealing the ventilation duct and then clean the duct 5 Pull the Printhead Fixer Lever forwa...

Страница 51: ...t from the pouch Important When handling the Printhead always hold it by the grips a Never touch the nozzles b or metal con tacts c This may damage the Printhead and affect printing quality Never touc...

Страница 52: ...do not keep the nozzles and metal contacts facing down If the nozzles or metal contacts are damaged it may affect the printing quality Do not reattach the removed Protective Part Dispose of these mat...

Страница 53: ...ep P head Print On in the Control Panel menu See Menu Set tings User s Guide In this case follow the instructions on the Display Screen for Printhead adjustment If Rep P head Print is Off perform Head...

Страница 54: ...enance Cartridge may become damaged or ink may leak out To prevent ink from leaking from a used Maintenance Cartridge avoid dropping the cartridge or storing it at an angle Otherwise ink may leak and...

Страница 55: ...aintenance and then press the OK button 4 Press or to select Repl maint cart and then press the OK button Instructions are displayed on the Display Screen Replace the Maintenance Cartridge 1 Open the...

Страница 56: ...tenance Cartridge or store it at an angle ink may leak and cause stains The remaining Maintenance Cartridge capacity is recorded on each printer Do not install a used Main tenance Cartridge in another...

Страница 57: ...e it 7 Keeping the new Maintenance Cartridge level insert it all the way in The printer now initializes the Maintenance Cartridge Important Do not remove the Maintenance Cartridge during initializatio...

Страница 58: ...9 Press the OK button Replacing the Maintenance Cartridge iPF850 Series Basic Guide Consumables and Maintenance Maintenance Cartridge 58...

Страница 59: ...t of cutting debris If you have replaced the roll After printing on paper that generates a lot of paper dust If the message Blue platen switch is dirty is displayed Important If the Platen inside the...

Страница 60: ...t away Important Do not touch the Linear Scale a Carriage Shaft b or Ink Tube Stabilizer c Touching these parts may damage them Avoid cleaning where the Carriage is retrac ted in position d or e c a b...

Страница 61: ...the printer there is a risk of fire or electrical shock Important Do not use a dry cloth to wipe inside the Top Cover This may create a static charge which may attract dust and affect the printing qu...

Страница 62: ...g as follows 1 On the Tab Selection screen of the Control Panel press or to select the Settings Adj tab Note If the Tab Selection screen is not displayed press the Menu button 2 Press the OK button Th...

Страница 63: ...r dust from the Paper Retainer a roller b and rubber roller c which become soiled easily At this time also wipe away soiling from the entire tray d 4 Close the Canopy 5 Turn the printer on a b c d iPF...

Страница 64: ...eed button Note A message is displayed on the Display Screen If you are unable to execute paper advance feed the paper using the following procedure 1 Press the Back button to display the Tab Selectio...

Страница 65: ...paper until approximately 20 cm 7 87 in is ejected into the tray 14 Press the button and rewind the roll paper until End of paper feed is displayed on the Display Screen Note The entire roll paper fe...

Страница 66: ...until it reaches the end of the tray 17 Press the Cut button to cut the roll paper 18 Open the Canopy and remove the two sheets of cut roll paper Cleaning the Stacker iPF850 Series Basic Guide Consuma...

Страница 67: ...inter is updating the firmware Off There are no active print jobs when the Data lamp is off c Message Lamp orange On A warning message is displayed Flashing An error message is displayed Off The print...

Страница 68: ...ctions for loading and removing paper or replacing ink tanks or printheads as well as other operations See How to View Instructions With Navigate User s Guide j Back button Displays the screen before...

Страница 69: ...played with the upper line selected You can use the buttons on the Control Panel to access each menu button OK button OK Back button Back button Load Paper Paper Menu Eject Paper Chg Paper Type Chg Pa...

Страница 70: ...tion message is displayed regarding the setting you entered follow the on screen instruc tions If you have changed the Interface Setup menu settings a message confirming whether to register the settin...

Страница 71: ...n instruc tions If you have changed the Interface Setup menu settings a message confirming whether to register the settings is displayed if you press Back button or Menu button Follow the instructions...

Страница 72: ...ing printing First Level Second Level Third Level Fourth Level Fifth Level Load Paper Roll 1 Upper Roll 2 Lower Cut Sheet Eject Paper Roll 1 Upper Roll 2 Lower Cut Sheet Chg Paper Type 1 Roll 1 Upper...

Страница 73: ...ll is On 4 Available only if Width Detection is Off 5 Leading edge is not available as a setting option in the Paper Detailed Settings dialog box of the printer driver 6 see Specifying the Cutting Met...

Страница 74: ...b Log Menu Map Color Palette Adjust Printer Head Posi Adj Standard Simple Other Initial adjustmt Manual 1 Head Inc Adj Feed Prior ity Adj Priori ty Automatic Print Quality Print Length Adj Quali ty 2...

Страница 75: ...ibutes Specify the values of Width Col or and Line Attributes Factory Select the pen num ber Indicates Width Color and Line Attributes Reset Pa lette All Palette Palette A Palette B Smoothing Software...

Страница 76: ...NS Domain Name 9 Ethernet Driver 8 Auto De tect 8 On Off Comm Mo de 6 8 Half Duplex Full Duplex Ethernet Type 6 8 10 Base T 100 Base TX 1000 Base T Spanning Tree 8 Not Use Use MAC Ad dress 8 xxxxxxxxx...

Страница 77: ...er Size Off On Roll Switching Use Optimal Size No RollSwitching TrimEdge Reload Automatic Off On Rep P hea d Print Off On Nozzle Check Frequency Standard 1 page 10 pages Off Warning Off On CarriageS c...

Страница 78: ...e setting in Date Format 8 Restrictions apply if a password is configured using Change Password in the Admin Menu Viewing and configuration is possible for administrators and only viewing for other us...

Страница 79: ...d Stacker cable This cable connects the Stacker and Printer e Docking unit right Install the Stacker on the Printer using the markings in this area as a guide f Docking unit left Install the Stacker...

Страница 80: ...der Load the roll on this holder e Ejection Support Prevents printed documents from winding around the Roll Holder or being drawn into the Paper Feed Slot f Paper Feed Slot When loading a roll insert...

Страница 81: ...n Stand A stand that holds the printer Equipped with casters to facilitate moving it o Stand L The left leg of the Stand p Stand R The right leg of the Stand q Leg Covers Covers for Stand L and Stand...

Страница 82: ...e Lamp 1 Blue Lit when the Stacker is ready When not lit up printed documents cannot be accepted from the Printer f Lamp 2 Green Lit when the Stacker Power switch is on g Power switch Turns the Stacke...

Страница 83: ...ols Roll Holder attachments and other items in this pocket f Power Supply Connector Connect the power cord to this connector g Roll Unit Power Supply Inlet Connect the connection cord for the Roll Uni...

Страница 84: ...on the Platen Also use the brush to move the blue Switch on the Platen i Cutter Rail The Cutter Unit passes over this rail to cut paper j Cutter Unit A round bladed cutter for automatic paper cutting...

Страница 85: ...nd lower the lever when replacing an Ink Tank To open it lift the stopper of the lever until it stops and then push it down toward the front To close it push it down until it clicks into place c Ink L...

Страница 86: ...nter transfer as described in the following table Prepare the Maintenance Cartridge in advance Always follow the instructions of the service representative when transferring the printer under Level 3...

Страница 87: ...ettings Adj tab Note If the Tab Selection screen is not displayed press the Menu button 3 Press the OK button The Set Adj Menu is displayed 4 Press or to select Prep MovePrinter and then press the OK...

Страница 88: ...f this message is displayed press the OK button and contact your Canon dealer for assistance Removing Ink Tanks 1 Open the Ink Tank Cover 2 Lift the stopper a of the Ink Tank Lock Lever a Lift the Ink...

Страница 89: ...m inside the tubes Important Do not remove the Maintenance Cartridge except when the message for replacing it is displayed If you remove the Maintenance Cartridge while ink is being drawn out the ink...

Страница 90: ...age the printer if you unplug it before it is off and transfer it in that state If you accidentally unplug the printer plug it in again reinstall the ink tanks and follow this procedure again 2 Open t...

Страница 91: ...t was removed and stored after initial installation Neglecting to attach the Belt Stopper may damage the printer Do not touch the Linear Scale a Carriage Shaft b or Ink Tube Stabilizer c Touching thes...

Страница 92: ...nstalling the printer is as follows For detailed instructions see the Setup Guide Assemble the stand 1 Referring to the Printer Stand Setup Guide assemble the Stand Caution The Stand must be assembled...

Страница 93: ...ving the printer firmly grasp the Carry ing Handles a under each side The printer may be unsteady if you hold it at other positions which poses a risk of injury from dropping the printer a 2 Remove ta...

Страница 94: ...rinter 5 Plug the power cord into the outlet 6 Press the power button to turn the printer on When the message Has printer been reinstalled Do not load ink tanks yet is displayed select Yes and press t...

Страница 95: ...all the software Note that the driver installation procedure varies depending on the type of connection See Installing the Software Windows P 96 See Installing the Software Mac OS P 98 11 Install the...

Страница 96: ...nstallation following the instruc tions displayed If you accidentally connect the USB cable first the printer driver may not be installed correctly When the printer is connected to a network via TCP I...

Страница 97: ...and connect the printer and computer with the USB cable 4 On the Finish window select Restart my comput er now and click Restart Software settings take effect after the computer re starts iPF850 Serie...

Страница 98: ...a network the printer s IP address may be changed if you reinstall the printer In this case be sure to reconfigure the printer s IP address 1 After making sure the computer and printer are not connect...

Страница 99: ...4 After installation click Exit iPF850 Series Installing the Software Basic Guide Software Installation Installing the Printer Driver Mac OS 99...

Страница 100: ...he need to print them Change the layout orientation relative to the paper You can save paper by correcting the direction in which the document is arranged on the paper if necessary Configuring Setting...

Страница 101: ...ess the Main pane 2 Select the Print Preview check box 3 After you click Print the Canon imagePROGRAF Pre view window will be displayed iPF850 Series Print Preview Basic Guide Software Installation Co...

Страница 102: ...ou to conserve paper Note If the page would exceed the roll paper width after rotation you can use this function with Scale to fit Roll Paper Width to print rotated pages Configuring Settings in Windo...

Страница 103: ...derless Printing check box to display the Information dialog box 3 Click the width of the loaded roll in the Roll Paper Width list 4 Click OK to close the Information dialog box 5 Select Fit Paper Siz...

Страница 104: ...in Windows 1 Access the Page Setup sheet 2 Click Size Options and register the original size 3 Select the Enlarged Reduced Printing check box 4 After you click Fit Roll Paper Width the Information dia...

Страница 105: ...he original as speci fied in the source application 4 Select the Enlarged Reduced Printing check box 5 Select Fit Paper Size Fit Roll Paper Width or Scaling Configuring Settings in Mac OS 1 Access the...

Страница 106: ...to Straighten Lines and Colors User s Guide If you are using cut sheets remove the Stacker from the printer Also when you execute Simple remove the Stacker from the printer See Installing and Removing...

Страница 107: ...just Printer and then press the OK button 5 Press or to select Head Posi Adj and then press the OK button 6 Press or to select Standard or Simple and then press the OK button A test pattern is printed...

Страница 108: ...rint Length is selected Note Either A High or B Standard Draft in the Adjust Length menu is applied depending on printer driver settings at the time of printing If you have selected Easy Settings in t...

Страница 109: ...ity in the printer driver Important Perform this adjustment with the Stacker installed on the printer However if you are using cut sheets remove the Stacker from the printer See Installing and Removin...

Страница 110: ...The scale bar prints Millimeter in 50 mm increments and Inch in 1 inch increments Note A test pattern is printed in black when you choose A High or in magenta if you choose B Standard Draft To cancel...

Страница 111: ...u do not find any scraps or jams see Troubleshooting When Paper Jams are not Found P 118 If the paper becomes jammed while ejecting to the stacker see If There is a Paper Jam while Using the Stack er...

Страница 112: ...t move the Cutter to the right side away from the paper Important If the Cutter is on the left side be sure to move it to the right If the Cutter is on the left side when you turn the printer on the p...

Страница 113: ...stops Important Always move the Carriage to the right side If the Carriage is on the left a Carriage error may occur when you turn on the printer 8 Hold the edge of the roll paper in the middle as you...

Страница 114: ...eing advanced you can resume printing Note You can ensure that the edge is cut neatly by selecting Paper Cutting in the printer menu See Specifying the Cutting Method for Rolls User s Guide Clearing a...

Страница 115: ...parts may damage them c a b 4 Lift the Release Lever 5 Hold the paper and pull it out toward the front Note If you do not find any scraps or jams see Troubleshooting When Paper Jams are not Found P 1...

Страница 116: ...er on See Turning the Printer On and Off User s Guide If There is a Paper Jam while Using the Stacker If There is a Paper Jam while Using the Stacker If there is a paper jam while ejecting paper to th...

Страница 117: ...the Stacker stand 4 Turn the printer off See Turning the Printer On and Off User s Guide 5 Holding the stacker outer frame a pull the stacker and remove it away from the printer OFF a a iPF850 Series...

Страница 118: ...is jammed in the stacker out from the opposite side to the printer and close the canopy 2 Make it ready to print on roll paper by referring to step 7 and later in Clearing Jammed Roll Pa per P 111 Tr...

Страница 119: ...r and lift the Ejection Guide 4 Check for paper in the lower part of the printer Re move any jammed paper here by pushing it to the floor with your fingers a iPF850 Series Troubleshooting When Paper J...

Страница 120: ...paper remains in the lower part of the printer push it to the floor with your fingers If the paper does not drop to the floor or to the lower part of the printer fold an A4 sheet three times insert i...

Страница 121: ...Top Cover 8 In a crouching position push the Roll Unit in 9 Turn the printer on See Turning the Printer On and Off User s Guide iPF850 Series Troubleshooting When Paper Jams are not Found Basic Guide...

Страница 122: ...d is not configured correctly in the Control Panel menu Change the Cut Speed setting in the Control Panel menu See Menu Structure P 72 During cutting printed documents fall out at an angle In the Cont...

Страница 123: ...ick Resume Printing in the menu In Mac OS restart the print job as follows 1 Click Print Scan This is identified as Printers Scanners or Print Fax in other versions of Mac OS 2 Choose the printer 3 Cl...

Страница 124: ...ctive Action The printer was forced off during operation Wait until the system has been filled with ink The display screen indicates Agitating The display screen indicates Agitating Cause Corrective A...

Страница 125: ...as cut to straighten it The leading edge of rolls may be cut to straighten it if Trim Edge First is set to a value other than Off in the Control Panel menu See Cutting the Leading Edge of Roll Paper A...

Страница 126: ...content of the warning See Menu Settings User s Guide Because the printer was left without ink tanks installed for some time ink has become clogged in the ink supply sys tem After the ink tanks have...

Страница 127: ...oting Paper Abrasion and Blurry Images User s Guide When printing on paper 0 1 mm 0 004 in thick or less choose a VacuumStrngth setting of Weakest in the Control Panel menu If rubbing still occurs in...

Страница 128: ...ry easily In the Control Panel menu set Roll DryingTime to at least 1 min See Menu Settings User s Guide When paper that does not dry easily is used for printing it may curl during printing and touch...

Страница 129: ...dj See Installing and Removing the Stacker On the Printer P 30 See Automatic Adjustment to Straighten Lines and Colors P 106 If Adj Quality is executed with the Stacker installed on the printer ad jus...

Страница 130: ...ht sides only Cut the printed document ejected from the printer and then use scissors or a cutting tool to cut away the edges on the top and bottom Choose a higher level of Print Quality in the Advanc...

Страница 131: ...nd stop printing 2 Change the type of paper in the printer driver and try printing again The length of printed images is inaccurate in the feeding direction The length of printed images is inaccurate...

Страница 132: ...e printer driver See Loading Rolls in the Printer P 15 See Loading Sheets in the Printer P 25 Make sure the same type of paper is specified in the printer driver as you have loaded in the printer 1 Pr...

Страница 133: ...connection method manually specifying the communi cation mode in use See Configuring the Communication Mode Manually User s Guide Cannot print over a TCP IP network Cannot print over a TCP IP network...

Страница 134: ...s Monitor as follows Note The following procedure is for Windows 7 The method of removing printer drivers varies depending on the version of Windows 1 Select Control Panel from the start menu 2 Select...

Страница 135: ...nt job An HP GL 2 command not supported by this printer was received Check the print job and settings The printer has received print data that includes HP RTL commands when Auto Rotate is On in the Co...

Страница 136: ...L 2 jobs are printed at maximum size even if a standard size is specified Cause Corrective Action The page size of the HP GL 2 print job as created in the source application is incorrect Set Detect im...

Страница 137: ...icate a problem with the printer There is a sound of suction from the Platen To prevent paper from rising paper is held against the Platen by suction from Vacuum holes under it There is a sound when a...

Страница 138: ...it does not indicate a problem The Printhead nozzles are clogged Check for nozzle clogging See Checking for Nozzle Clogging User s Guide Ink Level Detection Ink Level Detection Ink level detection wil...

Страница 139: ...ing ink level detection After checking the message press the button 4 After checking the message press the button 5 Press or to select Yes and then press the OK button 6 Check the message and press th...

Страница 140: ...about updating ink information is shown on the Display Screen After checking the message press the button 10 Press or to select Yes and then press the OK button Ink level detection is now released In...

Страница 141: ...possible 148 Paper position not suitable for borderless printing 149 Roll feed unit error 149 The roll feed unit is loose 149 Stacker not ready 149 Cutting Mode not Automatic 150 MediaType Mismatch M...

Страница 142: ...printing quality Adjust the paper size setting in the printer driver to match the size loaded in the print er as follows 1 Press or to select Stop Printing and then press the OK button 2 Change the pa...

Страница 143: ...ading Rolls in the Printer P 15 The printer now starts printing the print job Make sure the roll width selected in the dialog box displayed when you select Fit Roll Paper Width in the printer driver m...

Страница 144: ...nused paper A4 Letter vertical or larger More than one sheet may be required depending on the adjustment Cannot print as selected Another roll is in use Cannot print as selected Another roll is in use...

Страница 145: ...ecify the paper length See Specifying the Paper Length User s Guide 5 If Not finished printing Finish printing remaining jobs is shown on the Display Screen press the OK button Printing will resume st...

Страница 146: ...oaded Press or to select Load Paper and then press the OK button Load a sheet and then print See Loading and Printing on Sheets User s Guide Press or and select Stop Printing or press the Stop button...

Страница 147: ...printing Finish printing remaining jobs is shown on the Display Screen press the OK button Printing will resume starting from the page on which the error occurred Manually rewind the roll all the way...

Страница 148: ...ls User s Guide For information about paper that is compatible with automatic cutting see the Paper Reference Guide See Displaying the Paper Reference Guide User s Guide The Cutter Unit stops in the m...

Страница 149: ...ide User s Guide Paper position not suitable for borderless printing Paper position not suitable for borderless printing Cause Corrective Action Because paper expands or contracts depending on the env...

Страница 150: ...Mode not Automatic Cause Corrective Action The Stacker is ready to be used however the Printer Cutting Mode is not set to Automatic Cut Or Automatic Cutting is not set to Yes in the Printer Driver 1...

Страница 151: ...ss the OK button open the Ink Tank Cover and replace the Ink Tank for the color that is out of ink See Replacing Ink Tanks P 37 Remaining level of the ink cannot be correctly detected Check ink tank R...

Страница 152: ...re is a problem with the Ink Tank Replace it with a new Ink Tank See Replacing Ink Tanks P 37 The following ink tanks cannot be recognized The following ink tanks cannot be recognized Cause Corrective...

Страница 153: ...p printing Use each type of paper only where the recommended environmental conditions are met For details on environmental conditions for vari ous paper see the Paper Reference Guide See Displaying th...

Страница 154: ...ause Corrective Action The Printhead nozzles are becoming clogged If printing is faint clean the Printhead See Cleaning the Printhead P 61 Check printed document iPF850 Series Basic Guide Error Messag...

Страница 155: ...rinthead as follows and then execute Head Posi Adj again 1 Press the OK button to clear the error 2 Use Head Inc Adj to adjust the angle of inclination of the Printhead See Adjusting Line Misalignment...

Страница 156: ...se steps to clean the Printhead 1 Stop printing by pressing or to select Stop Printing 2 Clean the Printhead See Cleaning the Printhead P 61 If the message is still displayed when printing replace the...

Страница 157: ...ull You can continue to print but prepare a new Maintenance Cartridge to use when the message for replacement is displayed No Maintenance Cartridge capacity No Maintenance Cartridge capacity Cause Cor...

Страница 158: ...unneeded jobs stored in personal boxes See Deleting Saved Jobs User s Guide Mail box full Now printing without saving data Mail box full Now printing without saving data Cause Corrective Action No mo...

Страница 159: ...obs are stored in the Personal Box Delete unneeded jobs stored in personal boxes See Deleting Saved Jobs User s Guide iPF850 Series Mail box full Delete unwanted data Basic Guide Error Message Message...

Страница 160: ...ms and affect the printing quality GL2 Wxxxx The memory is full xxxx is 0501 0903 or 0904 GL2 Wxxxx The memory is full xxxx is 0501 0903 or 0904 Cause Corrective Action The printer memory is full Beca...

Страница 161: ...sistance Hardware error xxxxxxxx xxxx x represents a letter or number Hardware error xxxxxxxx xxxx x represents a letter or number Cause Corrective Action The last portion of roll paper was used durin...

Страница 162: ...inter up to date such as pa per information is in the wrong format Check the data Turn off the printer and wait a while before restoring power and then resend the data You have uploaded firmware for a...

Страница 163: ...error xxxxxxxx xxxx x represents a letter or number 161 Ink insufficient 151 Ink tank is empty 151 Insert the maintenance cartridge 157 Insufficient paper for job 144 Mail box full Delete unwanted dat...

Страница 164: ...er 145 Roll x jam x is 1 Upper or 2 Lower 147 Sheet printing is selected 146 Sheet removed 146 Stacker not ready 149 The following ink tanks cannot be recognized 152 The mail box is full 158 The paper...

Страница 165: ...er Stopper 80 I If a message is displayed 54 Ink level 138 Ink level detection 138 L Large Format Printing 104 M Maintenance Cartridge 3 54 81 157 Media Take up Unit 83 Menu Operations 68 Menu Structu...

Страница 166: ...iPF850 Series Basic Guide ENG CANON INC 2014...

Отзывы: