


29
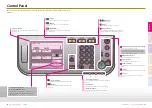
Easy Operation Guide
Send/Fax
30
Send and Fax Functions
Easy Operation Guide
Co
py
Pr
ef
ac
e
O
th
er
Pr
in
t
Sc
an
Se
nd
/F
ax
>>
Send and Fax Functions
1
Press [Communication
Settings]
→
[TX Settings]
under <Common Settings>.
2
Press [
▼
] or [
▲
] until [TX
Terminal ID] appears
→
press
[TX Terminal ID].
3
Press [On]
→
[OK].
To return to the top screen,
press
(Reset).
1
Press [System Settings]
*
→
[Forwarding Settings].
* To make changes to the System
Settings, log in to the machine
as the System Manager.
2
Press [Register]
→
register
the forwarding conditions
and destinations as
indicated on the touch
panel display.
3
Select the desired
forwarding setting
→
press
[Validate/Invalidate]
→
[Done].
To return to the top screen,
press
(Reset).
Press
(Additional Functions).
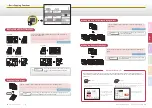
You can add the sender information at the top of the documents that you send via I-fax/fax. Information such as your
I-fax address, name and fax number is printed, enabling the recipient to know who sent the document.
Printing the Sender Information When Sending I-Faxes/Faxes
Press
(Additional Functions).
You can set the machine to automatically forward the received I-fax/fax documents to any desired destination. If a
received document matches the forwarding conditions you set, it is forwarded to the destination. You can also specify
a forwarding destination for received documents that do not match the forwarding conditions.
Automatically Forwarding Received Documents
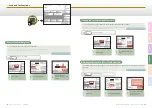
This section describes the operation procedures for specifying
the useful Additional Functions settings related to the Send and
Fax functions.
1
Press [Communication
Settings]
→
[TX Settings]
under <Common Settings>.
2
Press [
▼
] or [
▲
] until
[Default Screen for Send]
appears
→
press [Default
Screen for Send].
3
Select the desired setting
item
→
press [OK].
To return to the top screen,
press
(Reset).
Press
(Additional Functions).
You can specify the screen to display first when you press
(SEND). You can select Favorites Buttons screen, One-
touch screen, or the top screen of the Send and Fax functions as the screen to display first.
Setting the Send Screen to Suit Your Needs
Chapter 7
❖
Sending and Facsimile Guide
Chapter 7
❖
Sending and Facsimile Guide
Chapter 4
❖
System Settings Guide