background image

3

Caution

For stand assembly instructions, refer to the 

Printer Stand Setup Guide

 provided with the stand.

For roll unit installation instructions, refer to the 

Printer Stand Setup Guide

 provided with the stand.

Mount the printer on the stand.

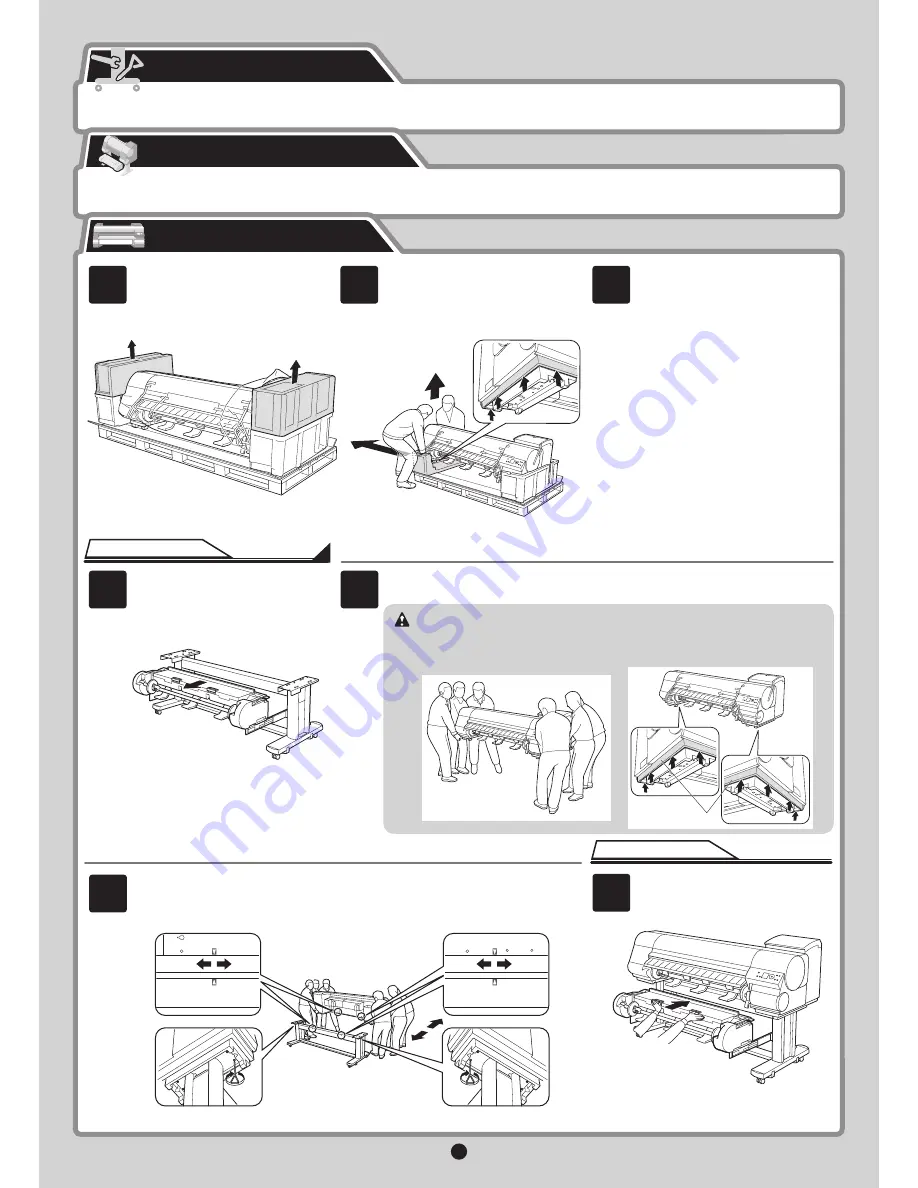
Remove the packaging material on top 

of the printer. 

Pull out the roll unit.

The printer alone weighs approximately 

112 kg. Moving the printer requires at least 

six people, three on either side. Be careful 

to avoid back strain and other injuries.

Push in the roll unit.

Instructions for iPF825

Assemble the stand, in preparation for printer installation. 

Install the roll unit on the stand. (iPF825 only.)

Remove the packaging material and the 

plastic covering from the other side of the 

printer the same way.

While two people hold the carrying handles 

under the printer on one end and lift the 

printer a little, have a third person remove the 

packaging material and the plastic covering 

from under the printer. After the packaging 

material has been removed, lower the printer.

Instructions for iPF825

Align the triangles on the back of the printer and 

Stand

 when setting the printer on the 

Stand

. Secure the printer and 

Stand


fi

 rmly together using four M4 hex screws on each side 

by the 

Allen Wrench

.

With three people holding the carrying handles under the printer on both ends, lift the printer.

When moving the printer, 

fi

 rmly grasp the 

carrying handles (a) under each side. Holding 

the printer at other positions is dangerous 

and cause injury and damage if the printer is 

dropped. 

Assemble the Stand

Install the Roll Unit

Install the Printer

2

3

1

5

4

6

7

a

Содержание imagePROGRAF iPF825 MFP Basic Guide No.1

Страница 1: ...for transferring the printer and instructions for reinstalling the printer driver 1 2 3 Printer operating instructions Printer driver instructions Printing instructions Maintenance procedures Instruc...

Страница 2: ...ndard accessory for the iPF825 Stand and Stationary Output Stacker 1 Printer For information about the stand and stationary output stacker refer to the Printer Stand Setup Guide provided with the stan...

Страница 3: ...from the other side of the printer the same way While two people hold the carrying handles under the printer on one end and lift the printer a little have a third person remove the packaging material...

Страница 4: ...ovided with the stand Set up the wheeled or stationary output stacker to catch ejected documents Optional for the iPF815 For the Media Take up Unit installation instructions refer to the setup guide p...

Страница 5: ...letely Lift the Printhead Fixer Cover to open it fully Instructions are now shown on the Display Screen regarding Printhead installation When the following screen is displayed press or to select the l...

Страница 6: ...nk may sediment which may affect printing quality Open the pouch and remove the Ink Tank Insert the Ink Tank into the holder facing as shown with the ink holes down Lift the Ink Tank Lock Lever until...

Страница 7: ...epending on how your printer is connected Install the printer driver and User Manual as follows Installation requires administrative rights such as those of Administrator Be sure to log on using an ac...

Страница 8: ...to try again Be careful not to insert the USB cable into the Ethernet port When the Install User Manual dialog box is displayed insert the provided User Manuals CD ROM in the CD ROM drive and click Ne...

Страница 9: ...the printer Use the LAN cable to connect the LAN port on the back of the printer to the hub port If the printer is on the Link indicator is green for 100Base TX connections and amber for 10Base T con...

Страница 10: ...en press the button OK Enter the IP address 1 Press or to move the cursor _ to each field for entering numbers 6 Press or to select TCP IP and then press the button MEMO Press the Online button Press...

Страница 11: ...a different language click Language Point at a software title to view a summary of the software Make sure the printer is on Turn the computer on and insert the provided User Software CD ROM for your...

Страница 12: ...e country or region of use and click Next On the Printer Selection window select The printer is connected to computers in a network and click Next After reading the precautions in the Getting Ready wi...

Страница 13: ...Exit other applications and click Continue After reading the software license agreement click Continue Click Agree Confirm that the required installation items are selected and then click Next Click N...

Страница 14: ...ge of the user manual to install and then click OK After installation is complete click Quit Click Install After reading the software license agreement click Continue Check the message and click Conti...

Страница 15: ...n the Paper Feed Slot a and advance the roll paper until you hear a tone Remove the Roll Holder from the printer If the paper is wrinkled or warped straighten it out before loading it Open the Top Cov...

Страница 16: ...ay not indicate a problem with the printer and the issue may be easily resolved Common messages and the causes are listed here with corrective actions To respond to error messages other than these ref...

Отзывы: