Canon imageCLASS MF5880dn Скачать руководство пользователя страница 12

10

3 Make Fax Settings

Select the Receive Mode that Suits Your Needs

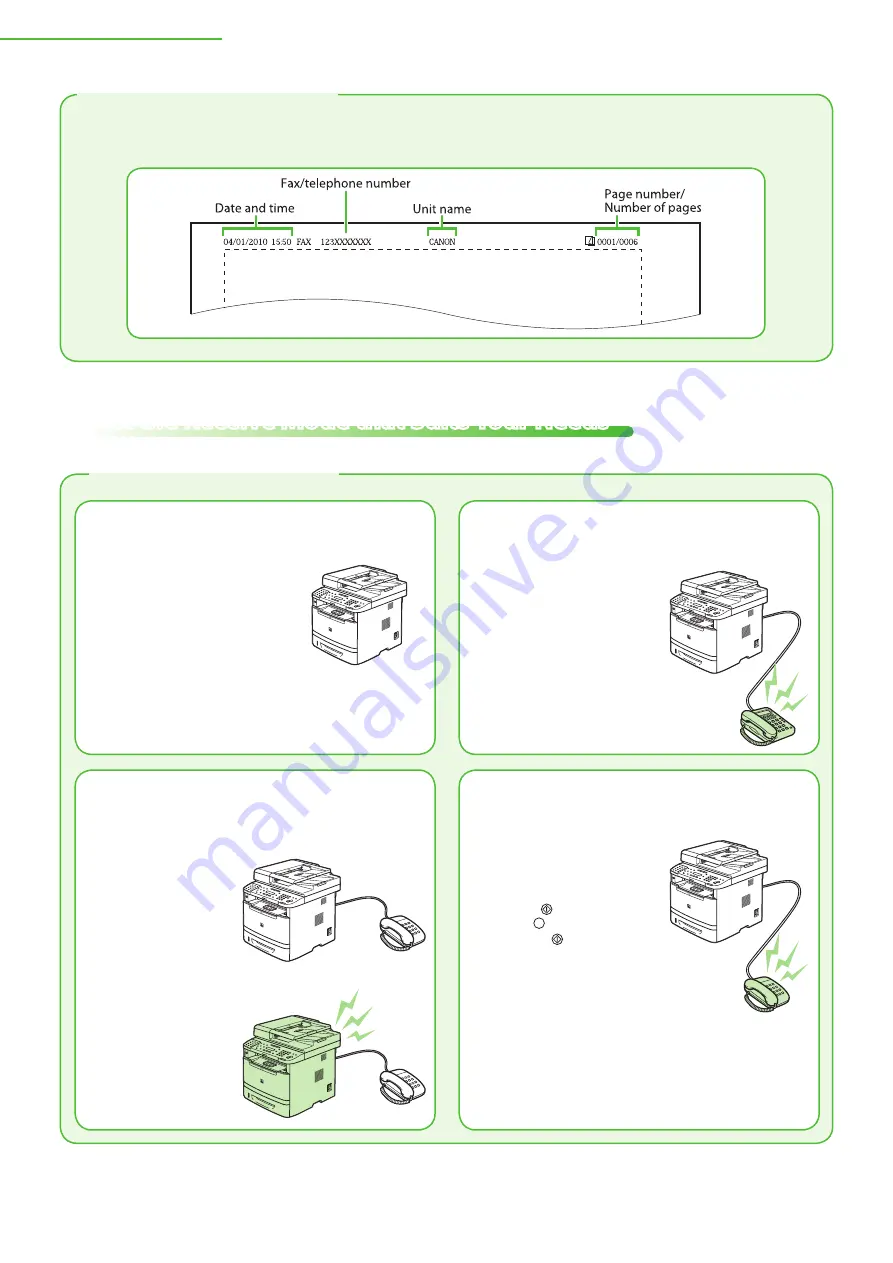
The sender information you register in the machine appears in the header of each page received by your 
recipient.

About Sender Information

About the Receive Modes

<FaxOnly>

Receives faxes automatically. When you use only the fax function, 
select this mode without connecting to the external telephone.

When Receiving FAX

The machine receives faxes 
automatically.

When Receiving VOICE CALL

The machine does not 
respond.

<AnsMode>

Receives faxes automatically and routes voice calls to the 
telephone with built-in answering machine.

When Receiving FAX

The telephone with built-in 
answering machine rings 
and the machine receives 
faxes automatically.

When Receiving VOICE CALL

The telephone with 
built-in answering 
machine rings and 
records voice messages.

<FaxTel>

Automatically switches between fax and a voice call. The machine 
receives faxes automatically and rings for voice calls.

When Receiving FAX

The machine receives faxes 
automatically.

When Receiving VOICE CALL

The machine rings. Answer 
the call.

<Manual>

Rings for every call, whether it is fax or a voice call. For fax, you 
need to manually activate the machine to receive the fax.

When Receiving FAX

The external telephone rings.
To receive the fax, you can 
either pick up the receiver 
and press the   [Start] key, 
or press the   [Hook] key 
followed by the   [Start] 
key. Alternatively, you can 
use the remote reception 
function through the 
external telephone.

When Receiving VOICE CALL

The external telephone 
rings. Answer the call.

Содержание imageCLASS MF5880dn

Страница 1: ... Fax Settings Set Up Network Connection Set Up Computers and Software Appendix Read This Manual First Be sure to read the manual before using the machine The remarks for important safety instructions are described in Basic Operation Guide Read the manual also Keep the manual for future reference ...

Страница 2: ...ode that Suits Your Needs 10 About the Receive Modes 10 If You Need to Use Pulse Dialing 12 4 Set Up Network Connection 13 Connect the LAN Cable 13 Compatible LAN Cables 13 Specify the IP Address Settings 13 Automatic Setting 13 Check IP Address Setting 13 Check Network Connectivity 14 5 Set Up Computers and Software 15 Types of Connection between Computers and the Machine 15 Network Connection 15...

Страница 3: ...Only For information on the standard features for each model see Available Features shown below The displays shown in this manual are the factory preset display for the MF5880dn in default setting Depending on the system configuration and product purchased the appearance of the display may differ Available Features The table below shows the available features on a product basis available not avail...

Страница 4: ...USB Connection Remote UI Scan to File Server E Mail Send Receive I Fax Receive The settings are now complete Go to e Manual Unpack the Machine Set Up Paper Cassette and Load Paper Connect Power Cord and Turn ON the Machine Connect Telephone Cables Register Sender Information Select the Receive Mode Install Software Connect the Machine to Network Check IP Address Setting Connect USB Cable Required ...

Страница 5: ... 2 Set Up the Machine Unpack the Machine Remove all shipping tape and packing materials from the machine 1 2 3 4 5 6 7 8 9 10 11 12 13 14 ...

Страница 6: ... Guide contains the machine setup and software installation Read this guide before operating this product Basic Operation Guide Before Using the Machine Documents and Print Media Copying Printing Registering Destinations in the Address Book Fax E mail Scanning Network Settings from a PC Maintenance Troubleshooting Machine Settings Appendix Read this manual next The Basic Operation Guide contains t...

Страница 7: ...r of the rear paper guide B and slide the guide to the mark for the size of the paper to be loaded Make sure to set the guides to the mark for the size of the paper to be loaded correctly If the guides are positioned incorrectly it may cause paper jams dirty prints etc A6 size paper cannot be loaded 4 Fan the paper stack and even the edges 5 Load the paper stack of the appropriate size with the pr...

Страница 8: ... of the Machine in the e Manual In the same manner load the paper into the optional paper cassette For attaching the optional paper cassette see Attach the Optional Cassette to the Main Unit below Attach the Optional Cassette to the Main Unit Take the cassette from the carton and remove all packing materials including shipping tape before attaching the optional cassette to the main unit Make sure ...

Страница 9: ...ect the country and press OK U N I T E D S T A T E S C O U N T R Y R E G I O N Make sure that the country region is selected correctly If not faxes may not be sent received properly It is possible to change the country region at a later time To change the country region press Menu 10 SYSTEM SETTINGS 6 COMMUNICATIONS 1 COUNTRY REGION and then select the country region 4 The machine enters the stand...

Страница 10: ...Telephone Cables Make Fax Settings About the Keys Connect the supplied telephone cable to the telephone line jack A on the back side of the machine and the telephone wall jack Use the telephone cable shorter than 118 1 8 3 m If you want to connect your own external telephone or telephone with built in answering machine connect it to the external device jack B on the back side of the machine Regist...

Страница 11: ... U N I T N A M E a Ex Maximum number of characters 24 characters including spaces Unit name your name company name etc If you accidentally enter an incorrect character press or to move the cursor to the character that needs correction and press Clear to delete the character 12 Press Stop Reset to return to the Standby mode Date and Time 1 Press Menu 2 Press or to select 7 TIMER SETTINGS then press...

Страница 12: ... and the machine receives faxes automatically When Receiving VOICE CALL The telephone with built in answering machine rings and records voice messages FaxTel Automatically switches between fax and a voice call The machine receives faxes automatically and rings for voice calls When Receiving FAX The machine receives faxes automatically When Receiving VOICE CALL The machine rings Answer the call Man...

Страница 13: ...is ringing To disable the incoming ring press Menu 4 TX RX SETTINGS 3 FAX SETTINGS 4 RX SETTINGS 4 INCOMING RING then select OFF Voice mail is not supported with AnsMode DRPD Distinctive Ring Pattern Detection service assigns two or more telephone numbers with distinctive ring patterns to a single telephone line allowing you to have both a fax number s and a telephone number s using only one telep...

Страница 14: ... know the type of telephone line you use contact your local telephone company 1 Press Menu 2 Press or to select 4 TX RX SETTINGS then press OK 3 Press or to select 3 FAX SETTINGS then press OK 4 Press or to select 2 USER SETTINGS then press OK 5 Press or to select 2 TEL LINE TYPE then press OK 6 Press or to select telephone line type then press OK TOUCH TONE Tone dialing Default ROTARY PULSE Pulse...

Страница 15: ...roperly follow the procedure in this section It is recommended that the network administrator perform this procedure Before performing this procedure make sure that the machine is turned ON and connected to a network For instructions on the settings for IPv6 see Network Settings in the e Manual The settings for the Static IP see Network Settings in the e Manual The display returns to the standby m...

Страница 16: ... switch wait for at least 10 seconds turn ON the main power switch wait for 90 seconds If the machine still does not get the IP address consult your network administrator 8 Press Stop Reset to return to the standby mode The settings for the Static IP see Network Settings in the e Manual Check Network Connectivity 1 Start the web browser on the computer that is connected to the network 2 Enter the ...

Страница 17: ... Pentium Celeron series 300 MHz or faster Memory 128 MB or more Microsoft Windows Server 2003 CPU Intel Pentium Celeron series 133 MHz or faster Memory 128 MB or more Network only Microsoft Windows Vista CPU Intel Pentium 800 MHz or faster Memory 512 MB or more Microsoft Windows Server 2008 CPU Intel processor 1 GHz 86 processor 1 4 GHz 64 processor or faster Memory 512 MB or more Network only Mic...

Страница 18: ...UFRII LT Driver the various data processing tasks conventionally executed within the printer are appropriately divided between the host computer and the printer to greatly reduce the overall printing time The workload can be delegated to match the output data thus realizing a significant increase in speed through optimization FAX Driver The FAX Driver is conceptually akin to a printer driver A use...

Страница 19: ... file name of the driver which was installed first to avoid conflicts You can change the file name either during or after the custom installation To change the name after the installation right click the driver icon then select Properties To install the software programs individually select Custom Installation then follow the on screen instructions If the error message is displayed indicating that...

Страница 20: ...o check the machine s IP address see Check IP Address Setting on p 13 8 9 10 11 Select Restart Computer Now Recommended then click Restart to restart your computer 12 Installation is complete If you continuously install Color Network ScanGear go to Color Network ScanGear on p 18 otherwise go to Check Installation on p 21 If you have several computers that connect to the machine through a network r...

Страница 21: ...anGear Tool and or the UDP port as an exception in Windows Firewall after installation has finished For details on how to manually register ScanGear Tool and or the UDP port see Network ScanGear Installation Guide in user Software CD ROM 9 The Readme file opens After reading it close the window 10 11 12 Installation is complete 13 On the Start or start menu point to Programs or All Programs Color ...

Страница 22: ...nnection Precautions Do not connect the USB cable before installing the software If you connect the USB cable before installing the software and the Found New Hardware Wizard screen appears click Cancel Make sure that the machine is turned ON before connecting the USB cable A USB cable is not included with the machine Windows Server 2003 and Windows Server 2008 are not supported with USB connectio...

Страница 23: ...lick start then select Printers and Faxes Windows 2000 On the Windows task bar click start select Settings and then double click Printers Windows Vista On the Windows task bar click Start select Control Panel and then click Printers Windows 7 On the Windows task bar click Start then select Devices and Printers Windows Server 2008 On the Windows task bar click Start select Control Panel and then do...

Страница 24: ...sure an IP address is assigned to the machine See Check IP Address Setting on p 13 1 2 3 Click How to Set to display the Send Setting Guide then minimize the guide until the tool is activated in step 7 Click Next to proceed to step 4 If the firewall is applied to the operating system the dialog box below appears Click Yes and continue the installation 4 Select your machine on the list Make sure th...

Страница 25: ...OM e Manual For Windows To Install the e Manual on your computer 1 Insert the User Manual CD ROM into your computer 2 Select the language 3 Click Install 4 The installation starts automatically 5 When the installation finished press OK 6 To display the e Manual double click the shortcut icon MF5800_Manual_us on the desktop To display the e Manual directly from the CD ROM 1 Insert the User Manual C...

Страница 26: ...ck a title to display the corresponding topic page G Print Click to print all categories or a single category H Function Categories Select a function category to display the list of image icons for the topics corresponding to that function Click an image icon or Display Function List to display the topic pages for the function category I Appendix Categories Select an appendix category to display t...

Страница 27: ...egistered trademarks trademarks or service marks of their respective owners Copyright Copyright 2009 by Canon Inc All rights reserved No part of this publication may be reproduced transmitted transcribed stored in a retrieval system or translated into any language or computer language in any form or by any means electronic mechanical magnetic optical chemical manual or otherwise without the prior ...

Страница 28: ...venkerkerweg 59 61 1185 XB Amstelveen The Netherlands CANON CHINA CO LTD 15F Jinbao Building No 89 Jinbao Street Dongcheng District Beijing 100005 PRC CANON SINGAPORE PTE LTD 1 HarbourFront Avenue 04 01 Keppel Bay Tower Singapore 098632 CANON AUSTRALIA PTY LTD 1 Thomas Holt Drive North Ryde Sydney NSW 2113 Australia CANON GLOBAL WORLDWIDE SITES http www canon com FT5 2842 000 xxxxxxxxxx CANON INC ...

Отзывы: