background image


4.12  Print Layout (Details) 

4.12.1  Selectable layout in Memory Card Direct Printing 

- Index printing 
  

Selectable in combination with all i900D/i905D-supported paper sizes and types. 

- Layout printing (multiple layouts) 
  

Selectable in combination with all i900D/i905D-supported paper sizes and types. 
 However, plain paper with borderless (2 photos with borderless, 4 photos with borderless, 8 
photos with borderless, postcard with borderless) is not selectable. 

- Other single frame printing (= single image / page) 
  

Selectable in combination with all i900D/i905D-supported paper sizes and types. 
 However, plain paper with borderless is not selectable. 

 
4.12.2  Selectable layout in Digital Camera Direct Printing 

When the language setting on the digital camera is not set to Japanese. 
(Media types for overseas are all the same, however the panel display differs depending on the 
languages. The following is the display of US English.) 

Standard Index 


Media Type 

Borderless Border 

Card#1 (Photo Paper Pro 4”X6”) 

O (1 photo) 

O (1 photo) 

O (24 photos) 

Card#2 (Photo Paper Plus Glossy 4”x6”) 

O (1 photo) 

O (1 photo) 

O (24 photos) 

Card#3 (Photo Paper Plus Glossy 5”x7”) 

O (1 photo) 

O (1 photo) 

O (35 photos) 

LTR (Photo Paper Pro Letter) 

O (1 photo) 

O (1 photo) 

O (80 photos) 

A4 (Photo Paper Pro A4) 

O (1 photo) 

O (1 photo) 

O (80 photos) 


When the language setting on the digital camera is set to Japanese 

Standard Index 

Media Type 

Borderless Border 

L (Professional Photo L) 

O (1 photo) 

O (1 photo) 

O (15 photos) 

2L (Professional Photo 2L) 

O (1 photo) 

O (1 photo) 

O (35 photos) 

Postcard (Professional Photo postcard) 

O (1 photo) 

O (1 photo) 

O (24 photos) 

Card (Professional Photo card) 

O (2 photos) 

O (2 photos) 

O (6x2 photos) 

A4 (Professional Photo A4) 

O (1 photo) 

O (1 photo) 

O (80 photos) 


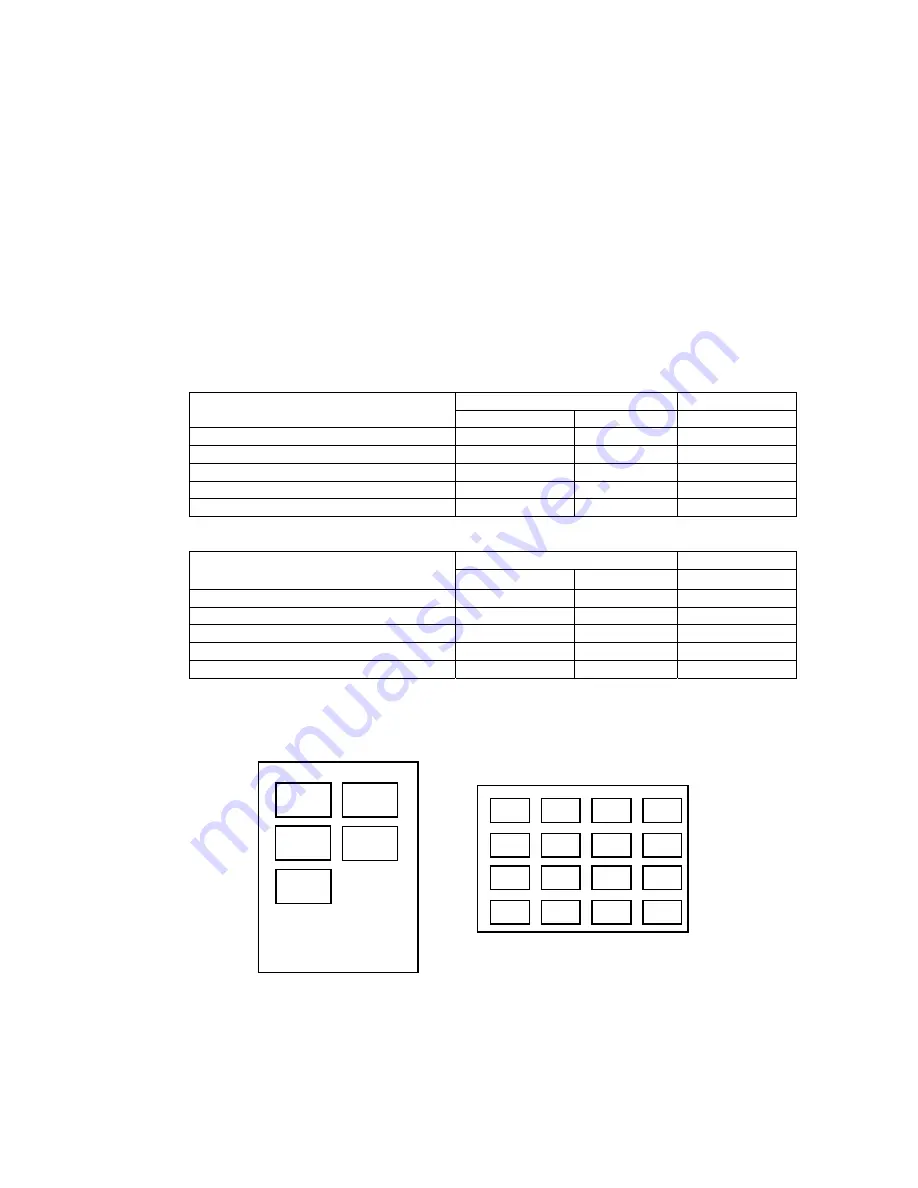
4.12.3  Layout in Memory Card Direct Printing 

Layout of multiple images is arranged as shown below. 
- Images are arranged horizontally, from left to right, top to bottom. 
 

3 4 

1 2 


16

15

14

13

12

11

10

9

7

6

5

3

2

1


- When the number of photos designated requires less space than the layout provides, nothing is printed 
in the remaining spaces. 

2 - 19 

Содержание i900D Series

Страница 1: ...i900D SERVICE MANUAL Canon ...

Страница 2: ...i900D i905D PIXUS 900PD SERVICE MANUAL Revision 0 QY8 1394 000 COPYRIGHT 2003 CANON INC CANON PIXUS 900PD i900D i905D 092003 XX 0 00 0 ...

Страница 3: ...Canon will release technical information when necessary When substantial changes are made to the contents of the manual Canon will issue a revised edition The following do not apply if they do not conform to the laws and regulations of the region where the manual or product is used Trademarks Product and brand names appearing in this manual are registered trademarks or trademarks of the respective...

Страница 4: ...oubleshooting of the i900D i905D Part 2 Technical Reference New technology and technical information such as FAQ s Frequently Asked Questions of the i900D i905D Part 3 Appendix Block diagrams and pin layouts of the i900D i905D Reference This manual does not provide sufficient information of disassembly and reassembly procedures Refer to the graphics in the separate Parts Catalog ...

Страница 5: ...int 1 22 4 PRINTER TRANSPORTATION METHOD Part 2 TECHNICAL REFERENCE 2 1 1 NEW TECHNOLOGIES 2 4 2 CLEANING MODE AND AMOUNT OF INK PURGED 2 5 3 PRINT MODE 2 7 4 PHOTO DIRECT PRINT FUNCTION 4 1 Host PC Memory Card Access Function with the Memory Card Startup Utility 2 8 4 2 Memory Card Direct Printing Function 2 10 4 3 File Search 2 11 4 4 File Sort 4 5 Date Print 2 12 4 6 Bubble Jet Direct Function ...

Страница 6: ...Part 1 MAINTENANCE ...

Страница 7: ...nt sensor None Correction performed through service test print 1 min Print head alignment At print head replacement At logic board ass y replacement To ensure accurate dot placement None printer buttons Computer settings via the printer driver 2 min Paper feed motor position adjustment 2 At paper feed motor unit replacement To adjust the belt tension Position the paper feed motor so that the belt ...

Страница 8: ...satisfying To improve nozzle conditions Printer buttons Computer settings via the printer driver 30 sec to 1 min Print head deep cleaning When print quality is not satisfying and not improved by print head cleaning To improve nozzle conditions Printer buttons Computer settings via the printer driver 1 to 1 5 min Ink tank replacement When an ink tank becomes empty No ink error 2 min Paper feed roll...

Страница 9: ...pages ISO JIS SCID No 5 pattern plain paper standard mode BCI 6Y 360 pages ISO JIS SCID No 5 pattern plain paper standard mode BCI 6PC 410 pages ISO JIS SCID No 5 pattern plain paper standard mode BCI 6PM 260 pages ISO JIS SCID No 5 pattern plain paper standard mode 1 4 Special Tools Name Tool No Purpose Remarks MOLYKOTE PG641 CK 0562 000 To be applied to the lift cam base s upper gear and the sli...

Страница 10: ...ring CD R printing 1850 1855 Set the CD R tray and tray feeder properly and press the Resume button 6 times 1 Presence of the CD R tray feeder during paper printing 1851 1856 Remove the CD R tray feeder and press the Resume button 7 times 1 No CD R or DVD R 1002 After setting a CD R or DVD R in the tray set the tray in the tray feeder and press the Resume button 8 times Warning The waste ink absor...

Страница 11: ...0814 1 9 times EEPROM error 6800 Logic board ass y QM2 0766 QM2 0767 1 10 times 2 Carriage lift mechanism error 5110 Lift cam shaft unit QM2 0593 Photo interrupter WG8 5571 Sheet feeder unit QM2 0589 Logic board ass y QM2 0813 QM2 0814 1 12 times Media sensor error 8000 Sheet feeder unit QM2 0589 13 times USB Host VBUS overcurrent 9000 Logic board ass y QM2 0813 QM2 0814 1 15 times Other hardware ...

Страница 12: ...tion of excess rise of the print head temperature If the print head temperature exceeds the specified limit a Wait is inserted during printing Presence of the CD R tray feeder 2 If the CD R tray feeder is attached when the front cover is opened the warning is displayed 1 When the CD R tray feeder is removed and the front cover is closed the warning is released 1 If the warning is displayed the car...

Страница 13: ...ead 2 purge unit or logic board ass y 1 Paper gets smeared Feed several sheets of paper or clean the paper path with cotton swab or cloth A part of a line is missing on printouts Replace the ink tank or print head 2 Color hue is incorrect Replace the ink tank or print head 2 or correct the media sensor Printing is incorrect Replace the logic board ass y 1 No ejection of black ink Replace the ink t...

Страница 14: ... mode 7 Perform the print head alignment in the user mode EEPROM information print Service test print Printing via USB connection Direct printing from a digital camera Bottom case unit QM2 0663 Ink absorber QC1 2232 2233 2234 2235 2236 After replacement 1 Reset the waste ink counter See 3 3 Adjustment Settings 6 Service mode Service test print Sheet feeder unit QM2 0589 After replacement 1 Correct...

Страница 15: ...eneral notes Make sure that the flexible cables and wires in the harness are in the proper position and connected correctly See 3 2 Special Notes on Repair Servicing 1 Flexible cable and harness wiring connection for details Do not drop the ferrite core which may cause damage Protect electrical parts from damage due to static electricity Before removing a unit after removing the power cord allow t...

Страница 16: ...ess wiring connection Use caution with the flexible cable and harness wiring Improper wiring or connection may cause line breakage possibly leading to ignition or emission of smoke III II I I DSC direct connector harness wiring Ground line DSC direct connector 1 10 ...

Страница 17: ...per feed motor and timing sensor CD R tray feeder switch Platen unit Timing sensor Paper feed motor Lift cam sensor III Logic board ass y carriage motor side wiring Purge motor harness Purge sensor harness Purge unit Power harness DSC direct harness Carriage motor harness 1 11 ...

Страница 18: ... at replacement of the Gear phase adjustment ar QC1 2297 adjust the phase so that with the even surface of the carriage 2 After replacement be sure to perform the service test print and confirm that no strange noise or faulty print operation due to dislocation of the belt or gear or out of phase motor etc occurs paper feed motor DO NOT loosen them in other cases 2 In attaching the PR lift cam ge s...

Страница 19: ... 3 Grease application 2 Carriage shaft Not applied 100 mm or less 23 21 21 23 8to18 5to7 13 12 11 10 9 7 5 6 8 16 17 18 14 15 4 21 22 22 21 1 Rearside 3 24 1 13 ...

Страница 20: ... tooth 2 locations MOLYKOTE PG641 1 drop x 5 locations Lift transmission gear QC1 2295 12 Larger gear tooth 5 locations smaller gear tooth 2 locations MOLYKOTE PG641 1 drop x 7 locations Lift transmission gear QC1 2296 13 Gear tooth all teeth MOLYKOTE PG641 2 drops 14 Bushing sliding portion MOLYKOTE PG641 1 drop Lift shaft gear 15 Gear tooth 2 locations MOLYKOTE PG641 1 drop x 2 locations Carriag...

Страница 21: ... unit or the 5 item set of the ink absorbers The standard amount for waste ink absorber replacement is given in the table below Waste ink amount 1 Bottom case unit or 5 item set of ink absorbers replacement Less than 7 Not required 7 or more Required 1 Check the waste ink amount by service test print or EEPROM information print See 3 3 Adjustment Settings 6 Service mode for details 1 15 ...

Страница 22: ...set to Auto or Thick paper On standalone printers press the Menu button to move to Maintenance and perform the selection Thick paper Contrast adjustment The contrast of the LCD viewer on the printer can be adjusted On standalone printers press the Menu button to move to Maintenance and perform the selection Contrast Quiet mode setting The quiet mode can be set to On or Off On standalone printers p...

Страница 23: ...rned off while pressing the Resume button press and hold the Power button Do not release the buttons The LED lights in green to indicate that a function is selectable 2 While holding the Power button release the Resume button Do not release the Power button 3 While holding the Power button press the Resume button 2 times and then release the Power and Resume buttons Each time the Resume button is ...

Страница 24: ...lease be careful not to select this mode 2 times Green Reference white PET paper correction value input 1 3 times Orange Reference plain paper correction value input 2 4 times or more Return to the menu selection Note After each correction value operation the mode returns to the service mode menu selection After finishing either of the correction value operations re select the media sensor correct...

Страница 25: ...es from green to orange After this only the Power button is accepted 5 Press the Power button to change the LED to green and press the Power button once again to exit the service mode and turn the printer off 1 Each operation panel button except the Power and Resume buttons will change the LCD display however if any two buttons or more are pressed simultaneously before the display becomes red an e...

Страница 26: ...ck 5 halftone There shall be no remarkable streaks or unevenness Check 6 CD R automatic print head alignment sensor correction The results shall be OK Check 7 media sensor correction Nothing printed indicates that the correction has been implemented If not implemented MEDIA SENSOR NO CALIBRATE is printed Service test print sample Check 1 Top of form accuracy Check 2 EEPROM information Refer to the...

Страница 27: ...ion value 11 Error history 0 1 12 No of times of hard power on 13 No of times of soft power on 14 No of print pages total plain paper high resolution paper Photo Paper Pro postcard Matte Photo Paper Photo Paper Plus Glossy L size 4x6 CD R 15 No of borderless print pages 16 No of times of print head installation 17 No of times of ink tank replacement Bk C M Y PC PM 18 No of times of purging manual ...

Страница 28: ... such as when the power is turned off in the user mode during transportation the media sensor may be dislocated 2 If the print head is removed from the printer and left alone by itself ink is likely to dry For this reason keep the print head installed in the printer even during transportation 3 If the carriage is not locked in the home position the carriage may move and apply stress to the carriag...

Страница 29: ...Part 2 TECHNICAL REFERENCE ...

Страница 30: ...ect the following troubles are likely to occur i In printing on specialty paper streaks or lines appear or color hue is improper The print quality is not good Solution Match the Media Type setting in the printer driver with the paper type actually set ii In printing on plain paper printing is smeared color hue is improper or black is faint The print quality is not good Solution In Custom Settings ...

Страница 31: ...inside the carriage unit For errors and their solutions relating to CD R printing see 2 1 Operator Call Errors Note When the CD R tray feeder is attached the carriage does not move to the center when the access cover is opened Before replacing an ink tank or the print head remove the CD R tray feeder 6 Automatic adjustment of the distance between the paper and the print head According to paper typ...

Страница 32: ...ts Photo Paper Pro PR 101 4 x 6 101 6 x 152 4mm 20 sheets Photo Paper Plus Glossy PP 101 4 x 6 101 6 x 152 4mm 20 sheets Photo Paper Plus Semi gloss SG 101 4 x 6 101 6 x 152 4mm 10 sheets Paper types and limits in the sheet feeder when the photo paper tray is attached Type Name Size Stacking capacity Plain paper 64 to 105g m2 A4 B5 A5 LTR LGL 5mm High resolution paper HR 101 A4 LTR 20 sheets Gloss...

Страница 33: ... cleaning after shipped from the plant 1 94 70 Dot count cleaning When the specified number of dots are printed from the previous black color cleaning Cyan and magenta dots are counted by large and small nozzles separately Timer cleaning 1 If 120 to 336 hours have elapsed since the previous cleaning till the start of the next printing 0 76 40 Timer cleaning 2 If 336 hours or more have elapsed sinc...

Страница 34: ...per GP 401 No of passes Resolution dpi 6 passes Bk Y 600x1200 M C M PC 600x600 8 passes Bk Y M C PM PC 4800x1200 Photo Paper Plus Glossy PP 101 No of passes Resolution dpi 6 passes Bk Y 600x1200 M C PM PC 600x600 8 passes Bk Y M C PM PC 4800x1200 Matte Photo Paper MP 101 No of passes Resolution dpi 6 passes Bk Y 600x1200 M C PM PC 600x600 8 passes Bk Y 600x1200 M C PM PC 600x600 T Shirt Transfers ...

Страница 35: ... M C PM PC 600x600 3 3 Resolution in Duplex Printing Paper type Quality level 5 Quality level 4 Quality level 3 Quality level 2 Quality level 1 Plain paper No of passes Resolution dpi 1 pass Bk 300x300 Y M C 300x300 1 pass Bk 300x300 Y M C 300x300 2 passes Bk Y 600x1200 M C 600x600 6 passes Bk Y 600x1200 M C PM PC 600x600 3 4 Resolution in Direct Printing Paper type Standard High Plain paper No of...

Страница 36: ... a higher priority is placed on a file when the file name not counting the file extension consists of 8 characters with the latter 4 being numeric in compliance with the DCF Design rule for Camera File system Files are sorted in ascending order of those 4 numeric figures 4 1 4 Data access For mounted cards in the i900D i905D data access to the memory card is possible by performing the usual file o...

Страница 37: ...n image is enlarged to print Select layout Selects a layout containing multiple images in one page and specify the image to be printed in the layout DPOF Performs printing according to the DPOF setting in the memory card 4 2 2 Print quality In the Memory Card Direct Printing two types of High or Standard print quality can be selected For the resolution for each print quality refer to 3 PRINT MODE ...

Страница 38: ...re processed data is displayed on the LCD for a moment In the LCD specifications if the thumbnail image exists in the image file the thumbnail image is displayed and then full resolution image is displayed In Plain paper Standard mode in Index printing as printing is conducted using the thumbnail image processed images are not printed In High quality mode full resolution images are printed even th...

Страница 39: ... searching 1 Hidden files and files under hidden directories 2 Files and sub directories with top three characters of THM under PWRSHOT DCIM or DC97 directories X PWRSHOT THM00001 jpg X DCIM THM00002 tif X DC97 THM00003 jpg X DCIM ABCD THM00004 tif X ABCD DCIM THM00005 jpg X ABCD DCIM EFGH THM00006 jpg X ABCD DCIM THMA IMG00006 jpg 3 RECYCLED directory Windows X RECYCLED X ABCD RECYCLED 4 TRASH di...

Страница 40: ...the files are then sorted in alphabetical order eg ABC_0001 JPG ABD_0001 JPG IMG_0001 JPG IMG_0001 TIF J is lower T C When both files are non DCF files C 1 From the beginning of the file name the position of first number is deleted sorting by distance in ascending order eg IMG001 JPG IMG_001 JPG C 2 When the result of the comparison in C 1 above is the same numbers are sorted in ascending order eg...

Страница 41: ...a types for overseas destinations are identical however the panel display differs depending on the languages The following is the display of US English Paper setting in digital camera operation panel i900D i905D Card 1 Photo Paper Pro 4 x6 PR 101 4 x6 Card 2 Glossy Photo Plus 4 x6 SP 101 4 x6 Card 3 Photo Paper Plus 5 x7 PC 101 C with perforation LTR Photo Paper Pro Letter PR 101 LTR A4 Photo Pape...

Страница 42: ... Image correction function Exif2 2 files are processed with Photo Optimizer PRO and for other files image correction is not implemented Not selectable by users 4 6 6 Maintenance Maintenance operation of the i900D i905D via the digital camera s operation panel is not possible Maintenance operations are possible through the operation panel of the i900D i905D printer even when connected to a digital ...

Страница 43: ...to 3 PRINT MODE 4 7 5 Image correction function The following four correction functions may not be selectable by users in some cases ViVid ViVid noise reduction Noise reduction APP ON OFF 4 7 6 Maintenance Maintenance operation of the i900D i905D via the digital camera s operation panel is not possible Maintenance operations are possible through the operation panel of the i900D i905D printer even ...

Страница 44: ...al Camera Direct Printing are impossible Setting is possible At the start of direct printing operations an error is displayed in the operation panel of the digital camera In Memory Card Direct Printing and Digital Camera Direct Printing Printing from the host computer is impossible Print setting on the host computer is possible At the start of print operations from the host computer an error is di...

Страница 45: ...ife when no key operation has occurred for five minutes the LCD viewer is powered off When any key other than the Power and Resume buttons is pressed with the LCD backlight off the LCD viewer turns on however the original function of the key is invalid The content displayed on the LCD viewer changes depending on the user s operation Eg When printing is being performed from the PC the LCD viewer di...

Страница 46: ...card is inserted into the card slot while the printer is on b When the printer is powered on while a memory card is in the card slot c When the USB bus is reset while the printer is on with a memory card in the card slot When the host computer is already on and is connected to the printer via USB or when the host computer is restarted 2 Power cut to the memory card When any of the following events...

Страница 47: ...11 2 Print specifications in DPOF print mode Photo number designation Only photos designated in the DPOF file can be printed and designation via the operation panel is impossible Paper type The paper type can be selected from the operation panel Layout Images designated for Standard printing in the DPOF file are printed in the designated order in the layout designated through the operation panel I...

Страница 48: ...ard Index Media Type Borderless Border Card 1 Photo Paper Pro 4 X6 O 1 photo O 1 photo O 24 photos Card 2 Photo Paper Plus Glossy 4 x6 O 1 photo O 1 photo O 24 photos Card 3 Photo Paper Plus Glossy 5 x7 O 1 photo O 1 photo O 35 photos LTR Photo Paper Pro Letter O 1 photo O 1 photo O 80 photos A4 Photo Paper Pro A4 O 1 photo O 1 photo O 80 photos When the language setting on the digital camera is s...

Страница 49: ...f and not printed The discarded image data will be equally divided between top and bottom or left and right Note As printing of the image is performed to an area 5 mm larger than that of the paper size the perimeter of the image is further trimmed by a few millimeters Processing in printing in print area without image trimming 1 Rotate the image data by 90 degrees if necessary to align the long ed...

Страница 50: ...OF Standard and other modes Location Lower right in the image In images with an aspect ratio other than 4 3 the date is moved such that the relative distance from the lower right to the image date is the same as when a 4 3 ratio is used Color Orange Size According to the layout 4 13 2 Date print in Digital Camera Direct Printing 1 Settings and data format When date print is set in the digital came...

Страница 51: ...ll not be printed Index mode Index printing Printing in Index mode Location Below the image Above the date Color Black Size Fixed size 0001 DPOF mode Index printing Printing in DPOF Index mode Location Below the image Color Black Size Fixed size 102 0229 DPOF mode Standard printing Printing in DPOF Standard mode Location Lower right in the image outside depending 102 0229 on the shape of the image...

Страница 52: ...he paper and the print head Prevent paper abrasion Printout is smeared Lines or streaks appear on printouts 3 Specifications Print results Different paper size paper type and layout at printing from a PictBridge supported digital camera The following settings are set to Standard in the digital camera at Direct Printing from the PictBridge supported camera Paper size Paper type Layout For items set...

Отзывы: