background image

21

3

Specify the paper size and layout.

„

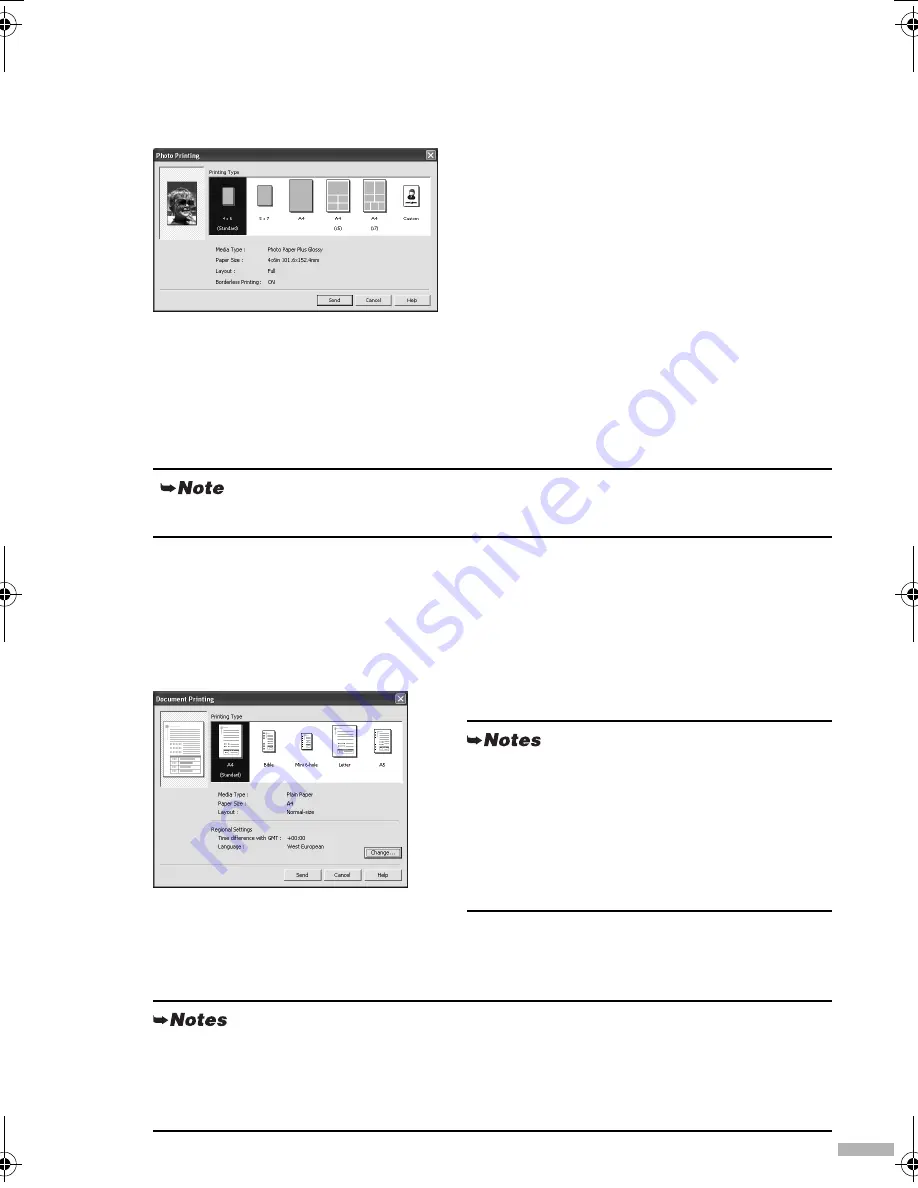
Changing the Photo Print Settings

(1) Click 

Change

 on 

Photo Print Settings

 in the i80 setup utility screen.

The 

Photo Printing

 dialog box appears.

(2) Select a desired layout for printing.

(3) Click 

Send

.

You can perform printing from a PDA or mobile phone with the specified media type and 

layout.

„

Changing the Document Print Settings

(1) Click 

Change

 on 

Document Print Settings

 in the i80 setup utility screen.

The 

Document Printing

 dialog box appears.

(2) Select the paper size for the document.

(3) Click 

Send

.

You can perform printing from a PDA or mobile phone with the specified media type.

4×6:

Prints a photo on Photo Paper Plus Glossy 4"×6"/101.6×152.4mm paper without border.

5×7:

Prints a photo on Photo Paper Plus Glossy 5"×7"/127.0×177.8mm paper without border.

A4:

Prints a photo on Photo Paper Plus Glossy A4 paper without border.

A4 5 (×5): Prints 5 photos on Photo Paper Plus Glossy A4 paper with border.
A4 7 (×7): Prints 7 photos on Photo Paper Plus Glossy A4 paper with border.

Click 

Custom

 if you want to specify the media type, paper size, layout, and borderless printing

Bible, Mini 6-hole, A5 paper are used for a 
personal organizer.
When printing these papers;

• Select 95×170mm for 

Bible

, 76×126mm for 

Mini 

6-hole

 and 210×148mm for 

A5

 as paper size.

• Load only one sheet at a time.

• Do not use paper thinner than 64gsm or 17lb.

Click 

Change

 on 

Document Printing

 to change the following settings.

Time difference with GMT

: when printing time-specifiable data, such as a schedule, you 

can reflect the time difference by specifying the country in which the data was created.

Language

: You can adopt the Language if incorrect text is printed.

i80.fm  Page 21  Monday, September 29, 2003  4:59 PM

Содержание i80 Series

Страница 1: ...BUBBLE JET PRINTER Quick Start Guide Table of Contents Preface 1 Shipping Materials 1 Introduction 1 Setting Up 2 ...

Страница 2: ...ils numériques International ENERGY STAR Program As an ENERGY STAR Partner Canon Inc has determined that this product meets the ENERGY STAR guidelines for efficiency The International ENERGY STAR Office Equipment Program is a global program that promotes energy saving through the use of computer and other office equipment The program backs the development and dissemination of products with functio...

Страница 3: ... Instructions that if ignored could result in personal injury or material damage caused by incorrect operation of the equipment These must be observed for safe operation Also read the Safety Precautions in the User s Guide Observe the warnings and cautions to avoid personal injury or damage to the printer Trademark Notices Canon is a registered trademark of Canon Inc BJ is a trademark of Canon Inc...

Страница 4: ... the incorrect voltage and frequency could cause a fire or electric shock Always push the plug all the way into the power outlet If your computer has an infrared communication feature you can print data without connecting a USB cable After connecting the universal AC adapter proceed to Installing the Print Head on page 3 If your computer has an earth connection ensure that this is attached If you ...

Страница 5: ... Head Installing the Print Head 1 Open the paper rest 2 Turn on the printer Do NOT turn on the computer yet The POWER lamp flashes and the printer begins to operate Wait until the POWER lamp remains fully lit 3 Open the print head cover The print head holder moves to the center If the Add New Hardware Wizard or Found New Hardware Wizard screen appears when carrying out the following operations cli...

Страница 6: ... lever 5 Remove the protective cap from the print head 6 Place the print head in the holder aligning the mark with the mark Do not touch the print head nozzles Do not attempt to reattach the protective cap once it has been removed lock button lock lever print head nozzles print head print head holder ...

Страница 7: ...ildren Do not drop or shake ink tanks as this may cause the ink to leak out and stain your clothes and hands 1 Take out the black ink tank 2 Hold the ink tank as shown in the diagram and remove the protective cap 3 Insert the black ink tank slant into the back slot aligning the mark with the mark 4 Press the until it clicks into place Do not touch the ink port Do not attempt to reattach the protec...

Страница 8: ...a flat surface 4 Load the paper aligning it with the right side of the sheet feeder You can load up to 30 sheets of plain paper Do not load exceed this limit 5 Slide the paper guide against the left side of the stack of paper Wait until the preparatory operation is complete it takes about 2 minutes Set the paper thickness lever to the right when using plain paper to the left when using thick paper...

Страница 9: ... CD ROM during the installation The driver cannot be correctly installed The screens below refer to Windows XP installation Screen may differ depending on the operating system you are using When installing the printer driver in Windows XP or Windows 2000 log on to the system as a member of the Administrators group The Setup Software User s Guide CD ROM contains the application software to import e...

Страница 10: ...on XP Windows double click My Computer in the Windows screen then double click the CD ROM icon If the language selection screen appears select a language then click the Next The i80 Setup Utility is a software for selecting a desired media type or layout when performing printing from a PDA or mobile phone through infrared communication If the USB connection is not recognized refer to the section N...

Страница 11: ...ou to restart the computer is displayed click Yes For further information of applications and how to start them refer to Applications Included in the CD ROM Package on page 28 Do not remove or insert the USB cable during installation as this may result in the computer or printer not operating normally Before installing the driver disable all virus detection programs and automatically loading progr...

Страница 12: ... where you want to install the printer driver and click Continue 9 Click Install 10 A message asking for your confirmation to restart your computer is displayed on the screen Read the message then click Continue Installation Software installation will start 11 Software installation is complete Restart your computer Before you use the printer you must carry out print head alignment on page 12 ...

Страница 13: ... and select In Windows XP or Windows 2000 Printing Preferences In Windows Me or Windows 98 Properties to open the setting screen 4 Click the Maintenance tab and click Print Head Alignment 5 Click Print Head Alignment If a message warning you not to perform other operations is displayed click OK It takes about 60 seconds to start printing 6 After the pattern is printed click Yes If the pattern is n...

Страница 14: ...stripes 9 Click OK This completes the printer setup The printer is now ready to use Aligning the Print Head Macintosh 1 Open the BJ Printer Utility dialog box 1 Double click the hard disk icon where the printer driver was installed the Applications folder and the Utilities folder 2 Double click the Print Center icon 3 Select i80 from the Name list and click Configure 4 Select i80 from the Product ...

Страница 15: ... at the print out From the patterns in Column A select the most even least irregular pattern and enter the number 5 In the same way one by one select the most even patterns printed with the least irregularities from each of Columns B to K enter their numbers and click Send If it is difficult to pick the best pattern on Column H pick the setting that produces the least noticeable vertical white str...

Страница 16: ...use WordPad for the purpose of explanation The procedures you use and the screens that appear on your computer may differ according to the application that you use Printing 1 Print the document from the application On the File menu click Print Check the application s user s manual for the actual procedures 2 Ensure that your printer is selected then click Windows XP Preferences Windows Me Windows ...

Страница 17: ...rinting 5 Help Click this for a more detailed explanation of the functions in the tab This may not appear in Windows XP or Windows 2000 If this happens click Start and select All Programs or Programs Canon i80 and Guide 6 Click this to change the cursor shape to By clicking on the item s name with this cursor an explanation will be displayed Clicking the Print Advisor allows you to change to the m...

Страница 18: ...ion s users manual for the actual procedures 2 Specify the page setup For details refer to Page Setup on page 17 3 Open the Print dialog box in your application to print the document On the File menu click Print Check the application s user s manual for the actual procedures 4 Specify the print settings according to your requirements For details refer to Basic Print Settings on page 17 5 Click Pri...

Страница 19: ...ded in the printer when printing on paper other than plain paper 1 Media Type Select the media loaded in the printer 2 Print Mode Select the type of document you want to print To specify more detailed settings for the print quality click Detailed Setting 3 Print Click this to start printing See Help for more information about other printer driver functions Click in the Page Setup dialog box or the...

Страница 20: ... Cleaning from the pop up menu Click Cleaning See page 12 for details on how to open the BJ Printer Utility When the Printer Runs out of Ink Replace the empty ink tank with a new one Specify the following ink tanks when purchasing Ink Tank BCI 15 Color Ink Tank BCI 15 Black 1 Open the print head cover and remove the empty ink tank Do not touch the lock lever 2 Install the new ink tank Close the pr...

Страница 21: ...ication driver must have been installed in Windows 98 computer or later In Windows 98 or Windows Me check whether the infrared communication driver has been installed To activate the infrared port carry out the following operation 1 Click Start and select Settings and then Control Panel sequentially 2 Check whether the Wireless Link icon Windows Me or the Infrared icon Windows 98 is displayed in t...

Страница 22: ...aper rest turn on the printer and then turn on the computer 2 Start the i80 Setup Utility Windows Click Start and select All Programs or Programs Canon Utilities i80 Setup Utility and i80 Setup Utility Macintosh Open the Applications folder and then double click the i80 Setup Utility folder and the i80 Setup Utility icon PDA The PDA must have an IrDA port and support the file transfer using the Ir...

Страница 23: ...on Photo Paper Plus Glossy 5 7 127 0 177 8mm paper without border A4 Prints a photo on Photo Paper Plus Glossy A4 paper without border A4 5 5 Prints 5 photos on Photo Paper Plus Glossy A4 paper with border A4 7 7 Prints 7 photos on Photo Paper Plus Glossy A4 paper with border Click Custom if you want to specify the media type paper size layout and borderless printing Bible Mini 6 hole A5 paper are...

Страница 24: ...rinting video files Depending on your device the Fine print quality option may not be available due to the restriction on the infrared transfer capacity Depending on your device it may not print data stored in a memory card It automatically sets the image quality and orientation horizontal or landscape according to the image size It automatically sets the margin according to the image size Dependi...

Страница 25: ...rect It allows you to print photos from a Canon Bubble Jet Direct compatible PictBridge incompatible digital camera or digital camcorder without a computer by simply connecting the digital camera or digital camcorder to this printer Hereafter the digital still camera and digital video camcorder are collectively called a digital camera or camera When producing photos with the digital camera connect...

Страница 26: ...in the Instruction Manual supplied with the camera Let s take a look at the paper size paper type layout image optimization modes and date printing modes that can be set on the PictBridge compliant camera connected to the printer Confirming or Changing the Camera Settings When a PictBridge compliant camera is connected and printing is started with no printing option selected this printer operates ...

Страница 27: ...ming for this printer About Image optimize By default On Exif print is selected for this printer About Date print By default Off is selected for this printer Paper Size setting Paper Type setting Paper loaded in printer 10 15cm 4 6 Default Photo Default Photo Paper Plus Glossy Fast Photo Photo Paper Pro 13 18cm 5 7 Photo Photo Paper Plus Glossy A4 Photo Photo Paper Plus Glossy Fast Photo Photo Pap...

Страница 28: ...lowing prints You can make a standard print from the image displayed in the single display mode or in the index display mode You can print specified numbers of images or make an index print by editing the DPOF For the images taken with an Exif 2 2 compatible digital camera the Photo Optimizer PRO function can be used If date printing is set from the operation panel of the digital camera the date w...

Страница 29: ...or Further Details For more information place the Setup Software User s Guide CD ROM in the CD ROM drive User s Guide Contents The User s Guide is HTML manual you can browse through on your computer How to View the User s Guide Contents Printer parts and their function Further printing techniques Routine maintenance Printing media Troubleshooting Specifications For Windows Double click the User s ...

Страница 30: ...r Driver Systems Requirements For Windows Use a computer equipped on which Windows XP Windows 2000 Windows Me or Windows 98 can operate USB interface or IrDA ver 1 1 CD ROM drive Available hard disk space for printer driver installation including temporary files Windows XP Windows 2000 65MB Windows Me Windows 98 30MB Including the capacity for the electric manual USB operation can only be guarante...

Страница 31: ...re is no guarantee that interference will not occur in a particular installation If this equipment does cause harmful interference to radio or television reception which can be determined by turning the equipment off and on the user is encouraged to try to correct the interference by one or more of the following measures Reorient or relocate the receiving antenna Increase the separation between th...

Страница 32: ...i80COV fm Page 1 Monday September 29 2003 10 16 AM ...

Отзывы: