


7.
Perform/change settings.
7.
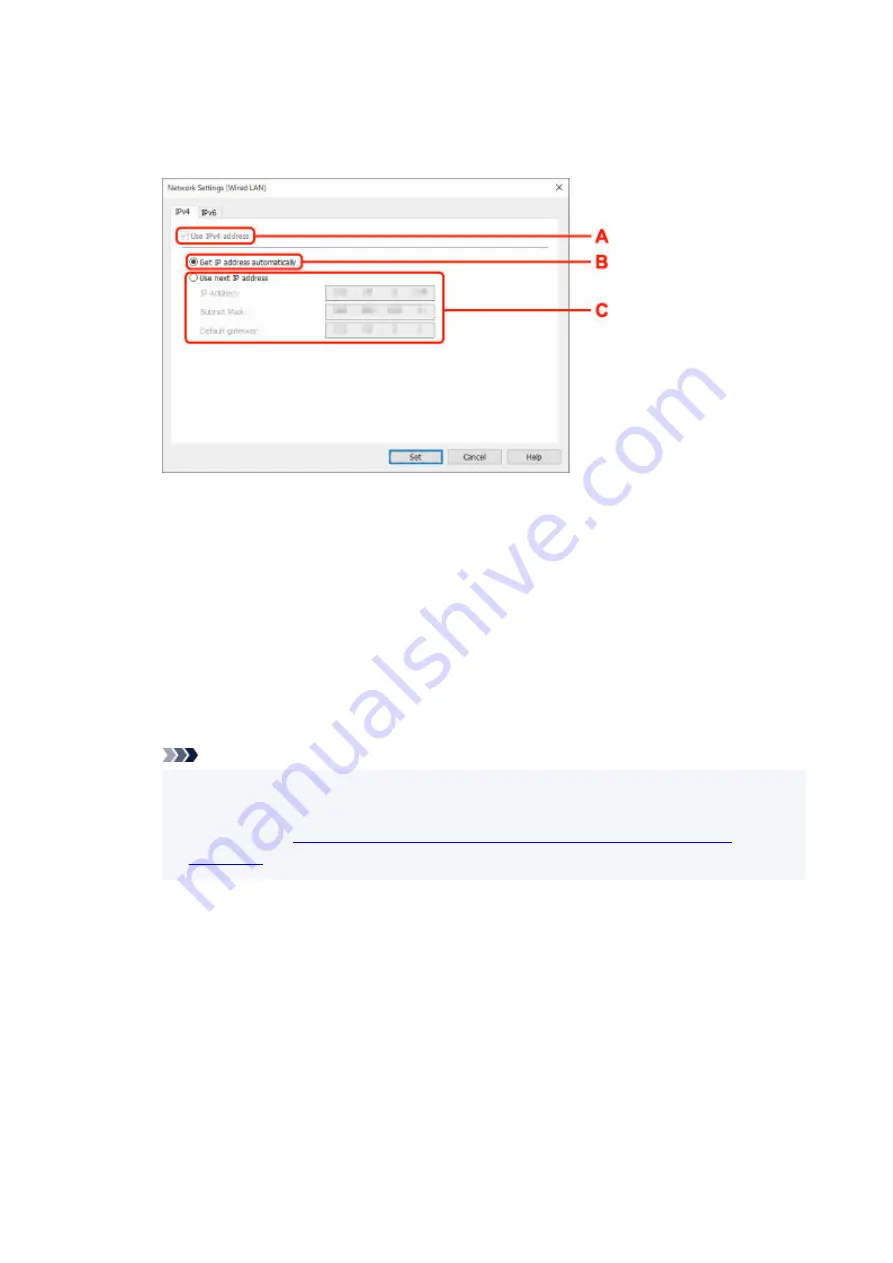
You can switch the screen between IPv4 and IPv6. Click the tab to switch the protocol.
• IPv4 settings
•
A: Use IPv4 address
Always selected. (displayed in a gray out state)
B: Get IP address automatically
Select this option to use an IP address automatically assigned by a DHCP server. DHCP
server functionality must be enabled on your router.
C: Use next IP address
Select this option if no DHCP server functionality is available in your setup where you use the
printer, or you want to use a fixed IP address.
Enter the IP address, subnet mask, and default gateway.
• IPv6 settings
•
Note
• If you select a USB connected printer on step 4, you cannot perform IPv6 settings depending
•
on the printer you are using.
List of Models Which Does Not Support IPv6 Configuration via USB
69
Содержание GX5000 Series
Страница 1: ...GX5000 series Online Manual English ...
Страница 44: ... For macOS Refer to Changing the Connection Mode in Setup Guide 44 ...
Страница 47: ...Restrictions Notices when printing using web service Notice for Web Service Printing 47 ...
Страница 53: ... For macOS Refer to Changing the Connection Mode in Setup Guide 53 ...
Страница 57: ...4 If you see a message other than the above follow the instructions 4 57 ...
Страница 62: ...Performing Changing Network Settings Canon Wi Fi Connection Assistant Screen Performing Network Settings 62 ...
Страница 79: ... TR9530 series TS3300 series E3300 series 79 ...
Страница 80: ...Handling Paper Ink Tanks etc Loading Paper Refilling Ink Tanks 80 ...
Страница 97: ...Refilling Ink Tanks Refilling Ink Tanks Checking Ink Level Ink Tips 97 ...
Страница 109: ...Adjusting Print Head Position 109 ...
Страница 120: ...120 ...
Страница 124: ...124 ...
Страница 127: ...Safety Safety Precautions Regulatory Information WEEE 127 ...
Страница 151: ...151 ...
Страница 155: ...Main Components Front View Rear View Inside View Operation Panel 155 ...
Страница 159: ...Repairing Your Printer I Print Head Holder The print head is pre installed 159 ...
Страница 168: ...Note When Wi Fi wired LAN or both are disabled the icon icon or both are not displayed 168 ...
Страница 192: ...9 Press the OK button 9 10 Enter the administrator password again 10 The administrator password is available 192 ...
Страница 197: ...6 Select ON and then press the OK button 6 197 ...
Страница 204: ...Information about Paper Supported Media Types Paper Load Limit Unsupported Media Types Handling Paper Print Area 204 ...
Страница 213: ...Printing Printing from Computer Printing from Smartphone Tablet Using PIXMA MAXIFY Cloud Link Paper Settings 213 ...
Страница 243: ...In such cases take the appropriate action as described Related Topic Canon IJ Status Monitor Description 243 ...
Страница 275: ...Printing Using Canon Application Software Easy PhotoPrint Editor Guide 275 ...
Страница 276: ...Printing from Smartphone Tablet Printing from iPhone iPad iPod touch iOS Printing from Smartphone Tablet Android 276 ...
Страница 311: ...Problems While Printing Scanning from Smartphone Tablet Cannot Print Scan from Smartphone Tablet 311 ...
Страница 315: ...For details about the functions of your printer see Specifications 315 ...
Страница 342: ...Errors and Messages Four Digit Alphanumeric Code Is Displayed on LCD When Error Occurred Message Is Displayed 342 ...
Страница 347: ...Try printing again once the current job is complete 347 ...
Страница 359: ...5 Hold jammed paper firmly with both hands 5 If the paper is rolled up pull it out and grasp the edges of the paper 359 ...
Страница 367: ... When transporting the printer for repairing it see Repairing Your Printer 367 ...


