background image

Basic Operation

48

With [

5

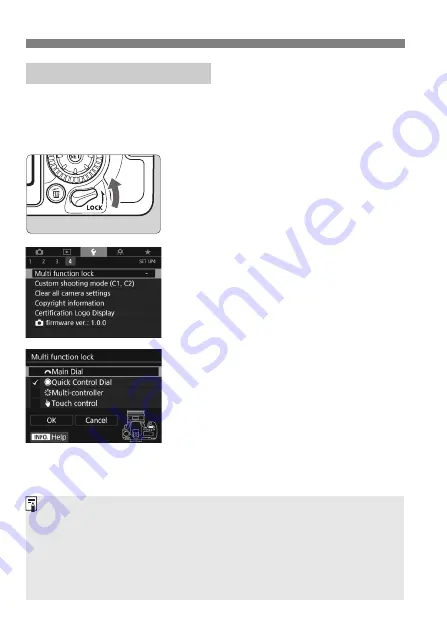
4: Multi function lock

] set and the <

R

> switch set 

upward, the camera prevents you from changing settings inadvertently 
by moving the Main Dial, Quick Control Dial, and Multi-controller or by 
touching the touch panel.

<

R

> switch set downward: Lock 

released
<

R

> switch set upward: Lock 

engaged

1

Select [Multi function lock].

Under the [

5

4

] tab, select [

Multi 

function lock

], then press <

0

>.

2

Add a checkmark [

X

] to the 

camera control to be locked.

Select a camera control and press 
<

0

> to add a checkmark [

X

].

Select [

OK

].

The selected camera controls will be 
locked when the multi function lock 
switch is in the locked position.

R

 Multi Function Lock

If the <

R

> switch is set upward and you try to use one of the locked 

camera controls (except when [

h

Touch control

] is set), <

L

> will be 

displayed in the viewfinder and on the LCD panel. On the shooting 
function settings display (p.49), [

LOCK

] will be displayed. During Live 

View shooting, [

LOCK

] will be displayed on the LCD monitor.

By default, when locked, the <

5

> dial will be locked.

In Basic Zone modes, only [

h

Touch control

] is settable.

Содержание EOS 80D (W)

Страница 1: ...Basic Instruction Manual E E Instruction manuals PDF files and software can be downloaded from the Canon Web site p 4 233 www canon com icpd Camera Wireless Function EOS 80D W...

Страница 2: ......

Страница 3: ...The Camera Basic Instruction Manual covers the most basic operations and functions Camera Basic Instruction Manual EOS 80D W...

Страница 4: ...miliarize Yourself with the Camera While reading this manual take a few test shots and see how they come out You can then better understand the camera Be sure to store this manual safely too so that y...

Страница 5: ...that the lenses are included Depending on the Lens Kit type lens instruction manuals may also be included Be careful not to lose any of the above items Item Check List Battery Pack LP E6N with protec...

Страница 6: ...n Manual Wireless Function Instruction Manual Camera and Wireless Function Basic Instruction Manual Lens Instruction Manuals Software Instruction Manuals 2 View the Instruction Manuals PDF files Doubl...

Страница 7: ...properly Also if you play back a movie on a card with a slow reading speed the movie may not play back properly To check the card s reading writing speed refer to the card manufacturer s Web site Comp...

Страница 8: ...tach the lens p 41 Align the lens s white or red mount index with the camera s mount index of the same color 4 Set the lens s focus mode switch to f p 41 5 Set the power switch to 1 then set the Mode...

Страница 9: ...ra will focus on the subject If necessary the built in flash will be raised 8 Take the picture p 44 Press the shutter button completely to take the picture 9 Review the picture The captured image will...

Страница 10: ...by pressing the M button to change its settings O When shown on the upper right of a page it indicates that the function is available only in the Creative Zone modes p 25 p Reference page numbers for...

Страница 11: ...oting 71 Setting the AF and Drive Modes 109 Image Settings 131 Advanced Operations 155 Shooting with the LCD Monitor Live View Shooting 173 Shooting Movies 197 Image Playback 215 Software Start Guide...

Страница 12: ...the Card 31 Using the LCD Monitor 34 Turning on the Power 35 Setting the Date Time and Zone 37 Selecting the Interface Language 40 Attaching and Detaching a Lens 41 Basic Operation 43 Q Quick Control...

Страница 13: ...ooting Candlelight Portraits 85 6 Shooting Night Portraits With a Tripod 86 F Shooting Night Scenes Handheld 87 G Shooting Backlit Scenes 88 2 Shooting Portraits 89 3 Shooting Landscapes 90 4 Shooting...

Страница 14: ...of Lens Peripheral Illumination and Aberrations 148 Reducing Flicker 152 Advanced Operations 155 d Program AE 156 s Shutter Priority AE 158 f Aperture Priority AE 160 Depth of Field Preview 161 a Man...

Страница 15: ...omputer 231 Software Start Guide 232 Downloading and Viewing the Software Instruction Manuals PDF Files 234 Downloading Images to a Computer 235 Index 241 For Troubleshooting guide and Specifications...

Страница 16: ...es connecting cables etc When disposing of a battery insulate the electrical contacts with tape Contact with other metallic objects or batteries may cause a fire or an explosion If excessive heat smok...

Страница 17: ...equipment To prevent a fire and electrical shock follow the safeguards below Always insert the power plug all the way in Do not handle a power plug with wet hands When unplugging a power plug grasp an...

Страница 18: ...tery leakage or explosion which will degrade the performance or shorten the life of the product Do not carry the camera around when it is attached to a tripod Doing so may cause an injury or an accide...

Страница 19: ...can cause the camera to malfunction The camera contains precision electronic circuitry Never attempt to disassemble the camera yourself Do not block the built in flash or mirror operation with your f...

Страница 20: ...ming up have the camera checked by your nearest Canon Service Center or check the camera yourself and make sure it is working properly If you use continuous shooting Live View shooting or movie shooti...

Страница 21: ...the card Do not store or use the card near anything that has a strong magnetic field such as a TV set speakers or magnets Also avoid places prone to having static electricity Do not leave the card in...

Страница 22: ...de Dial p 24 Mode Dial lock release button p 45 Microphones p 198 D Flash button p 170 Hot shoe Flash sync contacts EF S lens mount index p 41 Built in flash AF assist beam emitter p 170 113 EF lens m...

Страница 23: ...4 228 Serial number Q Quick Control button p 50 x Playback button p 216 L Erase button p 229 9 W X Y Z Multi controller p 47 Card slot p 31 0 Setting button p 52 Multi function lock switch p 48 5 Quic...

Страница 24: ...AF 9 AI Focus AF Z AI Servo AF K Servo AF 4 L Manual Focus p 127 192 Drive mode p 128 u Single shooting o High speed continuous shooting i Low speed continuous shooting B Silent single shooting M Sil...

Страница 25: ...uSY Built in flash recycling buSY Multi function lock warning L No card card error warning Card Card full warning FuLL Error code Err Aperture p 160 AF point selection MAF SEL N SEL AF y Flash exposur...

Страница 26: ...7 C Creative Auto p 78 8 Special scene p 82 v Creative filters p 95 P Food p 83 G HDR Backlight Control p 88 C Kids p 84 2 Portrait p 89 x Candlelight p 85 3 Landscape p 90 6 Night Portrait p 86 4 Clo...

Страница 27: ...shooting various subjects as desired d Program AE p 156 s Shutter priority AE p 158 f Aperture priority AE p 160 a Manual exposure p 162 F Bulb Custom shooting mode You can register the shooting mode...

Страница 28: ...lot Charge lamp Power plug IMPORTANT SAFETY INSTRUCTIONS SAVE THESE INSTRUCTIONS DANGER TO REDUCE THE RISK OF FIRE OR ELECTRIC SHOCK CAREFULLY FOLLOW THESE INSTRUCTIONS For connection to a supply not...

Страница 29: ...aching the Strap Pass the end of the strap through the camera s strap mount eyelet from the bottom Then pass it through the strap s buckle as shown in the illustration Pull the strap to take up any sl...

Страница 30: ...to a power outlet Recharging starts automatically and the charge lamp blinks in orange It takes approx 2 hr and 30 min to fully recharge a completely exhausted battery at room temperature 23 C 73 F Th...

Страница 31: ...ting in excess discharge and shorter battery life Store the battery with the protective cover attached Storing the battery when it is fully charged may lower the battery s performance The battery char...

Страница 32: ...and open the cover 2 Insert the battery Insert the end with the electrical contacts Insert the battery until it locks in place 3 Close the cover Press the cover until it snaps shut Open the cover and...

Страница 33: ...by the illustration face the card s label side toward you and insert it until it clicks in place 3 Close the cover Close the cover and slide it in the direction shown by the arrows until it snaps shut...

Страница 34: ...cover 2 Remove the card Gently push in the card then let go to eject it Pull the card straight out then close the cover Removing the Card The number of possible shots depends on the remaining capacity...

Страница 35: ...usehold power outlet accessories sold separately are used If the card already contains recorded images the image number may not start from 0001 If a card related error message is displayed on the LCD...

Страница 36: ...ver 180 to face the subject The indicated angle is only approximate 3 Face it toward you Normally use the camera with the LCD monitor facing you Using the LCD Monitor 180 175 90 Be careful not to forc...

Страница 37: ...ing the shutter button halfway p 44 to stop cleaning and take a picture If you repeatedly turn the power switch 1 2 at a short interval the f icon may not be displayed This is normal and not a malfunc...

Страница 38: ...play z x c m b n Level 100 70 69 50 49 20 19 10 9 1 0 Temperature Room Temperature 23 C 73 F Low Temperatures 0 C 32 F No Flash 1390 1250 50 Flash Use 960 860 Doing any of the following will exhaust t...

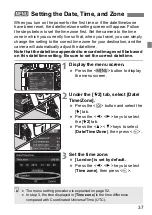
Страница 39: ...to recorded images will be based on this date time setting Be sure to set the correct date time 1 Display the menu screen Press the M button to display the menu screen 2 Under the 52 tab select Date...

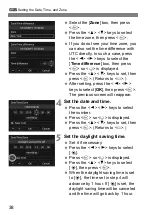
Страница 40: ...After setting press the Y Z keys to select OK then press 0 The previous screen will reappear 4 Set the date and time Press the Y Z keys to select the number Press 0 so r is displayed Press the W X key...

Страница 41: ...e reset in the following cases If this happens set the date time zone again When the camera is stored without the battery When the camera s battery becomes exhausted When the camera is exposed to belo...

Страница 42: ...t LanguageK Press the Q button and select the 5 tab Press the Y Z keys to select the 52 tab Press the W X keys to select the LanguageK then press 0 3 Set the desired language Press the W X keys to sel...

Страница 43: ...Turn the lens as shown by the arrow until it clicks in place 3 Set the lens s focus mode switch to AF AF stands for autofocus If it is set to MF manual focus autofocus will not operate 4 Remove the f...

Страница 44: ...g the Lens Do not look at the sun directly through any lens Doing so may cause loss of vision When attaching or detaching a lens set the camera s power switch to 2 If the front part focusing ring of t...

Страница 45: ...finger lightly on the shutter button 4 Press your arms and elbows lightly against the front of your body 5 To maintain a stable stance place one foot slightly ahead of the other 6 Press the camera ag...

Страница 46: ...sure is called camera shake It can cause blurred pictures To prevent camera shake note the following Hold and steady the camera as shown on the preceding page Press the shutter button halfway to autof...

Страница 47: ...dial to set the desired setting When the function selection ends or if you press the shutter button halfway the camera will be ready to shoot Use this dial to select or set the AF operation drive mod...

Страница 48: ...the shutter button halfway the camera will be ready to shoot Use this dial to select or set the AF operation drive mode ISO speed metering mode AF point selection etc 2 Turn the 5 dial only While loo...

Страница 49: ...ew shooting or movie shooting or scroll around magnified images during playback For menus and the Quick Control the Multi controller works only in the vertical and horizontal directions W X Y Z It doe...

Страница 50: ...trol to be locked Select a camera control and press 0 to add a checkmark X Select OK The selected camera controls will be locked when the multi function lock switch is in the locked position R Multi F...

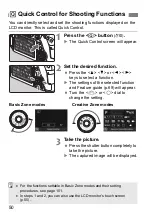
Страница 51: ...be displayed With the shooting function settings displayed you can turn the Mode Dial to see the settings for each shooting mode Pressing the Q button enables Quick Control of the shooting function s...

Страница 52: ...ttings of the selected function and Feature guide p 69 will appear Turn the 6 or 5 dial to change the setting 3 Take the picture Press the shutter button completely to take the picture The captured im...

Страница 53: ...creen Quick Control Shutter speed p 158 AF operation p 110 White balance correction Shooting mode 1 p 24 Highlight tone priority 2 p 147 Auto Lighting Optimizer p 142 Metering mode p 164 Picture Style...

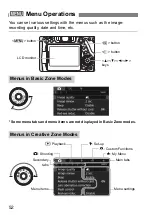
Страница 54: ...ome menu tabs and menu items are not displayed in Basic Zone modes 3 Menu Operations Menus in Basic Zone Modes Menus in Creative Zone Modes W X Y Z keys LCD monitor 0 button M button Q button Menu ite...

Страница 55: ...displayed when the z Shooting tab s 3 is selected 3 Select the desired item Press the W X keys to select the item then press 0 4 Select the setting Press the W X or Y Z keys to select the desired sett...

Страница 56: ...settable Dimmed Menu Items In step 2 you can also turn the 6 dial to select a menu tab In step 4 you can also turn the 5 dial to select certain settings In steps 2 to 5 you can also use the LCD monito...

Страница 57: ...frame will appear around the icon except on menu screens For example when you tap on Q the Quick Control screen appears By tapping on 2 you can return to the preceding screen Operations possible by ta...

Страница 58: ...finger on the screen Selecting a menu tab or item after pressing the M button Setting a scale control Quick Control Selecting AF points Setting functions during Live View shooting Setting functions du...

Страница 59: ...een Operations Since the LCD monitor is not pressure sensitive do not use any sharp objects such as your fingernail or a ballpoint pen for touch operations Do not use wet fingers for touch screen oper...

Страница 60: ...atted When the formatting is completed the menu will reappear For low level formatting press the L button to add a checkmark X to Low level format then select OK Before You Start 3 Formatting the Card...

Страница 61: ...by selecting Cancel Even in this case normal formatting will be completed and you can use the card as usual When the card is formatted or data is erased only the file management information is changed...

Страница 62: ...a set time of idle operation elapses The default setting is 1 min but this setting can be changed If you do not want the camera to turn off automatically set this to Disable After the power turns off...

Страница 63: ...ff when you press the shutter button halfway 1 Select LCD off on btn Under the 52 tab select LCD off on btn then press 0 2 Set the desired setting Select the desired setting then press 0 Remains on Di...

Страница 64: ...e AF operation One Shot AF Bulb timer Disable AF area selection mode Auto selection 45 pt AF Anti flicker shooting Disable Metering mode q Evaluative metering Mirror lockup Disable ISO speed settings...

Страница 65: ...balance Q Auto Ambience priority LCD off on button Remains on Touch control Standard Custom White Balance Canceled Date Time Zone Unchanged White balance correction Canceled Language Unchanged White b...

Страница 66: ...racking Movie recording quality Silent LV shooting Mode 1 MOV MP4 MP4 Movie recording size NTSC L6 Standard PAL L5 Standard Metering timer 8 sec Creative filters Disable Digital zoom Disable Sound rec...

Страница 67: ...ect Viewfinder display Under the 52 tab select Viewfinder display then press 0 2 Select Grid display 3 Select Show When you exit the menu the grid will appear in the viewfinder Displaying the Grid You...

Страница 68: ...can be displayed 2 Check the camera s tilt The horizontal tilt is displayed in 1 increments The tilt scale is marked in 5 increments When the red line turns green it indicates that the tilt is almost...

Страница 69: ...iewfinder display Under the 52 tab select Viewfinder display then press 0 2 Select Electronic level 3 Select Show 4 Press the shutter button halfway The electronic level will appear as shown in the il...

Страница 70: ...t source By default flicker detection is set to Show 1 Select Viewfinder display Under the 52 tab select Viewfinder display then press 0 2 Select Flicker detection 3 Select Show Displaying the Flicker...

Страница 71: ...hat mode function or option It also displays a description when you select a function or option with Quick Control The Feature guide turns off when you tap on the description or proceed with the opera...

Страница 72: ...the function s description Help If the Help fills more than one screen a scroll bar will appear on the right edge You can turn the 5 dial or press the W X keys to scroll Example z3 Long exp noise redu...

Страница 73: ...the camera sets everything automatically p 101 Also to prevent botched pictures due to misoperations advanced shooting function settings cannot be changed Basic Zon e Before Shooting in the 8 or v Mo...

Страница 74: ...mera will focus on the closest object Aiming the center of the Area AF frame over the subject will make focusing easier 3 Focus on the subject Press the shutter button halfway The lens focusing ring w...

Страница 75: ...p 44 If you are too close to the subject move away and try again When focus is achieved the AF points do not light up in red The AF points light up in red only when focus is achieved in low light cond...

Страница 76: ...the 7 Flash Off mode and shoot p 77 The built in flash fired and the picture came out extremely bright Move further away from the subject and shoot When shooting with flash if the subject is too close...

Страница 77: ...called focus lock Focus lock is also possible in other Basic Zone modes except 5 C In the A mode if the subject moves distance to camera changes during or after focusing AI Servo AF will take effect...

Страница 78: ...itor 3 Focus on the subject Press the shutter button halfway to focus When focus is achieved the AF point will turn green and the beeper will sound 4 Take the picture Press the shutter button complete...

Страница 79: ...light when camera shake is prone to occur the viewfinder s shutter speed display will blink Hold the camera steady or use a tripod When using a zoom lens use a wide angle to reduce blur caused by came...

Страница 80: ...ative Auto 1 Set the Mode Dial to C 2 Press the Q button 7 The Quick Control screen will appear 3 Set the desired function Press the W X or Y Z keys to select a function The settings of the selected f...

Страница 81: ...re you start shooting 1 Ambience based shots You can select and shoot with the ambience you want to convey in your images Turn the 6 or 5 dial to select the ambience You can also select it from a list...

Страница 82: ...n slider adjustments may not be selectable indicated by If you use Live View shooting you can see how the image is blurred in front of and behind the point of focus When you turn the 6 or 5 dial Simul...

Страница 83: ...ppressing the camera noise during viewfinder shooting M Silent continuous shooting You can shoot up to approx 3 0 shots per second continuously while suppressing the camera noise during viewfinder sho...

Страница 84: ...d shooting mode s icon Turn the 6 or 5 dial to select a shooting mode You can also select the shooting mode icon and press 0 to display a selection of shooting modes from which you can select one Avai...

Страница 85: ...u use flash the light may reflect off the dish or food and results in unnatural shadows By default b Built in flash off is set Try to prevent camera shake when shooting in low light conditions P Shoot...

Страница 86: ...u want to take the picture press the shutter button completely If you hold down the shutter button you can shoot continuously while maintaining autofocusing to capture changes in the subject s facial...

Страница 87: ...er s shutter speed display will blink Hold the camera steady or use a tripod When using a zoom lens use the wide angle end to reduce blur caused by camera shake even while handholding the camera Chang...

Страница 88: ...matically to obtain a good exposure of the subject It is recommended to play back the image after shooting to check the image brightness If the subject looks dark move nearer and shoot again Also shoo...

Страница 89: ...de four shots are aligned and merged into a single image However if there is significant misalignment in any of the four shots due to camera shake they may not align properly in the final image For sh...

Страница 90: ...firmly While shooting hold the camera firmly and steadily In this mode three shots are aligned and merged into a single image However if there is significant misalignment in any of the three shots du...

Страница 91: ...ut better against an uncluttered dark background Use a telephoto lens If you have a zoom lens use the telephoto end to fill the frame with the subject from the waist up Move in closer if necessary Foc...

Страница 92: ...ects near and far will be in focus better than at the telephoto end It also adds breadth to landscapes Shooting night scenes The 3 mode is also good for night scenes because it disables the built in f...

Страница 93: ...ance Some lenses have indications such as MACRO 0 39m 1 3ft on them The lens minimum focusing distance is measured from the V focal plane mark on the top of the camera to the subject If you are too cl...

Страница 94: ...ss the shutter button completely If you hold down the shutter button you can shoot continuously while maintaining autofocusing to capture changes in the subject s movement Viewfinder shooting max appr...

Страница 95: ...R Backlight Control You cannot select RAW or RAW JPEG If RAW is set the image will be recorded in the 73 quality Also if RAW JPEG is set the image will be recorded in the set JPEG quality If you shoot...

Страница 96: ...also appear External flash coverage When using a Speedlite with automatic flash coverage setting the zoom position will be fixed to the wide end regardless of the lens s zoom position When using a Sp...

Страница 97: ...e camera saves only the image with the Creative filter applied For the effects marked with an asterisk you can also take a picture without a Creative filter then apply the effect afterward and save it...

Страница 98: ...e Y Z keys to adjust the filter effect then press 0 7 Take the picture Press the shutter button completely to take the picture To return to viewfinder shooting press the 0 button to exit Live View sho...

Страница 99: ...s set continuous shooting cannot be set Dust Delete Data will not be appended to images shot with Fish eye effect applied c is set to b Flash Off by default Try to prevent camera shake when shooting i...

Страница 100: ...tap T on the bottom right of the screen you can switch between the white frame s vertical and horizontal orientations The camera focuses on the center of the white frame During viewfinder shooting ai...

Страница 101: ...f you shoot a moving subject the subject s movement may leave afterimages or the surrounding area of the subject may become dark The image alignment may not function properly with repetitive patterns...

Страница 102: ...en in each Basic Zone mode 1 Set the Mode Dial to a Basic Zone mode 2 Press the Q button 7 The Quick Control screen will appear 3 Set the desired function Press the W X or Y Z keys to select a functio...

Страница 103: ...k k k k k k k k k k k k k k k k k Built in flash firing a Automatic firing o o o o D Flash on Fires at all times k k k k k b Flash off k o k o k o o Ambience based shots p 102 k k k k k k Light scene...

Страница 104: ...ess the W X keys to select 1 Standard setting Ambience based shots will appear on the screen Press the Y Z keys to select the desired ambience The LCD monitor will display how the image will look with...

Страница 105: ...mode or set the power switch to 2 the setting will revert back to 1 Standard setting The Live View image shown with the ambience setting applied will not look exactly the same as the actual image Usi...

Страница 106: ...photo look more impressive than with 1 Standard setting 3 Soft The subject will look softer and more dainty Good for portraits pets flowers etc 4Warm The subject will look softer with warmer colors G...

Страница 107: ...r The picture will look brighter 8 Darker The picture will look darker 9 Monochrome The picture will be monochrome You can select the monochrome color to be blue black and white or sepia When Monochro...

Страница 108: ...02 you should first set Light scene based shots This will make it easier to see the resulting effect on the LCD monitor 1 Set the Mode Dial to 8 Set one of the following C 2 3 4 or 5 2 Set the Live Vi...

Страница 109: ...en press the shutter button completely to take the picture If you change the shooting mode or set the power switch to 2 the setting will revert back to e Default setting If you use flash the setting w...

Страница 110: ...may look too bluish and for light colored flowers SCloudy For subjects under overcast skies Makes skin tones and landscapes which may otherwise look dull on a cloudy day look warmer Also effective fo...

Страница 111: ...select the AF operation and drive mode that best match the shooting conditions and subject The O icon at the upper right of the page title indicates that the function is available only in Creative Zo...

Страница 112: ...for the respective shooting mode 1 Set the lens s focus mode switch to AF 2 Turn the Mode Dial to a Creative Zone mode 3 Press the f button 9 4 Select the AF operation While looking at the LCD panel...

Страница 113: ...dicator AF point If focus cannot be achieved the focus indicator o in the viewfinder will blink If this occurs the picture cannot be taken even if the shutter button is pressed completely Recompose th...

Страница 114: ...ervo AF automatically if a still subject starts moving After the subject is focused in One Shot AF if the subject starts moving the camera will detect the movement change the AF operation automaticall...

Страница 115: ...t in Flash AF assist beam will not be emitted from the built in flash in 7 or 8 35 modes or when Built in flash firing is set to b in A C 8 PCF24 or v GWXHcZ modes The AF assist beam will not be emitt...

Страница 116: ...one The AF area is divided into nine focusing zones for focusing G Large Zone AF Manual selection of zone The AF area is divided into three focusing zones left center and right for focusing H 45 point...

Страница 117: ...changes The AF area selection mode currently set is indicated on the top of the viewfinder Selecting the AF Area Selection Mode AF area selection mode With 8C Fn II 8 Select AF area selec mode you ca...

Страница 118: ...by shifting horizontally with the 6 dial or vertically with the 5 dial In the Zone AF mode turning the 6 or 5 dial will change the zone in a looping sequence Selecting the AF Point Manually 6 5 When y...

Страница 119: ...Pressing the S or B button lights up the AF points that are cross type AF points for high precision autofocusing The blinking AF points are horizontal line or vertical line sensitive For details see p...

Страница 120: ...maximum aperture of f 5 6 or faster and some f 8 lenses Since it has a horizontal pattern it can detect vertical lines It covers all 45 AF points The focusing sensor is geared for lenses with a maxim...

Страница 121: ...ing on the lens The lenses are thereby classified into eight groups from A to H When using a lens in Groups E to H fewer AF points will be usable See which group each lens belongs to on pages 123 126...

Страница 122: ...nts is possible All the AF area selection modes are selectable Cross type AF point Subject tracking is superior and high precision focusing is achieved AF points sensitive to horizontal lines Autofocu...

Страница 123: ...ontal lines Disabled AF points not displayed Autofocusing with only 35 points is possible Not possible with all 45 AF points All the AF area selection modes are selectable During automatic AF point se...

Страница 124: ...or and high precision focusing is achieved AF points sensitive to horizontal lines Disabled AF points not displayed Autofocusing is possible only with the center AF point Cross type AF point Subject t...

Страница 125: ...USM A EF35mm f 1 4L USM A EF35mm f 1 4L II USM A EF35mm f 2 A EF35mm f 2 IS USM A EF40mm f 2 8 STM A EF50mm f 1 0L USM A EF50mm f 1 2L USM A EF50mm f 1 4 USM A EF50mm f 1 8 A EF50mm f 1 8 II A EF50mm...

Страница 126: ...I II III B EF400mm f 2 8L IS USM Extender EF2x I II III B EF400mm f 2 8L IS II USM A EF400mm f 2 8L IS II USM Extender EF1 4x I II III B EF400mm f 2 8L IS II USM Extender EF2x I II III B EF400mm f 4 D...

Страница 127: ...28 105mm f 3 5 4 5 USM B EF28 105mm f 3 5 4 5 II USM B EF28 105mm f 4 5 6 F EF28 105mm f 4 5 6 USM F EF28 135mm f 3 5 5 6 IS USM B EF28 200mm f 3 5 5 6 B EF28 200mm f 3 5 5 6 USM B EF28 300mm f 3 5 5...

Страница 128: ...4x I II H f 8 EF100 400mm f 4 5 5 6L IS II USM Extender EF1 4x III G f 8 EF200 400mm f 4L IS USM Extender 1 4x B EF200 400mm f 4L IS USM Extender 1 4x With built in Ext 1 4x B EF200 400mm f 4L IS USM...

Страница 129: ...g until the subject looks sharp in the viewfinder MF Manual Focus Focusing ring If you press the shutter button halfway during manual focusing the AF point that achieved focus and the focus indicator...

Страница 130: ...when Servo AF is set the maximum speed will be max approx 5 0 shots sec i Low speed continuous shooting Max approx 3 0 shots sec While you hold down the shutter button completely the camera will shoo...

Страница 131: ...M is set the time lag from when you press the shutter button completely until the picture is taken will be slightly longer than normal With Live View shooting B and M cannot be set The continuous sho...

Страница 132: ...t up and the beeper will sound faster j Using the Self timer If you do not look through the viewfinder when you press the shutter button attach the eyepiece cover If stray light enters the viewfinder...

Страница 133: ...ding quality ISO speed Picture Style white balance Auto Lighting Optimizer noise reduction lens aberration correction anti flicker shooting and other functions The O icon at the upper right of the pag...

Страница 134: ...To select a JPEG setting press the Y Z keys On the upper right of the screen M megapixels x indicates the recorded pixel count and is the number of possible shots displayed up to 999 Press 0 to set i...

Страница 135: ...burst applies to o high speed continuous shooting Figures in parentheses apply to an UHS I class 16 GB card based on Canon s testing standards Image Quality Pixels Recorded Printing Size File Size MB...

Страница 136: ...will be recorded simultaneously to the card in both RAW and JPEG at the image recording qualities that were set The two images will be recorded with the same file numbers file extension JPG for JPEG a...

Страница 137: ...ithin ISO 100 ISO 16000 in 1 3 stop increments A indicates ISO Auto The ISO speed will be set automatically When the screen shown on the left is displayed you can press the B button to set it to AUTO...

Страница 138: ...t to ISO 25600 cannot be selected p 147 Shooting in high temperatures may result in images that look grainier Long exposures can also cause irregular colors in the image When you shoot at high ISO spe...

Страница 139: ...to The color tone will be adjusted automatically to suit the scene The colors will look vivid for blue skies greenery and sunsets particularly in nature outdoor and sunset scenes P Standard The image...

Страница 140: ...r of a subject that is captured in sunlight at a color temperature of 5200K will be adjusted to match the subject s colorimetrical color For subdued images with modest brightness and color saturation...

Страница 141: ...ity is set 1 Select White balance Under the z2 tab select White balance then press 0 2 Select a white balance setting Select the desired setting then press 0 Approx Applicable with Speedlites having a...

Страница 142: ...y you can increase the intensity of the image s warm color cast when shooting a tungsten light scene If you select Qw White priority you can reduce the intensity of the image s warm color cast If you...

Страница 143: ...etting Qw White priority The warm color cast of subjects may fade When multiple light sources are included on the screen the warm color cast of the picture may not be lessened When using flash the col...

Страница 144: ...ge will be recorded with the brightness and contrast corrected if necessary 3 Auto Correction of Brightness and ContrastN Depending on the shooting conditions noise may increase If a setting other tha...

Страница 145: ...Select the desired noise reduction level then press 0 M Multi Shot Noise Reduction This applies noise reduction with higher image quality than High For a single photo four shots are taken continuously...

Страница 146: ...fter shooting it may take some time to record an image to the card for noise reduction and merging the images During the processing of the images buSY will be displayed in the viewfinder and on the LC...

Страница 147: ...then press 0 Auto For exposures of 1 sec or longer noise reduction is performed automatically if noise typical of long exposures is detected This Auto setting is effective in most cases Enable Noise...

Страница 148: ...il the noise reduction process is completed Images taken at ISO 1600 or higher may look grainier with the Enable setting than with the Disable or Auto setting With Enable if a long exposure is shot wi...

Страница 149: ...18 gray to bright highlights The gradation between the grays and highlights becomes smoother 3 Take the picture The image will be recorded with highlight tone priority applied 3 Highlight Tone Priori...

Страница 150: ...rection then press 0 2 Select the setting Check that Correction data available is displayed for the attached lens Select Peripheral illumin then press 0 Select Enable then press 0 3 Take the picture T...

Страница 151: ...lect Enable then press 0 2 Take the picture The image will be recorded with the chromatic aberration corrected 1 Select the setting Check that Correction data available is displayed for the attached l...

Страница 152: ...orporating the correction data it is not necessary to register the correction data to the camera Lens Correction Data When distortion correction is enabled the camera records an image range narrower t...

Страница 153: ...nified view during Live View shooting the peripheral illumination correction will not be reflected in the image displayed on the screen The correction amount will be less if the lens used does not hav...

Страница 154: ...used by the flicker 3 Reducing FlickerN When Enable is set and you shoot under a flickering light source the shutter release time lag may become longer Also the continuous shooting speed may become sl...

Страница 155: ...t shots in advance is recommended If G is not displayed in the viewfinder under 52 Viewfinder display set Flicker detection to Show p 68 When the camera reduces the effects of the flicker when you sho...

Страница 156: ...154 MEMO...

Страница 157: ...aperture adjusting the exposure as you prefer etc The O icon at the upper right of the page title indicates that the function is available only in Creative Zone modes d s f a F After you press the sh...

Страница 158: ...bject Then press the shutter button halfway When focus is achieved the focus indicator o on the viewfinder s bottom right will light up when in One Shot AF mode The shutter speed and aperture will be...

Страница 159: ...ts The functions you can set are limited With d mode only the shutter speed and aperture are set automatically You can freely set the AF operation metering mode and other functions Program Shift In th...

Страница 160: ...a blurred effect giving the impression of motion s stands for Time value 1 Set the Mode Dial to s 2 Set the desired shutter speed While looking at the LCD panel turn the 6 dial 3 Focus on the subject...

Страница 161: ...a higher ISO speed If the highest f number blinks it indicates overexposure Turn the 6 dial to set a faster shutter speed until the aperture stops blinking or set a lower ISO speed Shutter Speed Disp...

Страница 162: ...ke less of the foreground and background fall within acceptable focus f stands for Aperture value aperture opening 1 Set the Mode Dial to f 2 Set the desired aperture While looking at the LCD panel tu...

Страница 163: ...r set a higher ISO speed If the 8000 shutter speed blinks it indicates overexposure Turn the 6 dial to set a slower aperture higher f number until the shutter speed blinking stops or set a lower ISO s...

Страница 164: ...If it cannot be set set the R switch downward then turn the 6 or 5 dial 4 Focus on the subject Press the shutter button halfway The exposure setting will be displayed in the viewfinder and on the LCD...

Страница 165: ...n amount is set Under z2 Auto Lighting Optimizer if the checkmark X for Disabled in M or B modes is removed Auto Lighting Optimizer can be set even in the a mode p 142 When ISO Auto is set you can pre...

Страница 166: ...etering e Center weighted average metering q Evaluative metering General purpose metering mode suited even for backlit subjects The camera adjusts the exposure automatically to suit the scene w Partia...

Страница 167: ...ted more heavily With q Evaluative metering the exposure setting will be locked when you press the shutter button halfway and focus is achieved In the w Partial metering r Spot metering and e Center w...

Страница 168: ...et the exposure compensation amount While looking in the viewfinder or at the LCD panel turn the 5 dial If it cannot be set set the R switch downward then turn the 5 dial If you set exposure compensat...

Страница 169: ...EB range Turn the 6 dial to set the AEB range Press the Y Z keys to set the exposure compensation amount Press 0 to set it When you exit the menu the AEB range will be displayed on the LCD panel 3 Tak...

Страница 170: ...ra will automatically stop shooting When Q or k is set the three bracketed shots will be taken continuously after a 10 sec or 2 sec delay You can set AEB in combination with exposure compensation If t...

Страница 171: ...that the exposure setting is locked AE lock Each time you press the A button the current exposure setting is locked 3 Recompose and take the picture If you want to take more pictures while maintainin...

Страница 172: ...250 sec 30 sec Manually set F Exposure continues while you hold down the shutter button or while the bulb timer is operating Manually set Flash Photography in the f Mode To obtain a correct flash exp...

Страница 173: ...ISO 6400 3 4 27 4 11 2 89 9 2 1 17 1 6 9 56 1 Flash cannot be used with movie shooting It will not fire AEB cannot be used with flash Detach any lens hood when shooting with the built in flash If a le...

Страница 174: ...172 MEMO...

Страница 175: ...hooting Movie shooting switch to A If you handhold the camera and shoot while viewing the LCD monitor camera shake may cause blurred images Using a tripod is recommended Remote Live View Shooting With...

Страница 176: ...n the screen to select the face or subject p 190 4 Take the picture Press the shutter button completely The picture is taken and the captured image is displayed on the LCD monitor When the playback di...

Страница 177: ...not point the camera toward an intense light source such as the sun or an intense artificial light source Doing so may damage the image sensor or the camera s internal components General Live View Sho...

Страница 178: ...u Tracking o FlexiZone Multi d FlexiZone Single AEB FEB Highlight tone priority Histogram Image recording quality Touch shutter Wi Fi function Picture Style Auto Lighting Optimizer HDR shooting Multip...

Страница 179: ...exposure setting Note that noise may be more noticeable than the actual image recorded When the 8 FG mode is set shooting with flash in Basic Zone modes or Expo simulation Enable in Creative Zone mod...

Страница 180: ...era will focus only once When focus is achieved the AF point will turn green and the beeper will sound While you hold down the shutter button halfway the focus will be locked You can then recompose th...

Страница 181: ...flash photography the continuous shooting speed will become slower When focus is achieved the AF point will turn blue The beeper will not sound in this case The exposure is set at the moment the pictu...

Страница 182: ...button 2 Select the AF method Turn the 6 dial to select the AF method then press 0 Focusing with AF AF Method Selecting the AF Method You can also set the AF method with z5 AF method the z3 tab in Ba...

Страница 183: ...the face you want to focus on You can also tap on the LCD monitor screen to select the face or subject If the subject is not a face z will be displayed 3 Focus on the subject Press the shutter button...

Страница 184: ...tion If the subject s face is significantly out of focus face detection will not be possible Adjust the focus manually p 192 so that the face can be detected then perform AF An object other than a hum...

Страница 185: ...ill appear on the LCD monitor 2 Select the AF point O Pressing 0 or the L button will toggle between automatic selection and zone selection In Basic Zone modes automatic selection is set automatically...

Страница 186: ...exposure then press the shutter button completely to take the picture p 174 If the camera does not focus on the desired target subject with automatic AF point selection select a zone or switch the AF...

Страница 187: ...displayed in a larger size 2 Move the AF point Use 9 to move the AF point to where you want to focus It cannot be moved to the edge of the screen Pressing 0 or the L button will return the AF point t...

Страница 188: ...Focusing with AF AF Method 186 4 Take the picture Check the focus and exposure then press the shutter button completely to take the picture p 174...

Страница 189: ...one or image center with automatic selection will be magnified If you press the shutter button halfway the display will return to normal and the camera will focus When FlexiZone Single is set and you...

Страница 190: ...color or pattern keeps changing Night scenes or points of light The image flickers under fluorescent or LED lighting Extremely small subjects Subjects at the edge of the picture Strongly backlit or r...

Страница 191: ...fer to the Canon Web site If you shoot a peripheral subject and it is slightly out of focus aim the center AF point or zone over the subject to focus focus again and then take the picture The AF assis...

Страница 192: ...on the spot to focus and shoot y Touch shutter Disable You can tap on a spot to perform focusing on where you want to focus Press the shutter button completely to take the picture 3 Tap on the screen...

Страница 193: ...If the Miniature effect Creative filter is set the touch shutter does not work If FlexiZone Multi and y Touch shutter Disable are set with a Basic Zone mode focusing cannot be performed by tapping on...

Страница 194: ...to the position where you want to focus You can also tap it to move it Pressing 0 or L button will return the magnifying frame to the screen s center 4 Magnify the image Each time you press the u but...

Страница 195: ...focusing ring to focus After achieving focus press the u button to return to the normal view 6 Take the picture Check the exposure then press the shutter button completely to take the picture p 174 I...

Страница 196: ...photos will deteriorate It is recommended that you temporarily exit Live View shooting and allow the camera to cool down before shooting again The red E icon indicates that the Live View shooting will...

Страница 197: ...low light if you set the 52 LCD brightness to a bright setting noise or irregular colors may appear in the Live View image However the noise or irregular colors will not be recorded in the captured im...

Страница 198: ...196 MEMO...

Страница 199: ...witch to k For cards that can record movies see page 5 If you handhold the camera and shoot movies camera shake can cause blurred movies Using a tripod is recommended in such cases Full HD 1080 Full H...

Страница 200: ...ct Before shooting a movie focus with AF or manual focus p 180 189 192 When you press the shutter button halfway the camera will focus with the current AF method 4 Shoot the movie Press the 0 button t...

Страница 201: ...ock After applying AE lock during movie shooting you can cancel it by pressing the S button AE lock setting is retained until you press the S button In Creative Zone modes you can set the R switch dow...

Страница 202: ...SO 25600 Even if you set Minimum to ISO 200 or higher and Maximum to ISO 3200 or lower the range will be set within ISO 100 ISO 6400 automatically If z3 Highlight tone priority is set to Enable p 147...

Страница 203: ...n the ISO speed see the next page 4 Set the shutter speed and aperture Press the shutter button halfway and check the exposure level indicator To set the shutter speed turn the 6 dial The settable shu...

Страница 204: ...a movie at ISO 16000 may result in much noise it is designated as an expanded ISO speed displayed as H When switching from still photo shooting to movie shooting check the ISO speed settings before s...

Страница 205: ...modes M Manual exposure N Time lapse movie Movie recording size AE lock AF method c u Tracking o FlexiZone Multi d FlexiZone Single Battery level Frame rate ISO speed Recording level Manual Wireless...

Страница 206: ...or the camera is connected to a TV set with an HDMI cable the electronic level cannot be displayed The electronic level grid lines or histogram cannot be displayed during movie shooting The display wi...

Страница 207: ...under fluorescent or LED lighting the movie may flicker Shooting a few test movies is recommended where you will perform zooming during movie shooting Zooming during movie shooting may result in reco...

Страница 208: ...so focus on the image by pressing the p button Stereo sound is recorded by the camera s built in microphones Most external stereo microphones equipped with a 3 5 mm diameter mini plug can be used With...

Страница 209: ...d and other functions You can select the movie s recording format D MOV The movie is recorded in the MOV format file extension MOV Convenient for editing with a computer C MP4 The movie is recorded in...

Страница 210: ...Rate fps frames per second 6 29 97 fps 8 59 94 fps For areas where the TV system is NTSC North America Japan South Korea Mexico etc 5 25 00 fps 7 50 00 fps For areas where the TV system is PAL Europe...

Страница 211: ...gh the file size is larger than with IPB Standard and IPB Light the movie is better suited for editing In MP4 Format X IPB Standard Compresses multiple frames at a time efficiently for recording Xv IP...

Страница 212: ...Minute Movie Recording Quality Total Recording Time on Card File Size 4 GB 16 GB 64 GB L 654 W 5 min 23 min 1 hr 33 min 654 MB min Movie Recording Quality Total Recording Time on Card File Size 4 GB 1...

Страница 213: ...The maximum recording time of one movie clip is 29 min 59 sec If the movie shooting time reaches 29 min 59 sec the movie shooting will stop automatically You can start shooting a movie again by press...

Страница 214: ...l movie shooting time depending on the shooting conditions If you use a tripod or if the Image Stabilizer is not necessary it is recommended to set the IS switch to 2 The camera s built in microphones...

Страница 215: ...card has a fast writing speed the indicator will either not appear or the level if displayed will hardly go upward First shoot a few test movies to see if the card can write fast enough Playback and...

Страница 216: ...214 MEMO...

Страница 217: ...basic procedures to play back images and movies Images shot and saved with another device The camera may not be able to properly display images captured with a different camera edited with a computer...

Страница 218: ...s starting with the last image captured turn the 5 dial counterclockwise To play back images starting with the first captured image turn the dial clockwise Each time you press the B button the informa...

Страница 219: ...216 you can press the W X keys to change the shooting information displayed at the screen s bottom as follows For details see pages 219 220 Shooting Information Display Detailed information Lens aberr...

Страница 220: ...gth Eye Fi card transmission status Playback number Total images recorded Protect images Eye Fi transfer completed Battery level Image recording quality Highlight tone priority ISO speed Exposure comp...

Страница 221: ...will be displayed for still photos taken as test shots for time lapse movies u will be displayed for images shot with the Creative filter function and for images that are processed RAW image processi...

Страница 222: ...length Histogram display RGB White balance information Picture Style information 1 Color space Noise reduction information Lens aberration correction information Picture Style information 2 If you us...

Страница 223: ...napshots The t icon will be displayed for HDR movies Sample Movie Information Display Movie shooting mode Time lapse movie Movie file size Shutter speed Compression method Movie recording size Shootin...

Страница 224: ...s 9 36 images 9 100 images Pressing the u button will switch the display as follows 100 images 9 36 images 9 9 images 9 4 images 9 1 image 2 Select an image Turn the 5 dial to move the orange frame an...

Страница 225: ...e magnification If you hold down the button the magnification will be reduced to the single image display 2 Scroll around the image Use 9 to scroll around the magnified image To exit magnified view pr...

Страница 226: ...er image With index display also touch the LCD monitor with one finger You can browse to the next or previous screen by swiping your finger up or down Swipe up to see the next newer images or swipe do...

Страница 227: ...display it as a single image Spread two fingers apart Touch the screen with two fingers together then spread your fingers apart on the screen As you spread your fingers the image will be magnified The...

Страница 228: ...s 0 to switch to the single image display 3 In the single image display press 0 The movie playback panel will appear at the bottom of the screen 4 Play back the movie Select 7 Play then press 0 The mo...

Страница 229: ...ame v Background music Plays back a movie with the selected background music X Edit Displays the editing screen Playback position mm ss Playback time minutes seconds 9 Volume Turn the 6 dial to adjust...

Страница 230: ...screen The movie will start playing back To display the movie playback panel tap s1 on the upper left of the screen To pause the movie while it is playing back tap on the screen The movie playback pa...

Страница 231: ...image Select Erase then press 0 The image displayed will be erased L Erasing Images Erasing a Single Image Once an image is erased it cannot be recovered Make sure you no longer need the image before...

Страница 232: ...230 MEMO...

Страница 233: ...This chapter explains the following Overview of the software for EOS DIGITAL cameras How to download and install the software on a computer How to download and view the Software Instruction Manuals PD...

Страница 234: ...cted to the camera Also you can copy background music tracks such as EOS Sample Music to the card You can use the background music as the soundtrack for a video snapshot album movie or slide show play...

Страница 235: ...file A drive icon and installer file will appear on the desktop If the installer file does not appear double click the drive icon to display it 2 Double click the installer file The installer starts 2...

Страница 236: ...country or region of residence and download the Instruction Manuals 2 View the Software Instruction Manuals PDF files Double click a downloaded Instruction Manual PDF file to open it To view the Instr...

Страница 237: ...cable to the camera s digital terminal with the cable plug s D icon facing the front of the camera Connect the plug to the computer s USB terminal 3 Use EOS Utility to download the images Refer to the...

Страница 238: ...the card into the card reader 3 Use Digital Photo Professional to download the images Refer to the Digital Photo Professional Instruction Manual Downloading Images with a Card Reader When downloading...

Страница 239: ...ce are trademarks or registered trademarks of HDMI Licensing LLC All other trademarks are the property of their respective owners About MPEG 4 Licensing This product is licensed under AT T patents for...

Страница 240: ...tion of non genuine Canon accessories e g a leakage and or explosion of a battery pack Please note that this warranty does not apply to repairs arising out of the malfunction of non genuine Canon acce...

Страница 241: ...ular installation If this equipment does cause harmful interference to radio or television reception which can be determined by turning the equipment off and on the user is encouraged to try to correc...

Страница 242: ...information on how to recycle this battery For CA USA only Included lithium battery contains Perchlorate Material special handling may apply See www dtsc ca gov hazardouswaste perchlorate for details...

Страница 243: ...L I For editing I only 209 Ambience based shots 102 Angle of view 42 Anti flicker shooting 152 Aperture priority AE 160 Area AF frame 114 Auto Lighting Optimizer 142 Auto power off 35 60 Autofocus 9 A...

Страница 244: ...ye effect 98 Flash Speedlite Built in flash 170 Effective range 171 Flash off 77 101 Flash sync contacts 20 Focus indicator 72 Focus lock 75 Focus mode switch 41 127 192 Focusing 9 AF Focusing point A...

Страница 245: ...ti 183 FlexiZone Single 185 Information display 176 Manual focusing MF 192 Possible shots 175 LOCK 48 Long exposure noise reduction 145 Low speed continuous shooting 128 M M Manual exposure 162 201 Ma...

Страница 246: ...Pressing halfway 44 Program AE 156 Program shift 157 Q Q Quick Control 50 100 Quick Control Dial 46 R RAW 132 133 134 RAW JPEG 132 Recharging 28 Reduced display 222 Release shutter without card 32 S...

Страница 247: ...cus 97 Software 232 Speaker 226 Special scene mode SCN 82 Sports 92 Spot metering 164 S RAW Small RAW 133 134 Stop down aperture 161 174 Strap 27 T Tapping 55 Temperature warning 194 212 Time zone 37...

Страница 248: ...246 MEMO...

Страница 249: ...sic Instruction Manual basic operation procedures for easy to use Connect to a smartphone Transfer images between cameras and Save images to Connect Station are explained Wireless Function Basic Instr...

Страница 250: ...Introduction What You Can Do Using the Wireless Functions CANON iMAGE GATEWAY 7 Send images to a Web service 1 Connect to a smartphone 5 Print images using a Wi Fi printer 2 Transfer images between ca...

Страница 251: ...to Connect Station sold separately wirelessly to save images 4 D Operate remotely using EOS Utility Connect the camera to a computer wirelessly and operate the camera remotely using EOS Utility EOS s...

Страница 252: ...ction Manual PDF file The Wireless Function Instruction Manual PDF file can be downloaded from the Canon Web site p 4 Easy Connection Using the NFC Function Instruction Manual Note that Canon cannot b...

Страница 253: ...e NFC Function W 21 Connecting with Easy Connection W 24 Operating the Camera Using a Smartphone W 28 Reconnecting W 31 Sending Images to a Smartphone W 33 Easy Connection Between Cameras W 39 Connect...

Страница 254: ...trol Dial W X Y Z Indicates the direction to push the Multi controller 0 Indicates the Setting button In addition to the above the icons and symbols used on the camera s buttons and displayed on the L...

Страница 255: ...W 7 1 Preparation and Basic Operation This chapter describes how to register a nickname for identification necessary for using the camera s wireless functions and the basic operations...

Страница 256: ...ce Be sure to set a nickname as otherwise you cannot set the wireless functions 1 Select Wireless communication settings Under the 51 tab select Wireless communication settings then press 0 2 Select N...

Страница 257: ...ers between 1 to 10 characters in length 4 Exit the setting When you are finished press the M button Select OK on the confirmation dialog and press 0 to return to the menu screen Since the nickname is...

Страница 258: ...ng the entry mode Select E at the bottom right of the bottom entry area Each time you press 0 the entry mode will change as follows Lower case 9 Numerals Symbols 1 9 Numerals Symbols 2 9 Upper case Wh...

Страница 259: ...select Wireless communication settings then press 0 2 Select Wi Fi NFC 3 Select Enable When a nickname for identification is not registered a registration screen is displayed See page W 8 to register...

Страница 260: ...e portal screen for setting the wireless functions Select an item and press 0 to display the setting screen then specify the settings On the Wireless communication settings screen you can set the foll...

Страница 261: ...e Remote control EOS Utility Print from Wi Fi printer View images on DLNA devices Upload to Web service Send images to smartphone While the camera is connected to a smartphone use this function to sen...

Страница 262: ...her device with a cable you cannot select 51 Wireless communication settings Disconnect the cable before changing any settings Cards For z l o and m the camera cannot be connected wirelessly if there...

Страница 263: ...Easy connection Wireless Connection Status LCD panel Wi Fi function Connection status Wi Fi function Not connected Connected Connection error Blinking Connection status Wi Fi function Wireless signal...

Страница 264: ...W 48 When using the NFC function follow the steps below to set the camera s NFC setting 1 Select Wi Fi NFC 2 Add X to Allow NFC connections Displayed when Wi Fi NFC is set to Enable Press the B button...

Страница 265: ...printers using the NFC function A connection cannot be established using the NFC function while shooting with the camera when there is no card when the LCD monitor is closed with the screen facing in...

Страница 266: ...refer to the download site of Camera Connect When an NFC enabled smartphone is touched to the camera before installing Camera Connect the download screen of Camera Connect will be displayed on the sma...

Страница 267: ...images to a smartphone Operate the camera to take a picture or change camera settings using a smartphone Send images to a smartphone from the camera This section explains how to connect the camera dir...

Страница 268: ...ction by selecting Easy connection Smartphones labeled with the p mark are NFC enabled Some smartphones are not labeled with the p mark even if they are NFC enabled if you do not know whether your sma...

Страница 269: ...tting NFC setting and NFC antenna position refer to the smartphone s instruction manual 1 Enable the NFC function on the camera and smartphone p W 16 2 Touch a smartphone to the camera If an image is...

Страница 270: ...again Select OK and press 0 After a message is displayed the qWi Fi on screen will appear The main window of Camera Connect will be displayed on the smartphone To return to the menu press the M button...

Страница 271: ...ing the position or rotating horizontally Another application on the smartphone may start depending on how you touch Check the position of the p mark then touch again When touching the smartphone to t...

Страница 272: ...ired For details refer to the smartphone s instruction manual 1 Select Wireless communication settings Under the 51 tab select Wireless communication settings then press 0 2 Select Wi Fi function Set...

Страница 273: ...the SSID network name displayed on the camera s LCD monitor For the password enter the encryption key displayed on the camera s LCD monitor Operation on the Smartphone SSID network name Camera s scre...

Страница 274: ...on the smartphone When the Waiting to connect screen is displayed on the camera s LCD monitor start Camera Connect on the smartphone 7 Select the camera to connect to on the smartphone Select and tou...

Страница 275: ...r The main window of Camera Connect will be displayed on the smartphone To return to the menu press the M button The settings for connecting to a smartphone are now complete For operations after setti...

Страница 276: ...amera can be viewed Images stored in the camera can be saved on a smartphone Operations such as deletion can be performed on images stored in the camera Remote shooting The camera s Live View image ca...

Страница 277: ...artphone s Camera Connect screen tap t On the camera s qWi Fi on screen select Disconnect exit If the qWi Fi on screen is not displayed select the 51 tab 9 Wireless communication settings 9 Wi Fi func...

Страница 278: ...s video snapshot time lapse movie Creative filters RAW image processing cropping resize In remote shooting the AF speed may become slower Depending on the connection status image display or shutter re...

Страница 279: ...le then select Wi Fi function 2 Select the Wi Fi function to connect to Press the W X or Y Z keys to select an item then press 0 3 Select Connect When settings for multiple connection destinations are...

Страница 280: ...s been changed restore the setting to connect to the camera or the same access point as the camera If you do not know the SSID of the destination when reconnecting select Review change settings 9 Conf...

Страница 281: ...ack an image on the camera touch an NFC enabled smartphone to the camera to send the image If a connection has already been established wirelessly terminate the connection and then play back an image...

Страница 282: ...is selected in step 2 the multiple image selection screen will appear See step 3 on page W 37 While the camera is connected to a smartphone wirelessly select Send images to smartphone in Wireless comm...

Страница 283: ...nd images from the Quick Control screen during playback 1 Connect the camera to a smartphone wirelessly 2 Play back the image and press the Q button 3 Select q 4 Select the images to send Select and s...

Страница 284: ...select Resize image and press 0 Select Send img shown and press 0 to send the image displayed When the transfer is complete the screen for step 1 will reappear To send another image repeat steps 1 an...

Страница 285: ...button you can select images from a three image display After selecting the images to send press the Q button 4 Select Resize image Set it if necessary On the displayed screen select an image size the...

Страница 286: ...ng the NFC function while the camera is connected to another device wirelessly In addition the camera cannot be connected to multiple smartphones at the same time Even if MOV format movies are display...

Страница 287: ...cannot be connected to Canon camcorders even if they have built in wireless functions The camera cannot be connected to Canon cameras without built in wireless functions even if they support Eye Fi ca...

Страница 288: ...ct Wi Fi function Set Wi Fi NFC to Enable then select Wi Fi function 3 Select z Transfer imgs between cameras 4 Start the connection on the target camera When the screen on the left is displayed on th...

Страница 289: ...er setting up a connection see page W 42 Note that GPS information is not displayed on the camera s playback screen even if GPS information is appended to the received image Shooting locations can be...

Страница 290: ...ch to send the image select Resize image and press 0 Select Send img shown and press 0 to send the image displayed When the transfer is complete the screen for step 1 will reappear To send another ima...

Страница 291: ...and press 0 3 Select the images to send Turn the 5 dial to select an image to send then add X Press 0 to add or remove X By pressing the I button you can select images from a three image display Afte...

Страница 292: ...total size make sure that the battery is adequately charged so it does not run out during the process Depending on the functionality of the target camera the movie files will be converted when they ar...

Страница 293: ...le then select Wi Fi function 2 Select the Wi Fi function to connect to Press the W X or Y Z keys to select an item then press 0 3 Select Connect When settings for multiple connection destinations are...

Страница 294: ...W 46 Reconnecting 4 Operate the target device Perform the reconnection procedure on the target camera as well By default settings are named after the nickname of the camera that was connected to...

Страница 295: ...eparately is a device that allows you to import captured still photos and movies for viewing on your TV set smartphone etc or sharing them over a network You can easily save still photos and movies to...

Страница 296: ...and Connect Station then hold the camera s p mark close to the Connect Station s NFC connect point When a message indicating the connection is displayed on the camera s LCD monitor and Connect Statio...

Страница 297: ...ith the camera When holding the camera close to Connect Station do not leave anything between the camera and Connect Station In addition when a case is attached to the camera communication may not be...

Страница 298: ...or operated in conjunction with any other antenna or transmitter except Canon accessories supplied or designated for this product The available scientific evidence does not show that any health proble...

Страница 299: ...marks or registered trademarks of Microsoft Corporation in the United States and or other countries Macintosh and Mac OS are trademarks of Apple Inc registered in the U S and other countries The Wi Fi...

Страница 300: ...E Eye Fi Card W 14 I iOS W 18 K Keyboard W 10 N NFC W 16 W 20 W 21 W 48 Sending images W 33 Nickname W 8 Q Quick Control W 35 R Reconnecting W 31 W 45 Reducing the image size W 37 W 43 Remote operatio...

Страница 301: ...W 53 MEMO...

Страница 302: ...W 54 MEMO...

Страница 303: ...W 55 MEMO...

Страница 304: ...W 56 MEMO...

Страница 305: ...W 57 MEMO...

Страница 306: ...W 58 MEMO...

Страница 307: ......

Страница 308: ...are current as of February 2016 For information on the compatibility with any products introduced after this date contact any Canon Service Center For the latest version Instruction Manual refer to th...

Отзывы: