background image

27

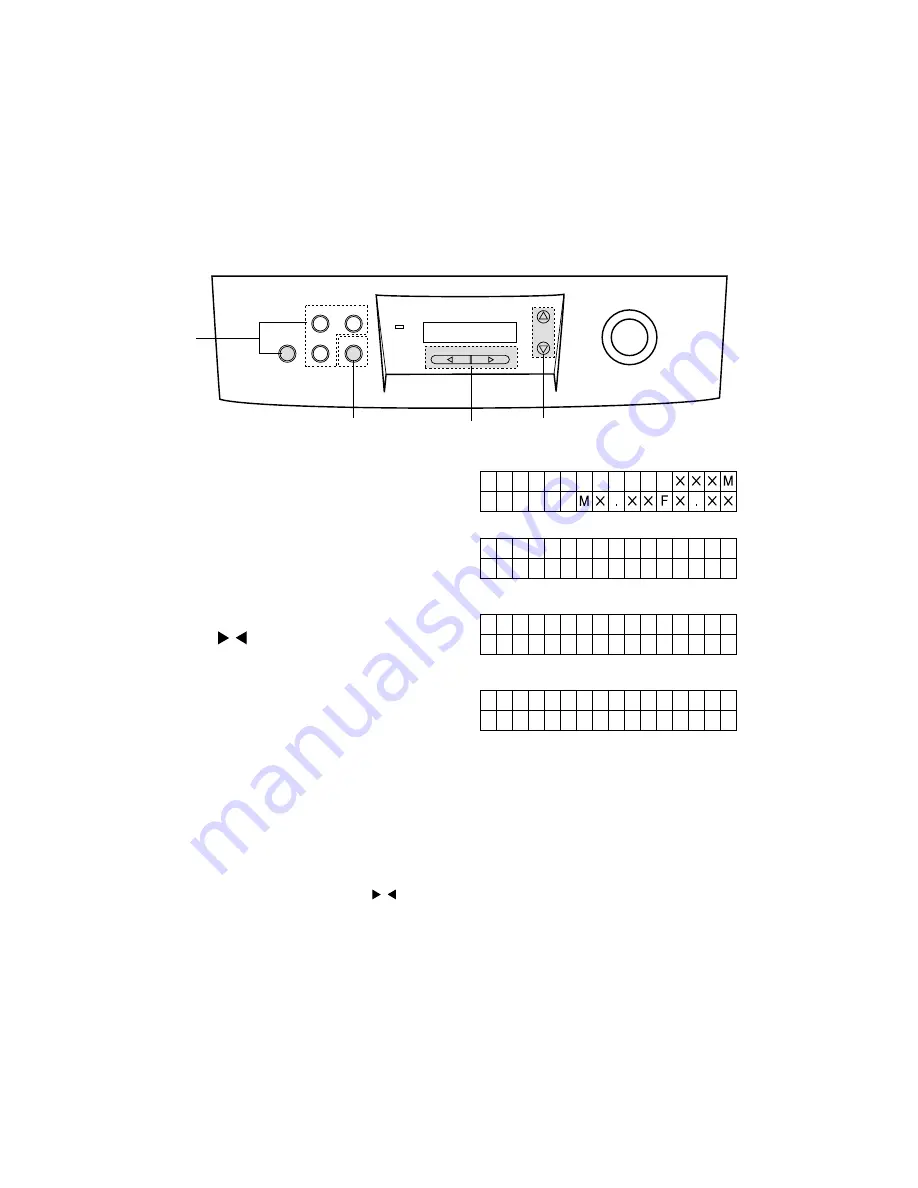
Performing SCSI and other settings with the Others menu

Use the Others key to open the Other menu to define the SCSI ID for the scanner, terminator setting,
buzzers sound setting, confirm the scanner version number, and so on.

Note:

 These settings can be performed only with the scanner display panel.

Display panel

Scan

Counter

Imprint

Home

DR - 4580U

Ready/Error

Select

Mode

Start / Stop

Others

Setting up the scanner

1

Press the Others key.

2

Press the up or down Mode arrow
key (


) to display the setting that

you want to select. (

 28)

3

Press the right or left Select key
(   ) to display the settings for the
selected mode.

4

To save the setting and return to
standby (Ready) press the Home
key.
-or-
If you want to perform other settings
before returning to standby, press
the desired menu key.

Scan

 19

Counter

 24

Imprint

 26

Press the right or left Select key (   ) to select the settings then press the Home key when you are
finished.

2

3

1

4

0 1 . V e r s i o n

0 2 . B u z z e r

O N

0 3 . S C S I

I D

N o . 0

R e a d y

Содержание DR-4580U

Страница 1: ...Instructions Please read these instructions carefully before using this product and save them for future reference ...

Страница 2: ... interference in which case the user will be required to correct the interference at his own expense Do not make any changes or modifications to the equipment unless otherwise specified in the manual If such changes or modifications should be made you could be required to stop operation of the equip ment RADIO INTERFERENCE REGULATIONS For 120V models This digital apparatus does not exceed the Clas...

Страница 3: ... La prise secteur devra se trouver à proximité de l appareil et être facilement accessible Le produit ne devra être utilisé qu avec le cordon d alimentation fourni par le fabricant Deutsch Warnung Zur Verhütung von Feuer dem und elektrischem Schlag dieses Erzeugnis nicht Regen oder sonstiger Feuchtigkeit aussetzen Die Steckdose muß nahe bei diesem Gerät angebracht und leicht zugänglich sein Dieses...

Страница 4: ...electrical shock if the cut off plug is inserted into any 13 amp socket If a new plug is to be fitted please observe the wiring code as shown below If in any doubt please consult a qualified electrician WARNING This appliance must be earthed IMPORTANT The wires in this mains lead are coloured in accordance with the following code Green and Yellow Earth Blue Neutral Brown Live As the colours of the...

Страница 5: ...ed Use only the power cord and plug provided with the scanner To avoid serious injury or damage to the scanner never disassemble the scanner Some parts inside the scanner become extremely hot and carry high voltage Never use flammable aerosol products near the scanner such as adhesive sprays air fresheners insect repel lent etc Before cleaning the scanner always switch off the power and disconnect...

Страница 6: ...void dusty air and high humidity To avoid breaking the document glass never place anything on top of the scanner Before connecting the power cord to the scanner confirm that the power source meets the rated power specifications printed on the name plate of the scanner When you remove the power cord from the power source grip it by the plug Never pull on the cord to remove the plug from the socket ...

Страница 7: ...ting the imprinter 25 Performing SCSI and other settings with the Others menu 27 Operating the scanner 30 Using the ADF 30 ADF loading guidelines 30 Documents you should never load in the ADF 30 Loading documents in the ADF 31 Feeding a document manually from the ADF 34 Using the flatbed to scan documents 35 Loading the flatbed 35 Loading the flatbed for repeated scanning 37 Using control sheets 3...

Страница 8: ...single sided documents Scanning docu ments placed on the flatbed is also extremely fast Flatbed scanning The flatbed allows you to scan bound documents and originals that are too thin or fragile to feed from the ADF Variety of scanning modes The following modes can be selected for scanning jobs Single sided or double sided documents Automatic feed of stacked documents or single manual feed Text bl...

Страница 9: ...ontinuous scanning CIS Contact Image Sensor used to scan the back sides of originals document The documents that you scan from the ADF or the flatbed of the scanner parent software application The software application that you use to operate the scanner The scanner operates with ISIS or TWAIN compliant software application Choosing a location for the scanner Follow these recommendations on these c...

Страница 10: ...r near office equipment or an appliance that generates a strong magnetic field The elec trical noise from such a device could interfere with operation of the scanner Never attempt to place or operate the scanner in a vertical position To avoid poor performance caused by static electricity never operate the scanner on top of a carpet Power source Use a power source with a voltage level that does no...

Страница 11: ...m is missing contact the supplier Note Save the original box and packing material for re packing the scanner if you need to transport it Document Scanner DR 4580U Manuals Blower Power cord ISIS TWAIN Driver Operating Instructions Before you begin License Agreement Setup CD ROM Registration card Warranty ...

Страница 12: ...ill not be able to use the scanner 1 Pull the scanner out 15 cm 6 in over the edge of a desk or worktable as shown in the illustration Caution To prevent the scanner from falling do not allow the scanner to overhang the edge of the table by more than 15 cm 6 in To avoid damaging the scanner never turn it upside down or lay it on its side 2 When moving the scanner install the metal clamp on the bot...

Страница 13: ...n tray Power switch On O Off Fan exhaust vent Imprinter door top door Open this door to install the imprinter or ink cartridge Connectors Connect the scanner and host computer Power cord Display panel Displays short messages when performing settings Power indicator The green lamp lights when the power is turned on When an error occurs the color changes to red steady or flashing In the sleep mode t...

Страница 14: ...12 Before you begin Standard mark Document glass Flatbed Cover sheet white sheet CIS glass Scanning section glass With the document cover open With the ADF open ...

Страница 15: ...ys the previous value in the selected mode Scan Scan Opens the Scan setting menu on the LCD Counter Counter Opens the Counter setting menu to you can set the number of documents to scan Imprint Imprint Opens the imprint menu so you can stamp scanned documents Others Others Opens the Others menu so you can set the SCSI device numbers and perform other important settings Home Home Saves the settings...

Страница 16: ...ing to the end of a scanning job When the job is finished Ready is displayed S t o p p i n g W a i t 1 2 3 4 5 6 Displayed immediately after pressing Start Stop during a scanning job When the Start Stop key is pressed during a scanning job the job is cancelled If you press Start Stop again after stopping scanning to perform scanner settings the settings display returns S c a n n e r S t o p p e d ...

Страница 17: ...sure that the fan exhaust vent is not blocked There should be at least 250 mm 9 8 in of open space behind the scanner WARNING THE SCANNER COULD BECOME EXTREMELY HOT IF THE FAN EXHAUST VENT IS BLOCKED RESULTING IN A FIRE MAKE SURETHIS AREA IS CLEAR AT ALL TIMES 3 Turn on the scanner s power page 16 Be sure to turn on the scanner s power before turning on the power to the computer When using daisy c...

Страница 18: ...earch for a suitable driver for my device recommended and then click Next to proceed to the Locate Driver Files screen 3 Clear all of the checkmarks in the Optional search locations and then click Next to pro ceed to the Driver Files Search Results screen 4 Select Disable the device and then click Finish With the Found New Hardware Wizard Windows XP select Install the software automati cally Recom...

Страница 19: ... u a g e E n g l i s h L e t t e r R e a d y 1 If the scanner is on switch it off 2 Press and hold down the Home key then switch on the scanner Release the Home key when you see the message High Speed Scanner in the LCD then wait until the lan guage selection display appears 3 Press the up or down mode keys to display the name of the language of your choice 4 Press the Home key and release it The ...

Страница 20: ... your host computer Display panel Scan Counter Imprint Home DR 4580U Ready Error Select Mode Start Stop Others Setting up the scanner 1 Press the Scan key 2 Press the up or down Mode arrow key to display the scanning mode that you want to select 19 3 Press the right or left Select key to display the settings for the selected mode 4 To save the setting and return to standby Ready press the Home key...

Страница 21: ...ont side halftone Sets gradation for the front side of document pages 0 4 F H a l f t o n e H o s t Host Binary Bayer dither 64 Bayer dither 16 Halftone dot 32 Halftone dot 64 Error diffusion Dynamic Th Dynamic Threshold does not appear if expansion memory DIMM is not installed To use Dynamic Threshold contact your service representative for installation of expansion memory DIMM 05 Back side dropo...

Страница 22: ... Black line removal When enabled removes the black lines that appear at the top and 1 1 B L K L R e m o v e i n e H o s t bottoms of scanned images Host Disable Enable 12 Scanning mode Sets scanning for actual document size or reduced 1 2 S c a n n i n g M o d e H o s t Host Fit to Page Actual Actual scans at 100 actual page size Some data on page edges may be lost Fit to Page shrinks image to fit...

Страница 23: ...nning speed 1 6 F e e d S p e e d H o s t Host Slow Normal Fast 17 Detect skew Determines whether the scanner detects skewed document feed when pages feed into the ADF at an angle Detect Not detect Detect Skewed feed is detected and paper feed is stopped Not detect Skewed feed is not detected 18 Save scanning conditions Selects the memory bank to which scanning conditions 01 to 17 are saved Memory...

Страница 24: ...alues Note When scanning confidential documents make sure that the number of pages scanned displayed in the LCD matches the actual number of pages scanned The double feed detection warning may be set off by thick or creased documents pages with correction fluid on them and document pages with punched holes When scanning these types of documents you should set the sensitivity for double feed detect...

Страница 25: ...y 2 Press the up or down Mode arrow key to display the setting that you want to select 24 3 Press the right or left Select key to display the settings for the selected mode 4 To save the setting and return to standby Ready press the Home key or If you want to perform other settings before returning to standby press the desired menu key Scan 19 Imprint 26 Others 28 4 3 2 1 0 1 D i s p C o u n t e r...

Страница 26: ...ter with a counter value of 301 and in increment of 2 Pages actually scanned 1 2 3 4 5 6 Counter display 303 305 307 309 311 313 02 Setting the user counter Selects the default number 0 9999999 before scanning Press to increase the user counter by one Press once to de crease the user counter by one Pressing and holding down or rapidly increases or decreases the value in units of 10 02 Setting the ...

Страница 27: ...ng up the scanner 1 Press the Imprint key 2 Press the up or down Mode arrow key to display the setting that you want to select 26 3 Press the right or left Select key to display the settings for the selected mode 4 To save the setting and return to standby Ready press the Home key or If you want to perform other settings before returning to standby press the desired menu key Scan 19 Counter 24 Oth...

Страница 28: ... the starting posi tion from the top of the page Enter a text string 0 10 mm or 0 4 in to 72 characters wide 182 8 mm or 7 2 in Here is an illustration of the example above The two letters print 14 8 mm 0 6 in from the top Top of the paper 14 8mm 0 6in 10mm 0 4in 4580 4580 Top of the printout when the imprinter start position is set to 2 characters Spaces fill out stamps shorter than 7 characters ...

Страница 29: ...etting up the scanner 1 Press the Others key 2 Press the up or down Mode arrow key to display the setting that you want to select 28 3 Press the right or left Select key to display the settings for the selected mode 4 To save the setting and return to standby Ready press the Home key or If you want to perform other settings before returning to standby press the desired menu key Scan 19 Counter 24 ...

Страница 30: ... a b l e Disable Enable Select Enable if the scanner is the last device on the SCSI device chain Even if Enable is selected the scanner s terminator does not function when the power is turned off In this case connect a standard SCSI terminator if you will be using the computer with the scanner powered off Changes in this setting become effective after the power is cycled off and on 05 Setting the ...

Страница 31: ...Displays the product ID of the scanner 0 8 P r o d u c t I D D R 4 5 8 0 U 09 Setting the sleep mode Sets the time after which the scanner enters the sleep mode 0 9 S l e e p M o d e A f t e r 1 5 m i n After 1 min After 60 min Disable Selecting the sleep mode makes it possible to minimize power consump tion by the scanner In order to meet ENERGY STAR requirements upon shipment from the factory th...

Страница 32: ...that point have been properly stored Note that skewed document feed and double feeding are more likely to occur when feeding pages of mixed sizes Always remove scanned documents from the document cover If the scanner does not scan a document in the hopper which is black or very dark on the opposite side add a white sheet of plain paper under the sheet When scanning a stack of different size sheets...

Страница 33: ...ts and make sure all fasteners such as staples pins etc have been removed 2 Tap the top edge and left edge of the stack against a flat surface to align the sheets 3 Check the manual feed selector and make sure that it is set for AUTO and set the document guide slightly larger than the actual size of the sheets Operating the scanner Align left edge Align top edge Manual feed selector Document guide...

Страница 34: ...d Landscape For nonstandard paper sizes make sure you align the left edge of the stack with the left side of the hopper and make sure the top edge is straight when you insert it into the feed slot If the edges of sheets in the stack curl the sheets may skew when feeding After loading the stack press down the edges with your hand to remove any curl 5 Slide the document guide to the right side of th...

Страница 35: ...actual length of the document pages by pressing down slightly and sliding it in the direction of the arrow Index card size document Pull up the exit substopper com pletely Caution Make sure the exit substopper is always down when it is not in use Leaving it fully extended could cause paper jams Operating the scanner Hopper extension tray Document cover Exit document stopper Index card Scan directi...

Страница 36: ...o set the ADF to feed one sheet at a time 1 Set the manual feed selector to MANUAL The hopper rises automatically to the cor rect height for manual feeding 2 Set the document guide to the width of the sheet 3 Insert one sheet into the feed slot Manual feed selector Document guide Feed slot ...

Страница 37: ...ace down on the document glass If the sheet is bent or creased flatten it before you load it Place the sheet on the document glass with the upper left corner of the sheet at the alignment mark and the short and long sides arranged as shown in the il lustrations Check the alignment of the sheet If it is not straight it will not be scanned cor rectly Operating the scanner Document cover Document Ali...

Страница 38: ...canning thick originals If you are scanning an open book or thick magazine do not close the docu ment cover To keep the document glass clean avoid touching it To ensure a good scanned image do not allow the original to shift on the document glass during scanning WARNING TO AVOID EYE FATIGUE OR POSSIBLE INJURYTOYOUR EYES NEVER LOOK DIRECTLY INTO THE SCANNING LAMP WHILE SCANNING LARGE ORIGI NALS WIT...

Страница 39: ... completely to separate it from the document cover 2 Follow the steps in the previous section to load the original on the flatbed for scanning 35 to 36 When you are finished scanning close the document cover slowly 3 Close the ADF With your hands on both sides of the ADF press down slowly and gently with even pressure on both sides until you hear it lock in place Caution To avoid damaging the hopp...

Страница 40: ... with the scanner Preparation of control sheets Please note the following when printing out control sheets Print control sheets on the specified paper size Do not enlarge or reduce the print size Set the printer margins so that the barcode pattern is located 25 mm from the leading edge of the paper and so that it is centered on the page 25mm Page center Example with A4 printout Example with A3 pri...

Страница 41: ...e the jammed sheet Removing a jammed paper from the feed slot 1 While pressing down the ADF door release open the ADF door and pull out the jammed sheet 2 Press down evenly and slowly on both sides of the ADF door until it locks in place When closing the ADF door press down evenly on both sides to ensure that it latches shut correctly ADF door ADF door release inside the ADF Feed slot ADF door Ope...

Страница 42: ...d remove the jammed sheet Slide the exit document stopper Pull out the Front door release located under the hopper The ADF and document cover sepa rate Raise the ADF and remove the jammed sheet 2 Close the ADF With your hands on both sides of the ADF press down slowly and gently with even pressure on both sides until you hear it lock in place Caution To avoid damaging the hopper extension tray nev...

Страница 43: ...experiencing these problems clean the rollers document sensor double feed detection sensor and paper detection sensor If the problem persists after cleaning purchase a Exchange Roller Kit sold separately and replace the feed rollers separation rollers and retard rollers If you see black or white streaks in your scanned images clean all the parts in the scanning area including the CIS glass white p...

Страница 44: ...ation Caution To prevent the rollers from moving out of position you must wipe them clean in the direction recom mended in the illustration The retard roller especially must be wiped in one direction to prevent it from moving out of position Cleaning the scanner Rollers to be cleaned are shaded Retard roller Wipe side to side to clean all rollers other than the retard roller see above Wipe in the ...

Страница 45: ... cover separate Raise the ADF and open it com pletely 6 Soak a clean cloth in a weak solu tion of water and mild detergent then wring the cloth out tightly Use the cloth to wipe the surfaces of the rollers Hold a roller in place to prevent it from rotating during cleaning and wipe it in the direction recommended in the illus tration Caution If the sensor roller comes loose during cleaning reattach...

Страница 46: ...ion tray to close the ADF Cleaning the scanning path Cleaning the scanning glass the CIS glass the white plate the sensor roller the document sensor the double feed detection sensor and the paper detection sensor 1 Switch the scanner off and discon nect the scanner power cord from the power source 2 Pull out the ADF door release and open the ADF door Cleaning the scanner ADF Hopper extension tray ...

Страница 47: ...ection sensors and paper detection sensor Cleaning the scanner Paper detection sensor Double feed detection sensor Document sensors Double feed detection sensor To clean the document double feed and paper de tection sensors remove the brush from the blower and blow out the dirt through the holes Blower ...

Страница 48: ... ADF door press down evenly on both sides to ensure that it latches shut correctly 5 Open the ADF Pull out the exit document stop per in the direction of the arrow Below the hopper pull out the Front door release The ADF and document cover separate Raise the ADF and open it com pletely Cleaning the scanner ADF Document cover Exit document stopper Front door release ADF door ...

Страница 49: ... during cleaning reattach it after clean ing is completed 49 7 Close the ADF With your hands on both sides of the ADF press down slowly and gently with even pressure on both sides until you hear it lock in place Caution To avoid damaging the hopper extension tray never press down on the hopper extension tray to close the ADF Cleaning the scanner Document sensors To clean the document sensor remove...

Страница 50: ... cover 2 Soak a clean cloth in a weak solu tion of water and mild detergent then wring the cloth out tightly Use the cloth to clean the document glass and the cover sheet 3 Slowly close the document cover Document cover Document glass Cover sheet Cleaning the scanner ...

Страница 51: ...e bushings on both ends of the shaft into the guide grooves matching the flat sides of the bush ings with the flat sides of the of the guide grooves 3 After reattaching the sensor roller press it lightly with your finger and confirm that it easily moves up and down Cleaning the scanner Left Side Gear Bushing sensor roller Guide groove Flat side of bushing Attach the right side in the same way ...

Страница 52: ...6 6 A 0 0 0 0 0 0 4 B 0 0 0 B M 4 6 B M 4 6 B M 4 6 5 B 0 0 0 0 B M 4 6 B M 4 6 6 B 0 0 0 0 0 0 1 1 7 1 0 0 B M 4 6 B M 4 6 B M 4 6 B M 8 2 1 l a g e L 0 0 0 B M 4 6 B M 4 6 B M 4 6 r e t t e L 0 0 0 0 B M 4 6 B M 4 6 Duplex 256 shades of gray i p d n o i t u l o s e R e z i S r e p a P 0 0 1 0 0 2 0 0 3 0 0 4 0 0 5 0 0 6 3 A 0 0 B M 4 6 B M 4 6 B M 8 2 1 B M 6 5 2 4 A 0 0 B M 4 6 B M 4 6 B M 4 6 ...

Страница 53: ... cord not plugged in Insert the power cord completely Scanned image has black dots or white patches after scanning from the flatbed Document glass and cover sheet are dirty Clean the document glass and cover sheet 48 Scanned image has vertical lines The sensor roller scanning glass or rollers are dirty Clean all the parts of the scanning section 41 Scanned image is blank Original was loaded face d...

Страница 54: ...ocument was skewed Open the ADF and remove the stopped document 39 U 2 0 S k e w E r r o r Originals are still in the scanner Remove all documents in the ADF Error Message Table Possible Cause Remedy LCD Rollers are dirty Clean the rollers 41 W a r n C l e a n R o i n g l l e r Rollers require replacement Replace the rollers W a r n R e p l a c e i n g R o l l e r Double feed occurred Check the AD...

Страница 55: ...Thickness for ADF Single paper feeding 0 05 to 0 15 mm 2 0 to 5 9 mils Continuous paper feeding 0 06 to 0 15 mm 2 4 to 5 9 mils Note 1 mil 1 1000 in Weight for ADF Single sheet feed 40 127 gsm 10 6 to 34 lb Continuous feed 50 127 gsm 13 to 34 lb Hopper capacity Max 200 sheets not to exceed the load limit mark External dimensions 464 732 328 mm 18 3 28 8 12 9 in w d h Weight 31 kg 68 lb Power ratin...

Страница 56: ...hreshold 19 20 E Emphasis 19 Error message 52 Exit document stopper 11 Exit substopper 11 Expanding memory 50 F Fan exhaust vent 11 Feed speed 21 Flatbed 12 Front door 11 Front door release 11 H Halftone 19 Home key 13 Hopper 11 Hopper extension tray 11 I Imprint key 13 Imprinter 25 Starting location 26 Imprinter door 11 L LCD 13 14 Selecting the display language 17 M Manual feed 34 Manual feed se...

Страница 57: ...ing mode 20 Scanning section glass 12 SCSI ID 28 Select keys 13 Sensor roller 49 Sleep mode 14 29 Standard mark 12 Start Stop key 13 Switching the scanner on off 16 T Terminator 28 U Unpacking 9 User counter 24 Using the ADF 30 Using the flatbed 35 ...

Страница 58: ......

Страница 59: ......

Страница 60: ...G 59 61 1185XB AMSTELVEEN THE NETHERLANDS CANON LATIN AMERICA INC 703 WATERFORD WAY SUITE 400 MIAMI FLORIDA 33126 U S A CANON AUSTRALIA PTY LTD 1 THOMAS HOLT DRIVE NORTH RYDE SYDNEY N S W 2113 AUSTRALIA CANON SINGAPORE PTE LTD 79 ANSON ROAD 09 01 06 SINGAPORE 079906 CANON HONG KONG CAMPANY LTD 10 F LIPPO SUN PLAZA 28 CANTON ROAD TSIMSHATSUI KOWLOON HONG KONG PUB CE IE 401A 0102P0 3 CANON ELECTRONI...

Отзывы: