background image

CHAPTER 4  IMAGE PROCESSING SYSTEM

4-6

COPYRIGHT © 2002 CANON INC.        CANON CLC1100/1130/1150/1160/1180 REV.2 FEB. 2002 PRINTED IN JAPAN (IMPRIME AU JAPON)

B. Shading Correction

The output of the CCD will not necessarily be uniform even if the light it receives is from an

original of even density. To make up for any discrepancy, shading correction is performed and the
data (collected while scanning an original) is corrected to generate data representing uniform light
distribution.

Measurements for correction are taken when the power switch is turned on and at the end of

copying operation, thus preparing for the next copying job.

Part 2>Chapter 3>2.1

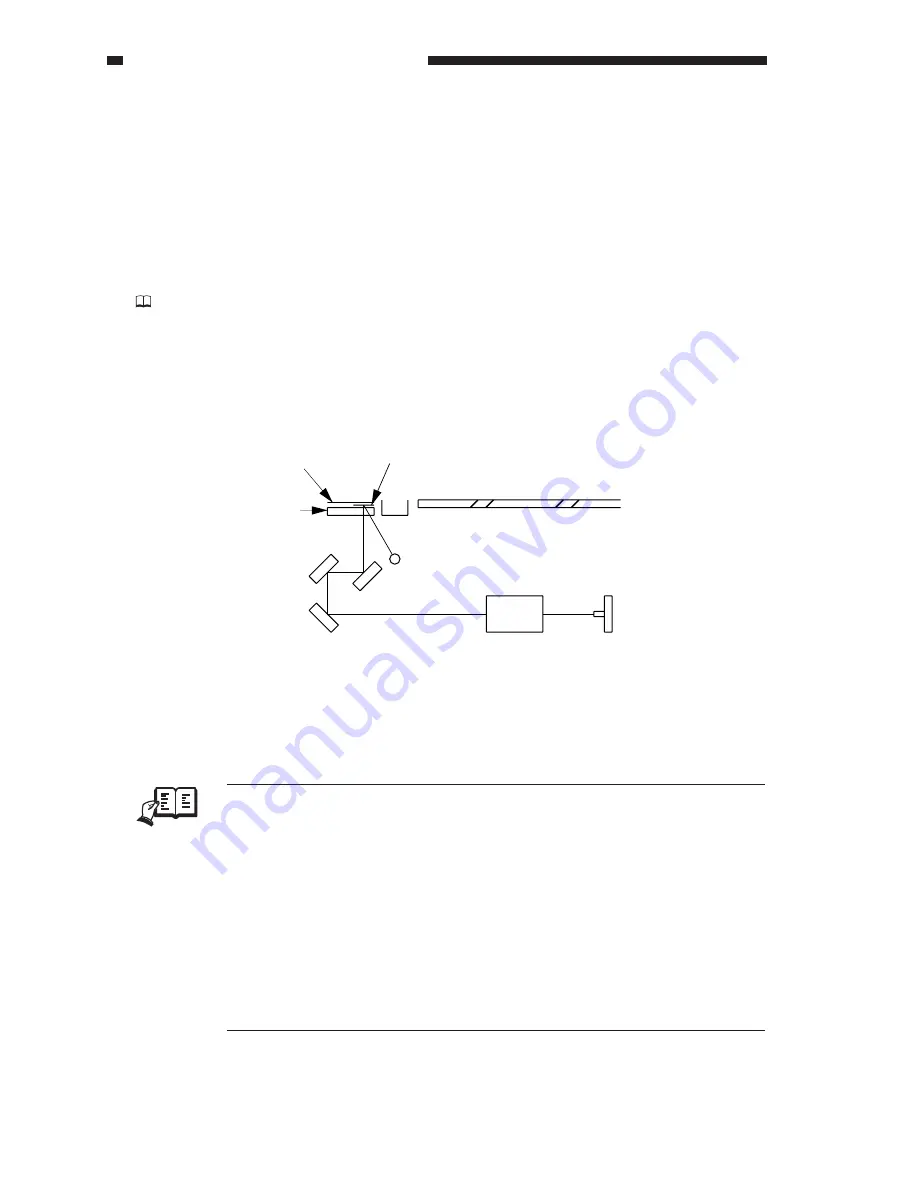
a. Shading Correction

1.

The CCD reads the bar code found under the standard white plate, and determines a
correction target value (Reference 1).

2.

The CCD measures the light reflected by the standard white plate, and generates its output.

Figure 4-402

3.

The shading correction circuit compares the measurements taken in 2 against the target
value determined in 1, and saves the difference as the shading correction value.

REF.

1. A bar code label is attached to the copier’s standard white plate. At the

factory, light of a specific intensity is directed to the standard white plate and
measured (B, G, and R values); the result is converted, and printed in the
form of a bar code for shipment.

2. The color balance of light areas may be adjusted in service mode

(ADJUST>COLOR>ADJ).

3. If the density or color balance of copies of a negative film cannot be

corrected using a base film, use service mode (PRJ>ADJUST>NEGA).

4. Scratches or dirt on the standard white plate will be subject to stronger

shading correction, causing vertical white lines on copies. If such is the case,
clean the standard white plate; if the problem is not corrected, try changing
the position of shading correction using service mode (ADJUST>ADJ-
XY>ADJ-S).

Standard
white plate

Glass

Bar code

Copyboard glass

Scanning lamp

Lens

CCD

Содержание CLC 1130

Страница 1: ...Reasons to update the descriptions in the previous documentation covering modification of functions and correction of typographical mistakes The present revision is a full revision Kindly make arrangements so that the old document may be replaced with the one being released Further please make sure the old document is properly disposed of FY8 13G3 03Y Printed in Japan Imprimé au Japon Major qualit...

Страница 2: ...COPYRIGHT 2002 CANON INC CANON CLC1100 1130 1150 1160 1180 REV 3 FEB 2002 PRINTED IN JAPAN IMPRIME AU JAPON REVISION 3 FEB 2002 FY8 13G3 030 COLOR LASER COPIER 1100 1120 1130 1140 1150 1160 1180 ...

Страница 3: ...vice manuals b Service handbooks c Service bulletins d Parts catalogs e a b c d Brother Canon Epson Gestetner IBM Hewlett Packard Kyocera MB Lexmark Minolta OCE OKI Olivetti Panasonic Ricoh Samsung Sanyo Sharp Toshiba Utax Xerox ...

Страница 4: ...TISING AND OTHER PRINTED MATTER ANY QUESTIONS REGARDING INFORMATION CONTAINED HEREIN SHOULD BE DIRECTED TO THE COPIER SERVICE DEPARTMENT OF THE SALES COMPANY THIS DOCUMENTATION IS INTENDED FOR ALL SALES AREAS AND MAY CONTAIN INFOR MATION NOT APPLICABLE TO CERTAIN AREAS COPYRIGHT 2002 CANON INC Printed in Japan Imprimé au Japon Use of this manual should be strictly su pervised to avoid disclosure o...

Страница 5: ... various units involved are operated and shows how they may be disassembled assembled and adjusted Chapter 4 Image Processing System discusses the principles of operation used for the mechanical electrical operations of the copier s image processing system It also explains the timing at which the various units involved are operated and shows how they may be disassembled assembled and adjusted Chap...

Страница 6: ...ter contains sections explaining the purpose of specific functions and the relationship between electrical and mechanical systems with reference to the timing of operation In the diagrams represents the path of mechanical drive where a signal name accompanies the symbol the arrow indicates the direction of the electric signal The expression turn on the power means flipping on the power switch clos...

Страница 7: ... By way of providing a reference to the document this manual uses the following convention EX Part 2 Chapter 3 2 1 Shading Correction The Copier Basic Series represents an accumulation of Canon s copier technologies used in common in existing machines and descriptions in the document are intended to supplement the contents of Service Manuals The Copier Basic Series consists of the following four p...

Страница 8: ......

Страница 9: ... CLC1130 3 cassette model CLC1150 2 cassette model with a duplexing unit RDF E2 E3 Feeds a large number of originals automatically for continuous copying Accepts double sided originals CLC Film Projector D1 Projects 35mm negative or positive film large size negative film or transparencies for making color copies Editor F1 Enables selecting areas and colors using a point pen Stapler Sorter F1 Sorts...

Страница 10: ...matically for continuous copying Accepts double sided originals Editor F1 Enables selecting areas and colors using a point pen Stapler Sorter F1 Sorts or groups copies Staples sorted copies CLC Buffer Path Unit 1 Limits curling of copied paper CLC Paper Deck E1 Accommodates as many as 2500 sheets of paper A4 B5 LTR Control Card V Enables control of copying work by group CLC1140 2 cassette model CL...

Страница 11: ... 17 A Safety of Laser Light 1 17 B CDRH Regulations 1 18 C Handling the Laser Assembly 1 19 D Safety of Toner 1 21 VII IMAGE FORMATION 1 22 A Outline 1 22 B Auxiliary Process 1 24 1 Post Cleaning Charging 1 24 I OUTLINE OF OPERATIONS 2 1 A Functional Construction 2 1 B Electrical Circuitry 2 2 1 Outline 2 2 2 CPU PCB 2 2 3 Control Panel 2 2 II BASIC SEQUENCE OF OPERATIONS 2 4 A At Power On 2 4 B B...

Страница 12: ...tandard White Plate 3 10 B Scanner Drive Assembly 3 11 1 Removing the Scanner Drive Motor 3 11 2 Adjusting the Tension of the Belt When Mounting the Scanner Drive Motor 3 11 3 Routing the Scanner Cable 3 11 CHAPTER 4 IMAGE PROCESSING SYSTEM I OUTLINE 4 1 II CCD CCD DRIVE 4 2 A Controlling the CCD 4 2 B CCD Driver Circuit 4 2 III ANALOG IMAGE PROCESSING 4 3 IV DIGITAL IMAGE PROCESSING 4 4 A Outline...

Страница 13: ... Unit 4 17 2 Removing the Analog Processor PCB 4 18 3 Removing the Image Processor PCB IP MAIN IP ED IF IP ECO 4 19 CHAPTER 6 IMAGE FORMATION SYSTEM I IMAGE FORMATION SYSTEM 6 1 A Outline 6 1 B Controlling the C Sensor 6 3 C Sequence of Operations image formation system 6 7 II IMAGE STABILIZATION 6 8 A Outline 6 8 B Controlling the Surface Potential of the Drum 6 10 1 Outline 6 10 2 Measuring the ...

Страница 14: ...lack Toner 6 35 1 Outline 6 35 2 Controlling the Supply of Black Toner 6 35 3 Measuring the Concentration of Black Toner patch detection 6 36 4 Detecting Dirt on the Window 6 38 5 Sequence of Operations measurement 6 39 6 Error Code E020 Related to Control of Toner Concentration 6 40 E New Gradation Correction Con trol patch detection CLC1140 1160 1180 6 46a 1 Outline 6 46a 2 New Gradation Correct...

Страница 15: ...aner Blade 6 78 3 Replacing the Photosensitive Drum Cleaner Scoop Up Sheet 6 79 4 Removing the Photosensitive Drum Cleaner End Seal and Felt 6 79 G Pre Cleaning Sensor Assembly No 2 Scoop Up Sheet Assembly 6 80 1 Replacing the No 2 Scoop Up Sheet Assembly 6 80 2 Points to Note When Handling the Pre Cleaning Sensor Assembly 6 80 H Black Toner Concentration Sensor Assembly 6 81 1 Removing the Black ...

Страница 16: ...lling the Attraction Mechanism 7 32 D Sequence of Operations registration attraction 7 33 V TRANSFER DRUM 7 34 A Outline 7 34 B Controlling the Locking Cam Inside the Transfer Drum 7 36 C Controlling Separation 7 39 1 Outline 7 39 2 Separating Paper 7 40 D Cleaning the Separation Drum Sheet 7 41 1 Outline 7 41 2 External Brush 7 42 3 Polishing Roller 7 42 E Sequence of Operations transfer drum 7 4...

Страница 17: ...o 1 Feeding Assembly 7 77 1 Construction 7 77 2 Removing the Horizontal Path Assembly 7 77 3 Removing the Attraction Roller Unit 7 78 4 Removing the Scraper of the Attraction Roller 7 79 5 Removing the Attraction Roller 7 80 6 Replacing the Attraction Roller Unit Spring Clutch Assembly 7 80 7 Removing the Registration Roller 7 81 8 Replacing the Registration Roller Releasing Spring Clutch Assembly...

Страница 18: ...Fixing Thermal Switch lower 8 20 11 Removing the Fixing Thermal Switch upper 8 20 12 Adjusting the Fixing Nip 8 20 B Fixing Cleaner Assembly 8 21 1 Removing the Fixing Upper Cleaning Belt 8 21 2 Mounting the Fixing Upper Cleaning Belt 8 22 3 Removing the Fixing Lower Cleaning Belt 8 23 4 Mounting the Fixing Lower Cleaning Belt 8 24 C Oil Applying Assembly Removing Assembly 8 25 1 Removing the Oil ...

Страница 19: ...ers 9 18 1 External Covers 9 18 2 Right Upper Cover 9 18 3 Left Inside Cover 9 19 4 Transfer Drum Frame Cover 9 19 5 Fixing Assembly Cover 9 19 6 Transfer Drum Frame Right Cover 9 20 7 Removing the Copyboard Glass 9 20 8 Removing the Upper Cover 9 21 B Control Panel 9 22 1 Removing the Control Panel 9 22 2 Removing the Control Panel PCB 9 22 3 Removing the LCD PCB 9 22 4 Removing the Numeric Keypa...

Страница 20: ...ing the Front Cover 10 20 2 Removing the Rear Cover 10 22 3 Removing the Right Cover 10 22 4 Removing the Upper Cover 10 22 B Paper Deck Related Work 10 23 1 Removing the Deck from the Copier 10 23 2 Removing the Compartment 10 25 3 Changing the Deck Paper Size 10 26 4 Adjusting the Deck Registration 10 27 5 Adjusting the Position of the Roll 10 27 C Drive System 10 28 1 Removing the Deck Pickup C...

Страница 21: ... the Board 11 33 2 Installing to the Copier 11 34 3 Checking Operations 11 36 4 Removing from the Copier 11 36 VII INSTALLING THE REMOTE DIAGNOSTIC DEVICE II 11 37 1 Installing to the Copier 11 37 VIII INSTALLING THE CASSETTE HEATER 11 46 CHAPTER 12 MAINTENANCE AND SERVICING I PERIODICALLY REPLACED PARTS 12 1 II CONSUMABLES AND DURABLES 12 2 A Copier 12 2 B Paper Deck 12 4 III SCHEDULED SERVICING ...

Страница 22: ...lor Block Pattern with γ correction PG TYPE 80 CLC1140 1160 1180 only 13 67a 13 Full Color Block Pattern without γ correction PG TYPE 81 CLC1140 1160 1180 only 13 67b D Troubleshooting Image Problems 13 68 IV TROUBLESHOOTING MALFUNCTIONS 13 97 A Troubleshooting Malfunctions 13 97 V TROUBLESHOOTING FEEDING FAULTS 13 150 A Paper Jams 13 150 B Feeding Faults 13 160 VI ARRANGEMENT OF ELECTRICAL PARTS ...

Страница 23: ...LVENTS AND OILS A 17 1 Starting Service Mode and Making Selections 13 184 2 Ending Service Mode 13 185 3 Backing Up the RAM 13 185 4 Basic Operation 13 194 B DISPLAY control display mode 13 196 C I O I O display mode 13 215 1 DC CPU 13 216 2 R CPU 13 232 D ADJUST adjustment mode 13 235 E FUNCTION operation check mode 13 282 F OPTION settings mode 13 305 G PG test print 13 321 H COUNTER counter mod...

Страница 24: ......

Страница 25: ...MES OF PARTS 1 7 A External View 1 7 B Cross Section 1 9 IV USING THE COPIER 1 12 A Control Panel 1 12 B Extended Functions 1 13 C User Mode 1 14 V DAILY MAINTENANCE BY THE USER 1 16 VI SAFETY 1 17 A Safety of Laser Light 1 17 B CDRH Regulations 1 18 C Handling the Laser Assembly 1 19 D Safety of Toner 1 21 VII IMAGE FORMATION 1 22 A Outline 1 22 B Auxiliary Process 1 24 This chapter shows the cop...

Страница 26: ......

Страница 27: ...1100 or 21 0 sec CLC1100 to generate the first full color copy and 9 6 sec to generate the first mono color copy No pre scanning 3 High Stability The copier uses a new method to control the concentration of toner promising stable production of high quality copies The newly adopted gradation correction control mechanism ensures stability of operation CLC1140 1160 1180 only 4 Varied Transfer Materia...

Страница 28: ...ations Copying Laser beam indirect photostatic transfer Charging Corona Exposure Slit laser beam Contrast adjustment Automatic Development Dry toner projection Toner supply Manual 345 g bottle Pickup Cassette x 2 CLC1100 1120 1140 1150 1180 cassette x 3 CLC1130 1160 multifeeder tray duplexing unit CLC1150 1180 Attraction Pre transfer static attraction Transfer Blade transfer Separation Separation ...

Страница 29: ...100 sheets Copying speed See Table 1 206 Copy size Cassette B5 257 x 182 mm LTR to A3 297 x 420 mm 279 4 x 431 8 mm 11 x 17 Multifeeder B5 257 x 182 mm to A3 297 x 420 mm 279 4 x 431 8 mm 11 x 17 extra length size 12 x 18 Paper type Cassette Plain paper 64 to 105 g m2 transparency A4 LTR Multifeeder Plain paper 64 to 209 g m2 transparency A4 LTR Auto double sided Plain paper only 90 to 105 g m2 Mu...

Страница 30: ...er Sorter F1 F2 CLC Buffer Pass Unit 1 CLC Paper Deck E1 Document Tray C1 CLC1100 1120 1130 1150 Document Tray H1 CLC1140 1160 1180 CLC Film Projector D1 only CLC1120 1130 1150 Editor F1 CLC Editor F1 Separating kit CLC IP ED Board B1 hereafter IP ED Board CLC Interface Board D1 hereafter IP IF Board Cassette Heater Kit 15 Cassette Heater Kit 16 Control Card V Copy Data Controller A1 NE Controller...

Страница 31: ...Y MRM CLC1160 MJT RSW QFJ RFN SEF TEQ UJQ CLC1180 MJU RSX MQX RSZ QFK RFM SEG TER UJR MRL Maximum power consumption 1 5 kW or less Copying 719 Wh or less reference only Standby 338 Wh or less reference only Noise Copying 73 dB sound power level Standby 59 dB sound power level Ozone 0 02 ppm or less average 0 05 ppm max Dimensions Width 768 mm 30 2 in Depth 773 mm 30 5 in CLC1100 1120 1130 1150 774...

Страница 32: ...D IN JAPAN IMPRIME AU JAPON CHAPTER 1 GENERAL DESCRIPITON E Default Ratios a Japan Australia others 6R5E Item Enlargement Reduction Default ratio I 1 1 154 I 1 0 250 II 1 1 224 II 1 0 500 III 1 1 414 III 1 0 611 IV 1 2 000 IV 1 0 707 V 1 4 000 V 1 0 816 VI 1 0 865 Table 1 205a 1 4a ...

Страница 33: ......

Страница 34: ...5c F Copying Speed Size paper size copies min full color copies min mono color CLC1100 Except for CLC1100 A3 297 x 420 mm A3 4 5 5 5 21 A4 210 x 297 mm A4 9 11 42 AAR 297 x 210 mm A4R 4 5 5 5 21 B4 257 x 364 mm B4 4 5 5 5 21 B5 182 x 257 mm B5 9 11 42 279 4 x 431 8 mm 11 x 17 4 5 5 5 21 11 x 17 LTR LTR 9 11 42 LTRR LTRR 4 5 5 5 21 LGL LGL 4 5 5 5 21 Table 1 206 Specifications are subject to change...

Страница 35: ...e Plain paper 64 to 105 g m2 Paper size A4 B5 LTR Storage size 2500 sheets 105 g m2 Serial No ZRU ZRT ZRS Paper size switch By size guide plate in steps and in service mode OPTION ACC DK P Dimensions Width 323 2 mm 127 in Depth 591 mm 23 3 in Height 432 mm 17 0 in Width 30 6 kg 67 4 lb Power supply DC from the copier Operating environment Same as the copier Specifications are subject to change for...

Страница 36: ...r 3 Multifeeder tray 4 Right lower cover 5 Control key 6 Power switch 7 Pickup cassette CLC1130 1160 Duplexing tray CLC1150 1180 8 Pickup cassette 2 3 CLC1130 1160 Pickup cassette 1 2 CLC1150 1180 9 Waste tone case cover 10 Right front cover 11 Left front cover 12 Copy tray 1 2 3 4 5 6 7 8 9 10 11 12 The above figure represents the CLC1100 1120 1130 1150 the names used however are also common amon...

Страница 37: ...2002 PRINTED IN JAPAN IMPRIME AU JAPON Figure 1 302 1 Fixing assembly knob 2 Connector for downloading parallel connector 3 Left front cover switch 4 Bk toner supply mouth 5 M toner supply mouth 6 C toner supply mouth 7 Y toner supply mouth 8 Right front cover switch 9 Unit drawer lever 1 2 3 4 5 6 7 8 9 ...

Страница 38: ...fer drum 15 Photosensitive drum cleaner 16 Post cleaning charging assembly 17 Lens Figure 1 303 18 Pre exposure lamp 19 CCD 20 Primary charging assembly 21 Dust proofing glass 22 Potential sensor 23 Photosensitive drum 24 Yellow developing assembly 25 Cyan developing assembly 26 Magenta developing assembly 27 Black developing assembly 28 Black toner concentration sensor 29 Transfer blade 30 Attrac...

Страница 39: ...ller 2 9 Multifeeder feed roller 2 10 Multifeeder feed roller 1 11 Multifeeder separation roller 12 Multifeeder pickup roller 13 Pickup vertical path roller 1 2 3 1 2 3 4 5 6 7 8 9 10 11 12 13 15 16 17 18 19 20 21 22 14 23 24 25 26 14 Cassette 1 2 separation roller 15 Cassette 1 2 feed roller 16 Cassette 1 2 pickup roller 17 Duplexing separation roller 18 Duplexing feed roller 19 Re pickup feed ro...

Страница 40: ...V model only 4 Registration roller 5 Attraction roller 6 Pre registration roller 1 7 Pre registration roller 2 8 Multifeeder feed roller 2 9 Multifeeder feed roller 1 1 2 3 4 5 6 7 8 9 10 11 12 13 15 16 14 17 18 10 Multifeeder separation roller 11 Multifeeder pickup roller 12 Pickup vertical path roller 1 2 3 13 Cassette 1 2 3 separation roller 14 Cassette 1 2 3 feed roller 15 Cassette 1 2 3 picku...

Страница 41: ...y Saver Start Stop Full Color Black Center Shift Original Recognition 5 1 2 3 4 6 7 8 9 10 11 12 13 17 19 21 18 20 15 16 14 1 Clip tray 2 Display contrast dial 3 Counter check key 4 Touch panel display 5 ACS key 6 Full Color key 7 Black key 8 Original Recognition key 9 Center Shift key 10 Energy Saver key 11 Power lamp 12 Control card slot option 13 Stop key 14 Start key 15 Clear key 16 Numeric ke...

Страница 42: ...t a sheet of paper between transparencies Color Balance Use it to adjust color balance brightness hue and density One Touch Color Use it to fine adjust image quality and hue Image Quality Adjustment Use it to remove images of the background or back of the original or to adjust chromatic space Sharpness Use it to produce sharp copy images Area Designation Use it to select an area of an original so ...

Страница 43: ... switching cassettes when the selected cassette runs out of paper to one holding the same size paper on off Audible Tones Use it to enable disable input alarm and end sounds on off Exposure Level Switch Use it to select the number of steps used to select copy density for the Copy Density key 9 steps 17 steps Transparency Feed Use it to select a cassette exclusively for transparencies Location Thin...

Страница 44: ...Recalibration Use it to correct the density used for the manual density adjustment standard center graduation Auto Gradation Use it to correct the hue of images Operate on the touch Adjustment panel you need not press the Start key Text Photo Priority Use it to adjust the slice level used to distinguish between text and photo when the original type is set to text printed photo or text silver halid...

Страница 45: ...APON V DAILY MAINTENANCE BY THE USER Instruct the user to clean the copyboard glass and the copyboard cover once a week without fail To clean wipe the part with a cloth moistened well wrung with water or solution of mild detergent and dry wipe it thereafter Take care not to scratch the reflecting face silver colored of the copyboard cover ...

Страница 46: ... a laser device can prove to be hazardous to the human body The machine s laser scanner system is sealed by means of a protective housing and external covers thereby preventing laser light from escaping to the outside of the machine Thanks to the construction the user is completely free from the dangers of exposure to laser light as long as the she operates the machine for its intended uses ...

Страница 47: ...ply to laser products produced on and after August 1 1976 and the sale of laser products within the US is prohibited unless they show compliance with the regulations Figure 1 602 shows the label certifying compliance with the CDRH regulations and all laser products to be sold in the US must bear a copy of the label Figure 1 601 CDRH Compliance Label The text may differ from model to model CANON MA...

Страница 48: ...g the insertion of any tool having a high reflectance Be sure also to remove any watches and rings They can reflect the laser beam to damage your eyes during work The copier s laser beam is a red light Any covers that may reflect the laser beam bear a copy of the label shown in Figure 1 603 Exercise particular caution whenever servicing inside such covers Figure 1 602a REF You will find the label ...

Страница 49: ...CHAPTER 1 GENERAL DESCRIPITON 1 20 COPYRIGHT 2002 CANON INC CANON CLC1100 1130 1150 1160 1180 REV 0 MAR 1999 PRINTED IN JAPAN IMPRIME AU JAPON Figure 1 602b Figure 1 602c ...

Страница 50: ... iron and small amounts of dyes If your skin or clothes have come into contact with toner be sure to remove as much of it as possible with tissue paper and then wash with water Hot water will cause toner to turn into jelly and become fused with cloth fibers resisting removal Further toner tends to react to vinyl material Keep it away from vinyl materials Do not dispose of toner into fire It can le...

Страница 51: ...Laser scanner Lens CCD Post cleaning charging assembly Image processing block Oil applying felt Fixing cleaning belt Photosensitive drum cleaner External static eliminator Internal static eliminator Transfer drum Transfer blade Attraction brush Photosensitive drum Pre exposure lamp Primary charging assembly Y developing assembly C developing assembly M developing assembly Bk developing assembly At...

Страница 52: ... 5 Attraction positive negative DC Step 6 Transfer positive negative DC Step 7 Separation negative DC AC Step 8 Photosensitive drum cleaning Step 9 Post cleaning charging negative DC Step 10 Fixing Step 11 Internal external static removal Figure 1 702 Static image formation block Delivery 10 Fixing 7 Separation Multifeeder Cassette Rotation of drum Flow of paper 11 Internal external static removal...

Страница 53: ...N B Auxiliary Process 1 Post Cleaning Charging The photosensitive drum may become subject to memories because of transfer discharge appearing on copy images To prevent such a problem a negative DC is applied to the drum thereby evening out the charges and consequently potential Post cleaning charging assembly Photosensitive drum Figure 1 703 ...

Страница 54: ... Sequence of Operations copying 2 6 C Generating the Image Leading Edge Signal 2 7 III CONTROLLING ELECTRICAL MECHANISMS 2 10 A Controlling the Main Motor M4 2 10 B Controlling the Drum Motor M2 2 12 C Inputs to and Outputs from the Major PCBs 2 14 This chapter explains the copier s basic operations and functions and the relationship between electrical and mechanical systems and provides an outlin...

Страница 55: ......

Страница 56: ... System Image Processing System Laser Exposure System Analog processor PCB To external device CCD driver Control panel CPU PCB DC driver PCB DC power supply PCB Original Scanning lamp Optical path Image processor PCB Laser driver PCB Laser scanner Image Formation System Drum cleaning Pre exposure Charging Laser exposure Development Transfer Separa tion Feeding Fixing Tray Transfer drum cleaning At...

Страница 57: ...scanning lamp controls the scanner motor controls job management controls scanner reading Controls image processing controls fans controls IPC RDF film projector Copy Data Controller or Remote Diagnostic Device Controls the editor controls bi Centronics communication controls serial communication Flash memory DIMM Contains control programs RAM Stores control data DC CPU Controls fixing temperature...

Страница 58: ...oad Fans Options Editor Projector Etc DIMM downloading Bi Centronics I F Control panel DC Loads Clutch Solenoid Motor Sensor Etc Flash memory Flash memory Flash memory R CPU DC CPU CPU PANEL CPU CPU PCB DC driver PCB Scanner motor driver PCB HVT AC PCB HVT DC PCB Developing bias PCB Laser controller PCB BD PCB Laser driver PCB Pickup driver PCB Registration path driver PCB Transfer drive PCB Trans...

Страница 59: ...eded during copying The photosensitive drum makes a single rotation for each rotation of the transfer drum c The fixing temperature is indicated in terms of the surface temperature of the fixing roller the reading of DISPLAY ANALOG in service mode i e temperature detected by the thermistor 1 2 3 4 1 2 3 4 5 6 7 8 WMUP AINTR STBY Photosensitive drum revolution Transfer drum revolution Side A sensor...

Страница 60: ...the power switch is turned on to when the surface temperature of the upper fixing roller reaches 130ºC From when the surface temperature of the upper fixing roller reaches 130ºC to when it reaches 158ºC From when INTR ends to when the Start key is turned on or the power switch is turned off Waits until the fixing roller warms up Measures and controls the drum surface potential Waits for a press on...

Страница 61: ...gh voltage output Main motor M4 Drum motor M2 Start key ON INTR COPY LSTR STBY DSRDY 1 2 3 4 5 6 7 8 1 2 3 4 5 6 7 8 Y M M C C Y K K M C Y K M C Y K Y M M C C Y K K 2 1 1 Shading correction 2 Drum surface potential control Period Purpose Performs an original detection scan Picks up paper Turns on and off the laser by video signals and develops and transfers the selected color Discharges paper The ...

Страница 62: ...mechanisms with reference to the leading edge of paper image leading edge signal on the transfer drum The image leading edge signal is generated about 0 3 sec before the distance a between point of laser exposure on the photosensitive drum and point of transfer and distance b between leading edge of paper and point of transfer become equal Figure 2 203 b a paper Leading edge of paper Transfer drum...

Страница 63: ...3 side B sensor found inside the transfer drum are used to generate image leading signals of their own ITOP A ITOP B Figure 2 204 a Transfer Drum When Copying on Side A Figure 2 205 Transfer drum PCB DC driver PCB CPU PCB Side A paper Side A image leading edge signal Linking plate Side A sensor PS2 Side B sensor signal plate Transfer drum Side A sensor signal plate I TOP A Transfer drum PCB DC dri...

Страница 64: ... M Indicates the color to develop e g M development In the case of small size paper copying starts on side B Table 2 203 Photosensitive drum revolution Transfer drum revolution Transfer drum side A side B Side A sensor PS2 Side B sensor PS3 Drum motor M2 INTR COPY LSTR STBY DSRDY Start key ON 1 9 1 9 8 8 B B B A A B A 2 M 2 3 4 5 6 7 8 9 10 11 12 1 B A B A B A B A B A B A B A B A B A B A B A B A 1...

Страница 65: ...ram of circuit Item Description Power supply 38 VDC from the DC power supply PCB Drive signal Drive signal MNMON from the DC driver PCB Moving drive parts Registration roller attraction roller developing assembly multifeeder feed roller Control Turing on off the main motor Controlling the main motor to a constant speed Detects errors Table 2 301 Figure 2 301 M4 DC driver PCB MNMRDY MNMON Main moto...

Страница 66: ...nd the output of the control signal stops removing the drive current and thus stopping the main motor b Controlling the Rotation to a Constant Speed When the main motor rotates its speed is detected and communicated to the rotation speed control circuit which in response compares the speed against pulse signals and exerts control so that the phase of one matches that of the other At this time a si...

Страница 67: ...ram of the circuit Table 2 302 Figure 2 302 M2 DC driver PCB DRMFG DRMRDY DRMON DRMSP1 DRMSP0 DRMCLK Rotation speed control circuit Drum motor M2 Reference pulse generation Rotation speed detection Motor driver Item Description Power supply 24 VDC from the DC power supply PCB Drive signal Drive signal DRMON from the DC driver PCB Operating drive assembly Photosensitive drum transfer drum Control T...

Страница 68: ...re proper fixing when copying on transparencies or thick paper the rotation speed is reduced to suit the speed of the fixing motor The foregoing speeds are controlled by two speed control signals DRMSP0 DRMSP1 from the DC driver PCB The rotation speed control circuit compares the pulse signals and reference signals clock signals and exerts control so that the phase of one matches that of the other...

Страница 69: ...202 J1203 J1301 J1302 J1303 J1306 J1207 J1201 J1210 J1204 J1205 J202 J203 J204 J201 J2012 J2103 J2201 J2002 J225 J226 J223 J224 J215 J214 J218 J217 J241 J242 CCD CCD driver PCB Analog processor PCB IP PRJ PCB Image processor main PCB Image processor motherboard External device Image processor ED IF PCB option IP ECO PCB ECO relay PCB Laser controller PCB BD detection PCB Laser driver PCB Scanner t...

Страница 70: ...ON1 SCHP PM15 SL1FMON2 J807 3 1 2 FM1 SL1FMERR J2002 A13 A15 A14 J901 J2006 1 2 1 2 J951 5V J963 J941 J962 J905 J902 J921 J922 J907 J908 24V 15V Scanner motor Scanner home position sensor Original exposure system cooling fan 1 LCD touch panel Scanner motor driver PCB See p 3 4 See p 3 3 CPU PCB See p 3 4 Control panel PCB See p 9 6 In response to an error returns ERR 1 to the PCB See p 9 1 Inverte...

Страница 71: ...B 3 4 Figure 2 305 J820 2 4 3 1 J808 J2004A J2011 J2007 J2008 J814 J817 J816 J813 J1005 J1006 Copy Data Controller or Remote Diagnostic Device ECO PCB J2010 J2005 J2002A J2002A J2002B J2001 2 4 3 1 5V CC V Control Card V DC driver PCB Memory PCB Bi Centronics I F PCB Flash memory downloading Editor Projector RDF PCU PCB Copy Data Controller PCB or Remote Diagnositc Device PCB ...

Страница 72: ...V 15V 24V 15V 24V 15V 24V 15V 24V 15V Exhaust fan Primary charging assembly fan Laser scanner motor cooling fan Ozone suction fan IP cooling fan Electrical unit cooling fan Original exposure system cooling fan 2 Original exposure system cooling fan 3 Back suction fan Power cord mount fan CPU PCB See p 9 6 In response to an error returns ERR 1 to the PCB See p 9 6 In response to an error returns ER...

Страница 73: ...S5 5V PS4 B6 B5 B4 5V 5V PS2 PS3 A5 A4 A3 Side A sensor Side B sensor C sensor Pre transfer paper sensor Post transfer paper sensor Separation sensor Attraction transfer locking cam HP sensor Transfer driver PCB Registration path driver PCB Transfer driver PCB DC driver PCB When the transfer drum is at the side A image leading edge 1 The light blocking plate is at PS2 When the transfer drum is not...

Страница 74: ...er paper sensor Multifeeder pickup sensor Multifeeder lifter H sensor Multifeeder lifter L sensor Cassette 1 lifter position sensor CLC1100 1120 1130 1140 1160 Cassette 1 paper sensor CLC1100 1120 1130 1140 1160 DC driver PCB When fixing oil is present 1 When the length of the upper fixing cleaning belt is more than a specific length 1 The light blocking plate is at PS11 When PS12 detects paper 1 ...

Страница 75: ... PS22 PS23 Pickup vertical path 1 sensor Cassette 2 lifter position sensor Cassette 3 lifter position sensor CLC1130 1160 Cassette 2 paper sensor Cassette 3 paper sensor CLC1130 1160 Pickup vertical path 2 sensor Pickup vertical path 3 sensor CLC1130 1160 Pre registration sensor Pickup driver PCB Registration path driver PCB DC driver PCB When PS21 detects paper 1 When the light blocking plate is ...

Страница 76: ...V 5V 5V 5V 5V 5V 5V 5V Cassette 1 lifter position sensor Cassette 2 lifter position sensor Cassette 1 paper sensor Cassette 2 paper sensor Pickup vertical path 2 sensor Pickup vertical path 3 sensor Re pickup vertical path sensor Pre registration sensor Registration path driver PCB Pickup driver PCB DC driver PCB When the lifter of the cassette 1 is up 1 When the light blocking plate is at PDS22 W...

Страница 77: ...path 1 sensor Delivery vertical path 2 sensor Duplexing path paper sensor Duplexing reversal paper sensor Duplexing tray paper sensor Duplexing unit inlet paper sensor Paper jogging guide HP sensor Duplexing driver PCB DC driver PCB When PS31 detects paper 0 When the light blocking plate is at PS31 When PS32 detects paper 1 When the light blocking plate is at PS32 When PS33 detects paper 1 When th...

Страница 78: ...cover sensor Left front cover sensor Delivery cover sensor Pickup cover sensor Cassette 1 open closed sensor Cassette 2 open closed sensor Cassette 3 open closed sensor CLC1130 1160 Pickup driver PCB DC driver PCB When PS31 detects paper 0 When the light blocking plate is at PS31 When the right front cover is closed 1 When the light blocking plate is at PS41 When the left front cover is closed 1 W...

Страница 79: ...V DPS47 DPS48 Right front cover senosr Left front cover sensor Delivery cover sensor Pickup cover senosr Cassette 1 open closed senosr Cassette 2 open closed sensor Pickup driver PCB When the cassette 2 is set in the copier 1 When the light blocking plate is at PS48 When the cassette 1 is set in the copier 1 When the light blocking plate is at PS47 When the pickup cover is closed 1 When the light ...

Страница 80: ...cleaner HP sensor Multifeeder tray open closed sensor Lower fixing cleaning belt length sensor Developing engagement driver PCB Transfer engagement driver PCB Pickup driver PCB DC driver PCB When the M developing assembly is at the home position 1 When the light blocking plate is at PS49 When the C developing assembly is at the home position 1 When the light blocking plate is at PS51 When the Y de...

Страница 81: ...A2 J500 LTHM4 LTHM3 UTHM2 UTHM1 J608 J617 1 3 4 2 J1019 B9 B7 B6 B8 J612 C2SZ0 C2SZ1 C3SZ0 C3SZ1 D3SZ0 D3SZ1 J619 1 3 4 2 J619 1 3 4 2 J1018 B9 B7 B6 B8 J1018 B9 B7 B6 B8 5V 5V 5V PSU2 PSU3 DPSU3 Cassette 2 paper length sensor CLC1100 1120 1140 Cassette 3 paper length sensor CLC1130 1160 Cassette 2 paper length sensor CLC1150 1180 Upper fixing thermistor 1 Upper fixing thermistor 2 Lower fixing th...

Страница 82: ... VR Cassette 3 paper width detecting VR CLC1130 1160 Cassette 3 paper level detecting VR CLC1130 1160 Multifeeder paper width detecting VR DC driver PCB Operates in conjunction with the lifter shaft of the cassette 1 and detects the level of paper analog signal Operates in conjunction with the side plate of the cassette 2 and detects the level of paper analog signal Operates in conjunction with th...

Страница 83: ... 1 paper level detecting VR Cassette 2 paper width detecting VR Cassette 2 paper level detecting VR Multifeeder paper width detecting VR DC driver PCB Operates in conjunction with the lifter shaft of the cassette 1 and detects the level of paper analog signal Operates in conjunction with the side plate of the cassette 2 and detects the level of paper analog signal Operates in conjunction with the ...

Страница 84: ... J743 2 1 J736 2 3 4 6 1 5 J1027 A5 A4 A3 A1 A6 A2 J1027 B5 B4 B6 5V 5V MTEP CTEP YTEP 5V 5V 5V M toner level sensor C toner level sensor Y toner level sensor Bk toner level sensor Waste toner full sensor Environment sensor DC driver PCB When the toner inside the M hopper is below a specific level 1 When the toner inside the C hopper is below a specific level 1 When the toner inside the Y hopper i...

Страница 85: ...7 B16 B17 PS71 J521 5V PCTHM PCDTC PCLEDON J1024 KEYSW J1012 A2 A1 A2 A3 WTNRBD PS70L PS70S PS69L PS69S N O SW2 J711 N O SW7 J535 Control switch Waste toner feedscrew lock detecting switch Transparency sensor Registration sensor Pre cleaning paper sensor Registration path driver PCB DC driver PCB When the control switch is inserted 0 When clogging by toner is detected 1 When the sensor detects pap...

Страница 86: ...kage breaker Noise filter Power switch DC power supply PCB DC driver PCB Transfer unit lever switch Delivery cover switch CLC1150 1180 Left front cover switch DC fuse PCB To PCBs DC power cut relay Environment switch AC power cut relay Lamp regulator AC fuse PCB Not found in 230V models Drum heater control PCB Cassette heater switch Cassette heater 1 Cassette heater 2 Deck heater outlet Upper fixi...

Страница 87: ...J312 B6 B7 B8 5V 5V 5V FXMON FXMLK FXMSP0 FXMSP1 MNMON MNMRDY LSMRDY LSMON LSMSEL LSMCLK DRMCLK DRMCW DRMSP1 DRMSP0 DRMFG DRMRDY DRMON PRIMFW PRIMRV CBRCMA CBRCMB TRCMON TRCMLK PRDMA PRDMB Drum motor Laser scanner motor Main motor Fixing motor Primary charging wire cleaning motor Cleaner blade reciprocating motor Transfer drum cleaner brush Polishing roller motor DC driver PCB See p 2 12 See p 5 6...

Страница 88: ... 1 2 A1 A2 J1008 24V HOPMON HOPMLK HOPMCW C1LFMON C2LFMON C3LFMON MFLFMA MFLFMB J341 B15 B16 J1017 B4 B3 PELA1ON M13 M15 LA1 M10 M11 M12 Hopper motor Cassette 1 lifter motor Cassette 2 lifter motor Cassette 3 lifter motor CLC1130 1160 Multifeeder lifter motor Pre exposure lamp Pickup driver PCB DC diver PCB When supplying toner 0 when stirring toner 1 In response to an error returns 0 to the PCB W...

Страница 89: ... B15 B16 J1017 J609 J1019 1 2 B4 B5 J613 J1018 1 2 B4 B5 J365 1 3 4 2 J1029 1 2 3 4 J1021 A10 A11 A12 A13 J361 J671 1 3 2 4 Hopper motor Pre exposure lamp Duplexing motor Cassette 2 lifter motor Cassette 1 lifter motor Multifeeder lifter motor Pickup driver PCB DC driver PCB When supplying toner 0 when stirring toner 1 In response to an error returns 0 to the PCB When 1 M10 turns on When 1 DM12 tu...

Страница 90: ... A4 A5 A7 B9 B8 B7 B6 B4 B2 B3 B4 B5 B7 PM5 PM7 M developing assembly locking motor Y developing assembly locking motor C developing assembly locking motor Bk developing assembly locking motor Transfer drum cleaner locking motor Attraction transfer locking cam motor Transfer drum locking motor Developing assembly locking driver PCB DC driver PCB While PM1 is rotating alternates between 1 and 0 for...

Страница 91: ...MA C2PUMB C2PUMB C3PUMA C3PUMA C3PUMB C3PUMB A2 A3 A5 A6 A13 A14 A16 A17 A11 A12 A14 A15 A14 A8 A4 A10 PRM2HL PRM1HL A4 A8 A11 C1PUMHL C2PUMHL C3PUMHL A9 Pre registration motor 2 Cassette 1 pickup motor Pre registration motor 1 Cassette 2 pickup motor Cassette 3 pickup motor CLC1130 1160 Registration path driver PCB Pickup driver PCB DC driver PCB While PM8 is rotating alternates between 1 and 0 p...

Страница 92: ...UPUMB DUPUMB DJOGMA DJOGMA DJOGMB DJOGMB A2 A3 A4 A5 A6 A7 A8 A9 A14 A8 A4 A10 PRM2HL PRM1HL A8 A11 D1PUMHL D2PUMHL 8 A9 DUPUMHL 8 A4 PM14 PM13 Pre registration motor 2 Pre registration motor 1 Cassette 1 pickup motor Cassette 2 pickup motor Re pickup motor Duplexing paper jogging motor Registration path driver PCB Pickup driver PCB Duplexing driver PCB DC driver PCB While PM8 is rotating alternat...

Страница 93: ... CTNRSUP MTNRSUP MDEVCL CDEVCL YDEVCL KDEVCL 7 8 J597 2 1 J332 A9 J1016 A4 J1015 B5 J331 B9 J594 2 1 1 2 J672 2 1 J673 2 1 J674 2 1 J675 2 1 24V 24V 24V M developing cylinder clutch C developing cylinder clutch Y developing cylinder clutch Bk developing cylinder clutch M toner supply clutch C toner supply clutch Y toner supply clutch Bk toner supply clutch Developing locking driver PCB DC driver P...

Страница 94: ...50 2 1 CL11 J341 A9 J1017 A10 J629 2 1 CL12 J341 B13 J1017 B6 J643J346 7 8 J344 9 J1018 A8 J656 2 1 CL13 J347 7 8 J348 7 8 J645 MFFDCL C1PUCL C2PUCL C3PUCL 24V J632 3 2 J345 B13 B14 24V 24V 24V 24V Registration clutch Multifeeder clutch Cassette 1 pickup clutch Cassette 2 pickup clutch Cassette 3 pickup clutch CLC1130 1160 Registration path driver PCB Pickup driver PCB DC driver PCB When 1 CL12 tu...

Страница 95: ...013 A2 J555 2 1 J312 A3 A4 DCL12 J341 A9 J1017 A10 J629 2 1 J344 9 J1018 A8 J656 2 1 J347 7 8 J348 7 8 J645 DCL13 J694 3 1 J393 A3 A4 J686 J342 9 J1019 A3 REPUCL J665 2 1 J349 4 5 J663 24V Registration clutch Multifeeder clutch Cassette 1 pickup clutch Cassette 2 pickup clutch Duplexing feeding clutch Re pickup clutch Pickup driver PCB Duplexing driver PCB Pickup driver PCB Registration path drive...

Страница 96: ...025 5 4 J713 1 3 2 J714 1 3 2 B4 B6 B5 J532 3 1 2 J1008 A3 A5 A4 TNFMON2 DLFMON1 DLFMON2 24V 24V 15V 24V 15V 24V Multifeeder pickup clutch Postcard feeder clutch 100V model only Delivery vertical path roller clutch CLC1150 1180 Toner suction fan Delivery cooling fan Power supply cooling fan 1 Power supply cooling fan 2 Pickup driver PCB DC power supply PCB DC driver PCB When 1 CL16 turns on When 0...

Страница 97: ...013 B11 J556 2 1 A1 A2 J551 2 1 A5 A6 J647 2 1 J346 15 16 J626 2 1 J653 2 1 J347 15 16 J344 11 J1017 A8 J1018 A6 24V 24V 24V 24V 24V 24V 24V Upper fixing cleaning belt solenoid Separation push up solenoid Lower fixing cleaning belt solenoid Separation claw solenoid Attraction roller solenoid Registration roller releasing solenoid Pickup roller 1 solenoid Pickup roller 3 solenoid CLC1130 1160 Picku...

Страница 98: ... J312 B12 B13 J311 B7 J1013 B11 J556 2 1 A1 A2 J551 2 1 A5 A6 DSL8 J626 2 1 J653 2 1 J347 15 16 J344 11 J1017 A8 J1018 A6 24V 24V 24V 24V 24V Separation push up solenoid Separation claw solenoid Upper fixing cleaning belt solenoid Lower fixing cleaning belt solenoid Pickup roller 1 solenoid Pickup roller 2 solenoid Registration roller releasing solenoid Attraction roller solenoid Transfer driver P...

Страница 99: ...A2 B2 B9 1 2 24V SL13 J689 J686 J623 J341 J1017 B18 A1 J686J393 B1 A10 J391 J1022 DELFLSL DUPPFSL MFPUSL ENDPLSL J705 2 1 24V Delivery paper detecting plate solenoid CLC1150 1180 Stopper plate solenoid CLC1150 1180 Duplexing paper feeding roller solenoid CLC1150 1180 Multifeeder pickup solenoid Stacking guide plate solenoid CLC1150 1180 Duplexing driver PCB Pickup driver PCB Duplexing driver PCB D...

Страница 100: ...developing bias Y developing bias C developing bias Bk developing bias Primary charging assembly Grid bias Transfer charging assembly Attraction charging assembly Cleaning rear charging assembly Separation charging assembly External static eliminator Internal static eliminator Developing bias PCB HVT AC PCB HVT DC PCB Potential measurement PCB Oil pump driver PCB DC driver PCB When 1 the oil pump ...

Страница 101: ......

Страница 102: ...trolling the Scanner Motor 3 4 B Changing the Reproduction Ratio 3 5 This chapter explains the operations and functions of the copier s drive and original detecting mechanisms and provides an outline of the timing at which various associated parts are driven III CONTROLLING THE INTENSITY OF THE SCANNING LAMP 3 6 A Outline 3 6 B Operations 3 7 IV DISASSEMBLY ASSEMBLY 3 8 A Original Exposure System ...

Страница 103: ......

Страница 104: ... motor used to drive the scanner Its direction of rotation changes when moving the scanner forward and in reverse while its speed of rotation changes according to the selected reproduction ratio Scanning lamp LA2 Halogen lamp 200 W Scanner thermal switch 1 TP1 Prevents overheating of the scanner 175ºC Scanner thermal switch 2 TP6 Prevents overheating of the scanner 175ºC Scanner home position sens...

Страница 105: ...nt forward No 1 mirror mount Signal plate Scanner home position sensor PS1 Photosensitive drum revolution Transfer drum revolution Side A sensor PS2 Side B sensor PS3 Video signal Scanner motor PM15 Scanner HP sensor PS1 Scanning lamp LA2 Start key ON Scanner forward Scanner in reverse SCRCT Takes measurements for shading correction ODETCT Performs original position detection black original detect...

Страница 106: ...If it should turn on because of an erratic operation the copier will immediately stop scanning Figure 3 104 shows the movement of the scanner during copying operation The start position is the point reached by the scanner by moving approximately 61 mm from the home position Figure 3 104 Original scanner home position sensor PS1 SCHP Scanner motor Forward In reverse Operation Switches to forward mo...

Страница 107: ...e scanner forward and in reverse and changes its speed according to the selected reproduction ratio When moving the scanner in reverse the speed of rotation remains constant regardless of the selected reproduction ratio To accommodate the sheet to sheet distance needed when retaining two sheets of paper on the transfer drum the scanner is moved in reverse at a high speed about ten times as fast as...

Страница 108: ...ng the scanner forward at a reproduction ratio of 90 The HOLD OFF signal is used to prevent the motor from overheating while it is at rest in standby state E208 The communication between the scanner motor driver PCB and the CPU PCB is disrupted B Changing the Reproduction Ratio The reproduction ratio in main scanning direction drum axial direction is changed by reading every so many image signals ...

Страница 109: ...scanning lamp is on or not 3 Controls the intensity of the scanning lamp so as to keep the intensity to a specific level against fluctuations in power voltage Figure 3 301 CPU PCB AC power supply J9 FU1 24V PWM 1 J10 3 24V J2004 J450 4 1 7 10 9 B4 B1 B2 6 TIM RST LACNTL LAON LAERR LAON S 4 B7 B5 Rectifying circuit Lamp regulator drive circuit Error latch circuit Switching circuit Intensity control...

Страница 110: ...control panel and activate the auto shut off mechanism If such has happened remove the cause and turn on the power switch to reset the copier In addition the copier is equipped with the following hardware protective mechanisms to protect against lamp malfunctions If the internal temperature of the thermal switch exceeds 175ºC the thermal switch turns off to cut off the power to the lamp If an over...

Страница 111: ... that comes with the screw used for the grounding wire and the varistor to ensure electrical continuity 6 Do not operate the machine with any of its parts removed unless otherwise mentioned 7 Keep in mind that the laser shutter is designed to close in response to the left cover switch i e when it turns off as when the left front cover is opened If you must operating the copier with the left front ...

Страница 112: ...403 1 2 1 3 3 3 4 5 6 6 Shift the scanning lamp to where the right stay 2 was found Turning a flat blade screwdriver in the direction of the arrow 5 open the electrode plate in the direction of the arrow 6 to detach the scanning lamp Do not work if the surface of the scanning lamp is hot Do not leave fingerprints on the surface of the scanning lamp Dry wipe the surface of the scanning lamp if it i...

Страница 113: ...gure 3 405 Figure 3 406 4 Remove the two screws 3 and detach the left stay 4 5 Remove the two screws 5 and detach the standard white plate 6 4 Mounting the Standard White Plate Mount the standard white plate a as shown i e its cut off b is toward the front c 1 Place the standard white plate 6 by butting it against the right stay 7 2 Secure the left stay 4 in place with two screws 3 as if to butt i...

Страница 114: ...screws and detach the scanner drive motor from the support plate Figure 3 407 2 Adjusting the Tension of the Belt When Mounting the Scanner Drive Motor 1 Put the belt over the pulley and tighten the screw by moving the motor as much as possible to the right Take extra care when mounting the motor so that you will not trap the scanner cable during the work It is a good idea to push away the scanner...

Страница 115: ...cover 6 Remove the upper cover 7 Remove the left stay 1 and the standard white plate 2 then detach the right stay 3 Mount the standard white plate a so that its cut off b is toward the front c Figure 3 409 8 Remove the flywheel 9 Remove the original exposure cooling fan 1 10 Remove the four screws 4 and detach the RDF mount left rear on the fixing assembly side 5 Figure 3 410 1 3 2 a b c 4 4 5 ...

Страница 116: ...o that the pulley shaft 6 of the No 2 mirror mount is visible through the long hole in the side plate Figure 3 411 Front of the Copier Figure 3 412 Rear of the Copier 12 Fit the binding screw M4x8 7 to the pulley shaft and temporarily secure the pulley to the side plate front rear in place thereby temporarily securing the No 2 mirror mount in place Figure 3 413 6 6 7 7 ...

Страница 117: ...he scanner cable on the pulley and hooks as shown Take care not to damage the cable by the edge of the metal plate Keep the four screws 8 loose during the work Figure 3 414 14 Remove the screw 7 fitted in step 12 both front and rear 15 Loosen the screw on the mirror positioning tool FY9 3040 and extend the arm 9 fully Figure 3 415 1 2 3 4 6 8 5 8 8 9 ...

Страница 118: ...R 1999 PRINTED IN JAPAN IMPRIME AU JAPON 3 15 CHAPTER 3 EXPOSURE SYSTEM 16 Fit the mirror positioning tool 10 between the No 1 mirror mount and the No 2 mirror mount and insert the pin 11 that comes with the mirror positioning tool Figure 3 416 Figure 3 417 11 10 10 11 ...

Страница 119: ...r cable to the No 1 mirror mount with two screws 13 through the angle hole in the side plate Figure 3 418 Figure 3 419 18 Detach the mirror positioning tool 19 When all work is done move the No 1 mirror mount by hand as if to make about 10 A3 full scans thereby adapting the cable to the pulley and the hooks Then fully tighten the four screws 8 that have been kept loose 13 12 13 12 ...

Страница 120: ...ine Width Detection Circuit 4 9 G Chromatic Space Correction Circuit 4 10 H Direct Mapping Circuit 4 10 I Logarithmic Correction and BGR to YMC Conversion 4 11 J Toner Color Correction Circuit 4 12 K Coloring Contour Processing 4 12 L Density Processing 4 13 M Enlargement Reduction Shift and Edit Processing 4 13 N Sharpness Filter Processing 4 14 O Anti Counterfeit Mechanism 4 14 P CMYBk RGB Integ...

Страница 121: ......

Страница 122: ...d by an original into electrical signals Analog processor PCB Performs analog image processing odd even number bit integration BGR level matching A D conversion Image processor PCB Performs digital image processing shading YMCBk conversion various image processing Table 4 101 Figure 4 101 No 2 mirror No 3 mirror No 1 mirror Scanning lamp Image Processing System Lens CCD driver CCD Laser controller...

Страница 123: ...R Number of CCD pixels 5000 pixels line Output system 2 channels odd even number Table 4 201 B CCD Driver Circuit The CCD driver reduces the impedance of image signals from CCD in its buffer impedance reduction circuit and sends the result to the analog processor PCB Figure 4 201 B G R OSAG CCD OSBG OSAB OSBB OSAG OSBG G ODD G EVEN B ODD B EVEN R ODD R EVEN CCD driver PCB Buffer impedance reductio...

Страница 124: ...six separate channels according to odd number bits and even number bits are held by sample hold signals SH and are integrated into image signals of three channels B G R to suit the select signal SEL A D conversion The A D conversion circuit converts B G and R image signals into 8 bit digital signals each in sync with the ADCLK signal and sends the result to the image processor PCB Table 4 301 Figu...

Страница 125: ...ction available as a standard indicates a function available as an option and a function not available Either an IP IF PCB or an IP ED PCB may be installed as an option PCB Description IP MOTHER bus for each IP PCB IP motherboard IP MAIN shading correction 3 line position matching color IP main correction original size detection chromatic space compression logarithmic correction coloring contourin...

Страница 126: ...ge line width detection Shading correction 3 lineCCD position matching Sensor color correction Chromatic space correction Direct mapping Logar ithmic correc tion Toner color correc tion Coloring contour ing Density proc essing Enlarge ment reduc tion Slanting Sharpness filter processing Anti counterfeit processing To laser controller PCB IP ED PCB CMYK integra tion Output color correction Texture ...

Страница 127: ...rates its output Figure 4 402 3 The shading correction circuit compares the measurements taken in 2 against the target value determined in 1 and saves the difference as the shading correction value REF 1 A bar code label is attached to the copier s standard white plate At the factory light of a specific intensity is directed to the standard white plate and measured B G and R values the result is c...

Страница 128: ...ay of the G image signal is maximum at a 400 ratio As a result the R image signal and the B image signal are sent out with a delay of 48 lines and 24 lines respectively D Sensor Color Correction Circuit The sensor color correction circuit serves to correct the transmission characteristics of the B G and R filters found inside the CCD Ideally each filter should pass light of specific wavelengths an...

Страница 129: ...on detection circuit is used to find out the size and position of an original on the copyboard It identifies an original as being a rectangle or a square possessing coordinates X1 Y1 and X2 Y2 found on the ends of a diagonal line Part 2 Chapter 3 2 15 Figure 4 405 If an RDF is installed the position of an original placed on the copyboard glass cannot be checked X1 X2 Y1 Y2 P1 P2 0 0 Original Copyb...

Страница 130: ...he pixel in question is the edge of an input image or not 3 Line Width Detection Detects the width of the line forming the edge of an input image Part 2 Chapter 3 2 9 Figure 4 406 REF 1 Black detection ACS is performed using the black detection signal ACSROI generated during pre scanning 2 The black detection signal ACSROI edge signal EDGE and line width signal LWTH from the black detection circui...

Страница 131: ...e printer unit is not reproduced faithfully To compensate for such discrepancies the copier is designed to identify the chromatic space hue brightness and saturation of the original from the RGB data it reads during pre scanning and converts the result into data that fits the range of color reproduction offered by its printer unit thereby enabling faithful reproduction of the original Figure 4 407...

Страница 132: ...not necessarily have linear characteristics To compensate for the discrepancy the copier performs level conversion as shown in Figure 4 408 b BGR to YMC Conversion The intensity of light passing through each of the filters B G R of the CCD and the density of Y M C of an original are in a complementary relationship enabling level conversion B to Y G to M R to C as shown in Figure 4 409 and generati...

Страница 133: ...processed edited according to instructions on specific colors or areas selected on the control panel or the editor A selected area is divided into a text area and a background area area without image data and the text area is further divided by the IP ED PCB into a character body area character contour area and shadow area each of which is subjected to the following image data processing editing 1...

Страница 134: ...UST COLOR OFST Y OFST M OFST C OFST K e Text photo mode selection In keeping with items a through c above a dark curve or light curve shown in Figure 4 411 is selected For mono black character mode however the curve will be as shown in Figure 4 412 Figure 4 411 M Enlargement Reduction Shift and Edit Processing When wiring to and reading from memory image data is processed for the following Part 2 ...

Страница 135: ... Chapter 3 2 8 O Anti Counterfeit Mechanism The copier is equipped with the following two mechanisms to prevent the production of counterfeit bank notes and certificates 1 Counterfeit Tracing Mechanism The ID number stored in the copier is printed on all copies The number is not visible to the eye and any copy of a bank note or certificate can be traced to the copier used to make it 2 Bank Note De...

Страница 136: ...he control panel or the editor Q Texture Processing The image data read during pre scanning is stored in memory for reading at time of image processing according to the instructions from the control panel R Color Conversion The color conversion block performs the following processing according to the instructions from the control panel or the editor Color conversion Posterization Solarization The ...

Страница 137: ...sher that comes with the screw used for the grounding wire and the varistor to ensure electrical continuity 6 Do not operate the machine with any of its parts removed unless otherwise mentioned 7 Keep in mind that the laser shutter is designed to close in response to the left cover switch i e when it turns off as when the left front cover is opened If you must operating the copier with the left fr...

Страница 138: ...e four screws 1 and detach the lens mount cover 2 Figure 4 501 4 Remove the nine screws 3 and detach the laser unit cover front 4 200V model only 5 Remove the two screws 5 and detach the laser unit cover rear 6 200V model only 6 Remove the two screws 7 and detach the two CCD unit retaining spring 8 7 Remove the grounding plate 9 Figure 4 504 Figure 4 502 Figure 4 503 8 Lift the CCD unit and discon...

Страница 139: ...tach the laser scanner cover 4 Figure 4 505 Move the mirror mount fully to the left Take care not to damage the power supply line 5 of the scanning lamp 5 Remove the two screws 6 and detach the IP upper cover 7 Take care not to trap the flat cable from the image processor PCB between the base plate and the analog processor PCB Figure 4 506 6 Remove the two screws 8 and detach the harness retainer ...

Страница 140: ...ve the delivery upper cover 2 Remove the two screws 1 and detach the image processor PCB cover 2 Figure 4 508 3 If the IP ED or IF PCB is installed remove the two screws 3 and detach the interface harness trainer 4 You need not perform this step when removing the IP ECO 4 Remove the two screws from both ends of each PCB then shift up the levers on both ends to detach the image processor PCB 1 2 4 ...

Страница 141: ......

Страница 142: ... BD SIGNAL 5 3 III LASER DRIVER CIRCUIT 5 4 CHAPTER 5 LASER EXPOSURE SYSTEM A Controlling the Laser System 5 4 B Controlling the Temperature of the Laser Unit 5 5 IV LASER SCANNER MOTOR 5 6 V DISASSEMBLY ASSEMBLY 5 7 A Electrical Parts 5 8 This chapter explains the operations and functions of the copier s laser exposure system and provides an outline of the timing at which various associated parts...

Страница 143: ......

Страница 144: ...aser scanner motor M3 Brushless DC motor BD mirror BD PCB Laser detection BD signal generation Laser controller PCB Laser emission timing and video signal control Laser driver PCB Laser emission control Laser scanner motor driver PCB Laser scanner motor rotation control Figure 5 101 Figure 5 101 DC driver PCB 8 facet mirror Laser scanner motor M3 Imaging lenses Cylindrical lens Collimating lens La...

Страница 145: ... the drum 2 Laser Scanning Method Beam spot scanning 3 Synchronization Control By the BD signal in main scanning direction By the ITOP signal in sub scanning direction 4 Laser Scanner Control Constant rotation speed B Sequence of Operations laser exposure system Figure 5 102 A4 LTR 2 Copies Full Color Direct Cassette 1 Start key ON Photosensitive drum revolution Transfer drum revolution Side A sen...

Страница 146: ... is used to send video signals from the image processor PCB to the laser controller PCB The laser controller PCB is designed to correct video signals and the laser driver PCB is used to send out video signals as laser intensity control signals in sequence Figure 5 201 E100 The BD signal is not detected within a specific period of time Laser controller PCB Video signal BD RBD Laser driver PCB Laser...

Страница 147: ... laser outputs Each of the signals has the following function 1 PH TX h200 switch signal to suit copying mode Serves to switch resolutions in main scanning direction i e to suit text output or photo output in sub scanning direction it is fixed to 400 dpi 2 PVE sync signal Serves as the sync signal when transmitting video signals 3 400 Signal Serves to select 400 dpi when 1 Figure 5 301 VD0 VD7 VCL...

Страница 148: ...eady signal Serves to indicate the state of the laser it is 0 when the laser is on and is 1 when the laser is off For VR2 see the instructions on how to adjust laser power under II B 2 Adjusting Laser Power in Chapter 13 REF When printing a test pattern in service mode the output command from the CPU PCB causes the laser controller PCB to form the appropriate test pattern for output B Controlling ...

Страница 149: ...a specific speed when the DC driver PCB causes the laser scanner motor drive signal LSMON to go 0 Figure 5 401 E110 If an error causes the rotation speed of the motor to deviate the laser scanner motor ready signal LSMRDY goes 0 causing the copier to indicate the code DC driver PCB LSMRDY LSMON Laser scanner motor PCB M3 Speed control circuit Motor driver Referenc pulse generation circuit Rotation...

Страница 150: ...her that comes with the screw used for the grounding wire and the varistor to ensure electrical continuity 6 Do not operate the machine with any of its parts removed unless otherwise mentioned 7 Keep in mind that the laser shutter is designed to close in response to the left cover switch i e when it turns off as when the left front cover is opened If you must operating the copier with the left fro...

Страница 151: ...processor PCB 3 Remove the nine screws 1 and detach the laser unit cover front 2 200V model only 4 Remove the two screws 3 and detach the laser unit cover rear 4 200V model only Figure 5 501 5 Remove the CCD unit 6 Disconnect the three connectors 5 and remove the two screws 6 then detach the original scanner motor driver PCB 7 Figure 5 502 2 Removing the Laser Scanner Unit 1 Remove the copyboard g...

Страница 152: ...Disconnect the five connectors 2 and remove the two screws 3 then remove the metal fixing 4 Figure 5 504 7 Remove the four screws 5 M4x12 and detach the laser scanner unit 6 Figure 5 505 When replacing the laser scanner unit hold it by its metal area or die cast member do not touch the laser driver PCB or the lens assembly When replacing the laser driver PCB further take care never to touch any of...

Страница 153: ...the factory If they must be replaced in the field be sure to replace them as a pair Figure 5 506 1 Remove the laser scanner unit from the copier 2 Disconnect the three connectors 1 and remove the six screws 2 then detach the laser controller PCB 3 3 Remove the six screws 4 and detach the laser driver upper cover 5 Figure 5 507 4 Disconnect the four connectors 6 and remove the five screws 7 then de...

Страница 154: ...he pins of the laser otherwise you can damage the laser by static electricity Figure 5 510 4 Adjusting Laser Power If you have replaced the laser scanner unit laser driver PCB or laser controller PCB enter the values recorded on the label that comes with the PCB in service mode ADJUST LASER Attach the label behind the right front cover If the output of the laser has decreased perform the following...

Страница 155: ...close 6 Remove the four screws 1 and detach the left inside cover 2 Figure 5 511 7 Remove the screw 3 and detach the laser power checker slot cover 4 Figure 5 512 8 Shift the laser power checker switch to 2 9 Holding the laser power check 5 so that its light receiving face is to the right insert it into the slot 6 10 Insert the lead wire of the laser power check into the digital multimeter set the...

Страница 156: ...hing the reading of the laser power checker turn VR2 gradually taking care not to increase the power in excess Turning VR2 c o u n t e r c l o c k w i s e reduces the laser output The laser diode is vulnerable Be sure NOT to exceed the value recorded on the label Take care NOT to press the Start key while making adjustments using VR2 14 Press the Stop key to stop the laser output 15 Perform laser ...

Страница 157: ... adjust the following according to their respective values recorded on the label T VFF P3 V00 P3 VFF 1 P3 VFF 2 P3 VFF 3 P3 VFF 4 To stop the laser output press the Stop key Use the following as a guide to standard values Item Standard Laser ON key T V00 Offset Value T V00 ON 0 15 to 0 20 T VFF Pmax T VFF ON x 70 P3 V00 Offset value P3V00 ON 0 1 to 0 15 P3 VFF 1 Pmax x 45 P3 V1 ON P3 VFF 2 Pmax x ...

Страница 158: ...LIES 6 28 A Outline 6 28 B Locking the Developing Assembly 6 29 C Controlling the Concentration of Color Toner 6 31 D Controlling the Concentration of Black Toner 6 35 E New Gradation Correction Control patch detection CLC1140 1160 1180 6 46a F Supplying Toner 6 47 V PHOTOSENSITIVE DRUM CLEANER ASSEMBLY 6 48 A Outline 6 48 B Controlling the Reciprocating Mechanism of the Cleaning Blade 6 49 C Cont...

Страница 159: ......

Страница 160: ...ironment sensor Using DC current level control setting by paper type environment sensor Internal external static Using DC constant current control on off control eliminating current control Using DC current level control setting by paper type environment sensor Using AC constant voltage control on off control Post cleaning current control Using DC constant current control on off control Using curr...

Страница 161: ...k External static eliminator Post cleaning charging assembly Separation charging assembly Primary charging assembly Laser exposure Potential sensor Developing cylinder Internal static eliminator Transfer blade Photosensitive drum Black toner concentration sensor HVT DC HVT AC PCB Attraction brush Developing bias PCB Environ ment sensor Potential measurement PCB DC driver PCB Gradation sensor Trans...

Страница 162: ...lation to the position of paper The relationship between the C sensor and the signal plate is as follows Table 6 102 a State of the Transfer Drum and the Signal Plate D Figure 6 102 Turning On the Transfer High Voltage by the Signal Plate D Signal plate Signal plate C Signal plate D Signal state Description Turns on the side B internal external static eliminator high voltage output Turns on the si...

Страница 163: ...U JAPON b State of the Transfer Drum and the Signal Plate C Figure 6 103 Turning on the Transfer High Voltage and Internal External Static Eliminator High Voltage by the Signal Plate C Transfer drum PCB DC driver PCB HVT DC HVT AC PCB Paper side B Transfer blade Internal external static eliminator C sensor PS4 Signal plate C Paper side A ...

Страница 164: ...P D falling edge detected by the C sensor is wrong 1001 The signal falling edge of the side B sensor is not generated after the signal of the SP D falling edge has been generated 1002 The signal rising edge of the side B sensor is not generated after the signal of the SP C rising edge has been generated 1003 The signal of the SP C rising edge is not generated after the signal of the side B sensor ...

Страница 165: ...is generated 10 ms earlier than normal after the signal of the side A sensor falling edge has been generated 1201 The signal of the side B sensor falling edge is generated 10 ms later than normal after the signal of the SP D falling edge has been generated 1202 The signal of the side B sensor rising edge is generated 10 ms later than normal after the signal of the SP C rising edge has been generat...

Страница 166: ... revolution Pre registration paper sensor PS30 Laser Scanner motor PM15 Scanning lamp LA2 Post cleaning high voltage output Pre exposure lamp LA1 Developing bias DC component Primary high voltage output Transfer high voltage output Developing bias AC component External internal static eliminator high voltage output Separation high voltage output Drum motor M2 Main motor M4 Attraction high voltage ...

Страница 167: ...developing bias 3 Determining the laser output Figure 6 201 shows the construction of the potential control mechanism Figure 6 201 Gradation sensor Test print IP MAIN PCB CCD Image proc essing circuit Laser driver Primary charging assembly grid Laser exposure Potential sensor Transfer drum Photosensitive drum Developing cylinder Black toner concentration sensor CPU PCB HVT DC PCB Developing bias P...

Страница 168: ...in environment Executing auto gradation correction Sensor used Potential sensor Potential sensor Environment sensor 1 2 3 4 Power On Measures the surface potential of the drum Measures the dark area potential attenuation Determines the contrast potential using the environment sensor Determines and controls the grid bias and developing bias Standby Start Key On Determines the contrast potential usi...

Страница 169: ...ent 2 Measuring the Surface Potential of the Drum As preparatory work taking place prior to the measurement of the machine s drum surface potential the photosensitive drum is charged to a level of Vg suited to the environment in question during initial multiple rotation or during copying operation specifically the measurement of the potential VdI is used to see if the charging assembly is operatin...

Страница 170: ...t is executed when the power switch is turned on while the temperature of the upper fixing roller is 130 C or less during initial multiple rotation following jam removal and once every two hours thereafter or when FUNCTION DPC DPC is initiated in service mode While dark area potential attenuation measurement is being executed the surface potential Vd5 occurring when the post cleaning charging asse...

Страница 171: ...ge is set to 110 to 130 V according to the content of moisture measured by the environment sensor Then a point where the contrast potential between Vdc and VL Figure 6 204 is identical to the target contrast potential is found and the target values of the grid bias and the developing bias are obtained Figure 6 204 The measurements of the surface potential may be checked by executing FUNCTION DPC D...

Страница 172: ...4 Vd3 Vg1 Vg2 Post cleaning high voltage output Dark area potential attenuation Initial drum surface potential Transfer drum locking motor Pre exposure lamp Grid bias Laser exposure Potential sensor measurement Drum motor Transfer drum revolution Photosensitive drum revolution VL2 VL1 Vd1 Vd1 Vd2 Vg1 Vg2 6 6 COPY VL2 Vd1 VL4 Vd3 Vd5 8 8 9 9 10 10 11 11 LSTR Vd1VL2 VL4 VL5 Vd3 Vg1 Vg2 Pre exposure ...

Страница 173: ...gure 6 207 2 Place the generated test print on the copyboard glass and have the copier read it The copier will determine the laser control value and the gradation control value from the image data it collected from the test print Thereafter in the case of the CLC1140 1160 1180 a sample color toner image patch image is deposited on the photosensitive drum using the value thus determined The patch i...

Страница 174: ...s 100 V or less Vd1 Vd2 VdI is 900 V or more The difference between Vd1 and Vd2 is 100 V or less Vd5 is 100 V or less The difference between Vd1 and VL1 is 30 V or less and in addition Vd1 is 350 or more or The difference between Vd2 and VL2 is 30 V or less and in addition Vd2 is 550 V or more Vd1 is 300 V or less and Vd2 is 500 V or less VL1 is 200 V or more and VL2 is 250 V or more Vd1 is 100V o...

Страница 175: ...d2 is 550 V or less VL2 is 50 V or less Photosensitive drum error in potential control The grid bias upper limit is reached The grid bias lower limit is reached The developing bias upper limit is reached The developing bias lower limit is reached The Vd1 upper limit his reached or the photosensitive drum has deteriorated The VL1 upper limit is reached The Vd2 upper limit is reached The VL2 upper l...

Страница 176: ... is used as a grid bias protection circuit If overcurrent occurs for example as a result of a short circuit on the grid plate the circuit will be turned off for about 0 1 sec and then will be reset automatically If a short circuit continues on the grid plate for some reason all images will be error images Each of the signals is used for the following 1 HVPR primary current activation signal When 1...

Страница 177: ... signals is used for the following 1 Controlling the Drive of the Developing Bias PCB When DBSBY is 1 The reference voltage generation circuit turns on and the developing bias PCB cooling fan drive circuit turns on Power is supplied to each circuit and the developing bias PCB cooling fan turns on Figure 6 302 J1001 A6 A5 B7 B6 A2 B3 A4 A3 B5 B4 A7 J401 3 J401 4 J402 1 J402 2 J401 7 J402 5 J401 5 J...

Страница 178: ...Application Voltage Level of the DC Bias DBDCI1 M Y DBDCI2 C Bk is controlled to 8 to 16 V a DC bias is generated at 16 V or less DBDCI1 and DBDCI2 are controlled using the data from potential control 5 Turning On Off the M C Y and Bk Developing Biases When DBS1 M DBS2 Y DBS3 C DBS4 Bk is 1 the developing bias is generated 2 When Controlling the M Developing Bias 1 DBSBY is 1 2 DBBPC1 M Y is 1 3 D...

Страница 179: ...e current control to suit the type of transfer medium regulator thick transparency and the temperature and humidity readings from the environment sensor Each of the signals is used for the following 1 HVATC attraction charging current ON OFF control signal When 1 the charging output is ready 2 HVATI attraction charging current level control signal Controlled to 8 to 16 V at 16 V or less the high v...

Страница 180: ...nt sensor Each of the signals is used for the following 1 SPDCC separation charging DC component ON OFF control signal When 1 the charging DC component output is ready 2 SPDCI separation charging DC component current level control signal Controlled to 3 to 11 V at 3 V or more the high voltage output is generated 3 SPACC separation charging AC component ON OFF control signal When 1 the charging AC ...

Страница 181: ...nternal static eliminator circuit of the HVT AC circuit 1 The separation DC AC high voltage output is absent 2 The external internal static eliminator AC high voltage output is absent 3 The internal static eliminator DC high voltage output is absent 4 The external internal static eliminator AC component ON OFF control signal HVIOC remains 1 for more than a specific period of time 5 The connector J...

Страница 182: ...rnal internal static eliminating current AC component ON OFF control signal When 1 the static eliminating current AC component output is ready 2 HVIDCC internal static eliminating current DC component ON OF control signal When 1 the static eliminating current DC component output is ready 3 HVIDCI internal static eliminating current DC component level control signal Controlled to 3 to 11 V at 11 V ...

Страница 183: ...llowing items of control 1 Controlling the static eliminating charge to a constant current level Each of the signals is used for the following 1 HVCC post cleaning charge ON OFF control signal When 1 the high voltage output is ready 2 HVCI post cleaning charge level control signal Controlled to 3 to 11 V at 11 V or less the high voltage output is generated Figure 6 306 1 2 J1012 A8 J411 6 T302 HVC...

Страница 184: ... TH Reference temperature 41ºC Error temperature 109ºC Table 6 301 When the error temperature is reached the control IC turns on to shut off the power to the drum heater 2 Controlling the Power Using the Environment Switch SW6 As long as the environment switch SW6 is on the drum heater remains powered regardless of the state on off of the main switch When the switch is off on the other hand the dr...

Страница 185: ...e power to the drum heater and the cassette heater thereby reducing power consumption 100 120 V model only 3 DRHERR It goes 1 when SSR2 is supplying the drum heater and the cassette heater with power Figure 6 308 E062 This error occurs if the DRHERR signal goes 1 while the DRHOFF signal is 1 and SSR2 is supplying the drum heater and the cassette heater with power SSR1 RL1 5V SW1 SW6 ON H3 DRHOFF D...

Страница 186: ...FW is 1 and PRIMRV is 0 while moving in reverse when PRIMFW is 0 and PRIMRV is 1 2 Conditions for Operation 1 The temperature of the fixing assembly is 130ºC or less when the power switch is turned on and during initial multiple rotation following jam removal 2 An image was formed on the photosensitive drum as many as 2000 times since the previous cleaning operation The count is incremented by 4 f...

Страница 187: ...trolling the concentration of black toner 4 Controlling the supply of toner M10 CL8 CL5 CL6 CL7 Bk M C Y TS1 TS2 TS3 TS4 Y Bk C M CL3 CL2 CL1 CL4 PM4 PM2 PM3 PM1 M4 SW7 M2 ATR4 ATR1 ATR2 ATR3 Waste toner feedscrew lock detecting switch Drum motor Hopper motor Toner supply clutch Toner level sensor Color toner concentration sensors Photosensitive drum Black toner concentration sensor Developing cyl...

Страница 188: ...ng assembly is in its unlocked state Bk M C Y PM3 PM2 PM1 PM4 PS53 PS51 PS49 PS55 Photosensitive drum Locking spring Developing assembly locking cam Developing assembly locking driver PCB DC driver PCB B Locking the Developing Assembly When the developing assembly locking motor PM1 through PM4 turns on the developing assembly locking cam starts to rotate to lock the developing assembly to the phot...

Страница 189: ...Detail code Error 0100 The M developing assembly HP sensor does not turn on 0200 The C developing assembly HP sensor does not turn on 0300 The Y developing assembly HP sensor does not turn on 0400 The Bk developing assembly HP sensor does not turn on 0101 The M developing assembly HP sensor does not turn off 0201 The C developing assembly HP sensor does not turn off 0301 The Y developing assembly ...

Страница 190: ...tration time of installation or replacement of the developer Measuring the concentration of toner Measures the concentration of the developer on the developing cylinder during copying operation Controlling the toner supply operation The target concentration and the concentration during copying operation are compared to determine the amount of toner to supply Controlling LED deterioration Light com...

Страница 191: ...linder Photodiode for measurement of reflected light DC driver PCB Reflecting mirror M C Y into X SGNL initial value REF initial value Rate of amplification LED ON shines on developing cylinder Start key ON Developing bias ON developing cylinder ON rotates Compares the initial data and the copy data to compute the change in toner concentration Meaures the concentration of developer during copying ...

Страница 192: ...ecked in service mode Table 6 403 3 Controlling the Color Toner Concentration Measurement Mechanism of the Photosensitive Drum The concentration of color toner on the photosensitive drum assembly is measured by the sensor used to measure the concentration of black toner Figure 6 406 The result of measurement is used as feedback when changing the target concentration of each toner For principles of...

Страница 193: ...erations CLC1100 1120 1130 1150 or 25 copying operations CLC1140 1160 1180 regardless of the selected copying mode or copying size Figure 6 404 Measuring M Developer M B COPY M 10 B A INTR Developer Side of transfer drum Image on photosensitive drum Measurement by Bk toner concentration sensor Measurement by color toner sensor Measures the concentration of toner on the developing cylinder and dete...

Страница 194: ...l concentration The concentration of a sample image is measured reference concentration at time of installation or replacement of developer Measuring the concentration of toner The concentration of the sample image during copying operation is measured Controlling the supply of toner Compares the initial concentration and the concentration during copying operation to determine the amount of toner t...

Страница 195: ... of operations used to measure the concentration of black toner When measuring the concentration of color toner PT SIG M C Y and PT REF M C Y are measured LED ON shines on the photosensitive drum Start key ON Rotates the photosensitive drum Forms a sample image on the photosensitive drum Detects dirt on the window Compares the initial data and copy data and Computes the change in toner concentrati...

Страница 196: ... and shining infrared light to a black toner image on the photosensitive drum will enable detection of the concentration of toner The density of a black toner image will decrease lighter as the amount of black toner inside the developer decreases and the degree of reflected light will increase Item Description Adjustment value PT SIG K Bk toner concentration signal Bk SGNL 338 150 PT SIG D 614 150...

Страница 197: ...r switch is turned on or while control rotation CNTR takes place during copying operation to measure PT SIG D without toner on the photosensitive drum The level of PT SIG D is low if the sensor window is soiled The ratio between the level of PT SIG D and a predetermined value is stored in memory and used to correct the output of the sensor while controlling the concentration of the toner inside th...

Страница 198: ...pying on side B a patch is formed in the area that faces the linking plate along the trailing edge of the image 2 When copying on side B a patch is formed in the area that faces the linking plate along the leading edge of the image Figure 6 408 Using Side B Bk n COPY Bk n 4 INTR The concentration of toner on the pho tosensitive drum is measured and an amount of toner to supply is dete rmined based...

Страница 199: ... related detail code b Flow of initial setting control using the black toner concentration sensor and its related detail code at time of replacement of developer c Flow of initial setting control using the color toner concentration sensor and its related detail code at time of replacement of developer d Flow of control using the black toner concentration sensor during copying operation and its rel...

Страница 200: ...embly FUNCTION INSTALL STIR FUNCTION INSTALL INIT K Stirs the developer inside the developing assembly LED on uses PS1 2 to check light converts light into voltage to set gain RGAIN K set to 4 V PS1 SGAIN K set to 3 V PS2 LED on uses PS1 2 to check light converts light into voltage to set the following REF D PS1 SGNL D PS2 As many as 16 patches are formed on the photosensitive drum are measured by...

Страница 201: ...if the measurement of P SGNL C M Y K is as indicated Items of detection The initial value is 305 or lower The initial value is 371 or higher The initial value of SGNL M C Y that has been read is 683 or lower The initial value of SGNL M C Y that has been read is 749 or higher Detail code 0424 0434 xx24 xx34 Figure 6 409 Photosensitive drum Photosensor PS1 Photosensor PS2 Black toner concentration s...

Страница 202: ...Stirs the developer inside the developing assembly FUNCTION INSTALL STIR x FUNCTION INSTALL INIT x Stirs the developer inside the developing assembly LED on uses PS1 to check light converts light into voltage to set the following REF M C Y PS1 LED on uses PS1 to check light converts light into voltage to set gain SGAIN M C Y set to 4 V LED on uses PS2 to check light converts light into voltage to ...

Страница 203: ...mputation Flow of operation Start key ON during initial rotation Forms a patch in the area coming face to face against the linking plate of the transfer drum The density of the patch is measured LED on uses PS1 to check light converts light into voltage Compares REF xx initial setting and REF xx read in 5 1 Item of detection The PS1 PS2 connector is disconnected The reading is 130 or higher The re...

Страница 204: ... 371 CLC 1100 1120 1130 1150 400 the other or higher The result is 3 00 or higher 20 times or more continuously compared with the initial setting SGNL K The result is 3 00 or lower 20 times or more continuously compared with the initial setting SGNL K The result is 5 or higher compared with the initial setting SGNL K The initial setting is 683 CLC 1100 1120 1130 1150 655 the other or lower The res...

Страница 205: ...to check light converts light into voltage Compares the initial setting SGNL M C Y and SGNL M C Y read in 3 3 Detail code xx00 xxA1 xxB1 xx61 xx71 xx90 xxA0 xxB0 xx66 xx76 xxC0 xxD0 xxE0 Items of detection The PS1 PS2 connector is disconnected The result is 30 or more lower than the initial setting REF M C Y The result is 30 or more higher than the initial setting REF M C Y The initial setting is ...

Страница 206: ...ensitive image and the LED sensor PS to take readings in the form of the intensity signal of the reflected light and the reference signal It then compares these signals against the target value stored in the RAM to compute any changes in toner concentration for use in gradation correction control The following is the flow of gradation correction control In response to a press on the Start key rota...

Страница 207: ...P SUM Y M C K Result of integration of control signals at time 32 of gradation correction P GRND Y M C K Settings of surface reflection light intensity during initial rotation of photosensitive drum P SENS P Measurement of surface reflection light 101 1022 intensity during initial rotation of photosensitive durm P SENS Y M C K Initial reference signal 257 799 Table6 412b Photosensitive drum LED Ph...

Страница 208: ...ainst the link plate along the leading edge of the image for copying on side A Developer Side of transfer drum Image on photosensitive drum Gradation sensor PS73 Measurement by Bk sensor PS72 Measurement by color toner sensor M B COPY M 10 B A INTR Figure6 412b Using Side B REF The patch image deposited to correct gradation and the patch image deposited to control the color toner concentration are...

Страница 209: ... of Making Initial Settings and Related Detail Code at time of shipment sensor replacement The notation xx in detail code indicates the color of developing assembly xx 01 M xx 02 C xx 03 Y Initial settings 1 Sensor replacement 2 Initial setting 2 1 Drum rotation 2 2 P SENS Y M C K reading 3 End Flow of operation The gradation sensor is replaced FUNCTION SNS ADJ P SENS The photopositive drum is rot...

Страница 210: ...C K reading 3 End Flow of operation Auto gradation correction is executed in user mode auto The photosensitive drum is rotated The LED is turned on and the light reflected by the surface of the photosensitive drum is measured by the sensor PS then the intensity of light is checked by conversion into voltage On the surface of the photosensitive drum a sample color toner image patch image is created...

Страница 211: ...ial rotation Measure DISPLAY DENS P SENS P and then sets the following DISPLAY DENS P GRND Y M C K On the surface of the photosensitive drum a sample color toner image patch image is formed in the area coming face to face against the link plate of the transfer drum The light reflected by the patch image is measured The LED is tuned on and the sensor PS is used to check the light reflected by the i...

Страница 212: ...evel sensor Piezoelectric oscillator Add Toner indicator Turns on the control panel at the end of copying operation Table 6 406 The hopper motor rotates in reverse for the following to stir the inside of the hopper 1 When FUNCTION INSTALL HP STIR 4 is executed in service mode at time of initial installation or after replacement of the hopper for about 2 min 2 When a toner absent condition is ended...

Страница 213: ... the photosensitive drum cleaner assembly are as follows 1 Controlling the reciprocating mechanism of the cleaning blade 2 Controlling the collection of waste toner Figure 6 501 M7 M4 Waste toner feedscrew lock detecting assembly Photosensitive drum cleaner assembly Cleaning blade reciprocating motor Waste toner feedscrew Cleaning blade Main motor LED Photosensitive drum Waste toner detecting diod...

Страница 214: ...ontrolling the Collection of Waste Toner 1 Checking the Waste Toner Case full The detection mechanism used to find out whether the waste toner case is full consists of the following Table 6 502 Item Description Sensor Transmission type sensor LED phototransistor Waste Toner Case Full message Indicated on the control panel at the end of copying operation Waste toner case capacity Equivalent of abou...

Страница 215: ...toner could leak from the drum cleaning assembly To prevent such a problem the waster toner feedscrew locking switch SW7 is used to detect a feedscrew lock condition E013 This error code is indicated when SW7 is pushed by gear A Figure 6 502 SW7 M4 If the waste toner feedscrew locks gear A shifts in the detection of the arrow Main motor Cleaner waste toner feedscrew Waste toner feedscrew Waste ton...

Страница 216: ...sher that comes with the screw used for the grounding wire and the varistor to ensure electrical continuity 6 Do not operate the machine with any of its parts removed unless otherwise mentioned 7 Keep in mind that the laser shutter is designed to close in response to the left cover switch i e when it turns off as when the left front cover is opened If you must operating the copier with the left fr...

Страница 217: ...ach the two hopper unit stopper metal fixings 3 Open the hopper unit fully 4 Remove the transfer drum rotating knob and detach the transfer cover 5 Remove the developing assemblies Bk M C Y 6 Remove the primary charging assembly 7 Remove the post cleaning charging assembly 8 Free the photosensitive drum cleaning blade from the photosensitive drum 9 Remove the cleaner unit 10 Remove the two screws ...

Страница 218: ...emove the black toner concentration sensor unit 12 Remove the screw 5 and detach the photosensitive drum positioning roll 6 Figure 6 604 13 Remove the three screws 7 then loosen the two fixing pins 8 and slide out the photosensitive drum frame unit 9 Figure 6 605 When sliding out the photosensitive drum frame unit be sure to work with extra care so as not to damage the photosensitive drum If conta...

Страница 219: ...JAPAN IMPRIME AU JAPON 14 Place the photosensitive drum unit as shown Figure 6 607 15 Place paper over the photosensitive drum as shown 16 Remove the screw 10 and remove the fixing pin unit right 11 Figure 6 608 17 Remove the three screws 12 and remove the photosensitive drum butting block front 13 Figure 6 609 10 11 12 13 ...

Страница 220: ... SYSTEM 18 Remove the threes screws 14 and detach the photosensitive drum butting block rear 15 Figure 6 610 19 Lift the stopper plate 16 and remove the scraper plate 17 Figure 6 611 20 Avoiding the protrusion 18 on the flange at the rear of the photosensitive drum slide out the photosensitive drum unit slowly Figure 6 612 14 15 16 17 18 ...

Страница 221: ...um is susceptible to light and exposure to light for a long time can lead to white spots or black bands on copies Whenever you have removed the photosensitive drum from the copier wrap it with the light blocking sheet or five to six sheets of fresh paper and keep it in a dark place Figure 6 614 REF If the photosensitive drum is exposed to light of 600 lux for 1 min and is kept in a dark place for ...

Страница 222: ...as shown in Figure 6 614a when replacing it or minute white or black dots may occur 5 Clean the black toner concentration sensor use a flannel cloth moistened with and then well wrung Mount the sensor The reason for using water is to remove charges from the sensor window of the black toner concentration sensor The presence of charges can attract toner to the sensor window After cleaning the sensor...

Страница 223: ...of the photosensitive drum will not come into contact with solvent 6 Dry wipe the window of the cleaner front sensor 7 Turn on the power switch so that the copier will be in standby state 8 Select and execute FUNCTION INSTALL STIR 4 in service mode 9 Select and execute FUNCTION SENS ADJ CLN OFST 10 Record the value under ADJUST SENS ADJ CLN THE CLN TMP on the service label behind the right front c...

Страница 224: ...ER 6 IMAGE FORMATION SYSTEM 5 Removing the Drum Heater 1 Remove the photosensitive drum 2 Remove the two screws M4x12 1 and detach the photosensitive drum flange front 2 Figure 6 615 3 Disconnect the connector 3 and pull out the drum heater 4 Figure 6 616 4 Lift off the photosensitive drum as shown Figure 6 617 1 2 4 3 ...

Страница 225: ...al black that has caked on the slip ring friction side It serves as lubricant Figure 6 619 Do NOT apply grease to the drum heater brush B Pre Exposure Lamp 1 Removing the Pre Exposure Lamp Unit 1 Remove the photosensitive drum 2 Disconnect the connector 1 and remove the screw 2 then detach the pre exposure lamp 3 Figure 6 618 5 1 2 3 1 6 Removing the Drum Heater Brush 1 Remove the rear cover 2 Rem...

Страница 226: ...arging assemblies equipped with charging wires each of which is 0 06 mm in diameter 2 Removing the Primary Charging Assembly 1 Open the hopper unit fully 2 Disconnect the connector 1 and remove the screw 2 then detach the primary charging assembly 3 Figure 6 621 3 Removing the Grid Plate 1 Remove the primary charging assembly 2 Remove the screw 1 and remove the grid plate 2 1 2 3 Figure 6 622 1 2 ...

Страница 227: ...e 2 Figure 6 623 3 Pick the cleaning pad 3 to remove Keep the following in mind for cleaning and checking the primary charging assembly Make a thorough check to be sure that the block front rear is free of melting by leakage thermal deformation caking yellowing or the like If a fault is found replace it with a new part without delay Be sure to check the inside of the block front rear as well as th...

Страница 228: ...tment Primary charging assembly Separa tion charging assembly External charging eliminator 4 mm approx Figure 6 625 6 Adjusting the Height of the Charging Wire The height of the charging wire may be adjusted by turning the screw found at the back of the charging assembly A full turn of the screw shifts the position of the charging wire by about 0 7 mm The height of the charging wire of the interna...

Страница 229: ...ion of the Bk Developing Assembly 1 Developing cylinder Figure 6 628 3 Removing the Developing Assembly 1 Open the right front cover 2 Remove the two screws and detach the hopper stopper plate then open the hopper fully 3 Remove the Y M C developing assembly Remove the screw 1 and disconnect the connector 2 then pull out the developing assembly slowly 4 Remove the Bk developing assembly Remove the...

Страница 230: ...e ATR Sensor of the Y M C Developing Assembly 1 Remove the Y M C developing assembly 2 Remove the screw 1 and slide the developing blade cover 2 to the right to remove In the case of the Y developing assembly slide it to the left Figure 6 631 3 Remove the four screws 3 and disconnect the connector 4 then remove the developing blade unit When assembling the parts force down the developing blade uni...

Страница 231: ... for removal The following uses the M developing assembly 1 Remove the developing assembly 2 Remove the screw M3x4 1 and detach the developing blade cover 2 Figure 6 634 3 Remove the four screws M3x6 3 and disconnect the connector 4 then remove the developing blade unit Figure 6 635 When assembling the part be sure to force down the developing blade unit and screw it in place Figure 6 636 2 1 4 3 ...

Страница 232: ...sheet 5 Remove the three screws 5 and detach the developing assembly lower cover 6 The screw identified as 5a is tightened over the white line Figure 6 637 6 Remove the resin screw 7 found at the front of the developing assembly and detach the electrode plate cover 8 Figure 6 638 7 Remove the two screws 9 then detach the bias wire 10 and the electrode 11 of the developing cylinder Figure 6 639 5 6...

Страница 233: ...e to leave a gap of 0 2 0 1 mm between the roll 4 and the washer 13 Figure 6 640 9 Remove the E ring 16 grip ring 17 two gears 18 bearing 19 and sleeve slider 20 at the rear of the developing assembly Figure 6 641 When assembling the part be sure there is NO gap between the gear 18 and the grip ring 19 10 Remove the two screws 21 at the rear of the developing assembly and detach the gear cover 22 ...

Страница 234: ...ing cylinder in the direction of the arrow and pull off the cylinder 25 Figure 6 644 While butting the bearing against the wall X1 of the case force the sleeve in the direction of Y and mount the grip ring Z1 making sure there is no gap In this condition butt the opposite bearing against the wall X2 of the case and mount the grip ring so that the gap between the roll and the washer is 0 2 0 1 mm F...

Страница 235: ... at an angle its gear at the rear can damage the photosensitive drum When inserting the developing assembly be sure that it is horizontal in relation to the rails and take extra care not to bring it in contact with the drum Further when inserting the black developing assembly be sure that it will not ride over the rails 7 Replacing the Developer 1 Open the hopper unit fully 2 Put a plastic bag 1 a...

Страница 236: ...disconnect the connector also 8 Remove the cap from the discharge opening and turn the gear by hand while tilting the developing assembly so as to remove all remaining developer Tilt the developing assembly farther and farther while turning the gear ultimately holding it upright 9 Fit the cap to the discharge opening 10 Mount the developing assembly to the copier 11 When the copier ends the wait u...

Страница 237: ...per into the developing assembly Try rotating the developer case slowly to avoid spilling 16 When done press the Stop key to end the operation 17 Disconnect the connector 3 and free its harness from the edge saddle then remove the screw 4 and detach the black toner concentration sensor unit Figure 6 650 4 3 CLC1100 1120 1130 1150 4 3 CLC1140 1160 1180 Figure 6 651 ...

Страница 238: ...he hopper unit and push in the roll until the first click is felt in the rail assembly at this time take care NOT to push in the hopper unit until it locks at the rear 21 Execute STIR Y M C K in service mode according to the color of developer you have replaced about 2 min each If you have replaced all four color developers execute STIR 4 22 Execute INIT Y M C K in service mode according to the co...

Страница 239: ......

Страница 240: ... the hopper stopper plate then open the hopper fully Figure 6 653 2 Removing the Hopper Unit 1 Open the hopper 2 Disconnect the two connectors 1 from the bottom of the hopper unit and remove the wire saddle Figure 6 654 3 Hold the hopper unit as shown and lift it If you are replacing the developer at the same time as replacing the hopper unit with a new one be sure to perform the work in II F Supp...

Страница 241: ...Remove the screw 1 and detach the toner receptacle 2 If the hopper motor does not rotate or fails to stop a transistor on the DC driver PCB may be damaged If such is the case replace the DC driver PCB Figure 6 656 3 Remove the two screws 3 and disconnect the two connectors 4 then remove the connector mount Figure 6 657 1 2 3 3 4 4 4 Remove the two screws 5 and remove the hopper motor Figure 6 658 ...

Страница 242: ...SYSTEM 4 Removing the Toner Supply Clutch The following uses the black hopper 1 Remove the hopper unit 2 Remove the two screws 1 and detach the hopper cover 2 Figure 6 659 3 Remove the six screws 3 and detach the hopper upper cover 4 Figure 6 660 4 Remove the two screws 5 and detach the reinforcing plate 6 Figure 6 661 1 2 1 3 4 3 3 6 5 5 ...

Страница 243: ...connectors 8 then detach the black hopper In the case of the magenta hopper remove the three screws 9 then detach the support plate 10 and the drive belt 11 in advance Figure 6 662 6 Remove the E ring 12 gear 1 13 bushing 14 E ring 15 E ring 16 and bushing 17 and disconnect the connector 18 of the hopper driver assembly then remove the clutch Figure 6 663 7 9 11 9 8 10 14 15 13 12 16 17 18 ...

Страница 244: ...e hopper unit fully 3 Remove the transfer drum knob and remove the two screws then detach the transfer unit cover 4 Loosen the screw 1 and rotate the blade releasing lever 2 clockwise unlocking direction until it stops Then tighten the screw 1 to secure and release the photosensitive drum cleaner blade from the photosensitive drum Figure 6 664 5 Remove the screw 3 Figure 6 665 6 Slide out the phot...

Страница 245: ...ened fully Do not turn the blade releasing lever counterclockwise locking direction before putting back the cleaner unit If you locked the cleaner unit in position by mistake release it then be sure to check that both edges of the scoop up sheet is normal 2 1 1 2 Replacing the Photosensitive Drum Cleaner Blade 1 Remove the photosensitive drum cleaner unit 2 Remove the screw 1 and detach the photos...

Страница 246: ...t the blade will not warp later If the amount of drum cleaner lubricant on the blade is not adequate be sure to apply a good amount before mounting it If toner is found where the blade is to be mounted be sure to remove it before starting the mounting work 6 78a 5 4 Remove the five screws 5 and detach the photosensitive drum cleaner blade When mounting the Photosensitive Drum Cleaner Blade 5 4 3 2...

Страница 247: ......

Страница 248: ...hree screws 1 and detach the photosensitive drum cleaner scoop up sheet 2 Figure 6 669 4 Removing the Photosensitive Drum Cleaner End Seal and Felt 1 Remove the photosensitive drum cleaner unit 2 When removing the end seal remove the two screws 1 and detach the photosensitive drum cleaner unit upper cover 2 Figure 6 670 3 Remove the screw 3 one each and detach the end seal 4 Figure 6 671 4 When re...

Страница 249: ... sensor to the new No 2 scoop up sheet plate 4 Mount the pre cleaning sensor assembly and the No 2 static eliminator to the copier Figure 6 673 2 Points to Note When Handling the Pre Cleaning Sensor Assembly If you have removed or replaced the pre cleaning sensor assembly be sure to perform the following 1 Dry wipe the window of the pre cleaning sensor and mount it at this time take care not to da...

Страница 250: ...ack Toner Concentration Sensor Assembly 1 Removing the Black Toner Con centration Sensor 1 Open the right front cover 2 Open the hopper 3 Disconnect the connector 1 2pc if CLC1140 1160 1180 and remove the screw 2 then slide out the black toner concentration sensor unit 3 Figure 6 674 2 3 1 CLC1100 1120 1130 1150 Figure 6 674a 2 3 1 CLC1140 1160 1180 ...

Страница 251: ... If CLC1100 1120 1130 1150 4 Remove the 2 screws 4 and take out the black toner concentration sensor from the unit then disconnect the connector 5 4 5 6 4 5 If CLC1140 1160 1180 4 Remove the 2 screws 6 5 Remove the 2 screws 4 and take out the black toner concentration sensor from the unit then disconnect the connector 5 Figure 6 674c Figure 6 674d 6 81a ...

Страница 252: ...nsor use a flannel cloth moistened with and then well wrung The reason for using water is to remove charges from the sensor window The presence of charges can attract toner to the sensor window After cleaning the sensor window with water do NOT leave droplets of water on it also do NOT dry wipe it 5 If you have removed gradation sensor for cleaning execute auto gradation correction in user mode CL...

Страница 253: ...onnector of the gradation sensor be sure that the black toner concentration sensor is ready to be detached from the unit to avoid an open circuit If you clean the gradation sensor use a flannel cloth moistened with and then well wrung The reason for using water is to remove charges from the sensor window The presence of charges can attract toner to the sensor window After cleaning the sensor windo...

Страница 254: ...e flywheel 4 Disconnect the connector 1 and remove the two screws 2 then detach the reciprocating motor assembly 3 Figure 6 677 J Waste Toner Feeding Assembly 1 Removing the Waste Toner Feedscrew Assembly 1 Remove the rear cover 2 Remove the flywheel 3 Remove the drum gear 4 Remove the four screws 1 and disconnect the high voltage connector 2 5 Disconnect the high voltage connectors of the primary...

Страница 255: ......

Страница 256: ...6 IMAGE FORMATION SYSTEM 6 Disconnect the three connectors 3 Figure 6 679 7 Remove the three screws 4 and remove the waste toner feed drive assembly 5 At this time take care not to drop gears or pins Figure 6 680 8 Remove the screw 6 and pull off the waste toner feedscrew assembly 7 to the front Figure 6 681 3 4 4 5 4 6 7 ...

Страница 257: ... Rail 1 Remove all developing assemblies 2 Remove the rear cover right upper cover and right rear cover 3 Remove the flywheel 4 Disconnect the four connectors 1 and remove the two screws 2 then detach the potential measurement PCB 5 Open the CPU PCB 6 Remove the drive assembly reinforcing plate Figure 6 682 7 While lifting the tension plate 3 by hand detach the drive belt 4 Figure 6 683 8 Remove t...

Страница 258: ...egulator unit slightly to the front and disconnect the connector B 8 and the connector C 9 and detach the lamp regulator PCB Figure 6 685 10 Disconnect the three connectors 10 and free the harness 11 to the developing drive assembly to the cable lamp Figure 6 686 11 Remove the two screws 12 and detach the cable guide 13 12 Free the harness 15 from the clamp 14 Figure 6 687 8 9 7 10 11 14 13 15 12 ...

Страница 259: ...19 19 21 22 27 26 24 23 21 27 26 Figure 6 688 14 Disconnect the three connectors 19 found on the top of the multifeeder assembly 15 Pull off the three pins 20 at the top and shift the partition sheet 21 in the direction of the arrow 16 Remove the transfer assembly frame from the copier Figure 6 689 17 Remove the two screws 22 and remove the toner receptacle 23 18 Remove the screw 24 and detach the...

Страница 260: ...C1100 1130 1150 1160 1180 REV 1 JAN 2000 PRINTED IN JAPAN IMPRIME AU JAPON 6 87 CHAPTER 6 IMAGE FORMATION SYSTEM 28 20 Pull the developing assembly rail mount 28 slightly to the front and detach it by rotating it clockwise Figure 6 691 ...

Страница 261: ......

Страница 262: ...EDING SYSTEM B Controlling the Locking Cam Inside the Transfer Drum 7 36 C Controlling Separation 7 39 D Cleaning the Separation Drum Sheet 7 41 E Sequence of Operations transfer drum 7 44 VI DETECTING JAMS 7 45 A Outline 7 45 B Sequence of Operations jam detection 7 47 VII DISASSEMBLY ASSEMBLY PICK UP ASSEMBLY 7 48 A Pickup Assembly 7 49 B Multifeeder 7 60 C Duplexing Unit 7 64 D Pickup Motor Dri...

Страница 263: ......

Страница 264: ...r is moved to the registration roller When the registration roller starts to rotate the attraction charging assembly turns on to keep the paper on the transfer drum The toner image on the photosensitive drum is transferred to the paper in this condition i e paper is rotated a maximum of four times while it is on the transfer drum In the case of small size paper 182 to 216 mm long in feeding direct...

Страница 265: ...Pre registration roller 2 9 Manual feed pull off roller 10 Multifeeder pickup roller 11 Pickup vertical path roller 1 2 3 12 Cassette 1 2 separation roller 13 Cassette 1 2 feed roller 14 Cassette 1 2 pickup roller 15 Duplexing separation roller 16 Duplexing feed roller 17 Re pickup feed roller 18 Cassette 2 19 Cassette 1 20 Duplexing tray 21 Duplexing feed rollers 1 2 3 4 5 22 Duplexing inlet roll...

Страница 266: ...er 100V model only 4 Registration roller 5 Attraction roller 6 Pre registration roller 1 7 Pre registration roller 2 8 Manual feed pull off roller 9 Multifeeder pickup roller 10 Pickup vertical path 1 2 3 roller 11 Cassette 1 2 3 separation roller 12 Cassette 1 2 3 feed roller 13 Cassette 1 2 3 pickup roller 14 Cassette 3 15 Cassette 2 16 Cassette 1 16 15 14 13 12 11 10 1 PS31 PS12 PS7 PS5 PS6 PS7...

Страница 267: ...ickup vertical path 2 sensor PS27 Pickup vertical path 3 sensor CLC1130 1150 1160 1180 only PS28 Re pickup vertical path sensor CLC1150 1180 only PS30 Pre registration sensor PS31 External delivery sensor PS32 Delivery vertical path 1 sensor CLC1150 1180 only PS33 Delivery vertical path 2 sensor CLC1150 1180 only PS34 Duplexing path sensor CLC1150 1180 only PS35 Duplexing reversal paper sensor CLC...

Страница 268: ...ee the construction of the CLC1130 1160 Item Description Feed reference Center Capacity 550 sheets cassettes 1 2 3 approximate of 81 4 g m2 paper Paper size setting Universal type by the user Table 7 202 Fixed size type by the service person Related mechanical adjustment Cassette horizontal registration Table 7 201 Functions Table 7 202 Construction of the Cassette Cassette 1 Cassette 2 Cassette 3...

Страница 269: ...d by each cassette of the copier Cassette 1 Cassette 2 Cassette 3 Cassette pickup motor PM10 PM11 PM12 Cassette pickup clutch CL11 CL12 CL13 Pickup roller solenoid SL7 SL8 SL9 Table 7 203a Pickup Assembly of the CLC1130 1160 Name Cassette Table 7 203b Pickup Assembly of the CLC1150 1180 Cassette 1 Cassette 2 Cassette pickup motor DPM11 DPM12 Cassette pickup clutch DCL12 DCL13 Pickup roller solenoi...

Страница 270: ... SL8 PM10 CL11 SL9 SL7 DC driver PCB Cassette 3 pickup motor drive pulse Cassette 2 pickup motor drive pulse Cassette 1 pickup motor drive pulse Cassette 2 pickup clutch drive signal C2PUCL Cassette 1 pickup clutch drive signal C1PUCL Pickup roller 1 solenoid drive signal PUP3SL Pickup roller 2 solenoid drive signal PUP2SL Pickup roller 3 solenoid drive signal PUP1SL Cassette 3 pickup clutch drive...

Страница 271: ...ure 7 202 Pickup Assembly of the CLC1150 1180 DPM12 DCL12 DCL13 DSL8 DSL9 DPM11 DC driver PCB Cassette 2 pickup motor drive pulses Cassette 1 pickup motor drive pulses Cassette 2 pickup clutch drive signal D2PUCL Cassette 1 pickup clutch drive signal D1PUCL Pickup roller 2 solenoid drive signal PUPD2SL Pickup roller 1 solenoid drive signal PUPD1SL ...

Страница 272: ...d on the copier will indicate E040 on its control panel Part 2 Chapter 6 2 1 4 b Table 7 204 shows the lifter motor lifter position sensor and paper sensor used for each cassette The CLC1100 1120 1140 s pickup system is identical to that of the CLC1130 1160 except that it does not have the cassette 3 See the construction of the CLC1130 1160 Table 7 204a CLC1130 1160 Cassette 1 Cassette 2 Cassette ...

Страница 273: ...l of Paper The copier uses the resistance occurring in the variable resistor operating in conjunction with the movement of the lifter drive shaft to detect the level of paper inside the cassette It indicates the result in four levels including absence of paper on its control panel Figure 7 204 Paper Pickup roller Feeding rollers Separation roller Lifter position sensor Paper sensor Open closed sen...

Страница 274: ... C1 HVOL Use it to enter the slice level of paper volume for cassette 1 for 275 sheets ADJUST CST ADJ C2 LVOL Use it to enter the slice level of paper volume for cassette 2 for 50 sheets ADJUST CST ADJ C2 HVOL Use it to enter the slice level of paper volume for cassette 2 for 275 sheets ADJUST CST ADJ C3 LVOL Use it to enter the slice level of paper volume for cassette 3 for 50 sheets ADJUST CST A...

Страница 275: ...ts special and thick paper 106 to 209 g m2 may be used only with the multifeeder Table 7 206 Paper Notation Size vertical x horizontal mm A3 A3 297 1 x 420 1 A4R A4R 210 1 x 297 1 A4 A4 297 1 x 210 1 B4 B4 257 1 x 364 1 B5R B5R 182 1 x 257 1 B5 B5 257 1 x 182 1 11 x 17 11 x 17 279 1 x 432 1 LETTER R LTRR 216 1 x 279 1 LETTER LTR 279 1 x 216 1 LEGAL LGL 216 1 x 356 1 Paper length sensor unit Paper ...

Страница 276: ...rvice mode ADJUST CST ADJ C2 STMTR Use it to change the paper width basic value for STMTR for cassette 2 ADJUST CST ADJ C2 A4R Use it to change the paper width basic value for A4R for cassette 2 ADJUST CST ADJ C3 STMTR Use it to change the paper width basic value for STMTR for cassette 3 ADJUST CST ADJ C3 A4R Use it to change the paper width basic value for A4R for cassette 3 If a transparency is ...

Страница 277: ... 1 2 3 4 Photosensitive drum revolution Transfer drum revolution Main motor M4 Cassette 2 pickup motor PM11 DPM11 Cassette 2 pickup clutch CL12 DCL12 Pickup roller 2 solenoide SL8 DSL12 Pickup vertical path 2 sensor PS26 Cassette 1 pickup re pickup motor PM10 PM13 Pickup vertical path 1 sensor PS21 PS28 Pre registration motor 2 PM8 Pre registration sensor PS30 Pre registration motor 1 PM9 Registra...

Страница 278: ... 2 2 1 b 4 Table 7 207 Item Description Pickup method Picks up paper from the stack continuously pickup roller feed roller separation roller Tray capacity 250 sheets of 81 4 g m2 paper Main motor M4 Drivers the multifeeder pickup system Multifeeder pickup clutch CL16 Turns on off the multifeeder pickup roller Multifeeder pickup solenoid SL14 Releases the multifeeder pickup roller Multifeeder feed ...

Страница 279: ...e slide guide assembly M4 M15 PM8 CL10 CL16 SL14 Pre registration motor Multifeeder feed roller 2 Main motor Multifeeder feed clutch Multifeeder pickup clutch Multifeeder feed roller 1 Multifeeder pickup roller Multifeeder pickup solenoid Pre registration roller 2 Sensor lever Pre registration sensor PS30 Multifeeder separation roller Multifeeder lifter motor Transparency sensor PS69 J1019 B15 Sli...

Страница 280: ...ter Multifeeder lifter sensor PS17 Detects the position of the lifter up Multifeeder lifter sensor PS18 Detects the position of the lifter down Multifeeder tray open closed sensor PS62 Detects the state open closed of the lifter tray Figure 7 209 B12 J1017 B16 B9 B13 B3 B4 M15 DC driver PCB Multifeeder lifter motor drive signal MFLMA B Multifeeder lifter detection up signal MFLHD Pickup driver PCB...

Страница 281: ...itive drum revolution Transfer drum revolution Main motor M4 Multifeeder lifter motor M15 Multifeeder lifter sensor upper PS17 Multifeeder pickup clutch CL16 Multifeeder pickup solenoid SL14 Multifeeder pickup sensor PS16 Multifeeder feed roller clutch CL10 Transparency sensor PS69 Pre registration sensor PS30 Pre registration motor 2 PM8 Pre registration sensor PS30 Pre registration motor 1 PM9 R...

Страница 282: ...y full color only the copier slows down the fixing roller to ensure proper fixing The copier is capable of recognizing transparencies of A4 A4R LTR or LTR R without input from the control panel The copier however will not feed a transparency of another size without input from the control panel causing a jam Part 2 Chapter 6 2 2 5 b Item Description Transparency detection Based on the combinations ...

Страница 283: ... A jam will occur if a medium of a type not selected on the control panel paper or transparency is fed while the copier is in mono color copying mode REF 1 Instruct the user to place a thick sheet of paper backing paper under a stack of transparencies in the cassette 2 Instruct the user to separate individual transparencies as by fanning them out before placing them in the cassette or on the multi...

Страница 284: ...very vertical path duplexing unit system Delivery vertical path clutch CL19 Turns on off the delivery vertical path roller 2 3 Duplexing feed clutch CL14 Turns on off the duplexing paper feed roller Stopper plate solenoid SL12 Drives the stopper plate Duplexing paper feed roller Releases the duplexing paper feed roller solenoid SL13 Stacking guide plate solenoid SL15 Drives the stacking guide plat...

Страница 285: ... JAPON Figure 7 301 Duplexing Drive System CL14 CL19 SL10 SL15 SL12 SL13 M14 M5 CL15 PM13 Delivery paper deflecting plate solenoid Fixing motor Duplexing motor Re pickup motor Delivery vertical path clutch Re pickup clutch Duplexing paper feed roller solenoid Duplexing paper feed clutch Stacking guide plate solenoid Stopper plate solenoid ...

Страница 286: ...oller 3 9 Duplexing path roller 4 10 Duplexing path roller 5 11 Duplexing paper feed roller 12 Duplexing reversing roller 13 Duplexing separation feed roller 14 Re pickup feed roller 15 Pickup vertical path roller 1 Table 7 302 Sensors Notation Name Notation Name PS28 Re pickup vertical path sensor PS35 Duplexing reversal paper sensor PS31 External delivery paper sensor PS36 Duplexing tray paper s...

Страница 287: ...e stacking guide plate move up and the stopper plate shifts up to prepare for the arrival of paper Each time paper arrives at the duplexing tray assembly the duplexing paper feed roller solenoid SL13 turns off and the duplexing paper feed roller moves down to the paper At the same time the stacking guide plate solenoid SL15 turns off so that the paper will not curl moving down the stacking guide p...

Страница 288: ...ates to prevent skew movement and jamming during re pickup by operating each time paper arrives at the duplexing tray If the paper jogging guide HP sensor PS40 does not turn on or off within a specific period of time after the paper jogging motor PM14 has turned on the copier indicates E050 on the control panel Part 2 Chapter 6 4 1 5 CL14 SL13 M14 Duplexing paper feed roller solenoid Duplexing mot...

Страница 289: ... Figure 7 305a Duplexing Tray top view Figure 7 305b Paper Jogging Operation In reverse forward Paper jogging plate Paper jogging guide motor Light blocking plate Paper jogging guide HP sensor PS40 DC driver PCB PM14 Paper jogging guide plate rear 8 mm 8 mm 8 mm 8 mm NO YES Paper Paper jogging guide plate front forward reverse Last copy forward ...

Страница 290: ... revolution Transfer drum revolution Main motor M4 Duplexing motor M14 Delivery paper deflecting pale solenoid SL10 Delivery vertical path 1 sensor PS32 Delivery vertical path 2 sensor PS33 Delivery vertical path clutch CL19 Duplexing inlet paper sensor PS37 Duplexing path sensor PS34 Duplexing reversal paper sensor PS35 Duplexing paper feed roller solenoid SL13 Duplexing paper feed clutch CL14 Du...

Страница 291: ...rom paper Then the stopper plate solenoid SL12 turns off and the stopper plate shifts down When the duplexing paper feed clutch CL14 and the re pickup clutch CL15 turn on the duplexing paper feed roller and the duplexing separation feed roller start to rotate by the drive of the duplexing motor M14 and the re pickup motor PM13 respectively to move the paper to the pickup vertical path assembly Aft...

Страница 292: ...Y DSRDY 1 2 3 4 1 2 3 4 Photosensitive drum revolution Transfer drum revolution Main motor M4 Duplexing motor M14 Duplexing paper feed clutch CL14 Duplexing paper feed solenoid SL13 Stopper plate solenoid SL12 Duplexing tray paper sensor SP36 Re pickup motor PM13 Re pickup path sensor PS28 Pre registration motor 2 PM8 Pre registration sensor PS30 Pre registration motor 1 PM9 Registration sensor PS...

Страница 293: ...lenoids clutches Item Description Pre registration motor 2 PM8 Stepping motor used to drive the pre registration roller 2 Pre registration motor 1 PM9 Stepping motor used to drive the pre registration roller 1 Main motor M4 Drives the registration roller Drives the attraction roller Registration clutch CL9 Turns on off the registration roller Registration roller releasing solenoid Locks unlocks th...

Страница 294: ...ller is put on the transfer drum sheet the registration roller releasing solenoid SL5 turns on causing the registration locking cam to rotate and at the same time releasing the registration link roller from the registration roller by the drive of the main motor M4 Figure 7 402 SL5 ON SL5 Transfer drum Attraction roller Registration roller Registration link roller Cam Arm Spring clutch Arm Registra...

Страница 295: ...l to the length of the paper to bring the attraction roller in contact with the transfer drum sheet At this time the attraction brush turns on causing the transfer drum sheet to attract the paper REF 1 In the case of a mono color copy the paper is separated before the transfer drum completes a full rotation As such SL6 remains on at all times with out turning off 2 In the case of retaining two she...

Страница 296: ... B sensor PS3 Laser Registration sensor PS70 Registration roller releasing solenoid SL5 Registration roller clutch CL9 Attraction roller solenoid SL6 Attraction brush high voltage output Transfer blade high voltage output Separation charging assembly Internal external static eliminator Attraction transfer locking cam HP sensor PS8 Attraction transfer locking cam motor PM7 Brush blade position Star...

Страница 297: ... PM6 Stepping motor used to lock and unlock the transfer drum cleaner Attraction transfer locking cam motor PM7 Stepping motor used to drive the attraction brush transfer blade and push on brush Transfer drum cleaner brush motor M8 DC motor used to drive the transfer drum cleaner brush Polishing roller motor M9 DC motor used to drive the polishing roller Separation push up solenoid SL3 Drives the ...

Страница 298: ...rawer connector of the transfer unit or transfer unit lever E074 Error in the transfer drum unit home position E079 Error in the transfer drum cleaner unit home position M9 M8 PM6 PM7 M2 PM5 PS5 PS59 PS6 PS7 PS8 SL3 SL4 PS57 Postcard feed roller 100V model only External static eliminator Separation claw Separation charging assembly Separation push up roll Drum motor Photosensitive drum Push on bru...

Страница 299: ...as needed See Figure 7 502 The copier s attraction transfer locking cam motor is a stepping motor and the locking mechanism of each brush and blade is operated by controlling the rotation of the three locking cams through application of specific pulses to the motor after the DC CPU identifies home position with reference to the signal from the attraction transfer locking cam HP sensor PS8 Figure 7...

Страница 300: ...IME AU JAPON 7 37 CHAPTER 7 PICK UP FEEDING SYSTEM Figure 7 503a Position of the locking cam State Home position The attraction brush transfer blade and inside brush are all off During attraction and transfer of 1st color The attraction brush and the transfer blade are on the inside brush is off ...

Страница 301: ... 0 MAR 1999 PRINTED IN JAPAN IMPRIME AU JAPON Figure 7 503b Position of the locking cam State During transfer of 2nd to 4th color The transfer blade is on the attraction brush and inside brush are off During transfer drum cleaning The inside brush is on the attraction brush and transfer blade are off ...

Страница 302: ...PICK UP FEEDING SYSTEM C Controlling Separation 1 Outline Paper retained by the transfer drum is separated by the separation claw and the separation push up roll regardless of how it is placed side A or B See Figure 7 505 Figure 7 504 Separation claw solenoid SL4 Separation push up solenoid SL3 Separation push up roll front ...

Страница 303: ... to the thickness of the separation claw roll The separation push up roll pushes up the transfer drum sheet from inside by the work of SL3 changing the shape of a portion of the transfer drum sheet and thereby increasing the curvature Thereafter the body of the paper causes its leading edge to separate from the transfer drum sheet and the separation claw slides into the gap to start separation At ...

Страница 304: ...oblem the transfer drum sheet is cleaned as follows Type Timing Cleaner Normal cleaning During last rotation External brush internal brush including double sided copying Special cleaning During last rotation after Polishing roller making a specific number of copies Table 7 502 REF The copier uses a limited amount of fixing oil and therefore is not equipped with a cleaning mechanism operated by an ...

Страница 305: ... such cleaning is performed so that a width in front of and behind the transfer drum linking plate is brushed twice Table 7 503 shows the conditions and the length of operation for cleaning the transfer drum sheet Table 7 503 3 Polishing Roller As the copier is used more and more the surface of its transfer drum sheet tends to collect paper lint and as a result its power of attraction will decreas...

Страница 306: ... rotating the motor M9 in reverse Table 7 504 shows the condition and length of operation of the polishing roller Condition Length During last rotation after 1000 copies cumulative Equivalent of 50 rotations of the transfer drum Figure 7 504 Figure 7 507 Transfer drum sheet Polishing roller Polishing roller locking spring rear Polishing roller motor Spring clutch Polishing roller return Polishing ...

Страница 307: ...hotosensitive drum revolution Transfer drum revolution Side A sensor PS2 Side B sensor PS3 Laser Registration sensor PS70 Separation push up solenoid SL3 Separation claw solenoid SL4 Separation sensor PS7 Attraction brush high voltage output Transfer blade high voltage output Separation charging assembly Internal external charging assembly Start key ON M M C C Y Y K K INTR COPY LSTR STBY M M C C Y...

Страница 308: ...rtical path 1 sensor CLC1100 1120 1130 1140 1160 only PS26 Pickup vertical path 2 sensor PS27 Pickup vertical path 3 sensor CLC1130 1150 1160 1180 only PS28 Re pickup path sensor CLC1150 1180 only PS30 Pre registration sensor PS31 External delivery sensor PS32 Delivery vertical path 1 sensor CLC1150 1180 only PS33 Delivery vertical path 2 sensor CLC1150 1180 only PS34 Duplexing path sensor CLC1150...

Страница 309: ...ain if it has been opened and closed for jam removal If any of the sensors detects paper when the power is turned on or the cover is closed the copier will identify the condition as being a jam If a jam occurs during continuous copying on the other hand the copier continues to make copies on paper that has already been picked up The pre cleaning paper sensor PS71 is a reflecting type paper sensor ...

Страница 310: ...on Side A sensor PS2 Side B sensor PS3 Laser Registration sensor PS70 Transfer blade Post transfer paper sensor PS6 Pre cleaning paper sensor PS71 Pre transfer paper sensor PS5 Separation sensor PS7 Internal delivery sensor PS12 External delivery sensor PS31 DSRDY ended Delay jam check normal if copy paper is present Stationery jam check normal if copy paper is absent 1 2 3 4 5 6 7 8 1 2 3 4 5 6 7...

Страница 311: ...ut the washer that comes with the screw used for the grounding wire and the varistor to ensure electrical continuity 6 Do not operate the machine with any of its parts removed unless otherwise mentioned 7 Keep in mind that the laser shutter is designed to close in response to the left cover switch i e when it turns off as when the left front cover is opened If you must operating the copier with th...

Страница 312: ...ly Figure 7 701 1 Pickup roller 2 Feed roller 3 Separation roller 2 Removing the Cassette Pickup Assembly Duplexing Pickup Assembly The cassette pickup assembly may be removed regardless of the type of copier The following cites the duplexing model 1 Open the front cover left right 2 Slide out the cassette duplexing unit 3 Remove the three screws 1 and detach the face cover 2 Figure 7 702 1 2 3 1 ...

Страница 313: ...U JAPON 4 Remove the three screws 3 and disconnect the two connectors 4 then detach the second pickup assembly 5 figure 7 703 5 Remove the four screws 6 and disconnect the connector 7 then slide out the duplexing pickup assembly 8 slowly to detach Take care not to drop the pickup assembly when sliding it out Figure 7 704 5 3 4 3 8 6 7 6 6 ...

Страница 314: ...embly be sure that the round marking 2 on its rub ber portion is to the front of the copier The pickup roller is identi fied by color front and rear Use the gold colored pickup roller for the front and the silver col ored pickup roller for the rear b Do not detach the rub ber portion of the pickup roller from the collar Figure 7 706 4 Removing the Cassette Pickup Assembly Feed Roller Separation Ro...

Страница 315: ...he separation roller support mount 6 Figure 7 708 6 Remove the separation roller 7 Figure 7 709 a When mounting the feed roller 1 to the pickup assembly be sure that the gear 2 at tached to the feed roller is at the front of the copier b When mounting the separation roller 1 to the pickup assembly be sure that the round marking 2 is at the front as shown Figure 7 710 6 5 5 7 2 1 1 2 ...

Страница 316: ...AU JAPON 7 53 CHAPTER 7 PICK UP FEEDING SYSTEM 4 4 5 5 Adjusting the Pressure of the Separation Roller 1 Remove the two screws 2 and detection lower guide 1 Figure 7 711 2 Remove the paper guide 3 Figure 7 712 3 Remove the two screws 4 and detach the separation roller assembly 5 Figure 7 713 1 2 2 3 ...

Страница 317: ...pressure spring 6 of the separation roller a If double feeding occurs move the hook of the spring in the direction of arrow A b If pickup failure occurs move the hook of the spring in the director of arrow B Figure 7 714 a Do not loosen the screw 1 used to secure the separation pressure spring plate in place b When mounting the separation roller unit be sure that the releasing lever 1 is positione...

Страница 318: ...ration of the Cassette 1 Remove the cassette front cover from the holder you want to adjust 2 Loosen the left right screw 1 3 Turn the adjusting screw 2 and adjust the position of the left right registration adjusting plate so that the left right registration is 2 0 1 5 mm with reference to the image A full turn will be about 0 7 mm Figure 7 717 To increase the registration at the front turn the a...

Страница 319: ...lexing Unit Feed Roller 1 Remove the duplexing pickup assembly 2 Remove the resin E ring 1 3 Remove the feed roller 2 Figure 7 719 9 Removing the Duplex Unit Separation Roller 1 Remove the duplexing pickup assembly 2 Remove the screw 1 and remove the face plate 2 Figure 7 720 3 Remove the screw 3 and remove the separation roller assembly 4 Figure 7 721 1 2 1 2 3 4 ...

Страница 320: ...er 6 Figure 7 722 a When attaching the feed roller 1 be sure that the round marking 2 is at the front b When mounting the separation roller 3 be sure that the round marking 4 is at the rear Figure 7 723 10 Removing the Duplexing Unit Pickup Roller 1 Remove the duplexing pickup assembly 2 Remove the screw 1 and detach the positioning pin 2 then detach the paper guide 3 5 6 2 3 4 1 4 2 Figure 7 724 ...

Страница 321: ...1130 1150 1160 1180 REV 0 MAR 1999 PRINTED IN JAPAN IMPRIME AU JAPON 3 Loosen the screw 4 on the paper guide Figure 7 725 4 Remove the two screws 5 and remove the paper guide upper 6 Figure 7 726 5 Remove the resin E ring 7 and remove the pickup roller 8 Figure 7 727 4 6 5 5 7 8 ...

Страница 322: ...g the pickup roller 1 to the pickup assembly be sure that the round marking 2 on the rubber portion is at the front The pickup roller is identi fied by color front and rear Use the gold colored pickup roller for the front Use the silver colored pickup roll for the rear b Do not detach the rubber portion of the pickup roller from the collar Figure 7 728 1 1 2 2 ...

Страница 323: ...two connectors 1 and remove the four screws 2 then detach the multifeeder assembly 3 Figure 7 729 2 Removing the Pickup Roller Feed Roller and Separation Roller 1 Remove the right middle cover 2 Remove the two screws 1 and detach the pickup roller cover 2 Figure 7 730 3 Remove the resin E ring 3 and pull out the pickup roller 4 slowly both front and rear The pickup roller is se cured in position t...

Страница 324: ...HAPTER 7 PICK UP FEEDING SYSTEM 4 Remove the screw 5 and detach the upper paper guide plate 6 Figure 6 732 5 Remove the E ring 7 and the bushing 8 of the pickup roller shaft Figure 7 733 6 Remove the resin E ring 9 and detach the feed roller 10 and the pickup roller shaft at the same time Figure 7 734 6 5 7 8 9 10 ...

Страница 325: ... 8 Remove the separation roller 13 The separation roller is se cured in position to the shaft with parallel pin Take good care not to drop the pin when removing or mounting it Figure 7 736 REF a Mount the pickup roller 1 so that the round marking is at the rear b Mount the feed roller 2 so that the round marking is at the rear c Mount the separation roller 3 so that the round marking is at the rea...

Страница 326: ...38 Figure 7 739 4 Attaching the Timing Belt for the Multifeeder Assembly Keep the rack plate 1 of the multifeeder closed Move the slide volume 2 in the direction of the arrow and attach the timing belt 3 Figure 7 740 5 Position of the Multifeeder Pickup Solenoid The position of the solenoid need not be adjusted but be sure to mount it where it initial was as upon shipment from the factory To do so...

Страница 327: ...de out the duplexing unit 4 Remove the two screws 1 and remove the two stopper plates 2 5 Remove the duplexing unit Figure 7 741 2 Removing the Feed Roller 1 Slide out the duplexing unit 2 Detach the paper retaining guide plate 1 by squeezing it slightly Figure 7 742 3 Remove the two resin E rings 2 and detach the feed roller 3 from the feed roller shaft The feed roller is identi fied by color fro...

Страница 328: ...JAPON 7 65 CHAPTER 7 PICK UP FEEDING SYSTEM 3 Remove the Duplexing Feed Assembly 1 Remove the duplexing unit 2 Remove the four screws 1 and detach the duplexing cover 2 Figure 7 744 3 Remove the two screws 3 and detach the duplexing stay Figure 7 745 4 Disconnect the connector 4 Figure 7 746 1 1 1 2 3 4 ...

Страница 329: ...APAN IMPRIME AU JAPON 5 Loosen the strap 5 fitted in the feed upper guide to free it from the boss and detach Figure 7 747 6 Open the duplexing feed cover 6 and detach it from the bushing at the rear Figure 7 748 7 Remove the E ring 7 and remove the gear 8 pay attention to the pin and the belt orange 9 Figure 7 749 5 6 9 7 8 ...

Страница 330: ...N 7 67 CHAPTER 7 PICK UP FEEDING SYSTEM 8 Loosen the screw on the tension plate 10 At this time take care not to lose the pin Figure 7 750 9 Remove the gear 11 pay attention to the pin and the belt black 12 Figure 7 751 10 Remove the E ring 13 at the rear and shift the bushing 14 Figure 7 752 10 11 12 13 14 ...

Страница 331: ...the guide plate 15 from the guide shaft of the duplexing feed assembly both front and rear Figure 7 753 12 Lift the rear of the duplexing feed assembly 16 and pull it off Figure 7 754 4 Adjusting the Left Right Registration of the Duplexing Unit 1 Slide out the duplexing and open the duplexing feeding assembly 2 Loosen the two screws 1 Figure 7 755 15 16 1 ...

Страница 332: ...usting the Position of the Paper Jogging Guide Sensor PS40 1 Select A4R or LTRR and complete copying on the first side of a double sided copy 2 Slide out the duplexing unit 3 Measure the distance L of the paper jogging guide plate 1 A4R L 210 0 3 mm LTRR L 216 0 3 mm 4 If the distance is not as indicated remove the duplexing cover 5 Loosen the screw 2 Figure 7 758 6 Using the screw 3 adjust the po...

Страница 333: ...re 7 760 7 Position of the Stopper Plate Solenoid 1 Keep the steel core 1 of the solenoid pulled to the solenoid body 2 Rotate the shutter 2 so that the distance L1 in the figure is 1 0 0 2 mm then mount the stopper plate solenoid Figure 7 761 8 Position of the Duplexing Paper Feed Roller Solenoid With the steel core of the solenoid pulled to the solenoid body mount the duplexing feed roller solen...

Страница 334: ... JAPAN IMPRIME AU JAPON 7 71 CHAPTER 7 PICK UP FEEDING SYSTEM 9 Position of the Stacking Guide Solenoid Mount the stacking guide solenoid in the center of the long hole 1 in the solenoid base Be sure to mark the position of the solenoid with a scriber before removing it Figure 7 763 1 ...

Страница 335: ...sembly 1 Remove the cassette pickup assembly or the duplexing pickup assembly 2 Remove the rear cover 3 Disconnect the connector 1 and remove the three screws 2 then remove the re pickup drive assembly 3 Figure 7 764 When removing the bot tommost cassette pickup assembly remove the two screws 4 and the pickup driver PCB unit 5 in ad vance Figure 7 765 2 Removing the Duplexing Motor 1 Slide out the...

Страница 336: ...ot leave out the washer that comes with the screw used for the grounding wire and the varistor to ensure electrical continuity 6 Do not operate the machine with any of its parts removed unless otherwise mentioned 7 Keep in mind that the laser shutter is designed to close in response to the left cover switch i e when it turns off as when the left front cover is opened If you must operating the copi...

Страница 337: ...he transfer drum while keeping your fingers in an opening of the transfer drum The transfer drum on the other hand will rotate in reverse when it is off the frame Keep this in mid Allowing it to rotate in re verse can damage the transfer blade attraction brush and transfer drum side scraper 1 Open the hopper and remove the transfer drum frame cover then slide out the transfer drum frame Figure 7 8...

Страница 338: ...and grasp the handle of the transfer drum with your left hand and lift it Take care not to let the at traction roller come into contact with the transfer drum sheet Figure 7 803 4 Place the transfer drum assembly as shown Figure 7 804 2 Points to Note When Handling the Transfer Drum After placing the transfer drum on the transfer drum frame check to make sure that it is as shown Figure 7 805 Corre...

Страница 339: ...er 13 II A 2 1 Attraction timing adjustment ATT T A ATT A B 2 Image leading edge margin adjustment RG XA RG XB RG Y 3 Attraction position adjustment TR DELAY_A TR DELAY_B 4 Image rear end adjustment TR END A TR END B 3 Removing the Transfer Drum Frame 1 Slide out the transfer drum frame 2 Remove the fixing assembly 3 Remove the transfer drum 4 Grasp the handles of the transfer drum frame and detac...

Страница 340: ... 3 Vertical path roller Figure 7 808 2 Removing the Horizontal Path Assembly 1 Slide out the transfer frame 2 Remove the screw 1 and disconnect the two connectors 2 then detach the solenoid unit 3 Figure 7 809 3 Disconnect the connector 4 and remove the two screws 5 4 Shift the horizontal path assembly 6 slightly to the right then detach it by pulling carefully to the front Figure 7 810 2 2 1 3 2 ...

Страница 341: ...e and remove the transfer cover and the transfer frame cover 2 Remove the screw 1 and disconnect the two connectors 2 then remove the solenoid unit 3 Figure 7 811 3 Remove the screw 4 detach the positioning pin 5 Figure 7 812 4 Move the attraction roller unit 6 to the front Take care so that the at traction roller unit or your fingers will not come into contact with the transfer sheet Figure 7 813...

Страница 342: ...ing shaft 9 through the large hole to detach the attraction roll unit Do not insert the transfer drum frame without fitting the solenoid unit removed in step 2 back in to avoid damage When you have detached the attraction roll unit be sure to mount it back to its initial position with its screw Figure 7 815 4 Removing the Scraper of the Attraction Roller 1 Remove the two TP screws 1 and detach the...

Страница 343: ...e 7 818 6 Replacing the Attraction Roller Unit Spring Clutch Assembly 1 Remove the attraction roller unit 2 Using a hex screw loosen the hex hole screw 1 and remove the spring clutch assembly 2 from the registration roller assembly rear 3 Clean the shaft to which the spring clutch was mounted 4 Loosen the hex hole screw of the new spring clutch assembly 5 Mount the new spring clutch assembly to th...

Страница 344: ...een the gear and the control ring then apply several more drops of oil 8 Repeat steps 6 and 7 so that as many as ten drops of oil have been applied in total 9 Wipe off any oil that has spread onto the control ring Figure 7 820 Figure 7 821 7 Removing the Registration Roller 1 Remove the transfer drum and the fixing assembly then detach the fixing assembly frame from the copier 2 Remove the attract...

Страница 345: ...9 PRINTED IN JAPAN IMPRIME AU JAPON 4 Remove the three screws 5 and detach the attraction roller drive gear unit 6 Figure 7 823 5 Remove the roller pressure spring rear 7 6 5 5 Figure 7 824 6 Remove the E ring 9 and spring 10 of the registration roller upper 8 then remove the bushing 11 Figure 7 825 7 11 10 9 8 ...

Страница 346: ...ency sensor is located under the portion of the registration roller be sure not to let the roller in contact with it Figure 7 826 8 Remove the E ring 13 and the washer 14 then pull off the bushing 15 Figure 7 827 9 While holding the pressure releasing lever 16 in place by hand shift the rubber roll shaft 17 to the left in the direction of the arrow and pull it to the front Figure 7 828 12 14 15 13...

Страница 347: ... CANON INC CANON CLC1100 1130 1150 1160 1180 REV 0 MAR 1999 PRINTED IN JAPAN IMPRIME AU JAPON 10 Remove the E ring 18 two washers 19 spring 20 and bushing 21 Figure 7 829 11 Pull out the registration rubber roller 22 as shown Figure 7 830 18 20 19 21 22 ...

Страница 348: ...to the shaft At this time keep the spring clutch butted against the E ring side Further when tightening the hex hole screw be sure that the screw and the D cut of the shaft are perpendicular 4 Apply several drops of lubricating oil in the gap 5 between the gear 3 and the control ring 4 of the spring clutch Figure 7 832 5 Thereafter rotate the gear of the spring clutch several times so that the oil...

Страница 349: ...connect the two connectors 2 then detach the transfer cleaner unit Figure 7 834 2 Removing the Transfer Cleaner Brush 1 Remove the transfer cleaner unit 2 Turn the bushing 1 of the brush 180º in the direction of the arrow to detach the brush Figure 7 835 3 Removing the Scraper upper lower of the Transfer Cleaner Unit 1 Remove the transfer drum unit 2 Remove the transfer cleaner brush 3 Remove the ...

Страница 350: ...ve the screw 2 and detach the filter cover 3 4 Remove the filter Figure 7 838 4 3 3 2 1 5 Applying Lubricant to the Transfer Drum Cleaner 1 Use a specific lubricant e g FY9 6006 2 Put a drop of lubricant one drop each at points indicated A 3 Turn the gear several times by hand so that the lubricant spreads inside the bushing 4 Put another drop one each once again and repeat step 3 5 When all amoun...

Страница 351: ... static eliminator 9 Transfer cleaner push on brush 10 Transfer polishing roller 11 Transfer drum cleaner 12 External static eliminator 1 2 3 4 5 6 7 8 9 10 11 12 The one way clutch is in operation while the transfer drum is on the transfer drum frame Do not rotate the transfer drum while keeping your fingers in an opening of the transfer drum The transfer drum on the other hand will rotate in rev...

Страница 352: ...t cover and slide out the hopper then open it 180º 2 Slide out the transfer drum frame 3 Remove the transfer drum from the transfer drum frame 4 Remove the four TP screws 1 and remove the transfer drum side scraper 2 Figure 7 840 5 Peel off the trailing edge of the transfer drum sheet and keep the edge loose Figure 7 841 6 Peel off the leading edge of the transfer drum sheet Figure 7 842 2 2 1 1 ...

Страница 353: ...r drum be sure to remove it com pletely Figure 7 843 3 Attaching the Transfer Drum Sheet Do not touch the area on the transfer drum sheet where paper will be at tracted 1 Shift the locking lever of the transfer blade and the attraction brush in clockwise direction to release them 2 Clean the area where double sided tape is attached on the transfer drum ring with alcohol 3 Turn the ring so that the...

Страница 354: ... fer drum sheet with a long hole temporarily in place so that that the gap between the left side of the transfer drum sheet and the edge of the transfer ring is about 0 5 mm 2 Then lightly pull the transfer drum sheet to the right so that the middle of the sheet will not become slack and attach the right side of the sheet where a round hole is found 3 At this time check to make sure that the right...

Страница 355: ...olding the transfer drum sheet turn the front side of the transfer ring to wrap it around the transfer drum Figure 7 847 Figure 7 848 Figure 7 848a Figure 7 848b Leading edge of sheet Trailing edge of sheet 0 1 5 mm or less After wrapping the transfer drum sheet around the transfer drum check the gap between the leading edge and the trailing edge of the sheet make sure it is 0 1 5 mm If not go bac...

Страница 356: ... try using both thumbs as shown moving them as if to rub the sheet in axial direction Do not move the thumbs in peripheral direction which can cause parts of the sheet to lift 9 Remove the backing paper from the trailing edge of the transfer drum sheet 10 Without pulling the transfer drum sheet lightly press along the middle of the double sided tape along the trailing edge of the sheet in sequence...

Страница 357: ...f dis tortion exists the transfer drum will likely come into contact with the photosen sitive drum causing toner to fuse to the photosensi tive drum and ultimately leading to cleaning faults of the photosensitive drum if slack exists on the other hand such image faults as transfer faults and color displacement can occur 14 Mount the transfer drum side scraper removed when detaching the old transfe...

Страница 358: ...gure 7 852 5 Remove the Transfer Blade 1 Turn the locking lever 1 clockwise to free the lock 2 Remove the screw 2 then pull out the transfer blade 3 When pulling out the transfer blade take care not to bring the plastic film into contact with the flange Figure 7 853 Figure 7 854 1 3 2 6 Removing the External Static Eliminator 1 Remove the fixing assembly cover 2 Remove the screw 1 and remove the l...

Страница 359: ...ll out the internal static eliminator 2 Figure 7 855 8 Removing the Separation Changing Assembly 1 Pull out the transfer drum frame 2 Remove the screw 1 and remove the separation charging assembly 2 Be sure to use the initial screw binding M4x6 when mounting the sepa ration charging assembly The use of a longer screw will result in irregular in tervals Figure 7 856 9 Removing the Polishing Roller ...

Страница 360: ...from the transfer drum frame 2 To protect the transfer sheet from scratches place the transfer drum unit on a fault place Figure 7 858 3 Remove the screw 1 and push down the polishing roller locking lever 2 once then turn it clockwise to free the lock Figure 7 859 The four pins 3 used to keep the spring from turn ing will slip off when the lock is freed Take care not to lose these pins Figure 7 86...

Страница 361: ...RIME AU JAPON 4 Remove the screw 4 E ring 5 inside the shaft 1 and shaft connecting member 6 then detach the gear unit 1 7 together with its shaft Figure 7 861 5 Remove the two E rings 8 outside the shaft 2 and the screw 9 and disconnect the connector 10 then remove the polishing roller motor unit 11 Figure 7 862 4 7 6 5 8 10 11 9 8 ...

Страница 362: ...e Separation Push Up Solenoid 1 Remove the transfer drum from the transfer drum frame 2 Remove the four screws 1 and detach the two transfer sheet scrapers 2 3 Peel off the transfer sheet Figure 7 863 4 Disconnect the connector 3 and remove the spring 4 Figure 7 864 5 Remove the E ring 5 from the front side plate of the transfer drum Figure 7 865 2 2 1 1 3 4 5 ...

Страница 363: ...transfer drum and detach the separation claw unit Pay attention to the spring on the shaft of the separa tion claw unit Figure 7 866 7 Remove the two screws 7 and detach the separation push up solenoid 8 Figure 7 867 12 Remove the Brush Motor M11 1 Remove the transfer drum from the transfer drum frame 2 Remove the four screws 1 and remove the two transfer sheet scrapers 2 Figure 7 868 6 7 8 2 2 1 ...

Страница 364: ...rush motor 5 Figure 7 869 13 Removing the Transfer Cleaner Push On Brush Unit 1 Remove the transfer drum from the transfer drum frame 2 Remove the polishing roller unit 3 Peel off the transfer sheet 4 Turn the transfer drum ring so that the dent shown in the figure in the rear ring is opposite the brush Figure 7 870 5 Remove the two screws 1 and disconnect the connector 2 then remove the transfer ...

Страница 365: ...move the transfer drum from the transfer drum frame 2 Peel off the transfer sheet 3 Remove the separation push up roll 1 Figure 7 872 E Transfer Drum Locking Motor Assembly PM5 1 Slide out the transfer drum frame 2 Remove the rear cover 3 Open the CPU PCB 4 Remove the two screws 1 and disconnect the two connectors 2 then detach the transfer drum locking motor assembly Figure 7 873 1 1 2 1 2 ...

Страница 366: ...rew 1 and disconnect the external static eliminator connector 2 5 Remove the two screws 3 and remove the fixing assembly connector base 4 6 Remove the three screws 5 and disconnect the two connectors 6 then detach the transfer drum cleaner locking motor assembly Figure 7 874 5 4 3 5 5 6 2 1 G Delivery Assembly CLC1100 1120 1130 1140 1160 only 1 Removing the Delivery Assembly 1 Remove the left uppe...

Страница 367: ...e the nine screws 1 and disconnect the two connectors 2 4 Slide out the delivery unit slowly to detach Figure 7 876 2 Position of the Delivery Assembly Paper Deflecting Plate Drive Solenoid SL10 1 Remove the delivery assembly 2 Place the delivery assembly on its end on a level surface 3 Loosen the adjusting screw 4 to make adjustments while keeping the paper deflecting plate 2 butted against the d...

Страница 368: ...G SYSTEM III CONTROLLING THE FIXING TEMPERATURE 8 9 A Controlling the Temperature of the Fixing Roller 8 9 B Protective Functions 8 11 IV DISASSEMBLY ASSEMBLY 8 13 A Fixing Assembly 8 14 B Fixing Cleaner Assembly 8 21 C Oil Applying Assembly Removing Assembly 8 25 D Internal Delivery Assembly 8 26 E Drive Assembly 8 27 This chapter explains the operations and functions of the copier s fixing syste...

Страница 369: ......

Страница 370: ...lower roller Life estimated at about 25 000 copies Driven by the fixing upper cleaning belt solenoid SL1 and the fixing lower cleaning belt SL2 Number of operations varies according to the size of paper Small size 182 to 216 mm 1 operation per copy Large size 217 to 432 mm 2 operations per copy Length of cleaning belt detected by the following Fixing upper cleaning belt length sensor PS11 Fixing l...

Страница 371: ... FIXING NIP CHK Nip measurement COUNTER MISC FIX WEB Cleaning belt counter Figure 8 101 M5 Oil tank Fixing upper cleaning belt solenoid SL1 Fixing upper cleaning belt Fixing motor One way clutch Fixing upper cleaning belt length sensor PS11 Oil pipe Oil applying felt Fixing blade Oil pan Fixing upper roller Fixing lower cleaning belt length sensor PS67 Fixing lower cleaning belt solenoid SL2 One w...

Страница 372: ...switch ON Start key ON 1 2 3 4 5 6 1 2 3 4 1 2 3 4 5 6 7 8 9 1 2 3 4 5 6 7 8 9 M M C C Y Y K K Controlled to 158 C 2 Controlled to 158 C 2 1 200mm sec 75mm sec 1 If small size once per copy for large size twice per copy 2 For normal full color copying For 3 hr from the start if the temperature of the fixing roller is 100ºC or less when the power switch is turned on controlled to 163ºC in the case ...

Страница 373: ...ed based on the combination of the states of the speed switch signals FXMSP0 FXMSP1 To prevent deformation otherwise caused by pressure the fixing roller is rotated for about 0 6 sec at low speed 75 mm sec at intervals of 30 min after it has stopped rotating in standby state E014 This code is indicated if the speed of rotation of the fixing motor deviates from a specific value and the motor clock ...

Страница 374: ...130 1150 1160 1180 REV 0 MAR 1999 PRINTED IN JAPAN IMPRIME AU JAPON 8 5 CHAPTER 8 FIXING SYSTEM Figure 8 201 DC driver PCB FXMON FXMSP0 FXMSP1 FXMLK Rotation speed control circuit Motor driver Fixing motor M5 Rotation speed detection circuit ...

Страница 375: ...copier will indicate a warning to communicate that the cleaning belt is running out when the sensor detects the arm Paper size Number of operations Small size 182 to 216 mm Once per paper Large size 217 to 432 mm Twice per paper Note 1 In the case of a transparency once per sheet Note 2 The number of times the fixing cleaning belt turns on and off is the same for both upper and lower solenoids REF...

Страница 376: ...d discharge sides The piezoelectric element warps to take on a convex or concave shape when a voltage is applied servicing to move fixing oil from the suction side to the discharge side by repeating this operation The filter inside the oil pan serves to clean the fixing oil in circulation Foreign matter and excess fixing oil are moved away to the oil pan by the fixing blade The level of fixing oil...

Страница 377: ...te in the presence of the oil pump drive signal FXOILPD 1 generated by the DC CPU 0001 This code is indicated when the oil pump driver PCB is in operation while the DC CPU keeps the oil pump drive signal EXOILPD 0 off Fixing upper roller Oil applying felt Oil pipe Fixing low roller Oil tank Fixing blade Oil pan Fixing oil level sensor PS10 front Oil pump PSP1 Backflow preventing valve Piezo electr...

Страница 378: ...on the CPU PCB causes the fixing upper heater drive signal UHON and the fixing lower heater drive signal LHON to go 1 or 0 so as to control the surface temperature of each roller to a specific level See Table 8 301 If energy saver mode has been selected in user mode the surface temperature of the upper roller and the lower roller is controlled as shown in Table 8 302 Table 8 301 Note The values in...

Страница 379: ... color copying For normal mono color copying controlled to 162ºC for 3 hr from the start controlled to 168ºC 3 For 3 hr from the start controlled to 163ºC for others controlled to 158ºC Photosensitive drum revolution Transfer drum revolution Side A sensor PS2 Side B sensor PS3 Laser Main heater H1 Sub heater H2 Cleaning belt solenoid SL1 SL2 Oil pump PSP Main motor M4 Drum motor M2 Fixing motor M5...

Страница 380: ... more the copier will indicate E000 on the control panel and will cut off the power to the fixing heater d If the gate array detects that the voltage of any of the four thermistors THM1 THM2 THM3 THM4 is about 1 0 V about 220ºC or more E000 will be indicated on the control panel and thereafter the power to the fixing heater will be cut e If the SSR is on USSRD or LSSRD 1 in the absence of heater d...

Страница 381: ...switch SW3 Delivery cover switch SW5 Left front cover switch SW4 DC power supply PCB DC fuse PCB Power switch SW1 Fixing upper cleaning belt Fixing upper roller Fixing lower roller Fixing upper thermistor THM1 Fixing upper thermistor 2 THM2 Fixing lower thermistor 3 THM3 Fixing lower thermistor 4 THM4 High temperature detection circuit Gate array Open circuit detection circuit High temperature det...

Страница 382: ... that comes with the screw used for the grounding wire and the varistor to ensure electrical continuity 6 Do not operate the machine with any of its parts removed unless otherwise mentioned 7 Keep in mind that the laser shutter is designed to close in response to the left cover switch i e when it turns off as when the left front cover is opened If you must operating the copier with the left front ...

Страница 383: ...it 1 Open the front cover 2 Remove the fixing cover 3 Slide out the transfer drum frame 4 Remove the two screws 1 and detach detection fixing upper cover 2 Figure 8 402 5 Open the inside delivery assembly fixing delivery assembly 6 While keeping the joint of the screw 3 in place with radio pliers to prevent shaving of each screw remove the two screws 3 and detach the fixing upper roller unit 4 Whe...

Страница 384: ...ter and remove the screw 3 then remove the metal fixing 4 6 Slide out the fixing upper heater to the front Figure 8 405 4 Removing the Fixing Upper Roller 1 Open the front cover 2 Remove the fixing cover 3 Slide out the transfer drum frame 4 Remove the fixing assembly 5 Remove the fixing upper heater 6 Open the fixing upper roller unit and remove the screw 1 then detach the harness guide 2 Figure ...

Страница 385: ... Heater 1 Open the front cover 2 Remove the transfer drum frame cover and the fixing cover 3 Slide out the transfer drum frame 4 Pull out the faston 1 at the rear of the fixing lower heater Figure 8 409 5 Pull out the faston 2 at the front of the fixing lower heater and remove the screw 3 then detach the metal fixing 4 6 Pull out the fixing lower heater to the front Mount the heater so that the ca...

Страница 386: ... the screw 1 and slide the fixing inlet guide 2 to the rear to detach Figure 8 411 6 Remove the fixing lower heater 7 Open the fixing upper roller unit 8 Remove the screw 3 and shift the heater faston base 4 Figure 8 412 9 Pull out the fixing lower roller as shown When mounting the fix ing lower roller take care so that it will not be dam aged by the thermistor 10 Remove the metal fixing from the ...

Страница 387: ...ers upper lower front rear Front of the Roller The fixing upper roller has the shorter U shaped cut off 1 The fixing lower roller 2 has the longer cut off Rear of the Roller The fixing upper roller has a D cut 3 The fixing lower roller does not have any special marking Figure 8 414 Take care The gear 1 used for each roller has its own orientation Figure 8 415 1 2 3 1 ...

Страница 388: ...ove the two screws and detach the fixing upper cover 4 Remove the screw 1 one each and remove the fixing upper thermistor Figure 8 416 9 Removing the Fixing Lower Thermistor 1 Open the front cover 2 Remove the transfer drum frame cover and the fixing cover 3 Slide out the transfer drum frame 4 Remove the fixing assembly unit 5 Disconnect each connector 1 and remove the screw 2 then detach the fixi...

Страница 389: ...8 418 11 Removing the Fixing Thermal Switch upper 1 Open the front cover 2 Slide out the transfer drum frame 3 Remove the two screws and detach the fixing upper cover 4 Remove the cleaning belt unit 5 Remove the two screws 1 and remove the cable of the thermal switch then remove the screw 2 and detach the thermistor together with its mounting base Figure 8 419 12 Adjusting the Fixing Nip Measuring...

Страница 390: ...Fixing Upper Cleaning Belt 1 Open the front cover 2 Remove the fixing cover 3 Slide out the transfer drum frame 4 Remove the two screws and detach the fixing upper cover 5 Remove the two screws 1 and detach the fixing upper cleaner assembly 2 Figure 8 422 6 Remove the two screws 3 and remove the two bushings 4 then detach the fixing upper cleaning belt Figure 8 423 1 1 2 a c b feeding direction A3...

Страница 391: ...ound the cleaning belt take up shaft 1 two to three times 2 Mount the feed shaft 2 of the cleaning belt as shown 3 Put the lever 3 of the fixing upper cleaning belt length sensor inside 4 Mount the take up shaft of the cleaning belt as shown Figure 8 424 rear view 1 2 Figure 8 425 5 Operate the cleaning belt feed lever 4 10 to 20 times to remove all slack The cleaning belt can be come slack when y...

Страница 392: ...xing cover 3 Slide out the transfer frame 4 Detach the fixing unit 5 Disconnect the connector 1 and remove the two screws 2 then detach the fixing left cover Figure 8 427 6 Disconnect the two connectors 3 and remove the two screws 4 then remove the fixing lower cleaning belt unit Figure 8 428 7 Remove the two screws 5 and remove the two bushings 6 then detach the fixing lower cleaning belt Figure ...

Страница 393: ...by reversing the steps used to remove it and with the following mind 1 Wind the cleaning belt around the cleaning belt take up shaft 1 two to three times 2 Mount the cleaning belt feed shaft 2 as shown 3 Mount the take up shaft so that the lever 3 of the fixing lower belt length sensor is on top of the cleaning belt 4 Mount the take up shaft of the cleaning belt as shown 5 Operate the cleaning bel...

Страница 394: ...the figure Figure 8 432 rear Figure 8 433 front 1 Removing the Oil Applying Felt 1 Open the front cover 2 Remove the fixing cover 3 Slide out the transfer frame 4 Remove the fixing upper cover 5 Open the fixing upper roll unit 6 Shift the oil applying felt shaft 1 to the left and remove the oil felt 2 Figure 8 434 1 1 1 front rear 1 2 If you have replaced the oil felt execute COPIER FUNCTION FIXIN...

Страница 395: ... the oil applying felt 6 Remove the four screws 1 and remove the fixing blade Figure 8 435 REF The oil felt is symmetrical in shape when viewed from above You may turn it over to use the other side D Internal Delivery Assembly 1 Removing the Fixing Separation Claw 1 Open the front cover 2 Remove the fixing cover 3 Remove the two flat head screws 1 and remove the separation claw meal fixing 2 Take ...

Страница 396: ...he two screws 1 5 Disconnect the two connectors 2 and remove the two screws 3 then detach the fixing motor together with its PCB Figure 8 437 2 Points to Note When Replacing the Oil Pump The oil pump may be replaced without any adjustment However be sure to keep a paper rag or the like against it to stop oil pouring out when the tube is removed 3 Adjusting the Fixing Upper Lower Solenoid Make adju...

Страница 397: ......

Страница 398: ...Supply PCB 9 10 CHAPTER 9 EXTERNALS AUXILIARY MECAHANISMS C Protection System 9 11 D Backup Battery 9 13 VI EDITOR 9 14 A Outline 9 14 B Operations 9 14 C Zero Adjustment of Input Coordinates 9 16 VII DISASSEMBLY ASSEMBLY 9 17 A Covers 9 18 B Control Panel 9 22 C Editor 9 24 D Flywheel 9 26 E Fans 9 27 F Drive System Belt Layout 9 28 G Drum Motor Assembly 9 28 H Main Motor M4 Drive Assembly 9 32 I...

Страница 399: ......

Страница 400: ...rols control panel LEDs Controls data communication Provides data display data CPU PCB PANEL CPU CPU Adjusts LCD contrast Inverter PCB LCD Touch panel Numeric key pad PCB Control panel Control panel PCB Pilot lamp Control Panel Contrast VR PCB COPIER FUNCTION PANEL LCD CHK Use it to check the LCD for missing dots COPIER FUNCTION PANEL LED CHK Use it to start a check on control panel LEDs COPIER FU...

Страница 401: ...AN IMPRIME AU JAPON II DOWNLOADING A Outline The machine s CPU PCB possesses 3 types of CPUs The firmware of these CPUs is stored in separate flash ROM DIMMs and may be updated by replacing the DIMMs or using the Service Support Tool SST The CPUs are also designed to store data needed for various processing in the form of backup data ...

Страница 402: ...pgrading by DIMM replacement New firmware SST v1 32 or later Bi Centronics I F PCB Parallel interface R CPU JCON PANEL CPU MCON DC CPU DCON Backup RAM Firmware J11 Backup data Backup RAM Firmware J10 Backup data Backup RAM Firmware J12 Backup data Flash ROM DIMM Upgrading by DIMM replacement New firmware Flash ROM DIMM Upgrading by DIMM replacement New firmware CPU PCB Downloading of firmware Uplo...

Страница 403: ...he existing PCB The backup data from the three CPUs cannot be uploaded or downloaded all at once requiring work on a unit basis The parallel port for downloading is controlled by JCON and communication to other CPUs is by way of JCON When starting downloading you must select the target CPU once you have made a selection you will not be able to change it in the middle of operation If you want to co...

Страница 404: ...is common in downloading of firmware and uploading downloading of backup data Figure 9 202 Items to Prepare PC Be sure that the SST of v1 32 or later has been installed Parallel Cable Be sure that the cable is compatible with IEEE1284 with the indication IEEE1284 Std Compliant The length must be as short as possible while not affecting the work Firmware The files for the SST designed for the machi...

Страница 405: ... Turn on the PC 2 Decompress the files of the firmware offered and store them in the NewROM folder inside the ServTool folder of the drive to which the SST has been installed The firmware is compressed in the form of self decompressing files with its destination being C ServTool NewROM folder Figure 9 203 3 Start the SST 4 Click To next on the left of the Main menu Figure 9 204 ...

Страница 406: ... 1150 1160 1180 REV 0 FEB 2002 PRINTED IN JAPAN IMPRIME AU JAPON CHAPTER 9 EXTERNALS AUXILIARY MECHANISMS 9 2e 5 Click Registering Firmware Figure 9 205 6 Click Register from NewROM folder on the Registration screen for the firmware Figure 9 206 ...

Страница 407: ...wly registered firmware is added to the list Check the list 1 You cannot register multiple pieces of firmware all at once leading to an er ror if attempted Be sure to register on an individual basis 2 When the registration ends successfully the files inside the NewROM folder are moved so that you need not delete the file inside the NewROM before sorting the files of the next firmware ...

Страница 408: ...ctions 1 Turn off the machine and the PC 2 Open the front cover of the machine then remove the screw and disconnect the connector cover Switch the mode switch to LOAD Figure 9 207 3 Connect the PC to the machine using a parallel cable 4 Turn on the PC 5 Start up the SST 6 Click To next on the right of the Main menu Figure 9 208 COPY LOAD Bi Centronics connector Switch ...

Страница 409: ...APAN IMPRIME AU JAPON 9 2h 7 Turn on the machine 8 Select the desired model name and unit and click Connect for the model name in relation to the SST for example CLC1100S for the unit name for example DCON JCON or MCON Figure 9 209 9 Check the connection of the cable and the setting of the mode switch and click OK Figure 9 210 ...

Страница 410: ... MECHANISMS 9 2i 10 Click OK so that the SST communicates with the machine to obtain necessary data 11 When the communication ends the information on the firmware obtained from the machine will be indicated Click OK to bring up the Job Selection screen Figure 9 211 12 On the Job Selection screen click the appropriate button Figure 9 212 ...

Страница 411: ...30 1150 1160 1180 REV 0 FEB 2002 PRINTED IN JAPAN IMPRIME AU JAPON 9 2j D Downloading the Firmware 1 On the Job Selection screen click Firmware Downloading 2 Select the firmware to download from the list by clicking so that Start is enabled To start the work click Start Figure 9 213 ...

Страница 412: ...PC exchange appropriate information at the start of downloading and the flash ROM is cleared 4 See that after clearing the flash ROM the SST and the PC transfer the firmware and write it to the flash ROM The progress of transfer is indicated in the form of a progress bar 5 See that the results of downloading are indicated Click OK to return to the Job Selection screen Figure 9 214 ...

Страница 413: ...ANON CLC1100 1130 1150 1160 1180 REV 0 FEB 2002 PRINTED IN JAPAN IMPRIME AU JAPON 9 2l E Uploading Backup Data 1 On the Job Selection screen click Backup Data Uploading 2 Click All on the list of backup data to enable Start To start downloading click Start Figure 9 215 ...

Страница 414: ...the progress bar indicates the progress of data transfer 4 See that the following screen appears at the end of uploading Enter the name of the file in the file name field to enable Start Saving Click it to store the data To delete the uploaded data click Discard Data Figure 9 216 5 At the end of uploading click OK to return to the Job Selection screen Figure 9 217 ...

Страница 415: ...wnloading Backup Data 1 On the Job Selection screen click Backup Data Downloading 2 Click the downward arrow on the right of the backup data list to bring up the list of stored backup data Select backup data to download from the list so that its information will be indicated and Start will be enabled To start downloading backup data click Start Figure 9 218 ...

Страница 416: ...0 1180 REV 0 FEB 2002 PRINTED IN JAPAN IMPRIME AU JAPON CHAPTER 9 EXTERNALS AUXILIARY MECHANISMS 9 2o 3 See that the progress bar indicates the progress of data transfer 4 When downloading ends click OK to return to the Job Selection screen Figure 9 219 ...

Страница 417: ... Unit Selection screen Figure 9 220 If you have connected to a unit and then decide to connect to a different unit be sure to turn off and then on the machine s power switch while the Unit Se lection screen remains 3 End the SST and shut down Windows 4 Turn off the machine and the PC 5 Disconnect the connection cable from the machine and the PC 6 Shift the machine s mode switch to COPY 7 Mount the...

Страница 418: ... 240V 6 Tl total Bk C P 4C Mn C L 4C Mn C Sm 4C Mn P L 4C Mn P Sm 230V 7 Tl total 4C Mn C L 4C Mn C Sm All C P Sm Bk C P L Bk C P Sm 230V 8 Tl total 4C Mn C L 4C Mn C Sm Bk C P L Bk C P Sm CopyScanTTL 230V 9 Tl total Bk C P 4C Mn C L 4C Mn C Sm 4C Mn P L 4C Mn P Sm 230V 10 Tl total Bk C P 4C Mn C L 4C Mn C Sm 4C Mn P L 4C Mn P Sm Legend C copying operation P printing operation Copy Scan TTL total ...

Страница 419: ...on Cools the original exposure system Discharges heat from inside Prevents soiling of the primary charging assembly Cools the motor Prevents soiling of the primary charging assembly Prevents stray toner Cools the IP PCB Cools the AP PCB Cools the power supply Cools the delivery assembly and assists feeding Cools the power supply Cools the original exposure system Cools the original expose system C...

Страница 420: ...NON CLC1100 1130 1150 1160 1180 REV 1 JAN 2000 PRINTED IN JAPAN IMPRIME AU JAPON 9 5 CHAPTER 9 EXTERNALS AUXILIARY MECHANISMS Figure 9 401 Arrangement of the Fans FM17 FM14 FM9 FM7 FM4 FM13 FM16 FM5 FM6 FM2 FM3 FM15 FM8 FM11 FM1 ...

Страница 421: ...02 R CPU or DC CPU CPU PCB Full speed signal Half speed signal Voltage switching circuit Error signal 24V 15V 24V 15V Fan 2 Sequence of Operations Figure 9 403 STBY STBY COPY CNTR DSRDY AINTR WMUP Laser scanner motor cooling fan FM4 Power supply cooling fan 1 2 FM9 FM13 Delivery cooling fan FM11 1 Delivery cooling fan FM11 2 Original exposure system cooling fan 1 2 3 FM1 FM14 FM15 Exhaust fan FM2 ...

Страница 422: ...tects the DC power supply system from overcurrent Cuts off the AC power system for the original scanning lamp fixing heater fixing oil pump and the like Operates in conjunction with the transfer unit lever switch SW3 left front cover switch SW4 and delivery cover switch SW5 CLC1150 1180 only Cuts off DC power 15 24 38 V Operates in conjunction with the transfer unit lever switch SW3 left front cov...

Страница 423: ...aker OFF ON ON ON ON ON ON Main switch OFF OFF OFF ON ON ON Environment switch OFF ON ON ON ON ON Cover switch Open Open Close Cassette heater switch OFF ON OFF ON ON Drum heater OFF OFF ON ON ON OFF ON Cassette heater OFF OFF OFF ON OFF ON ON DC power supply OFF OFF OFF OFF ON ON ON AC relay OFF OFF OFF OFF OFF OFF ON DC relay OFF OFF OFF OFF OFF OFF ON Cover switch transfer unit lever switch SW3...

Страница 424: ...mal switch Fixing lower thermal switch Fixing lower heater Fixing upper heater Oil pump driver PCB Fixing oil pump Transfer driver PCB Registration path driver PCB Developing bias PCB DC converter Original scanner motor driver PCB Analog processor Paper deck HVT DC HVT AC DC drier PCB Duplexing driver PCB Pickup driver PCB Transfer locking driver PCB Developing locking driver Laser scanner motor d...

Страница 425: ...706 2 4 2A 8V J1705 7 10 1A 8V J1705 5 10 2A 8VU J1705 3 10 4A The ratings of the fuses on the DC fuse PCB and the AC fuse PCB are as shown in Table 9 504 Table 9 503b Rated Outputs Output Connector Power supply tolerance Overcurrent protection setting 12V J1704 1 10 5A 15V J1705 9 10 1A 24V F J1705 1 10 2A or more 24V J1703 1 J1703 2 J1703 3 J1703 4 10 5A 38VU J1702 1 10 5A Table 9 504 Fuse Ratin...

Страница 426: ...n the other hand the copier will stop output 2 only Figure 9 502 Block Diagram of the Protection System Table 9 505 Protective Functions DC power supply PCB Output 1 Output 2 Converter circuit 1 Conversion circuit 2 3 3V 5V 8V 8V 8VU 12V 15V 24V F 24V 38V Over current detection circuit 1 Over current detection circuit 2 Output stop signal 1 Output stop signal 2 Sequence control circuit Stops outpu...

Страница 427: ...9 power cut 24V line FU940 38V line FU941 38V line Load laser controller PCB analog processor PCB original scanner driver PCB registration path driver PCB transfer driver PCB pickup driver PCB developing engagement driver PCB paper deck transfer engagement driver PCB duplexing driver PCB DC driver PCB CPU control panel inverter laser scanner motor driver PCB Not used laser controller PCB paper dec...

Страница 428: ...sion If used wrongly a lithium battery can cause combustion or chemical explo sion Do not re charge disassemble or incinerate it Keep all lithium batteries out of reach of children Be sure to dispose of any used batteries according to the appropriate instructions Battery lithium Uses backup description Life Replacement After replacement BAT1 3V 1000mAh Control value data for R CON and PANEL CON Da...

Страница 429: ...ic pen input point B Operations When the pen switch presses on the tablet the CPU on the editor controller PCB applies pulses to each electrode wire through the tablet decoder in a specific direction in terms of 1 2 n 1 n n 1 The static bond occurring between the pulse and the pen switch allows the controller PCB to read the level strong or weak of the voltage through the pen switch Figure 9 601 T...

Страница 430: ... 602 Decoder X Decoder Y Amplifi cation Peak hold A D conversion Vn 1 Vn Vn 1 Editor controller PCB CPU Output to copier line interval L n 1 n 1 Vn 1 n X 1 n 1 Vn 1 Detection Applies pulses to electrode wire 1 n 1 n n 1 Voltage is maximum Vn at nth electrode wire Vn Vn 1 Vn Vn 1 Computes x from data table Obtains L x mm between n and n 1 between n and n 1 line interval L n 1 ...

Страница 431: ...rdinates If you have replaced the editor controller PCB or the tablet be sure to set the DIP switch on the controller PCB according to the label attached to the cable of the tablet Figure 9 603 and 604 If a discrepancy still exists after setting the DIP switch execute EDITOR ADJUST EDADJ X Y in service mode Figure 9 603 Figure 9 604 Tablet Label Setting SW ON OFF 10 1 2 3 4 5 7 6 8 9 ...

Страница 432: ...he washer that comes with the screw used for the grounding wire and the varistor to ensure electrical continuity 6 Do not operate the machine with any of its parts removed unless otherwise mentioned 7 Keep in mind that the laser shutter is designed to close in response to the left cover switch i e when it turns off as when the left front cover is opened If you must operating the copier with the le...

Страница 433: ...Upper cover 11 12 Right face cover 2 13 Right front cover 2 14 Right lower cover REF The number in parentheses indicates the number of mounting screws used Note that one of the screws used to mount the rear cover must be used to gether with a toothed washer Remove the covers as needed when cleaning inspecting or repairing the inside of the machine Those covers that may be detached by mere removal ...

Страница 434: ...igure 9 703 4 Transfer Drum Frame Cover 1 Remove the transfer drum knob 1 2 Remove the two screws 2 and detach the transfer drum frame cover 3 figure 9 704 5 Fixing Assembly Cover 1 Remove the screw and detach the fixing knob 1 2 Remove the two screws 2 and detach the fixing assembly cover 3 When mounting the fixing assembly cover be sure that the hook at the bottom of the cover is securely fit te...

Страница 435: ... be sure that the hook at the bottom of the cover is se curely fitted in the hole in the transfer drum frame Figure 9 706 7 Removing the Copyboard Glass 1 Remove the two screws and detach the copyboard glass retainer right 2 Lift the right end of the copyboard glass to detach REF When removing the copyboard glass do not re move any part except the copyboard glass retainer right When mounting it be...

Страница 436: ...ear upper cover 2 Remove the control panel 3 Remove the three face plates 1 of the screw holes for the projector with a flat blade screwdriver 4 Remove the copyboard glass 2 Figure 9 707 5 Remove the two screws 3 and detach the vertical size plate 4 Figure 9 708 6 Remove the two flat head screws 5 7 Remove the nine screws 6 and detach the upper cover 7 Figure 7 709 1 2 4 3 6 5 6 5 6 6 6 6 6 6 6 ...

Страница 437: ... and detach the control panel 2 Figure 9 710 2 Removing the Control Panel PCB 1 Turn over the control panel 2 Disconnect the five connectors 1 of the control panel PCB 3 Remove the five screws M3x8 2 and the screw M3x4 3 then detach the control panel PCB Figure 9 711 3 Removing the LCD PCB 1 Remove the control panel PCB 2 Remove the seven black screws 1 and the grounding screw 2 then detach the co...

Страница 438: ...IARY MECHANISMS 3 Disconnect the connector 3 and remove the four screws 4 then detach the LCD PCB Figure 9 713 4 Removing the Numeric Keypad PCB 1 Remove the control panel PCB 2 Remove the control panel fixing plate 3 Remove the 13 screws 1 and remove the pilot lamp assembly 2 4 Remove the numeric keypad PCB 3 Figure 9 714 3 4 4 2 3 1 1 1 ...

Страница 439: ...ve the six face plates 1 used for screws Figure 9 715 2 Remove the two screws M8x6 six screws M8x10 and six screws M8x23 a total of 14 screws then detach the copyboard cover 3 Remove the two screws 2 and detach the controller PCB cover 3 Figure 9 716 4 Disconnect the two connectors 4 and remove the 4 screws 5 and the flat cable 6 then detach the editor controller PCB 7 Figure 9 717 1 1 1 2 2 3 4 5...

Страница 440: ...re ferring to the switch set tings indicated on the flat cable Figure 9 718 2 Removing the Editor Mirror 1 Remove the six face plates for screws 2 Remove the two screws M8x8 six screws M8x10 and six screws M8x28 a total of 14 screws then detach the copyboard cover 3 Remove the two screws and detach the controller PCB cover 4 Remove the flat cable 1 and five screws 2 then remove the controller PCB ...

Страница 441: ...eft as shown when handling it 1 Remove the rear cover 2 Turn the flywheel counterclockwise so that it is as shown in the figure Do NOT turn the flywheel clockwise Otherwise it will damage the cleaning blade causing cleaning faults Figure 9 721 3 Remove the two screws 1 and detach the flywheel 1 2 4 Remove the two screws 3 and detach the flywheel 2 4 Figure 9 720 figure 9 722 2 Points to Note When ...

Страница 442: ... fan FM6 Toner suction fan FM7 IP cooling fan FM8 Electric unit cooling fan FM9 Power supply cooling fan FM9 Power supply cooling fan 1 FM11 Delivery cooling fan FM13 Power supply cooling fan 2 FM14 Original exposure system cooling fan 2 FM15 Original exposure system cooling fan 3 FM16 Back suction fan FM17 Power supply cord mount fan 1 Air filter 2 Toner filter 3 Ozone filter No description is gi...

Страница 443: ...or the developing assembly registration roller attraction roller and photosensitive drum cleaner 2 belt for the multifeeder pickup assembly Figure 9 724 G Drum Motor Assembly 1 Removing the Drum Motor M2 1 Remove the photosensitive drum unit 2 Remove the rear cover 3 Remove the flywheel 4 Remove the potential control PCB 5 Remove the two screws 1 and detach the flywheel 2 1 2 Figure 9 725 6 Remove...

Страница 444: ...nt and disconnect the connector B 5 and connector C 6 then detach the lamp regulator PCB Figure 9 727 8 Remove the three screws 7 and detach the duct 8 of the primary charging assembly fan 9 Remove the three screws and disconnect the connector then detach the primary charging assembly fan Figure 9 728 10 Remove the screw 9 and the two hex hole stop screws 10 then detach the gear 11 from the drum s...

Страница 445: ...re 9 730 2 Mounting the Drum Motor Assembly When the drum motor assembly is removed from the copier be sure to adjust its position using the drum shaft position tool FY9 3045 when mounting it back to eliminate any discrepancy 1 Slide out the photosensitive drum unit from the copier 2 Remove the six screws 1 and detach the photosensitive drum butting block 2 front rear then detach the photosensitiv...

Страница 446: ...the copier with seven screws 8 Figure 9 733 5 Mount the drum shaft positioning tool 9 to the photosensitive drum frame unit with the two screws 10 removed in step 2 6 Secure the drum motor assembly in place with seven screws 7 Remove the drum shaft positioning tool slide out the photosensitive frame unit from the copier then mount the unit and parts removed in steps 1 and 2 Figure 9 734 8 8 8 8 7 ...

Страница 447: ...e back suction fan 1 5 Remove the six screws 2 and detach the drive assembly reinforcing plate 3 Figure 9 735 6 While lifting the tension plate 4 by hand detach the drive belt 1 5 7 Disconnect the two connectors 6 and remove the five screws 7 then detach the main motor assembly 8 together with the mounting plate Figure 9 736 8 Remove the clamp of the motor output shaft and remove the four screws t...

Страница 448: ...and OPTION in service mode Or back up the data using the downloading tool 2 Remove the CPU PCB 3 Mount the new PCB 4 Detach the three flash memory PCBs and memory PCB from the old CPU PCB and mount them on the new CPU PCB 5 Turn on the power switch 6 Select FUNCTION CLEAR DC CON R CON and MMI COPY in service mode then press the OK key 7 Turn off and then on the power switch 8 Enter the data values...

Страница 449: ... old flash memory PCB from the CPU PCB 3 Mount the new flash memory to the CPU PCB 4 Turn on the power switch 5 Select FUNCTION CLEAR DC CON R CON and MMI COPY in service mode then press the OK key 6 Turn off and then on the power switch 7 Enter the data values recorded in step 1 8 Execute FUNCTION CCD CCD ADJ in service mode 9 Turn off and then on the power switch ...

Страница 450: ... connectors 3 Remove the four screws 1 and detach the HVT DC PCB 2 Figure 9 739 4 Disconnect all connectors 5 Remove the three connectors 3 and detach the HVT AC PCB 4 Figure 9 740 K Developing Bias PCB 1 Removing the Developing Bias PCB 1 Remove the delivery assembly 2 Disconnect the four connectors 1 and remove the two screws 2 then detach the developing bias PCB 3 together with the PCB case 1 1...

Страница 451: ......

Страница 452: ...artment 10 12 F Controlling the Deck Motors 10 14 II DETECTING JAMS 10 17 A Outline 10 17 III DISASSEMBLY ASSEMBLY 10 19 A External Covers 10 20 B Paper Deck Related Work 10 23 C Drive System 10 28 D Feeding System 10 34 E Electrical System 10 38 This chapter explains the operations and functions of the mechanisms used to pick up paper from the paper deck and the relationship between electrical an...

Страница 453: ......

Страница 454: ...sor Deck lifter upper limit sensor Deck lifer position sensor Deck set sensor Deck paper level upper sensor Deck paper level lower sensor Deck open sensor When PS101 detects paper 1 When the light blocking plate is at PS101 When PS102 detects paper 1 When the light blocking plate is at PS102 When the deck lifter is at the upper limit 1 When the light blocking plate is at PS103 When the lifter is a...

Страница 455: ... J5 J31 J7 J26 J4 J25 J22 1 3 J3 1 DOPEN DOPNSW DLFLD 7 8 Deck open switch Deck open indicator Deck open detecting switch Deck lifter lower limit detecting switch Power supply Copier Deck driver PCB When SW100 is pushed as the deck is opened 0 0 when the deck is being opened closed 0 LED remains on or flashes while the deck lifter motor is rotating When the deck is opened 0 When SW101 is not pushe...

Страница 456: ...CD DPRSD 24VU DOPSD 24VU PM101 24V 24V DPUMA DPUMA DPUMB DPUMB J27 J22 SL101 CL102 M101 J18 J15 J5 J16 J15 J6 J28 SL102 Deck pickup motor Deck lifter motor Deck pickup clutch Deck pickup solenoid Deck open solenoid Deck driver PCB See p 10 14 See p 10 15 When 0 CL102 turns on When 0 SL101 turns on When 0 SL102 turns on 2 1 2 1 1 2 11 12 1 2 9 10 9 10 3 1 6 5 4 2 1 2 1 2 B1 B2 B6 B7 J4 ...

Страница 457: ...et in the deck is lifted by the lifter and held to a specific pickup position by the lifter When the Start key is pressed and as a result the deck pickup clutch CL102 turns on the drive of the deck pickup motor PM101 rotates the pickup roller to pick up paper At this time the pickup feed roller and the separation roller make sure that only one sheet of paper is picked up then when the deck pickup ...

Страница 458: ...NTED IN JAPAN IMPRIME AU JAPON 10 5 CHAPTER 10 PAPER DECK Figure 10 104 DC CPU PS101 CL102 PM101 SL101 Copier Side deck driver PCB Deck pickup paper detection signal DKPPD Deck pickup clutch drive signal DPUCD Deck main motor drive signal Deck pickup solenoid drive signal DPRSD ...

Страница 459: ...1 FEB 2002 PRINTED IN JAPAN IMPRIME AU JAPON 3 Sequence of Operations pickup Figure 10 105 INTR COPY DSRDY 1 2 3 4 1 2 3 4 Photosensitive drum revolution Transfer drum revolution Deck pickup motor PM101 Deck pickup clutch SL102 Deck pickup solenoid SL101 Deck pickup sensor PS101 Start key ON ...

Страница 460: ...er inside the deck is detected by the deck paper absent sensor PS102 When paper runs out and as a result the paper detecting lever of the pickup roller assembly leaves the deck paper absent sensor the copier will indicate the Add Paper message on the control panel Figure 10 106a Paper Present Figure 10 106b Paper Absent Paper detecting lever Deck paper absent sensor paper Lifter Paper detecting le...

Страница 461: ...ximate volume of paper inside its compartment using the deck paper level upper sensor PS107 deck paper level lower sensor PS108 and deck paper absent sensor PS102 It sends the result of its finding to the copier which in turn will indicate the level on its control panel Table 10 101 shows the relationship between the level of paper and the states of sensors and the indications on the control panel...

Страница 462: ...rface of paper If the lifter fails to stop moving up after the sensor lever blocks the lifter position sensor because of some fault the lifter upper limit sensor PS103 will turn on to prevent damage to the deck by excess upward movement On the other hand the lifter starts to move down when the deck open switch SW100 is pushed and continues to move down until the lifter moves past the sensor lever ...

Страница 463: ...kup motor Deck open detecting switch SW101 Deck paper level upper sensor PS107 Deck pickup roller Deck lifter position sensor PS104 Deck lifter upper limit sensor PS103 Deck open switch SW100 Deck paper level lower sensor PS108 Deck lifter motor Deck lifter lower limit detecting switch SW102 Lifter paper Deck lifter cable Deck separation roller Deck pickup feed roller ...

Страница 464: ... a black belt which moves up and down within a display window in the deck front cover in keeping with the movement of the rack When the level of paper decreases and as a result the lifter moves up to the pickup position the area of the black belt inside the display window will gradually increase thereby indicating the reduction in the level of paper white area Figure 10 108 Deck front cover The li...

Страница 465: ...o the copier the deck open sensor PS109 detects the light blocking plate of the compartment causing the lifter to move as far up as the pickup position When the deck lifter motor rotates in response to deck opening closing movement the deck open indicator LED100 on the open switch PCB will turn on or flash Figure 10 109 DC CPU M101 SW102 SL102 SW101 PS103 PS109 SW100 LED100 Open switch PCB Compart...

Страница 466: ...0 Deck open indicator LED Deck lifter motor M101 Deck paper lever upper sensor PS107 Deck lifter lower limit detecting switch SW102 Deck open solenoid SL102 Deck open detecting switch SW101 Deck open sensor PS109 Deck lifter position sensor PS104 Deck open switch ON Compartment set Flashing On Flashing Off Compartment in open state Deck lifter down Deck lifter up Varies according to the level of p...

Страница 467: ...by the copier s DC CPU The deck pickup motor is turned on and off by controlling the output of the pulse signals from the copier DPUMA DPUMA DPUMB DPUMB on the other hand the deck pickup motor is kept on hold by causing the deck pickup motor hold signal to go 1 Figure 10 111 PM101 24V 5V DPUMA DPUMA DPUMB DPUMB Copier DC CPU Deck pickup motor hold signal DPUMHL Deck driver PCB Motor drive voltage ...

Страница 468: ... reason the copier will indicate E041 on its control panel 1 Conditions for the Lifter to Move Up The deck is connected to the copier The deck set signal DMNTSD goes 1 The compartment is closed The deck open detection signal DOPND goes 1 The deck compartment is closed The deck open detecting switch is ON The deck lifter upper limit detection signal DLFUL goes 0 and in addition the deck lifer posit...

Страница 469: ...t drive signal Deck lifter motor upper limit drive signal Combination circuit Motor drive circuit Deck open signal DOPEN Deck lifter upper limit detection signal DLFUL Deck open detection signal DOPND Deck lifter position detection signal DLFPD Deck set signal DMNTSD Deck lifter roller limit detecting signal DLFLD Deck driver PCB Deck open detecting switch SW101 Deck lifter motor Deck paper level ...

Страница 470: ... to monitor the movement of paper A jam is identified by reading signals from the sensor at such times as programmed in advance in the copier s DC CPU When the DC CPU identifies a jam it will discharge all paper moving ahead of the jam stop the ongoing operation and then indicate jam removal instructions on its control panel Figure 10 201 Copier PS101 Table 10 201 Sensor Name Description PS101 Dec...

Страница 471: ...ies a jam under the following conditions Paper is found over the deck pickup sensor PS101 when the copier s power switch is turned on at the end of the wait period or during standby Deck Pick Up Vertical Delay Jam Figure 10 202 INTR COPY Deck pickup clutch CL102 Jam check Deck pickup sensor PS101 Deck pickup motor PM101 Start key ON Jam indicator ON Normal Error ...

Страница 472: ... that comes with the screw used for the grounding wire and the varistor to ensure electrical continuity 6 Do not operate the machine with any of its parts removed unless otherwise mentioned 7 Keep in mind that the laser shutter is designed to close in response to the left cover switch i e when it turns off as when the left front cover is opened If you must operating the copier with the left front ...

Страница 473: ...ront upper cover 3 Compartment open close switch 4 Front cover 5 Right cover 6 Upper cover 7 Rear cover 1 2 3 4 5 6 7 rear 1 2 Figure 10 302 2 Loosen the four screws 3 and move the front cover 4 of the deck toward the front to remove Figure 10 303 1 Removing the Front Cover 1 Disconnect the deck from the copier and push down the latch plate 2 of the compartment 1 to open the compartment 1 3 4 ...

Страница 474: ... upper cover is 3 1 mm Figure 10 305 If you moved the paper level indicator drive belt or the deck lifter behind the front cover after removing the front cover lower the deck lifter to its lower limit and move the drive belt by hand so that the white area in the window will increase in the direction of the arrow If the deck is started without matching the paper level indication and the deck lifter...

Страница 475: ...six screws 1 then detach the rear cover 2 The screw 1a has a washer Figure 10 307 3 Removing the Right Cover 1 Open the compartment and remove the screws 1 then move the right cover 2 to the front to detach The screw 1a has a washer Figure 10 308 4 Removing the Upper Cover 1 Remove the rear cover 2 Push down the latch plate 2 of the compartment 1 to open the compartment 1 Figure 10 309 1a 1 1 1 1 ...

Страница 476: ...t the connector 4 then detach the front upper cover 5 Figure 10 310 4 Remove the two screws 6 and detach the upper cover 7 Figure 10 311 B Paper Deck Related Work 1 Removing the Deck from the Copier 1 Place paper or the like 3 about 8 cm high on the floor for placement of the deck 2 to prevent deformation of the roll support plate 1 Figure 10 312 3 4 5 7 6 2 3 1 3 8 cm approx ...

Страница 477: ...50 1160 1180 REV 0 MAR 1999 PRINTED IN JAPAN IMPRIME AU JAPON 2 Remove the right cover 3 Remove the four screws 4 and detach the deck 5 from the deck mount 6 Figure 10 313 4 Holding the deck 7 as shown place it on the base prepared in step 1 Figure 10 314 4 6 left 5 4 right 7 ...

Страница 478: ... about 8 cm high on the floor for placement of the deck 2 to prevent deformation of the roll support 1 Figure 10 315 2 Disconnect the deck from the copier and push down the latch plate 5 of the compartment 4 to open the compartment 4 Figure 10 316 3 Remove the right cover 4 Remove the screw 6 of the harness guide and disconnect the connector 7 Figure 10 317 8 cm approx 2 3 3 1 5 4 rear 6 7 ...

Страница 479: ... lift the compartment slightly and detach it to the front 7 Place the compartment on the base prepared in step 1 Figure 10 319 3 Changing the Deck Paper Size If the deck paper size must be changed to comply with the user s request perform the following 1 Open the compartment of the deck and remove all paper 2 If the lifter of the deck is up turn on the copier and push the sensor lever 2 of the pap...

Страница 480: ...ment and adjust the position of the latch plate 1 of the deck open solenoid SL02 by turning the two screws 2 At this time use the graduations 3 on the latch plate as a guide After adjusting the left right registration be sure to check the position of the front cover p 10 21 Figure 10 322 5 Adjusting the Position of the Roll If the compartment cannot be opened or closed smoothly requiring adjustmen...

Страница 481: ...then detach the deck pickup clutch 3 When mounting the pickup clutch be sure to put the clutch in the slip stop 4 Be sure also to hook the harness on the U groove 5 of the guide Figure 10 324 2 Removing the Deck Pickup Motor Assembly 1 Disconnect the deck from the copier then remove the six screws and detach the ear cover 2 Disconnect the two connectors 1 and remove the four screws 2 of the deck d...

Страница 482: ... up position press the sensor lever 1 of the paper supply position inside the compartment to stop the lifter about 7 cm from the bottom of the compartment base plate Then insert a hex wrench into the hole of the lifter drive shaft 3 to hold it in place against turning Figure 10 326 3 Remove the compartment from the deck p 10 25 4 Disconnect the connector 5 and remove the five screws 6 then remove ...

Страница 483: ...or lever 1 of the paper supply position inside the compartment to lower the lifter so that the holes in the left and right of the compartment side plate and the holes in the left and right of the lifter match then insert two long screwdrivers 2 through the holes to position the lifter At this time try matching the top face of the lifter against the scribe line on the compartment left plate to faci...

Страница 484: ...et screws 16 of the pulley 15 on the outside to detach the pulley 15 on the outside in advance Figure 10 330 5 Removing the Lifter Cable deck rear 1 Open the compartment of the deck and remove all paper 2 Remove the screw and detach the paper rear end guide plate of the compartment 3 Push the sensor lever 1 of the paper supply position inside the compartment to lower the lifter so that the left an...

Страница 485: ... Figure 10 332 6 Disconnect the four connectors 5 and remove the six screws 6 then detach the metal plate 7 Figure 10 333 7 Insert a hex wrench 9 or the like into the hole of the lifter drive shaft 8 to hold it in position against turning If the lifter drive shaft is not held in position as instructed the lifer cable will become slack when the lifter motor unit is removed Take full care Figure 10 ...

Страница 486: ...ok the lifter cable on the upper pulley 4 4 Hook the ball of the lifter cable on the pulley 5 of the lifter drive shaft and wind the cable along the groove about 1 5 times by hand At this time be sure to keep the lifter cable taut until the long screwdrivers used to hold the lifter in place are lifted as far up as they move 5 Secure the pulley to the lifter drive shaft with two set screws 6 6 Secu...

Страница 487: ...ct the two connectors 1 and remove the five screws 2 3 Remove the deck pickup unit 3 Figure 10 337 When mounting the deck pickup unit 3 be sure to tighten the three screws shown in the figure first Figure 10 338 2 Removing the Deck Pickup Roller 1 Remove the deck pickup unit 2 Turn over the deck pickup unit and remove the resin ring 1 one each then remove the deck pickup roller 2 Figure 10 339 2 2...

Страница 488: ...marking 2 on the collar silver colored is at the front and the marking 3 on the side of the roller is at the rear Figure 10 340 When mounting the deck pickup roller 4 at the rear be user that the marking 5 on the side of the roller and the marking 6 on the side of the collar gold colored are at the rear Figure 10 341 2 3 1 direction of rotation Collar gold colored rear of copier 4 5 6 director of ...

Страница 489: ... and the drive belt 3 to the front Figure 10 342 5 Orientation of the Deck Pickup Feed Roller When mounting the deck pickup feed roller 1 be sure that the belt pulley 2 is at the front When mounting the pickup feed roller rubber to the pickup feed roller shaft be sure that the marking 3 is at the rear Figure 10 343 6 Removing the Deck Separation Roller 1 Disconnect the deck from the copier and rem...

Страница 490: ...lerated when the sponge is exposed to light and is a general characteristic of urethane sponge There is no difference in performance and the part is not identified by color Figure 10 345 7 Adjusting the Deck Separation Roller Pressure If double feeding or pickup failure occurs when pickup is from the side paper deck adjust the position of the pressure spring of the deck separation roller If pickup...

Страница 491: ...rt plate before removing the solenoid Or mark the position of the solenoid with a scriber on the support plate If you are mounting the solenoid on its own be sure to secure it in place where it was before removal Figure 10 347 E Electrical System 1 Removing the Deck Driver PCB 1 Disconnect the deck from the copier then remove the six screws and detach the rear cover 2 Disconnect the seven connecto...

Страница 492: ... the latch plate 2 of the compartment 1 to open the compartment 1 Figure 10 349 2 Remove the three screws 3 and disconnect the connector 4 then detach the front upper cover 5 Figure 10 350 3 Remove the two screws 6 and detach the deck open switch PCB 7 When mounting the front upper cover be sure not to trap the harness by the deck open switch PCB and be sure to connect all connectors rear 2 1 3 4 ...

Страница 493: ......

Страница 494: ... Collection Case 11 7 C Supplying Fixing Oil 11 9 D Mounting the Drum Cleaner and Setting the Environment Switch 11 11 E Supplying Toner 11 15 F Supplying the Starter Developer 11 19 G Checking the Images and Operations 11 23 H Changing the Cassette Paper Size 11 25 III RELOCATING THE COPIER 11 28 IV MOUNTING THE DOCUMENT HOLDER 11 30 V INSTALLING THE CONTROL CARD UNIT V 11 31 VI INSTALLING THE CO...

Страница 495: ......

Страница 496: ...º 59º and 30ºC 86ºF and the humidity must be between 5 and 80 Avoid an area near a water faucet water boiler humidifier and refrigerator Figure 11 101 3 Avoid areas near a source of fire and areas subject to dust ammonium gas and direct sunshine As necessary provide curtains to block out the sun 4 The level of ozone generated by the machine in operation should not affect the health of people worki...

Страница 497: ...quate space for maintenance work See the following figures for spatial requirements Copier Only 320 cm 126 in min 100 cm 39 in min 100 cm 39 in min 100 cm 39 in min 100 cm 39 in min Copier 280 cm 110 in min Figure 11 102 Copier Stapler Sorter F1 Buffer Path Unit 1 Paper Deck E1 Figure 11 103 320 cm 126 in min 190 cm 63 in min 100 cm 39 in min 100 cm 39 in min 160 cm 63 in min 430 cm 169 in min Cop...

Страница 498: ... not directly be drawn into another In addition avoid installing the machine near the air vent of the room In general the silicone gas vaporized silicone oil from the fixing assembly generated by a copier tends to soil its corona charging wire shortening its life Keep in mind that this phenomenon is particularly conspicuous in a low humidity environment Exhaust Wrong Exhaust Wrong Figure 11 104 Fi...

Страница 499: ...ave brought in the copier from a cold to warm place leave it alone for at least an hour so that it will become used to the new environment before unpacking it A Unpacking 1 Unpack the copier 2 Tear open the plastic bag covering the copier and peel off the fixing tape then pull out the grips from the copier 3 Lift the pickup side copier s right about 5 cm while working in a group of two and pull ou...

Страница 500: ... lift the delivery side copier s left about 5 cm and remove the cushioning material in the direction of the arrow Figure 11 202 5 Lift the pickup side and the delivery side in turns to remove the plastic bag 6 Working in a group of two lift the paper delivery side copier s left and pull out the cardboard to slide out the slope plates Figure 11 203 Skid Slope plate ...

Страница 501: ... slope plates and secure them in place with the pins Be sure that each slope plate is placed so that the boss at the center faces down Figure 11 204 8 Slide down the copier from the skid Position one person to support from below while the other pushes from above 9 Open the cardboard box and take out the parts and materials Check to make sure that all attachments are available Pin Slope plate ...

Страница 502: ...relocating the copier store it away to the right of the waste toner collection case Figure 11 205 4 Open the right and left front covers and remove the tape and fixing material from the lever and the like 5 Release the lever and slide out the transfer unit 6 Peel off the fixing tape and open the internal delivery unit 7 Pull off the two fixing roller releasing rolls using radio pliers 8 Close the ...

Страница 503: ...n case Be sure that the plastic bag is dilated 11 Remove the fixing member and the fixing tape from inside the cassette Be sure to remove the packaging material before turning on the power switch 12 Fit the size rolls that come with the copier from within the cassette so that the hole of the marking A STMT R and the hole of the marking H LTR R are out of view The rolls are used to prevent the use ...

Страница 504: ...e the fixing material from within Figure 11 210 2 Remove the screw and detach the stopper of the transfer drum You will be using the stopper when relocating the copier Figure 11 211 3 Remove the cap from the fixing oil tank 4 Remove the outside cap and the inside cap of the fixing oil bottle and replace them with the funnel that comes with the oil bottle Figure 11 212 Transfer drum knob Screw Tran...

Страница 505: ...wise with your fingers so that it is as shown Shift the levers of the attraction brush and the transfer blade to the left to lock the brush and the blade in position You will hear clicks when you rotate the lever counterclockwise It is a normal condition provided to prevent reverse rotation during operation Figure 11 214 Transfer drum Transfer blade lever Attraction brush lever both are unlocked T...

Страница 506: ... JAPON 11 11 CHAPTER 11 INSTALLATION D Mounting the Drum Cleaner and Setting the Environment Switch 1 Remove the two screws and remove the two slide stoppers of the hopper toner box unit 2 While pushing down the hopper stopper slide out the hopper unit and turn it toward the front Figure 11 215 Screws ...

Страница 507: ... JAPAN IMPRIME AU JAPON 3 Disconnect the connector yellow harness on the right side and free the harness from the edge saddle then remove the screw and slide the black toner density sensor unit straight out Figure 11 216 Screw Connector CLC1100 1120 1130 1150 Connectors Screw CLC1140 1160 1180 Figure 11 216a 11 11a ...

Страница 508: ... edge No 2 blade front No 2 blade rear Black toner sensor face CLC1100 1120 1130 1150 Figure 11 217 5 Clean the black toner concentration sensor and the gradation sensor CLC1140 1160 1180 only use a flannel cloth moistened with and then well wrung The reason for using water is to remove charges from the sensor window of the black toner concentration sensor and the gradation sensor The presence of ...

Страница 509: ... screw During insertion take care not to make contact with the photosensitive drum If the No 2 blade comes into contact with the photosensitive drum during insertion lubricant can spread to the photosensitive drum causing white spots in copy images 7 Remove the screw and pull the photosensitive drum cleaner to the front then shift it counterclockwise and then slide it out Figure 11 218 Screw Photo...

Страница 510: ...he edge Use light tapping strokes When applying to the edge move from above to the edge surface as if to collect the lubricant where the drum comes into contact Cleaning blade releasing lever Screw Unlocked Locked Cleaning blade Figure 11 219 9 Mount the photosensitive drum cleaner with a screw Take care not to make contact with the photosensitive drum unit 10 While holding the cleaner blade relea...

Страница 511: ...nside the copier 12 Remove the four screws and mount the left lower cover ON OFF Environment switch Screw Figure 11 221 13 Check to make sure that the environment switch top black is ON otherwise turn it ON At time of shipment from the factory CLC1120 1130 1150 OFF CLC1100 1140 1160 1180 ON Keep the cassette heater switch bottom gray OFF Figure 11 222 14 Mount the left lower cover with four screws...

Страница 512: ...er switch E Supplying Toner 1 Close the left front cover and insert the cover switch actuator into the right cover switch Be sure grounding is properly made Otherwise the leakage breaker can fail to operate properly 2 Insert the control key 3 Connect the power plug and turn on the power switch Make sure that the power is as rated 10 Figure 11 223 ...

Страница 513: ... paper on the floor under the hopper open and fit the hopper stoppers into the four supply mouths found in the bottom of the hopper Figure 11 224 5 Shake the Bk toner bottle up and down as shown 20 times or more Do not shake the bottle until immediately before setting it to the hopper Check to make sure that the toner has not caked Figure 11 225 ...

Страница 514: ...of the Bk toner hopper and fit the Bk toner bottle into the mouth of the hopper then holding the base of the bottle turn it clockwise about 10º Figure 11 226 7 Open the slide shutter of the Bk toner bottle and tap lightly on the bottom and the side of the bottle two to three times Check to make sure that all toner has fallen into the hopper Figure 11 227 ...

Страница 515: ...d turn the bottle counterclockwise about 10º to detach Check to make sure that no toner remains on the mesh of the hopper mouth otherwise tap on the mesh so that the toner falls inside the hopper Figure 11 228 9 Supply C and Y toners in the same way 10 Press the following keys on the control panel in sequence to start service mode 2 8 Press these two keys at the same time 11 Press COPIER ...

Страница 516: ... HP STR 4 Be sure to wait until the indication on the control panel is READY before executing HP STR 4 in service mode 15 Press OK 16 Wait until the toner 4 colors inside the hopper has been stirred fully about 2 min F Supplying the Starter Developer 1 Press SPLY K Be sure to wait until the indication on the control panel is READY before executing SPLY K in service mode 2 Press OK ...

Страница 517: ... supply funnel that comes with the copier in the supply mouth of the developing assembly and hold it in place Do not use the supply funnel whose mouth is too small Be sure to try one color at one time Figure 11 229 5 Take out the M C Y and Bk starter bottles and shake them well Peel off the seals 6 Pour the starter developer into the developing assembly Try tilting the starter developer bottle gra...

Страница 518: ...ere do NOT push in the hopper unit to lock it in position as yet 1 Take extra care pushing in the hopper unit all the way to its locking position at the rear will damage the hopper by the hopper plug 2 Do no handle the hopper unit roughly Otherwise large amounts of toner will drop from the hopper assembly 10 Press STIR 4 Be sure to wait until the copier indicates READY on its control panel before ...

Страница 519: ... the hopper cap by pulling it slowly in horizontal direction If you pull on the hopper cap at an angle the seal of the hopper cap will become damaged resulting chips falling into the developing assembly Take adequate care 16 Press ADJUST 17 Press DENS 18 Record the data shown on the DENS screen on the service label The service label is attached behind the Service data sheet cover inside the right ...

Страница 520: ...to its locking position at the rear then mount the two slide stoppers 21 Close the left and right front covers G Checking the Images and Operations 1 Slide out the cassette 2 Put paper in the cassette 3 Attach the Free Paper Size label to the universal type cassette Figure 11 232 4 Remove the cassette size plate and attach the side label indicating the appropriate paper size 5 Put the size plate b...

Страница 521: ...ation correction Before generating test prints be sure that paper of B4 or larger is set 10 Set a test sheet on the copyboard and check the images produced by trying all cassettes as the source of paper In the case of the CLC1150 1180 try the duplexing tray also Make sure no abnormal noise is heard Check the copy images made at each default reproduction ratio Check to be sure that as many copies a...

Страница 522: ...operation is normal 13 Clean up the area around the copier 14 Move the copier to its site of installation and secure it in place using the adjuster Check to make sure that the copier is more or less level 15 Fill out the service sheet H Changing the Cassette Paper Size 1 Slide out the cassette 2 Pick the two hooks used to change the paper size and lift the cover of the side guide plate to remove Y...

Страница 523: ...ase of the universal cassette 5 Remove the screw of the rear guide plate and relocate the rear guide plate to the appropriate size index In the case of the universal cassette slide the rear end guide plate to the appropriate size index If the paper is A3 or 11x17 orient and mount the rear guide plate as shown In the case of the universal cassette hold the grip of the rear end guide plate and slide...

Страница 524: ...ssette Paper Sizes Code 01 02 03 04 05 06 07 08 09 10 11 12 13 14 15 16 17 18 19 20 Code 21 22 23 24 25 26 27 28 29 30 31 32 33 34 35 36 37 38 39 40 Notation A1 A2 A3R A3 A4R A4 A5 A5R B1 B2 B3 B4R B4 B5R B5 11x17 LTRR LTR STMT STMTR Notation LGL K LGL K LGLR FLSC A FLS OFI E OFI B OFI A LTR A LTRR G LTR G LTRR A LGL G LGL FGLI FOLI A OFI ALL Paper A1 A2 A3R A3 A4R A4 A5 A5R B1 B2 B3 B4R B4 B5R B5...

Страница 525: ...k from the copier and pack them separately 2 Fit the scanner metal fixing Put the metal fixing 1 against the hole in the delivery assembly and slide it from the front to the rear to secure the scanner mirror base in place Tape the metal fixing to the left upper cover Figure 11 301 3 Tape the cap of the toner hopper in place If the hopper contains toner remove the hopper unit and transport it separ...

Страница 526: ... of silicone oil 12 Put back the parts by performing steps 5 through 11 in reverse 13 Loosen the screw 7 and unlock the cleaning blade releasing lever 8 slowly while holding it in place tighten the screw Figure 11 302 Figure 11 303 5 6 4 2 3 7 8 Locked Un locked 14 Mount the transfer drum stopper using a screw 15 Tape the releasing lever of the transfer drum in place 16 Tape the front cover delive...

Страница 527: ...IN JAPAN IMPRIME AU JAPON IV MOUNTING THE DOCUMENT HOLDER 1 Peel the face stickers 1 found on the right or the left of the copier and fit the stepped screws 2 2 Fit the document holder 4 on the stepped screws and secure it in place with screws 3 Figure 11 401 Copier Right Figure 11 402 Copier Left 4 2 3 1 4 2 1 3 ...

Страница 528: ...ting screw 3 of the face cover 4 Disengage the claws 4 and detach the face plate 5 from the card slot 5 Attach the insulating sheet 6 over the display opening for the control card unit in the control panel Figure 11 502 6 Peel off the protective sheet from the control card unit 7 Secure the control card unit to the control panel with four self tapping screws 7 At this time insert a card into the c...

Страница 529: ...504 9 Secure the grounding wire 10 of the control card to the opening under the copier s control panel The opening is found to the left of the connector of the primary charging assembly Figure 11 505 10 Peel off the protective sheet from the nameplate of the control card unit 11 Attach the nameplate 11 of the control card unit to the copier s control panel Figure 11 506 12 Mount the control panel ...

Страница 530: ...NTED IN JAPAN IMPRIME AU JAPON 11 33 CHAPTER 11 INSTALLATION VI INSTALLING THE COPY DATA CONTROLLER A1 The Copy Data Controller A1 is not available in certain sales areas 1 Setting the Board Set up the board by referring to the Copy Data Controller A1 Installation Procedure REF ...

Страница 531: ...1 Be sure to comply with the laws and regulations of the country 2 Be sure that the copier has been properly installed 3 Be sure that the copier s power plug is disconnected 4 Be sure to identify the screws by type length diameter and location 5 Be sure to prepare settings data on the computer at the service station if remote control is planned 1 Remove the four screws 2 and detach the face plate ...

Страница 532: ...R 11 INSTALLATION 2 Connect the 8 pin connector 3 of the unit with the copier s 8 pin connector 4 Figure 11 607 3 If you are installing the Card Reader A1 connect the 9 pin relay cable or the card reader connected to the connector J4 of the unit with the copier s 9 pin connector Figure 11 608 3 4 J4 Cable for card reader ...

Страница 533: ...with four screws 6 Figure 11 609 3 Checking Operations Check the operations by referring to the Copy Data Controll A1 Installation Procedure 4 Removing from the Copier When removing the copy data controller from the copier start service mode and execute COPIER OPTION IN FACE B CLR 0 not connected 1 connected If the setting is not 0 a communication error E717 between copy data controller and copier...

Страница 534: ... Copier When installing the diagnostic device to the copier keep the following in mind 1 Be sure to comply with the laws and regulations of the country 2 Be sure that the copier has been properly installed 3 Be sure that the copier s power plug is disconnected 4 Be sure to identify the screws by type length diameter and location 5 Be sure to prepare setting data on the computer at the service stat...

Страница 535: ...160 1180 REV 1 FEB 2002 PRINTED IN JAPAN IMPRIME AU JAPON 2 Connect the connector 3 of the power supply unit to the connector 4 of the diagnostic device as shown Figure 11 702 3 Remove the four screws 6 and detach the face plate 5 of the copier s rear cover Figure 11 703 4 3 5 6 6 ...

Страница 536: ...connector 8 of the copier side Figure 11 704 5 Secure the diagnostic device 9 to the copier s rear cover with four screws 10 Use the screws that come with the unit Figure 11 705 6 Remove the slack from the cable between the copier and the diagnostic device and bundle the excess length of the cable on the diagnostic device side then fix the bundle in place with the harness band 11 Figure 11 706 7 8...

Страница 537: ...FF Figure 11 708 1 If IC6 13 is not mounted you need not mount it newly 2 If you are mounting a ROM IC6 13 or replacing it as when upgrading the diagnostic device be sure to shift bit 7 of the DIP switch 14 SW2 7 to ON Figure 11 709 LED1 LED2 LED3 2 1 LED5 LED6 LED4 IC6 SW1 SW4 SW3 6 1 BAT1 CN4 1 2 CN3 CN2 1 2 3 4 5 6 7 8 SW2 12 LED1 LED2 LED3 2 1 LED5 LED6 LED4 IC6 SW1 SW4 SW3 6 1 BAT1 CN4 1 2 CN...

Страница 538: ... ON OFF ON OFF Description SW3 1 SW3 2 Function OFF OFF Sets the signal transmission level of the modem to 16 dBm ON OFF Sets the signal transmission level of the modem to 14 dBm OFF ON Sets the signal transmission level of the modem to 12 dBm ON ON Sets the signal transmission level of the modem to 10 dBm Keep it to OFF at all times Use it to set the line to push pulse mode Use it to set the line...

Страница 539: ...ush switch 18 SW4 In response LED5 19 should turn off indicating that the RAM has been initialized Table 11 703 Figure 11 712 LED1 LED2 LED3 2 1 LED5 LED6 LED4 IC6 SW1 SW4 SW3 6 1 BAT1 CN4 1 2 CN3 CN2 1 2 3 4 5 6 7 8 SW2 17 19 18 Bits of SW2 Setting SW2 1 OFF SW2 2 OFF SW2 3 OFF SW2 4 ON SW2 5 OFF SW2 6 ON SW2 7 See step 8 SW2 8 OFF LED1 LED2 LED3 2 1 LED5 LED6 LED4 IC6 SW1 SW4 SW3 6 1 BAT1 CN4 1 ...

Страница 540: ...are using the extension function of the diagnostic device connect the existing telephone or fax machine to the connector TEL 22 and then connect the telephone cable to the connector LINE 21 Figure 11 714 15 Call the service station and request initial settings Upon reception LED4 23 red will start to flash Figure 11 715 LED1 LED2 LED3 2 1 LED5 LED6 LED4 IC6 SW1 SW4 SW3 6 1 BAT1 CN4 1 2 CN3 CN2 1 2...

Страница 541: ... diagnostic device Press the push switch 18 SW4 on the PCB In response LED6 24 red will turn on if the transmission ends successfully LED6 24 red will turn off if it ends in failure it will start to flash If you press the push switch SW4 18 while LED6 24 is flashing transmission will occur once again If you press the push switch SW1 25 while LED6 24 is flashing transmission will be canceled Figure...

Страница 542: ...elivery occurs Figure 11 718 20 Attach the switch settings label 28 to the top cover and record the settings of the switches 21 Secure the top cover 1 in place with two screws 2 When doing so check to make sure that the cable is secured to the cable guide inside the diagnostic device and is not trapped by the top cover 1 Figure 11 719 LED1 LED2 LED3 2 1 LED5 LED6 LED4 IC6 SW1 SW4 SW3 6 1 BAT1 CN4 ...

Страница 543: ...ter and check to make sure that the following is available 1 Cassette heater for 200 V model FG2 9812 000 1 pc 2 Relay harness FG6 2422 000 1 pc 3 Screw XA9 0628 000 2 pc Figure 11 801 2 Turn off the copier s power switch and disconnect the power plug from the power outlet 3 Slide out the cassettes 1 and 3 1 2 and 3 in the case of the CLC1130 1160 and remove the inside cassette from each Figure 11...

Страница 544: ...ide is difficult to open use a screwdriver Figure 11 804 6 Connect the 2 pin end of the relay harness to the copier s connector If you are installing the cassette heater to the CLC1130 1160 make the following connections relay harness of the upper cassette heater with the lower connector on the copier side relay harness of the lower cassette heater with the upper connector on the copier side Figur...

Страница 545: ...rail of the cassette as shown and connect its 3 pin end to the connector of the cassette heater Figure 11 806 8 Secure the relay harness in place with the guides Be sure to fix it in place at four locations and that its band position is to the right of the cable guides as shown Figure 11 807 Route outside the rail Relay harness Cassette heater Band Cable guides Relay harness ...

Страница 546: ...f the CLC1130 1160 If you are installing the cassette heater for the upper cassette fit it into the groove found at the rear of the cassette 1 stay If you are installing the cassette heater for the lower cassette fit it into the groove found at the rear of the cassette 2 stay Figure 11 808 10 Mount the cassette heater to the stay of the cassette with two screws figure 11 809 Hook on the groove Cas...

Страница 547: ...N JAPAN IMPRIME AU JAPON 11 Mount the inside cassette to each pickup cassette Take care not to mistake the inside cassette for the universal cassette 12 Turn on the cassette heater switch SW8 found to the left bottom of the copier 13 Mount the copier s left bottom cover Figure 11 810 ON OFF Cassette heater switch ...

Страница 548: ...HAPTER 12 MAINTENANCE AND SERVICING I PERIODICALLY REPLACED PARTS 12 1 II CONSUMABLES AND DURABLES 12 2 A Copier 12 2 B Paper Deck 12 4 III SCHEDULED SERVICING CHART 12 5 IV SCHEDULED SERVICING LIST 12 7 A Copier 12 7 B Paper Deck 12 8 This chapter discusses how the copier s parts may be inspected and serviced ...

Страница 549: ......

Страница 550: ...RTS As of January 2002 No Part name Part number Q ty Life copies Remarks 1 Ozone filter FM2 5 6 FB2 4397 3 25 000 1 Or 1 yr 2 Air filter FM1 FB4 4819 1 25 000 Or 1 yr 3 Air filter FM3 FF5 8405 1 25 000 Or 1 yr 4 Air filter FM14 15 FB2 0247 2 25 000 Or 1 yr 5 Toner filter FM5 6 FB4 4442 2 25 000 Or 1 yr 6 Ozone filter FM5 FB4 9641 1 25 000 1 Or 1 yr 1 22 000 copies in CLC1100 ...

Страница 551: ...al static charging wires Separation internal and external charging wires 21 No 2 cleaning blade 22 Attraction brush unit 23 Transfer blade unit 24 Transfer drum cleaner 25 Polishing roller 26 Transfer drum sheet No Part name Part number Q ty Life Remarks copies FB4 4677 FF5 3993 FF5 8392 FF5 8393 FG6 1046 FH7 3350 FB4 5117 FF2 3552 FF2 3551 FF5 4327 FF5 4331 FF2 4710 FF5 8427 FY9 7006 FY3 0030 FY3...

Страница 552: ... starter developer 57 M starter developer 58 C starter developer 59 Bk starter developer FB2 0631 FF5 2070 FB4 4484 FB4 4486 FF5 9084 FF5 2101 FF5 2102 FF5 2103 FF5 2104 FF5 8366 FF5 8367 FB4 4536 FH7 4617 FH7 4618 FH7 4619 FH7 4611 FH7 4612 FH7 4613 FG5 3181 FG6 0892 FG6 0795 FG6 0796 FG6 0801 FG6 0888 FF5 7829 FF5 7830 FB2 7777 FF9 1913 FG6 0781 FG6 0782 FG6 0783 FG6 0784 FB4 7807 F42 3132 F42 3...

Страница 553: ...D IN JAPAN IMPRIME AU JAPON B Paper Deck No Part name Part number Q ty Life Remarks copies As of January 2002 1 Paper deck pickup roller 2 Paper deck feeding roller 3 Paper deck separation roller FB4 2033 FB4 2034 FB2 7777 2 2 1 250 000 250 000 250 000 Actual number of copies Actual number of copies Actual number of copies ...

Страница 554: ...ies a images b background for soiling c characters for clarity d leading edge margin e left right margin f trailing edge margin g fixing registration displacement back for soiling h abnormal noise i counter operation Standard 8 0 1 5 mm Direct Standard 2 0 1 5 mm Direct Standard 2 5 1 5 mm Direct Report to the person in charge Record the counter readings Check faulty copies Make test copies in Dir...

Страница 555: ...f the lever does not shift to OFF replace the leakage breaker Pay attention to its orientation during replacement After replacement make a check one again 1 Press the test switch for the leakage breaker to make sure that it operates normally After making a check turn off the power switch and shift the lever to ON then turn on the power switch Check to make sure that the grounding wire is c o n n e...

Страница 556: ......

Страница 557: ...JAN 2000 PRINTED IN JAPAN IMPRIME AU JAPON No Work Checks Remarks Put the sample copies in order Clean up the area around the copier Record the final counter readings Fill out the service book and report to the person in charge 11 12 13 Record the history of checks on the leakage breaker in the service book ...

Страница 558: ... vertical path roller Transfer drum cleaner Jam sensor PS6 metal plate resin tape used for No 2 static eliminator mount Jam sensor PS5 metal plate polishing roller motor mounting plate Dust proofing glass Shielding plate block Use alcohol Or 1 yr Or 1 yr Or 1 yr Use blower brush After cleaning apply silicone oil Use lubricant Remove unit and clean Remove unit and clean Remove unit and clean every ...

Страница 559: ...ner pan Leakage breaker Image adjustment For primary charging assembly clean every 20 000 copies in low humidity areas for high temperature humidity areas clean every 15 000 copies In high temperature humidity areas replace every 15 000 copies For high temperature humidity areas replace every 15 000 copies Turn over blade See Note Clean with cotton wad see Note Clean when replacing photosensitive ...

Страница 560: ...COPYRIGHT 2000 CANON INC CANON CLC1120 1130 1150 REV 0 DEC 2000 PRINTED IN JAPAN IMPRIME AU JAPON 12 9 CHAPTER 12 MAINTENANCE AND SERVICING ...

Страница 561: ...r concentration sensor and the gradation sensor CLC1140 1160 1180 only use a flannel cloth moistened with and then well wrung The reason 1for using water is to remove charges from the sensor window The presence of charges can attract toner to the sensor window After cleaning the sensor window with water do NOT leave droplets of water on it also do NOT dry wipe it 2 If you have cleaned the sensor b...

Страница 562: ...6 D Troubleshooting Image Problems 13 68 IV TROUBLESHOOTING MALFUNCTIONS 13 97 A Troubleshooting Malfunctions 13 97 V TROUBLESHOOTING FEEDING FAULTS 13 150 A Paper Jams 13 150 B Feeding Faults 13 160 VI ARRANGEMENT OF ELECTRICAL PARTS 13 161 A Sensors 13 161 B Thermistors Lamps and Heaters 13 165 C Clutches 13 166 D Solenoids 13 168 E Fans 13 170 F Motors 13 171 G PCBs 13 173 H Paper Deck 13 175 I...

Страница 563: ......

Страница 564: ...roblem is not of the copier Go to step 6 Step 1 2 3 4 Yes No NO NO NO YES Checks Is the power plug connected to the power outlet Are the front cover and the delivery cover closed fully Is the rated voltage present at the power outlet Is the rated voltage present between J1 1 and 2 J1 is found near the power cord base If you want to find out the cause part of the problem in question see the Cause c...

Страница 565: ...nnect the negative probe to the terminal J109 2 When you open the front left cover the left cover switch will turn off and at the same time the laser shutter will close If you must operate the copier with its front left cover open you will have to insert the cover switch actuator into the left cover switch Do not insert a screwdriver or the like into the laser optical path at such times NO YES NO ...

Страница 566: ...urn the adjusting screw at the front of the primary charging assembly counterclockwise Execute test printing at PGTYPE 10 or 5 Turn the adjusting screw at the front of the primary charging assembly clockwise Is the difference in density gone Check to find out if the copyboard glass is riding over something Clean the scanning lamp reflecting plate mirror standard white plate and copyboard glass Exe...

Страница 567: ...iled Replace the developer Go through the check items for the developing assembly Check the supply of toner from the hopper Replace the sensor Check Items for the Developing Assembly 1 Is the mechanism used to lock the developing assembly to the photosensitive drum normal 2 Is the position of the developing assembly normal 3 Are the developing assembly butting roll and butting block free of dirt 4...

Страница 568: ...l static eliminator Adjusting the Original Exposure System Color Balance Check the positions of the copyboard glass standard white plate original scanning lamp reflecting plate and mirrors and clean them Check to see if the No 1 mirror No 2 mirror base is not riding over the rail Check to find out if the value of ADJUST COLOR in service mode is identical with the value recorded on the label Check ...

Страница 569: ...System Part Tool and others Work and remarks Transfer Drum System Part Tool and others Work and remarks Charging wire shielding plate block Lint free paper alcohol Dry wiping then cleaning with alcohol Do NOT use water Note 2 Transfer drum cleaner assembly Blower brush Cleaning Jam sensor PS6 metal plate resin tape section Blower brush Lint free paper Dry wiping Jam sensor PS5 metal plate Blower b...

Страница 570: ...tion Roller 5 Orientation of the Duplexing Feed Roller and the Duplexing Separation Roller 6 Orientation of the Manual Pickup Feed and Separation Rollers 7 Attaching the Timing Belt for the Multifeeder Assembly 8 Adjusting the Postion of the Duplexing Unit Paper Jogging Guide Sensor 9 Position of the Duplexing Unit Stopper Plate Solenoid 10 Position of the Duplexing Feed Roller Solenoid 11 Replaci...

Страница 571: ...n the CPU PCB 3 Adjusting the Laser Power 4 Adjusting the Laser 5 When Replacing the Scanning Lamp Standard White Plate Lamp Regulator Lamp Reflecting Plate Analog Processor PCB No 1 2 Mirror Base Unit No 1 2 3 Mirror and CCD Unit 6 When Replacing the BD Unit 7 Checking the Enviroment Measurement PCB 8 Registering the Cassette Multifeeder Paper Width Basic Value 9 Checking the Surface Potential Sy...

Страница 572: ... 0 1 5 mm Trailing edge 2 5 1 5 mm 4 5 2 0 mm The value in parentheses represents double sided copying Figure 13 201 Leading Edge Image Margin Figure 13 202 Left Right Image Margin 2 Checking Adjusting the Image Margin When making checks and adjustments observe the following order a Adjusting the left right registration b Adjusting the attraction position ATT T c Adjusting the image margin RG XA R...

Страница 573: ...icated perform the following Figure 13 203 Figure 13 204 A 2 1 For the Cassette 1 Remove the cassette front cover from the cassette holder you want to adjust 2 Loosen the left right screw 1 3 Turn the adjusting screw 2 to adjust the position of the horizontal registration adjusting plate so that the horizontal registration on an image is 2 0 1 5 mm A full turn causes a shift of about 0 7 mm To inc...

Страница 574: ...ration is 2 0 1 5 mm in Direct Figure 13 205 Figure 13 206 For the Duplexing Unit Loosen the screw 1 and move the position of the paper jogging guide so that the registration is 2 0 1 5 mm in Direct b Adjusting the Attraction Position ATTRACT 1 Select A4 2 Select ADJUST FEED ADJ ATT CHK 3 Set ATT CHK to 1 2 sheet retention sides B and A and press OK 4 Select ATT ON and press OK Paper will be picke...

Страница 575: ... both sides A and B Figure 13 207 Figure 13 208 7 Make adjustments so that d is 0 0 5 mm in service mode ADJUST FEED ADJ for side A ATT T A for side B ATT T B Changing ATT T A ATT T B to 1 will shift the point of attraction by about 0 4 mm A higher setting will delay the start of attraction in the direction of the black arrow while a lower setting advances it in the direction of the white arrow 8 ...

Страница 576: ...nts one each shown in the figure will be generated Figure 13 209 Test print on side A Test print on side B Figure 13 210 4 Measure the leading edge margin d on the print Perform this for both sides A and B 5 Select the following service modes then make adjustments by changing the settings so that the leading edge d is 8 0 5 mm for side A ADJUST FEED ADJ RG XA for side B ADJUST FEED ADJ RG XB Setti...

Страница 577: ... 211 Test print on side A Test print on side B Figure 13 212 4 Measure the transfer delay d on side B on the generated print 5 Select ADJUST FEED ADJ TR DLY A or B in service mode and make adjustments so that the transfer delay is 3 0 5 mm Changing the setting to 1 will shift the transfer delay by about 0 4 mm A higher setting will increase the transfer delay while a lower setting will decrease it...

Страница 578: ...Image Trailing Edge Margin TR END A B end of transfer high voltage If you have replaced the transfer drum unit in the field correct the variation in the end of the transfer voltage 1 Select ADJUST FEED ADJ TR END A or B in service mode and enter 25 10 mm 2 Select ADJUST FEED ADJ TR2 ON then press the OK key 3 Measure the distance X mm between the point at which blurring starts along the trailing e...

Страница 579: ... e 1 through 8 Then perform adjusting the mirror position Figure 13 214 2 Adjusting the Mirror Position Be sure to adjust the position of the mirror when you have routed the scanner drive cable 1 Extend the arm of the mirror positioning tool FY9 3040 fully 2 Fit the mirror positioning tool between No 1 mirror base and No 2 mirror base 3 Route the scanner drive cable to the No 1 mirror mount Figure...

Страница 580: ...around it and keep it in a dark place b If you are installing a new photosensitive drum be sure to perform the following 1 Install the new photosensitive drum At this time be sure to mount it so that the lot No label attached inside it is toward the front of the copier 2 Mount the primary charging assembly pre cleaning charging assembly photosensitive drum cleaner assembly and developing assemblie...

Страница 581: ...on of the Photosensitive Drum Fixing Shaft Slide the photosensitive drum frame unit about 5 cm out of the copier and then slide it back in If the movement is not smooth adjust the position of the photosensitive drum fixing shaft using the drum shaft positioning tool FY9 3045 This adjustment however need not be made if the images are free of color displacement blurring and faults at intervals and m...

Страница 582: ...h seven screws 7 Detach the drum shaft positioning tool and slide out the photosensitive drum unit from the copier then mount the unit and parts removed in step 1 4 Use of Grease Do NOT use grease conducting or otherwise to the slip ring for the drum heater Developer Yellow Cyan Magenta Black S B gap 0 62 mm 0 74 mm 0 74 mm 0 48 mm Table 13 201 7 8 Figure 13 220 5 Adjusting the Developing Assembly...

Страница 583: ...ress the Stop key to stop the operation 6 Fit the cap back on the discharge opening 7 Remove the screw and detach the developing assembly then detach the cap from the discharge opening In the case of the black developing assembly disconnect the connector also 8 While tilting the developing assembly turn the gear by hand to discharge all remaining developer At this time tilt the developing assembly...

Страница 584: ... K in service mode about 10 min 18 Execute INIT Y M C K in service mode about 10 min 19 Select ADJUST DENS in service mode 20 Record the data of the DENS screen on the service label 1 Clean the gradation sensor use a flannel cloth moistened with and then well wrung Mount the sensor The reason for using water is to remove charges from the sensor window of the gradation sensor The presence of charge...

Страница 585: ...ice mode 4 Record the settings of ADJUST SENS ADJ CLN TH CLN TMP in service mode to the service label 9 Points to Note about the Black Toner Concentration Sensor If you clean the black toner concentration sensor use a flannel cloth moistened with and then well wrung The reason for using water is to remove charges from the sensor window of the black toner concentration sensor The presence of charge...

Страница 586: ......

Страница 587: ...er s front The pickup roller is identified by color as follows for the front use the gold colored roller for the rear use the silver colored roller Figure 13 225 2 Orientation of the Cassette Feed Roller When mounting the feed roller 1 to the pickup assembly be sure that the gear 2 of the feed roller is at the copier s front Figure 13 226 3 Orientation of the Cassette Separation Roller When mounti...

Страница 588: ...irection of arrow A b If pickup failure occurs move the spring in the direction of arrow B Figure 13 228 5 Orientation of the Duplexing Feed Roller and the Duplexing Separation Roller When mounting the feed roller 1 be sure that the round marking 2 is at the copier s front When mounting the separation roller 3 be sure that the round marking 4 is at the copier s rear Figure 13 230 6 Orientation of ...

Страница 589: ...nit Paper Jogging Guide Sensor 1 Select A4R or LTRR and perform copying on the first side of a double sided copy 2 Slide out the duplexing unit 3 Measure the distance L of the paper jogging guide plate 1 A4R L 210 0 3 mm LTRR L 216 0 3 mm 4 If the distance is not as indicted adjust the position of the paper jogging guide sensor Figure 13 232 9 Position of the Duplexing Unit Stopper Plate Solenoid ...

Страница 590: ...top mechanism as such keep the following in mind Do not turn the transfer drum clockwise with your fingers inside the opening in the transfer drum while the transfer drum is on the transfer drum frame When the transfer drum is off the frame it will tend to rotate in clockwise direction If the transfer drum is rotated clockwise the transfer brush and the attraction brush will become damaged a Remov...

Страница 591: ...IME AU JAPON 5 Peel off the trailing edge of the transfer drum sheet and keep it off the transfer drum Figure 13 238 Figure 13 237 Figure 13 236 6 Peel off the leading edge of the transfer drum sheet 7 Peel off the transfer drum sheet while holding it on its leading edge Remove all traces of adhesive from the transfer drum ring ...

Страница 592: ... the attraction brush in clockwise direction to release them 2 Clean the area where double sided tape is attached on the transfer drum ring with alcohol 3 Turn the ring so that the ring linking plate 1 is positioned as shown 4 Remove the double sided tape from the leading edge where holes are found of the transfer drum sheet 5 By referring to the long hole in the left side of the linking plate and...

Страница 593: ... slack and attach the right side of the sheet where a round hole is found 3 At this time check to make sure that the right edge of the transfer drum sheet will not overlap the edge of the transfer ring otherwise shift the left side of the sheet where a long hole is found and start over with step 2 6 Let the transfer drum sheet drop on its own weight and remove the backing paper from both sides of ...

Страница 594: ...ure that the sheet is horizontal and start over 8 After making sure that there is no gap start attaching both ends of the sheet to the transfer drum At this time try using both thumbs as shown moving them as if to rub the sheet in axial direction Do not move the thumbs in peripheral direction which can cause parts of the sheet to lift 9 Remove the backing paper from the trailing edge of the transf...

Страница 595: ...e is no distortion or slack in the middle of the transfer drum If distortion exists the transfer drum will likely come into contact with the photosensitive drum causing toner to fuse to the photosensitive drum and ultimately leading to cleaning faults of the photosensitive drum if slack exists on the other hand such image faults as transfer faults and color displacement can occur 14 Mount the tran...

Страница 596: ...per Deflecting Plate Solenoid SL10 delivery assembly Loosen the adjusting screw 4 to make adjustments while the paper deflecting plate 2 is butting against the delivery upper guide 3 when the solenoid 1 is on viewing the delivery assembly from the side at the rear 1 4 2 3 14 Applying Lubricant to the Transfer drum Cleaner 1 Use a specific lubricant e g FY9 6006 2 Put a drop of lubricant one drop e...

Страница 597: ...ing assembly a Measuring the Nip Width If you are taking measurements while the roller is not hot let the copier complete its standby period wait 15 min and make 20 copies b Taking Measurements 1 Start service mode 2 Select FUNCTION FIXING NIP CHK and press OK The nip width is correct if as indicated otherwise use the adjusting nut 1 to make adjustments b and c are points 10 to 15 mm from paper en...

Страница 598: ...on of the Cleaning Belt Mount the fixing cleaning belt as shown Figure 13 249 Fixing Upper Cleaning Belt rear view Figure 13 250 Fixing Lower Cleaning Belt rear view 4 Orientation of the fixing Upper Lower Solenoid Adjust the position so that the stroke A is 3 0 2 mm for the fixing paper solenoid and 4 0 2 mm for the lower fixing solenoid Figure 13 251 ...

Страница 599: ...Coating Assembly 1 The oil coating unit is adjusted and assembled at the factory and must not be removed Do not touch the screws 1 shown in the figure 2 If you have replaced the oil felt be sure to e x e c u t e COPIER FUNCTION FIXING PUMP ON in service mode to impregnate it with fixing oil Be sure to press the Stop key in about 10 min Figure 13 252 rear Figure 13 253 front 1 1 1 ...

Страница 600: ...TED IN JAPAN IMPRIME AU JAPON 13 31 CHAPTER 13 TROUBLESHOOTING F Externals Controls 1 Handling the Flywheel The copier s flywheel 1 weighs 8 kg in total Take extra care not to drop it during work When holding it be sure to support it on its left and right as shown Figure 13 254 1 ...

Страница 601: ...drive belt 1 behind the front cover by hand lightly in the direction of the arrow until it stops so that the white area in the window 2 increases 3 Mount the front cover 3 If you operate the deck without matching the paper level indicator and the deck lifter you can damage the drive system of the paper level indicator Exercise care Figure 13 255 Figure 13 256 2 Adjusting the Left Right Registratio...

Страница 602: ... place with a hex wrench 1 and a long screwdriver 2 2 Fix the cable fixing plate 3 in place to the lifter with two screws 3 Hook the lifter cable on the pulley 4 4 Hook the ball of the lifter cable on the pulley 5 of the lifter drive shaft and wind the cable along the groove about 1 5 turns At this time be sure that the lifter cable is taut until the long screwdriver used to keep it in position is...

Страница 603: ...g 3 on the side of the roller is at the copier s rear Figure 13 260 Figure 13 261 6 Orientation of the Deck Pickup Feed Roller When mounting the deck pickup feed roller 1 be sure that the belt pulley 2 is at the copier s front When mounting the pickup feed roller rubber to the pickup feed roller shaft be sure that the marking 3 is at the copier s rear Figure 13 262 When mounting the deck pickup ro...

Страница 604: ...eparation Roller Pressure If double feeding or pickup failure occurs when pickup is from the side paper deck adjust the position of pressure spring of the deck separation roller If pickup failure occurs move the position of the spring in the direction of arrow A If double feeding occurs move the position of the spring in the direction of arrow B Figure 13 263 A B ...

Страница 605: ...to the new CPU PCB 5 Turn on the power switch 6 Select FUNCTION CLEAR DC CON R CON and MMI COPY in service mode then press the OK key 7 Turn off and then on the power switch 8 Enter the data you took notes of in step 1 9 Execute FUNCTION CCD CCD ADJ in service mode 10 Turn off and then on the power switch 2 When Replacing the Flash Memory on the CPU PCB 1 Check the data of ADJUST and OPTION in ser...

Страница 606: ...er switch 2 Remove the copyboard glass then remove the lens base cover and the laser scanner cover 3 Turn on the power switch 4 Open the front left cover Make sure the front left cover will not close 5 Remove the left inside cover 6 Remove the laser power checker inlet cover 7 Set the laser power checker switch to 2 8 Holding the laser power checker 1 so that its light receiving face is on the rig...

Страница 607: ...re starting the following work 1 Select ADJUST LASER in service mode 2 Select T V00 and enter 255 then press OK 3 Select T V00 ON and press OK The laser will turn on Take notes of the reading offset To stop the laser output press the Stop key 4 Select T V00 and adjust T V00 so that the following is true offset value 0 15 to 0 20 mV 5 Likewise adjust T VFF PE V00 P3 VFF 1 P3 VFF 2 P3 VFF 3 and P3 V...

Страница 608: ...1 and the probe to the check pin GND on the BD PCB 3 Execute FUNCTION LASER POWER in service mode 4 Loosen the screw used to secure the BD unit in place and tighten it when the output reading of the meter is maximum 7 Checking the Environment Measurement PCB The environment measurement PCB and the environment sensor are checked using the environment measurement PCB checker TKN 0457 and the environ...

Страница 609: ... Check the temperature and the humidity on the DISPLAY ANALOG screen in service mode and record the readings data A TEMP C data A1 ABS HUM data A2 4 Press the Reset key and turn off the power switch 5 Detach the environment sensor from the environment measurement PCB and insert the environment sensor calibration tool TKN 0456 in its place 6 Turn on the power switch and leave the copier alone for 5...

Страница 610: ...tered 6 Slide out the cassette for which you want to register a basic value and set the paper width guide plate inside the cassette to STRMTR 7 Set the cassette in the copier 8 Select FUNCTION CST in service mode 9 Select a size C1 STMTR C2 STMTR C3 STMTR for the cassette in question and press OK 10 See that basic value 2 has been registered 11 Set the cassette to the size desired by the user b Mu...

Страница 611: ... DC driver PCB and the potential measurement unit is good or not A zero level check is designed to find out whether the CPU reads the surface potential of the drum as 0 when it is 0 V A zero level check may be either of the following two Method 1 to find out whether the level shift circuit on the DC driver PCB is good or not Method 2 to find out whether the potential measurement circuit is good or...

Страница 612: ...ough distance from the sensor window 5 Connect one end of the jumper wire to the copier s chassis metal plate GND of the copier 6 Insert the cover switch actuator into the cover switch assembly 7 Turn on the power switch After turning on the power switch do NOT touch the potential sensor assembly 8 Check to make sure that DISPLAY DPOT DPOT is 100 30 V in service mode If the reading is as indicated...

Страница 613: ... J1050 of the new DC driver PCB 11 Checking the Photointerrupter The copier allows the use of its service mode when checking its photointerrupers in addition to the use of a conventional meter 1 Using a Meter 1 Set the meter range to 30 VDC 2 Connect the probe of the meter to J101 7 GND on the DC driver PCB or J3 3 GND on the deck driver PCB 3 Connect the probe of the meter to the terminals on the...

Страница 614: ...en the light blocking plate is at PS3 When the light blocking plate is not at PS3 When the light blocking plate is at PS4 When the light blocking plate is not at PS4 When paper is present over PS5 When paper is absent over PS5 When paper is present over PS6 When paper is absent over PS6 When paper is present over PS7 When paper is absent over PS7 When cam is not at HP When cam is at HP When paper ...

Страница 615: ...per is present over PS12 When paper is absent over PS12 When paper is present over PS15 When paper is absent over PS15 When the lifter is down When the lifter is up When the lifter is down When the lifter is up When paper is present over PS19 When paper is absent over PS19 When paper is present over PS20 When paper is absent over PS20 When paper is present over PS21 When paper is absent over PS21 ...

Страница 616: ...n paper is absent over PS25 When paper is present over PS26 When paper is absent over PS26 When paper is present over PS27 When paper is absent over PS27 When paper is present over PS28 When paper is absent over PS28 When paper is present over PS30 When paper is absent over PS30 When paper is present over PS31 When paper is absent over PS31 Paper is present over PS32 Paper is absent over PS32 When...

Страница 617: ...S36 When paper is absent over PS36 When paper is present over PS37 When paper is absent over PS37 While the guide is present over PS40 While the guide is absent over PS40 When the cover is closed When the cover is open When the cover is closed When the cover is open When the cover is closed When the cover is open When the cover is closed When the cover is open When the cassette is closed When the ...

Страница 618: ...P When not at HP When at HP When not at HP When at HP When not at HP When the tray is closed When the tray is open When paper is present over PS67 When paper is absent over PS67 When paper is present over PS68 When paper is absent over PS68 When paper is present over PS69 When pepper is absent over PS69 When paper is present over PS70 When paper is absent over PS70 When paper is present over PS71 ...

Страница 619: ... light blocking plate is pushed When the light blocking plate is not pushed When the light blocking plate is pushed When the light blocking plate is not pushed When the light blocking plate is pushed When the light blocking plate is not pushed When the light blocking plate is pushed When the light blocking plate is not pushed When the light blocking plate is pushed When the light blocking plate is...

Страница 620: ...sparency tend to produce copies which tend to be mistaken for foggy copies An original prepared in light pencil tends to produce copies which are likely to be mistaken for light copies 3 Checking the Copyboard Cover Copyboard Glass and Standard White Plate If any of these parts is soiled clean it with a moist cloth If scratches are found replace it 4 Checking the Charging Assemblies a Check each c...

Страница 621: ... a machine is brought in from a cold to warm place condensation can occur inside it causing various problems a Condensation on the original scanner or the laser exposure system glass mirror lens can produce images that are too dark or light b Condensation in the charging system can cause leakage of current c Condensation on the pickup or feed guide can cause feeding faults If condensation is noted...

Страница 622: ...with No 8 light area barely visible and No 9 white 2 Color Patch Each color can be identified and is not appreciably different from the color on the original Test Sheet 3 Photo There is no appreciable difference in color balance 4 3 Color Gradation Scale No 8 is barely visible and No 9 is white 5 Halftone Band Each color is not appreciably different from the color on the original Test Sheet The ba...

Страница 623: ...2 PRINTED IN JAPAN IMPRIME AU JAPON Figure 13 301 CANON CA 1 Test Chart Gray scale from No 1 to No 3 dark area from No 4 to No 6 halftone area from No 7 to No 9 light area Color path Gradation scale from No 1 to No 3 dark area from No 4 to No 6 halftone area from No 7 to No 9 light area halftone band Photo ...

Страница 624: ...COPYRIGHT 2002 CANON INC CANON CLC1100 1130 1150 1160 1180 REV 1 FEB 2002 PRINTED IN JAPAN IMPRIME AU JAPON 13 55 CHAPTER 13 TROUBLESHOOTING Figure 13 302 Standard Image Sample ...

Страница 625: ... number See Table 13 301 5 If you have selected TYPE 3 4 5 or 6 set the output color using COLOR Y COLOR M COLOR C or COLOR K If for instance you want to generate magenta set COLOR M to 1 6 Press the Start key At the end of a check using a test print be sure to put TYPE back to 00 TYPE 0 1 2 3 4 5 6 7 to 9 10 11 12 13 14 15 16 17 to 79 80 81 82 to 99 Description Image from the CCD normal copying F...

Страница 626: ...t for all colors suspect a fault in the laser system or transfer system b White Lines in Development If white lines are noted in a cyan area only of the copy suspect a fault in the cyan developing assembly c Uneven Density between Left and Right If uneven density between left and right is noted for all colors in the same way suspect a fault in the height of the primary charging wire If it is noted...

Страница 627: ...olor test print shows 256 colors using 16 x 16 frames starting at the leading edge of paper The rows that follow are repetitions of the frames a Hues of 256 Colors The hues are as shown in the figure Otherwise suspect deterioration of the developer deterioration of the photosensitive drum and mixing of developers In COPIER TEST PG of service mode set all of the following to 1 COLOR Y COLOR M COLOR...

Страница 628: ... PG TYPE 3 Use a 256 gradation test print to check gradation and balance among colors a Gradation Use the test print to check gradation between density 0 and density 255 You can generate a printout of each developer color using COPIER TEST PG of service mode and selecting the following COLOR Y COLOR M COLOR C COLOR K Figure 13 305 COLOR M Set to 1 16 frames 16 frames ...

Страница 629: ...ing is noted in the white area of the figure suspect a fault in the developing system or the photosensitive drum or wrong adjustment of the laser c White Lines If white lines are noted in images suspect a fault in the developing system d Uneven Density between Left and Right If uneven density is noted between left and right suspect dirt on the developing roller dirt on the butting block and a faul...

Страница 630: ...id plate c White Lines If white lines are noted at the same position for all colors suspect a fault on the transfer drum sheet and dirt on the primary charging wire If they occur at different positions or if they are limited to a single color suspect a fault in the developing assembly d Uneven Density at Regular Intervals Original scanner at intervals of about 0 5 mm not applicable to PGTYPE 5 tes...

Страница 631: ...CHAPTER 13 TROUBLESHOOTING 13 62 COPYRIGHT 2002 CANON INC CANON CLC1100 1130 1150 1160 1180 REV 1 FEB 2002 PRINTED IN JAPAN IMPRIME AU JAPON Figure 13 307 COLOR M Set to 1 ...

Страница 632: ... processing The copier is normal if regular copies do not show color displacement Use test prints if regular copies show color displacement as when finding out the position of displacement and or when identifying the color b Angles and Straight Lines If faults are noted for right angles and straight lines suspect displacement of the laser beam and a fault in the beam detection mechanism 1 You can ...

Страница 633: ... CANON INC CANON CLC1100 1130 1150 1160 1180 REV 1 FEB 2002 PRINTED IN JAPAN IMPRIME AU JAPON 8 YMCBk 64 Gradation Test Print PG TYPE 12 Use a YMCBk 64 gradation test print to check the gradation of each color Y M C Bk at the same time Figure 13 309 ...

Страница 634: ...50 1160 1180 REV 1 FEB 2002 PRINTED IN JAPAN IMPRIME AU JAPON 13 65 CHAPTER 13 TROUBLESHOOTING 9 BGR 64 Gradation Test Print PG TYPE 13 Use a BGR 64 gradation test print to check the gray balance and gradation in BGR mode 2 color mode Figure 13 310 ...

Страница 635: ...st print to check gray balance gradation of each color Y M C Bk and fogging a Gray Balance Look at the gray scale area to find out whether each color is generated in even density b Gradation Check the gradation of each color Y M C Bk and for difference in density c Fogging If a white area is foggy suspect a fault in the developing system or the photosensitive drum or wrong adjustment of the laser ...

Страница 636: ...3 TROUBLESHOOTING 11 Full Color Light Area 16 Gradation YMCBk Test Print PG TYPE 15 Use a full color light area 16 gradation test print to check the gray balance of a light area and the gradation of each color Y M C Bk Compared with one generated using PG TYPE 14 this test print makes a check easier Figure 13 312 Light area ...

Страница 637: ... γ γ correction PG TYPE 80 CLC1140 1160 1180 only Use the full color block pattern test print primarily to check bright hues a Hues of the Full Color Block Pattern Check to be sure that the hues are reproduced as shown in the following figure If the hues are not as indicated you may suspect deterioration of the developer or the photosensitive drum or mixing of developer Figure 13 312a ...

Страница 638: ...Block Pattern without γ γ γ γ γ correction PG TYPE 81 CLC1140 1160 1180 only When compared with the pattern produced using PG TYPE 80 it makes a check on relatively dark hues easy a Hues of the Full Color Block Pattern If the hues are not as indicated you may suspect deterioration of the developer or the photosensitive drum or mixing of developer Figure 13 312b ...

Страница 639: ...as a soiled image back The copy has a fixing fault The copy has stray toner from fixing The copy is blank The copy is solid black The copy has color displacement The copy has uneven density at the center A3 The copy has lines 1st copy only A3 near 175 mm along leading edge The copy has color displacement magenta The copy has uneven density magenta The copy has color displacement A4 side A on trans...

Страница 640: ...ection of J1008 on the DC driver PCB and check the wiring from J1008 to the pre exposure lamp PCB if normal replace the pre exposure lamp PCB Step 1 2 3 4 5 6 7 8 9 10 11 Yes No YES NO YES YES YES YES NO NO NO NO NO Checks Clean the primary charging assembly dust proofing glass reflecting mirror and lens Is the problem corrected Is the output of the halftone test print TYPE 5 normal for all colors...

Страница 641: ...assembly Replace the fixing roller Check the fixing oil applying assembly oil hose oil tank oil pump and oil removing blade for a fault if faulty replace the part Step 12 13 14 Yes No NO YES YES NO Checks Is the uneven density noted at the same position for all colors of the output image of the halftone test print TYPE 5 Is the transfer blade or the transfer blade protective sheet warped or faulty...

Страница 642: ...roller Check the fixing oil applying assembly oil hose oil tank oil pump and oil removing blade for a fault and replace any faulty part Step 1 2 3 4 5 6 7 8 9 Yes No YES NO YES NO NO NO YES YES YES NO Checks Clean the primary charging assembly dust proofing glass reflecting mirror lamp and lens Is the problem corrected Is the uneven density noted in a specific color of the output image of the half...

Страница 643: ...ping of the transfer blade Or replace the transfer charging assembly Increase the setting of ADJUST HV SP HV SP in service mode however keep in mind that too high a setting can cause image distortion Step 1 2 3 4 5 6 7 8 9 Yes No YES NO YES YES YES YES NO YES YES Checks Clean the primary charging assembly dust proofing glass reflecting mirror and lens Is the problem corrected Is the problem noted ...

Страница 644: ... Check the inlet to the fixing assembly for dirt If the problem is noted on the trailing edge of the image only replace the fixing roller End Clean the surface of the CCD with a blower brush If the problem is not corrected replace the CCD unit Step 10 11 12 13 14 Yes No NO YES YES YES NO YES NO Checks Are there scratches in the peripheral direction of the photosensitive surface Are there scratches...

Страница 645: ...the charging assembly dust proofing glass reflecting mirror and lens Is the problem corrected Generate a halftone test print TYPE 5 Is the problem noted Generate a horizontal stripe test print TYPE 10 Is the problem noted in a specific color of the copy image Clean the fixing assembly inlet guide upper lower Is the problem corrected Are there scratches and dents in the peripheral direction of the ...

Страница 646: ...hen paper wraps around the transfer drum is it in contact with the transfer cleaning brush polishing roller or the like Clean the standard white plate scanning lamp reflecting plate and mirror Is the problem corrected Be sure to adjust the CCD if you have replaced the scanning lamp mirror CCD or any other optical part When Using Cleaner Lubricant Before detaching the cap shake the cleaner lubrican...

Страница 647: ...escription of horizontal lines on the next page 1 Check the power supply voltage for fluctuations Be sure to connect the copier to an exclusive outlet 2 Check the scanning lamp and lamp regulator Check the No 1 2 mirror base for wobbling Check the contact between CCD and CCD driver Step 1 2 3 4 Yes No YES NO YES NO YES NO Checks Clean the primary charging assembly dust proofing glass reflecting mi...

Страница 648: ...ratches and fault Clean the teeth of the developing cylinder drive gear Color location A3 All colors entire surface M Near 160 mm from the leading edge and thereafter Near 105 mm from the leading edge and thereafter C Near 105 mm from the leading edge and thereafter Near 50 mm from the leading edge and thereafter Y Near 50 mm from the leading edge and thereafter Near 50 mm from the leading edge an...

Страница 649: ...nd C 135 mm from the leading edge All colors 260 mm from the leading edge to 315 mm All colors 199 mm from the leading edge Non specific color non specific position Cause The attraction roller has a fault The engagement of the attraction roller drive gear is not proper The attraction roller has wear deformation scratches cracks vibration The impact occurring when the transfer blade hits the connec...

Страница 650: ...nd Replace the transfer charging assembly Replace the transfer drum sheet If scratches are found be sure to find out its cause When replacimg see II D 11 See IV 52 Check the transfer drum for wobbling Check the fixing roller upper lower for deformation Step 1 2 3 4 5 6 7 8 Yes No NO YES NO YES YES YES YES YES NO YES Checks Generate a halftone test print TYPE 5 Is the problem noted Is the problem n...

Страница 651: ...e fixing roller for scratches and deformation Check the seal at the end of the cleaning blade of the photosensitive drum Check the end of the cylinder of the developing assembly for soiling Replace the developer After replacememt execute the work under II C 6 Replace the developing assembly Step 1 2 3 4 5 6 Yes No YES NO YES YES YES YES NO Checks Is there a lump of toner in the middle of a spot Is...

Страница 652: ...oltage output adjustment mode Action Go to step 7 Replace the paper Set ADJUST MISC ATT RTN3 in service mode to 1 Set ADJUST MISC ATT RTN4 in service mode to 1 Set ADJUST MISC ATT RTN3 and ATT RTN4 in service mode to 1 End Settings 5 to 5 Unit 2 µA Step 1 2 3 4 5 6 Yes No YES YES YES YES YES YES Checks Is the problem noted particularly on thick paper Is the paper inside the cassette wavy because o...

Страница 653: ...atic eliminator high voltage system or replace the attraction push on roller unit Step 7 Yes No YES NO Checks Decrease the setting of ATT xx according to the type of paper suffering from the problem Is the problem corrected ATT T1 for thick paper single sided copying or copying on the 1st side of a double sided copy ATT T2 for thick paper copying on the 2nd side of a double sided copy ATT OHP for ...

Страница 654: ...n roller scraper and the area around them if a fault is found replace the scraper Step 1 2 3 4 5 6 7 8 9 10 11 Yes No YES NO YES NO YES YES YES YES NO YES YES Checks Is the image soiled only after a double sided copy has been made Is the image margin within specification Is the image margin foggy Is the cleaning blade of the photosensitive drum cleaner assembly locked in position Is paper or forei...

Страница 655: ... does the brush rotate 1 Check the take up mechanism of the cleaning belt 2 Clean the upper roller and the lower roller 3 Clean the oil blade 4 Clean the contact face used for applying oil 5 Clean the fixing inlet guide 6 Clean the oil removing blade 1 Clean the delivery roller and the external static eliminator separation charging assembly 2 If the separation claw is soiled with toner change the ...

Страница 656: ...n claws to see if they are mounted properly See IV 54 Check the oil applying assembly Check the mechanism used to supply oil from the oil case Mount the parts properly Adjust the nip Check the thermistor for a fault Step 1 2 3 4 5 Yes No YES NO NO NO NO YES Checks Is the problem noted in paper feeding direction Does the heater H1 H2 turn on immediately after power on Is the upper roller of the fix...

Страница 657: ... paper in question using ADJUST HV SP in service mode Is the problem corrected SP N1 for plain paper single sided copying and copying on the 1st side of a double sided copy SP N2 for plain paper copying on the 2nd side of a double sided copy SP T1 for thick paper single sided copying and copying on the 1st side of a double sided copy SP T2 for thick paper copying on the 2nd side of a double sided ...

Страница 658: ...ever to the locked position Fit the charging assembly See IV 47 Check the developing cylinder clutch Check the transfer high voltage system Check the high voltage cable from the HVT PCB to the transfer charging assembly if a fault is found replace the high voltage cable if normal replace the HVT DC PCB Check the developing bias system Try replacing the developing bias PCB Step 1 2 3 4 5 6 7 Yes No...

Страница 659: ...essor PCB IP MAIN PCB After replacement execute the work under II H 5 Step 1 2 3 4 5 6 7 8 9 10 Yes No YES YES NO NO YES NO YES YES YES NO NO YES Checks Generate a horizontal stripe test print TYPE 10 Is the image normal Execute FUNCTION DPC DPC in service mode Is the copy image normal Is the photosensitive drum cleaned Is there electrical continuity between both connectors of the high voltage cor...

Страница 660: ... according to color and position Step 1 2 3 4 5 6 7 8 Yes No YES YES YES YES YES YES YES NO YES Checks Clean the side A sensor and the side B sensor PS2 PS3 of the transfer drum Is the problem corrected Is the gear of the photosensitive drum or the gear of the transfer drum worn or loosened Is there a gap around the ring frond at the front and the rear of the transfer drum or around the connecting...

Страница 661: ...from the lading edge K near 150 mm from the leading edge All colors 390 mm to 410 mm from the leading edge Non specific color non specific position Cause The black text recognition mechanism has failed because of vibration of the No 1 No 2 mirror mount The impact occurring when the developing assembly is locked in position rocks the No 1 No 2 mirror base displacing the latent image on the photosen...

Страница 662: ...r for deformation if necessary replace it Step 1 2 3 4 5 6 7 8 9 10 Yes No YES YES YES YES YES YES YES YES NO YES Checks Generate a halftone test print using TYPE 5 DENS M C Y K 25 TXPH 0 and make checks Is the screw on the core fixing tab of the photosensitive drum loose Is the fixing screw on the flywheel loose Is the flywheel mounted at an angle Is the 300T gear of the transfer drum soiled or d...

Страница 663: ...n roller soiled Is the screw on the core fixing roll of the photosensitive drum loose Is the fixing screw on the flywheel loose 19 The copy has color displacement magenta Cause Registration roller clutch CL9 Attraction roller Photosensitive drum shaft Flywheel Action Apply oil to the spring clutch or replace it Clean the attraction roller Replace the scraper Tighten the screws Tighten the fixing s...

Страница 664: ...4 5 6 7 Yes No YES YES NO YES YES YES NO Checks Generate a halftone test print using TYPE 5 DENS M C Y K 25 TXPH 0 With the transfer drum frame locked in position is there a gap around the frame Is the holder slide FB2 0601 on the copier s front side plate damaged or displaced Is the mechanism used to release the registration roller operating normally Is the screw on the core fixing roll of the ph...

Страница 665: ...screw Mount the handle properly Use a specified screw Clean or replace the part After replacement execute the work under II C 2 Clean or replace the part After replacement execute the work under II C 2 Clean or replace the part Check the transfer blade attraction brush for deformation replace any deformed part Step 1 2 3 4 5 6 7 Yes No YES YES YES YES YES YES NO Checks Generate a halftone test pri...

Страница 666: ...drum drive assembly for damage and dirt Step 1 2 3 4 5 6 7 8 9 10 Yes No YES YES NO YES YES YES YES YES YES NO Checks Generate a halftone print using TYPE 5 DENS M C Y K 25 TXPH 0 Is the screw on the core fixing roll of the photosensitive drum loose Slide the photosensitive drum frame unit about 50 mm out of the copier Is there a discrepancy of 2 mm or more between the drum shaft and the photosens...

Страница 667: ...um drive assembly Action Tighten the screw Tighten the fixing screw Mount the flywheel properly Check the 140T gear and the 108 20T gear of the photosensitive drum drive assembly for damage and dirt Step 1 2 3 4 Yes No YES YES YES NO Checks Generate a halftone test print using TYPE 5 DNES M C Y K 25 TXPH 0 and make a check Is the screw on the core fixing roll of the photosensitive drum loose Is th...

Страница 668: ...7 E700 38 E717 39 E718 39a E719 40 E800 41 E803 42 E804 43 AC power is absent 44 DC power is absent 45 The oroginal scannner fails to move forward in reverse 46 The scannning lamp fails to turn on 47 The developing assembly fails to be locked in position 48 The cassette lifter fails to move up 49 Pickup operation fails cassette duplexing unit 50 Pickup operation fails mutifeeder 51 The registratio...

Страница 669: ... the DC driver PCB or the CPU PCB After replacement execut the work under II H 10 or II H 1 Step 1 2 3 4 Yes No NO YES NO YES NO Checks Clear E000 Note Is E000 indicated immediately after the power switch is turned on Turn off the power switch and disconnect the connector J1004 of the DC driver PCB Measure the resistance between a and b of the following table Is it 1 KΩ or less Is 24 V present bet...

Страница 670: ......

Страница 671: ...II H 1 Step 1 2 3 4 5 6 Yes No NO NO NO YES YES YES NO Checks Clear E000 and turn on the power switch Does the fixing heater turn on when the power switch is turned on Make a visual check Be user to turn off the power switch immediately after a check Slide out the fixing unit and let the fixing roller cool Then set the fixing unit and turn on the power switch Start service mode and select COPIER D...

Страница 672: ...g belt almost used up After replacing the fixing cleaning belt has the cleaning belt counter been cleared in service mode COPIER COUNTER MISC FIX WEB Is the lever of the fixing cleaning belt length sensor as follows for the fixing upper cleaning belt inside of the belt for the fixing lower cleaning belt outside of the belt Replace the fixing cleaning belt length sensor Is the problem corrected 3 E...

Страница 673: ... PRINTED IN JAPAN IMPRIME AU JAPON 13 99a 4 E008 Cause Fixing oil pump driver PCB DC driver PCB CPU PCB Action End Replace the DC driver PCB or the CPU PCB After replacement execute the work under II H 10 or II H 1 Step 1 Yes No YES NO Checks Replace the fixing oil pump driver PCB Is the problem corrected ...

Страница 674: ......

Страница 675: ... 1 Check the wiring from J1026 to the main motor if normal replace the main motor Step 1 2 3 4 5 Yes No YES YES YES NO YES NO Checks Does the main motor rotate during initial rotation Does the main motor start to but fail to rotate during initial rotation Set the meter range to 5 VDC and measure the voltage between J1026 A3 MNMON and J1026 A4 GND on the DC driver PCB Does it change from about 0 to...

Страница 676: ...Check the wiring from J1026 to the drum motor if normal replace the drum motor Step 1 2 3 4 5 Yes No YES YES YES NO YES NO Checks Does the drum motor rotate during initial rotation Does the drum motor start to but fail to rotate during initial rotation Set the meter range to 5 VDC and measure the voltage between J1026 A12 DRMON and J1026 A13 GND on the DC driver PCB Does it change from about 0 to ...

Страница 677: ... when the switch is released 8 E014 Cause Fixing roller drive assembly Fixing oil application system DC fuse PCB Fixing motor M5 DC driver PCB CPU PCB Action Go to step 5 Check the fixing roller drive system for overload Check the fixing oil application system e g fixing oil pump Check the voltage between J935 1 and 3 of the DC fuse PCB If it is not 24 V replace the DC fuse PCB Check the wiring fr...

Страница 678: ...C fuse PCB Duplexing motor M14 DC driver PCB CPU PCB Action Go to step 4 Check the duplexing unit for overload Check the voltage between J934 1 and 8 on the DC fuse PCB if not 24 V replace the DC fuse PCB Check the wiring from J1029 to the duplexing motor if normal replace the duplexing motor Replace the DC driver PCB or the CPU PCB After replacement execute the work under II H 10 or II H 1 Step 1...

Страница 679: ... ADJUST DENS once again End End Correct the connection and wiring Step 1 2 3 4 Yes No NO YES YES NO Checks Is the setting of COPIER DISPLAY DENS in service mode the same as that on the service label Execute STIR for the color for which E020 is indicated using service mode COPIER FUNCTION INSTALL Is the problem corrected Replace the developer for the color for which E020 is indicated and execute CO...

Страница 680: ...he work under II C 7 Mount the transfer unit front cover Replace the black toner concentration sensor If you have replaced the toner concentration sensor be sure to replace the developer also After replacement execute the work under II C 9 or II C 6 End Replace the DC driver PCB or the CPU PCB After replacement execute the work under II H 10 or II H 1 Step 5 6 7 8 9 Yes No YES YES NO YES NO YES NO...

Страница 681: ...rk under II C 7 Clean the window End End Check the wiring from the DC driver PCB to the black toner concentration sensor if normal replace the black toner concentration sensor After replacement execute the work under II C 9 End Check the wiring from the DC driver PCB to the toner concentration sensor if normal replace the toner concentration sensor After replacement execute the work under II C 9 S...

Страница 682: ...0 1150 1160 1180 REV 0 FEB 2002 PRINTED IN JAPAN IMPRIME AU JAPON 13 7 CHAPTER 13 TROUBLESHOOTING 13 106a Be sure to wait until initial rotation has ended before executing service mode Otherwise malfunction can occur This is not limited to INIT ...

Страница 683: ......

Страница 684: ...H 1 Step 1 2 3 Yes No NO NO YES Checks Is the setting of COPIER DISPLAY DENS in service mode identical to the setting recorded on the service label Is the setting of the following in service mode the same as the setting indicated on the service label ADJUST DENS P SENS Y M C K CLC1140 1160 1180 only Replace the CPU PCB Is the problem corrected c E020 xx50 xx51 xx52 xx53 xx60 xx61 xx62 xx63 xx64 xx...

Страница 685: ...r inside the hopper and the toner lever sensor Step 1 2 3 4 5 6 7 8 9 Yes No NO YES YES NO YES NO YES YES NO NO YES Checks Perform the instructions under E20 Making a Check on the next page Is E020 still indicated Execute COPIER FUNCTION INSTALL STIR M C Y I for the color for which E020 is indicated Is the problem corrected Replace the developer for which E020 is indicated and execute COPIER FUNCT...

Страница 686: ...ce mode COPIER FUNCTION PART CHK MTR and press OK for MTR ON Does the hopper motor rotate e E020 00FF xxFF E020 Making Checks 1 Find out the color for which E020 is indicated in service mode COPIER DISPLAY ERR 2 Turn off and then on the copier and select the following A3 11x17 21 copies mono color copying using the color for which E020 is indicated 3 Select COPIER DISPLAY DENS in service mode 4 Pl...

Страница 687: ...ES YES NO YES NO Checks Is the detail code 0100 0200 0300 or 0400 Is the connector of the developing assembly HP sensor indicated by the detail code connected securely Replace the developing assembly HP sensor indicated by the detail code Is the problem corrected Is the developing assembly locking drive assembly subjected to foreign matter or damage Replace the developing assembly locking motor in...

Страница 688: ...te lifter motor drive assembly indicated by the detail code subjected to foreign matter or damage Replace the cassette lifter motor indicated by the detail code Is the problem corrected Is the multifeeder lifter drive assembly subjected to foreign mater or damage Replace the multifeeder lifter motor Is the problem corrected 15 E041 Cause Deck lifter position sensor PS104 Lifter cable DC power supp...

Страница 689: ...matter End Replace the DC fuse PCB End Replace the DC driver PCB or the CPU PCB After replecement execute the work under II H 10 or II H 1 Step 1 2 3 4 5 Yes No NO YES YES NO YES NO Checks Is the paper jogging guide HP sensor normal See II H 11 on how to check Is there any obstacle or foreign matter in the path of the paper jogging guide plate Replace the duplexing paper jogging guide motor Is the...

Страница 690: ... power switch if the error is indicated once again go to step 2 Replace the primary charging assembly Check the primary high voltage cable Replace the HVT DC PCB Turn off and then on the power switch if the error is indicated once again go to step 2 Step 1 2 3 4 5 6 7 8 Yes No NO YES YES YES YES YES YES YES YES NO YES NO YES NO YES YES NO YES Checks Is the setting of COPIER ADJUST V CONT M C Y K i...

Страница 691: ...lace the laser unit or the laser driver Check the photosensitive drum for grounding if normal replace the photosensitive drum After replacement execute the work under II C 2 Turn off and then on the power switch if the error is indicated once again go to step 2 Step 9 10 11 12 13 14 15 16 17 18 Yes No NO NO NO YES NO YES YES NO YES NO YES NO YES Checks Is the primary charging assembly fitted prope...

Страница 692: ...Turn off and then on the power switch if the error is indicated once again go to step 2 Ground the drum properly End End Replace the CPU PCB After replacement execute the work under II H 1 Turn off and then on the power switch if the error is indicated once again go to step 2 Step 19 20 21 22 Yes No NO YES NO YES YES NO Checks Check the temperature and humidity in service mode COPIER DISPLAY ANALO...

Страница 693: ... assembly HVT AC PCB DC driver PCB CPU PCB Action Connect the connector properly Replace the DC fuse PCB Correct the area of leakage or replace the charging assembly Correct the area of leakage or replace the static eliminator End Replace the DC driver PCB or the CPU PCB After replacement execute the work under II H 10 or II H 1 Step 1 2 3 4 5 Yes No YES NO YES YES YES NO Checks Is the connector J...

Страница 694: ...PU PCB Action End If the plate is displaced mount it properly if it is damaged replace it Check the locking mechanism of the transfer drum Remove the cause of overload Replace the DC driver PCB or the CPU PCB After replacement execute the work under II H 10 or II H 1 Step 1 2 3 4 Yes No YES NO NO YES NO Checks Replace the sensor indicated by the detail code Is the problem corrected Is the conditio...

Страница 695: ...e the faulty part Further remove the cause of the fault End Replace the DC driver PCB or the CPU PCB After replacement execute the work under II H 10 or II H 1 Step 1 2 Yes No YES YES NO Checks Does the polishing roller drive system have a fault Or is it subjected to overload Replace the polishing roller motor Is the problem corrected c E072 0202 Cause Attraction transfer locking cam HP sensor PS8...

Страница 696: ...fer unit lever if normal replace the DC driver PCB or the CPU PCB After replacement execute the work under II H 10 or II H 1 Step 1 Yes No YES NO Checks Does the drawer connector 1 of the transfer unit lever have a fault b E073 0002 Cause Transfer unit drawer connector 2 DC driver PCB CPU PCB Action Replace the drawer connector 2 Check the wiring from J1014 A4 on the DC driver PCB to the transfer ...

Страница 697: ...it drawer connector DC driver PCB CPU PCB Action Replace the drawer connector Check the wiring from J1013 B2 on the DC driver PCB to the drawer connector J544 of the transfer unit if normal replace the DC driver PCB or the CPU PCB After replacement execute the work under II H 1 0 or II H 1 Step 1 Yes No YES NO Checks Does the drawer connector of the registration path unit have a fault ...

Страница 698: ......

Страница 699: ...the transfer drum locking motor Is the problem corrected Is 24 V present between J300 3 and 4 on the transfer driver PCB and 5 V between J300 1 and 2 Replace the transfer locking driver PCB Is the problem corrected 24 E079 Cause Transfer drum cleaner HP sensor PS59 DC fuse PCB Transfer locking driver PCB DC driver PCB CPU PCB Action Replace the sensor PS59 Replace the DC fuse PCB End Replace the D...

Страница 700: ...ser unit or the laser driver PCB End Try replacing the following BD unit When replacimg see II H 6 laser driver PCB image processor main PCB Step 1 2 3 4 5 Yes No NO NO YES NO YES NO Checks Is the laser shutter operation normal Is power present at J1200 on the laser controller PCB Is there a fault between the following connectors Laser controller PCB J1201 J1202 J1203 J1207 Laser Driver Motherboar...

Страница 701: ...driver PCB CPU PCB Action End Replace the DC driver PCB or the CPU PCB After replacement execute the work under II H 10 or II H 1 Step 1 Yes No YES NO Checks Replace the laser controller unit Is the problem corrected 28 E190 Cause DC power supply PCB Connector wiring Laser controller unit CPU PCB Action Check the wiring and the DC fuse PCB if normal replace the DC power supply PCB Connect the conn...

Страница 702: ...he work under II H 1 Step 1 2 3 Yes No NO YES YES NO Checks Is the original scanner HP sensor normal See the instructions on how to check photointerrupters Replace the original scanner motor Is the problem corrected Replace the original scanner motor driver PCB Is the problem corrected 29 E191 Cause Connector DC fuse PCB DC driver PCB Action As necessary connect all connectors End Check the wiring...

Страница 703: ...lace the DC power supply PCB Connect the connectors properly Replace the following parts in turns original scanner motor driver PCB CPU PCB After replacement execute the work under II H 1 Step 1 2 Yes No NO YES NO Checks Is power present at J380 on the original scanner motor driver PCB Is there a fault in the connection between J602 on the original scanner motor drive PCB and J2003 on the CPU PCB ...

Страница 704: ......

Страница 705: ...N 32 E220 Cause Connector wiring Lamp regulator PCB CPU PCB Action See IV 46 Connect the connectors properly Try replacing the following parts in turns lamp regulator PCB CPU PCB Step 1 2 Yes No NO YES NO Checks Does the scanning lamp turn on Is there a fault in the connection between J2004 on the CPU PCB and J450 on the lamp regulator PCB ...

Страница 706: ...tor error If multiple errors from above occur at the same time the detail code will be the sum and indicated in hexadecimal notation for example If BD error 0001 B shading correction RAM error 0004 and G shading correction RAM error 0008 occur at the same time the indication will be 0001 0004 0010 001C a E305 0001 See the descriptions under E100 b E305 0002 0004 0008 0010 0020 Cause IP MAIN PCB Ac...

Страница 707: ...PCB IP MAIN PCB Step 1 Yes No NO YES Checks Is the connection between J223 J224 on the IP ED PCB and J214 J215 on the IP MIAN PCB normal 36 E634 Cause Lamp projector Thermal switch projector Action Replace the lamp Remove the cause of activation and replace the thermal switch Try replacing the following parts in turns power supply PCB of projector projector controller PCB Step 1 2 Yes No NO YES NO...

Страница 708: ...data remote diagnostic device controller PCB CPU PCB Action Disconnect it after executing service mode Connect the connectors properly Try replacing the following parts in turns copy data remote diagnostic device PCB CPU PCB After replacement execute the work under II H 1 Step 1 2 Yes No NO YES NO Checks Has the copy data remote diagnostic device been disconnected from the copier after executing C...

Страница 709: ... work under II H 1 Step 1 2 Yes No NO YES NO Checks Is the power supply PCB of the projector normal Is the connection between J216 J217 J218 on the IP MAIN PCB and J216 J241 J242 on the IP PRJ PCB faulty 39a E719 Cause Error clear Connector Coin vendor CPU PCB Action End Make the connection secure End Replace the CPU PCB After replacement execute the work under II H 1 Step 1 2 3 Yes No YES NO YES ...

Страница 710: ...ace the DC fuse PCB End Check the wiring from the DC driver PCB to the power switch if normal replace the DC driver PCB or the CPU PCB After replacement execute the work under II H 10 or II H 1 Step 1 2 3 4 Yes No YES YES NO YES NO Checks Turn off and then on the power switch Is the problem corrected Is the connection of the relay connector J8 of the power switch SW1 faulty Is 24 V present between...

Страница 711: ......

Страница 712: ...C power cut relay RL3 DC power supply PCB Action Replace the DC driver PCB or the CPU PCB After replacement execute work under II H 10 or II H 1 Close the covers and levers properly Then check the switches if faulty replace them Replace the DC fuse PCB Check the wiring between the DC power supply PCB and the DC fuse PCB if normal replace the DC power cut relay Check the AC power line if normal rep...

Страница 713: ... unit DCP CVR oil pump driver drum heater controller SSR or presence of foreign matter Try a check for electrical continuity once again if not 0Ω replace the leakage breaker Check or replace the power cord or the line filter Replace the relay RL1 Replace the relay Check the wiring of the AC power line and connectors Step 1 2 3 4 5 6 Yes No NO NO YES NO YES NO NO YES Checks Is the power lug connect...

Страница 714: ...Checks Is AC power present between the following terminals between J701 1 and J701 3 and between J701 2 and J701 4 on the DC power supply PCB Turn off the power switch and disconnect the power plug then check each switch SW3 SW4 SW5 for electrical continuity Is it normal Disconnect all connectors of the DC power supply PCB J1702 J1703 J1704 J1705 J1706 Connect the power plug to the power outlet an...

Страница 715: ...DC fuse PCB to the DC loads Check the DC loads Replace the DC fuse PCB Step 4 Yes No YES NO Checks Connect all connectors of the DC power supply PCB Is the voltage of the connectors shown in the following table normal Connector J906 J907 J908 J909 J910 J931 J932 J933 J934 J935 J936 J937 Pin 3 4 4 to 6 6 to 10 5to8 2 4 to 6 4 to 7 5 to 7 6 to 9 3 4 5 to 8 2 4 Output 5V 5V 5V 5V 5V 24V 24V 24V 24V 2...

Страница 716: ...with alcohol and apply a small amount of lubricant Check the wiring and the light blocking plate if normal replace the sensor Connect the connector properly See IV 44 End Replace the original scanner motor Step 1 2 3 4 5 6 Yes No NO NO NO NO NO YES NO Checks Is the drive cable routed properly Is the rail free of dirt Does the mirror base move smoothly when pushed by hand Is the original scanner ho...

Страница 717: ...eplace the lamp Replace the lamp regulator Check to make sure that the lamp and the harness do not have a short circuit See IV 43 Checks Turn off the power switch and disconnect the power plug Is the lamp mounted properly Check both terminals of the scanner thermal switch Is there electrical continuity Disconnect J11 3 pin of the lamp regulator and set the meter range to 1 kΩ Dose the index swing ...

Страница 718: ... the CPU PCB if normal replace the CPU PCB After replacement execute the work under II H 1 Checks Turn off the power switch and connect J9 Set the meter range to 50 VDC and turn on the power switch Is 24 VDC present between J450 2 24 V and J450 1 GND Set the meter range to 50 VDC and connect the probes to J450 10 LAON and J450 1 GND of the lamp regulator Does the voltage change from about 24 to ab...

Страница 719: ...rs and wiring if normal replace the motor Replace the cam replace the leaf spring or remove the foreign matter Replace the gear or remove the foreign matter Replace the DC driver PCB or the CPU PCB After replacement execute the work under II H 10 or II H 1 Step 1 2 3 Yes No NO NO YES NO Checks Does each developing assembly motor operate Remove the developing assembly drive assembly Does the cam op...

Страница 720: ...e DC driver PCB or the CPU PCB After replacement execute the work under II H 10 or II H 1 Step 1 2 3 4 5 6 Yes No NO NO NO NO NO YES NO Checks Slide out the cassette and move up the holding plate inside the cassette by hand Does it move smoothly Is the movement of the latch assembly of the grip on the cassette normal Push down the pickup roller releasing lever with your finger Does the pickup roll...

Страница 721: ...recommended dimensions Check the gear Check the pickup separation feed roll Check the guide plate for deformation and foreign matter Step 1 2 3 4 5 6 7 8 Yes No NO NO NO NO YES NO NO YES Checks Slide the cassette in and out Is the sound of the lifter falling and the lifter motor turning heard Is the drive belt routed properly Are the right front cover left front cover right lower cover and left co...

Страница 722: ...H 10 or II H 1 Step 9 10 11 Yes No NO NO YES NO Checks Turn off the power switch and disconnect J346 J347 and J348 of the pickup driver PCB and J392 of duplexing driver PCB Set the meter range to x100Ω and measure the resistance between the following terminals on the harness side is it about 120Ω SL7 J346 15 16 SL8 DSL8 J347 15 16 SL9 DSL9 J348 15 16 SL13 J392 A1 A2 Turn off the power switch and d...

Страница 723: ... as necessary adjust or replace the plate Check the wiring if normal replace the solenoid End Replace the DC driver PCB or the CPU PCB After replacement execute the work under II H 10 or II H 1 Step 1 2 3 4 5 Yes No YES NO NO YES YES NO Checks Is paper picked up not slipping under the pickup roller Select the multifeeder and press the Start key Does the multifeeder pickup roller rotate Does the li...

Страница 724: ... and the drive system e g gears Replace the clutch Replace the registration driver PCB Replace the DC driver PCB or the CPU PCB After replacement execute the work under II H 10 or II H 1 Step 1 2 3 Yes No NO YES YES NO Checks Is the drive from the main motor and the pre registration motor 1 2 transmitted to each roller through gears Set the meter range to 30 VDC and measure the voltage between J31...

Страница 725: ... step 16 Set COPIER ADJUST MISC ATT RTN1 to 1 in service mode Set COPIER ADJUST MISC ATT RTN2 to 1 Step 1 2 3 4 5 6 7 8 9 10 11 12 13 Yes No NO NO NO NO NO YES YES YES YES YES YES YES YES Checks At time of attraction is the attraction roller locked to the transfer drum At time of attraction does the attraction roller rotate smoothly Is the position of the attraction guide normal Is the connection ...

Страница 726: ...O Checks Does the problem occur in single sided copying mode or when copying on the first side of a double sided copy and also when copying on both sides of a double sided copy Increase the setting of COPIER ADJUST HAV ATT ATT N1 or ATT N2 Is the problem corrected ATT N2 if the problem occurs in plain paper mode and in addition in single sided copying mode or when copying on the 1st side of a doub...

Страница 727: ...lace the pre exposure lamp Replace the DC driver PCB or the CPU PCB After replacement execute the work under II H 10 or II H 1 Step 1 2 Yes No NO YES NO Checks Turn off the power switch and disconnect J1008 of the DC driver PCB Set the meter range to x100 Ω and measure the resistance between J1008 A1 and A2 on the harness side Is it about 20Ω Connect J1008 and turn on the power switch Set the mete...

Страница 728: ...ES Checks Are the fixing drawer connector J18 of the transfer drum frame and the connector J1024 of the DC driver PCB connected securely Slide out the transfer drum frame Set the meter range to x1Ω and connect the meter probes to the following terminals of the fixing drawer connector does the index of the meter swing J18 1 and 3 J18 2 and 4 Is there electrical continuity in the thermal switch Set ...

Страница 729: ...normal replace SSR1 Replace the DC driver PCB or the CPU PCB After replacement execute the work under II H 10 or II H 1 Step 7 8 Yes No NO YES NO Checks Slide in the transfer drum frame and turn on the power switch Set the meter range to 250 VAC and connect the meter probes to the following terminals of the faston of the AC power cut relay RL1 does the index of the meter swing Terminals 6 and 8 of...

Страница 730: ...NO YES YES NO Checks Turn off the environment switch Is the problem corrected Is there electrical continuity between J14 1 and 3 of the AC fuse PCB Remove the drum heater and set the meter range to x100Ω and connect the meter probes to J22 1 and J22 3 of the heater does the index of the meter swing Set the meter range to x100Ω and connect the meter probes to J22 5 and J22 6 Does the meter index sw...

Страница 731: ...s Is the cassette heater switch on Turn off the environment switch Is the problem corrected Is there electrical continuity between J14 1 and 3 of the AC fuse PCB Are the connection and wiring between the following connectors normal J15 J16 cassette heater switch SSR2 100 120 V model only environment switch Turn off the power switch and disconnect the power plug then remove the cassette heater that...

Страница 732: ... drive system Check the hopper motor drive system Check the transfer drum cleaner locking motor drive system Check the spring gear and attraction scraper Step 1 2 3 4 5 6 7 8 9 Yes No YES YES YES YES YES YES YES YES YES Checks Is the noise coming from the original exposure system Is the noise coming from the drum unit Is the noise coming from a fan Is the noise heard only when the main motor is ro...

Страница 733: ...TING FEEDING FAULTS A Paper Jams Jams in the copier tend to occur in any of the following locations 1 Pickup assembly 2 Registration feeding assembly 3 Transfer drum cleaning assembly 4 Separation feeding assembly 5 Fixing delivery assembly 6 Delivery vertical path duplexing feeding assembly 7 Duplexing unit re pickup assembly 2 3 4 5 6 1 7 Figure 13 501 ...

Страница 734: ...l path sensor 1 PS21 Re pickup vertical path sensor PS28 Deck pickup sensor PS101 Multifeeder pickup sensor PS9 Pickup vertical path sensor 3 PS27 Pickup path sensor 2 PS26 Pickup vertical path sensor 1 PS21 Re pickup feeding path sensor PS28 Transparency sensor PS69 Pre registration sensor PS30 Registration sensor PS70 Code xx50 xx51 0052 xx60 xx61 xx70 xx80 xx81 xx82 xx83 xx84 xx90 Sensor Post t...

Страница 735: ...e separation roller Replace the feed roller Check each paper guide plate for foreign mater and deformation Check the sensor lever and wiring if normal replace the sensor Step 1 2 3 4 5 6 7 8 9 10 Yes No NO NO YES YES NO NO YES YES YES YES NO Checks Is the paper from a cassette Is the cassette set in the copier properly Is the paper curled or wavy Try paper of a type recommended by Canon Is the pro...

Страница 736: ...backing sheet Replace the multifeeder pickup roller Check each paper guide for foreign matter and deformation Check the sensor lever and wiring if normal replace the sensor Step 11 12 13 14 15 16 Yes No NO YES NO NO YES YES NO Checks Try manual copying Does the pickup roller of the multifeeder start to rotate Try paper of a type recommended by Canon Is the problem corrected Is the transparency of ...

Страница 737: ...ctly See IV 51 Replace the registration roller See IV 52 Replace the deformed or worn roller Check each paper guide plate for foreign matter and deformation Check the sensor lever and wiring if normal clean or replace the sensor Step 1 2 3 4 5 6 7 8 Yes No YES YES NO NO YES NO YES YES NO Checks Is the paper curled or wavy Try paper of a type recommended by Canon Is the problem corrected Is the tra...

Страница 738: ...SNS ADJ CLN OFST Or replace the sensor Check the internal brush if normal replace the attraction transfer locking cam motor PM7 Replace the faston of the high voltage cable Correct the electrode plate of the charging block Replace any faulty part Remove the cause of the fault Replace the transfer driver PCB or the DC driver PCB After replacement execute the work under II H 10 Step 1 2 3 4 5 6 7 8 ...

Страница 739: ...Check the solenoid Replace the separation push up roller Check the sensor lever and wiring if normal replace the sensor Check the postcard feeding unit and the postcard feeding clutch CL18 Check the fixing motor M5 If foreign matter is found on the paper guide plate remove it if deformation is found correct it Step 1 2 3 4 5 6 7 Yes No NO NO YES NO YES NO NO YES Checks Is the separation charging a...

Страница 740: ...n the thermistor with solvent Adjust the lever so that it moves smoothly Replace the sensor Check the delivery roller drive assembly Check the delivery plate paper deflecting solenoid SL10 1 Check the oil applying mechanism 2 Check the amount of silicone oil Step 1 2 3 4 5 6 7 8 9 10 11 Yes No YES NO YES YES NO NO YES NO NO NO NO YES Checks Is the separation claw soiled Does the fixing roller rota...

Страница 741: ... fixing motor and the duplexing motor driver assembly if normal replace the delivery vertical path clutch CL19 Check the sensor lever and wiring if normal replace the sensor Check the duplexing motor drive assembly Check the sensor lever and wiring if normal replace the sensor Check each paper guide plate and the duplexing feeding assembly or foreign matter and deformation Step 1 2 3 4 5 Yes No NO...

Страница 742: ...ging guide motor PM14 if normal replace the home position sensor PS40 Check the stopper plate solenoid SL12 See IV 49 Replace the duplexing paper feed roller Replace the duplexing separation roller Replace the duplexing feed roller Check each paper plate or duplexing tray assembly for foreign matter and deformation Step 1 2 3 4 5 6 7 8 9 10 11 Yes No NO YES YES YES NO YES NO NO NO NO YES NO Checks...

Страница 743: ... assembly and the registration roller assembly The paper may be moist Advise the user on the correct method of storing paper Advise the user to use recommended paper Check to see if the cassette heater is operating normally Clean the guide with solvent Adjust the nip Try replacing the upper and lower rollers in turns Step 1 2 3 4 5 Yes No YES YES YES NO YES NO YES Checks Turn off the power switch ...

Страница 744: ... sensor Separation sensor Attraction transfer locking cam HP sensor Multifeeder pickup sensor Fixing oil level sensor Fixing upper cleaning belt level sensor Internal delivery sensor Multifeeder paper sensor Multifeeder lifter H sensor Multifeeder lifter L sensor Cassette 1 lifter position sensor Cassette 1 paper sensor Pickup vertical path 1 sensor Cassette 2 lifter position sensor Cassette 3 lif...

Страница 745: ...ensor Transfer drum HP sensor Transfer drum cleaner HP sensor Multifeeder tray open closes sensor Fixing lower cleaning belt length sensor Waste toner case full sensor Transparency sensor Registration sensor Pre cleaning paper sensor Bk toner concentration sensor Gradation sensor CLC1140 1160 Cassette 2 paper length sensor CLC1100 1120 1140 Cassette 3 paper length sensor CLC1130 1160 Cassette 1 pa...

Страница 746: ...g oil level sensor Fixing upper cleaning belt length sensor Internal delivery sensor Multifeeder paper sensor Multifeeder lifter H sensor Multifeeder lifter L sensor Cassette 1 lifter position sensor Cassette 2 lifter position sensor Cassette 1 paper sensor Cassette 2 paper sensor Pickup vertical path 1 sensor Pickup vertical path 2 sensor Re picup vertical path sensor Pre registration sensor Exte...

Страница 747: ...eveloping assembly HP sensor Y developing assembly HP sensor Bk developing assembly HP sensor Transfer drum HP sensor Transfer drum cleaner HP sensor Multifeeder tray open closed sensor Fixing lower cleaning belt length sensor Waste toner case full sensor Transparency sensor Registration sensor Pre cleaning paper sensor Bk toner concentration sensor Gradation sensor CLC1180 Cassette 2 paper length...

Страница 748: ...tch Fixing lower thermal switch Scanner thermal switch 2 Pre exposure lamp Scanning lamp Fixing upper heater Fixing lower heater Drum heater Cassette heater 1 Cassette heater 2 Leakage breaker Noise filer Fixing heater SSR Drum cassette deck heater SSR AC power cut relay DC power cut relay Power cord Power switch Control switch Transfer unit lever switch Left front cover switch Delivery cover swit...

Страница 749: ...g cylinder clutch C developing cylinder clutch Y developing cylinder clutch Bk developing cylinder clutch M toner supply clutch C toner supply clutch Y toner supply clutch Bk toner supply clutch Registration clutch Multifeeder feeding clutch Cassette 1 pickup clutch Cassette 2 pickup clutch Cassette 3 pickup clutch CLC1130 1160 Multifeeder pickup clutch Postcard feeding clutch 100 V model only C C...

Страница 750: ...veloping cylinder clutch Y developing cylinder clutch Bk developing cylinder clutch M toner supply clutch C toner supply clutch Y toner supply clutch Bk toner supply clutch Registration clutch Multifeeder feeding clutch Cassette 1 pickup clutch Cassette 2 pickup clutch Duplexing feeding clutch Re pickup clutch Multifeeder pickup clutch Postcard feeding clutch 100 V model only Delivery vertical pat...

Страница 751: ...1 SL2 SL3 SL4 SL5 SL6 SL7 SL8 SL9 SL14 Fixing upper cleaning belt solenoid Fixing lower cleaning belt solenoid Separation push up solenoid Separation claw solenoid Registration roller releasing solenoid Attraction roller solenoid Pickup roller 1 solenoid Pickup roller 2 solenoid Pickup roller 3 solenoid CLC1130 1160 Multifeeder pickup solenoid D Solenoids 1 CLC1100 1120 1130 1140 1160 SL14 SL1 SL2...

Страница 752: ...per cleaning belt solenoid Fixing lower cleaning belt solenoid Separation push up solenoid Separation claw solenoid Registration roller releasing solenoid Attraction roller solenoid Pickup roller 1 solenoid Pickup roller 2 solenoid Delivery paper deflecting plate solenoid Stopper plate solenoid Duplexing paper feed roller solenoid Multifeeder pickup solenoid Stacking guide plate solenoid 2 CLC1150...

Страница 753: ...FM15 FM16 FM17 Original exposure system cooling fan 1 Exhaust discharge fan Primary charging assembly fan Laser scanner motor cooling fan Ozone suction fan Toner suction fan IP cooling an Electrical unit cooling fan Power supply cooling fan 1 Delivery cooling fan Power supply cooling fan 2 Original exposure system cooling fan 2 Original exposure system cooling fan 3 Back suction fan Power cord mou...

Страница 754: ...ng brush motor Polishing roller motor Hopper motor Cassette 1 lifter motor Cassette 2 lifter motor Cassette 3 lifter motor CLC1130 1160 Multifeeder lifter motor M developing assembly locking motor C developing assembly locking motor Y developing assembly locking motor Bk developing assembly locking motor Transfer drum locking motor Transfer drum cleaner locking motor Attraction transfer locking ca...

Страница 755: ...m leaner brush motor Polishing roller motor Hopper motor Cassette 1 lifter motor Cassette 2 lifter motor Duplexing motor Multifeeder lifter motor M developing assembly locking motor C developing assembly locking motor Y developing assembly locking motor Bk developing assembly locking motor Transfer drum cleaner locking motor Attraction transfer locking cam motor Pre registration motor 2 Pre regist...

Страница 756: ...PCB Image processor ECO PCB ECO relay PCB Laser controller PCB Laser drive PCB BD PCB Original scanner motor driver PCB Control panel PCB Inverter PCB Contrast VR PCB Keypad PCB ECO PCB Memory PCB Bi Centronics I F PCB DC driver PCB DC power supply PCB AC fuse PCB DC fuse PCB Drum heater controller PCB Oil pump driver PCB Transfer driver PCB Registration path driver PCB Pickup driver PCB Duplexing...

Страница 757: ...3 611b Figure 13 611b 31 32 33 34 35 36 37 38 39 40 41 Developing bias PCB HVT AC PCB HVT DC PCB Potential measurement PCB Main motor driver PCB Laser scanner motor PCB Hopper motor PCB IP ED IF PCB option IP PRJ PCB option Flicker controller PCB 230 V model only Transformer PCB 11 16 41 12 8 29 9 3 13 5 14 26 37 18 7 6 22 20 31 21 1 27 32 24 40 17 ...

Страница 758: ... PS108 PS109 SW100 SW101 SW102 Deck pickup sensor Deck paper absent sensor Deck lifter upper limit sensor Deck position sensor Deck set sensor Deck paper level upper sensor Deck paper level lower sensor Deck open sensor Deck open switch Deck open detecting switch Deck lifter lower limit detecting switch H Paper Deck 1 Sensors and Switches SW102 SW101 PS101 PS105 PS104 PS102 PS103 PS107 SW100 PS109...

Страница 759: ...R 1999 PRINTED IN JAPAN IMPRIME AU JAPON Table 13 613 Figure 13 613 PM101 M101 CL102 SL101 SL102 1 2 Deck pickup motor Deck lifter motor Deck pickup clutch Deck pickup solenoid Deck open solenoid Deck driver PCB Deck open switch PCB 2 Motors Clutches Solenoids and PCBs PM101 SL102 M101 SL101 2 1 CL102 ...

Страница 760: ... the field 1 DC Driver PCB VR2 VR1 J1040 J1030 J1029 J1022 J1023 J1024 LED1 1 1 5 1 12 1 7 2 8 2 J1001 J1053 J1052 5 1 5 1 3 1 J1051 7 1 ON 2 1 J1050 SW1 J1026 A1 A15 B15 B1 J1027 J1028 J1025 A1 A10 B10 B1 A1 A8 A1 A10 A1 A12 B10 B1 A1 A10 B12 B1 B1 B8 J1002 A10 A1 B1 B10 J1005 A10 A1 B1 B1 B2 A1 A2 B49 B50 A49 A50 B10 J1004 J1006 B1 B13 A1 A12 A13 A1 B1 A1 A18 B18 B1 J1015 J1016 J1017 A1 A16 B16 ...

Страница 761: ...in PCB VR1 LED1 LED2 J2001 J2002 J2003 J2004 1 4 B2 B1 B14 B15 A34 A33 A2 A1 B34 B33 B2 B1 A34 A33 A2 A1 B34 B33 B2 B1 A2 A1 A50 A49 B1 B2 B49 B50 A1 A2 A29 A30 B1 B2 B29 B30 A1 A2 A49 A50 B1 B2 B49 B50 A1 A2 A9 A10 B10 B9 B1 B2 A34 A33 A2 A1 B34 B33 B2 B1 A34 A33 A2 A1 B34 B33 B2 B1 A2 A1 A9 A8 B9 B8 B2 B1 A1 A2 A33 A34 B1 B2 B33 B34 A1 A2 A33 A34 B1 B2 B33 B34 A14 A15 A2 A1 B2 B1 B8 B9 A8 A9 A2 ...

Страница 762: ...RIME AU JAPON 13 179 CHAPTER 13 TROUBLESHOOTING 4 Analog Processor PCB Figure 13 617 5 Laser Driver PCB 1 11 J2102 J2100 J2101 B24 A24 B25 A25 B2 B1 A2 A1 1 6 J2104 1 13 J2103 8 1 J2105 Figure 13 618 VR2 for Pmax adjustment of the laser 1 14 J1302 1 16 J1303 J1304 A15 B15 J1301 8 1 A1 B1 VR1 VR2 ...

Страница 763: ...gure 13 619 7 DC Fuse PCB 1 3 J10 4 1 J9 VR2 J450 1 10 VR1 6 1 J931 7 1 J932 2 1 J910 J936 J930 1 8 1 2 4 1 J906 1 5 J939 6 3 J907 1 6 J909 J905 3 1 4 2 1 8 J933 J908 1 10 J934 1 9 J935 1 FU939 FU940 FU926 FU941 FU921 FU922 FU925 FU904 FU905 FU906 FU901 FU923 FU924 FU903 FU935 FU934 FU932 FU933 FU931 FU936 FU937 FU938 4 4 1 J929 4 2 3 1 J937 2 1 J938 Figure 13 620 ...

Страница 764: ...V 0 MAR 1999 PRINTED IN JAPAN IMPRIME AU JAPON 13 181 CHAPTER 13 TROUBLESHOOTING 8 AC Fuse PCB Figure 13 621 9 Developing Bias PCB J5 FU101 1 2 1 3 J405 10 1 J406 J401 1 2 J404 VR509 J402 7 1 J400 4 1 VR508 VR505 VR504 VR506 VR507 VR503 VR502 VR501 Figure 13 622 ...

Страница 765: ...180 REV 0 MAR 1999 PRINTED IN JAPAN IMPRIME AU JAPON 10 HVT AC PCB Figure 13 623 11 Potential Measurement PCB VR102 VR101 VR103 10 1 5 1 J421 J106 J105 2 1 J104 6 1 J103 Figure 13 624 LED1 remains on while the surface potential of the drum is being measured 1 4 J3 1 4 J2 1 5 J1 VR1 VR2 LED1 ...

Страница 766: ...itial screen Level 1 Level 2 item Screen and Level 3 item screen 2 8 User screen Initial screen Level 1 Level 2 item screen Level 3 item screen Level 3 item screen Level 3 item screen Level 3 item screen Reset key Reset key Select an item From Level 1 Level 2 item screen Select a Level 1 item at the top of the screen Select a Level 2 item from the list Previous Next page Previous Next page Previou...

Страница 767: ...ress 2 and 8 on the keypad at the same time 3 Press the asterisk key on the control key The above operations will bring up the following Initial screen Figure 13 703 Initial Screen COPIER FEEDER SORTER PRJ DISPLAY I O ADJUST FUNCTION OPTION TEST COUNTER EDITOR Control display mode I O display mode Adjustment mode Operation inspection mode Settings mode Test print mode Counter mode Service mode of ...

Страница 768: ... power switch after ending service mode 3 Backing Up the RAM At time of shipment from the factory each machine is adjusted individually and its adjustment values are recorded on the service label one of the two labels attached to the service data sheet cover behind the front cover If you have replaced the CPU PCB or initialized the RAM be sure to record all service mode values ADJUST OPTION of the...

Страница 769: ...E AU JAPON ADJ XY CCD LASER DENS ADJ X ADJ Y ADJ S ADJ J EC B EC G EC R T V00 T VFF P3 V00 P3 VFF 1 P3 VFF 2 P3 VFF 3 P3 VFF 4 SGNL Y SGNL M SGNL C REF Y REF M REF C SIGG Y SIGG M SIGG C RGAIN K D Y TRGT D M TRGT D C TRGT PTOFST Y PTOFST M PTOFST C PTOFST K D REF Y D REF M D REF C D REF K D REF 4 D SGNL Y Adjust Back Up Data Items ...

Страница 770: ...AL D SGNL M D SGNL C D SGNL K D SGNL 4 P REF Y P REF M P REF C P REF K P SGNL Y P SGNL M P SGNL C P SGNL K SIGG K SIGG P Y SIGG P M SIGG P C SIGG P K RGAN P Y RGAN P M RGAN P C RGAN P K P SENS Y P SENS M P SENS C P SENS K PS ADJ Y PS ADJ M PS ADJ C PS ADJ K VBACK Y VBACK M VBACK C VBACK K EPOTOFST PF CRT Y PF CRT M PF CRT C PF CRT K OFST P Y OFST P M Adjust ...

Страница 771: ...N IMPRIME AU JAPON PASCAL COLOR HV TR HV SP OFST P C OFST P K ADJ Y ADJ M ADJ C ADJ K OFST Y OFST M OFST C OFST K P ADJ Y P ADJ M P ADJ C P ADJ K P OFST Y P OFST M P OFST C P OFST K TR TR TR L1 HV L2 TR N1 TR N2 TR T1 TR T2 TR UT1 TR UT2 TR S1 1 TR S2 1 TR OHP TR POST HV SP SP L1 SP L2 SP N1 SP N2 SP T1 SP T2 SP UT1 Adjust ...

Страница 772: ...HV SP HV IEL HV ATT SP UT2 SP S1 1 SP S2 1 SP OHP SP POST SP ON N1 SP ON N2 SP ON L1 SP ON L2 SP ON T1 SP ON T2 SP ONUT1 SP ONUT2 SP ON S1 SP ON S2 SP ONOHP SP ON PT HV IEL IEL L1 IEL L2 IEL N1 IEL N2 IEL T1 IEL T2 IEL UT1 IEL UT2 IEL S1 1 IEL S2 1 IEL OHP IEL POST HV ATT ATT L1 ATT L2 ATT N1 ATT N2 ATT T1 ATT T2 ATT S1 ATT S2 ATT OHP Adjust ...

Страница 773: ...APON HV ATT DOC REC FEED ADJ CST ADJ MISC ATT UT1 ATT UT2 ATT POST DA XS DA XE DA YS DA YE DS DOC ATT T A ATT T B RG XA RG XB RG Y TR DLY A TR DLY B TR END A TR END B C2 STMTR C2 A4R C3 STMTR C3 A4R MF A4R MF A6R MF A4 C1 LVOL C1 HVOL C2 LVOL C2 HVOL C3 LVOL C3 HVOL SEG ADJ K ADJ ATT RTN1 ATT RTN2 ATT RTN3 ATT RTN4 BC ADJ ACS ADJ Adjust ...

Страница 774: ...APTER 13 TROUBLESHOOTING SENS ADJ HV SP AC HV PSTCL FEEDER PRJ CLN TH CLN TMP HV SP SP L1 SP L2 SP N1 SP N2 SP T1 SP T2 SP UT1 SP UT2 SP S1 1 SP S2 1 SP OHP SP POST HV PSTCL ADJ RX ADJ RY ADJ DX ADJ DY DS PRJ DS OHP RD XS RD XE RD YS RD YE DA XS DA XE DA YS DA YE NEGA B NEGA G NEGA R POSI B POSI G POSI R N LMT Adjust ...

Страница 775: ...00 1130 1150 1160 1180 REV 0 MAR 1999 PRINTED IN JAPAN IMPRIME AU JAPON PRJ EDITOR N G LMT P LMT P G LMT OHP LMT P DA XS P DA XE P DA YS P DA YE N DA XS N DA XE N DA YS N DA YE O DA XS O DA XE O DA YS O DA YE CHNGR X CHNGR Y ED X ED Y LOOP MB LOOP TH MRK MB MRK TH Adjust ...

Страница 776: ...3 193 CHAPTER 13 TROUBLESHOOTING BODY USER CST ACC INT FACE CCD DISP MODEL SZ RCPR MD F WEB PASCAL PSCL MD EC GLASS PSTCL ON METAL OHP MODE COPY LIM COUNTER1 COUNTER2 COUNTER3 COUNTER4 COUNTER5 COUNTER6 CONTROL COLDOFST MONO SPD CLR L SP PRJ L SP BKL L SP P SZ C1 P SZ C2 COIN DK P REMOTE B CLR P PRT MF Option ...

Страница 777: ...LESHOOTING 13 194 COPYRIGHT 2002 CANON INC CANON CLC1100 1130 1150 1160 1180 REV 0 MAR 1999 PRINTED IN JAPAN IMPRIME AU JAPON 4 Basic Operation a Initial Screen Figure 13 705 b Level 1 Level 2 Item Screen Figure 13 706 ...

Страница 778: ... previous page To next page Number of pages ready for servicing copying operation jam exists executing service operation executing warm up operation cover is open performing copying operation error exits toner is absent fixing oil is absent waste toner case is full yyyyy aaaaa bbbbb OK ADJ X Press an item to highlight Before change Input value Numerical input range Accept input value Reverse 0 Sto...

Страница 779: ...B DISPLAY control display mode The COPIER DISPLAY screen looks like the following and it provides the items shown on the next page Figure 13 709 The FEEDER DISPLAY screen looks like the following and it provides the item shown on the next page VERSION USER ANALOG CST STS ACC STS JAM ERR DPOT DENS SENSOR CCD 1 1 READY FEEDSIZE A4 Figure 13 710 ...

Страница 780: ...state of connection of the paper deck state of connection of the projector state of connection of the editor state of connection of the PS XJ state of insertion of the control card state of connection of the copy data controller machine internal temperature environment sensor machine internal humidity environment sensor machine internal absolute humidity temperature THM1 of the middle of the fixin...

Страница 781: ...etting V of Y at laser output FF setting V of M at laser output FF setting V of C at laser output FF setting V of Bk at laser output FF setting V of Y for developing bias DC component setting V of M for developing bias DC component setting V of C for developing bias DC component setting V of Bk for developing bias DC component setting V of Y for grid bias setting V of M for grid bias setting V of ...

Страница 782: ...ection solid density of M at time of auto gradation correction solid density of C at time of auto gradation correction solid density of Bk at time of auto gradation correction correction value of Y used to set the maximum toner density while gradation characteristics are being controlled for stabilization correction value of M used to set the maximum toner density while gradation characteristics a...

Страница 783: ...e photosensitive drum concentration reference signal for C toner on the photosensitive drum concentration reference signal for Bk toner on the photosensitive drum concentration signal of Y toner on the photosensitive drum present value concentration signal of M toner on the photosensitive drum present value concentration signal of C toner on the photosensitive drum present value concentration sign...

Страница 784: ...etween target value and patch data value for new gradation correction Difference in C between target value and patch data value for new gradation correction Difference in Bk between target value and patch data value for new gradation correction Previous difference in Y between target value and patch data value for new gradation correction Previous difference in M between target value and patch dat...

Страница 785: ......

Страница 786: ...alization 0 normal 1 initializing local operation 0 normal 1 operating 0 remote 1 local EDITOR DISPLAY Items Level 1 item DISPLAY Level 2 item Level 3 item ED X ED Y Description input coordinates in editor sub scanning X direction input coordinates in editor main scanning Y direction VERSION Indicates the ROM version of the PCBs of the copier and its options Display XX YY R D number Version number...

Страница 787: ...er size configuration code Code 00 01 02 03 Configuration AB Inch A All sizes ACC STS Indicates the state of connection of options Level 3 FEEDER SORTER DECK PRJ EDITOR PS XJ CARD DATA CON Remarks 0 not connected 1 connected Description Indicates the sate of connection of the feeder Indicates the state of connection of the sorter Indicates the state of connection of the paper deck Indicates the st...

Страница 788: ... Indicates the machine internal absolute humidity Indicates the temperature THM1 of the middle of the fixing upper roller Indicates the temperature THM3 of the middle of the fixing lower roller Indicates the temperature THM2 of the ends of the fixing upper roller Indicates the temperature THM4 of the ends of the fixing lower roller CST STS Indicates the paper size of the cassette multifeeder Level...

Страница 789: ...card Description Indicates the order of jams higher the number older the jam Indicates the location of the jam Jam code Indicates the source of paper Indicates the soft counter for the source of paper Indicates the size of paper JAM 1 8 READY AAA BBBB CCCC DDDD E FFff G HHHHHH IIIII AAA BBBB CCCC DDDD E FFff G HHHHHH IIIII AAA BBBB CCCC DDDD E FFff G HHHHHH IIIII AAA BBBB CCCC DDDD E FFff G HHHHHH...

Страница 790: ...h sensor PS27 pickup vertical path sensor 2 PS26 pickup vertical path sensor 1 PS21 re pickup vertical path sensor PS28 transparency sensor PS69 pre registration sensor PS30 registration sensor PS70 Code xx50 xx51 0052 xx60 xx61 xx70 xx80 xx81 xx82 xx83 xx84 xx90 Jam sensor post transfer paper sensor PS6 pre transfer paper sensor PS5 pre cleaning paper sensor PS71 separation sensor PS7 internal de...

Страница 791: ...15 xx19 xx21 xx22 xx23 xx24 xx25 xx26 xx31 xx41 xx51 xx52 Jam Lever idle swing Pick up trailing edge skew Pick up error Reversal delay Reversal leading edge skew Remaining original Pulled original Pick up delay Registration delay Pick up skew Delivery delay Delivery stationary Pick up stationary Reversal stationary Remaining reversal original Reversal pick up delay Code xx53 xx54 xx72 xx81 xx91 xx...

Страница 792: ...BBB CCCC DDDD EEEE FFff G HH AAA BBBB CCCC DDDD EEEE FFff G HH AAA BBBB CCCC DDDD EEEE FFff G HH AAA BBBB CCCC DDDD EEEE FFff G HH AAA BBBB CCCC DDDD EEEE FFff G HH Figure 13 712 Level 3 AAA BBBB CCCC DDDD EEEE FFff G HH Remarks 1 to 32 32 max See Self Diagnosis If none 0000 0 copier 1 feeder 2 sorter Description Indicates the order of errors the higher the number the older the error Indicates the...

Страница 793: ...of GREEN shading target value of RED gain increase value of BLUE gain increase value of GREEN gain increase value of RED offset adjustment value of BLUE OD offset adjustment value of GREEN ODD offset adjustment value of RED ODD offset adjustment value of BLUE EVEN offset adjustment value of GREEN EVEN offset adjustment value of RED EVEN gain adjustment value of BLUE ODD gain adjustment value of GR...

Страница 794: ...ce potential V of the photosensitive drum setting V of Y at laser output 00 setting V of M at laser output 00 setting V of C at laser output 00 setting V of Bk at laser output FF setting V of Y at laser output FF setting V of M at laser output FF setting V of C at laser output FF setting V of Bk at laser output FF setting V of Y for developing bias DC component setting V of M for developing bias D...

Страница 795: ...f de fogging potential for Bk measurement of drum surface potential at laser V00 with the primary charging assembly at 500 V measurement of drum surface potential at laser V00 with the primary charging assembly at 700 V measurement of drum surface potential at laser VFF with the primary charging assembly at 500 V measurement of drum surface potential at laser VFF with the primary charging assembly...

Страница 796: ... of the developer inside the C developing assembly computed value of the developer inside the Bk developing assembly window soiling correction coefficient for Y window soiling correction coefficient for M window soiling correction coefficient for C window soiling correction coefficient for Bk solid density of Y during auto gradation correction solid density of M during auto gradation correction so...

Страница 797: ...nt of the present M developer concentration measurement of the present C developer concentration concentration reference signal for the Y toner on the photosensitive drum concentration reference signal for the M toner on the photosensitive drum concentration reference signal for the C toner on the photosensitive drum concentration reference signal for the Bk toner on the photosensitive drum concen...

Страница 798: ...tion control Difference in Y between target value and patch data value for new gradation correction Difference in M between target value and patch data value for new gradation correction Difference in C between target value and patch data value for new gradation correction Difference in Bk between target value and patch data value for new gradation correction Previous difference in Y between targe...

Страница 799: ......

Страница 800: ...e of sensors of particular importance for servicing work Level 3 SC HP ITOP A ITOP B WEB W TONER Remarks 0 HP 1 not HP 0 present 1 absent 0 case not full 1 case is full Description output of the original scanner HP sensor PS1 output of the side A sensor PS2 output of side B sensor PS3 cleaning belt is out case full 0 sensor not detecting signal plate 1 sensor detecting signal plate ...

Страница 801: ...ormal 1 being initialized 0 normal 1 moving 0 remote 1 local Description presence absence of the auto changer presence absence of the slide tray type of tray presence absence of slides state of the tray tray movement error tray HP error tray local movement position of the tray lens movement state of motor excitation position of the lens open circuit in the lamp initialization local movement remote...

Страница 802: ...JAPON 13 215 CHAPTER 13 TROUBLESHOOTING C I O I O display mode The Level 2 screen of I O mode looks like the following and it provides the items shown on the next page DC CON R CON DC CPU input output port R CPU input output port Figure 13 713 Guide to Screens P001 xxxxxxxxxxxxxxxx bit 0 bit 15 address ...

Страница 803: ...or PS5 signal registration sensor PS70 signal pre registration sensor PS30 signal transparency sensor PS69 signal multifeeder pickup sensor PS9 signal deck pickup sensor PS101 signal re pickup vertical path sensor PS28 signal pickup vertical path 1 sensor PS28 signal pickup vertical path 2 sensor PS26 signal pickup vertical path 3 sensor PS27 signal pre registration sensor PS30 signal not used mul...

Страница 804: ... M3 ready signal fixing motor M5 ready signal drum motor M2 ready signal main motor M4 ready signal not used not used not used not used not used not used not used not used not used paper deck connect signal duplexing unit connect buffer path unit connect signal transfer drawer connector connect signal registration path driver drawer connect signal transfer drawer connector signal fixing drawer con...

Страница 805: ...not used not used not used cassette 2 paper length sensor 1 PSU2 signal cassette 2 paper length sensor 0 PSU2 signal cassette 3 paper length sensor 1 PSU3 DPSU3 signal cassette 3 paper length sensor PSU3 DPSU3 signal not used Bk toner level sensor TS4 signal not used not used Y toner level sensor TS3 signal not used C toner level sensor TS2 not used M toner level sensor TS1 signal waste toner feed...

Страница 806: ...used not used cassette 1 lifter sensor PS19 signal cassette 2 lifter sensor PS22 DPS22 signal cassette 3 lifter sensor PS23 DPS23 signal not used not used not used not used shutoff SHUTOFF error detection SSR2 error detection not used not used not used not used counter mode 5 signal counter mode 4 signal counter mode 3 signal counter mode 2 signal counter mode 1 signal counter mode 0 signal not us...

Страница 807: ... HP sensor PS40 signal attraction transfer locking cam home position sensor PS8 signal transfer drum cleaner HP sensor PS59 signal transfer drum HP sensor PS57 signal not used not used not used not used not used Bk developing assembly HP sensor PS55 signal Y developing assembly HP sensor PS53 signal C developing assembly HP sensor PS51 signal M developing assembly HP sensor PS49 signal not used po...

Страница 808: ... static eliminator high voltage error HVT AC error detection cleaning blade reciprocating motor M7 error detection buffer path unit locking cam sensor signal not used not used not used not used not used pre cleaning paper sensor PS71 signal not used not used not used not used not used not used not used not used not used not used not used not used not used fixing motor M5 CLK signal not used drum m...

Страница 809: ...ot used fixing oil pump driver error detection not used fixing upper thermistor open circuit detection fixing lower thermistor open circuit detection fixing upper heater error detection fixing lower heater error detection SSR1 fixing upper heater side error detection SSR1 fixing lower heater side error detection not used not used not used not used not used not used not used not used not used toner...

Страница 810: ...e exposure lamp LA1 activation signal laser scanner motor M3 clock switch signal transfer drum cleaner brush motor M8 drive signal duplexing motor M14 not used not used not used cleaning blade reciprocating motor M7 drive signal laser sensor motor M3 drive signal Bk toner supply clutch CL8 drive signal Y toner supply clutch CL7 drive signal C toner supply clutch CL6 drive signal M toner supply clu...

Страница 811: ...rive signal fixing oil pump PSP1 drive signal SSR2 not used not used stopper plate solenoid SL12 drive signal stopper plate solenoid SL12 drive signal not used not used not used duplexing feeding clutch CL14 drive signal not used not used not used Gradation sensor concentration measurement LED ON signal Bk toner concentration measurement LED ON signal Y toner concentration measurement LED ON signa...

Страница 812: ... sensor select signal 1 deck sensor select signal 0 pre registration jam timing signal pickup sensor select signal 2 pickup sensor select signal 1 pickup sensor select signal 0 not used not used not used not used not used A D multiplex select signal 2 A D multiplex select signal 1 A D multiplex select signal 0 not used not used fixing upper cleaning belt solenoid SL1 fixing lower cleaning belt sol...

Страница 813: ...al multifeeder pickup clutch CL16 drive signal deck pickup clutch CL102 drive signal duplexing feed clutch CL14 drive signal cassette 1 pickup clutch CL1 drive signal cassette 2 pickup clutch CL12 DCL12 drive signal cassette 3 pickup clutch CL13 DCL13 drive signal not used not used not used not used not used not used not used not used toner suction fan FM6 drive signal 1 toner suction fan FM6 driv...

Страница 814: ...put select 1 signal transfer acceleration remote signal trainer 0 µ remote signal transfer DC remote signal attraction acceleration remote signal attraction 0 µ remote signal attraction DC remote signal grid remote signal primary DC remote signal HV DEV ENABLE signal HV DC ENABLE signal HV AC ENABLE signal post cleaning charging DC remote signal separation DC remote signal separation AC remote sig...

Страница 815: ...S108 signal deck detection signal deck lifter lower limit detecting switch SW102 signal not used not used not used hopper motor M10 reverse rotation drive signal hopper motor M10 drive signal fixing motor M5 speed signal 1 fixing motor M5 speed signal 0 not used fixing motor M5 driver signal not used not used main motor reversal signal main motor M4 drive signal drum motor M2 speed signal 1 drum m...

Страница 816: ...roller 1 solenoid SL7 pickup roller 2 solenoid SL8 DSL8 pickup roller 3 solenoid SL9 DSL9 buffer path unit solenoid SL1 drive signal buffer path unit clutch CL1 drive signal buffer path unit solenoid SL2 drive signal buffer path unit cam HP select signal duplexing stacking guide plate solenoid SL15 drive signal not used attraction roller solenoid SL6 drive signal separation push up solenoid SL3 dr...

Страница 817: ...FM3 full speed drive signal primary charging assembly fan FM3 half speed drive signal laser scanner motor cooling fan FM4 drive signal not used electrical unit cooling fan FM8 full speed drive signal electrical unit cooling fan FM8 half speed drive signal not used not used not used not used not used not used not used not used ozone suction fan FM5 error detection primary charging assembly fan FM3 ...

Страница 818: ... P023 P024 P025 P026 P027 P028 Remarks 1 download mode 1 OFF Description not used not used not used not used not used not used not used not used not used not used not used not used not used not used LD J2DCON power switch off signal not used not used not used not used not used not used not used bit 15 14 13 12 11 10 9 8 7 6 5 4 3 2 1 0 15 0 15 0 15 0 15 0 15 0 15 0 15 0 ...

Страница 819: ...signal R CON to DC CON power ready signal R CON to PANEL CON power ready signal not used digitizer request signal CVR time rest signal scanning lamp LA2 ON signal not used original exposure system cooling fan 1 FM1 half speed drive signal original exposure system cooling fan 1 FM1 full speed drive signal original scanner motor driver RESET signal projector SSR ON signal not used digitizer ACK sign...

Страница 820: ...gnal internal signal internal signal internal signal internal signal internal signal internal signal not used RS 232C input signal scanner IPC error 3 scanner IPC error 2 scanner IPC error 1 scanning lamp LA2 ON detection signal CVR error detection internal signal internal signal not used RS 232C output signal internal signal not used not used not used internal signal internal signal internal sign...

Страница 821: ...l original exposure system cooling fan 2 FM14 full speed signal Copy Data Controller or Remote Diagnostic Device count signal Control Card V count signal not used internal signal internal signal internal signal internal signal control switch SW2 detection signal not used internal signal download mode signal not used for factory adjustment not used not used for factory adjustment original exposure ...

Страница 822: ...N 13 235 CHAPTER 13 TROUBLESHOOTING D ADJUST adjustment mode The Level 2 screen of ADJUST mode looks like the following and it provides the items shown on the next page Figure 13 714 COLOR HV ATT HV SP AC HV PSTCL V CONT ADJ XY CCD LASER MISC SENS ADJ PASCAL DOC REC HV SP DENS HV IEL HV TR FEED ADJ CST ADJ ...

Страница 823: ...nes as for laser unit replacement enters the laser control initial value at VFF 45 for photo mode 400 lines as for laser unit replacement enters the laser control initial value at VFF 55 for photo mode 400 lines as for laser unit replacement enters the laser control initial value at VFF 65 for photo mode 400 lines as for laser unit replacement enters the laser control initial value at VFF 70 for p...

Страница 824: ...ue of the concentration target of C toner during ART control correction value for the laser output of Y toner during ART control correction value for the laser output of M toner during ART control correction value for the laser output of C toner during ART control correction value for the laser output of Bk toner during ART control reference signal value for the concentration sensor of Y toner in ...

Страница 825: ... for ATR control reference signal value of M toner on the photosensitive drum during INIT for ATR control reference signal value of C toner on the photosensitive drum during INIT for ATR control reference signal value of Bk toner on the photosensitive drum during INIT for ATR control signal value of Y toner on the photosensitive drum during INIT for ATR control signal value of M toner on the photo...

Страница 826: ...or patch data M Use it to adjust offset in relation to initial settings for patch data C Use it to adjust offset in relation to initial settings for patch data K Y color adjustment for de fogging potential reference 0 M color adjustment for de fogging potential reference 0 C color adjustment for de fogging potential reference 0 Bk color adjustment for de fogging potential reference 0 potential off...

Страница 827: ...eas color balance adjustment and density of Bk light areas color balance adjustment of Y for output from an external image controller color balance adjustment of M for output from an external image controller color balance adjustment of C for output from an external image controller color balance adjustment of Bk for output from an external image controller color balance adjustment of Y light area...

Страница 828: ... transfer charging bias adjustment for single sided copying or copying on the 1st side of a double sided copy in units of µA for thick paper transfer charging bias adjustment for copying on the 2nd side of a double sided copy in units of µA for extra thick paper transfer charging bias adjustment for single sided copying or copying on the 1st side of a double sided copy in units of µA for extra thi...

Страница 829: ......

Страница 830: ...ustment for single sided copying or copying on the 1st side of a double sided copy in units of µA for thick paper transfer charging bias adjustment for copying on the 2nd side of a double sided copy in units of µA for extra thick paper transfer charging bias adjustment for single sided copying or copying on the 1st side of a double sided copy in units of µA for extra thick paper transfer charging ...

Страница 831: ...s adjustment for single sided copying or copying on the 1st side of a double sided copy in units of µA for thick paper transfer charging bias adjustment for copying on the 2nd side of a double sided copy in units of µA for extra thick paper transfer charging bias adjustment for single sided copying or copying on the 1st side of a double sided copy in units of µA for extra thick paper transfer char...

Страница 832: ...ransfer charging bias adjustment for single sided copying or copying on the 1st side of a double sided copy in units of 50 µA for thick paper transfer charging bias adjustment for copying on the 2nd side of a double sided copy in units of 50 µA for extra thick paper separation charging bias adjustment for single sided copying or copying on the 1st side of a double sided copy in units of 50 µA for ...

Страница 833: ...r single sided copying or copying on the 1st side of a double sided copy in units of 50 µA for thick paper transfer charging bias adjustment for copying on the 2nd side of a double sided copy in units of 50 µA for extra thick paper separation charging bias adjustment for single sided copying or copying on the 1st side of a double sided copy in units of 50 µA for extra thick paper separation chargi...

Страница 834: ...r single sided copying or copying on the 1st side of a double sided copy in units of 50 µA for thick paper transfer charging bias adjustment for copying on the 2nd side of a double sided copy in units of 50 µA for extra thick paper separation charging bias adjustment for single sided copying or copying on the 1st side of a double sided copy in units of 50 µA for extra thick paper separation chargi...

Страница 835: ...ironment adjustment value for single sided copying or copying on the 1st side of a double sided copy for thick paper separation re charging ON environment adjustment value for copying on the 2nd side of a double sided copy for extra thick paper separation re charging ON environment adjustment value for single sided copying or copying on the 1st side of a double sided copy for extra thick paper sep...

Страница 836: ...atic eliminator bias adjustment for single sided copying or copying on the 1st side of a double sided copy in units of 0 5 kV for thick paper internal static eliminator bias adjustment for copying on the 2nd side of a double sided copy in units of 0 5 kV for extra thick paper internal static eliminator bias adjustment for single sided copying or copying on the 1st side of a double sided copy in un...

Страница 837: ... single sided copying or copying on the 1st side of a double sided copy in units of 0 5 kV for thick paper internal static eliminator bias adjustment for copying on the 2nd side of a double sided copy in units of 0 5 kV for extra thick paper internal static eliminator bias adjustment for single sided copying or copying on the 1st side of a double sided copy in units of 0 5 kV for extra thick paper...

Страница 838: ...for single sided copying or copying on the 1st side of a double sided copy in units of 0 5 kV for thick paper internal static eliminator bias adjustment for copying on the 2nd side of a double sided copy in units of 0 5 kV for extra thick paper internal static eliminator bias adjustment for single sided copying or copying on the 1st side of a double sided copy in units of 0 5 kV for extra thick pa...

Страница 839: ...n high voltage output adjustment for single sided copying or copying on the 1st side of a double sided copy in units of 2 µA for thick paper attraction high voltage output adjustment for copying on the 2nd side of a double sided copy in units of 2 µA for extra thick paper attraction high voltage output adjustment for single sided copying or copying on the 1st side of a double sided copy in units o...

Страница 840: ...for single sided copying or copying on the 1st side of a double sided copy in units of 2 µA for thick paper attraction high voltage output adjustment for copying on the 2nd side of a double sided copy in units of 2 µA for extra thick paper attraction high voltage output adjustment for single sided copying or copying on the 1st side of a double sided copy in units of 2 µA for extra thick paper attr...

Страница 841: ...nt for single sided copying or copying on the 1st side of a double sided copy in units of 2 µA for thick paper attraction high voltage output adjustment for copying on the 2nd side of a double sided copy in units of 2 µA for extra thick paper attraction high voltage output adjustment for single sided copying or copying on the 1st side of a double sided copy in units of 2 µA for extra thick paper a...

Страница 842: ...r drum during ATT ON 1 2 sheet retention of sides B and A 2 retention on side A 3 retention on side B executes attraction of paper to the transfer drum according to ATTCHK OK key to start auto stop specifies position of attraction on the transfer drum during RGST ON 1 2 sheet retention on sides B and A 2 retention on side A 3 retention on side B executes printing for checking registration retentio...

Страница 843: ...l input for the paper level detecting VR for cassette 2 for 275 sheets slice level input for the paper level detecting VR for cassette 3 for 50 sheets slice level input for the paper level detecting VR for cassette 3 for 275 sheets separation level adjustment between text and photo in text photo mode or text silver halide mode for plain paper addition of a rotation for attraction rotation for sign...

Страница 844: ...opying on the 2nd side of a double sided copy in units of 0 5 kV for thick paper separation charging bias adjustment for single sided copying or copying on the 1st side of a double sided copy in units 0 5 kV for thick paper separation charging bias adjustment for copying on the 2nd side of a double sided copy in units of 0 5 kV for extra thick paper separation charging bias adjustment for single s...

Страница 845: ...or single sided copying or copying on the 1st side of a double sided copy in units 0 5 kV for thick paper separation charging bias adjustment for copying on the 2nd side of a double sided copy in units of 0 5 kV for extra thick paper separation charging bias adjustment for single sided copying or copying on the 1st side of a double sided copy in units of 0 5 kV for extra thick paper separation cha...

Страница 846: ...ying on the 1st side of a double sided copy in units 0 5 kV for thick paper separation charging bias adjustment for copying on the 2nd side of a double sided copy in units of 0 5 kV for extra thick paper separation charging bias adjustment for single sided copying or copying on the 1st side of a double sided copy in units of 0 5 kV for extra thick paper separation charging bias adjustment for copy...

Страница 847: ...l for original detection from the reference sheet position of film with the projector in use adjustment of the read area with original detection OFF and with the projector in use in units of 0 06 mm standard 0 adjustment of the read area with original detection OFF and with the projector in use in units of 0 06 mm standard 0 adjustment of the read area with original detection OFF and with the proj...

Страница 848: ...th the projector in use a higher setting darkens C area change of the limit for the projector lamp in negative normal mode with the projector in use change of the limit for the projector lamp in negative normal mode with the projector in use change of the limit for the projector lamp in positive normal mode with the projector in use change of the limit for the projector lamp in positive normal mod...

Страница 849: ...use in units of 0 6 mm standard 0 adjustment of position in sub scanning direction with the rotary changer of the projector in use in units of 0 6 mm standard 0 99 to 99 99 to 99 99 to 99 99 to 99 99 to 99 99 to 99 99 to 99 99 to 99 99 to 99 EDITOR ADJUST Items Level 1 ADJUST Level 2 Level 3 ED X ED Y LOOP MB LOOP TH MRK MB MRK TH Description adjustment of input coordinates in editor sub scanning ...

Страница 850: ... 100 to 100 2 5 to 2 5 mm Unit about 0 06 mm Description Use it to make adjustments so that the image read position matches the reference point on the copyboard glass Fine adjusts the distance between the original scanner HP sensor to the read start position Unit number of steps from the stepping motor Make adjustments as shown in the next page Fine adjusts the CCD reading start position Unit pixe...

Страница 851: ...r the original scanner motor front Point of measurement Standard white plate Note 1 Execute this mode upon replacement of a PCB or initialization of the RAM The settings will be returned to standard settings requiring you to enter the appropriate settings Be sure to record any new settings on the service label Adjusting the Image Read Start Position Be sure to check the present point of attraction...

Страница 852: ...FF 55 for photo mode 400 lines as upon replacement of the laser unit Use it to enter the laser control initial value at VFF 65 for photo mode 400 lines as upon replacement of the laser unit Use it to enter the laser control initial value at VFF 70 for photo mode 400 lines as upon replacement of the laser unit Use it to turn on the laser output when adjusting the laser power Use it to turn on the l...

Страница 853: ... toner concentration reference signal gain value for each color during ATR control Use it to adjust the toner concentration reference signal gain value for Bk during toner concentration control Use it to adjust the toner concentration target present value of each color during ATR control Use it to adjust the correction value of the laser output of each color during ATR control Use it to adjust the...

Страница 854: ...ing initialization for the toner concentration sensor of each color in relation to light reflected by the photosensitive drum Use it to adjust the signal value during initialization for the toner concentration sensor of all colors in relation to light reflected by the photosensitive drum Use it to adjust the toner concentration reference signal value for each color on the photosensitive drum durin...

Страница 855: ...C PF CRT K Remarks 4 to 4 Standard 0 side darkens side lightens 0 to 1023 Standard 0 25 to 25 Description Use it to adjust the de fogging potential for each color Use it to adjust the potential offset value Use it to adjust the offset value of laser strength for each color PASCAL Adjusts automatic gradation correction Level 3 OFST P Y OFST P M OFST P C OFST P K Remarks 127 to 128 Description Use i...

Страница 856: ...color balance and density of light areas of each color Be sure to follow the Image Adjustment Basic Procedure To increase the degree of reproduction of extremely light areas decrease the setting Use it to correct the color balance of each color when output is from an external image controller Be sure to set the user color balance to 0 before using this mode Be sure to follow the Image Adjustment B...

Страница 857: ...side of a double sided copy using plain paper Use it to adjust the transfer charging bias for copying on the 2nd side of a double sided copy using plain paper Use it to adjust the transfer charging bias for one sided copying and when copying on the 1st side of a double sided copy using thick paper Use it to adjust the transfer charging bias when copying on the 2nd side of a double sided copy using...

Страница 858: ... side of a double sided copy using plain paper Use it to adjust the separation charging bias for copying on the 2nd side of a double sided copy using plain paper Use it to adjust the separation charging bias for one sided copying and when copying on the 1st side of a double sided copy using thick paper Use it to adjust the separation charging bias when copying on the 2nd side of a double sided cop...

Страница 859: ... the separation re charging on environment adjustment value for single sided copying or copying on the 1st side of a double sided copy using thin paper Use it to adjust the separation re charging on environment adjustment value for copying on the 2nd side of a double sided copy using thin paper Use it to adjust the separation re charging on environment adjustment value for single sided copying and...

Страница 860: ...e of a double sided copy using plain paper Use it to adjust the internal static eliminating bias for copying on the 2nd side of a double sided copy using plain paper Use it to adjust the internal static eliminating bias for one sided copying and when copying on the 1st side of a double sided copy using thick paper Use it to adjust the internal static eliminating bias when copying on the 2nd side o...

Страница 861: ... 1st side of a double sided copy using plain paper Use it to adjust the attraction charging bias for copying on the 2nd side of a double sided copy using plain paper Use it to adjust the attraction charging bias for one sided copying and when copying on the 1st side of a double sided copy using thick paper Use it to adjust the attraction charging bias when copying on the 2nd side of a double sided...

Страница 862: ... be framed in black by the work of original detection mode Use this item to make settings so as to remove such frames Keep in mind that a change in the settings will affect the frame width in original detection mode while the projector is in use Adjusting the Slice Level for Original Detection You may set a slice level of your choice for original detection A higher slice level will increase the de...

Страница 863: ...ment value for transfer drum main scanning direction drum axial Enter a fine adjustment value for the transfer delay on side A of the transfer drum Enter a fine adjustment value for the transfer delay on side B of the transfer drum Use it to select a point of attraction on the transfer drum during ATT ON Use it to execute attraction of paper to the transfer drum according to ATT CHK settings Use i...

Страница 864: ...value for A4R in the multifeeder Use it to adjust the paper width basic value for A6R in the multifeeder Use it to adjust the paper width basic value for A4 in the multifeeder Use it to enter a slice level for the cassette 1 paper level detecting VR for 50 sheets Use it to enter a slice level for the cassette 1 paper level detecting VR for 275 sheets Use it to enter a slice level for the cassette ...

Страница 865: ...n to attraction rotation for copying on the 2nd side of a double sided copy using plain paper full color black Use it to add a single attraction rotation for single sided copying and copying on the 1st side of a double sided copy using thin paper full color black Use it to add a single rotation to attraction rotation for copying on the 2nd side of a double sided copy using thin paper full color bl...

Страница 866: ...n the 1st side of a double sided copy using thick paper Use it to adjust the separation charging bias when copying on the 2nd side of a double sided copy using thick paper Use it to adjust the separation charging bias for single sided copying and when copying on the 1st side of a double sided copying using extra thick paper Use it to adjust the separation charging bias when copying on the 2nd side...

Страница 867: ...a CPU PCB or initialization of the RAM The settings will be returned to standard settings requiring you to enter the appropriate settings Be sure to record any new settings on the service label Feeder Related Items FEEDER ADJUST Level 3 ADJ RX ADJ RY ADJ DX ADJ DY Remarks 50 to 50 Unit 0 1 mm Description Use it to adjust the registration in sub scanning direction with the feeder in use Use it to a...

Страница 868: ...in use Use it to adjust the slice level for original detection in reference to the reference sheet of film e g 6x6 8x10 placed on the copyboard glass with the projector in use Use it to adjust the read area when the original detection mechanism is off or when original detection fails even when the original detection mechanism is on with the projector in use Use it to adjust the read area when the ...

Страница 869: ...n when copying positive film with the projector in use Use it to change the limit for the projector lamp in negative normal mode with the projector in use Use it to change the limit for the projector lamp in negative copyboard mode with the projector in use Use it to change the limit for the projector in positive normal mode with the projector in use Use it to change the limit for the projector in...

Страница 870: ...n area select color create mode A higher setting makes filling of gaps easier but too high a setting can lead to bleeding Use it to adjust the binary slice level for reading images into memory when coloring in area select color create mode A higher setting enables reading fine lines Use it to adjust processing for reading images into memory in marker select point select mode A higher setting makes...

Страница 871: ...REV 1 JAN 2000 PRINTED IN JAPAN IMPRIME AU JAPON E FUNCTION operation check mode The COPIER FUNCTION screen looks like the following and it offers the items shown on the pages that follow Figure 13 717 INSTALL CCD LASER DPC CST CLEANING FIXING PANEL CLEAR ATTRACT PART CHK MISC R MISC P SENS ADJ ...

Страница 872: ...out 2 min stirs the developer inside the Bk developing assembly OK key to start auto stop in about 2 min stirs the developer inside the four color developing assemblies in sequence OK key to start auto stop in about 9 min reads the initial value of the Y toner concentration signal SGNL REF OK key to start auto stop reads the initial value of the M toner concentration signal SGNL REF OK key to star...

Страница 873: ...cking T VFF OK key to start Stop key to stop turns on the laser for checking P3 V00 OK key to start Stop key to stop turns on the laser for checking P3 VFF 1 OK key to start Stop key to stop turns on the laser for checking P3 VFF 2 OK key to start Stop key to stop turns on the laser for checking P3 VFF 3 OK key to start Stop key to stop turns on the laser for checking P3 VFF 4 OK key to start Stop...

Страница 874: ...etection reference point 2 for A4R paper in cassette 3 OK key to start auto stop stores paper width detection reference point 1 for A4R paper in multifeeder OK key to start auto stop stores paper width detection reference point 2 for A6R paper in multifeeder OK key to start auto stop stores paper width detection reference point 3 for A4 paper in multifeeder OK key to start auto stop rotates the po...

Страница 875: ... start turn off and then on power switch initializes the RAM of the DC CPU OK key to start initializes the RAM of the R CPU OK key to start initializes the RAM of the PANEL CPU OK key to start initializes the backup data of service mode OK key to start clears the jam history OK key to start clears the error history OK key to start turns on the scanning lamp OK key to start auto stop after several ...

Страница 876: ... 287 CHAPTER 13 TROUBLESHOOTING PRJ FUNCTION Items Level 1 FUNCTION Level 2 Level 3 LAMP CCD Description drives the projector lamp for a specific period of time OK key to start auto stop reads in data and executes gain adjustment at time of projector installation OK key to start auto stop CLC1120 1130 1150 only ...

Страница 877: ...ssemblies in sequence 1 Select the item to highlight and press the OK key 2 The operation will stop automatically in about 9 min Use it to read the initial value of a specific toner concentration signal SGNL REF The screen COPIER ADJUST DENS will show the reading Be sure to record it on the service label Using the Item 1 Select the item to highlight and press the OK key 2 The operation will stop a...

Страница 878: ... of installation or hopper unit replacement Using the Item 1 Select the item to highlight and press the OK key 2 The operation will stop automatically in about 2 min Use it to read the concentration sensor output data once again after cleaning the black toner concentration sensor to suit the light reflected by the photosensitive drum Using the Item 1 Select the item to highlight and press the OK k...

Страница 879: ...matically and the result will be indicated 3 Turn off and then on the power switch For future expansion LASER Adjusts laser related items Level 3 POWER T V00 T VFF P2 V00 P3 VFF 1 P3 VFF 2 P3 VFF 3 P3 VFF 4 Remarks OK key to start Stop key to stop Description Use it to turn on the laser output for adjusting the laser power Use it to turn on the laser output when checking T V00 Use it to turn on th...

Страница 880: ...tomatically Use it to select the point of attraction on the transfer drum during RGST ON 1 2 sheet retention sides B and A 2 side A detecting 3 side B retention Use it to execute printing for checking the point of registration side of attraction using C according to RGST CHK settings This mode uses the source of paper selected before starting service mode Using the Item 1 Select the item to highli...

Страница 881: ...e OK key 2 The operation will stop automatically for R D for R D for R D for R D DPC Measures the potential of the photosensitive drum Level 3 DPC OFST INIT Remarks Description Use it to execute measurement of the potential of the photosensitive drum Using the Item 1 Select the item to highlight and press the OK key 2 The operation will stop automatically Use it to execute offset adjustment of the...

Страница 882: ... reference point for cassette 2 3 for CLC1150 1180 cassette 3 Using ht Item 1 Adjust the side guide pal of the bottommost cassette to STMTR 2 Select C2 STMTR or C3 STMTR to highlight and press the OK key 3 Likewise store a reference point for A4R size Use it to store the paper width detecting reference point for the multifeeder Using the Item 1 Place A4R paper in the multifeeder and adjust the sid...

Страница 883: ...the Test Sheet in A4 2 Select the item to highlight and press the OK key 3 A cyan image will automatically be prepared and discharged 4 Measure the width of the area indicated in the figure Use it to impregnate the felt with oil by running the fixing oil pump for about 10 min when replacing the oil applying felt Using the Item 1 Select the item to highlight and press the OK key The fixing motor wi...

Страница 884: ... press the Stop key Use it to start a check on the LEDs on the control panel Using the Item 1 Select the item to highlight and press the OK key The LEDs on the control panel will turn on in sequence 2 To stop press LED OFF Use it to end a check on the LEDs on the control panel 1 Press the item highlighted to end the operation Use it to start a check on the key inputs from the control panel Using t...

Страница 885: ...e not used See Table 13 704 Codes 8 through 20 are not used Description Use it to select the clutch to check Using the Item 1 Select the item to highlight 2 Enter the code of the clutch using the keypad 3 Press the OK key Use it to check the operation of the clutch selected using CL 1 Select the item to highlight and press the OK key The clutch will tun on 2 To stop press the Stop key Use it to se...

Страница 886: ...em 1 Select the item to highlight and press the OK key The solenoid will turn on 2 To stop press the Stop key Use it to select the high voltage output to check Using the Item 1 Select the item to highlight 2 Enter the code of the high voltage output using the keypad 3 Press the OK key Use it to check the operation of the high voltage output selected using SHV Using the Item 1 Select the item to hi...

Страница 887: ...em cooling fan 2 3 FM14 15 Table 13 703 Codes and Fans COPIER FUNCTION Code 0 1 2 3 Name hopper motor M10 transfer drum cleaner brush motor M8 not used duplexing motor M14 Code 4 5 6 7 Name laser scanner motor M3 fixing motor M5 drum motor M2 main motor M4 Table 13 704 Codes and Motors Code 0 1 2 3 4 Name multifeeder pickup solenoid SL14 deck pickup solenoid SL101 duplexing paper feed roller solen...

Страница 888: ...developing assembly locked developing bias AC DC ON wait for stop command equivalent of photosensitive drum 10 rotations M developing assembly unlocked developing bias AC DC OFF primary output grid output OFF photosensitive drum 1 rotation pre exposure lamp OFF drum motor OFF drum motor ON pre exposure lamp ON photosensitive drum 1 rotation primary output grid output 500 V ON C developing assembly...

Страница 889: ...AC DC OFF primary output grid output OFF photosensitive drum 1 rotation pre exposure lamp OFF drum motor OFF drum motor ON pre exposure lamp ON photosensitive drum 1 rotation primary output grid output 500 V ON Bk color developing assembly locked developing bias AC DC ON wait for stop command equivalent of photosensitive drum 10 rotations Bk developing assembly unlocked developing bias AC DC OFF p...

Страница 890: ...K key 2 Turn off and then on the power switch Use it to initialize the RAM of the DC CPU on the CPU PCB Using the Item 1 Select the item to highlight and press the OK key 2 Turn off and then on the power switch Use it to initialize the RAM of the R CPU on the CPU PCB 1 Select the item to highlight and press OK key 2 Turn off and then on the power switch Use it to initialize the RAM of the PANEL CP...

Страница 891: ...and press the OK key 2 The scanner moves to point A and 1 4 is indicated on the display 3 Each press on the OK key causes the scanner to move as follows HP B HP C HP 4 The operation ends when the scanner moves to 4 HP in response to a press on the OK key 1 HP A HP 2 HP B HP 1 HP C 4 HP For R D MISC P Checks the operation of the printer unit Level 3 DRUM ROT POWEROFF Remarks Description Use it to r...

Страница 892: ...he cam to the point of attraction transfer Using the Item 1 Select the item to highlight and press the OK key 2 The cam will move to the point of attraction transfer and will stop automatically Use it to rotate the attraction transfer locking cam motor thereby moving the cam to the point of transfer Using the Item 1 Select the item to highlight and press the OK key 2 The cam will move to the point...

Страница 893: ...of the projector on for a specific period of time Using the Item 1 Select the item to highlight and press the OK key 2 The lamp of the projector will remain on for about 1 min and will turn off automatically Use it to read CCD gain adjustment and data at time of installing a projector Using the Item 1 Select the item to highlight and press the OK key 2 The operation will stop automatically Althoug...

Страница 894: ...1180 REV 0 MAR 1999 PRINTED IN JAPAN IMPRIME AU JAPON 13 305 CHAPTER 13 TROUBLESHOOTING F OPTION settings mode The COPIER OPTION screen looks like the following and it offers the items shown on the pages that follow BODY USER CST ACC INT FACE Figure 13 718 ...

Страница 895: ...coating on the copyboard glass 0 absent 1 present 2 not used 9 for future expansion use it to switch the post cleaning charging mechanism 0 normal 1 all environments Use it to change the frequency at which the color toner concentration of the photosensitive drum is measured 0 25 images 1 50 images 2 75 images 3 100 images Use it to execute auto adjustment of the target settings of the SGNL signal ...

Страница 896: ...s Use it to set placement of 2 sides when the projector is in use 0 normal 1 prohibit in full color 2 prohibit in black mono 3 prohibit at all times Use it to set placement of 2 sides in back light mode 0 normal 1 prohibit in full color 2 prohibit in black mono 3 prohibit at all items use it to select a paper size for cassette Table 13 708 use it to select a paper size for cassette 2 for CLC1150 1...

Страница 897: ...80 REV 0 MAR 1999 PRINTED IN JAPAN IMPRIME AU JAPON PRJ OPTION Items Level 1 OPTION Level 2 Level 3 BK LIGHT Description not used EDITOR OPTION Items Level 1 OPTION Level 2 Level 3 ED MODE Description use it to switch editor operation mode 0 prohibit input 1 1 point input 2 continuous input ...

Страница 898: ... switch data display within the DISPLAY CCD screen Use it to switch the destination Use it to switch cover the mode of reciprocating operation for the drum cleaning blade Use it to change the frequency of turning on the fixing cleaning belt Use it to switch the gradation correction data contrast potential obtained by auto gradation correction Use it to smooth out the gradation of an image from an ...

Страница 899: ...ies Use it to change the upper limit on the copy count Use it to select a counter type to suit the user or dealer soft counter 1 through 4 on the control panel of a 120 230 V model Use it to select a counter type to suit the use or dealer soft counter 5 6 on the control panel In the absence of a control key control card or ID No input copying remote printing or remote scanning is permitted with co...

Страница 900: ...evice Device total ID No counter Disabling control key with conditions YES YES YES YES YES Disabling ID No input with conditions YES YES YES YES NO Disabling control card with conditions YES NO NO YES YES Yes increment the count No do not increment the count Guide to the Reference Table The counter on the Counter Check screen is incremented under all conditions i e disabling control key control ca...

Страница 901: ...ard 3 With ID No Registration in Use For 3 or 4 for black and white copying without an ID No input the counter for the group in question for the ID No will not be incremented For 2 3 or 4 for remote printing without an ID No input the counter for the group in question for the ID No will not be incremented For 2 or 4 for remote printing the counter for the group in question for the ID No will not b...

Страница 902: ...evel 3 P SZ C1 P SZ C2 Remarks See Table 13 708 Description Use it to select a paper size for cassette 1 Use it to select a paper size for cassette 2 for CLC1150 1180 cassette 1 ACC Selects option related settings Level 3 COIN DK P Remarks 1 Display to support coin vender 0 A4 1 B5 2 LTR Description Use it to turn on off the coin vendor notation Use it to select a paper size for the paper deck ...

Страница 903: ...2 copy full color large copy full color small copy mono color large copy mono color small copy black and white large copy black and white small copy full color large double sided copy mono color small double sided copy mono color large double sided copy mono color small double sided copy black and white large double sided copy black and white small double sided Function C P C P C P C P C P C P C P...

Страница 904: ...0 31 32 33 34 35 36 37 Counter print 1 print 2 print full color 1 print full color 2 print mono color 1 print mono color 2 print black and white 1 print black and white 2 Function P P P P P P P P Color All All 4C 4C Mono Mono Bk Bk Paper size M M M M M M M M Count for double sided sheet Increment for large size sheet 1 2 1 2 1 2 1 2 Table 13 707a ...

Страница 905: ...opy scan full color small copy scan black and white large copy scan black and white small copy print full color large copy print full color small copy print black and white large copy print black and white small copy print black and white 2 copy print black and white 1 copy print full color mono color large copy print full color mono color small copy print full color mono color 2 copy print full c...

Страница 906: ...r mono color 1 print full color mono color large print full color mono color small print full color mono color 2 print full color mono color 1 copy print large copy print small copy print 2 cop ring 1 Function C C P P P P C P C P C P C P Color 4C Mono 4C Mono 4C Mono 4C Mono 4C Mono 4C Mono All All All All Paper size M M L S M M L S M M Count for double sided sheet Increment for large size sheet 2...

Страница 907: ...py scan large size 4 copy scan small size 4 copy scan total 4 Function C C P P C P C P C P C P S S S S S S S S Color All All All All Mono Mono Bk Bk 4C Bk All All All All All All Paper size L S L S L S L S M M L S M L S M Count for double sided sheet Increment for large size sheet 1 1 1 1 Table 13 707c Guide to the table Function C copy P print S scan Color 4C 4 color full MONO yellow magenta cyan...

Страница 908: ...A3R A3 A4R A4 A5 A5R B1 B2 B3 B4R B4 B5R B5 11x17 LTRR LTR STMT STMTR Notation LGL K LGL K LGLR FLSC A FLS OFI E OFI B OFI A LTR A LTRR G LTR G LTRR A LGL G LGL FGLI FOLI A OFI ALL Paper A1 A2 A3R A3 A4R A4 A5 A5R B1 B2 B3 B4R B4 B5R B5 11x17 Letter R Letter Statement Statement R Paper Legal Korean Government Korean Government R Foolscap Australian Foolscap Oficio Ecuadorian Officio Bolivian Offic...

Страница 909: ...l 3 BK LIGHT not used Remarks 0 do not indicate 1 indicate default 0 Description Use it to enable or disable indication of a mode on the User screen when copying positive film with a protective sheet using back light BOX Editor Related Items EDITOR OPTION Level 3 ED MODE Remarks 0 prohibit input 1 1 point input 2 continuous input Description Use it to switch editor operation mode ...

Страница 910: ...00 lines 1 400 lines 2 800 lines use it to switch LUT for test printing 0 LUT present 1 LUT absent use it to adjust the Y density for TYPE 05 during test printing 0 to 255 a higher setting darkens the image use it to adjust the M density for TYPE 05 during test printing 0 to 255 a higher setting darkens the image use it to adjust the C density for TYPE 05 during test printing 0 to 255 a higher set...

Страница 911: ... the number of lines used for test printing Use it to switch LUT used for test printing Use it to set the output each color for each TYPE For example to generate on M mono test print set COLOR M to 1 and others to 0 Input Numbers and Test Prints Input No 00 01 02 03 04 05 06 07 08 09 10 Description image from CCD normal copying for R D 256 colors 256 gradations 16 gradations 17 gradations 100 half...

Страница 912: ...pages that follow Figure 13 720 You can check the number of times each mechanism has operated Resetting a Counter Reading 1 Select an item to highlight 2 Press the Clear key on the control panel The counter will be reset to 00000000 Here the notations large size and small size are used as follows large size covers B4 or larger sheets small size covers sheets smaller than B4 TOTAL PICK UP FEEDE SCA...

Страница 913: ...thesis color large size copy total counter copy print synthesis color small size copy total counter cop print synthesis black large size copy total counter copy print synthesis black small size copy total counter copy print synthesis total copy counter large size copy total counter small size copy total counter color large size copy total counter color small size coy total counter black large size...

Страница 914: ...ifeeder large size cop total counter multifeeder small size copy total counter paper deck coy total counter 2nd side pickup total counter large size 2nd side pickup total counter 2nd side small size pickup total counter number of locking operations Y developing assembly number of locking operations M developing assembly number of locking operations C developing assembly number of locking operation...

Страница 915: ...activation period in sec primary charging wire cleaning pad upper execution number of operations primary charging wire cleaning pad lower execution number of operations manual feed pickup roller paper passage number of sheets manual feed feed roller paper passage number of sheet manual feed separation roller paper passage number of sheets attraction roller scraper paper passage number of sheets wa...

Страница 916: ...drive period in sec fixing heater lower drive period in sec pre exposure lamp activation period in sec primary charging assembly high voltage activation period in sec separation charging assembly high voltage activation period in sec internal static eliminator high voltage activation period in sec external static eliminator high voltage activation period in sec post cleaning charging assembly high...

Страница 917: ...28 COPYRIGHT 2000 CANON INC CANON CLC1120 1130 1150 REV 0 MAR 1999 PRINTED IN JAPAN IMPRIME AU JAPON PD SP RL FX IN BS paper deck separation roller paper passage number of sheets fixing insulating bush paper passage number of sheets ...

Страница 918: ... an open circuit The SSR is faulty Timing of detection xx indicates a heater xx 01 upper heater xx 02 lower heater xx01 The high temperature detection circuit on the DC driver PCB has detected overheating 220ºC or more in the middle of the heater xx02 The thermistor THM1 THM3 has detected 210ºC xx04 The high temperature detection circuit on the DC driver PCB has detected overheating on the ends of...

Страница 919: ... of detection xx indicates a heater xx 01 upper heater xx 02 lower heater xx03 The gate array of the DC driver PCB has determined that SSR1 for the fixing heater is on for about 1 6 sec or more even after the DC CPU turned it off 0100 As many as 2 000 copies have been made after the fixing upper cleaning belt length sensor detected the sensor lever and indicated a warning on the control panel 0200...

Страница 920: ... 1 sec or more while the fixing motor is rotating The cleaning blade reciprocating motor driver circuit on the DC driver PCB has detected an overcurrent for 0 1 sec or more The duplexing motor clock signal DUPMLK is 0 for 1 sec or more while the duplexing motor is rotating Toner Concentration Fault xx indicates the color of a developing assembly xx 00 MCYBk in common xx 01 M xx 02 C xx 03 Y xx 04 ...

Страница 921: ...amplings is 70 or more xx16 At time of setting initial data as during installation the variation of PT SIG M C Y levels for 16 concentration data samplings is 102 or more xx17 At time of setting initial data as during installation the variation of PT REF M C Y levels for 16 concentration data samplings is 70 or more xx20 At time of setting initial data as during installation the result of averagin...

Страница 922: ... At time of setting initial data as during installation the result of averaging five retry samplings of PT SIG M C Y levels is 683 or less or that of PT SIG K levels is 305 or less xx25 At time of initial data setting as upon installation the value after sampling and averaging of the following is 256 or lower ADJUST DENS P SENS Y M C K xx30 At time of setting initial data as during installation th...

Страница 923: ...ed e g cleaning fault Timing of detection xx32 At time of setting initial data as during installation the result of averaging the first sampling of PT SIG M C Y levels is 930 or more or that of PT SIG K levels is 550 or more xx33 At time of setting initial data as during installation the result of averaging samplings of PT REF M C Y levels is 859 or more xx34 At time of setting initial data as dur...

Страница 924: ...not be performed the level of SIGG M C Y is E0 or more or 20H or less 0441 At time of setting initial data as during installation gain setting cannot be performed the level of RGAIN K is E0 or more or 20H or less xx42 At time of setting initial data as during installation gain setting cannot be performed the level of SIGG P M C Y K is 250 or more or 40 or less xx43 At time of setting initial data ...

Страница 925: ...ata xx62 During copying sequence the level of PT REF M C Y set initially is 767 or less because of an error in the memory backup data xx63 During copying sequence the level of PT SIG M C Y is 683 CLC 1100 1120 1130 1150 655 the other or less or that of PT SIG K is 305 or less because of an error in the memory backup data xx64 During copying sequence the level of PT REF D is 400 or less because of ...

Страница 926: ...in the memory backup data xx73 During copying sequence the level of PT SIG M C Y set initially is 749 or more or that of PT SIG K is 371 CLC 1100 1120 1130 1150 400 the other or more because of an error in the memory backup data xx74 During copying sequence the level of PT REF D set initially is 1000 or more because of an error in the memory backup data xx75 During copying sequence the level of PT...

Страница 927: ... detection xx80 When samplings are taken during copying sequence the level of WINDOW M C Y K window soiling correction coefficient is 130 or more xx81 When samplings are taken during copying sequence the level of WINDOW M C Y K window soiling correction coefficient is 70 or less xxA0 When samplings are taken during copying sequence the level of SGNL M C Y is 306 or less xxA1 When samplings are tak...

Страница 928: ...ner level sensor is faulty The hopper motor is faulty The hopper motor has an open circuit Timing of detection xxB0 When samplings are taken during copying sequence the level of SGNL M C Y is 1020 or more when feeding 10 sheets or more continuously xxB1 When samplings are taken during copying sequence the level of REF M C Y set initially increases intensity by 30 or more xxB2 When samplings are ta...

Страница 929: ...bly HP sensor is 0 0400 When the power switch is on the Bk developing assembly HP sensor is 0 0101 When the developing assembly is locked the M developing assembly HP sensor is 1 0201 When the developing assembly is locked the C developing assembly HP sensor is 1 0301 When the developing assembly is locked the Y developing assembly HP sensor is 1 0401 When the developing assembly is locked the Bk ...

Страница 930: ...for a specific period of time 0000 The paper jogging guide HP sensor does not go 0 when the paper jogging motor has been kept on for a specific period of time 0001 The paper jogging guide HP sensor does not go 1 when the paper jogging guide motor has been kept on for a specific period of time Potential Control Related Error VdI potential during initial rotation Vd5 post cleaning charging area duri...

Страница 931: ... limit VL2 is at the upper measurement limit Vd1 is at the lower measurement limit VL1 is at the lower measurement limit Vd2 is at the lower measurement limit VL2 is at the lower measurement limit Timing of detection 0051 Vd1 is 300 V or less and in addition Vd2 is 500 V or less 0052 VL1 is 200 V or more and in addition VL2 is 250 V or more 0053 Vd1 is 100 V or less and in addition is 150 V or les...

Страница 932: ...e within 10 sec after the operation to lock the transfer drum has started 0001 There is an error in the falling edge timing of the signal plate detected by the side B sensor 0002 There is an error in the rising edge timing of the signal plate detected by the side B sensor 0003 There is an error in the rising edge timing of the signal plate detected by the C sensor 0004 There is an error in the fal...

Страница 933: ...ide B sensor has been generated 1004 The falling edge signal of the signal plate C to be detected by the C sensor is not detected after the rising edge of the signal plate detected by the side B sensor has been generated 1005 The rising edge signal of the signal plate to be detected by the side A sensor is not generated after the falling edge of the signal plate C detected by the C sensor has been...

Страница 934: ...y the side B sensor is generated 10 ms earlier after the rising edge signal of the signal plate C detected by the C sensor has been generated 1103 The rising edge signal of the signal plate C to be detected by the C sensor is generated 10 ms earlier after the falling edge signal of the signal plate detected by the side B sensor has been generated 1104 The falling edge signal of the signal plate C ...

Страница 935: ...ated 1202 The rising edge signal of the signal plate to be detected by the side B sensor is generated 10 ms later after the rising edge signal of the signal plate C detected by the C sensor has been generated 1203 The rising edge signal of the signal plate C to be detected by the C sensor is generated 10 ms later after the falling edge signal of the signal plate detected by the side by side B sens...

Страница 936: ... registration path driver PCB is faulty The DC driver PCB is faulty The CPU PCB is faulty Timing of detection 1207 The rising edge signal of the signal plate D to be detected by the C sensor is generated 10 ms later after the rising edge signal of the signal plate detected by the side A sensor has been detected 1208 The rising edge signal of the signal plate to be detected by the C sensor is gener...

Страница 937: ... 0002 During copying operation the connection signal TD CNCT of the drawer connector of the transfer unit is 1 0003 During copying the drawer connect signal CONNECT of the registration path unit is 1 0000 The transfer drum HP sensor does not go 1 when the transfer drum locking motor has been kept on for a specific period of time 0001 The transfer drum HP sensor does not go 0 when the transfer drum...

Страница 938: ... on or the Copy Start key has been pressed The communication between the original scanner driver PCB and the CPU PCB is interrupted or 5 sec or more During standby the scanning lamp turns on even though the R CPU keeps the scanning lamp ON signal off During copying the scanning lamp turns off even though the R CPU keeps the scanning lamp ON signal on At power on RAM access within the IP MAIN PCB d...

Страница 939: ... ECO PCB and its ROM are a poor match The communication between IP ED PCB and IP MAIN PCB is interrupted for 5 sec or more The LAOFF signal remains 0 when the projector controller PCB turns on the LCNT signal The communication between the DC CPU and the R CPU on the CPU PCB is interrupted for 5 sec or more The copy data controller or the remote diagnostic device has been physically detached The co...

Страница 940: ...fixing roller occurring if these errors were designed to be reset while the thermistor has an open circuit 2 The fixing cleaning belt counter COPIER COUNTER MISC FIX WEB in service mode is cleared when the fixing cleaning belt is replaced 3 E004 is indicated on the control panel for about 1 6 sec when the error occurs thereafter the power switch wil be disabled i e error auto power off is activate...

Страница 941: ... The feeder motor M8 is faulty The tray position sensor S25 is faulty The registration sensor 1 S3 is faulty The skew sensor 1 S4 is faulty The manual feed registration sensor S19 is faulty The image leading edge sensor S20 is faulty The original sensor 1 S7 is faulty Timing of detection The communication is monitored at all times and it is interrupted for 5 sec or more The state of the sensor rem...

Страница 942: ...a specific period of time varying from copier to copier after the Start key has been pressed The operation fails to end within 2000 msec after the motor drive signal has been generated The operation does not end within 2000 msec after the motor drive signal has been generated The operation does not end within 2000 msec after the motor drive signal has been generated The auto adjustment mechanism o...

Страница 943: ... 5000 msec after the motor drive signal has been generated The auto adjustment mechanism of the stapler internal paper sensor fails or an error occurs in the auto adjustment value The operation fails to end within a specific period of time after the motor drive signal has been generated for initialization 20000 msec except initialization 2000 msec The clock plate sensor of the motor does not gener...

Страница 944: ...50 1160 1180 REV 2 FEB 2002 PRINTED IN JAPAN IMPRIME AU JAPON APPENDIX A GENERAL TIMING CHART A 1 B SIGNALS AND ABBREVIATIONS A 3 C GENERAL CIRCUIT DIAGRAM A 9 D PAPER DECK GENERAL CIRCUIT DIAGRAM A 13 E SPECIAL TOOLS A 15 F SOLVENTS AND OILS A 17 ...

Страница 945: ......

Страница 946: ... Registration clutch CL9 Registration roller locking unlocking solenoid SL9 Attraction roller solenoid SL9 Attraction high voltage output Pre exposure lamp LA1 Post cleaning high voltage output Primary grid high voltage output Laser Developing assembly locking motor Developing cylinder clutch Developing bias Transfer high voltage output Separation high voltage output Internal external static elim ...

Страница 947: ...e exposure lamp LA1 Post cleaning high voltage output Primary grid high voltage output Laser Developing locking motor Developing cylinder clutch Developing bias Transfer high voltage output Separation high voltage output Internal external high voltage output Separation roll push up solenoid SL3 Separation claw drive solenoid SL4 Separation sensor PS7 Fixing motor M5 Fixing cleaning belt solenoid I...

Страница 948: ...nal C1PLVR CASSETTE 1 PAPER LEVEL VR signal C1PUCL CASSETTE 1 PICK UP CLUTCH command C1PUMA CASSETTE 1 PICK UP MOTOR command C1PUMA CASSETTE 1 PICK UP MOTOR command C1PUMB CASSETTE 1 PICK UP MOTOR command C1PUMB CASSETTE 1 PICK UP MOTOR command C1PUMHL CASSETTE 1 PICK UP MOTOR HOLD command C2LFD D1LFD CASSETTE 2 1 LIFTER SENSOR signal C2LFMON CASSETTE 2 1 LIFTER MOTOR ON command C2PAD D1PAD CASSET...

Страница 949: ... COOLING FAN ERROR signal DELFLSL DELIVERY PAPER DEFLECTOR SOLENOID command DINPD DUPLEXING UNIT INLET PAPER SENSOR signal DJGHP PAPER JOGGING GUIDE HOME POSITION SENSOR signal DJOGMA DUPLEXING UNIT PAPER JOGGING GUIDE MOTOR command DJOGMA DUPLEXING UNIT PAPER JOGGING GUIDE MOTOR command DJOGMB DUPLEXING UNIT PAPER JOGGING GUIDE MOTOR command DJOGMB DUPLEXING UNIT PAPER JOGGING GUIDE MOTOR command...

Страница 950: ...ORONA CURRENT LEVEL CONTROL signal HVCC POST CLEANING CORONA ON OFF CONTROL signal HVCI POST CLEANING CORONA LEVEL CONTROL signal HVGI GRID BIAS LEVEL CONTROL signal HVGIC GRID BIAS ON OFF command HVIDCC INTERNAL STATIC ELIMINATOR DC ON OFF CONTROL signal HVIDCI INTERNAL STATIC ELIMINATOR DC LEVEL CONTROL signal HVIOC EXTERNAL INTERNAL STATIC ELIMINATOR AC ON OFF CONTROL signal HVPR PRIMARY CURREN...

Страница 951: ...FEEDER LIFTER HIGH SENSOR signal MFLLD MULTIFEEDER LIFTER LOW SENSOR signal MFPAD MULTIFEEDER PAPER SENSOR signal MFPUCL MULTIFEEDER PICK UP CLUTCH command MFPUD MULTIFEEDER PICK UP SENSOR signal MFPUSL MULTIFEED PICK UP SOLENOID command MFPWVR MULTIFEEDER PAPER WIDTH VR signal MNMON MAIN MOTOR ON command MNMRDY MAIN MOTOR READY signal MTEP M TONER EMPTY signal MTNRSUP M TONER SUPPLY CLUTCH comman...

Страница 952: ...REGDTC REGISTRATION SENSOR signal REPUCL DUPLEXING UNIT PICK UP CLUTCH command RGRLSL REGISTRATION ROLLER RELEASING SOLENOID command RPUVPD DUPLEXING UNIT PICK UP VERTICAL PATH SENSOR signal SCDSL SEPARATION CLAW SOLENOID command SCFMERR LASER SCANNER MOTOR COOLING FAN ERROR signal SCFMON LASER SCANNER MOTOR COOLING FAN ON command SCHP SCANNER HOME POSITION signal SHUTOFF SHUT OFF signal SJAMD SEP...

Страница 953: ...IXING ROLLER TEMPERATURE 1 signal UTHM2 UPPER FIXING ROLLER TEMPERATURE 2 signal UWEBSL UPPER CLEANING WEB SOLENOID command VCLK VIDEO CLOCK PULSE command VD0 VD7 VIDEO0 7 command WTNRBD WASTE TONER FEEDING SCREW LOCK DETECTING SWITCH signal WTONER WASTE TONER FULL SENSOR signal Y REF Y REFERENCE signal Y SGNL Y TONER DENSITY signal YDEVA Y DEVELOPING ASSEMBLY ENGAGING MOTOR command YDEVA Y DEVELO...

Страница 954: ...8 7 6 5 4 3 2 1 1 2 3 4 5 6 7 8 9 10 10 9 8 7 6 5 4 3 2 1 J2005H J2005A J2005B J2010A J2010B J2010H J2 J2008 J1006 J1005H J1005A J1005B 1 2 3 1 2 3 4 1 2 3 1 2 3 9 8 7 6 5 4 4 3 2 1 GND GND GND GND GND J745H FM2 FM7 J744H J745 J744 FM4 J735H J735 GND 1 2 3 1 2 3 9 8 7 6 5 4 3 2 1 J733A J733H J733B FM16 J811H J81 FM3 1 2 3 FM17 J822H J822 3 2 1 J723H J723 1 2 3 1 2 3 4 5 6 7 8 9 1 2 3 1 2 3 1 2 3 1...

Страница 955: ...9 J649 CL1 J650H J650 J643A J643H J643B J644A J644H J644B PS46 PS21 J651 M 1 2 3 4 5 6 1 2 1 2 3 1 2 3 1 2 1 2 3 1 2 3 16 15 14 13 12 11 10 9 8 7 6 5 4 3 2 1 10 9 8 7 6 5 4 3 2 1 1 2 3 4 5 6 7 8 9 10 8 7 6 5 4 3 2 1 1 2 3 4 5 6 7 8 24V 24V 24V 5V GND 5V GND 24V 5V GND 5V GND SL CL J347 SL8 J626H J626 PS24 J627 PS22 J628 CL12 J629H J629 J621A J621H J621B J622A J622H J622B PS47 PS26 J630 J631 PM1 J3...

Страница 956: ...4V 24V 24V 24V 24V 24V 24V 12 11 10 9 8 7 6 5 4 3 2 1 7 6 5 4 3 2 1 1 2 3 4 5 6 7 6 5 4 3 2 1 1 2 3 4 5 6 5V GND 5V GND 5V GND 5V GND J336 J588A J588H J588B J589A J589H J589B J598 PS55 J599 PS49 J600 PS51 J601 PS53 13 12 11 10 9 8 7 6 5 4 3 2 1 13 12 11 10 9 8 7 6 5 4 3 2 1 1 2 3 4 5 6 7 8 9 10 11 12 13 1 2 3 4 5 6 7 8 9 10 11 12 13 12 11 10 9 8 7 6 5 4 3 2 1 1 2 3 4 5 6 7 8 9 10 11 12 12 11 10 9 ...

Страница 957: ......

Страница 958: ... MT1 J32 1 2 3 4 5 6 7 8 9 10 11 J5A J5B J5H GND DKPPE 5V GND DLFUL 5V GND DLFPD 5V 1 2 3 4 5 6 7 24VU DPRSD GND DPFDD 5V 24V DPUCD 14 13 12 11 10 9 8 7 6 5 4 3 2 1 1 2 3 4 5 6 7 8 9 10 11 12 13 14 10 9 8 7 6 5 4 3 2 1 1 2 3 4 5 6 7 8 9 10 J10D J10L J15D J15L J15H 8 9 10 11 DOLON 5V GND DOPEN 4 3 2 1 1 2 3 4 J19L J19D J19H 3 2 1 3 2 1 3 2 1 SL J11 J13 J14 PS102 PS103 PS104 J16D J16H J16L SL101 3 2...

Страница 959: ......

Страница 960: ... Tool number Shape Rank Remarks 1 2 3 4 5 6 FY9 4013 CK 0436 TKN 0093 TKN 0456 TKN 0457 TKN 0197 A A A B B B Use it in combination with a digital multimeter when adjusting the intensity of laser from the laser unit Use it when making electrical checks use it in combination with a laser power checker when adjusting the intensity of light from the laser unit Do not remove the transfer frame while th...

Страница 961: ...TKN 0480 A B B B B B Use it when adjusting or checking images Use it when adjusting the distance between No 1 and No 2 mirrors use it in combination with a mirror positioning tool Use it to adjust the S B gap of the developing assembly Use it to adjust the potion of the photosensitive drum shaft Use it when adjusting the position of the transfer separation claws Use it when cleaning the cleaning b...

Страница 962: ...g scanner rail Lubricating e g drive part Lubricating e g photosensitive drum cleaning blade Lubricating e g spring clutch No 1 2 3 4 5 6 7 Composition Fluorine family hydrocarbon Alcohol Surface activating agent Water Fluorine family hydrocarbon Alcohol Chorine family hydrocarbon Mineral oil family lithium soap Molybdenum disulfide Silicone oil Silicone oil Fluorine graphite Synthetic oil Remarks...

Страница 963: ......

Страница 964: ...t Division Office Imaging Products Quality Assurance Center CANON INC Printed in Japan REVISION 0 MAR 1999 18723 35338 71720 REVISION 1 JAN 2000 18723 REVISION 2 DEC 2000 18723 REVISION 3 FEB 2002 36850 5 7 Hakusan 7 chome Toride Ibaraki 302 8501 Japan ...

Страница 965: ...0102ABX XX X PRINTED IN JAPAN IMPRIME AU JAPON This publication is printed on 100 recycled paper ...

Отзывы: