background image

0-2

0-2

Notes Before it Works Serving

CAUTION:

At servicing, be sure to turn off the power source according to the specified steps and 
disconnect the power plug.

CAUTION:

Do not turn off the power switch (of the host machine)  when downloading is under way.
Turning off the main power switch while downloading is under way can disable the 
machine.

Points to Note at Cleaning

CAUTION:

When performing cleaning using organic solvent such as alcohol, be sure to check that 
the component of solvent is vaporized completely before assembling.

Содержание Cassette Module-Y1

Страница 1: ...6 5 4 3 2 1 Cassette Module Y1 Service Manual Rev 0 ...

Страница 2: ...information as the need arises In the event of major changes in the contents of this manual over a long or short period Canon will issue a new edition of this manual The following paragraph does not apply to any countries where such provisions are inconsistent with local law Trademarks The product names and company names used in this manual are the registered trademarks of the individual companies...

Страница 3: ...switch closing the front door and closing the delivery unit door which results in supplying the machine with power 2 In the digital circuits 1 is used to indicate that the voltage level of a given signal is High while 0 is used to indicate Low The voltage value however differs from circuit to circuit In addition the asterisk as in DRMD indicates that the DRMD signal goes on when 0 In practically a...

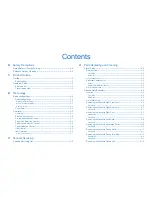
Страница 4: ...Removing the Cassette Pickup Roller 4 11 Procedure 4 11 Removing the Cassette Pickup Idler Gear 4 12 Preparation 4 12 Procedure 4 12 Removing the Cassette Pickup Unit 4 12 0 Safety Precautions Notes Before it Works Serving 0 2 Points to Note at Cleaning 0 2 1 Product Outline Outline 1 2 Specification 1 2 Names of Parts 1 2 External View 1 2 Cross section View 1 2 2 Technology Basic configuration 2...

Страница 5: ...ition adjustment 5 2 Image position adjustment 5 3 Left Image Margin 5 3 Leading Edge Non Image Width 5 3 Left Non Image Width 5 4 6 Installation Installing this Equipment 6 2 Appendix Service Tools II Special Tools II Oils and Solvents II General Circuit Diagram III ...

Страница 6: ... Notes Before it Works Serving Points to Note at Cleaning Safety Precautions ...

Страница 7: ...TION Do not turn off the power switch of the host machine when downloading is under way Turning off the main power switch while downloading is under way can disable the machine Points to Note at Cleaning CAUTION When performing cleaning using organic solvent such as alcohol be sure to check that the component of solvent is vaporized completely before assembling ...

Страница 8: ...1 1 Product Outline Product Outline Outline Names of Parts ...

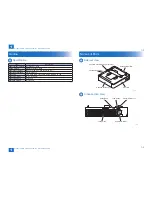
Страница 9: ...s 80 g m2 650 sheets 64 g m2 Paper feed reference Center reference Paper size A4 R A5 R B5 R LGL LTR R STMT R EXEC R 16K Paper grammage 64 g m2 to 105 g m2 Paper size switch By the user Duplexing method Through path T 1 1 Names of Parts External View Cassette Left Cover Cassette Rear Cover Cassette Connecting Upper Terminal Cassette Cassette Right Door Cross section View Lifting Plate Pickup Rolle...

Страница 10: ...2 2 Technology Technology Basic configuration Controls ...

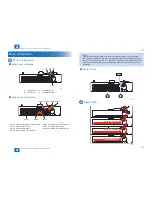
Страница 11: ...S107 Cassette Pickup Sensor PS103 Cassette Retry Sensor SW101 Cassette Size Detection Switch PS104 Cassette Paper Level Sensor A F 2 1 F 2 2 NOTE Parts numbers of the Cassette 2 are listed As for parts numbers of the Cassette 3 and Cassette 4 replace the number at the hundreds place of the corresponding parts number of the Cassette 2 with 2 or 3 respectively Unless there is a particular difference...

Страница 12: ...er and Separation Roller are driven by the Cassette Pickup Motor M101 SL101 M101 M102 5 1 2 3 4 PS107 1 Pickup Roller 4 Pickup Vertical Path Roller 2 Feed Roller 5 Lifting Plate 3 Separation Roller Pickup Retry Control If the Cassette Retry Sensor PS103 is not turned ON within a specified period of time after the start of pickup operation operation of the Pickup Motor M101 and the Cassette Pickup ...

Страница 13: ... Size Length 1 2 3 4 A5 R 210 0 ON ON STMT R 215 9 ON ON B5 R 257 0 ON EXEC R 267 0 ON ON 16K R 270 0 ON ON LTR R 279 4 ON ON A4 R 297 0 ON ON ON LGL 355 6 ON No cassette In addition presence of the cassette is detected when the size switch is pushed If no switch is pushed it is judged as no cassette F 2 8 T 2 1 Rear Guide Plate Cassette Size Switch SW101 Rear Detection Rink Setting method when th...

Страница 14: ... OFF Approx 50 to approx 50 sheets ON ON OFF Approx 50 sheets or less ON No papers Tray Paper Flag Cassette Paper Sensor PS102 Cassette Paper Level Sensor A PS104 Cassette Paper Level Sensor B PS105 Paper Level Flag Lifter Gear T 2 3 F 2 10 OFF OFF OFF ON ON ON Cassette Paper Level Sensor B Cassette Paper Level Sensor A If the paper is full If the paper is approx half If the paper is a little If t...

Страница 15: ...assette Lifting Plate Detection Sensor PS101 is not turned ON even raising the Lifter for 3 seconds absence of paper is notified Lifting Plate Flag Lifting Plate Lifter Paper Flag PS101 PS102 M102 F 2 12 Lifter Control When Cassette is set The Lifting Plate is raised until the Cassette Lifting Plate Detection Sensor PS101 is turned ON During pickup If the Cassette Lifting Plate Sensor PS101 is OFF...

Страница 16: ...ry Registration Sensor PS11 3 0A05 Power on Registration Sensor PS11 3 0107 Delay Fixing Paper Sensor PS19 3 0207 Stationary Fixing Paper Sensor PS19 3 0A07 Power on Fixing Paper Sensor PS19 3 0108 Delay Delivery Sensor PS5 3 0208 Stationary Delivery Sensor PS5 3 0A08 Power on Delivery Sensor PS5 3 010A Delay Reverse Sensor PS6 3 020A Stationary Reverse Sensor PS6 3 0A0A Power on Reverse Sensor PS...

Страница 17: ...3 3 Periodic Servicing Periodic Servicing Periodic Servicing List ...

Страница 18: ...e Consumble parts CL Cleaning LU Lubricate AD Adjustment CH Inspection No Item Parts No Q ty Life Remarks 80 000 sheets 500 000 sheets 1 Cassette pickup roller FB6 3405 1 CR Same as estimated product life 2 Cassette transfer roller FC6 7083 1 CR Replace with cassette separation roller 3 Cassette separation roller FC6 6661 1 CR Replace with cassette transfer roller T 3 1 ...

Страница 19: ...4 4 Parts Replacing and Cleaning Parts Replacing and Cleaning List of Parts Disassembly Assembly ...

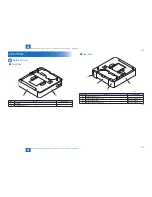
Страница 20: ...rnal View Rear Side List of Parts External View Front Side 2 1 No Name Reference 1 Cassette 2 Cassette Left Cover F 4 1 T 4 1 Rear Side 2 3 4 1 No Name Reference 1 Cassette Rear Cover 2 Cassette Right Rear Cover Refer to page 4 7 3 Cassette Right Door Refer to page 4 7 4 Cassette Right Front Cover Refer to page 4 6 F 4 2 T 4 2 ...

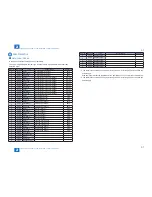
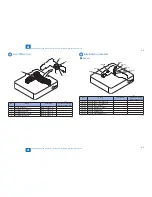
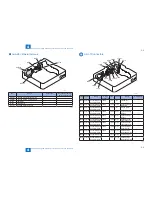
Страница 21: ...page 4 12 3 Cassette Feed Roller Refer to page 4 8 4 Cassette Separation Roller Refer to page 4 10 5 Cassette Pickup Roller Refer to page 4 11 F 4 3 T 4 3 Electrical Components Sensor PS101 PS107 PS103 PS106 PS102 PS104 PS105 No Name Reference Adjastment during parts replacement PS105 Cassette Paper Level Sensor B PS104 Cassette Paper Level Sensor A PS102 Cassette Paper Sensor PS106 Cassette Right...

Страница 22: ...te Module Controller PCB J1805 J1002 SL101 Cassette Pickup Solenoid J805 PCB101 Cassette Module Controller PCB J1003 M101 Pickup Motor J806 PCB101 Cassette Module Controller PCB J1806 J1004 PS107 Cassette Pickup Sensor J806 PCB101 Cassette Module Controller PCB J1806 J1005 PS101 Cassette Retry Sensor J806 PCB101 Cassette Module Controller PCB J1806 J1006 PS102 Cassette Paper Level Sensor A J806 PC...

Страница 23: ...y Location Rear Side Disassembly Assembly Location Front Side 2 1 No Name Reference 1 Cassette 2 Cassette Left Cover F 4 7 T 4 7 Rear Side 2 3 4 1 No Name Reference 1 Cassette Rear Cover 2 Cassette Right Rear Cover Refer to page 4 7 3 Cassette Right Door Refer to page 4 7 4 Cassette Right Front Cover Refer to page 4 6 F 4 8 T 4 8 ...

Страница 24: ...djastment during parts replacement 1 Casstte Pickup Unit Refer to page 4 12 2 Cassette Pickup Idler Gear Refer to page 4 12 3 Cassette Feed Roller Refer to page 4 8 4 Cassette Separation Roller Refer to page 4 10 5 Cassette Pickup Roller Refer to page 4 11 F 4 9 T 4 9 Removing the Cassette Right Front Cover Procedure 1 Pull out the cassette 1 and open the Cassette Right Door 2 2 Remove the Cassett...

Страница 25: ... Procedure 1 Open the Cassette Right Door 1 2 Remove the Cassette Right Rear Cover 2 1 Screw 3 2 Hooks 4 4 1 3 2 F 4 11 Removing the Cassette Right Door Preparation 1 Remove the Cassette Right Front Cover Refer to page 4 6 2 Remove the Cassette Right Rear Cover Refer to page 4 7 Procedure 1 Remove the Cassette Right Door 2 while freeing the Right Door Sensor Harness 1 from the guide A 4 Screws 3 1...

Страница 26: ...pass the Right Door Sensor Harness 1 through the Harness Guide A and install the Harness Band 2 at the lower side of the guide 3 when assembling Because the connector cannot be connected to the Right Door Sensor 2 A 3 4 1 F 4 13 Removing the Cassette Feed Roller Procedure CAUTION Be sure not to touch the surface of the roller when disassembling assembling F 4 14 Disassembling Procedure 1 Remove th...

Страница 27: ...emove the Cassette Feed Roller 2 1 2 Assembling Procedure CAUTION Be sure to install the Cassette Feed Roller 1 with the gear to the shaft at the upper side and the Cassette Separation Roller 2 to the shaft at the lower side when assembling 1 2 F 4 17 F 4 16 1 Install the Cassette Feed Roller 2 by aligning the protrusion A of the Feed Roller Shaft with the groove 1 of the Cassette Feed Roller 1 2 ...

Страница 28: ...re CAUTION Be sure not to touch the surface of the roller when disassembling assembling F 4 19 Disassembling Procedure 1 Remove the cassette 1 1 F 4 20 2 Release the claw 1 of the Cassette Separation Roller and remove the Cassette Separation Roller 2 1 2 Assembling Procedure CAUTION Be sure to install the Cassette Feed Roller 1 to the shaft at the upper side and the Cassette Separation Roller 2 to...

Страница 29: ...tte Separation Roller 2 by aligning the protrusion A of the Separation Roller Shaft with the groove 1 of the Cassette Separation Roller A A 1 2 2 Return the cassette to the original position F 4 23 Removing the Cassette Pickup Roller Procedure CAUTION Be sure not to touch the surface of the roller when disassembling assembling 1 Remove the cassette 2 Remove the Fixation Pin 1 and remove the Casset...

Страница 30: ...e 4 11 Procedure CAUTION Be sure not to touch the surface of the roller when disassembling assembling 1 Remove the Cassette Pickup Idler Gear 1 1 Claw 2 1 2 F 4 25 Removing the Cassette Pickup Unit Preparation NOTE When the host machine is installed remove the Right Front Cover 1 the Right Rear Cover 2 and the Right Door Unit 3 Refer to the Disassembly Assembly of the main body 1 2 3 F 4 26 1 Remo...

Страница 31: ...ing Disassembly Assembly Removing the Cassette Pickup Unit Procedure Procedure 1 Remove the Cassette Pickup Unit 1 2 Connectors 2 1 Wire Saddle 3 4 Screws 4 CAUTION When pulling out the Cassette Pickup Unit 1 at disassembly assembly be sure not to cause open circuit by making the harness 2 get caught 1 2 A F 4 27 x2 x4 1 4 3 2 F 4 28 ...

Страница 32: ...5 5 Adjustment Adjustment Outline Image position adjustment ...

Страница 33: ...ded copy 2 5 1 5 mm Double sided copy 2 5 2 0 mm 10 8 6 5 4 2 0 2 5 1 5mm 2nd side of double sided copy 2 5 2 0mm p 5 3 Leading Edge Non Image Width Single sided copy 2 5 1 5 mm Double sided copy 2 5 1 5 mm 2 5 4 6 8 10 12 14 16 18 20 0 2 5 1 5mm 2nd side of double sided copy 2 5 1 5mm p 5 3 F 5 1 F 5 2 Category Item Reference Left Non Image Width Single sided copy 2 5 1 5 mm Double sided copy 2 5...

Страница 34: ...left edge Increase the value an increase of 10 will increase the margin width by 1 mm Decrease the value a decrease of 10 will decrease the margin width by 1 mm NOTE Be sure to perform the following procedure for right edge margin adjustment Service mode PRINT PRINT NUMERIC 055 Reference target value 1st side 0 5mm or larger 2nd side 0 5mm or larger F 5 4 Leading Edge Non Image Width Service mode ...

Страница 35: ... NUMERIC 035 Cassette 1 Service mode PRINT PRINT NUMERIC 036 Cassette 2 option Service mode PRINT PRINT NUMERIC 037 Cassette 3 option Service mode PRINT PRINT NUMERIC 038 Cassette 4 option 10 8 6 5 4 2 0 1st side of copy 2 5 1 5mm 2nd side of copy 2 5 1 5mm Image edge Increase the value an increase of 10 will increase the non image width by 1 mm Decrease the value a decrease of 10 will decrease th...

Страница 36: ...6 6 Installation Installation Installation Installing this Equipment ...

Страница 37: ...stallation Installation 6 2 6 2 Installation Installing this Equipment Installation Installing this Equipment Installing this Equipment When installing this equipment refer to the User Installation Procedure ...

Страница 38: ... Service Tools General Circuit Diagram Appendix ...

Страница 39: ...dition when making an electrical check A each service engineer is expected to carry one B each group of 5 service engineers is expected to carry one C each workshop is expected to carry one T 7 1 Oils and Solvents Name Uses Composition Remarks Alcohol cleaning e g glass plastic rubber external covers fluoride family hydrocarbon alcohol surface activating agent water Do not bring near fire Procure ...

Страница 40: ... PS101 Cassette Paper Sensor PS102 Cassette Retry Sensor PS103 Cassette Paper Level Sensor A PS104 Cassette Paper Level Sensor B PS105 Cassette Right Cover Sensor PS106 Cassette Size Detection Switch To Lower Cassette Module To Upper Cassette Module or Host Machine SW101 1 2 3 4 5 J1805D 1 2 3 J1001L J1001LH 4 1 2 3 J1802DWH MT1 4 1 2 3 J1802LWH MT2 18 17 16 15 14 13 12 11 10 9 8 2 3 4 5 6 1 7 19 ...

Отзывы: