Appendix
9
(3) Making minute adjustments to specified colors
This feature allows you fine tune a specified color to any color you like. And the results of
your adjustments are applied to the sample image in the main window in real time.
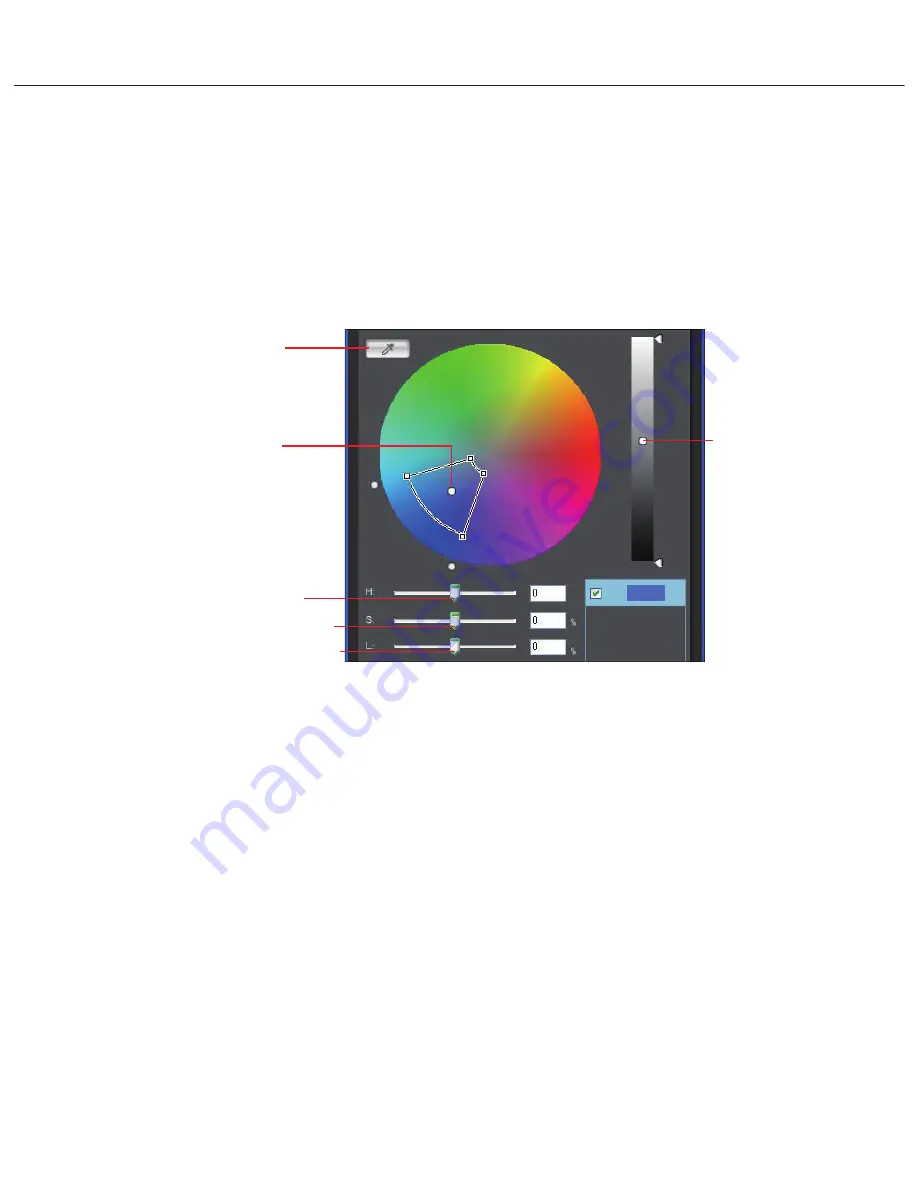
①Specifying the color to be adjusted and the available adjustments
If you click the eye-dropper button and then click the location of the color you want
to adjust in the sample image, the specified color is plotted as an adjustment point (Two
adjustment points appear, one for hue and saturation and the other for luminosity.) on
the color wheel. You can then fine-tune the color in the plotted adjustment points using
the [H] (hue), [S] (saturation) and [L] (luminosity) sliders.
* As well as specifying the color by clicking in the image, you can also specify a target color by clicking the color
directly in the color wheel. However, bear in mind that this method does not show you the location
of the specified color in the sample image.
* You can also color by selecting [Specify the numerical values for color adjustment] in the [Edit] menu, which
then allows you to specify the color by entering the color value in the [Specify the numerical values for color
adjustment] window.
* H, S and L stand for Hue, Saturation and Luminosity respectively.
* If you change the work color space in the preferences window during the adjustment process, the adjustment
points in the tool palette also move in response.
Eye-dropper button
Hue and saturation
adjustment points
H (hue) adjustment slider
Luminosity
adjustment
point
S (saturation) adjustment slider
L (luminosity) adjustment slider
Fig. 010 Panel for minute color adjustment
Содержание 40D - EOS 40D DSLR
Страница 2: ...SERVICE MANUAL Copyright 2007 Canon Inc EOS 40D REF NO C12 6171 ...
Страница 121: ...Parts Catalog Copyright 2007 Canon Inc ...
Страница 122: ......
Страница 123: ...EOS 40D REF NO C12 6171 PARTS CATALOG Copyright 2007 Canon Inc ...
Страница 159: ...CH1 8516 ASW 020 REF NO C12 6171 CANON INC 2007 SEP 2007 01 3 PCB DIAGRAM 3 7 ASW FPC SIDE A SIDE B ...
Страница 163: ...REF NO C12 6171 CANON INC 2007 SEP 2007 01 3 PCB DIAGRAM 3 11 BSW FCP SIDE A SIDE B ...
Страница 164: ...K C H 1 8 5 0 6 0 1 0 REF NO C12 6171 CANON INC 2007 SEP 2007 01 3 PCB DIAGRAM 3 12 CFSW FPC SIDE A SIDE B ...
Страница 167: ...0 1 0 C H 1 8 4 9 7 REF NO C12 6171 CANON INC 2007 SEP 2007 01 3 PCB DIAGRAM 3 15 IMG B FPC SIDE A SIDE B ...
Страница 168: ...0 1 0 C H 1 8 4 9 6 REF NO C12 6171 CANON INC 2007 SEP 2007 01 3 PCB DIAGRAM 3 16 IMG T FPC SIDE A SIDE B ...
Страница 169: ...C H 1 8 5 0 7 M I F 0 1 0 REF NO C12 6171 CANON INC 2007 SEP 2007 01 3 PCB DIAGRAM 3 17 MIF FPC SIDE A SIDE B ...
Страница 176: ...0 1 0 C H 9 1 1 1 2 REF NO C12 6171 CANON INC 2007 SEP 2007 01 3 PCB DIAGRAM 3 24 SI FPC SIDE A SIDE B ...


